No matter what your age, receiving a card in the post for your birthday is possibly one of the best feelings ever, so today we’re taking a look at some cute birthday card ideas you can make and send to wish someone a very happy birthday.
Making your own cards means you can personalize them to fit the recipient perfectly - there is nothing more special than receiving a handmade item, knowing that it’s been lovingly crafted especially for you.
The birthday card ideas and templates we are sharing today are suitable for a whole host of age ranges and recipients. The cards are simple to make no matter what your skill level and you don’t even need to print some of them! Some of the designs can be edited on the computer and sent as an e-card, which is a great option to use if you’re now working remotely but still want to send a personalized card to a work colleague.
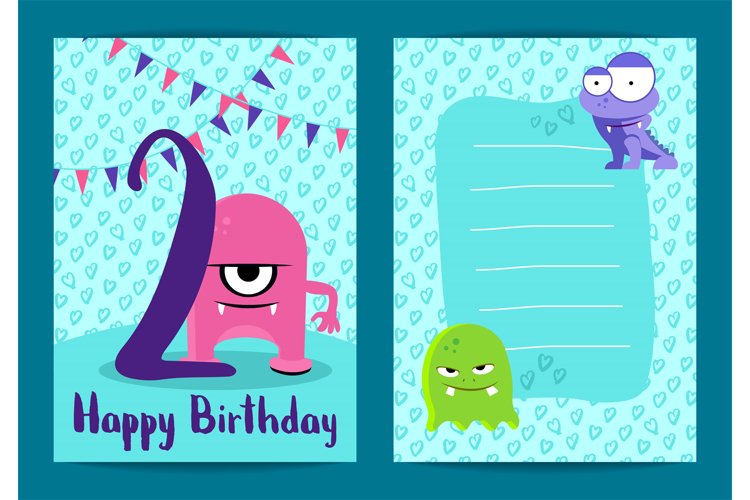
These cheeky little monsters would be perfect for printing out on mid-weight card stock to make a foldable card or printed onto a glossy photo paper to then stick back to back to make a fun birthday postcard. You could even scale the image down slightly and print double-sided onto card stock to make present gift tags.
Image credit: ONYXprj
If you have a laser printer, you could edit the colors slightly in Adobe Illustrator or Photoshop to turn the number two and ‘happy birthday’ into black text. Once the card is printed, you can add a foil sheet over the top of it, sandwich it between another piece of card, and run the design through a hot foiling machine or laminator (because laser printer ink is heat reactive it will adhere to the foil!). Give it a few minutes to cool down once it comes out of the machine and then carefully peel back the foil to reveal the stunning metallic finish.
What a regal design for a special little someone! This Princess Birthday Card design comes with the multiple cut layers needed to achieve the finished result shown, plus it comes with the numbers 0-9, so it can be personalized for any age.
Image credit: Digital Gems
This design would be great for using lots of different textures, and you could make the dress layers and crown from glitter cardstock to add a bit more sparkle or cut them from metallic self-adhesive vinyl to the layer on the other card stock beneath. You could even make the dress out of fabric! All you would need is some fabric scraps that are big enough to fit the design and some fusible interfacing. Attach your fusible interfacing to the wrong side of your fabric, making it stiffer and less likely to fray when you run it through a cutting machine. Treat your fabric just as you would card stock and place it on your mat for your cutting machine; make sure to select the relevant cutting pressure and let the machine work its magic. Once it’s cut, remove it from the mat, trim up any loose threads or fraying, and then add to your card.
This card design is perfect for easy decoupage; it comes with JPG and EPS files, which can easily be edited in free software such as Canva.
Image credit: YummyBuum
First, you’d need to add the relevant number of candles to the card and then make sure you’re happy with the positioning of everything. Next, you want to print out a full copy of the card; this will be your base layer and what you fold in half to make the actual birthday card.
After that, you need to decide which aspects of the card you want to make 3D, and I’d suggest making the text and the actual image of the cake the parts that stand out - print out another copy of the card and then cut out the text and card as close and as neatly to the outline as possible. Flip the parts you’ve cut out over and add adhesive 3D pads to the back, flip the design back over and position it directly over the correlating part on the main card. You can keep adding layers to build up the design more if you want to!
This floral birthday card is super simple to make using a cutting machine such as a Cricut or could even be carefully cut out by hand. It’s perfect for layering with two different colors or even textures of card - a subtle shimmer card in a complimenting shade would look lovely showing through the rose cutouts.
Image credit: Fine Cutting Templates
If you want to make it look even fancier, you could swap out the different colored cards for some colored vellum to make an almost stained glass effect. Vellum paper is translucent, giving a lovely change of depth to the card when it’s open, on a windowsill or mantlepiece, and the light passes through it. Vellum is easy to work with on your Cricut (there is a vellum setting if you search the material list). The only real thing to look out for is how you attach the vellum to the card; using glue can make the vellum crease and wrinkle when it reacts to the moisture in the glue, so I would suggest using double-sided tape instead.
This intricate paper cut design is perfect for making on a Cricut machine (it might be a bit fiddly to do by hand!) The file comes as two pieces, so you have the front paper cut and the scalloped backing card. The paper cut would look lovely just mounted directly onto some bright color card, but why not have some fun with it - Have you ever tried making your own gradient glitter card before?
Image credit: Plus Products
It’s super easy to make your own glitter card, but it can be a bit messy, so you’ll need to make sure you’re working on something that’s easy to clear up; maybe put a plastic table cloth down before starting. Get your scalloped edge card, some PVA glue, and your glitters. Spread a thin and even layer of PVA all over the card and then sprinkle your glitter over it but make sure to leave a gap in between the colors of 1-1.5cm as that’s where we create the gradient. Once you have your glitter on your card, carefully pick it up and give it a little wiggle side to side, we want to make the different colors of glitter fall towards each other and mix so that we don’t have a harsh color line. Tap off the excess glitter and then leave the card to dry under something heavy so that it stays flat.
How adorable are the cards in this birthday card bundle! They are great for kids to decorate for their friends and would look great with a ‘mosaic’ background. Cut the card as per the instructions, and then give the colored backing card that slots into the 4 corner tabs to the kids to decorate.
Image credit: Digital Gems
Draw a thin pencil line onto the backing card by slotting it in place first and drawing around the front of the card cutouts so that they know where to decorate if they are going for certain colors
Show them how to make a mosaic effect with torn-up bits of colored paper or old magazines glued down to the backing card. It can be a great teaching moment to learn about color shades and how to match them up - maybe they want to use different shades of orange and yellow paper to make the lion’s mane or different colored spots on the dinosaur's back.
Looking for a birthday card design that will suit any occasion? This is the bundle you want!
This carefully curated set of 25 printable modern birthday card designs is suitable for sending to anyone. The mix of bold images in pastel and muted colors means that they can be printed off ‘as is’ or embellished to make them extra special.
Image credit: Plus Products
The simplest way to jazz them up would be to add foil accents on any of the black ink parts of the prints. To do this you would separate the design layers so that you can print a version on a regular printer without the black text and elements. You then run that printed card through a laser printer so that it adds the black text and elements over the top in black laser ink. Layer over a sheet of metallic foil and run it through a hot laminator machine - the heat from the laminator reacts with the laser-printed areas and adheres the foil to them!
This Fairy-themed paper-cut card is beautifully unique and also comes with a paper-cut envelope! The file comes with 3 templates, one for the card and then two for the envelopes (so you can either have a plain envelope or the paper cut design one)
Image credit: HobbyIdeasShop
There are so many ways you could layer this design to make it stand out but I think the simplest, and possibly most effective, way to make it look stunning would be to use a dark cardstock/paper stock for the paper cut pieces and then use a piece of shimmer metallic of glitter cardstock in a lighter, maybe pastel, color behind them to show off the design.
You could make it so that the contrasting color paper also doubles up as a card insert and envelope liner. You would need to add a line of double-sided tape to the folded paper so that it attaches to the inside of the card and falls open like an extra page, and for the envelop you need to cut the contrasting paper slightly smaller than the original pattern and secure it with glue on all side apart from where it faces the fairy cut out.
How fun is this Crayon gift card holder design, it’s perfect for presenting a gift card or birthday money to a craft-loving kid. The file comes with multiple file options, so it can be cut via a machine like a Cricut or a Silhouette or can be printed as a PDF and cut by hand.
Image credit: Printable Cuttable Creatables
There is space on the opposite side of the design to be able to write a gift note or message. Worried that your handwriting isn’t neat enough? You can get the Cricut to write it for you! Find a font you love (you can get kid's handwriting fonts on Font Bundles) and write your message out in a text box on Design Space, change the line type of that text from ‘Cut’ to ‘Draw’, position it on the back piece of card where you want it written and click ‘attach’. Your Cricut machine will now instruct you to insert a pen into the holder when it works through the cut process.
9. Owl Gift Card Holder Created by Digital Gems
‘Hoo’ would you give this cute birthday card to? This owl gift card holder birthday card is super simple to make, thanks to its clever design. All the different layers are easy to assemble once cut - Use a sturdy piece of card stock for the main body of the owl and the gift card holder section, and then add the eyes and beak. This is a great little project to use up some of your paper of vinyl scraps, you could even use googly eyes! If the kids are getting involved, why not let them add some feathers to the wings
Image credit: Digital Gems
As with the crayon gift cardholder, there is room on the back of this design to leave a message; you could even add a little message to the inside of the wings; you’d just need to orientate the text box to fit within the cut lines, this can be done by using the circular arrow button on the top right-hand corner of the text box.
Happy Crafting!
We hope that this post has given you some inspiration for some cute birthday card ideas to try out. We'd love to see anything you create, so please do share your projects in our Facebook Group, The Design Bundles Customer Community.
Crafter's Calendar: A Guide to Inspire You All Year Long!
Weekly Design Challenge 7: Under The Sea
11 Prosperous Businesses You Could Start Using Sublimation Printers
By using our website you consent to all cookies in accordance with our cookie policy.