Unlimited Downloads 15% off Marketplace Purchases Exclusive Software Access Unlimited Downloads
15% off Marketplace Purchases
Exclusive Software Access
Start your Free Trial Start your Free Trial Maybe Later
Top Halloween Craft Ideas for Your Cricut

Top Halloween Craft Ideas for Your Cricut

Prepare for the spooky season with some fun and easy Halloween craft ideas for your Cricut. Stay tuned for a spooktacular time!

Top Halloween Craft Ideas for Your Cricut 13

It's a shame that Halloween is such a short holiday compared to the others that we celebrate. Have you seen the Halloween and fall files in our Halloween Craft Bundle ? They've inspired us so much that our creative cauldron is practically overflowing with all of the ideas for Halloween-themed and fall crafts!

Easy Halloween Craft Ideas You Can Make With a Cricut  

Today you'll discover 4 ghoulishly good Halloween crafts that you can make with the help of your Cricut, including a gothic mug, cute but spooky kids clothing, and a scary layered papercraft. But that's not all; there's a full step-by-step tutorial so you can create your own Halloween wall decoration. Let's dive right in!


Custom Halloween Mug

Sometimes you see an SVG file and think, 'this would be perfect for XYZ' Well, that's exactly how we felt when we saw these Gothic Halloween Ornate Frames. They just screamed (or maybe shrieked!) classy Halloween Mug.

Creating custom mugs is a favorite quick DIY for many. They make great gifts or are perfect for adding a bit more seasonal fun to your daily tea/coffee/hot chocolate habit! To do this DIY, you will need a matte black mug, iridescent or glossy vinyl, and an SVG cut file (the design above is from the Halloween SVG Bundle | Gothic SVG bundle 16 designs).

Top Halloween Craft ideas for your Cricut 3

Upload and resize your SVG File to fit on your mug, choose a complementary color of vinyl to cut your design from - iridescent or glossy vinyl works really well on matte surfaces as it not only gives another color to look at, it gives a whole other texture that catches the light differently. Next, ensure to wash the mug before applying - wash in hot soapy water, let it dry fully, and then wipe it down with isopropyl alcohol (this ensures that you've got every bit of oil or dirt off of it).

Once your mug is dry, carefully place your design; smooth the surface working from the center out to make sure you clear any air bubbles. Then, carefully peel the transfer tape off, and voila, a fancy new mug to see you through the Halloween season!

Fall-tastic Kids Clothing

Fall-tastic...Fantastic...see what we did there? Kids look cute in anything, but they look adorable in Halloween-themed clothing. These fun baby vests can be made using Printable HTV. Just find a design you like (the below includes PNG images from this Fall Sublimation Png Bundle, Retro Distressed 6 png designs.

Top Halloween Craft ideas for your Cricut 4

Take your PNG image and upload it into Cricut Design Space as a 'Print Then Cut' image; follow the instructions on the screen to send the image to your printer; once your image has been printed, leave it for at least 10 minutes to fully dry. Next, use your Cricut to cut around the outline - you may want to do a test run to see what pressure you need to cut at as printable HTV can be quite thin.

Carefully remove the backing paper from your printable HTV, being sure not to stretch or tear it, place your design onto your fabric, and lay a piece of transfer paper on top (if your packet of printable HTV doesn't come with one, you can use greaseproof paper instead). Follow the manufacturer's instructions for pressing directions, and then marvel at your handy work!

Spooky Layered Papercut Frame

Making intricate papercuts has never been easier now that our clever cutting machines can do the majority of the hard work for us. Layered papercut shadowbox frames make for lovely seasonal decor; you can even keep the same frame and swap out the papercuts each holiday! The below DIY was made using the3D Haunted House SVG, Halloween Mandala, Shadowbox Cut File from Okadee SVG. To make this yourself, you will need cardstock in various colors, self-adhesive foam dots, a glue stick, and a shadow box frame.

Top Halloween Craft ideas for your Cricut 1

Our clever designers make it really easy to produce wonderful shadow boxes. Upload your papercut SVG to Design Space and resize it so that it will fit your frame, send your design to cut, and be careful when peeling the papercuts off of your mat (you don't want them to curl or tear).

When you have all of your layers cut, you are ready to assemble - flip your layers over and attach foam dots to the parts of your paper cuts with the largest surface area as that's where the design will need the most support to stop it sagging. For the thinner layers, you will want to use a glue stick to stick them together. Once all of the dots are installed, you can carefully peel the backings off and start stacking your design working from the back piece forwards.

When all of your glue is dry, you can slot the paper cut into a shadow box frame, and if you're feeling extra crafty, you can add some lights to the back so that they shine through the paper layers!

Check out How To Make A 3D Layered Paper Craft Design for the full tutorial.

How To Make a Halloween Wall Banner

This pennant flag banner would look great as a Halloween Wall Decoration or a spooky yard flag ready for trick or treaters. Of course, you could make it stand out even more by using glow-in-the-dark HTV!

Draft - Top Halloween Craft Ideas for Your Cricut 12

To Make This Halloween Craft ​DIY, You Will Need:

Draft - Top Halloween Craft Ideas for Your Cricut 5

Step 1. Measure Your Flag

The main challenge with this craft is that the flag you use could be an odd shape; this can make it hard to know how to resize your cut file - but never fear, there's a straightforward solution for you!

Draft - Top Halloween Craft Ideas for Your Cricut 6

Your pennant flag is essentially made up of two shapes, a square with an upside-down triangle stuck on the bottom. So first, you need to measure and make a note of the size of the square and the size of the triangle; you can see from the image that I measured slightly in from the sides of our flag, and that's because it had a stitched border around the perimeter (which would have been difficult to press vinyl on to) so I took the width measurement of 23cm from just inside that border.

Step 2. Make a Template in Design Space

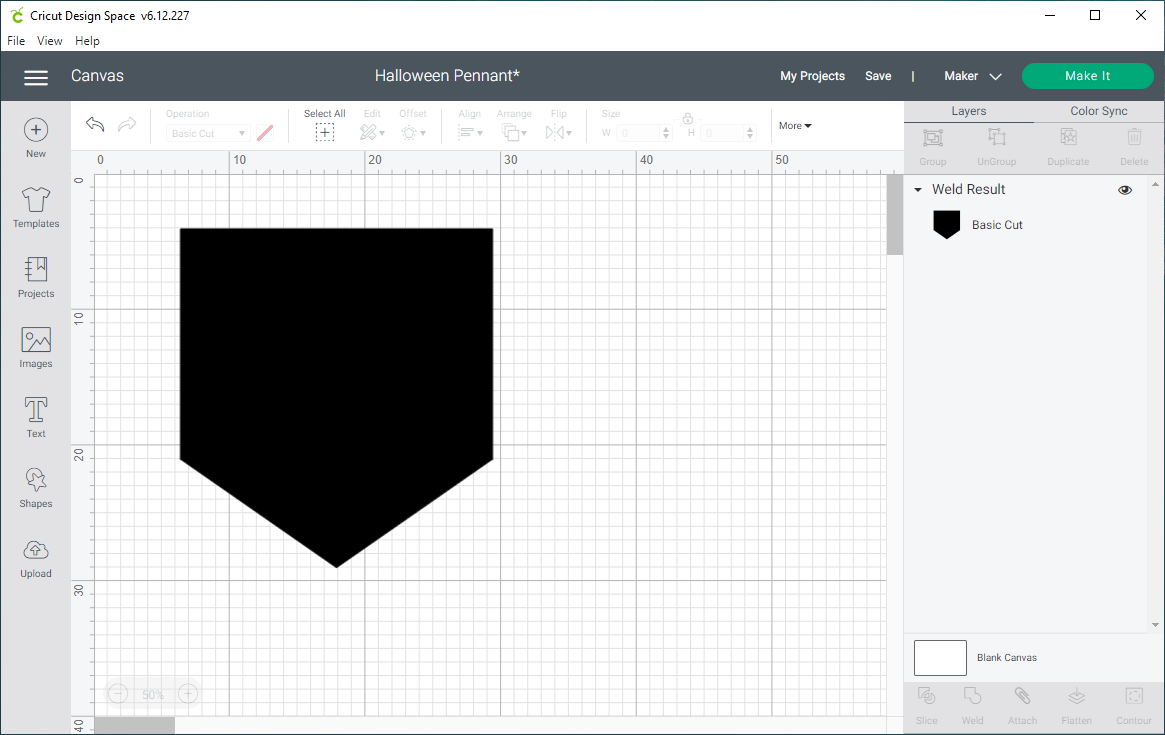
Once you have noted down your square and triangle sizes, you are ready to create your template in Design Space. Using the 'Shapes' option on the left-hand toolbar, add a square and a triangle to your canvas.

Draft - Top Halloween Craft Ideas for Your Cricut 7

Adjust the size of the shapes to match the measurements you took. Next, flip the triangle around and line it up with the bottom of your square. Once they are lined up, select both shapes and then hit the 'Weld' button to make your solid pennant shape.

Draft - Top Halloween Craft Ideas for Your Cricut 8

I colored mine black as that matches the material I'm using. You don't have to color match your projects, but it can help you decide on colors for the rest of your design!

Step 3. Upload your SVG File

Now that you have your design area set up, it's time to upload the SVG file you're using.

Draft - Top Halloween Craft Ideas for Your Cricut 9

You can see from the right-hand panel that this SVG file is made up of lots of individual layers, making it really easy to change the design's colors.

Step 4. Changing Layer Colors

I've used 5 different colors in this design - white and purple for the wording, silver and green for some of the design flourishes, and gunmetal silver for the cauldron shape.

Draft - Top Halloween Craft Ideas for Your Cricut 10

Each aspect of this design is a different layer (so the letters in a word, for example, as all individual layers per letter), so I've gone through and grouped layers into their relevant parts, such as all the letters in the words 'Double Double' and welded them together to ensure they cut as one piece from the vinyl. Once you have welded your layers, you can change the color to suit the design.

Step 5. Cut and Weed Your HTV

When you are happy with your design, you want to press the 'Make It' button in the top right corner and follow the on-screen instructions to cut your vinyl.

Draft - Top Halloween Craft Ideas for Your Cricut 11

Once it is cut and weeded, you are ready to start heat pressing!

Step 6. Layering HTV

If you work from the top of a design when layering HTV, it's easier to find the center of your layout. When layering, be sure to refer back to your design on Design Space to double-check the placement and spacing.

Draft - Top Halloween Craft Ideas for Your Cricut 12

I've used a Teflon sheet for this project as it helps to protect the vinyl I've already pressed when adding a new layer. Once you have finished your design, be sure to give the whole thing a good all-over press - you know you've pressed your HTV correctly if you can see the weave of the fabric through the vinyl.

Step 7. Get Ready For Halloween!

The flags are great for hanging around the house as home decor or as yard decorations. Wherever you place them, you'll be in the Halloween spirit in no time!

We hope these tutorials have inspired some great ideas for your Halloween crafting. As always, if you do make anything using Design Bundles files, be sure to share a picture of it in our Facebook Group,The Design Bundles Customer Community; we love to see what you create!

Need more boo-stastic Halloween ideas? Then check the video out below and see what Crystal is making!

You may also be interested in ...

Crafter's Calendar: A Guide to Inspire You All Year Long!
Inspiration

Crafter's Calendar: A Guide to Inspire You All Year Long!

Welcome to your essential companion for creative crafting throughout...
Weekly Design Challenge 7 - Under the Sea
Inspiration

Weekly Design Challenge 7: Under The Sea

The Weekly Design Challenge 7 inspired amazing designs around the theme "Under the Sea".
11 Prosperous Businesses You Could Start - Sublimation Printing
Inspiration

11 Prosperous Businesses You Could Start Using Sublimation Printers

Here are some businesses you could start today with your sublimation printer
Help Center
ol image