Unlimited Downloads 15% off Marketplace Purchases Exclusive Software Access Unlimited Downloads
15% off Marketplace Purchases
Exclusive Software Access
Start your Free Trial Start your Free Trial Maybe Later
How To Decoupage a 3D Christmas Card

How To Decoupage a 3D Christmas Card

Today we are going to look at how to decoupage a Christmas card that is perfect for sending out to anyone on your list this year to spread some festive cheer.

Many people have heard of the term découpage and know it to be the art of decorating an object by gluing paper pieces to it, usually in a few overlapping layers, so that the finished piece looks like a painting or mosaic of images.


3D Decoupage is slightly different and is a craft where you cut out multiples of the same image in varying sizes to layer together and create a three-dimensional finish.

You can buy pre-designed decoupage sheets that have the separate layers already picked out for you, but you're stuck with limited styles and designs if you choose that option, so we're going to teach you how to create a 3D decoupage out of any image you want with this easy-to-follow tutorial.

How To Decoupage a 3D Christmas Card 12

Disclaimer: Designbundles.net is a participant in the Amazon Services LLC Associates Program, an affiliate advertising program designed to provide a means for sites to earn advertising fees by advertising and linking to Amazon.co.uk.

What You'll Need to Make a Decoupage Christmas Card

In this tutorial to make a 3D decoupage Christmas card, we used a Cricut Machine to cut our backing card and add the text using the writing function, but this can all be done by hand too.

How To Decoupage a 3D Christmas Card 9

How To Decoupage

It's possible to create a 3D decoupage out of almost any image you can find once you understand the basic concepts. It's all about identifying what is in the background and the foreground.

Step 1. Creating Your Decoupage Paper Set

Once you find an image you'd like to work with for your Decoupage, you need to turn it into a layer sheet. This is simply the image printed multiple times on a sheet of photo paper so that you can cut each one individually to create your layers. I'm using a cute sublimation design I found while looking for Christmas illustrations. I picked it as it's easy to distinguish the foreground and background layers, as well as it being an adorable design!

How To Decoupage a 3D Christmas Card 1

I find it's easiest to import my chosen image into Canva, adjust the size, and then fit as many as I can onto one A4 page. Then, when you are happy with your layout, click the download button in the top toolbar and select PDF Print as the file type. I printed mine onto matte photo paper, as you want to have a material that is thicker than regular printer paper (as it needs to hold its shape when stacked) but not so thick that it's hard to cut precisely.

Step 2. Identifying Your Layers

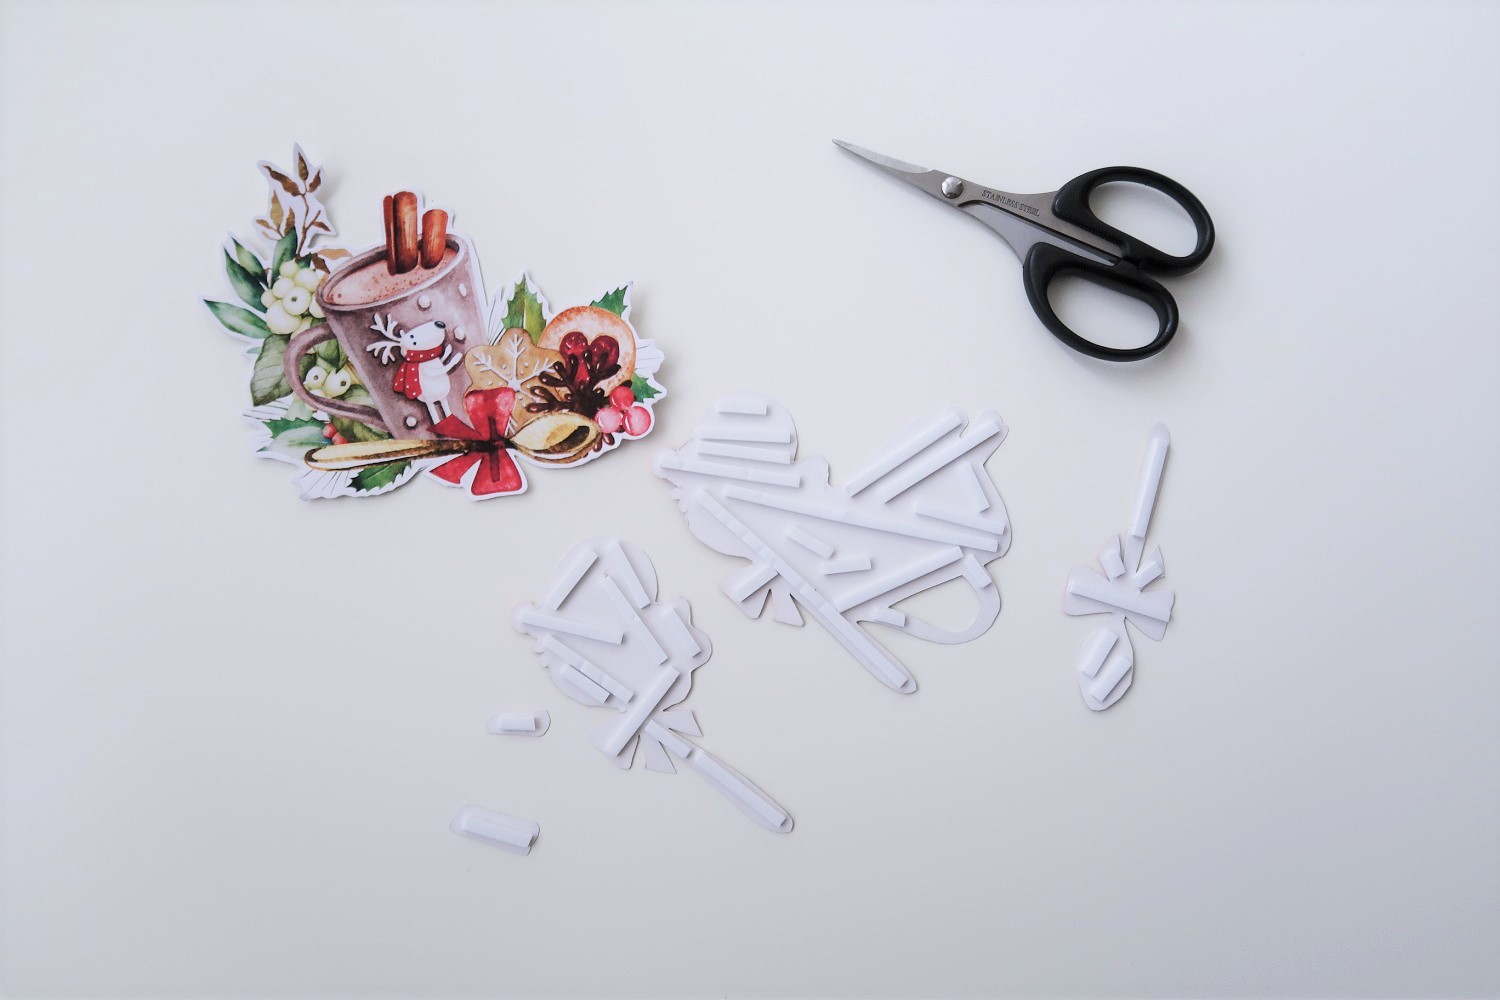
We need to identify which parts of our image we want to highlight for our layers. We start with one full image cut out, and then we pick out the items in the foreground for our subsequent layers. Not only that, but we then go on to pick out anything interesting that would look good as an extra layer.

In the case of my image, the background would be the mistletoe leaves, and the foreground would be the mug of hot cocoa, spoon, and biscuits, so I cut my second layer out to just be the items in the foreground.

How To Decoupage a 3D Christmas Card 6

With this illustration, the spoon and cookies sit in front of the mug, so I can cut another layer out just highlighting them and then also pick the cinnamon sticks and spoon out individually as extra layers.

Step 3. Preparing Your Layers

Cut 3D foam pads to size so that you can add them to the back of each layer.

I like to make sure that mine is well 'reinforced' as, if it's a card you want to send through the mail, you don't want the layers to get squashed.

How To Decoupage a 3D Christmas Card 7

Position your layers carefully on top of one another, making sure that they are as inline as possible.

How To Decoupage a 3D Christmas Card 8

Once all your layers are attached, put the Decoupage to one side and move on to preparing your card for personalizing.

Step 4. Personalizing Our Card

To make our Decoupage really stand out, we need to give it a background. I want to add a bright background cutout with a message added on, but my handwriting is terrible, so I'm going to get my Cricut to write it for me!

Writing With The Cricut

First, I need to create my background. Cricut has recently released some new free shape options in its latest update, so I've chosen the new rounded corner square as my background shape.

How To Decoupage a 3D Christmas Card 5

My card blank is 13.5cm square, so I've adjusted the background to be just under 13cm so that it'll leave a small border on the card.

How To Decoupage a 3D Christmas Card 6

I used a text box to add the message 'Happy Holidays' in the Frosted Gingerbread Handwritten font (if you aren't sure how to add new fonts into Design Space, we have a handy tutorial here), and I've positioned it in the top right-hand corner so that my Decoupage will fit around it.

How To Decoupage a 3D Christmas Card 7

To turn this into a written font instead of a cut font, we need to highlight the layer and go to the 'Operation' drop-down in the top menu bar. We can select the Pen option under the draw heading.

How To Decoupage a 3D Christmas Card 8

When we go to the Make It screen, it will prompt us to install a pen into Clamp A which it will then use to write the text before it cuts the square shape. Once that's done, we end up with something like this.

How To Decoupage a 3D Christmas Card 10

Step 5. Assembling a 3D Decoupage Card

Now that we've got all of our components ready, we can assemble our 3D Decoupage card.

How To Decoupage a 3D Christmas Card 11

This is the time to get creative with any other little embellishments you want to add.

I had some small pearl cabochons on hand that I glued onto the squared shape to look like snow, as there was a bit too much empty space around my decoupage layers. A lovely way to highlight your decoupage creation is to pick out certain elements in the design and add some glitter to them; it doesn't have to be a lot - less is more with glitter, but added in the right places it can really finish a card off nicely.

How To Decoupage a 3D Christmas Card 13

Add the decoupage layer to the backing paper, and we've got a finished card!

Happy Christmas Crafting!

Decoupage is such a fun and relaxing craft; it's especially great for use on greeting cards as you can print off your sheets, sit in front of the TV with a hot chocolate and watch a Christmas film while cutting all the layers. You could even look at turning a 3D decoupage into a Christmas decoration; the finished projects look lovely set in box frames or turned into ornaments for the tree - if you used a design like this, then you could create two and stick them back to back to make a double-sided 3D decoupage ornament.

If you give this tutorial a try, we'd love to see the finished results! Make sure to share a photo of any of your creations in our Customer Community Group over on Facebook.

You may also be interested in ...

Make a Family Quote Canvas Frame
How-to

In 2 Steps Make A Family Quote Canvas Frame

In this blog post discover how to easily add a family quote using HTV to a canvas frame.
Make a cute Winter Snowman Pillowcase
How-to

Make A Cute Winter Snowman Pillowcase

We are going to show you how to make a snuggly worthy pillowcase with a cheerful Winter Snowman
How to Make a Snowflake Card with your Cricut Joy
How-to

How To Make a Snowflake Card With Your Cricut Joy

Quickly make a beautiful and intricate snowflake card with your Cricut Joy cutting machine
Help Center
ol image