Our Plus Membership gives you access to over 3,090,663 exclusive products. You also get up to 15% off non-discounted marketplace products.
If that wasn’t enough we have a suite of Design Tools such as Craft Designer & Illustrate AI. Become an Unlimited Member today to access!
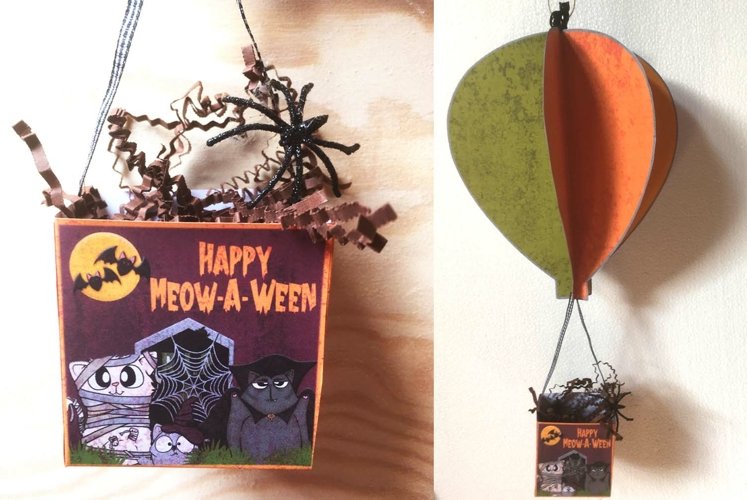
Some paper projects are totally worth going back to. Right, crafters? Years ago, I designed this really fun air balloon. Like most of our creative crafts here in Plus, this one is also very versatile. Let's dive right into the mini tutorial and share all kinds of alternative ideas, tips and tricks to make our project all yours. This is the time for air balloons where I live in Flanders, Belgium. Though, I will admit. I'm seeing less and less of them over the years. I love the aesthetic of an air balloon. It makes a super fun decor item either inside or out. I've got a huge picture window and it's always ideal when I can hang things from the ceiling of the window box. It helps even out whatever theme I'm going with in regards to decor pieces.
In this download, you will receive 6 printable jpg sheets at 8x11 inches.
I've given an abbreviated step by step with photos that might help facilitate the process. Print out all of the sheets. You won't want to do back to back printing because you'll be gluing the white side together. Finally, right? Hehehe... Besides a straight forward project, you hardly need any materials or supplies and the shapes are mega easy to cut out.
You'll only need scissors, glue and whatever other elements you'll want to finish it off. You can use ribbon, string, thread, raffia, fishing line...to attach the box to the balloon. I used a narrow black and white gingham ribbon witch totally screams Halloween. Hehehe... I also just so happened to have a few of these adorable, black cat beads. Puurfect for the Meow-A-Ween Collection, right? How lucky?
After you've cut out all of the shapes (6), fold your air balloons right down the middle. I found it easiest to match up the flat bottom piece and softly bend over the side and match up the edges. It came out really great. Nearly perfect! It will depend on the weight of paper you use as well as how close you cut the balloon to the outline. As you can see, I left a lot of my outline. I just like the way it looks for this project and lately, I've been coloring the outlines for our projects so they become more of a feature rather than an annoying black guide.
I used regular printer paper and a fat glue stick. I was so pleased with the result. I didn't have any ugly bubbles and I still had just a bit of play to line it perfectly. Paste the white or inside of each half as shown in the image. Remember to put your string through the middle if you want it that way. It's the best way to do this if you want serious rigidity. In other words, if you plan on either putting it outside or if you want to put something heavy in the basket.
Since mine is just going to hang in the window, inside with really light stuff in the basket, I used a good glue dot, my bead and natural twine. A glue gun would probably give an even better result. You may have to clip a bit of white excess at the edges if it bothers you. I only had a little, tiny bit. If you've got a whole lot, you can always ink over those edges. It gives a super cool look.
The box assembly is straight forward. Cut it out from the printable, fold over the flaps and glue the flaps. Easy, right? How you attach the box to the balloon is totally up to you. You can attach all four corners with string. This will be ideal if you want to put heavy things in it. You can string all of the way through your balloon and have them all come out of the top or you can attach your string to the bottom of the balloon as you see it here. I used glue dots, but you can use a glue gun, tape...My ribbon was about 6 inches and I only used two pieces. I attached the ribbon to the box in the same manner, as you can see in the little gallery.
You can add extra stickers, a fun banner at the top or around the box. You could hang something from the bottom of the box, too if you like. The first time I did this project, I put bling and ribbon around the flat of the balloon to cover up my tape job of the string and to make the air balloon extra special.
Another idea for you is to cut out full length pictures of your kids or family and place them in the box! You know me. I'm always looking for ways to turn everything into a scrapbooking project.
I hope you enjoy this festive Halloween holiday paper idea. I think it would be fairly easy for kids. They just might need some help with the string. Look for more coordinating papers, stickers, word art and more from the Meow-A-Ween Collection in Plus.
Happy crafting!
Introducing Design School – our jam packed platform with its own mini search engine! Design School was made to help you learn all there is to know about fonts, graphics, templates, designs, file types, different software programs, Frequently Asked Questions and much much more.

Viewing Product