Unlimited Downloads 15% off Marketplace Purchases Exclusive Software Access Unlimited Downloads
15% off Marketplace Purchases
Exclusive Software Access
Start your 7 Day Free Trial Start Plus Trial Maybe Later
Create A DIY Santa Cookie Tray with Torch Paste

Create A DIY Santa Cookie Tray with Torch Paste

Did you know that you can burn designs into wood using Torch Paste? Create intricate projects that will amaze everyone, even Santa. You can use a reusable stencil or permanent vinyl to achieve the desired result. In today’s blog post, I’m going to show you how to create this festive DIY Santa Cookie tray using Torch Paste.

Wood burned Santa Cookie Tray - Mockup

Wood burning with gel is not an exact science but does create a rustic and unique style. Results can vary depending on the type of wood, the amount of heat and gel applied. Some areas will be lighter than others, creating a gradient that adds character to your Santa cookie tray.

Crystal has also created a video on how to wood burn with Cricut. Here she uses another design from the same Santa Cookie Tray bundle.


Materials And Equipment Needed

Design - Santa Tray SVG Bundle (includes 7 designs!)

Cutting machine - a Cricut or any cutting machine that you have - I will be using my Cricut Maker and Cricut Design Space mobile app but you can also use your PC

Cricut smart stencil - find the stencil here https://amzn.to/3WM6UKM or you can any light tack vinyl, like I did

Transfer Tape - to transfer the stencil design

Torch Paste Wood burning gel - https://amzn.to/3UF5Tm8

Squeegee - https://amzn.to/3fKIzob or an old gift card

Sandpaper - 220 grit to sand your wooden board

Protective goggles and latex gloves

Wooden board - pine seems to work very well with torch paste. You need to find a board that has not been varnished, or else this technique will not work.

Depending on the design, you can use any size you want. I used a 30cm x 30cm pine board that I had lying around. Later on, this will be cut into a circle with a scroll saw. Avoid using a board that is less than 2cm thick as the heat will cause it to warp.

Materials needed for wood burning - Santa Cookie Tray

Heat Gun - you need to reach a heat of 400°C or about 775°F. Be sure to work in a well ventilated area. This is the heat gun that I used for the process.

Heat gun - wood burning Santa cookie tray

Disclosure: Some of the links are affiliate links, meaning, at no additional cost to you, we will earn a commission if you click through and purchase.

It’s recommended you seal the surface with a food grade sealer after burning with the Torch Paste.

Step 1 - Upload And Cut your Santa Tray SVG

Let’s get started by uploading the SVG design to Cricut Design Space.

Adjust the height and width to match the size of your wooden board. Tap on Edit bottom of the screen to adjust the size. To keep the ratio consistent, make sure the Lock icon shows as locked.

I prefer to adjust the designs on the longest side. In this case, that would be the height.

Resize Santa tray SVG - Cricut Design Space

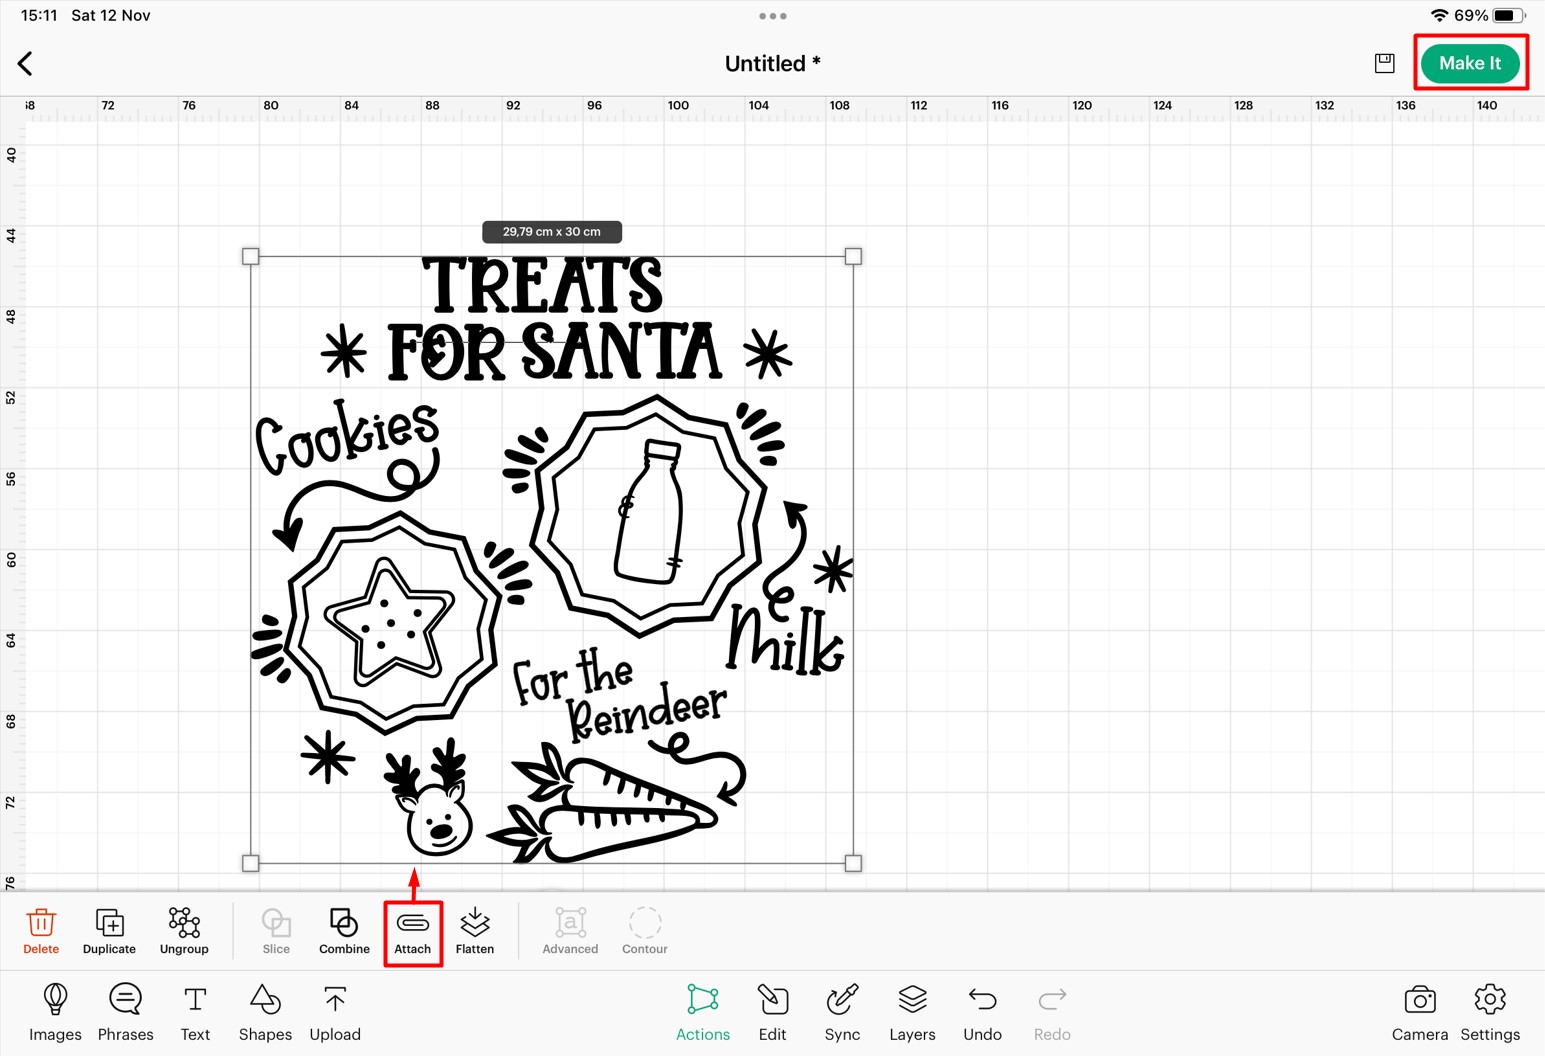
We need to attach the design elements so everything cuts exactly as seen on the screen. If you don’t do this, Cricut will rearrange the design in an effort to conserve material.

Select your design, then go to Actions at the bottom of the screen. Tap on Attach so your design will cut as one object. Next, tap on Make It in the top right corner.

Use the Attach function - Cricut Design Space

Follow the prompts to choose your mat size. Then tap on Next in the top right corner to choose your material settings.

If you are using a Cricut vinyl or stencil, tap on Browse Materials to select your type of material. If you want to use your own vinyl, you can edit the material settings in Cricut Design Space to create your own custom settings.

Follow the instructions to load your mat with your material and blade into your machine. Next, click on the “C” icon to cut.

Step 2 - Apply The Wood Burning Gel

When creating a stencil, you will want to weed out parts of the design you would normally keep. To make this easier to understand, refer back to the design on your screen. Do you see the black areas that are filled in? These are the areas you want to remove.

After weeding the design, place your transfer tape over it and burnish until the vinyl has transferred to the tape. Next, sand down the surface of your wooden board until smooth.

Wipe off any dust debris and then apply the stencil and transfer tape to your wooden board. Burnish until the vinyl has transferred and then gently lift off the tape.

Apply vinyl stencil for wood burning Christmas SVG

Scoop out a small amount of the Torch paste with your squeegee. You can also add more or remove some of the gel as you go along.

Begin by applying the gel over the stencil. The gel will add an orange tinge and is an indication of where it has been applied. Scrape off any excess gel and place this back in the jar.

Torch paste - Santa cookie tray

It may be a good idea to wait 2-3 minutes before removing the vinyl. This can prevent gel from being accidentally transferred to your hands and the board. When ready, remove the vinyl.

Step 3 - Use The Heat Gun On The Santa Cookie Tray

Switch on your heat gun and let it heat up for a few seconds. Remember to wear your glasses to protect your eyes and work in a well ventilated area! There are three things to remember to get a successful result:

1 - Hold your heat gun at roughly a 45° angle, about 5cm away from the wooden board.

2 - Keep your heat gun moving back and forth or in circles to prevent scorching.

3 - Take your time.

As the Torch paste heats up, it will begin to darken. If you want a darker result, apply the heat for a longer time, but be careful that you avoid burning the area.

Use heat gun to burn Torch paste Christmas SVG

Carry on applying heat throughout the design until you get the result you want. Some areas will be lighter than others, but this adds depth to your project. Once done, allow to cool down completely before lightly wiping off any debris or residue that may be left behind.

To complete my Santa cookie tray, I used a scroll saw to cut out the circle. Here is my final result and I'm pretty sure Santa and his reindeer will be impressed! Now for the milk, cookies and carrots.

Santa cookie tray - final result

You can create tons of gift ideas with wood burning designs. Santa cookie trays are a wonderful way to keep the magic alive for your little one. There's no better time than now to get started with your Christmas décor. So grab your copy today.

You may also be interested in ...

Make a Family Quote Canvas Frame
How-to

In 2 Steps Make A Family Quote Canvas Frame

In this blog post discover how to easily add a family quote using HTV to a canvas frame.
Make a cute Winter Snowman Pillowcase
How-to

Make A Cute Winter Snowman Pillowcase

We are going to show you how to make a snuggly worthy pillowcase with a cheerful Winter Snowman
How to Make a Snowflake Card with your Cricut Joy
How-to

How To Make a Snowflake Card With Your Cricut Joy

Quickly make a beautiful and intricate snowflake card with your Cricut Joy cutting machine
Help Center
ol image