Unlimited Downloads 15% off Marketplace Purchases Exclusive Software Access Unlimited Downloads
15% off Marketplace Purchases
Exclusive Software Access
Start your Free Trial Start your Free Trial Maybe Later
How To Make a Burlap Wreath for Christmas

How To Make a Burlap Wreath for Christmas

Adding a decorated burlap wreath to your front door is one of the quickest and easiest ways to dress up your home for any holiday season. The beauty of a burlap wreath (other than how easy they are to make!) is its versatility - they can work as rustic and farmhouse chic decor or, with the addition of a few simple embellishments, can be turned into a modern masterpiece.

In this post, I'll teach you how to make a stunning wreath that is perfect for decorating for any season or occasion. Once you get the technique down for making a ruffle wreath, the possibilities are endless; you can add extra colors and ribbon textures, custom message plaques to fit with the season, and even lights!

Also, if you're looking for a crafty side hustle, then wreaths are a great niche to get into - we've talked before about Cricut crafts that are great to make and sell at places like craft fairs, but wreaths are ideal for taking seasonal custom orders for.

How To Make a Burlap Wreath for Christmas 12

Disclaimer: Designbundles.net is a participant in the Amazon Services LLC Associates Program, an affiliate advertising program designed to provide a means for sites to earn advertising fees by advertising and linking to Amazon.co.uk.

What You'll Need To Make A Burlap Wreath

To make a basic burlap wreath, you only need three items: a wreath form, a burlap ribbon roll, and some string! Once you have the basic technique down, you can add in other elements or decorate the wreath with embellishments.

One extra item I would suggest having on hand would be a lint roller as burlap ribbon can shed some fibers when you first unroll it, and they love to cling to your clothes!

How To Make a Burlap Wreath for Christmas 1

How To Make A Burlap Wreath

Let's take a look at how easy it is to make a ruffled burlap wreath.

(If you're reading this and you're from the UK, you might be wondering what exactly burlap is! The UK word for it is Hessian - you can find hessian fabric rolls on Amazon, eBay, and from online floristry wholesalers)

Step 1. Anchor Your Fabric

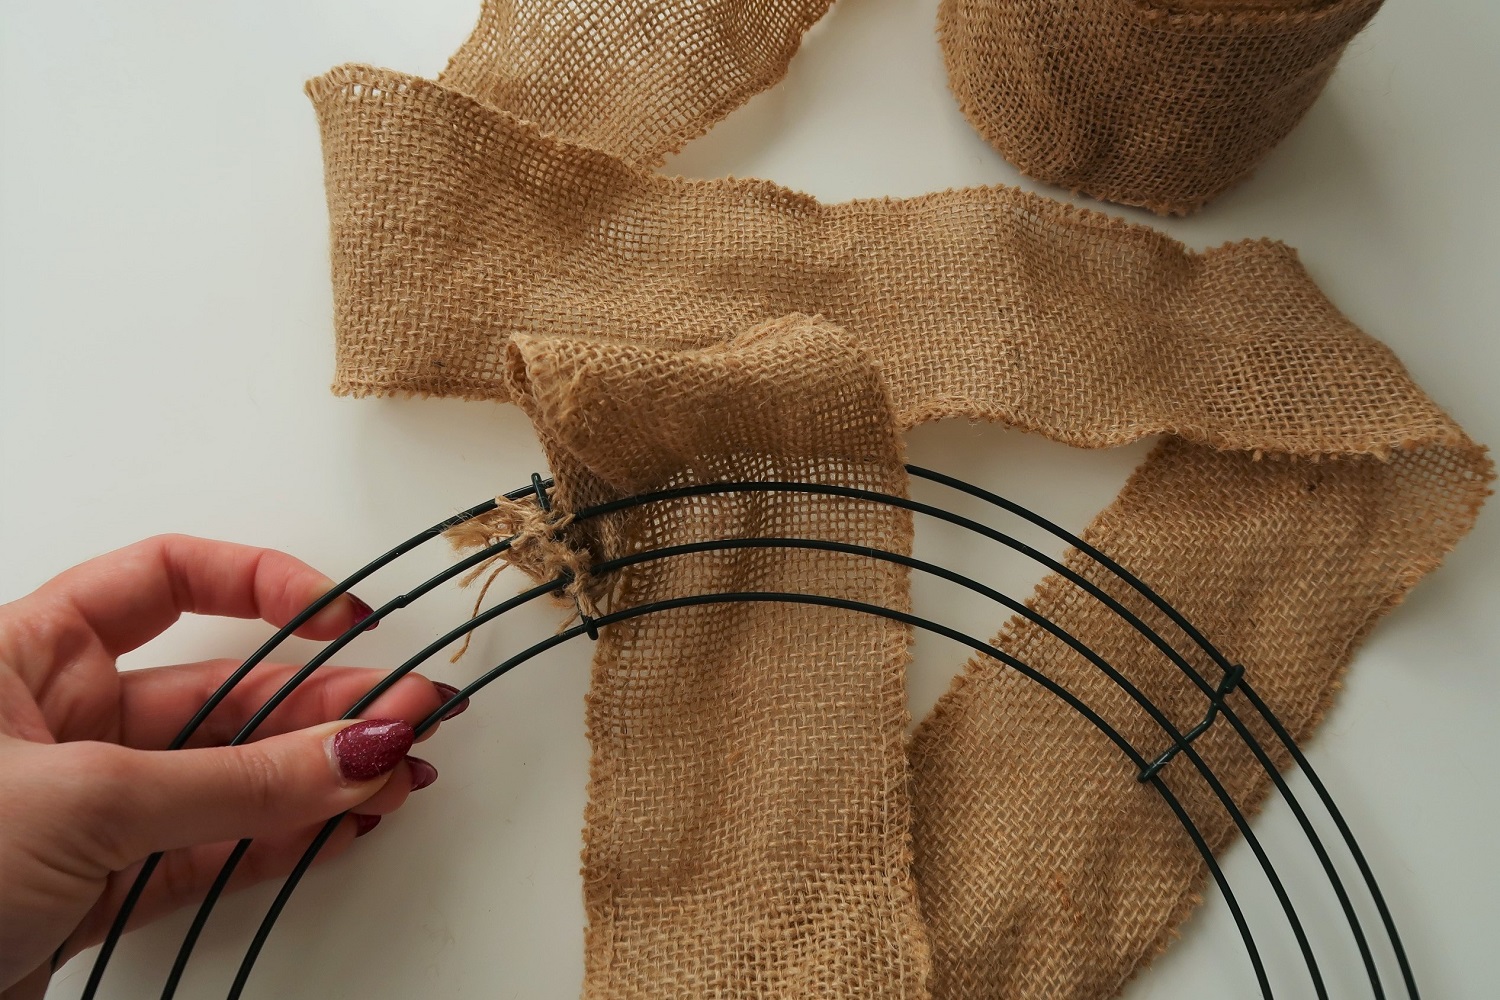
Before we start making our loops for our wreath, we need to ensure that the burlap ribbon's end is well secured to the wreath form. To do this, we fold the end of the ribbon over by about 2cm and threaded short lengths of jute string through.

How To Make a Burlap Wreath for Christmas 13

We're going to be working from the back to the front on the wreath form, so we want to attach the burlap to the back of the wreath so that we can poke it through to the front. The wreath form has 3 'channels', so we're using a section of string to secure the ribbon on the crossbar of each channel.

Step 2. Making The Loops

Once tied on and secure, unroll some of your burlap (you need a decent length to work with each time, so unrolling it helps to make it easier) and poke a loop of burlap through the top channel.

How To Make a Burlap Wreath for Christmas 2

This first loop is a bit difficult as we are fighting against the anchor points, but it gets easier as you go on.

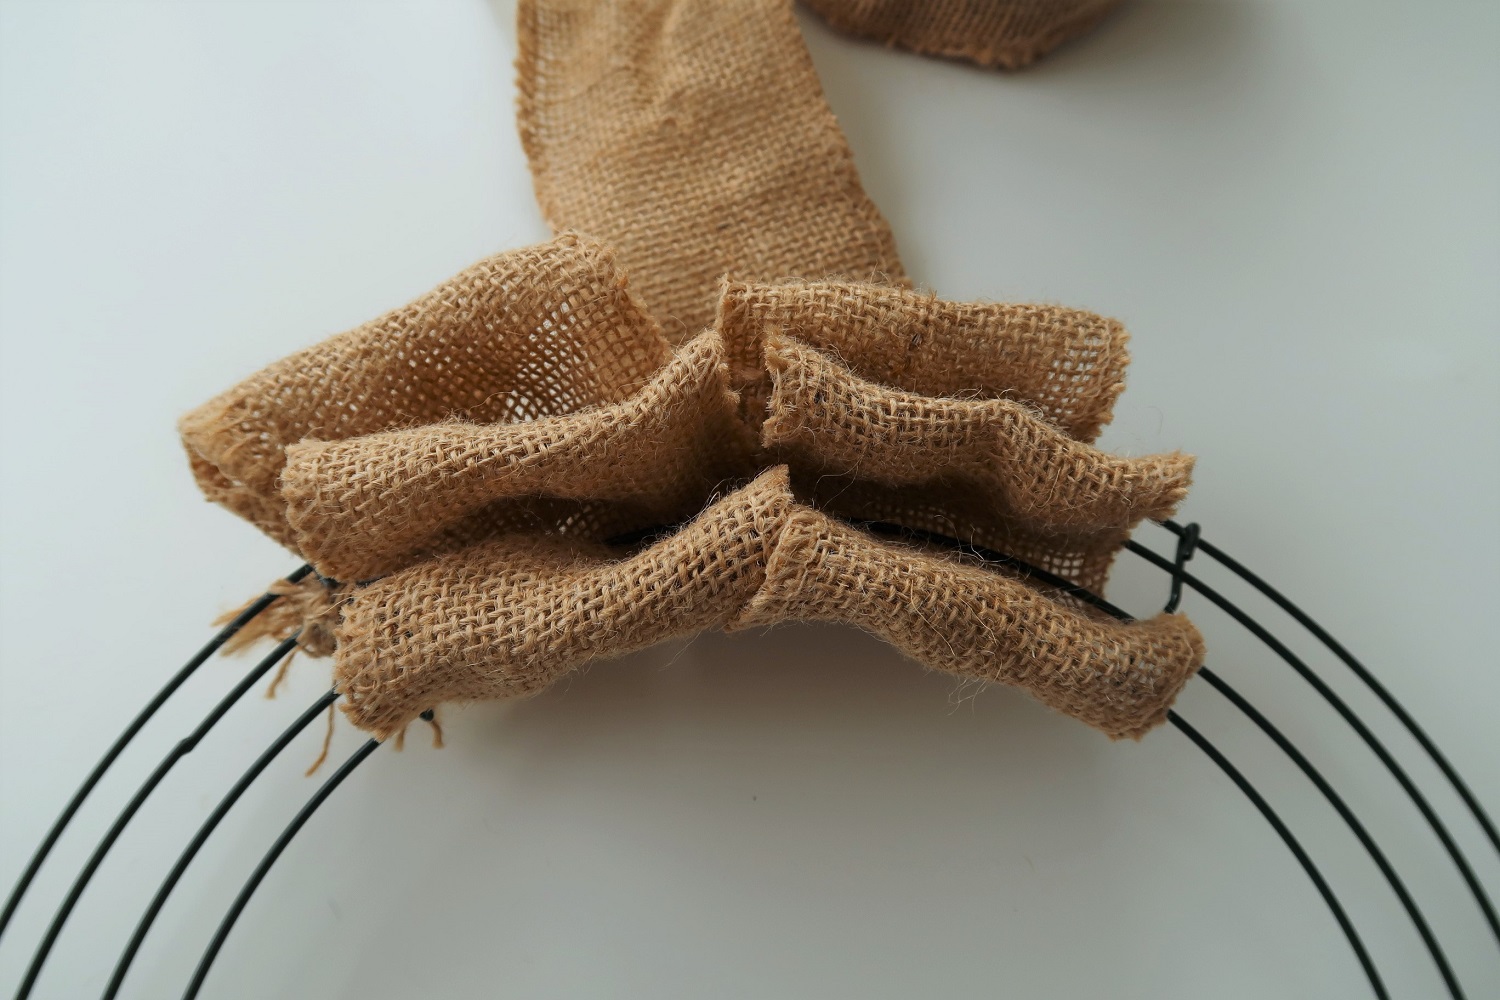
Next, add another loop through the middle channel...How To Make a Burlap Wreath for Christmas 3

...and then a loop through the bottom channel.

How To Make a Burlap Wreath for Christmas 4

Your first row should end up looking something like this.

How To Make a Burlap Wreath for Christmas 5

If you are struggling to get the loops to look even or stay in place when you are looping the next channel; I found that it is easiest to hold the loops on my fingers on my left hand while pushing the burlap through with my right, that way I can keep the loops all looking the same size and with a similar tension on them.

How To Make a Burlap Wreath for Christmas 6

When you've made the loop in the bottom channel, create a twist in the fabric (this helps stop it from pulling back through) and then take the burlap back up to the top channel and start the process again.

How To Make a Burlap Wreath for Christmas 7

You'll quickly find that the loops take up a lot of space in that first section, so this is where we get to the 'squash' that creates the ruffles on the wreath.

How To Make a Burlap Wreath for Christmas 8

Step 3. Creating Ruffles

To create the ruffles, hold the wreath form behind your current loops and then use your thumb to squash the loops back towards the rest of your hand.

How To Make a Burlap Wreath for Christmas 9

Don't worry if you aren't happy with the shape of the ruffles at this stage; we can fix them later.

Carry on the process of creating the loops in that new space you've just created by squashing the current rows back.

How To Make a Burlap Wreath for Christmas 10

I'm able to fit five sets of loops in each section of my wreath form; yours might hold more or less depending on the size of the wreath you are working with. You don't want to add so many that it's really difficult to add more loops, just add them until it covers the section evenly when released from being squashed up.

Keep going until you've worked the whole way around the wreath. Then, to finish the end of your wreath, you can just tuck the ribbon tail into the back or secure it with a dab of hot glue.

How To Make a Burlap Wreath for Christmas 11

You can then go back in and fluff up any areas that need it. As burlap is quite stiff, it's easy to open up the loops to give more fullness in places, don't overthink it; just make sure you've got the wire covered in all areas. The decorations we add next will help to push the ruffles out more.

How to Add Lights to a Burlap Wreath

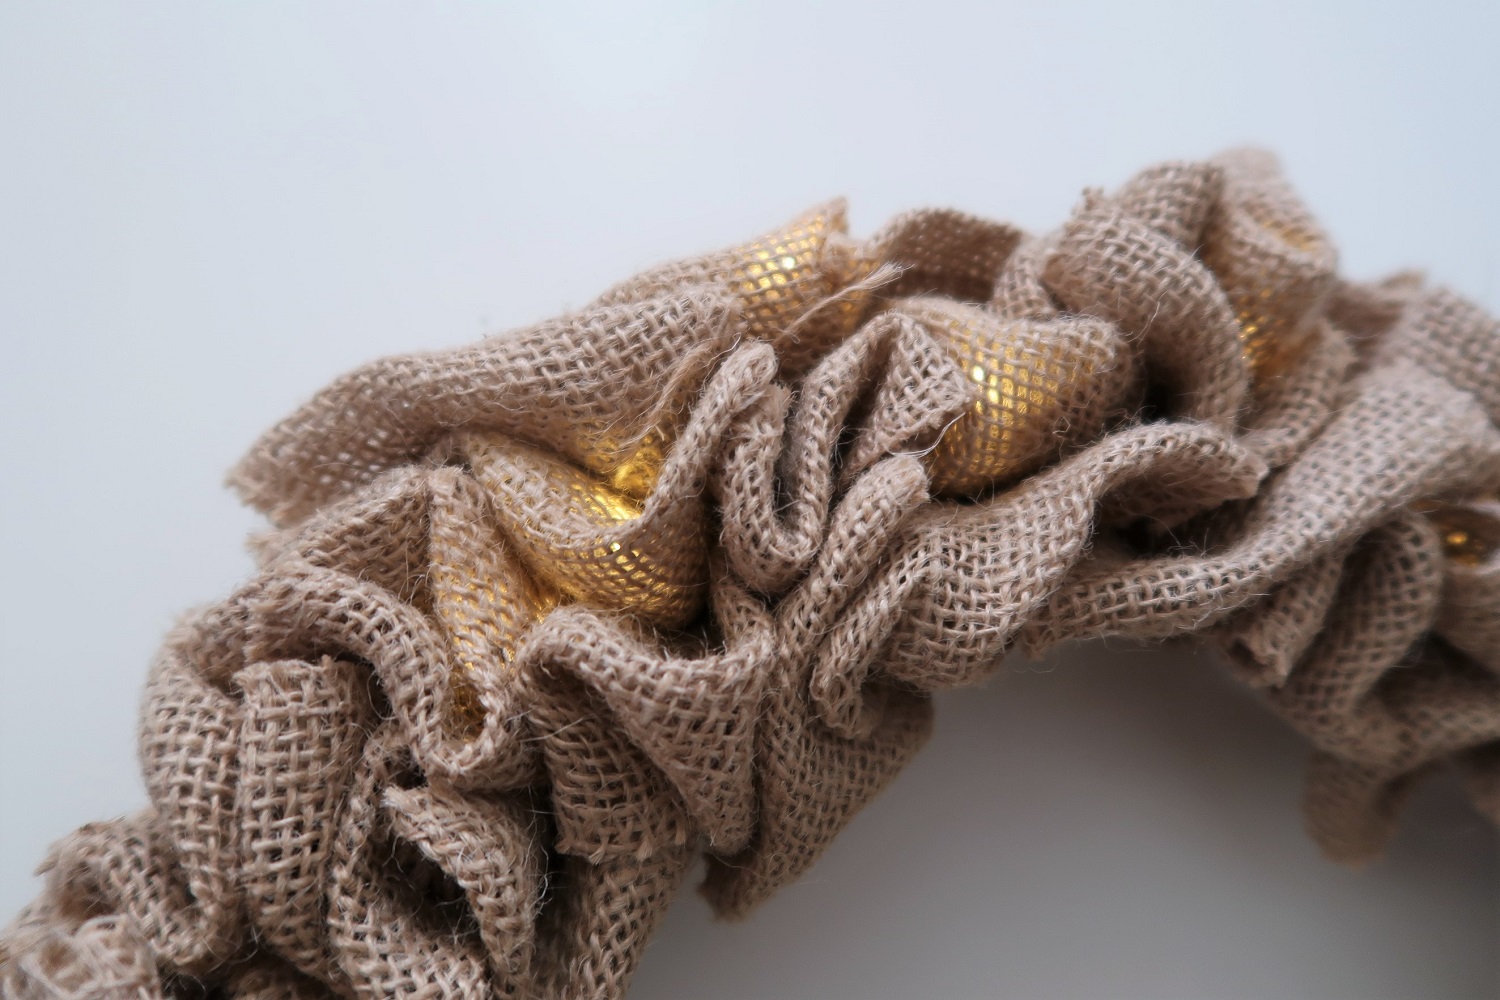
If you want to add lights to your burlap wreath, then it's a good idea to do this step before you get to the final decorating stages. The way we've constructed our wreath means we can easily add string lights into gaps between the ruffles and channels.How To Make a Burlap Wreath for Christmas 21

Depending on how tightly you've squashed the loops to make the ruffles, you might find that the string lights will stay in place without any additional fixing needed. However, if you find that they are a bit loose, you can take a small cable tie or floristry wire and secure them to the wreath form.

How To Make a Burlap Wreath for Christmas 22

You can choose to have the lights poking out in between the burlap loops or sit inside the loop so they give a soft glow. I prefer the way they look seated inside the burlap as it diffuses the light and doesn't detract from any of the other embellishments and decorations you add later.

How to Make a Burlap Wreath With Two Colors

Adding an extra color of ribbon to your burlap wreath is simple!

How To Make a Burlap Wreath for Christmas 14

You attach it into the wreath form the same way we did with the burlap ribbon and just swap out one of your burlap loops for a ribbon loop. For example, in the image above, I swapped my middle channel loop for ribbon, but you could also create a random pattern or swap out every other loop so that it doesn't look too blocky.

Decorating Your Burlap Wreath

The great thing about burlap wreaths is that they can be dressed up for any season. If you pick your decorations carefully, you can even make it so that you just swap them out every few months to create an entirely new look.

How To Make a Burlap Wreath for Christmas 15

This design was made using wire to secure all the decorative components to the wreath form so that they are easy to remove.

To add things like baubles, thread a thin wire through the hanging loop and then push it through the burlap ruffles until it shows at the back of the wreath form, adjust the bauble so that it sits how you want it to, and then twist the ends of the wire together to hold it in place. Ribbons can be done in the same way, thread wire through the back of the knot of the ribbon and attach to the wreath.

Adding a Festive Message to Your Burlap Wreath

Wreaths are designed to welcome people into your home, so why not add a festive message to yours. It's easiest to make your message plaque out of card that can be attached to your wreath - my favorite way to make a message that stands out is to use a glitter card with a contrasting vinyl color; let me show you how!

How To Make a Burlap Wreath for Christmas 16

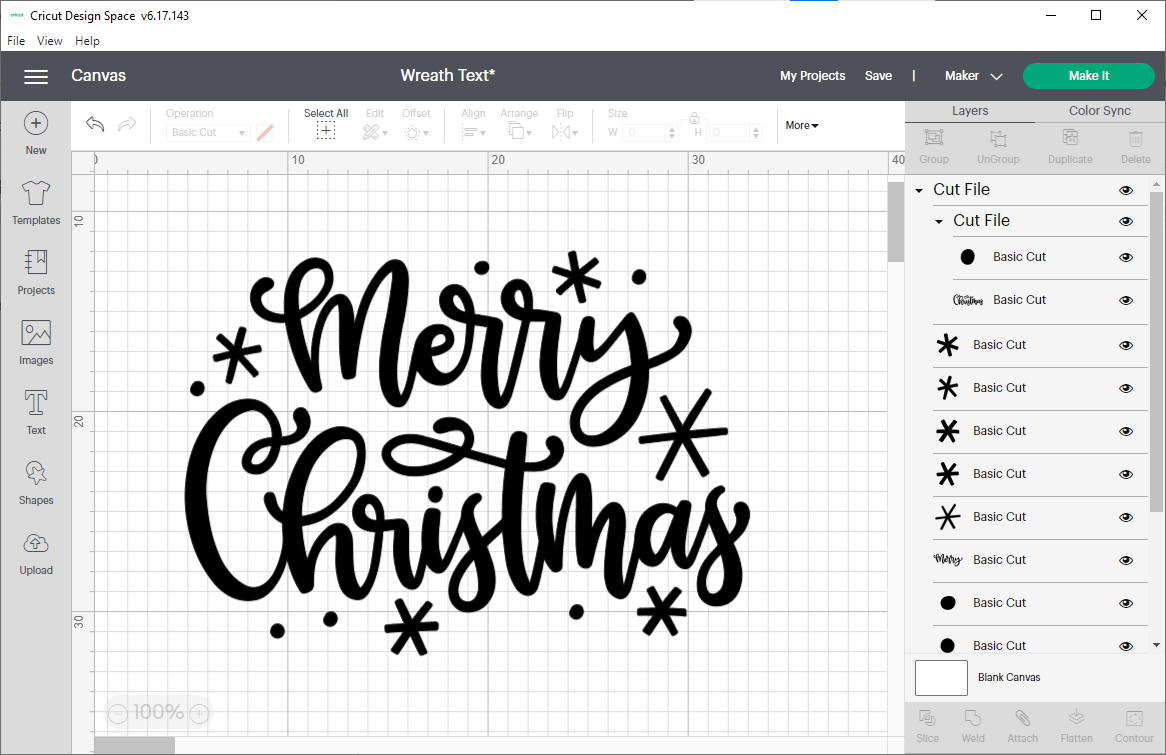
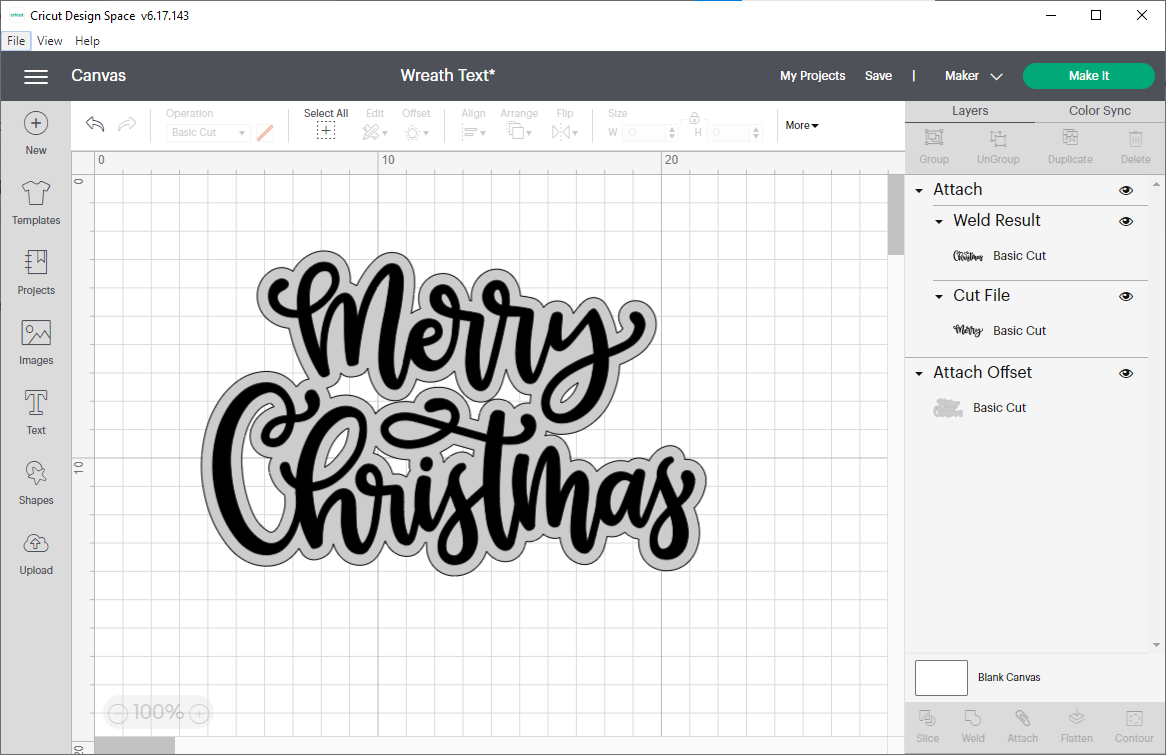
Find an SVG Quote you like (or create your own using a festive font); I choose to use this 'Merry Christmas, Hand Lettered, Cut File' from the Plus section on the Design Bundles site. I removed the extra items from the text, the stars and dots, so I was left with just the text reading Merry Christmas.

How To Make a Burlap Wreath for Christmas 17

This text would be too thin to work on its own, so by adding an offset to it we can make it a layered design that stands out and is easy to attach to our wreath!

Make sure your text is all attached (this design had them as two different layers so I had to highlight and attach them together) and then select the 'Offset' option from the top menu bar.

How much offset you add is entirely personal preference; if you want your message plaque to be all one piece of card, you will need to add enough offset so that both words connect. Once you are happy with the composition of the design, you can send it to cut.

How To Make a Burlap Wreath for Christmas 18

For my wreath, I cut the back offset layer out of silver glitter card and the wording out of matte black vinyl.

How To Make a Burlap Wreath for Christmas 19

Getting vinyl to adhere well to a rough surface like a glitter card can be a bit tricky but I've found that if you use a flat edge, such as a ruler, to hold down the rest of the transfer tape as you lift one edge; you can then apply pressure to the vinyl underneath to help it stick.

How To Make a Burlap Wreath for Christmas 20

All that's left to do now is add your message to your wreath, adorn with some other decorations and hang it on your door!

Happy Christmas Crafting!

We hope this post has inspired you to craft your own wreaths for the festive season and beyond. If you make one, we'd love to see it! Be sure to share some pictures of it on socials and tag @DesignBundles

You may also be interested in ...

Make a Family Quote Canvas Frame
How-to

In 2 Steps Make A Family Quote Canvas Frame

In this blog post discover how to easily add a family quote using HTV to a canvas frame.
Make a cute Winter Snowman Pillowcase
How-to

Make A Cute Winter Snowman Pillowcase

We are going to show you how to make a snuggly worthy pillowcase with a cheerful Winter Snowman
How to Make a Snowflake Card with your Cricut Joy
How-to

How To Make a Snowflake Card With Your Cricut Joy

Quickly make a beautiful and intricate snowflake card with your Cricut Joy cutting machine
Help Center
ol image