Unlimited Downloads 15% off Marketplace Purchases Exclusive Software Access Unlimited Downloads
15% off Marketplace Purchases
Exclusive Software Access
Go Unlimited Maybe Later
How to use Siser EasyColor DTV

How to use Siser EasyColor Direct to Vinyl or DTV

Do you love sublimation designs but don’t own a sublimation printer? Well, now you can print those same designs using your Inkjet printer! Siser EasyColor Direct to Vinyl is an easy to use, durable heat transfer printable vinyl with exceptional qualities. With DTV, you can print detailed designs in full color without needing special inks.

This is every crafter’s dream when it comes to printable HTV. In this article I will discuss how DTV works and how it compares to traditional printable HTV.

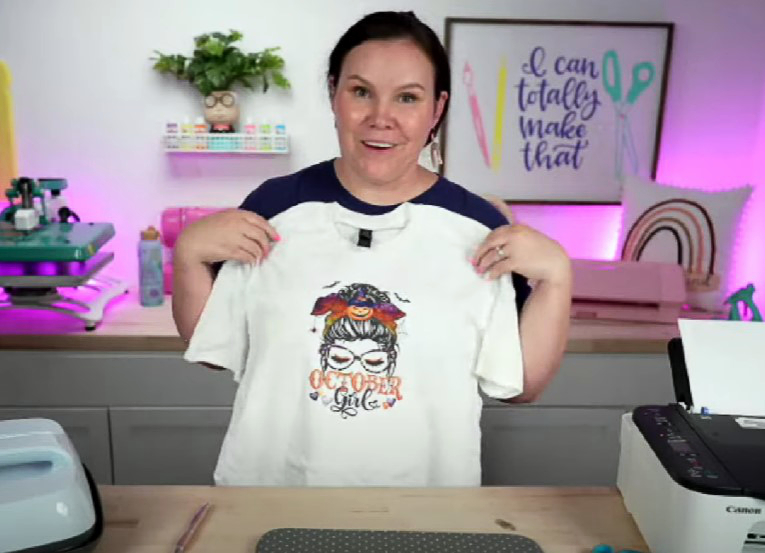
In the video below Crystal goes through a step by step process on using Siser EasyColor DTV. The results are amazing. You just have to see this!

*Please take note: the Giveaways (1:58) mentioned have ended and are no longer applicable. You don’t want to miss this video as the results are unbelievable!


Materials and Equipment

Siser EasyColor DTV: https://www.143vinyl.com/siser-easycolor-dtv/?partner=440066

Inkjet printer: https://www.walmart.com/ip/Canon-PIXMA-TS3522-All-In-One-Wireless-InkJet-Printer-With-Print-Copy-and-Scan-Features/722961036 (this is similar to the one Crystal used in the video)

Parchment paper or Teflon Sheet

Heat Press or EasyPress

Siser TTD Easy Mask: sold separately but only needed if the design consists of multiple pieces

Design: Grab the Halloween Craft Bundle while you still have the chance! You can also jump right on over to the Messy Bun or Halloween Sticker Bundle products that Crystal used in the video.

Material: this can be a shirt, apron, bag made of cotton, polycotton or polyester

Cutting machine or cut by hand

Disclosure: Some of the links are affiliate links, meaning, at no additional cost to you, we will earn a commission if you click through and purchase.


Siser EasyColor Direct to Vinyl - what exactly is it?

Siser EasyColor Direct to Vinyl is a heat transfer printable vinyl that can be used with most desktop inkjet printers. That means full color prints without the need for a sublimation printer or special blanks. You simply use the ink that came with your inkjet printer.

How to use Siser Direct to Vinyl or DTV 1

If you love the sublimation bundles on offer, now you can use them with DTV. Not only can you use sublimation files, you can also use PNG images, stickers bundles and more with DTV. If you love a particular SVG file, that can be turned into an image for print then cut.

The printed design is then cut out with a cutting machine. Don’t have a cutting machine? You can do a “fussy” cut by hand. Anyone can use DTV!

How to use Siser Direct to Vinyl or DTV 2

How does DTV differ from printable HTV?

While there are printable HTV options on the market, the quality isn’t always durable. Printable HTV feels like paper and can suffer from color bleed issues or the design lifting after the first wash. This can be so frustrating, especially when you’ve spent so much money and time working on your project.

Siser has really knocked this out of the park with their DTV. Similar to vinyl, DTV has a rubbery feel before heat setting. Once applied, it becomes buttery soft and feels amazing.

How to use Siser Direct to Vinyl or DTV 3

Not only are the colors brilliant, but it holds up to washing exceptionally well. Siser Direct to Vinyl won’t easily fade, won’t bleed, and won’t lift up.

Note:

As DTV is designed to be used with inkjet printers, it’s advisable NOT to use it with your sublimation printer. The point of this material is to make “sublimation” accessible to inkjet users. At the time of this article Siser did not have an answer yet for laser printing. So it’s best to stick to inkjet for now.

What materials can DTV be applied to?

While it would be great to use DTV on other materials, Siser recommends it be used only on textiles like cotton, polyester, elastane and blends. If you were asking, yes, you can also use DTV on colors!

How do you use Siser EasyColor DTV?

With DTV, all you need to do is set up your purchased design in your preferred software. For example, Crystal used Cricut Design Space.

How to use Siser Direct to Vinyl or DTV 4

To cut around the design, you will need to add an offset. I will tell you more about this below. With sticker bundles this has already been done for you! So you’re good to go!

Resize your design

When resizing be sure to lock the Width and Height to keep the aspect ratio consistent. You can find this at the top of the toolbar. It’s a good idea to resize your design before adding an offset to avoid any design issues later on.

Create an Offset to cut around your design

Once you create an offset it will automatically fill with black but this can be changed. Click on the color box next to the Operation box and choose another color. In the example below, the offset was changed to a light purple.

How to use Siser Direct to Vinyl or DTV 6

The thickness of your offset will also depend on how much white you want on the edges.

On white material, this isn’t a problem. On darker materials you may want a closer cut but be careful. Siser DTV is very thin, flexible and soft. Depending on your machine, smaller details can end up being a complete mess. It can also cause issues with weeding where the vinyl will stretch. That’s why it’s a good idea to add an offset.

After adding the offset you need to Flatten the image and offset. With print then cut, Flatten creates one design to cut instead of cutting individual pieces.

How to use Siser Direct to Vinyl or DTV 5

Print your purchased design

Turning on the Bleed function when printing is another way to prevent white edges. If there is already an offset, you don’t need to use this function. Send the design to print and in the settings you can turn on the Bleed function if necessary. This will create an extended “bleed” of color from the edge.

If you look closely, you will see that the DTV sheet has a white side and a side with a slight green tinge. You want to print on the white side. So check that you are loading the page into your printer correctly.

How to use Siser Direct to Vinyl or DTV 7

Unlike sublimation, you don’t need to mirror the design as it’s going on face up. For the Printer settings, use the default settings you would normally print with. It’s as easy as that!

If you wonder why the colors appear dull when printing, don’t worry! After heat pressing, the colors are activated and will be unbelievably vibrant. Just wait and see.

Cut and weed the DTV design

In Cricut Design Space, the material setting that worked well for Crystal is the Every Day Iron-On with pressure set to Default. Cricut Design Space will show you how to place the DTV on the mat so be sure to pay attention. Follow the rest of the instructions and proceed to cut.

How to use Siser Direct to Vinyl or DTV 8

After cutting, remove the DTV from your mat. Now, weed out the excess so you are left with the design and offset.

How to use Siser Direct to Vinyl or DTV 9

Next, get your heat press ready. Press your shirt, bag, apron or material you are using for a few seconds. This will remove any moisture as well as iron out any wrinkles.

Gently and carefully peel off the design and place onto your shirt or bag. If your design is split into parts, you can use the TTD Easy Mask (sold separately). The mask can be used over and over.

How to use Siser Direct to Vinyl or DTV 10

Heat Set

When pressing, you can achieve a matte or gloss finish. For a matte finish, use parchment paper. For a glossy finish use a Teflon sheet.

The great thing about Siser DTV is that if you don’t like the matte finish, place a Teflon sheet on top and press again. Voila, you now have a glossy look! Same goes for matte. Just use parchment paper and glossy becomes matte.

Set your heat press or EasyPress to 315° for 15 seconds for the best results. Now lightly press your design.

How to use Siser Direct to Vinyl or DTV 11

Next, peel off the parchment paper or Teflon sheet to reveal the stunning colors! No need to wait for anything to cool down!

How to use Siser Direct to Vinyl or DTV 12

Tada! Now that’s magic!

How to deal with wrinkles after washing

When washing you will most likely get wrinkles on the design. This is an easy fix. Just place your parchment or Teflon sheet over the design, press or iron for a few seconds and it will smooth out.

It’s so easy to use DTV that the whole family can join in! Let the kids have some fun and make their own goodies. Did you know that you can layer Siser EasyColor DTV with Siser EasyWeed HTV? You can layer one on top of the other, in no particular order.

Other HTV products will need to be placed on top of the DTV design in order to work. Grab some of your favorite glitter HTV to complete your masterpiece. There is nothing stopping your creativity now.

You may also be interested in ...

Make a Family Quote Canvas Frame
How-to

In 2 Steps Make A Family Quote Canvas Frame

In this blog post discover how to easily add a family quote using HTV to a canvas frame.
Make a cute Winter Snowman Pillowcase
How-to

Make A Cute Winter Snowman Pillowcase

We are going to show you how to make a snuggly worthy pillowcase with a cheerful Winter Snowman
How to Make a Snowflake Card with your Cricut Joy
How-to

How To Make a Snowflake Card With Your Cricut Joy

Quickly make a beautiful and intricate snowflake card with your Cricut Joy cutting machine
Help Center
ol image