Unlimited Downloads 15% off Marketplace Purchases Exclusive Software Access Unlimited Downloads
15% off Marketplace Purchases
Exclusive Software Access
Go Unlimited Maybe Later
Make a Winter Snowman Face Ornament

2 Steps to Create a Winter Snowman Face Christmas Ornament

Do you love Winter themed ornaments? I know I do and this SVG Snowman face ornament is just perfect for the holiday season. You can add these quirky smiling faces to wooden rounds with vinyl or even cardstock. Today I’m going to show you a quick and easy way to create a Christmas tree decoration with a snowman face.

Winter Snowman Ornament - mockup

Materials Needed For This Project

Design - Winter Snowman Faces Bundle Vol 1

Cutting machine - A Cricut, Silhouette or any cutting machine that you have

Cardstock or vinyl - I'm using black and orange cardstock (230gsm), as it works better than vinyl with a painted surface

White acrylic paint

Paint brush or sponge

Glue (if using cardstock) - any glue will work fine, I used a wood glue for my project

Transfer tape and scrape - if you are using permanent vinyl

Wooden round - choose a size depending on where you will hang it. A size of 6cm-8cm is good for hanging on a tree while a bigger size is best for hanging on a door. You can drill the hole now or later on.

A piece of string or ribbon

Materials needed for Snowman Face project

Along with my Cricut Maker, I will also be using Cricut Design Space to cut out the Snowman face SVG. For more crafting options, check out the cute Snowman Faces available on Design Bundles.

Don’t forget to unzip your file to your PC or Mac once you have purchased and downloaded it.

Step 1 - Upload Then Cut The Snowman Face

Begin by uploading the SVG cut file to Cricut Design Space. Resize the snowman face according to the size of your wooden round. I like to resize on the longest side, making sure the lock icon is closed (locked) to keep the ratio consistent.

Lock and edit height and width adjustment

Attach The SVG Design (Optional)

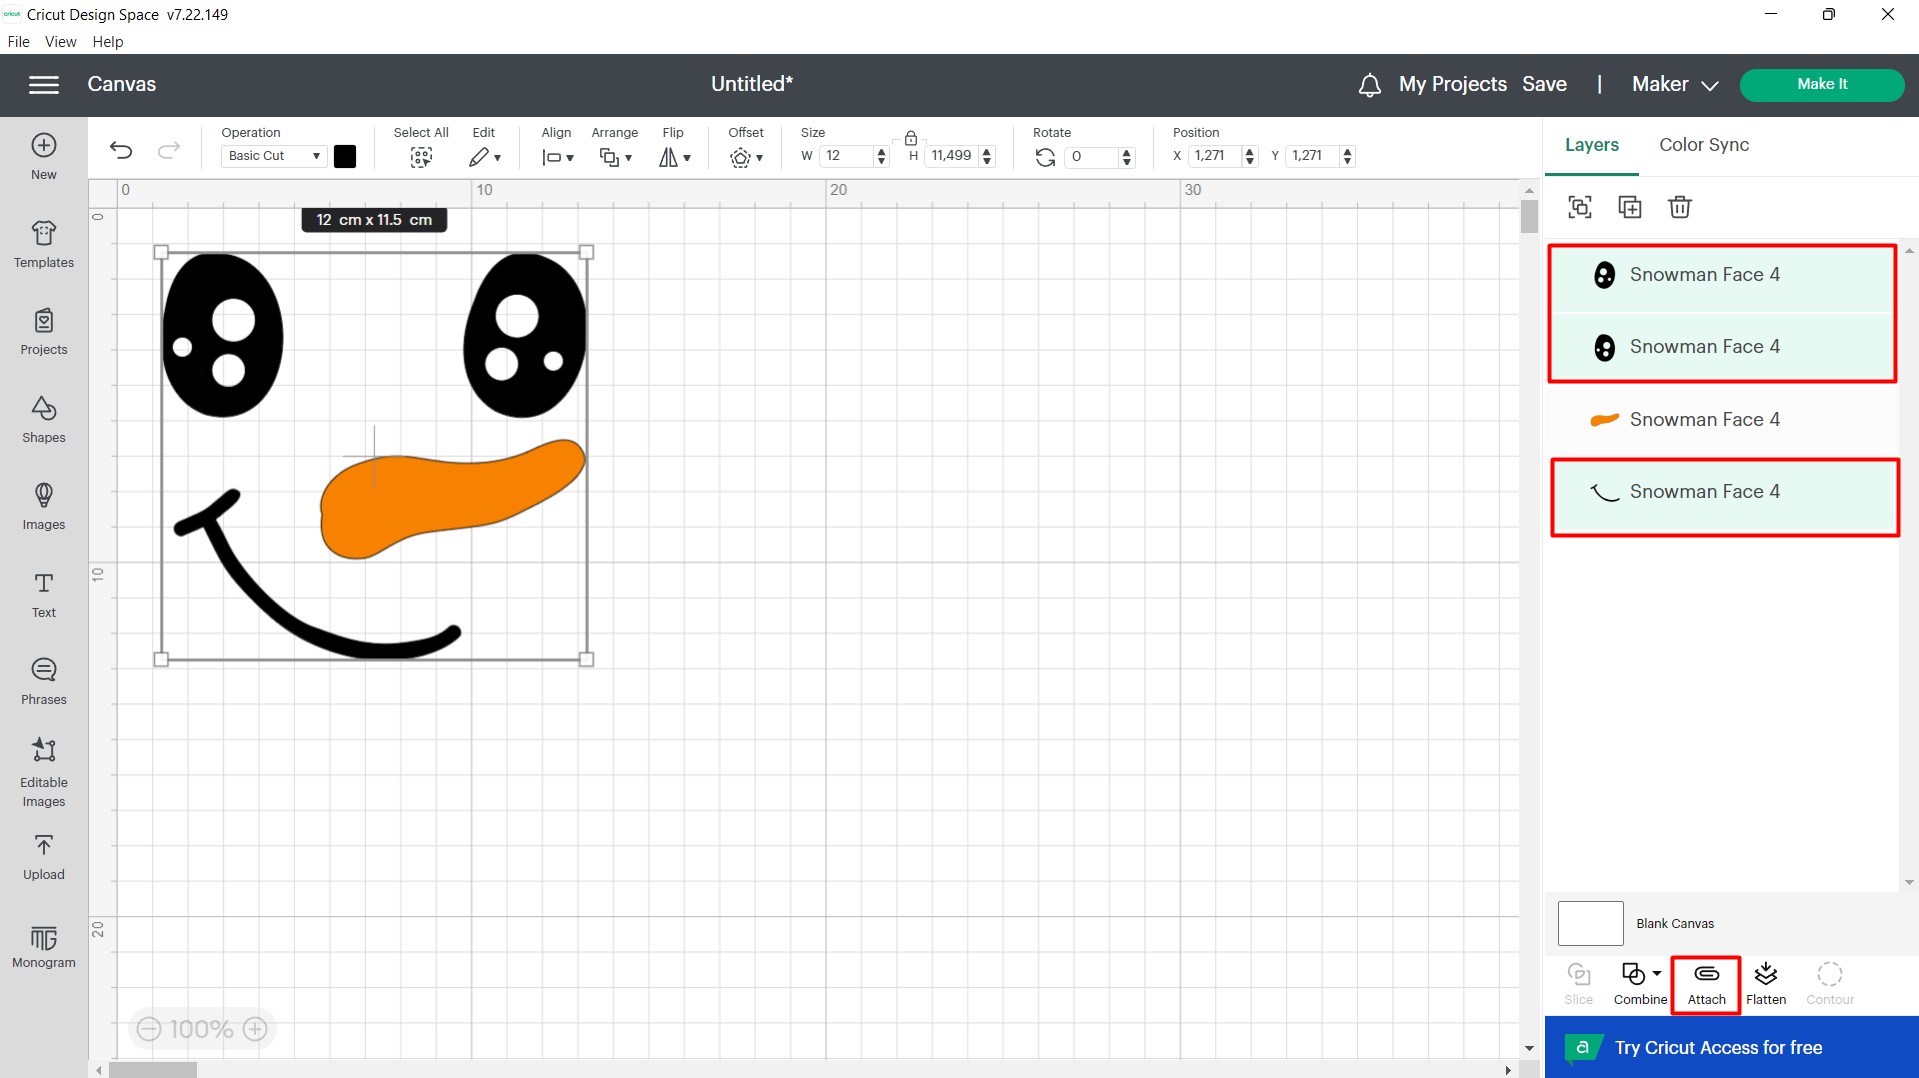
Now, with most projects, you will attach or weld the entire design. This is so it cuts on your mat exactly as you see it on your screen. If you don’t, Design Space will arrange the parts intuitively to save you material.

You are very welcome to cut your material this way, especially if you are using vinyl. For color designs, you would need to attach by color. First, right-click and select Ungroup.

In the layers panel on the right-hand side, Shift + click and then select all of the parts of the design that are the same color. Next, click Attach at the bottom right of the screen. Do this for any additional remaining colors if needed.

Attach Christmas SVG by color - Cricut Design Space

Next, click on the Make It button on the top right corner.

Click Make It button - Snowman Christmas Ornament

Choose The Mat and Material

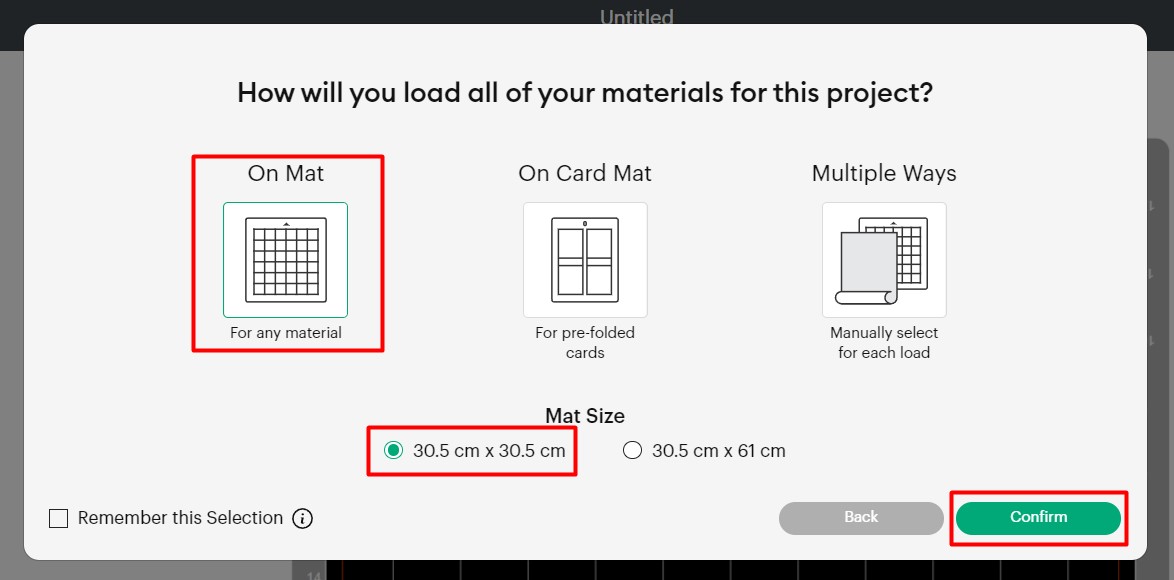
Since I am using cardstock, there was no need to use the attach option. After clicking on the Make It button, you will be taken to the mat selection screen. Here I chose the option On Mat, 30.5cm x 30.5cm.

Snowman face ornament - select mat and size

As you can see, because I didn't attach the parts, Design Space rearranged the Christmas SVG to save material. Your mats are also color coded according to the design colors, which is extremely helpful when cutting.

I don’t have to worry about what to select and cut next, Design Space has done it all for me. Once you are happy with everything, click on Continue bottom right.

Click Continue to cut Snowman SVG in Cricut Design Space

On the next page, select the material you are using. I have selected Cardstock (for intricate cuts) as my favorite as this gives me the cleanest cut. To find more material options, click on Browse All Materials.

Select material for Snowman ornament

After selecting your material, Design Space will ask you to load your mat and Fine Point Blade. Follow the instructions from there on. The prompts will tell you when and what color cardstock to load next. As easy as that, you are ready to start cutting!

Follow instructions to cut cardstock - Cricut Design Space

Step 2 - Make Your Winter Snowman Face Ornament

Before adding the cardstock or vinyl, paint the middle of your wooden ornament with white acrylic paint. You can use as many layers as you want. In the image below, I used 3 layers of paint, allowing each layer to dry completely before applying the next.

We have an awesome post on 3 methods for painting on wood slices in case you need it.

Snowman Christmas ornament - paint wooden round

I arranged the cardstock pieces until I was happy with the placement on the wooden round. Then, the glue was applied to the cardstock and this was then placed on the wood round.

Glue down cardstock - Snowman face ornament

Add a final touch by drilling a hole near the top of your wooden round doesn’t have one already. Remember, safety first so wear protective gear for your ears and eyes. Add string or ribbon to complete your project.

Add ribbon to Christmas ornament - Snowman face SVG

Now your Snowman face wooden round is ready as a Christmas tree ornament or door hanger. What are your favorite Christmas decorations?

You may also be interested in ...

Make a Family Quote Canvas Frame
How-to

In 2 Steps Make A Family Quote Canvas Frame

In this blog post discover how to easily add a family quote using HTV to a canvas frame.
Make a cute Winter Snowman Pillowcase
How-to

Make A Cute Winter Snowman Pillowcase

We are going to show you how to make a snuggly worthy pillowcase with a cheerful Winter Snowman
How to Make a Snowflake Card with your Cricut Joy
How-to

How To Make a Snowflake Card With Your Cricut Joy

Quickly make a beautiful and intricate snowflake card with your Cricut Joy cutting machine
Help Center
ol image