Unlimited Downloads 15% off Marketplace Purchases Exclusive Software Access Unlimited Downloads
15% off Marketplace Purchases
Exclusive Software Access
Go Unlimited Maybe Later
How to Make Bunting for Parties and Celebrations!

How to Make Bunting for Parties and Celebrations!

Today we're going to look at how to make bunting that is perfect for any special occasion with this easy step-by-step tutorial.

Bunting is a great way to inject some extra personality into your party decor. The best news is that it's super simple to make, you can create it to fit any color scheme for any occasion, and you have complete control over the message you want it to send - be that funny, sweet, or even a little bit cheeky!

How to Make Your Own Bunting for Parties and Celebrations! 11

We're going to be making Bunting suitable for a kid's party today, so we're using bright colors and simple but impactful shapes and text.

What You'll Need To Make Your Bunting

To make your bunting, you will need cardstock in a range of colors to match your party's theme; we'd suggest using paper that is at least 120gsm in weight as you want it to be heavy enough to lay well when hung and not crease if it gets blown around.

How to Make Your Own Bunting for Parties and Celebrations! 7

You will also need a cutting machine such as a Cricut, Silhouette, or Brother to cut our pennant shapes from the cardstock. We will be using a Cricut Maker today and a blue 'Light Grip' mat.

To attach your different layers of card, you can use double-sided tape or glue, and then you will need to find some ribbon or string to attach your pennants to.

Quick List:

-Cardstock in a range of colors (a minimum of 120gsm)

-A cutting machine - we're using Cricut Maker

-A blue 'Light Grip' mat

-Double-sided tape or glue

-Ribbon or string

How to Make Bunting for Parties and Celebrations!

Let's take a look at how to make your fabulous personalized bunting for your next celebration to wow your guests and really tie your party decor together.

Step 1. Find a Bunting Template

We found this Bunting Banners SVG file from SVG Cuttables and thought it was perfect for this project as it gives you both one and two-layer options for each shape, making the design process even easier!

How to Make Your Own Bunting for Parties and Celebrations! 1

Image credit: Bunting Banners SVG

Once you have purchased and downloaded your Bunting SVG file, you will need to upload it to Design Space and add it to your canvas.

P.s. you can learn more about SVG Cuttables in their Seller Spotlight interview.

Bunting Template Size

You can make your bunting as large or as small as you like. To resize the template in Design Space, you can use the arrows button on the bottom left corner of the image to scale it up or down while keeping the original proportions. Or you can unlock the padlock icon on the left-hand side to then be able to manipulate the size and shape in whatever direction you like.

How to Make Your Own Bunting for Parties and Celebrations! 2

We are using A4 cardstock for our bunting, and we're going to size the template so that we can make two out of one sheet of A4. To do this, we have reduced the image's width to 13cm (and because we have kept the proportions the same as the original, the height has now changed to 19cm).

Step 2. Organizing Your Bunting Layers

We are using the layered template for our bunting to get 2 separate cut layers on our canvas. To make it easier to organize your cuts, we suggest changing the color of the layers to correspond to your cardstock colors.

How to Make Your Own Bunting for Parties and Celebrations! 3

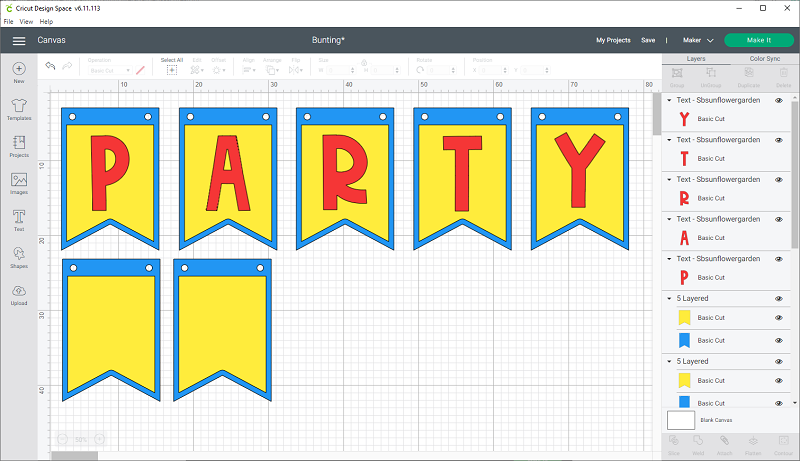
We will be cutting 7 bunting pennants for this project, and they will be made using blue and yellow cardstock, so we have changed the templates layer colors and duplicated them 7 times.

Step 3. Adding Text To Your Bunting

The beauty of making your own bunting is that you can have it say whatever you want - whether it's the usual 'Happy Birthday,' 'Congratulations,' something sentimental or funny, you want to find a font that fits with your party theme and style. We're making our bunting for a child's party, so we want to go for a fun, cartoon-style font. We found a fantastic free font called Sunflower Garden that is perfect for this project.

How to Make Your Own Bunting for Parties and Celebrations! 4

Create a text box on Design Space and type your wording out, highlight your text and then click the 'un-group' option in your layers toolbar so that you can drag each letter to its own pennant to make sure it's the right size and sits nicely in the space. This already looks great but do you know what could make it stand out? Layering the letters with a glitter card! To do this, we will need to use the Offset function.

Layering Letters With the Offset Function

The Offset function on Design Space might just be our favorite new feature. Before it was introduced, it wasn't easy to get a nicely spaced border around an image or font without a lot of messing around with layers and alignments, but now it's as easy as 2 clicks! Select your letter, click on the 'Offset' button on the top menu, adjust the distance to suit your design, and click 'Apply.'

How to Make Your Own Bunting for Parties and Celebrations! 5

The offset will appear as another layer on our canvas, so we can select that and change its color to match the cardstock we will cut it from.

Step 4. Cutting Your Design

Once you are happy with your design, you need to hit the 'Make It' button, which will take us to our Mat set-up screen.

How to Make Your Own Bunting for Parties and Celebrations! 6

Check that all cuts fit onto your cardstock and load up your mat and machine ready to cut.

Step 5. Assembling Your Bunting Layers

Now that we've got all our layers cut, it's time to start assembling!

How to Make Your Own Bunting for Parties and Celebrations! 8

We've used double-sided tape to layer our letters as they are a bit more delicate but used a glue stick to add our letters to our yellow pennant and our yellow pennant to the blue pennant as it helps to keep it nice and sturdy.

How to Make Your Own Bunting for Parties and Celebrations! 9

Step 6. Threading Your Bunting

You can use whatever you like to thread your bunting, but we have found that using a ribbon with a width similar to the diameter of the holes to be the best solution. This is because it means the pennants stay nicely spread out along your ribbon (as they can't easily slide around), and it also means the bunting is more durable so that you can use it more than once.

How to Make Your Own Bunting for Parties and Celebrations! 10

You want to pass the ribbon through the front of the pennant so that the majority of the ribbon is stretched across the back to them come through the hole on the opposite side; this keeps it looking neater.

Be sure to leave yourself quite a bit of spare ribbon on each end so that you have some adjustment room on the spacing of the pennants when it's on the wall.

Step 7. Hanging Your Bunting

Next comes what may be the most difficult step, hanging your bunting! Depending on the length of your bunting, this may be a two-person job and involve some climbing: so please do be careful. Attach one end of your bunting to the wall and then hold the other end up to assess the current spacing of the pennants; it's easier to spread them out more when only one end is attached so do the majority of your adjustments now before fixing it in place.

Step 8. Admire Your Handy Work

The only thing left to do now is to admire your handy work and...get ready for the party!

How to Make Your Own Bunting for Parties and Celebrations! 12

The beauty of making your own bunting is that you can tailor it to your own needs and the personalization options are endless, especially if you take good care of it as it can be used time and time again.

Why not try making a set that can grow with your kids? All you need to do is make the wording 'Happy Birthday' and then several additional pennants that say 1st, 2nd, 3rd, and so on. You can then just unthread the pennants each time and add the relevant year creating a tradition and keepsake that can be used repeatedly.

Happy Crafting!

We'd love to know what you think of this tutorial and if you make your own version, be sure to share images to social media and tag us or post them in our Facebook Group, The Design Bundles Customer Community.

You may also be interested in ...

Make a Family Quote Canvas Frame
How-to

In 2 Steps Make A Family Quote Canvas Frame

In this blog post discover how to easily add a family quote using HTV to a canvas frame.
Make a cute Winter Snowman Pillowcase
How-to

Make A Cute Winter Snowman Pillowcase

We are going to show you how to make a snuggly worthy pillowcase with a cheerful Winter Snowman
How to Make a Snowflake Card with your Cricut Joy
How-to

How To Make a Snowflake Card With Your Cricut Joy

Quickly make a beautiful and intricate snowflake card with your Cricut Joy cutting machine
Help Center
ol image