Unlimited Downloads 15% off Marketplace Purchases Exclusive Software Access Unlimited Downloads
15% off Marketplace Purchases
Exclusive Software Access
Start your 7 Day Free Trial Start Plus Trial Maybe Later
Make Your First Glitter HTV Shirt With Your Cricut

Make Your First Glitter HTV Shirt With Your Cricut

Fall heralds the welcoming of warm, cozy days and Pumpkin Spice. It’s a great time to get creative with tons of ideas on Design Bundles. Are you still new to crafting with your Cricut? Then join me as I show you how to make your first Heat Transfer Vinyl (HTV) shirt using your Cricut. Heat Transfer Vinyl, or HTV, is a heat pressed product that can be used on a variety of materials.

I can’t get enough of all the glitter colors that are available. Did you know that you can cut designs big enough to fit a shirt with your Cricut Joy? You bet you can and it’s so easy!

Make Your First Glitter HTV Shirt With Your Cricut 1

I am totally in love with sparkly gold HTV and it works perfectly for a Fall inspired theme. This project will work with any crafting machine. My “oh so cute” Cricut Joy will be my trusty companion in this crafting adventure. So let’s get started!

Supplies You Will Need For Your HTV Shirt

You only need a few materials when making your first HTV shirt. You can use a heat press or your Cricut EasyPress if you have one. The brand of HTV will depend on what you have available. Siser is a great choice for HTV crafts.

Cricut cutting machine - or any cutting machine

Mat and tools - Scissors, Weeding tool

Gold Glitter HTV - any brand you prefer

Black T-shirt - I went with a shirt for 6-7 year olds

SVG Design - Fall/Halloween Subway Art

Heat Press - or use a Cricut EasyPress

Lint Roller - for those pesky little bits of fluff

Parchment paper

Materials needed for Cricut HTV shirt

For my Cricut Joy, I need to break up the design into cuttable pieces. It’s quick to do and allows you to use your Joy with larger pieces. If you are using a larger cutting machine, you can skip the first step and move onto the second.

1. SVG Setup in Cricut Design Space

If you haven’t done so already, download and install Design Space on your computer or iPad. The next step is to open Design Space and upload your SVG. I always find that SVG files are super flexible and the best option for projects like this.

Before going ahead, it’s a good idea to resize the SVG to the size of your shirt area. For my shirt, a Width of 14cm (1.57 inches) and Height of 20cm (7.87 inches) worked perfectly.

The design needs to be ungrouped first so it can be broken apart. Be sure to select the design, then go to the right side panel. At the top of the panel click on the Ungroup icon.

Ungroup SVG in  Cricut Design Space

We are now going to combine or weld specific parts. But didn’t we just separate everything? Yep, but it will all become clear soon.

First, click on the word “Autumn”. Then click on Weld at the bottom right. Doing this will tell Design Space to cut it as one design. If you don’t do this, your design will be split up into pieces all over the cutting mat!

Next, select multiple items. Go ahead and click on “Greetings”, then hold down Shift while clicking “Harvest” and the top leaf. With all three selected, click on Weld. Don’t forget to combine the bottom elements “Blessings”, “Pumpkins” and second leaf in the same way.

Weld selected SVG elements

SVG files can appear a bit confusing at first. When starting out I didn’t know where to begin. I would definitely suggest checking out how to use SVG files in Design Space. It certainly helped me!

Great, now we are ready to cut!

2. Choose Mat Size And Turn On Mirror Option

At the top right corner, click on Make It. This will take you to a new screen where you can select to use a Mat and the mat size. I’m sticking with my Standard Grip 11.4cm x 16.5cm (4.5” x 6.5”) that came with my Cricut Joy. Click Continue to go to the next page.

Choose Mat size in Cricut Design Space

As you can see, Design Space has split everything up into 3 sections or mats. This means that I will be cutting three times. The way Design Space arranges the designs is extremely helpful and saves me so much time!

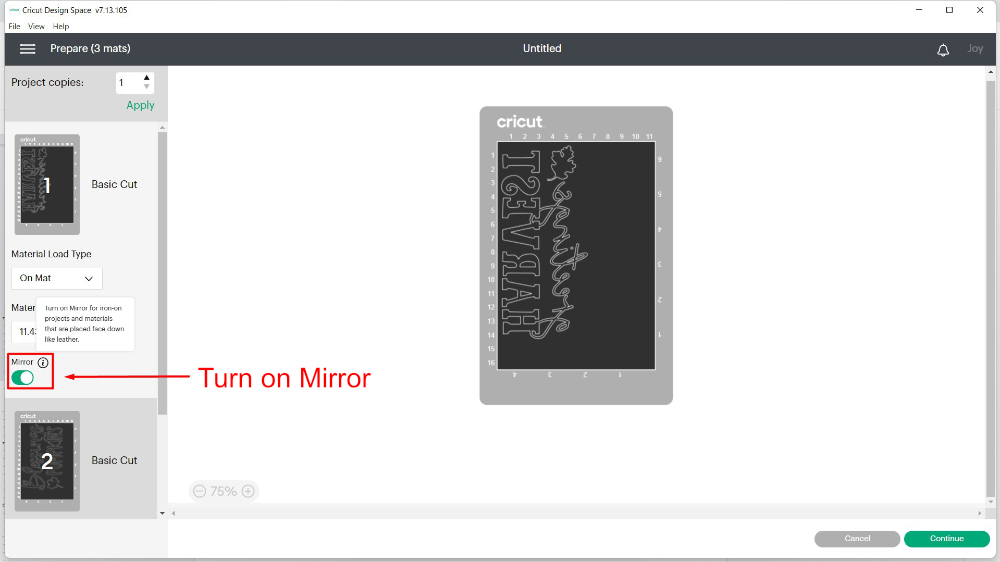
The most important setting we need to focus on is the Mirror option. When working with HTV, the design needs to be reversed. Under each section click on the Mirror option to flip the design.

Turn on Mirror for HTV in Design Space

When cutting HTV, the carrier (shiny side) is placed face down on the cutting mat. After cutting, the carrier side is placed facing up on the shirt. Don’t worry, I’ll show you exactly what I mean in a little bit.

Select the first mat on the left side then click on Continue bottom right.

Select design to cut in Design Space

3. Cut The HTV Design With Your Cricut

In the next window you will be asked to choose your material. I already have the Cricut Glitter Iron On option set as my favorite. So I only have to click that. To change your material, click on Browse All Materials and follow the prompts from there.

Set base material for Cricut Joy

After selecting your material, you can still change Pressure. I left this as Default. Design Space will remind you to mirror your HTV and to place it shiny side down. That little reminder has saved me tons of frustration!

Next, follow the directions and load the material onto your mat. Let’s take a look at the image below. The carrier side, where you can see the HTV color, has been placed face down. The side that will be cut is now facing up.

Load mat into Cricut machine

Make sure the cutting tool is locked in, then load your mat into the cutting machine. The Cricut Joy will detect if you have enough material. I find this a huge plus since I tend to get excited about a project and forget to measure properly!

When the machine is ready, you will see the third option become available. You can now click Go bottom right to start cutting. When done, click Unload. Quick as that, your design has been cut.

4. Weed Then Heat Press The HTV Design

Using your weeding tool, remove all of the unnecessary pieces and don’t forget the smaller parts. I know from experience, you don’t want to miss those smaller pieces!

Remove excess HTV from design

In the image below, you can see the weeded designs so far. The top design is the cut area and the bottom shows the carrier side facing up. The carrier side will be placed facing up on the shirt.

Front and back of HTV design

Use a lint roller on your shirt to remove any bits of fluff. Set the heat, pressure and time on your heat press according to the HTV requirements. Place the shirt on your heat press and press for about 2 seconds. This will remove any excess moisture and wrinkles.

To measure out the placement, I have some quick and easy tips for you.

Tip 1 - For spacing from the collar, measure out with about 3 fingers side by side

Tip 2 - Creating a “seam” down the middle helps to center your design. Do this by folding the shirt in half and pressing for a few seconds.

Tip 3 - If you don’t like the idea of a middle seam, you can use a placement ruler to line up your design to the shirt.

My HTV needed 15 seconds with a heat setting of 150° and medium pressure. Open the heat press and place your first part of the HTV carrier side up. As the second part overlaps, you will need to press the designs one at a time.

Place HTV on shirt in heat press

Lock your heat press in place and press the button to start. When done, open the heat press but be careful not to burn yourself!

Some HTV products require a cold peel. If that’s the case, allow it to cool completely before removing the carrier.

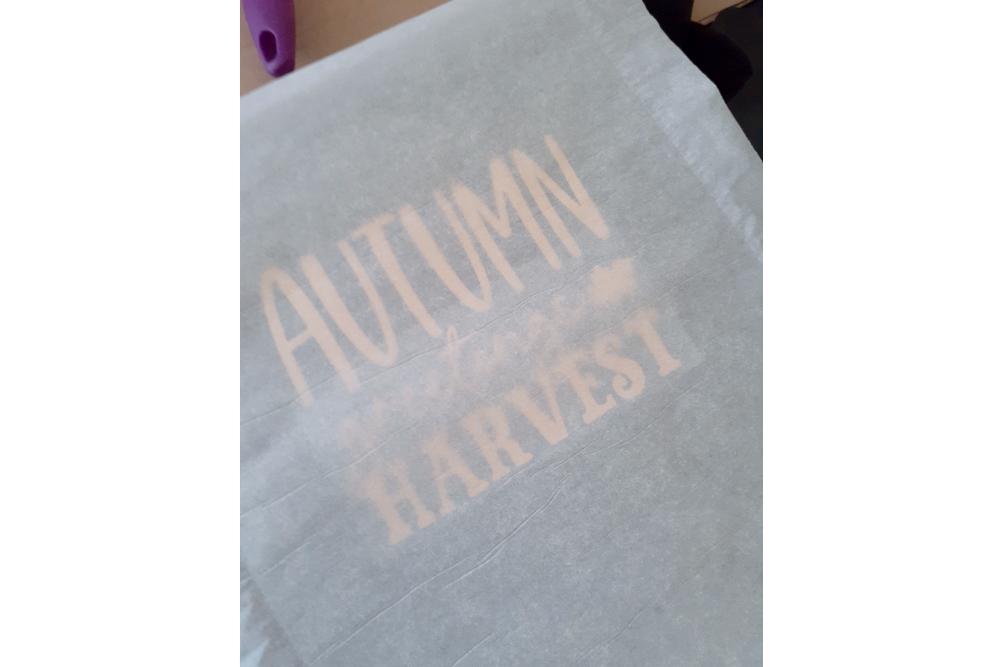
With my HTV, it required a semi-warm peel. So I allowed it to cool for a few seconds then peeled off the carrier sheet. Doesn’t it look awesome?

Peel off HTV carrier

For the next section, you will need to use parchment paper to protect the “Autumn” HTV and your heat press. Position the second section, then place parchment paper on top.

Protect HTV with parchment paper

Press again for the required amount of time. Next, peel off the carrier sheet.

Repeat this for the rest of the design. Remember to remove the carrier sheet after each press. When done, lay the parchment paper over the entire design and press one more time. This is just an extra precaution.

So how do you know that the HTV was pressed correctly? You should be able to see the imprint of the fibers through the HTV. If you have issues with the HTV not staying put, keep the following tips in mind.

Tip 1 - Check that you are using the correct heat settings according to the manufacturer.

Tip 2 - Check your pressure. With a heat press you can adjust the pressure according to your material. My HTV needed medium pressure, which meant applying some effort to lock the heat press.

Tip 3 - Check the time according to the manufacturer’s instructions.

These tips should help you if you face any issues when working with HTV.

Want to see what the finished shirt looks like?

HTV on shirt with Cricut Joy

You did it! You have just created your first HTV Fall inspired shirt. Feels amazing doesn’t it? Now that you know how, try using HTV on other items like pillow cases, make-up bags and so much more.

We've got a little secret to share. Did you know Design Bundles offer tons of FREE fonts and designs? Grab this awesome FREE Flipped My Witch Switch SVG today!

You may also be interested in ...

Make a Family Quote Canvas Frame
How-to

In 2 Steps Make A Family Quote Canvas Frame

In this blog post discover how to easily add a family quote using HTV to a canvas frame.
Make a cute Winter Snowman Pillowcase
How-to

Make A Cute Winter Snowman Pillowcase

We are going to show you how to make a snuggly worthy pillowcase with a cheerful Winter Snowman
How to Make a Snowflake Card with your Cricut Joy
How-to

How To Make a Snowflake Card With Your Cricut Joy

Quickly make a beautiful and intricate snowflake card with your Cricut Joy cutting machine
Help Center
ol image