Unlimited Downloads 15% off Marketplace Purchases Exclusive Software Access Unlimited Downloads
15% off Marketplace Purchases
Exclusive Software Access
Start your 7 Day Free Trial Start Plus Trial Maybe Later
Unique Cricut Maker Projects To Inspire Crafters and Creatives

Unique Cricut Maker Projects To Inspire Crafters and Creatives

Are you looking for some new Cricut Maker Projects to sink your teeth into? Or maybe you've just purchased a Cricut Maker, and you're a bit overwhelmed by all the amazing ideas you keep seeing all over the internet?

Unique Cricut Maker Projects To Inspire Crafters & Creatives 24

Don't worry. It's completely normal; we all get project paralysis sometimes. The easiest way to snap out of it is to pick one simple project and go for it! Even if it's something you've never tried before, there's no better time to learn. Plus, the Cricut Maker's new features make it all super easy. Woohoo! And this post will make your decision-making process even easier.

Join us as we look at some of the Cricut Maker's new cutting features and show you how to use them to make felt flowers, wooden coasters, Christmas gift tags, and provide loads more inspiration for other projects.

Cricut Projects Ideas to Test the Cricut Maker's New Features 

Did you know that the Cricut Maker has 10x the cutting force as the Cricut Explore machine? This means you can cut a whole host of new materials, which further opens the possibilities for crafting with this clever machine. So let's take a look at some fun projects you can do to really test out the Cricut Maker's new features!

How To Make Felt Flowers With the Cricut Maker

The Cricut Maker has a range of new cut settings, meaning it’s now even easier to cut fabrics such as felt. Paper flowers are a big trend at the moment, but their main drawback is that they can get damaged easily, so we decided to make them out of felt instead!

For this project, we're going to use a template made especially for making flowers from felt. However, you can use any paper flower template if you make sure that you set the material correctly for felt when it comes to cutting it - we found the 'Stiff Felt' setting works best.

Before you start, you'll want to make sure that your felt is secured well to your mat because it's using a higher cutting force, and with only one pass at the cut, you want to make sure that the blade doesn't drag the fabric.

The easiest way to make sure the fabric is secure is to use a new or clean mat, smooth the fabric down as much as possible (use a roller to really make sure it's stuck well) and then secure the edges with tape - washi tape works fine and is easier to remove from the mat afterward.

Unique Cricut Maker Projects To Inspire Crafters & Creatives 17

Step 1. Upload and Resize Your Cut File on Your Design Space Canvas

Once you are ready to cut, hit the 'Make It' button and follow the on-screen instructions.

Unique Cricut Maker Projects To Inspire Crafters & Creatives 16

Step 2. Lay Out Your Felt Pieces in Size Order

Once you've removed your cut from the mat, Lay out your felt pieces in size order; as a general rule, you work from the inside of the flower out, so we're going to take the two smallest petal shapes and put them together first.

Unique Cricut Maker Projects To Inspire Crafters & Creatives 17

Step 3. Fold and Glue Your First Petal

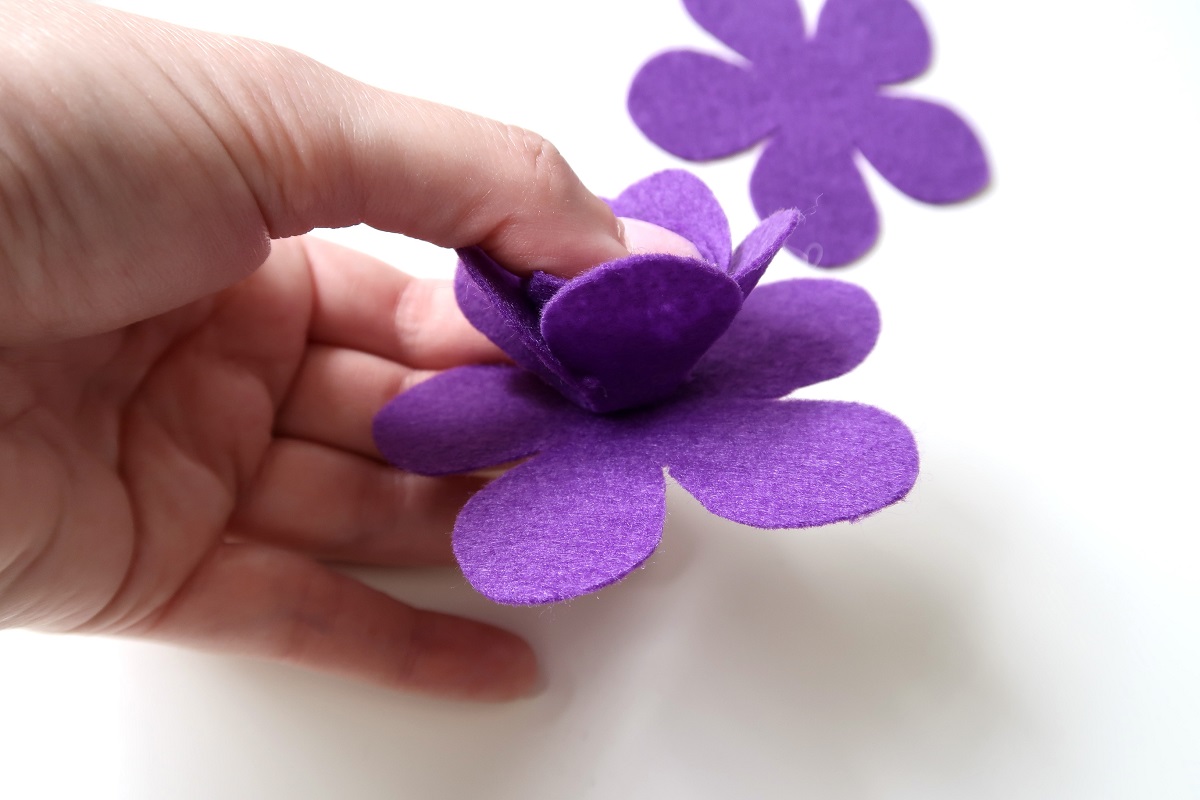
Create a fold in the base of the first petal, secure it with a dab of hot glue, and then wrap the second petal around it and secure it with more glue. The next layer is the slightly bigger petals, and we do the same with them, wrap them around and secure them with glue.

Unique Cricut Maker Projects To Inspire Crafters & Creatives 17

Once you've added your last layer, it should look like this - this little flower would look great on its own, but we're going to add even more layers to give it more volume!

Unique Cricut Maker Projects To Inspire Crafters & Creatives 17

Step 4. Add More Layers to Your Flower 

Use a dab of hot glue to secure the bottom of your flower to the center of the smallest 5 petal shape. Add a bit more glue to the base of the petals and one at a time fold them up to meet the rest of the flower. Overlap the petals slightly to give it a bit more shape. Keep going with each layer of the 5 petal shapes...

Unique Cricut Maker Projects To Inspire Crafters & Creatives 17

...and you will eventually end up with something like this! These flowers are such a fun Cricut Maker project and are perfect for adding to wreaths or making unique wedding bouquets.

Unique Cricut Maker Projects To Inspire Crafters & Creatives 17

Cutting Basswood With the Cricut Maker

Who needs a laser cutter when you have a Cricut Maker! If you always see amazing laser cutter and engraving designs that you'd love to give a go but don’t have the space for a laser cutter at the moment, why not try them out with the good old Cricut Maker.

The new articulated knife blade (thanks to the new drive housing) means it can easily cut through material such as basswood. Since basswood sheets are usually fairly flat, they stick to the mats quite well, but it's always worth giving them a good press down and securing the sides just in case.

The Basswood setting on the Cricut Maker is set to make multiple passes at the cut at varying depths, so it can take a little while to cut. We'd suggest making sure it's cutting ok on the first few passes and then going to make a drink or grab a snack.

Unique Cricut Maker Projects To Inspire Crafters & Creatives 14

Once your machine has finished cutting, it should look like this; as you can see, some parts of the cut have already popped out, and others are lifting really easily. You are best off pulling the mat away from the Basswood rather than peeling the Basswood off of the mat.

Unique Cricut Maker Projects To Inspire Crafters & Creatives 15

Once you have removed your cut design from the rest of the sheet and removed any of the little detail cutouts, you may need to give it a little bit of a rub down with some sandpaper. Even though the blade has cut all the way through the design, you can still be left with a few little rough bits. At this stage, you can either decide to leave your basswood plain or paint it to bring out the design.

Unique Cricut Maker Projects To Inspire Crafters & Creatives 16

Quick and Easy Cricut Projects With Vinyl

The great thing about using a Cricut for crafting is that it makes everything so quick; all you really need to do is find an SVG file that you love, think of something to add it to, and in no time at all, you can have a finished project. Here are some of our favorite quick and easy project ideas that you can make with your Cricut Maker today.

Celebration T-Shirts

What better way to mark a special occasion than with a custom t-shirt. A layered HTV t-shirt design is straightforward to do; the main things to remember are - mirror the image (as we've using HTV, so we're cutting on the reverse of the vinyl) and take your time with lining up the different color layers.

You know the saying 'measure twice, cut once'? Well, with HTV, it's 'line up layers twice, heat press once.' Granted, it's not as catchy, but it has the same sentiments.

Unique Cricut Maker Projects To Inspire Crafters & Creatives 17

Image credit: First Day of School SVG Bundle | Hello Back to School SVG

Personalized Keyrings

Keyrings are great little token presents or add-on items if you're making a set of matching items for someone. In addition, they are a great project to use to test out your vinyl weeding and, if you're using different colors on one design, vinyl layering skills.

Unique Cricut Maker Projects To Inspire Crafters & Creatives 18

Image credit: Keyring Monogram Bundle 4, Circular Pattern, Monogram Frame

Baby Keepsakes

This project is a great one to test out your measuring and re-sizing skills! This Birth Stats SVG can be resized to fit any space, so you can add it to any stuffed animal you like. First, you need to make sure you've selected all layers and group them together before clicking the padlock on the bottom left of your highlighted area. Once you unlock the padlock, you can pull the corner of the layers box to stretch or squash them to fit any space.

Unique Cricut Maker Projects To Inspire Crafters & Creatives 19

Image credit: Birth stats svg, welcome baby svg, birth announcement svg

Christmas Gift Ideas To Make With Cricut

Yes, we said the C-word, but when you're a crafter, is it ever really too early to be working on Christmas projects? Here's a selection of our festive favorites, from gift wrap and decor to fun Christmas gift ideas you can make with the Cricut.

Christmas Gift Tags

Does anyone else love wrapping presents? It's so fun to add your own little touches to a wrapped gift to make it look even more special. So why not use a file like these Christmas Gnome tags, cut them out on a metallic card, and then layer them with a plain card on the back to make them really stand out.

Unique Cricut Maker Projects To Inspire Crafters & Creatives 20

Image Credit: Christmas Gnome Tags Set, Gnome Gift Label Pack

Faux Leather Jewelry

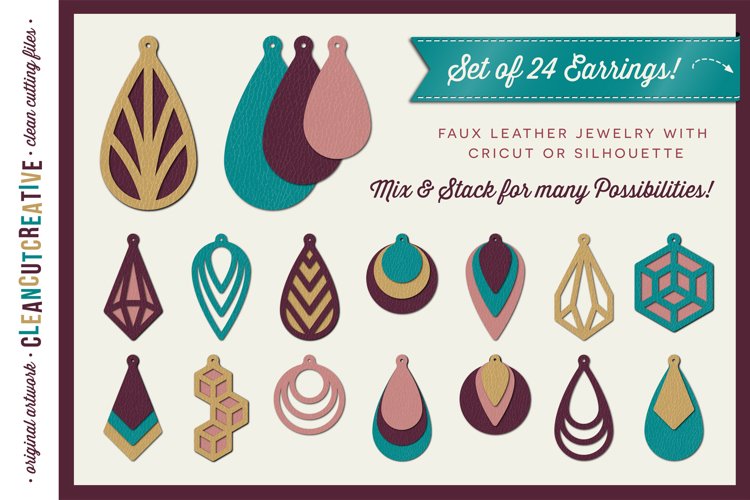
Jewelry always makes for a great gift but it's even better if you can make it yourself in the recipient's favorite colors! Try using an SVG file to create some layered faux leather earrings, its cuts the same way as any other material; you need to make sure it is securely stuck to your mat before starting the cut.

Unique Cricut Maker Projects To Inspire Crafters & Creatives 23

Image Credit: Set of 24 Faux Leather Earrings - SVG DXF EPS PNG craft file

Christmas Gnome Decorations

It doesn't matter what you call them - Tomte, Nisse, Christmas Gnomes, there is one thing that is universally true, these little guys are cute! You could use a file like this on absolutely anything - maybe you want to make some festive pj's for the family, design a special hot chocolate mug, print custom stickers to seal all of your gifts - whatever it is, as soon as you put this little guy on your design it instantly becomes 100% more festive.

Unique Cricut Maker Projects To Inspire Crafters & Creatives 22

Image credit: Plaid Gnome SVG File

You could even get extra crafty and turn him into a cut wood veneer tree decoration, let us show you how!

How To Cut Wood Veneer on the Cricut Maker

To get started, you'll need an SVG file with multiple layers; we chose this Christmas Gnome SVG from the PLUS range of files.

Step 1.Upload the File Onto Design Space

Upload the file onto Design Space and select all layers and create a duplicate; weld this duplicate together - this is creating a backboard for us to attach the other layers to.

Unique Cricut Maker Projects To Inspire Crafters & Creatives 3

Choose which color wood veneer you’re going to use for each layer and color them accordingly on Design Space - We're using the same wood for the hat and the body, so we have kept them the same color on the mat.

Step 2. Click the Make It Button and Set Your Base Material

Cricut has a pre-set option for Natural Wood Veneer, which we found to work perfectly.

Unique Cricut Maker Projects To Inspire Crafters & Creatives 4

Step 3. Attach Your Veneer to Your Mat

Attach your veneer to your mat, making sure that it is completely flat - it can help to use a roller to smooth it out and then securing the edges with tape.

Unique Cricut Maker Projects To Inspire Crafters & Creatives 16

Load the mat into your Cricut and let it get to work; the Natural Wood Veneer cut setting will make 4 passes at the cut at varying depths, so it takes a little longer to run.

Step 4.Once Your Wooded Veneer Is Cut Carefully Remove It From the Mat

Once your wooded veneer is cut, carefully remove it from the mat. It can be helpful to use something flat like a ruler to help lift it off.

Unique Cricut Maker Projects To Inspire Crafters & Creatives 15

Once all your pieces are cut, you can set to work putting them all together, it's a bit like a jigsaw puzzle!

Step 5. Apply Glue to Your First Cut Piece 

Apply glue to your first cut piece (we start with the biggest piece as the edges are easier to line up and then the rest will slot into place around that) and position it on the backboard.

Unique Cricut Maker Projects To Inspire Crafters & Creatives 15

This next step is important because we are using a very thin wood veneer. It tends to lift or bend when introduced to moisture, so to stop that from happening, we need to secure it in place whilst it dries.

Step 6. Secure the Wood in Place as the Glue Dries

We like to use plastic sewing clips as they are nice and small and won't mark the veneer; you could also try putting it under a heavy book to keep the layers flat as they dry.

Unique Cricut Maker Projects To Inspire Crafters & Creatives 15

Once all your pieces are attached and dry, you should end up with something like this!

Unique Cricut Maker Projects To Inspire Crafters & Creatives 22

These little gnomes are perfect for turning into tree decorations or gift tags (make a tiny hole in the top of the hat and loop through some ribbon or string) or could even be used as card toppers for extra special Christmas cards.

Happy Crafting!

What was the first project you tried with your Cricut Maker? Have you played around with the new material options yet? Hopefully, this has given you some inspiration for new projects to try. If you make your own version of these crafts, be sure to share images to social media and tag us or post them in our Facebook Group, The Design Bundles Customer Community.

You may also be interested in ...

3 Eye Catching Fall Decor DIY Tutorials for Your Home
Creativity

3 Eye Catching Fall Decor DIY Tutorials for Your Home

We share 3 Fall themed decor tutorials that you can use to dress your home for Halloween and Autumn.
Seller Spotlight: Bella B Studio
Creativity

Seller Spotlight: Bella B Studio

Join us for another exciting installment in our Seller Spotlight...
3 of the Top Christmas Craft Ideas for Your Cricut
Creativity

3 of the Top Christmas Craft Ideas for Your Cricut

We look at the best Christmas craft ideas for your Cricut and share 3 mini-tutorials
Help Center
ol image