- By Design Bundles
- 14 Mins
- Procreate Tutorials
How to Create a Shadow Brush in Procreate
Please note: we have the latest version of Procreate 5X. If you do not see the features mentioned below, ensure your Procreate is up-to-date.
Make a Brush Shape
The most important step when making any kind of brush, especially a shadow brush is the shape. We are going to create a shape that will be our main stroke shape and use it to create a shadow effect on our brush strokes.
A quick reference to our in-depth guide on creating Procreate brushes. Make sure your canvas is squared then you can move on to the below steps.
Step 1 - Draw your brush shape
Start by drawing the main stroke shape like an oval or circle using one of Procreate’s standard brushes (I used the Monoline brush). Draw your shape big, almost the full size of the canvas. Fill your shape so it’s a solid shape and not just the outline.
Draw and fill your shape in black only, here is the color code if you need it (#000000).
Step 2 - Resize and position
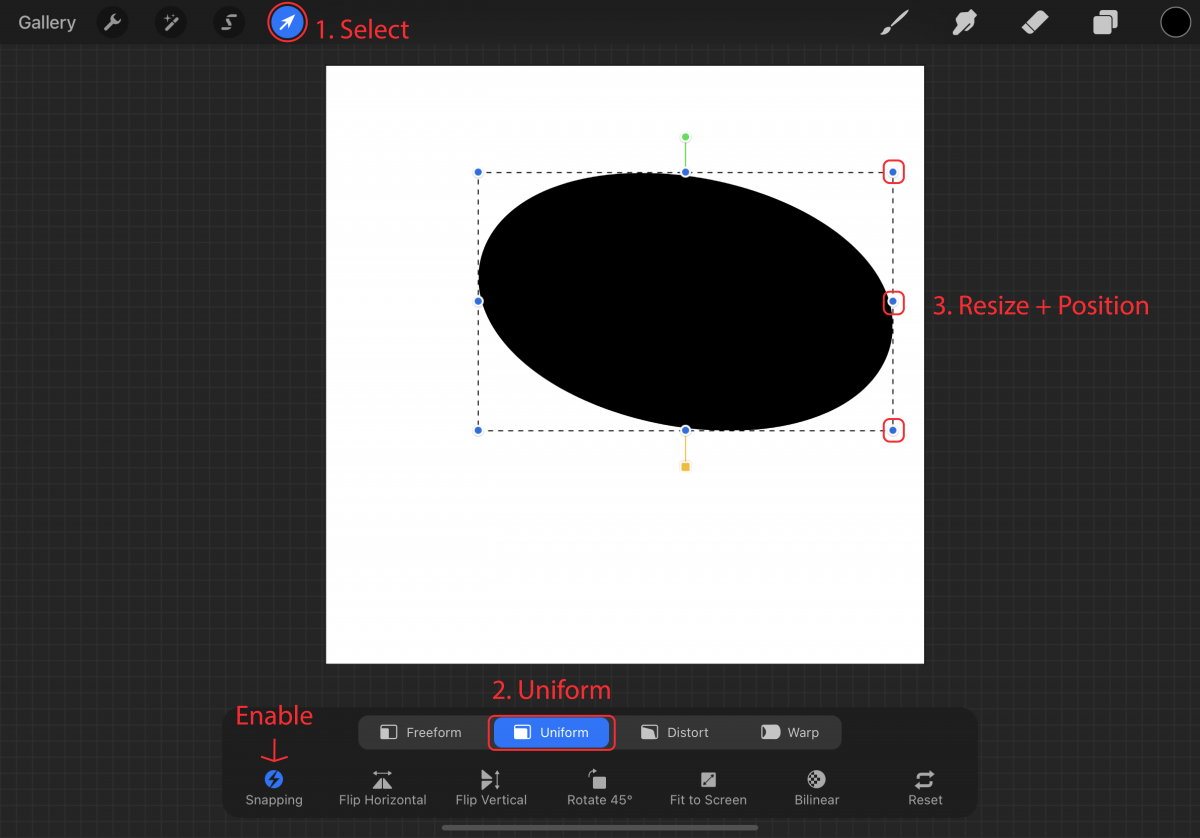
Once you have drawn your shape, tap on the “Transformation” tool (mouse pointer icon). Ensure you have “Uniform” selected and “Snapping” enabled. Resize your shape to be smaller about 3/4 size of your canvas to leave enough space for the shadow. I moved my main stroke shape to the right of my canvas, as I want my shadow to fall on the left.
Tap on the “transformation” tool again once you are done repositioning it.
Step 3 - Duplicate
We will now duplicate our main stroke shape and make it our shadow shape. We have a tutorial on how to duplicate in Procreate if you need help.
Step 4 - Recolor
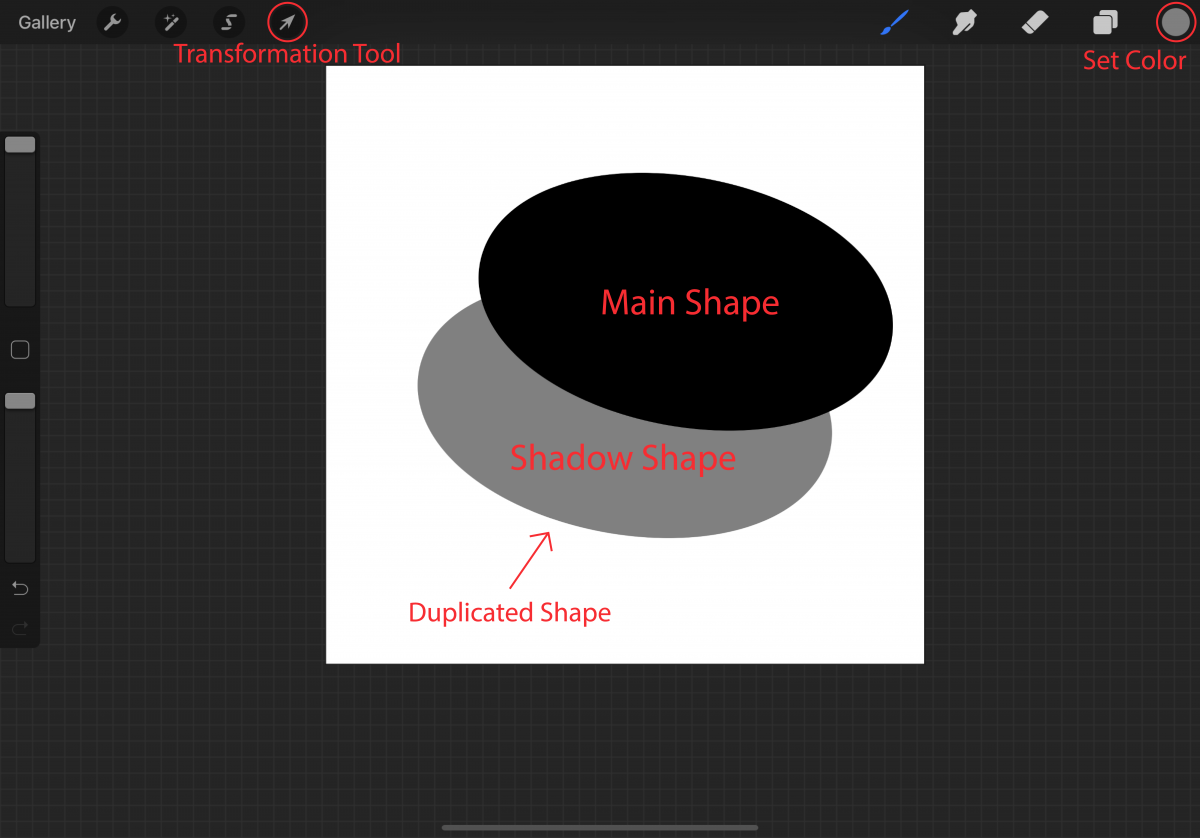
Recolor the duplicated shape grey (#808080), you can simply drag and drop the color on the shape to recolor it.
Step 5 - Position Shadow
In the Layers panel, we are going to move our shadow shape (grey) below our main shape (black). To move the layer, press, and hold until the layer has lifted, then simply drag it down and drop. Using the “Transformation” tool, position your shadow shape below and to the left of your main stroke shape. Tap on the “transformation” tool again once you are done repositioning it.
Step 6 - Resize Shadow brush
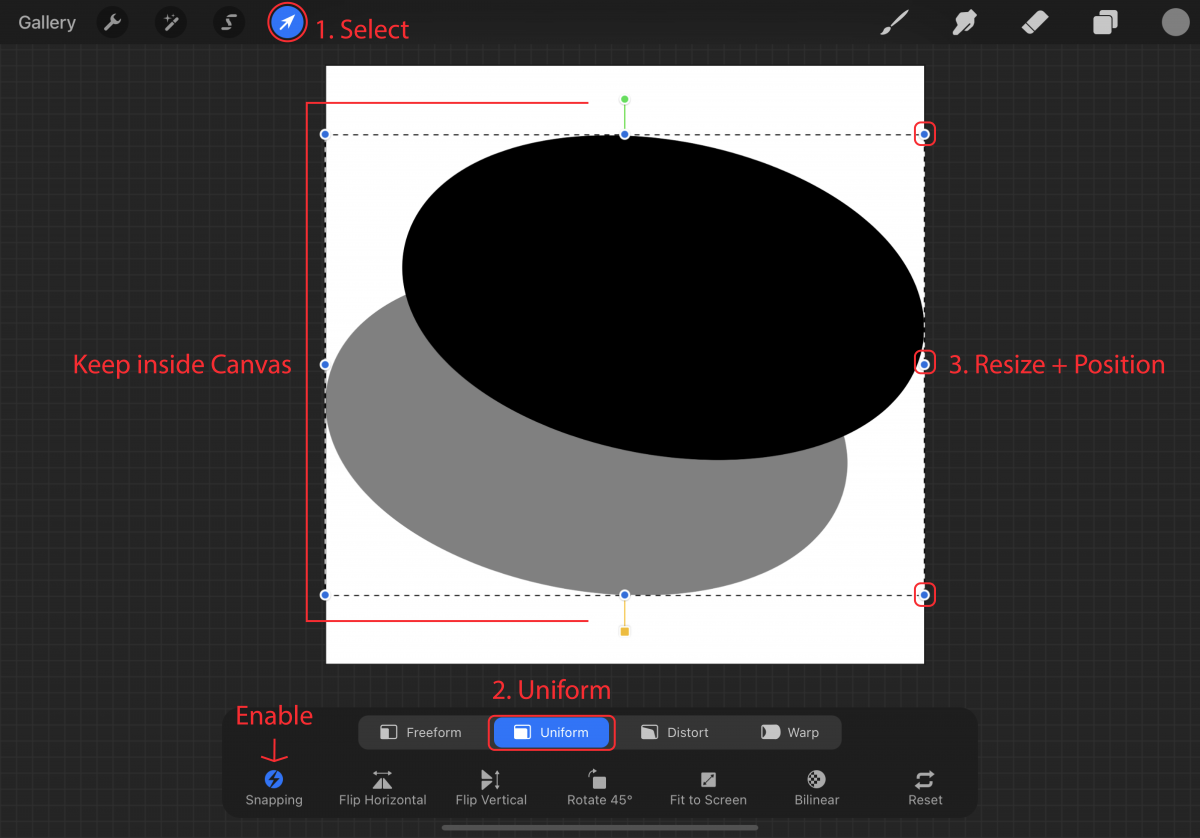
We will now resize our shapes as one to fill the canvas and sit in the center. Go to your “Layers” panel (Stacked square icon) and select both layers by tapping on the top layer and swiping right on the second layer. When both are selected they will have a blue highlight around them (See image).
With both shapes selected tap on the “Transformation” tool and resize the shapes as big as possible without going over the canvas edge. Move and ensure the shapes are perfectly centered vertically and horizontally.
Tap on the “transformation” tool again once you are done repositioning it.
Step 7 - Export Shadow Brush
Heading to the “Actions” panel (Wrench icon), tap on “Share” and Export your brush shape as a JPEG image. Select “Save image” in the prompt.
Making the shadow brush
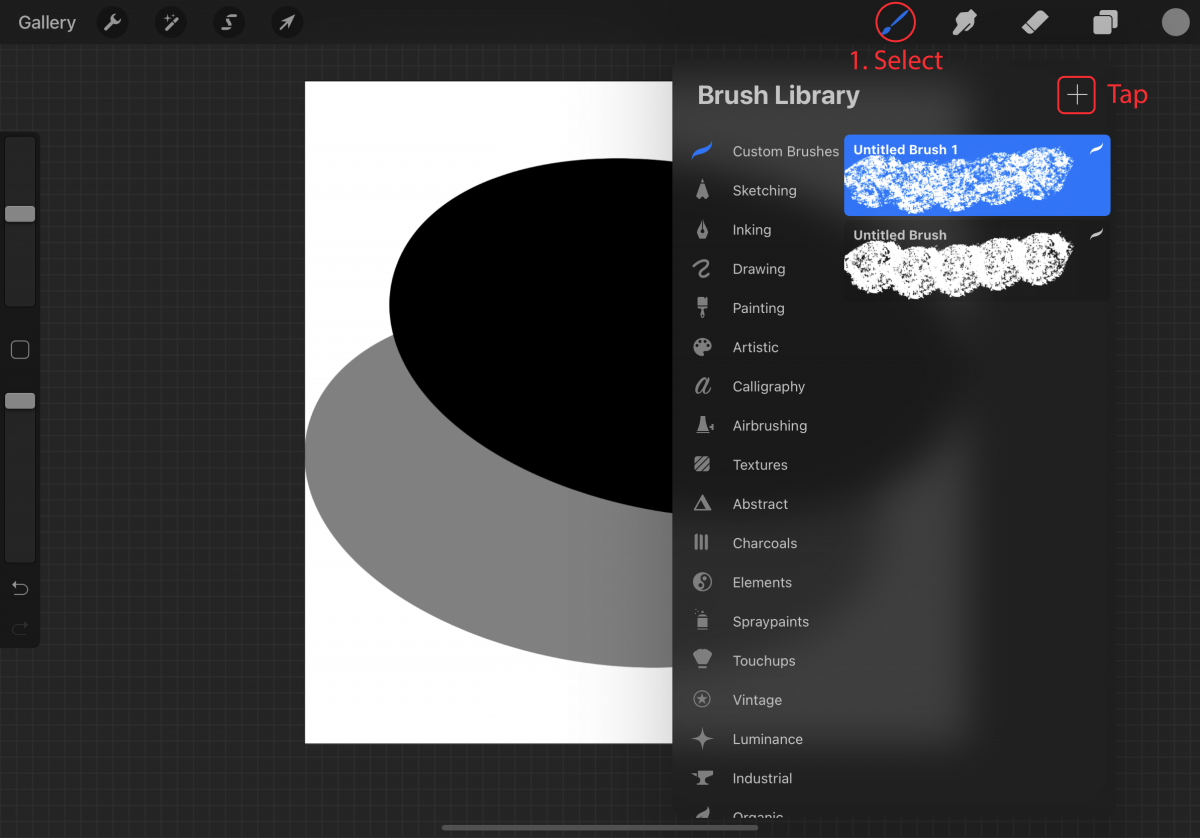
We are going to make our custom brush and import the shape that we just made. Go to the Brush Library (brush icon) on the right side of your toolbar, and tap on the plus (+) symbol located inline with the “Brush Library” text on the right.
After pressing on the plus (+) symbol the Brush Studio will display. This is where we will add our settings to make our shadow brush.
Step 1 - Add shadow brush shape
In the Brush Studio go to “Shape” The first setting we will change in the Brush Studio is the shape of our brush. Tap on the “Shape” option in the left options panel. Tap on the “Edit” button next to the Shape Source wording (Landscape view) if your iPad is in portrait display simply tap on the Circle in the grey bar.
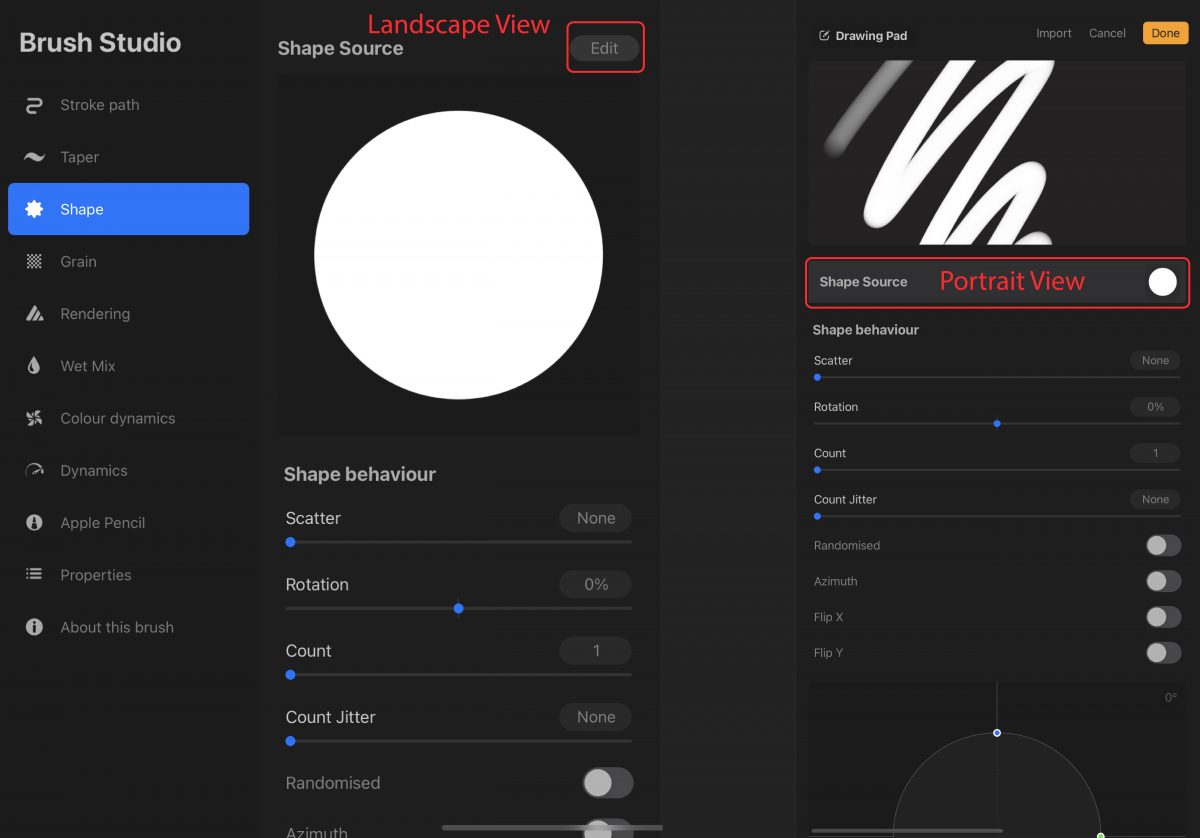
Step 2 - Import the shape
Tap on “Import”, on the Right if in landscape view, on the left if in portrait view. Select “Import a photo” from the image source options list. Locate and select your brush shape.
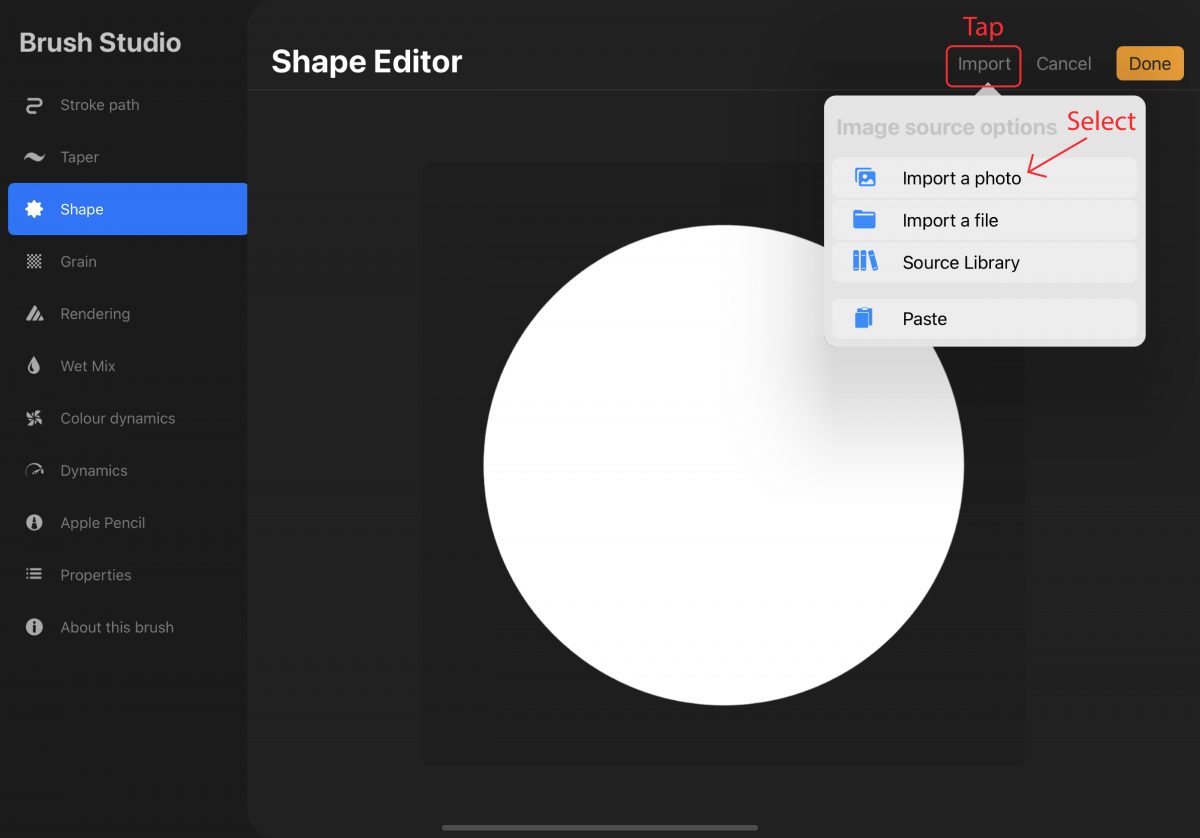
Step 3 - Invert your image
This step is very important so don’t skip it! Let me give you a quick explanation of why we need to invert our image and how Procreate responds. As mentioned earlier in this tutorial Procreate looks at Black, White, and Grey colors only when making a custom brush. White is where the color will be added and black is the blank space. If we don’t invert our image “making the shape white” our brush will be squared with our shape being empty.
To invert your image simply tap on it with 2 fingers and tap on “Done” to apply the new brush shape imported.
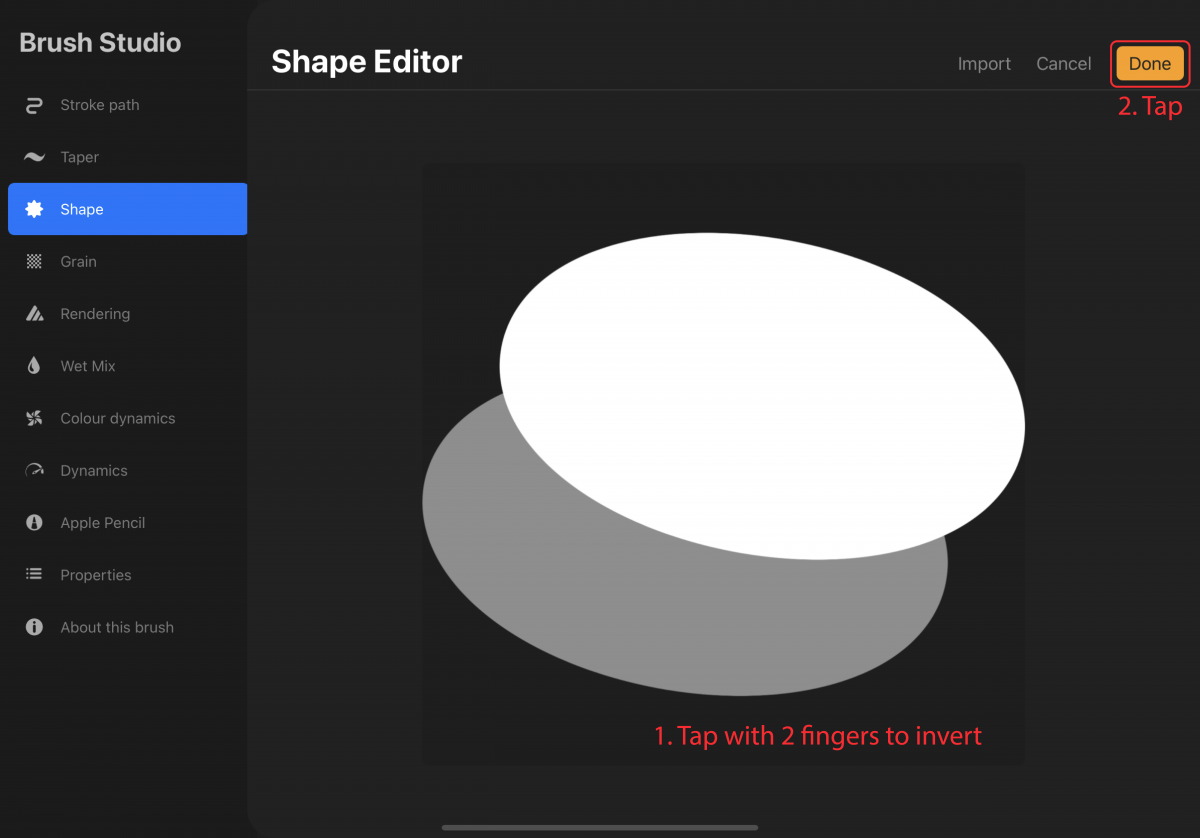
Step 4 - Rendering
At this point, your shadow brush won’t look like a shadow brush. To have the shadow brush display correctly, go to “Rendering” and under the “Rendering mode” change it to “Light Glaze". Another setting to look at is “Flow” under blending, set this to “max” if it isn’t already.
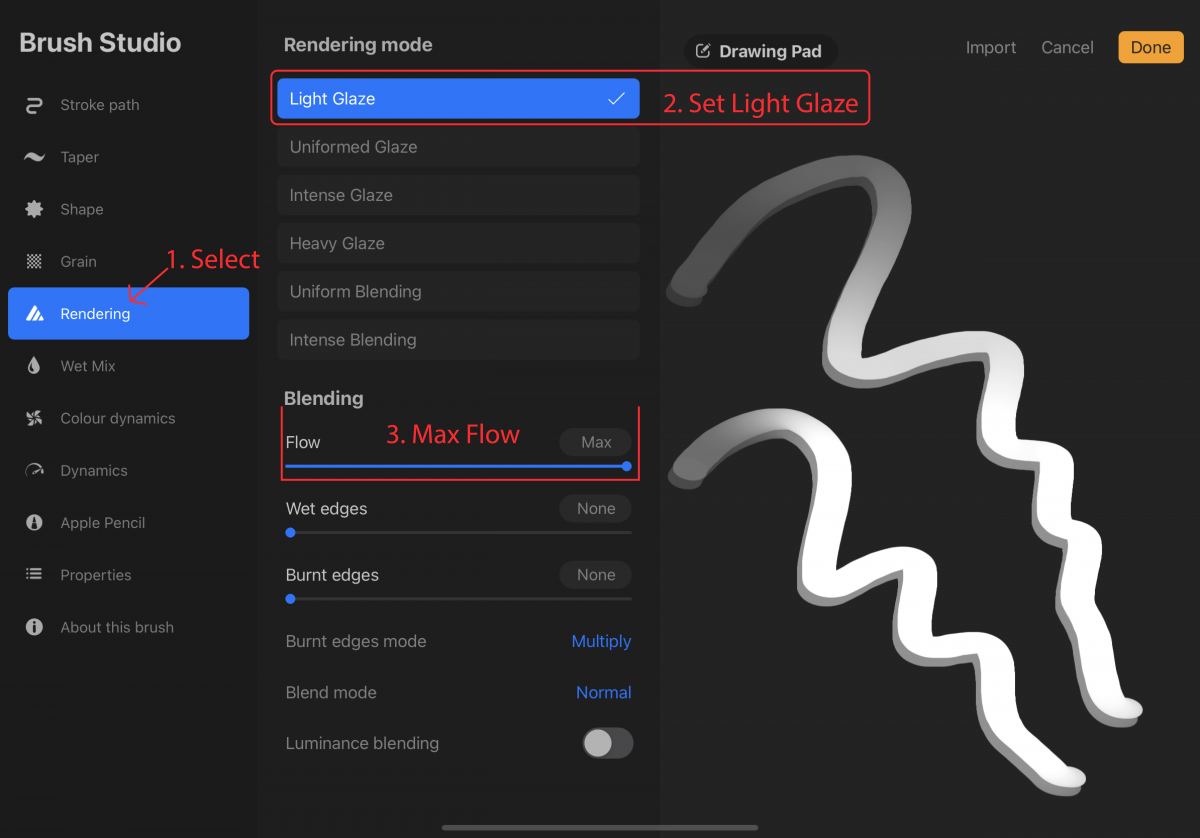
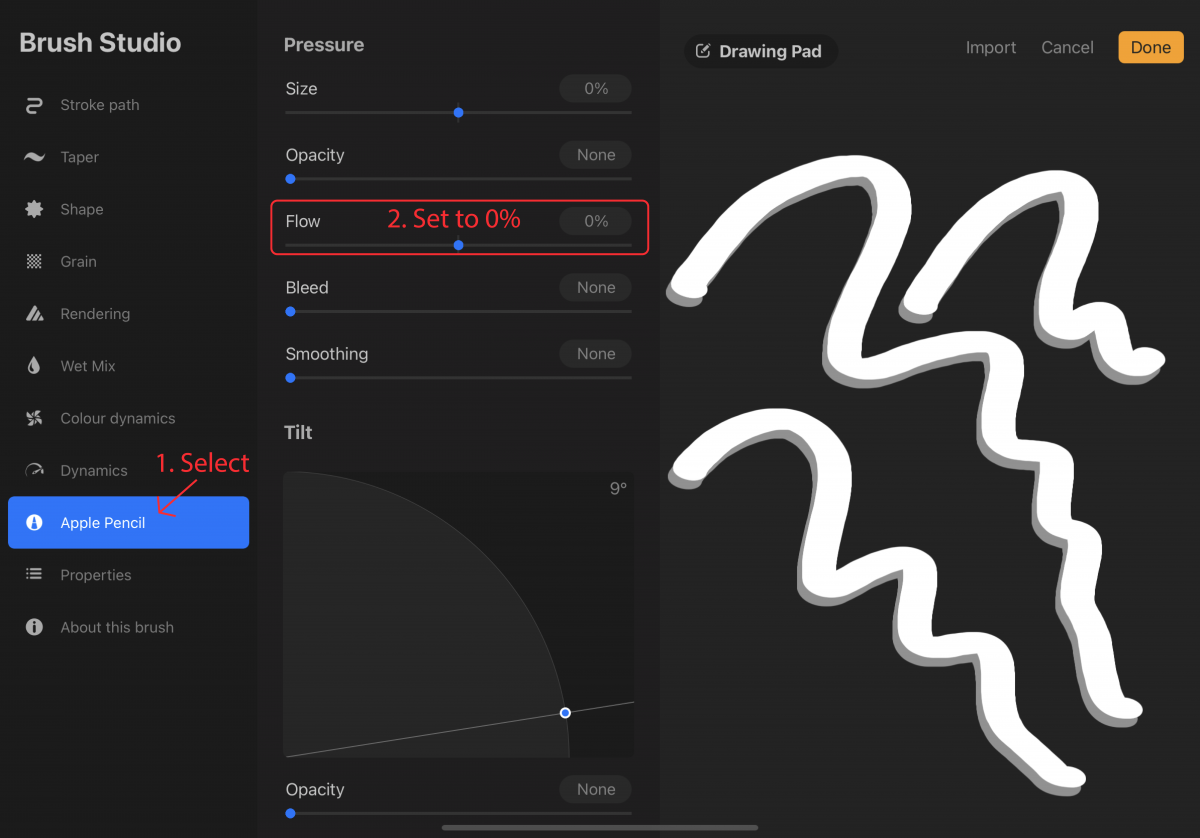
Step 5 - Flow
This step is optional if you want to have your stroke opacity the same regardless of pressure. In the “Apple Pencil” section, under “Pressure” set the “Flow” to 0%. This will remove transparency based on the pressure of your stroke.
Step 6 - Spacing
The last setting I’m going to change is in “Stroke path”. I want my shadow brush to be a continuous stroke with no spacing in the stroke. I’ve set my “Spacing” slider to “None”. I also changed my “StreamLine” slider to “Max”, this is what I preferred.
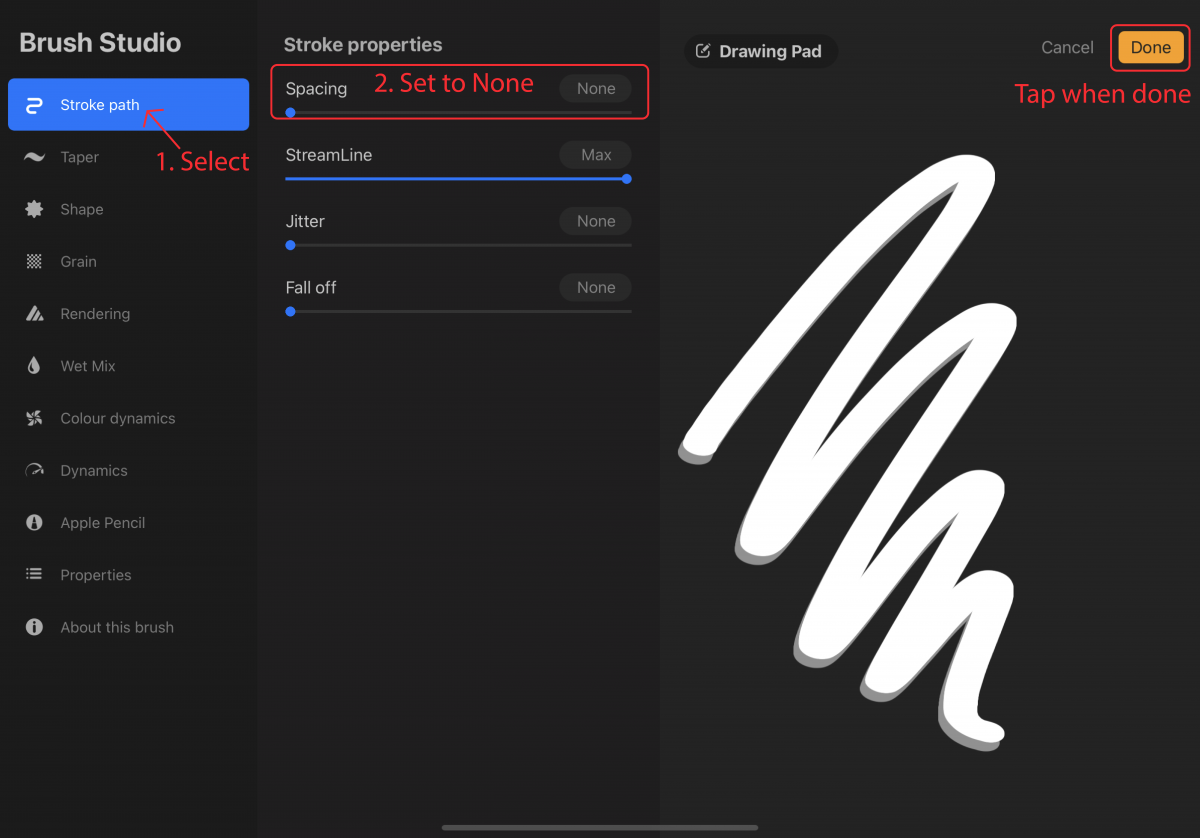
Go ahead and make additional changes if you want to and set a name for your brush. Once you are done making edits, tap on “Done”.
Testing the Brush
Now is the fun part of making a custom brush, testing it out. I started by making a background using 3 colors. As you can see my shadow of the brush is 50% opacity, giving me a cool effect on my waves and making my colors blend nicely.
Next, I tested my brush with text, and as we can see the shadow brush does a great job of adding a drop shadow in my Design Bundles text.
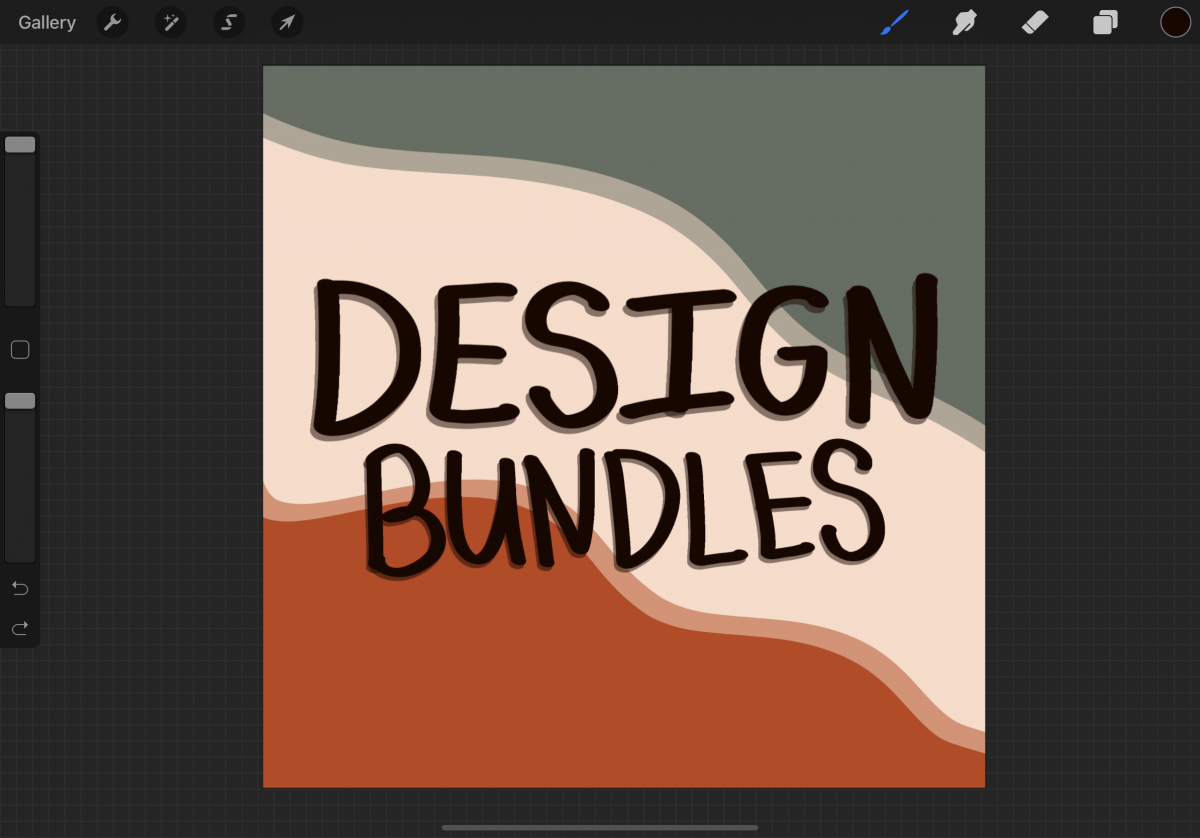
And that’s it! Your custom shadow brush is made and as you saw there is more than just one way you can use this brush. Use it to give your lettering a quick and simple shadow or make backgrounds or use it as a fun way to blend colors.
6 Related Procreate Tutorials
Procreate stamp brushes are a great tool to have. They can be used to add creative elements like leaves or base models for drawing. The stamp brushes can be customized and new brushes created with ease. In this tutorial we are going to create a stamp brush in Procreate. If ...
You can make your custom Procreate brushes that add unique textures and strokes to your artwork. And the best part of making your brushes is it’s so much fun and enables you to take real-world textures and shapes and make them digital. In this tutorial, we’re going to ...
Procreate textures unlock endless possibilities when creating artwork. Not only can a texture brush be used for adding texture, but is a great time saver and can add unique patterns and backgrounds. In this tutorial, we are going to create a textured brush for Procreate. If you are short on ...
1- Open Cricut Design Space. Select the text tool.2- Type your text. Select your font. I will be using the Dallon font from fontbundles.net.3- Click on your text and then adjust the letter spacing.4- Adjust the letter spacing so all the letters touch a tiny bit.5...
In this tutorial, we are going to install brushes in Procreate. We will be using the Procreate Marker Brush and Procreate Lettering Brushes.Note: In order to use Procreate Brushes, you’ll need the Procreate App installed on your iPad or iPhone. Procreate is an iOS only app so the ...
Do you want a multicolored rainbow brush that you can make from your favorite standard Procreate Brush? In this tutorial, I’ll take you through the steps on how you can turn any brush into a fun rainbow brush. We are using the Blackburn brush that comes standard with Procreate ...

 All your Font Needs


