
Tinsel Text Effect in Photoshop
Discover how to create a tinsel text effect in Photoshop layer by layer.
Do you need a fun text effect for a party design or party photo? This tutorial will teach you how to create a festive tinsel text effect in Photoshop. The results will be blue, but you can simply use other colors to make the tinsel text effect fit any occasion.

Whether the font is a sans serif or a script font, simple fonts tend to work better for this text effect. We chose to use the Regular font style from the Holidays Font Duo, but the Swirls font style would also work.
Step 1 - Add Text
Click the Type Tool (T) and select your font. The font size will depend on the word(s) and your font, so you can adjust it accordingly. Then click on the canvas and enter your text. Our font size is 180.59 pt.

Increase Tracking
If the Character panel is not already open, go to Window > Character. Then select the text with the Type Tool (T).
In the Character panel, increase the Tracking to move the letters apart. You don’t want the letters too close together, or the tinsel effect on each letter will run into each other. We set the tracking to 100 for our letters.

Step 2 - Create the Tinsel Base Brush
Next, we will modify the Dune Grass brush to create the brush that we will use to make the base of the tinsel text effect.
Restore Legacy Brushes Brush Set if Needed
If the Brushes panel is not open, go to Window > Brushes. If you have never restored the Legacy Brushes Brush Set before, click the (hamburger) menu icon in the top right corner of the Brushes panel and select Legacy Brushes.

When prompted, click OK.

Search for and Select Dune Grass Brush
In the search bar of the Brushes panel, enter “Dune Grass” and click on the Dune Grass brush.

Modify Dune Grass Brush Presets
Open the Brush Settings panel. Depending on the size of your letters, you may need to adjust the settings we provide in this tutorial.
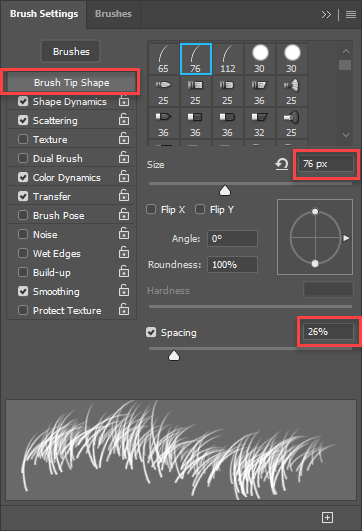
Brush Tip Shape
In the Brush Tip Shape tab, enter 76 px for Size, 26% for Spacing, and leave the rest of the settings.
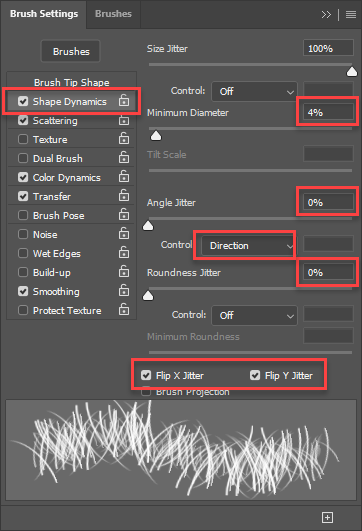
Shape Dynamics
In the Shape Dynamics tab, modify the following settings:
- Minimum Diameter: 4%
- Angle Jitter: 0%
- Control: Direction
- Roundness Jitter: 0%
- Flip X Jitter: Checked
- Flip Y Jitter: Checked
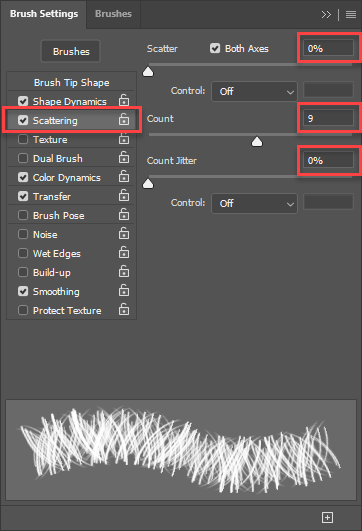
Scattering
In the Scattering tab, modify the following settings:
- Scatter: 0%
- Count: 9
- Count Jitter: 0%
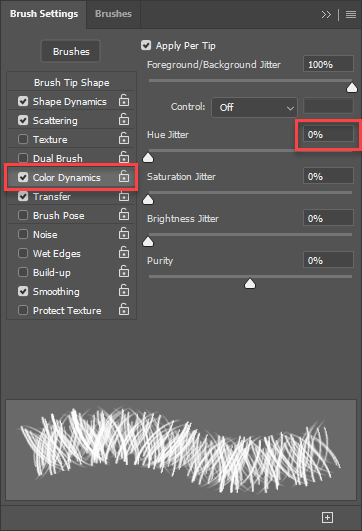
Color Dynamics
In the Color Dynamics tab, lower Hue Jitter to 0% and leave the rest of the settings.
Save New Tinsel Base Brush
Make sure you save this brush so you can reuse it in the future. Click on the menu icon on the top-right side of the Brush Settings panel and click on New Brush Preset.

Enter a name for the brush in the New Brush dialog, such as Tinsel Base, and click OK. Whenever you want to use this brush, you can simply search for it in the Brush panel.

Step 3 - Create a Work Path
Right-click on the text layer and choose Create Work Path.

Once the Work Path has been created, there will be a path with anchor points going around the edges of the letters, as seen in the following image.

Step 4 - Create a New Layer and Rename It
With the Work Path still active, click the Create New Layer button at the bottom of the Layers panel. Next, double-click on the new layer’s name and change it to “Tinsel Base.” Then hide the text layer by clicking on the eye icon to the left of its layer thumbnail.

You should now only see the Work Path, like in the following image.

Step 5 - Add Stroke Path
We will pick a Foreground and Background color to use with the brush we just created. Because we want our tinsel text effect to be blue, our Foreground and Background colors will be shades of blue. We will use #1614fd (blue) for the Foreground color and #000074 (dark blue) for the Background color.

Select the Tinsel Base layer and either the Direct Select Tool (A) or Path Select Tool (A). Then right-click on top of the Work Path and choose Stroke Path.

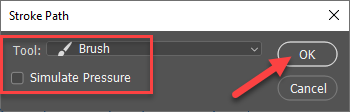
In the Stroke Path dialog, select Brush for the Tool option, make sure the Simulate Pressure box is unchecked and click OK.
The Work Path will now have the brush applied to it. As mentioned before, you may need to adjust the brush presets in the Brush Settings panel to better match your letter size.

Step 6 - Fill in the Letters
Use the Zoom Tool (Z) and zoom in on the letters.

Select the Brush Tool (B) and with the brush we created, fill in the center areas of the letters manually. It’s ok to leave some areas slightly bare.
It doesn’t have to be perfect, but pay attention to the direction you’re drawing the brushstrokes. For instance, don't draw horizontally on vertical parts of the letters as the tinsel would be going in the wrong direction.

Step 7 - Add Layer Styles
Once you have finished filling in the letters, double-click on the Tinsel Baselayer thumbnail and apply the following Layer Styles.
Inner Glow
In the Inner Glow tab, click the Reset to Default button at the bottom and change the following settings:
- Blend Mode: Linear Light
- Opacity: 69%
- Color: (#050fa6)
For the Color option, you want to pick a color that’s in between the Foreground and Background colors used earlier in terms of color value. This Layer Style will help to make the ends of the tinsel look like they’re slightly glowing, so don’t pick a color that’s too dark.

Drop Shadow
In the Drop Shadow tab, click the Reset to Default button and change the following settings:
- Opacity: 20%
- Angle: 113
- Distance: 12px
- Size: 2px

Step 8 - Create the Tinsel Top Brush From the Tinsel Base Brush
We will modify the brush we created earlier to make a second tinsel brush. Open the Brush Settings panel again.
Brush Tip Shape
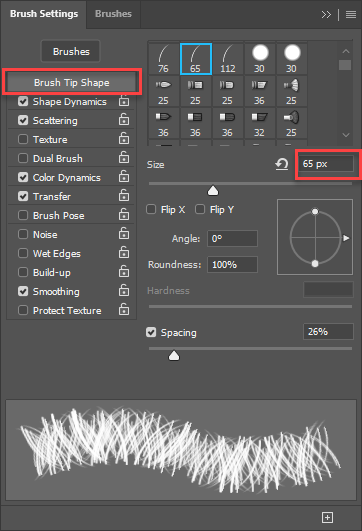
In the Brush Tip Shape tab, change the size to 65 px.
Scattering
In the Scattering tab, change Scatter to 93%.

Color Dynamics
In the Color Dynamics tab, set Brightness Jitter to 100%.

Save Modified Brush
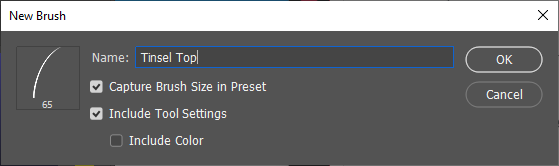
You can also save this brush preset for future use and name it Tinsel Top.
Step 9 - Repeat Steps 4 to 6 With a Couple Changes
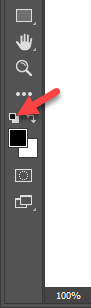
Repeat Step 4, but name the new layer Tinsel Middle. Then repeat Step 5, but when picking Foreground and Background colors, simply click the Default Colors icon to reset the Foreground and Background colors back to black and white.
Lastly, repeat Step 6. Your tinsel text effect should look similar to our image below.

Step 10 - Change Blending Mode of Tinsel Middle Layer
In the Layers panel, select Tinsel Middle layer and change its Blending Mode to Vivid Light.

Step 11 - Duplicate Tinsel Middle Layer
Click + drag Tinsel Middle layer down to the Create New Layer button at the bottom of the Layers panel to duplicate the layer.

Then rename it to Tinsel Top. Select the duplicate layer on top and change its Blending Mode to Linear Light.

Step 12 - Hide or Delete Work Path
Before we edit the tinsel edges, you can now hide or delete the Work Path. Delete the Work Path by going to the Paths panel, clicking the Delete Current Path icon, and then clicking Yes in the dialog that pops up.

Step 13 - Edit Tinsel Edges
Select the Eraser Tool (E) and erase pieces around the edges that are too long, look out of place, or look too much like grass. Starting with the Tinsel Top layer, repeat this step for each layer.

Your tinsel text effect is complete! Again, the tinsel text effect can be created in any color!

Now you can save your tinsel text as a transparent PNG to use with any design. This party scene creator is perfect for making a background that you can add to your tinsel text to make an image like the first one in this tutorial.
For other cool text effects, look at our tutorial on making a water text effect and sparkler text effect in Photoshop.


