
How to Add Lightning to a Photo in Photoshop
Adding weather elements to photos is a fun way to change the mood. In this tutorial, we will show you how to add lightning to a photo in Photoshop. You will be creating realistic lightning bolts from scratch to add to your images.
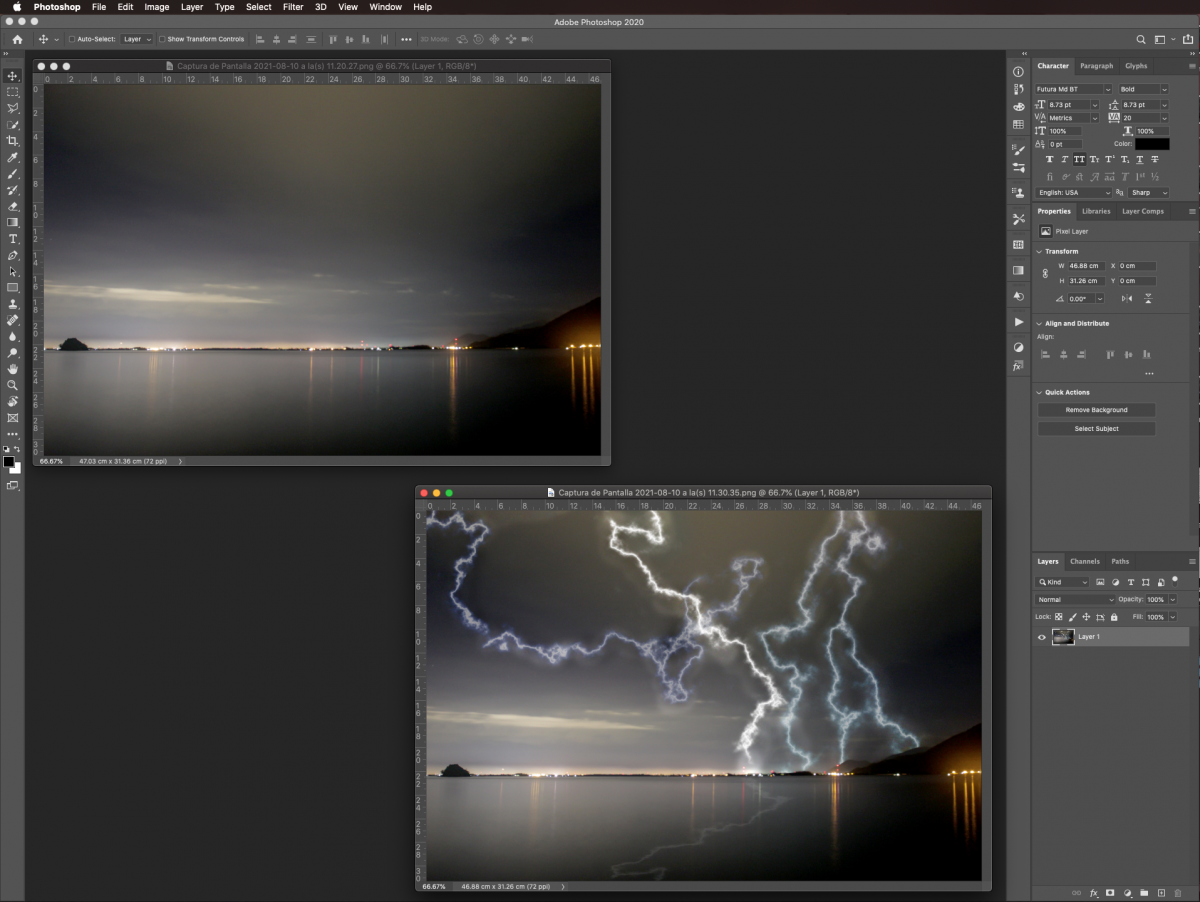
We will use a night sky photo to apply the effect to, but there are tons of other great nature photos available on Design Bundles to check out.
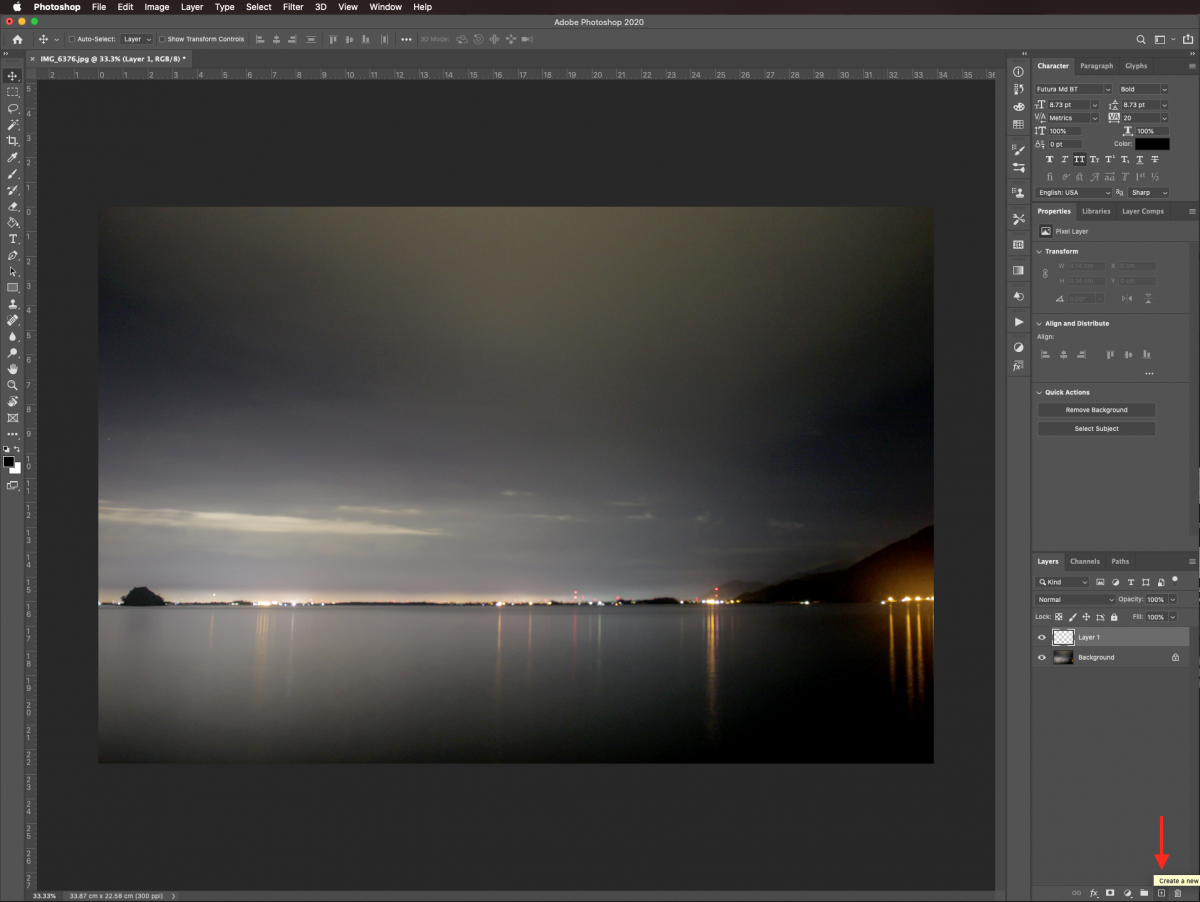
We will begin by adding a new layer and a gradient fill. In Photoshop, open the image you want to edit. Create a new layer by clicking on the small button at the bottom of the Layers panel.
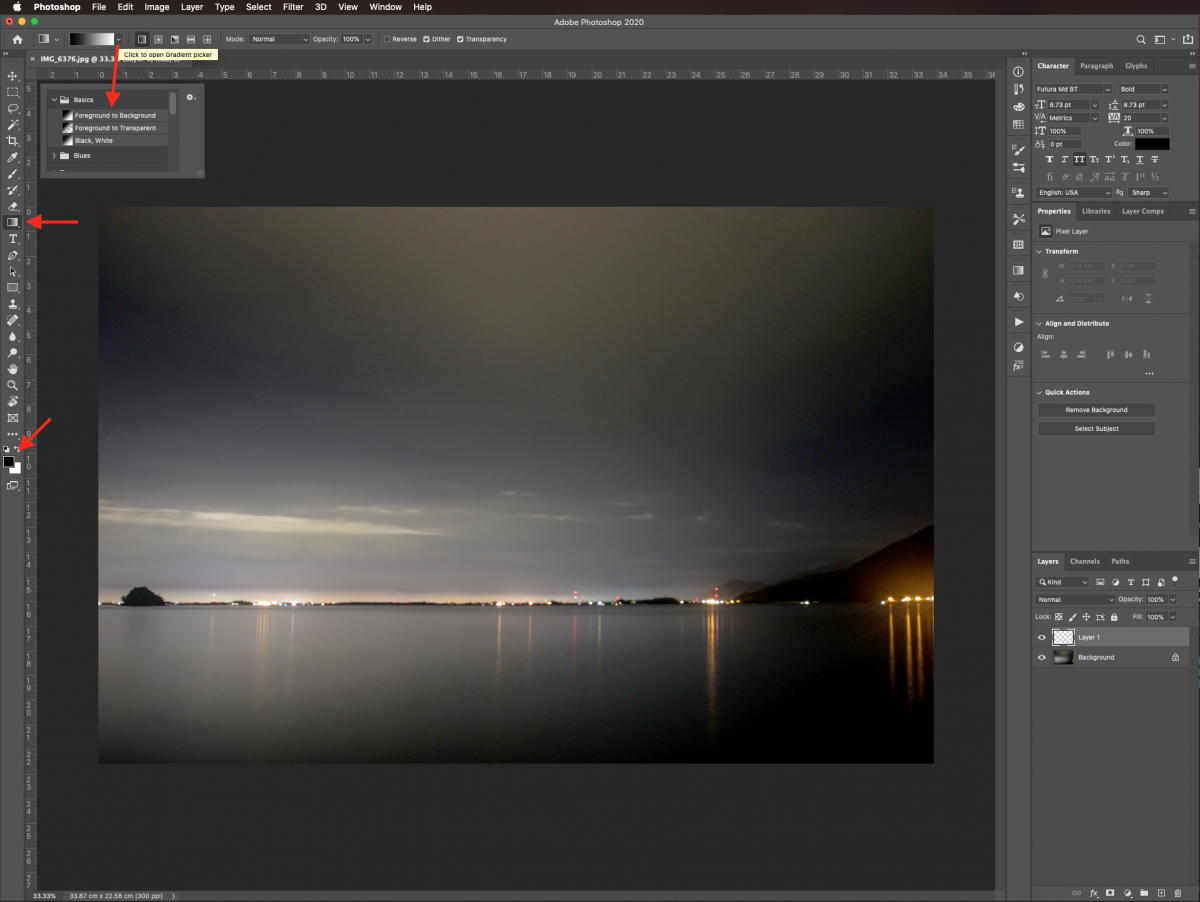
To create the lightning bolts, we are going to modify a gradient by applying some filters. Use the Gradient tool (G) on the new layer to create a Foreground to Background (black to white) gradient.
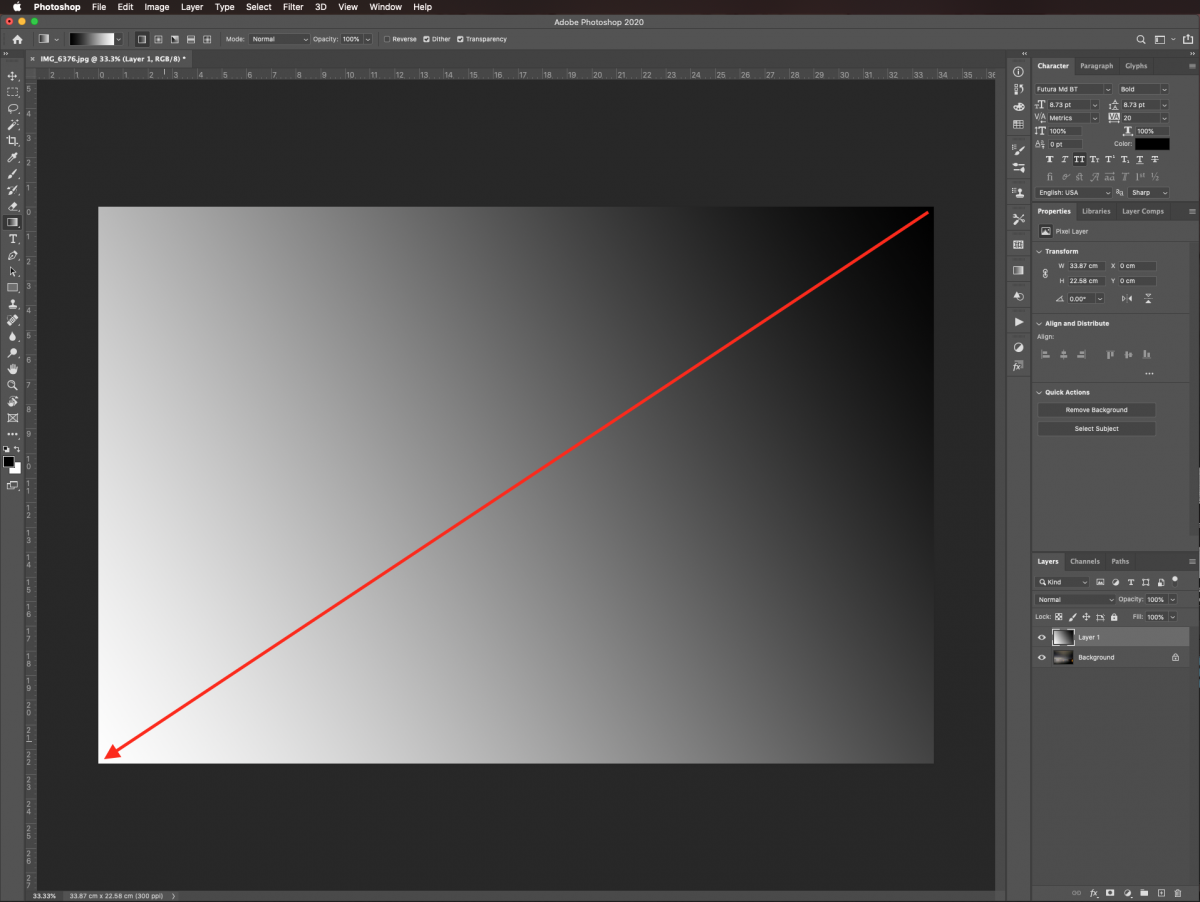
Click with your cursor on the top right side of the canvas. Then drag down until you reach the bottom left corner and release.
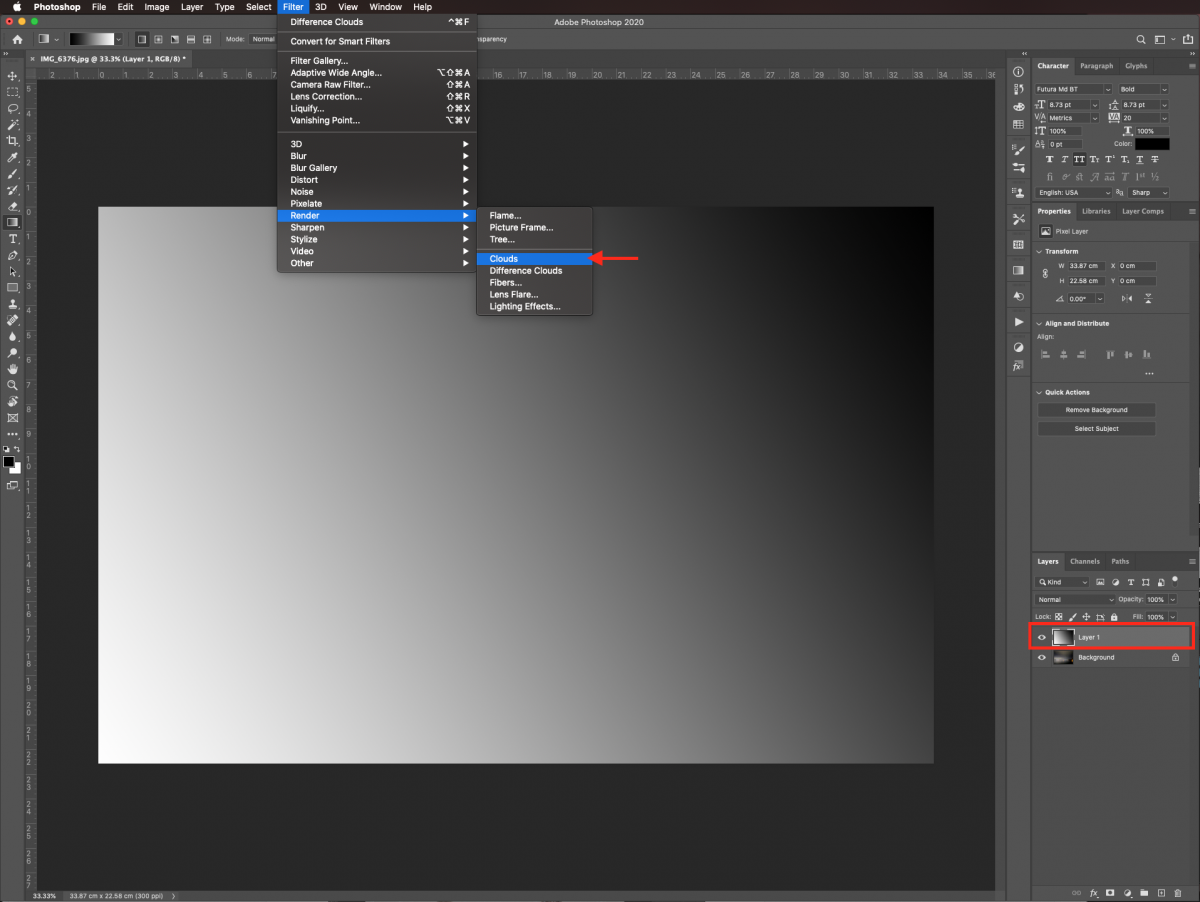
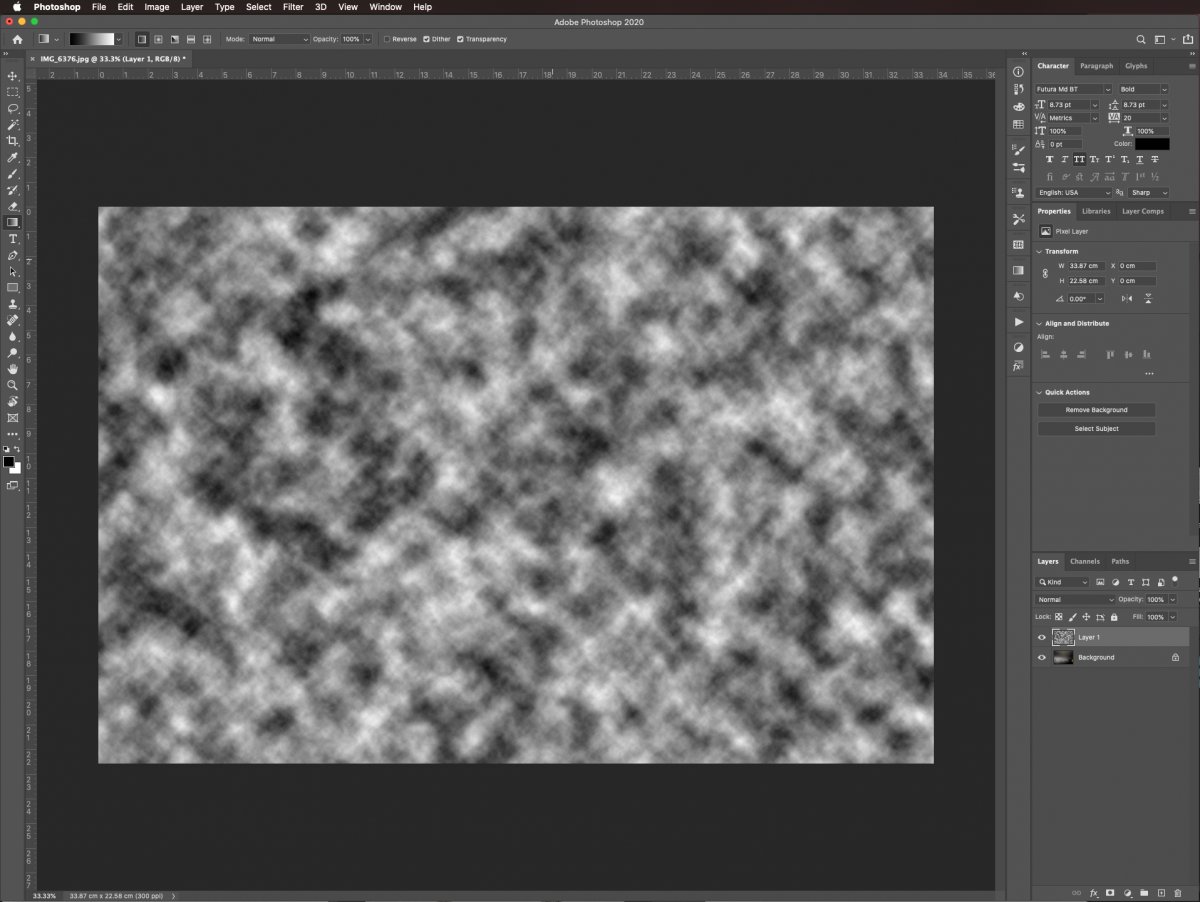
To start creating the effect, Render filters will be applied to the gradient. Make sure that the default Foreground and Background colors are selected (black and white). Next, go to Filter > Render > Clouds.
The resulting image should look similar to the one below.
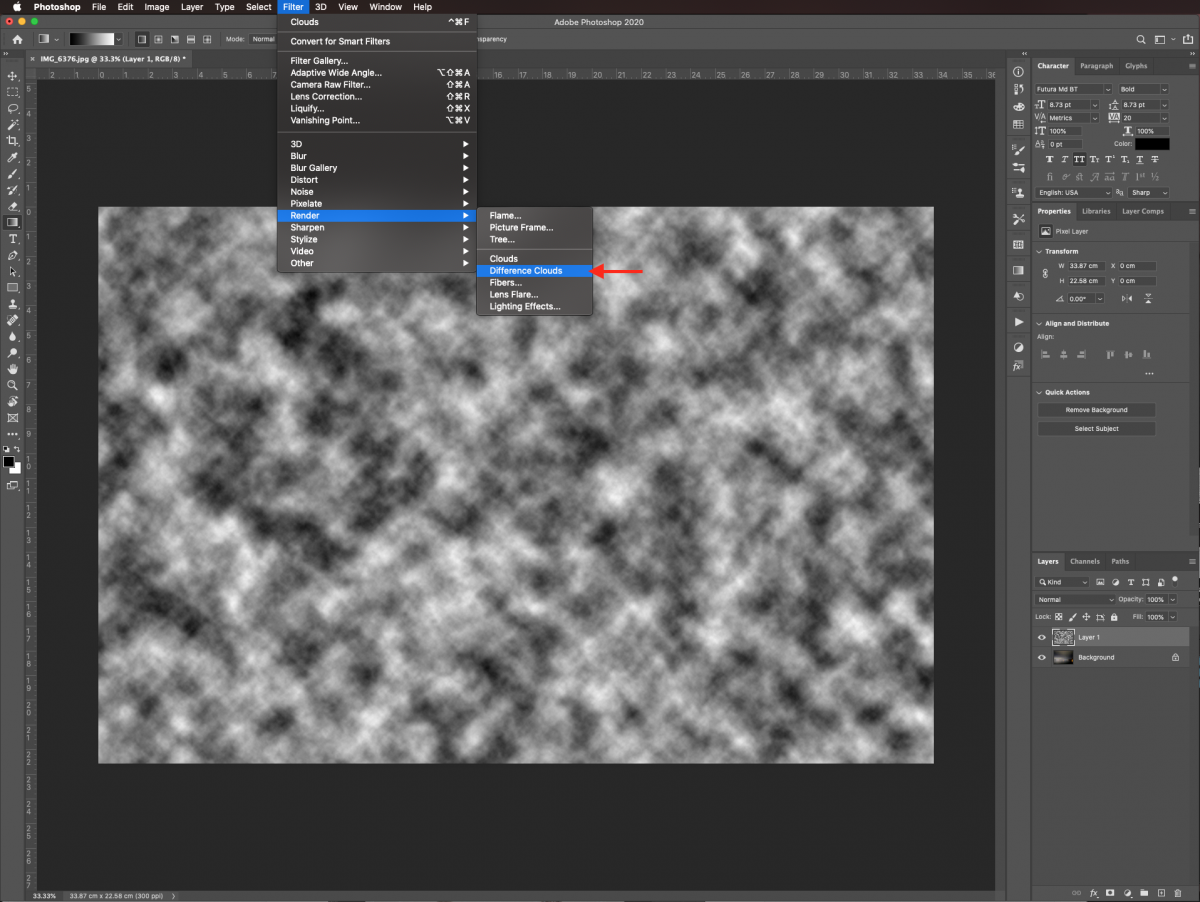
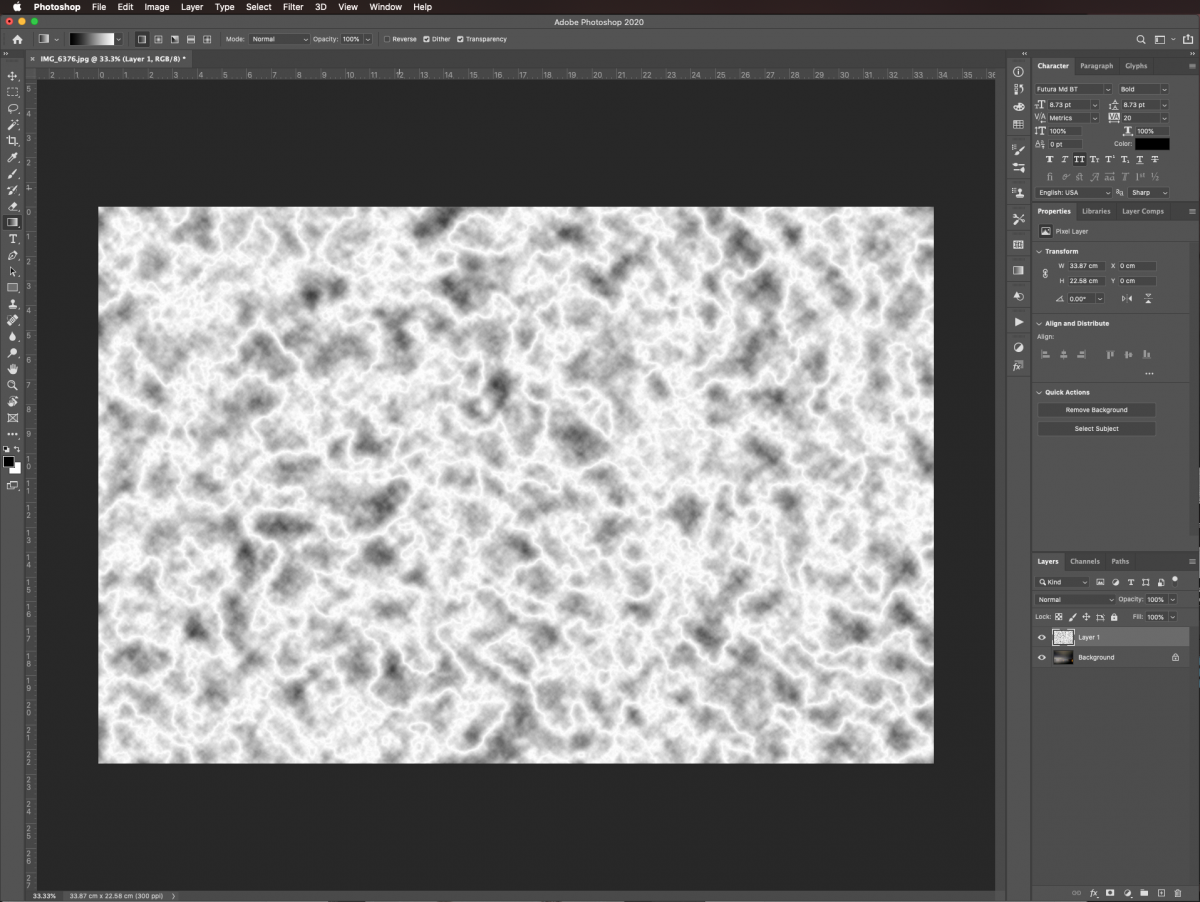
To keep adding to the effect, go to Filter > Render > Difference Clouds.
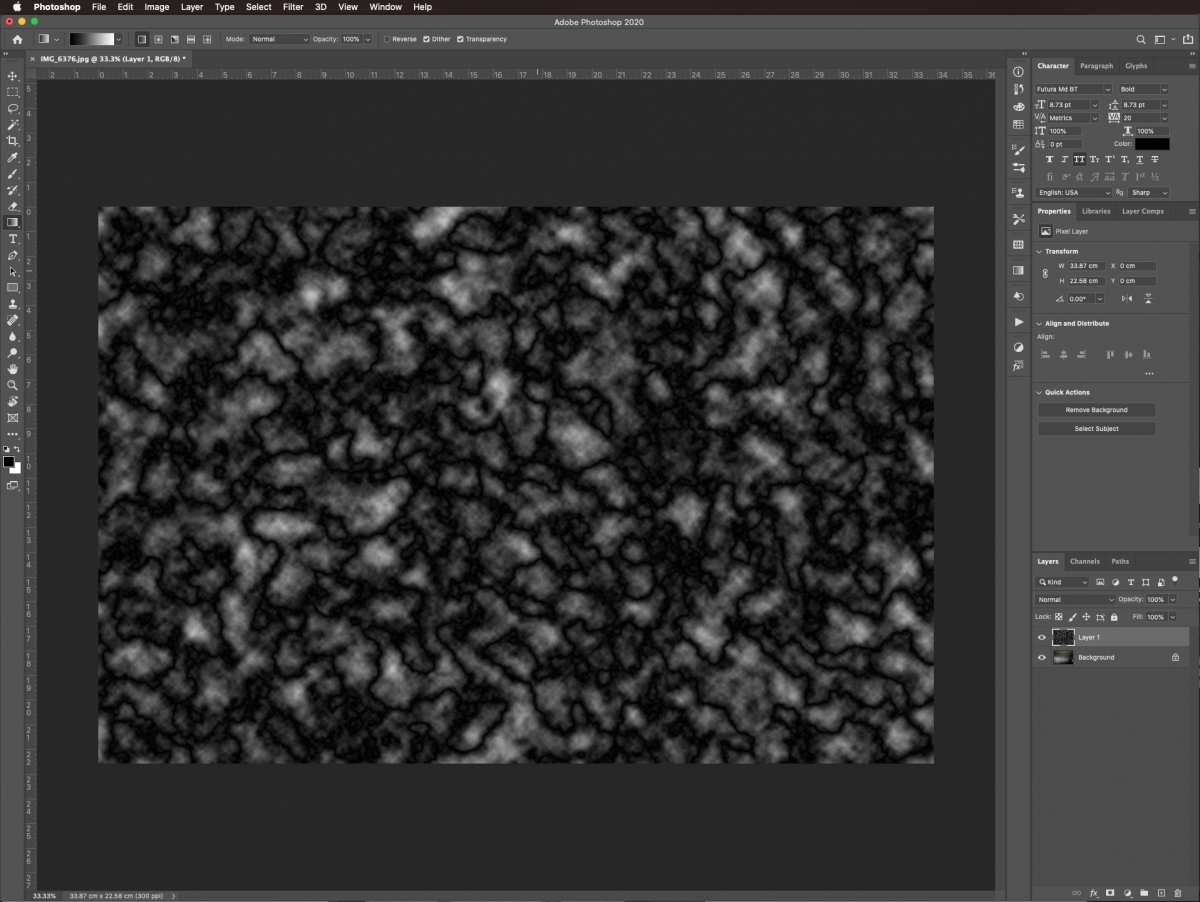
After adding the filter your image should resemble the one below.
The color of the lightning needs to be white so we are going to invert the image. Go to Image > Adjustments > Invert to invert the layer (Command/Control + I).
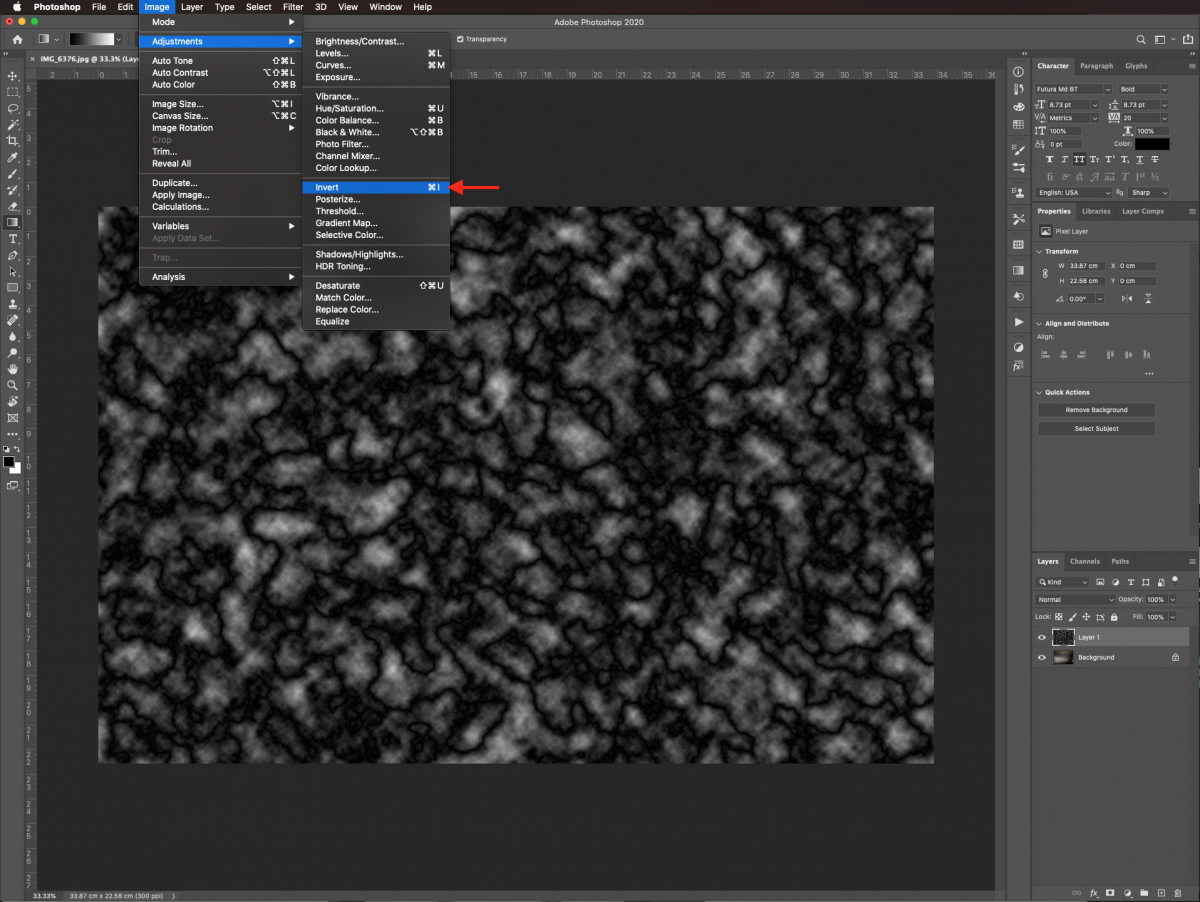
The color of the lightning bolts will now be white.
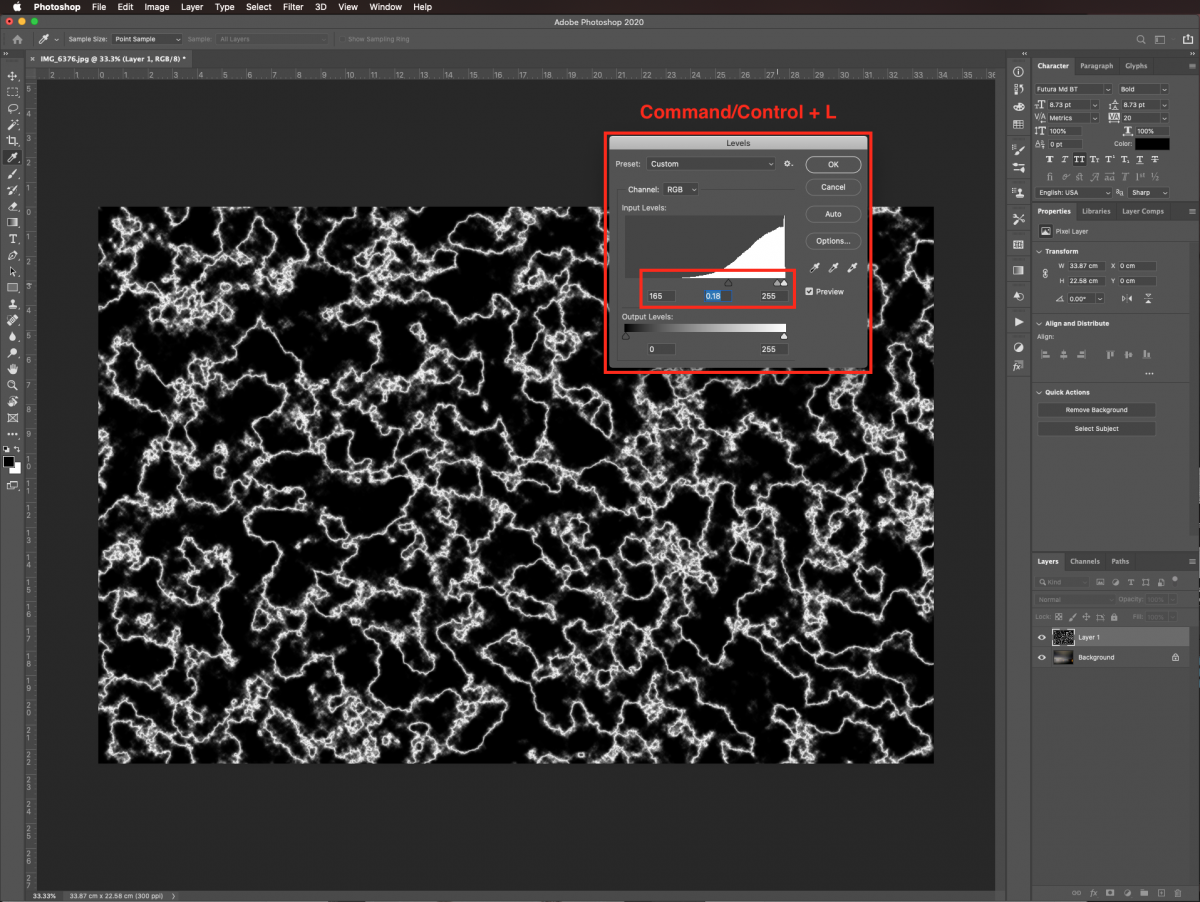
We need to give the image more contrast and make the lightning bolts more defined. Do this by clicking on Image > Adjustments > Levels (Command/Control + L). In the Levels panel, move the left (blacks) and center (greys) levers almost all the way to the right. The idea is to have white lightning bolts over a black background.
We don’t want lightning all over the image. So we are going to remove the majority of the lightning ‘bolts’ and only keep a few.
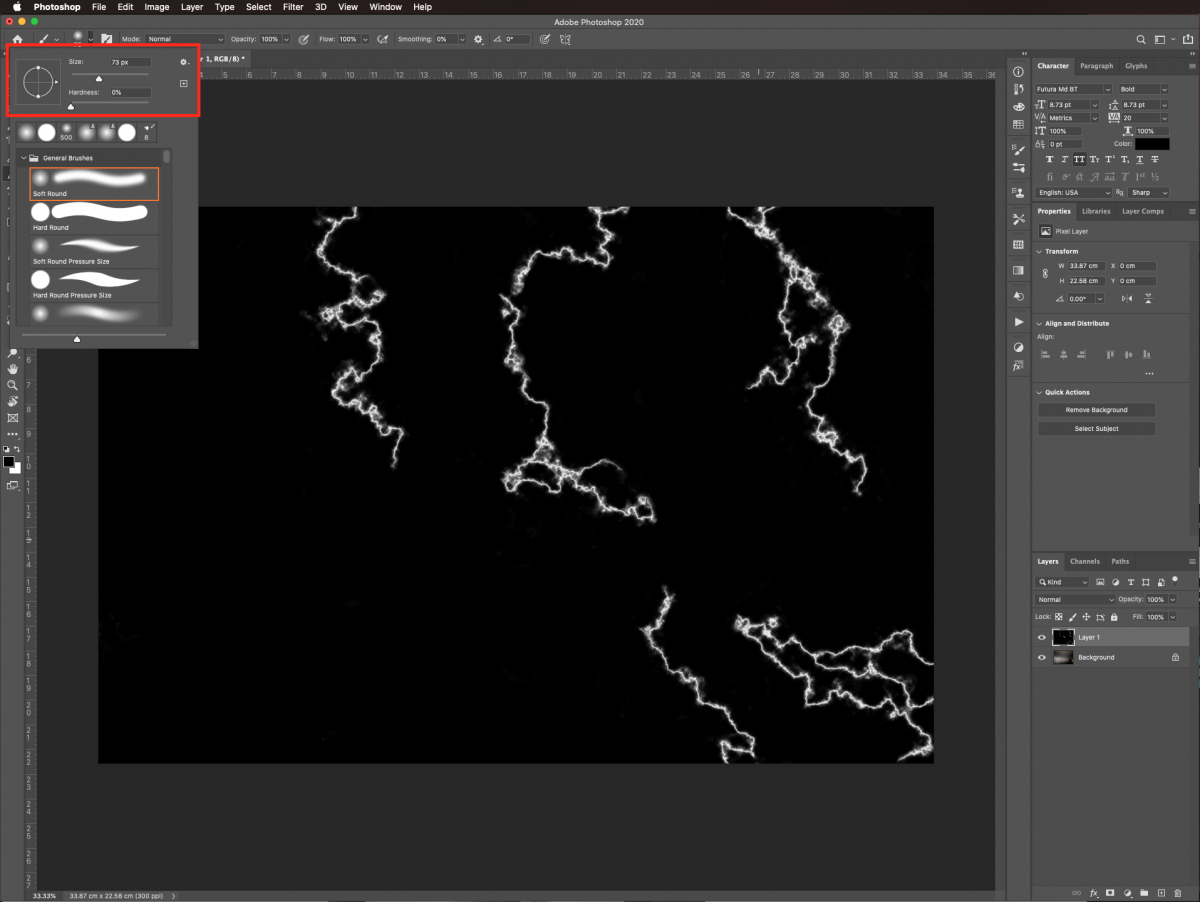
Use the Brush tool (B) with a big and soft brush to erase some of the excess lightning leaving just one or two. We used a brush size of 450 px and 0% Hardness. Remember to make sure that black is set as the Foreground color.
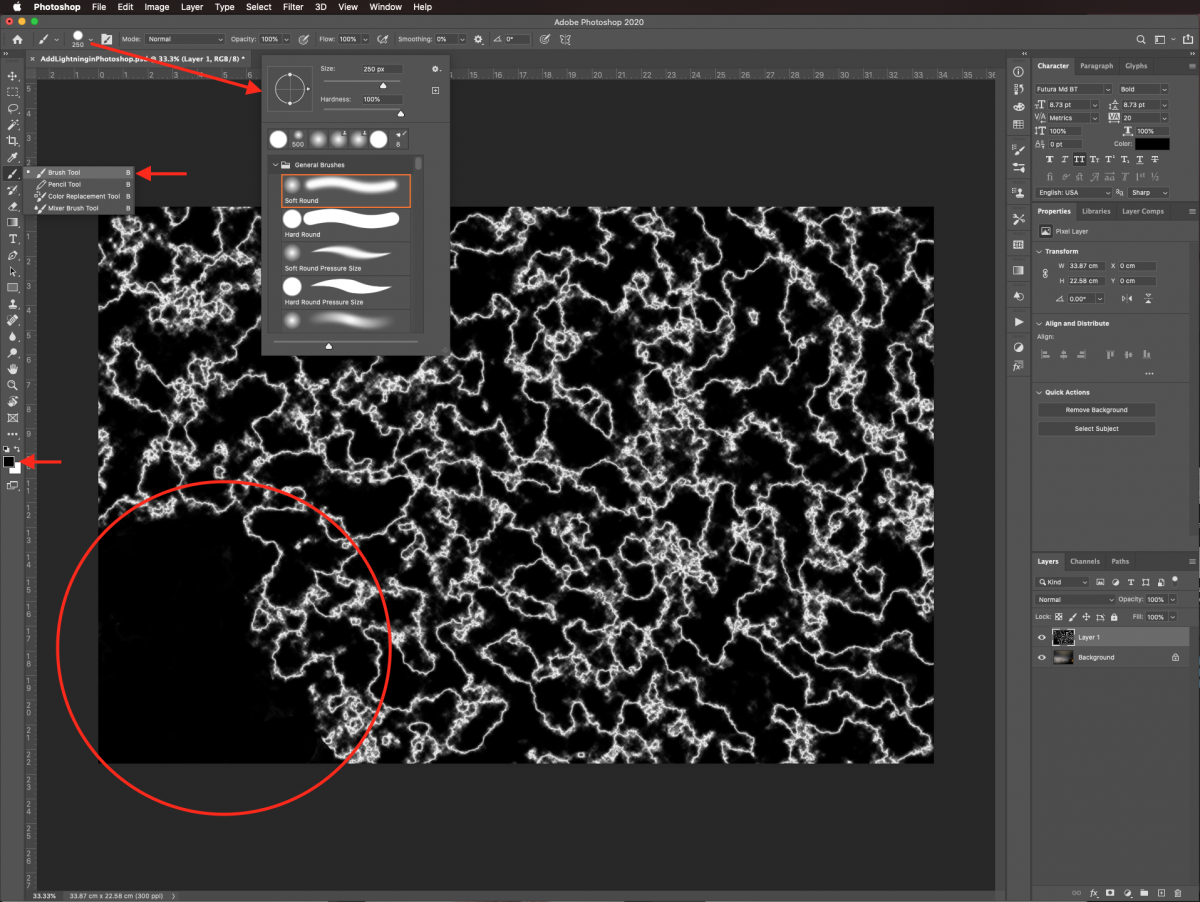
Adjust the size of your brush as needed to clean up some of the areas.
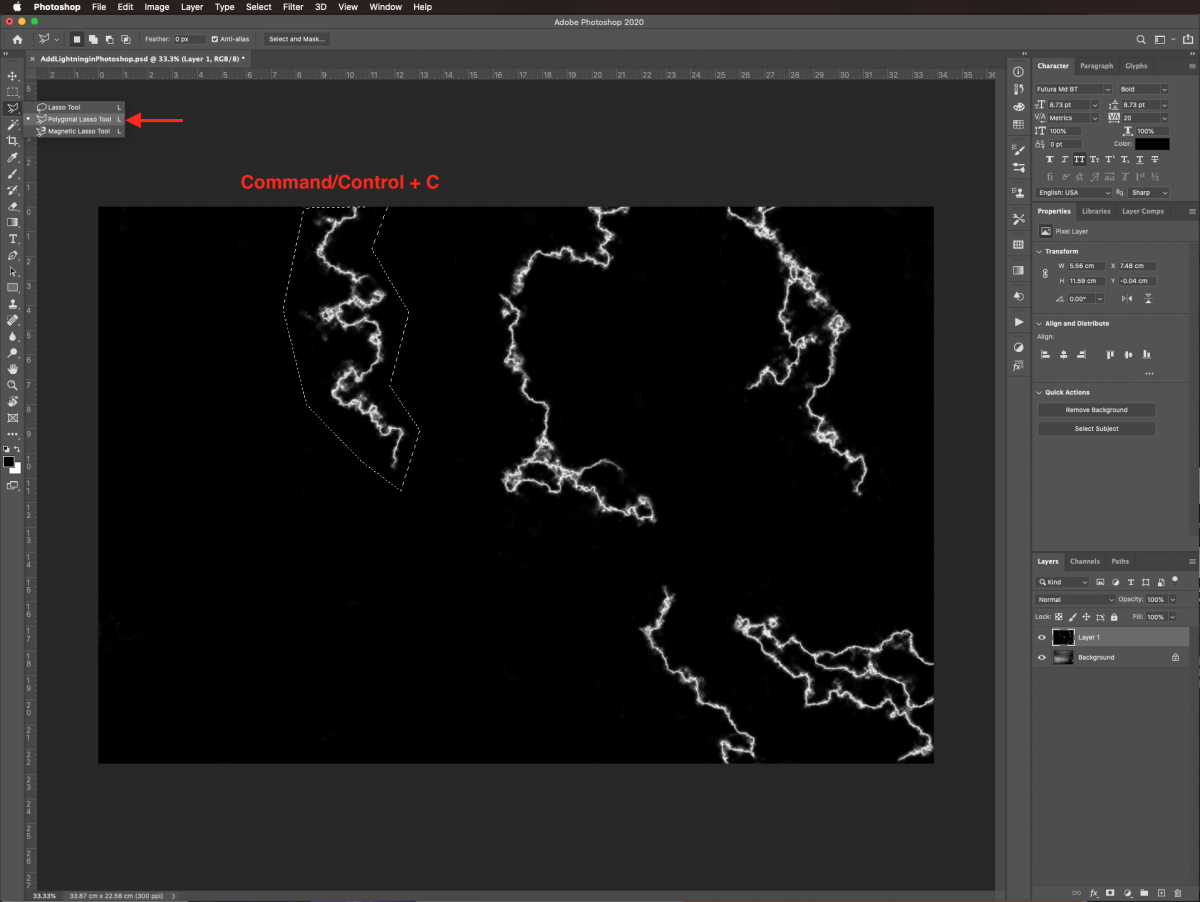
In this step, we will be isolating each lightning bolt. Use the Polygonal Lasso tool (L) and make a selection around one. Copy (Command/Control + C) or Cut (Command/Control + X) your selection.
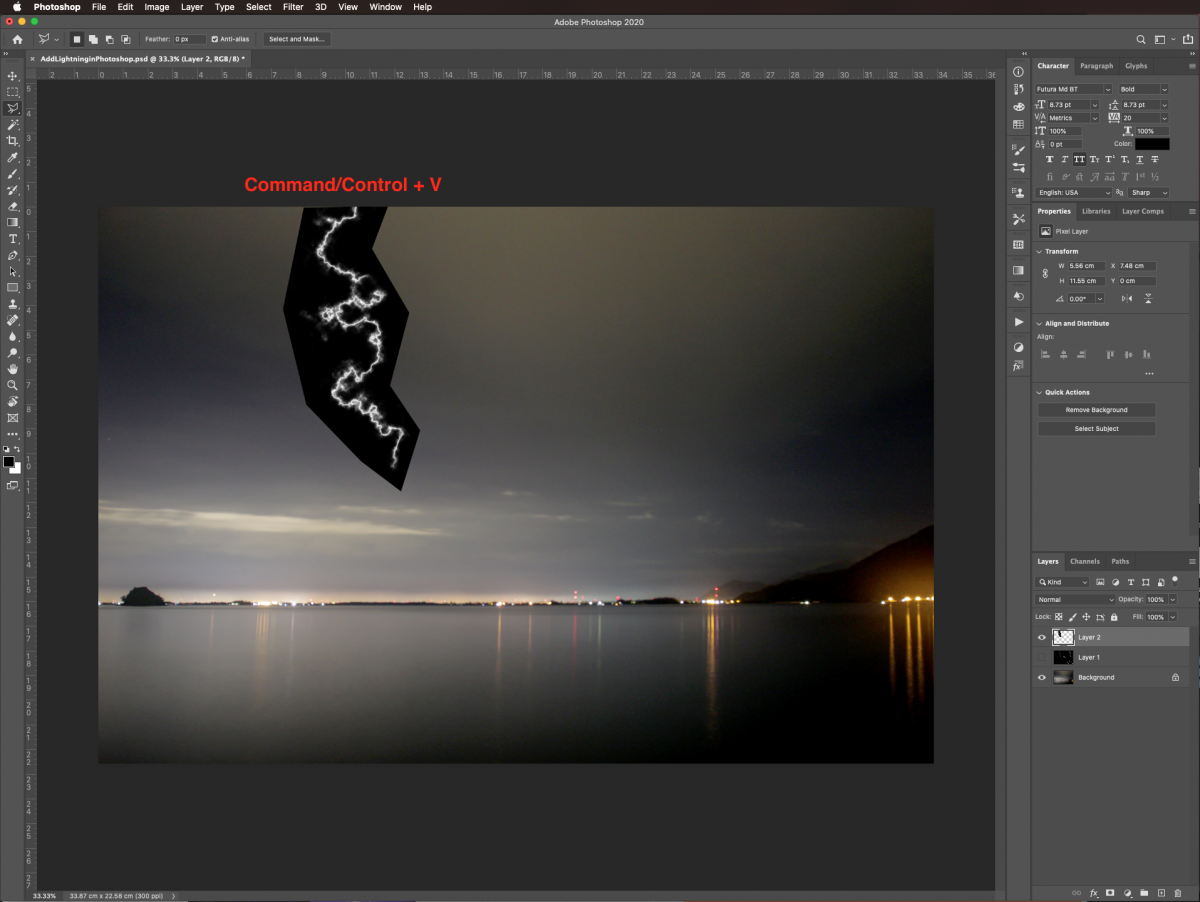
Then, Paste (Command/Control + V) the selection so it ends up in a separate layer.
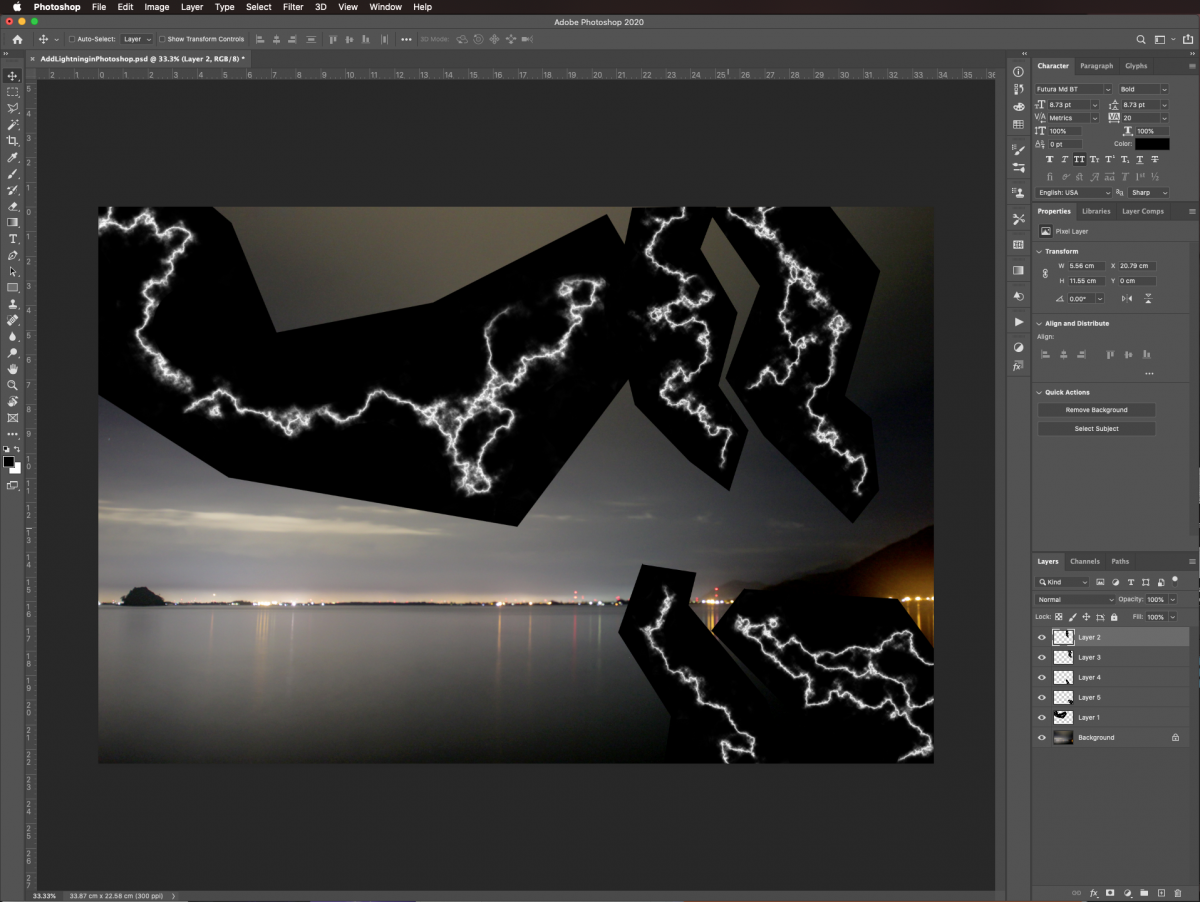
Repeat this with the rest of the lightning bolts.
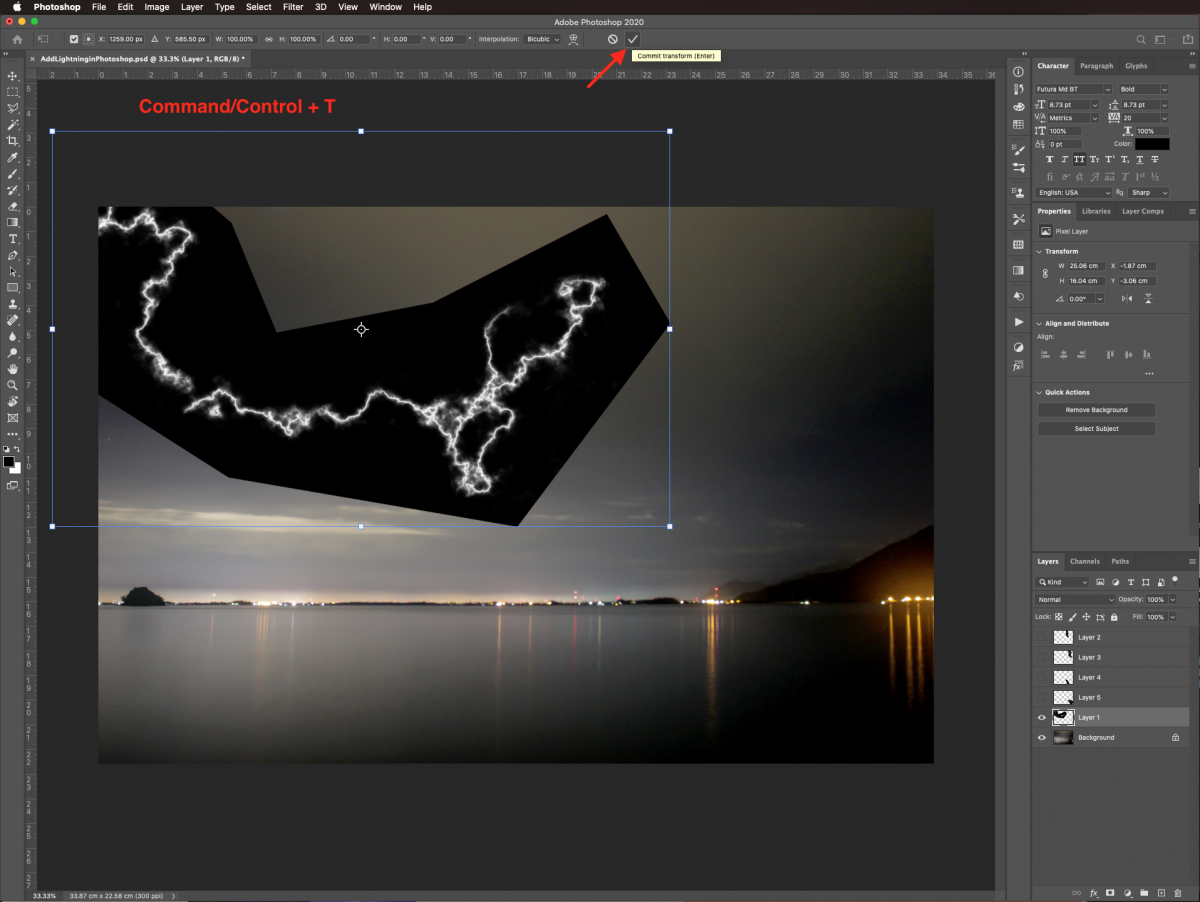
To make the scene more realistic, the lightning bolts need to be blended in with the background. Select the Free Transform (Command/Control + T) to resize and/or rotate the bolts to better fit with the background image. Once you are done, hit Enter or click on the small check mark on the top menu.
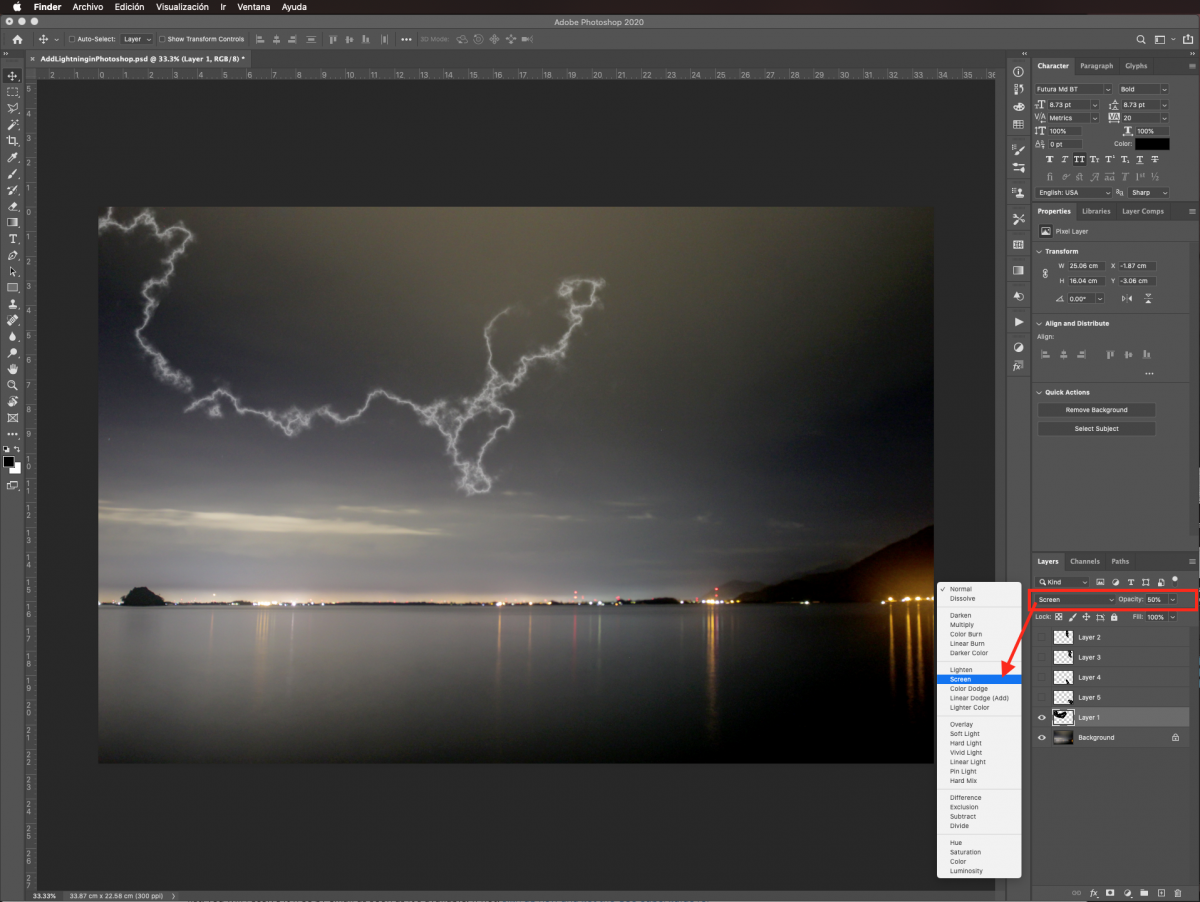
Blend the lightning with the background image by changing its Blending Mode to Screen. If needed, lower the Opacity of the layer a bit. To create an effective blend we used 50% opacity.
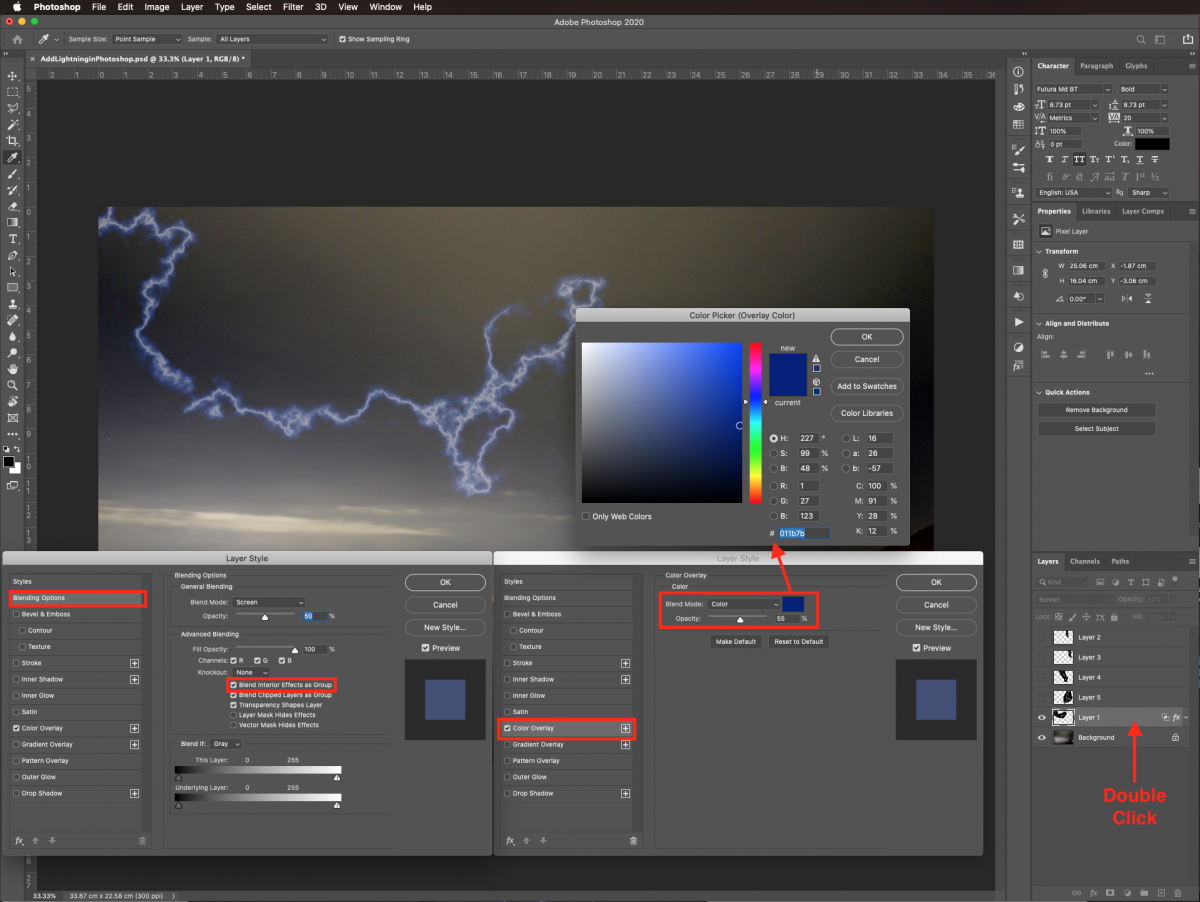
We want to add some color to the lightning bolts. Double-click on top of the one lightning bolt layer thumbnail to open the Layer Style panel. Add a Color Overlay using a dark blue (#011B7B), choose Color as the Blending Mode and 55% Opacity. We want to be certain that this overlay affects only the lightning bolt. Go to the Blending Options tab and check the Blend Interior Effects as a Group box.

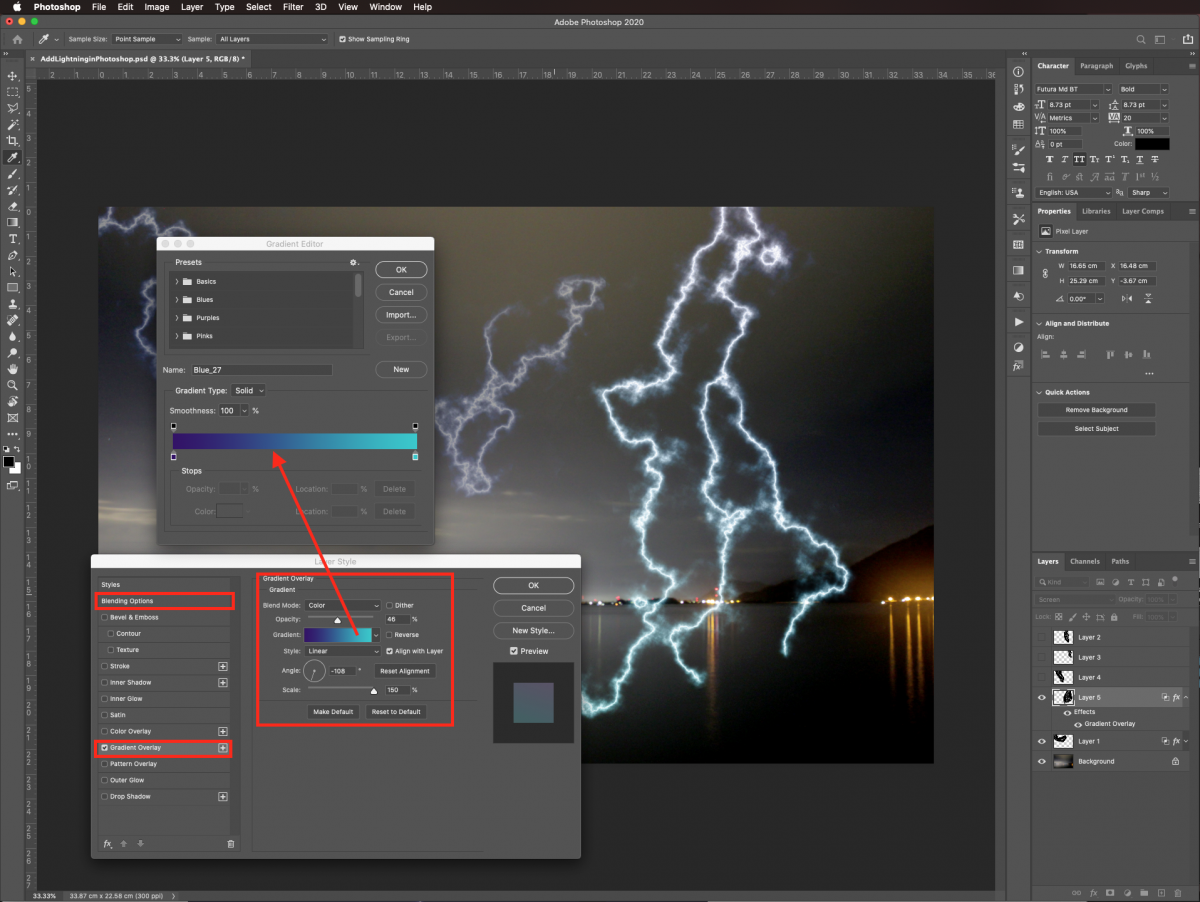
You can also use a Gradient Overlay. Choose a gradient from the presets in the Gradient Editor. Next, choose Color as the Blending Mode then experiment with the different values to achieve the results you want. Remember to check the Blend Interior Effects as a Group box in the Blending Options tab.
In order to apply some effects to the image and to better position the lightning bolts, we need to isolate the sky.
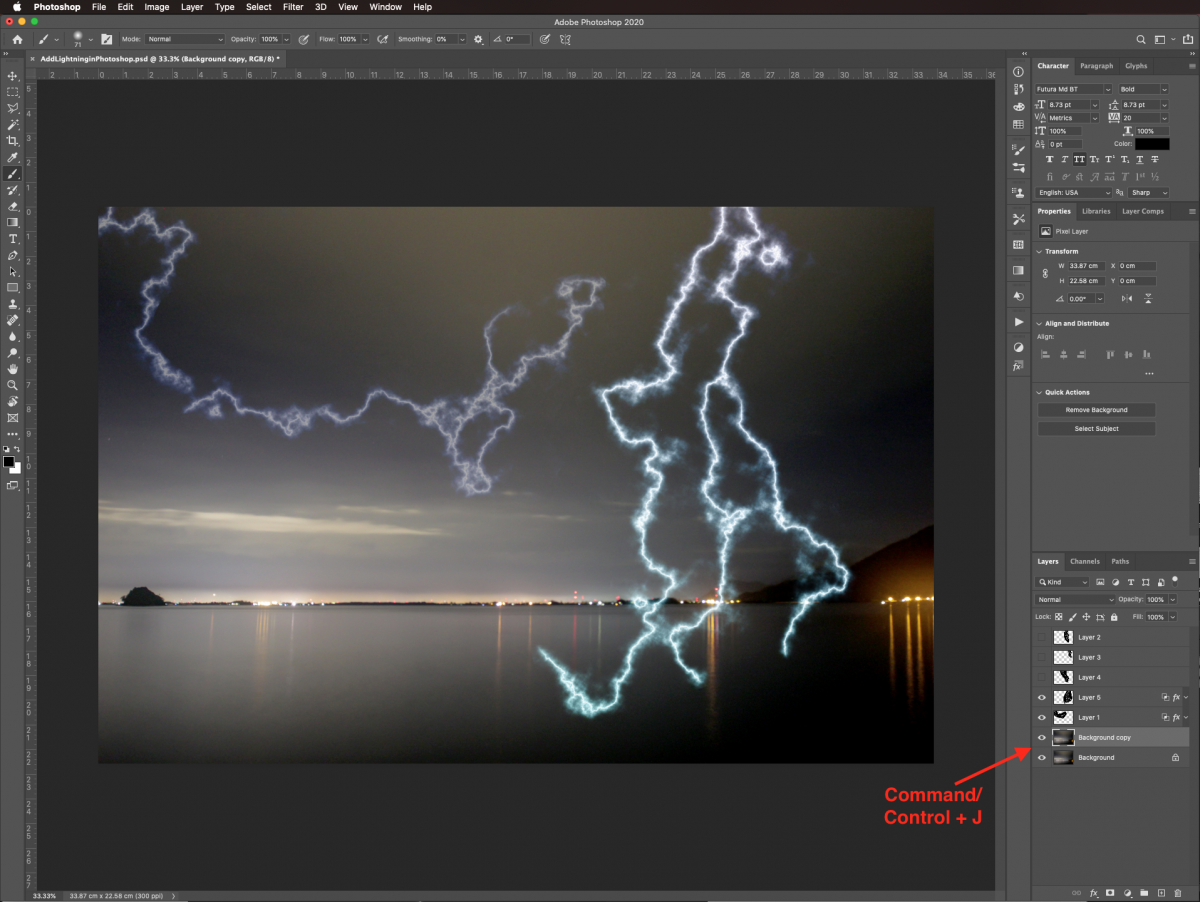
First, duplicate the background layer (Command/Control + J).
With the duplicate layer selected, enter Quick Mask mode by clicking Q. The thumbnail should have a slight red shade now.
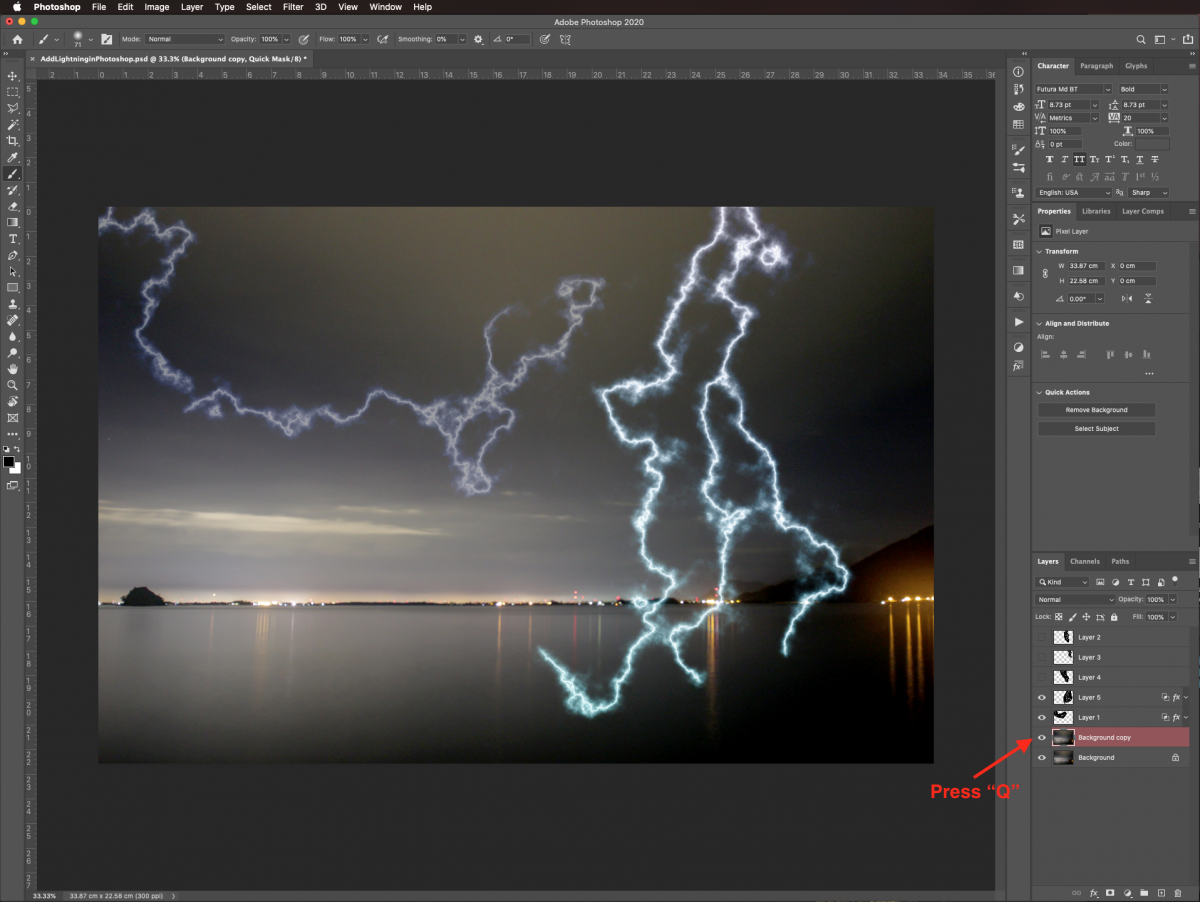
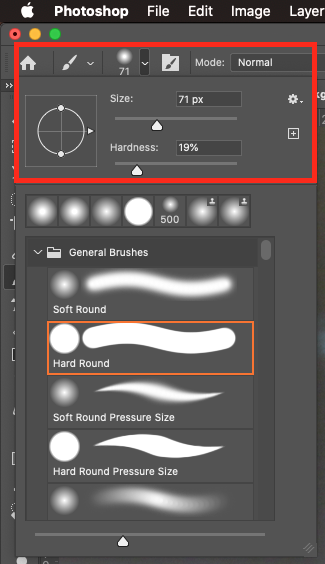
Use the Brush tool (B) with a medium brush to create a selection of the areas you want to keep unchanged.
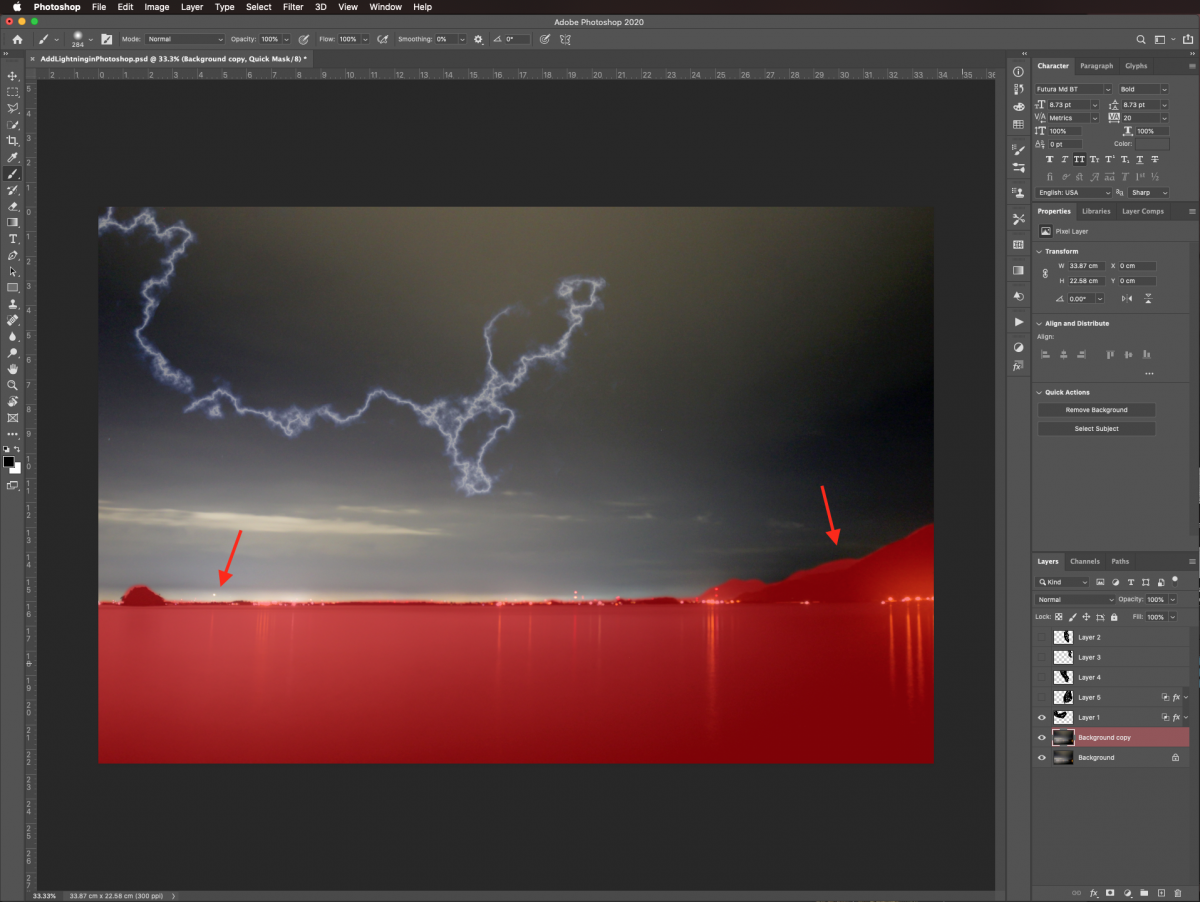
In our case, the sea, mountains, and land on the horizon were selected. Only the sky should be left out of the selection.
Exit Quick Mask mode by clicking Q again to create a selection.
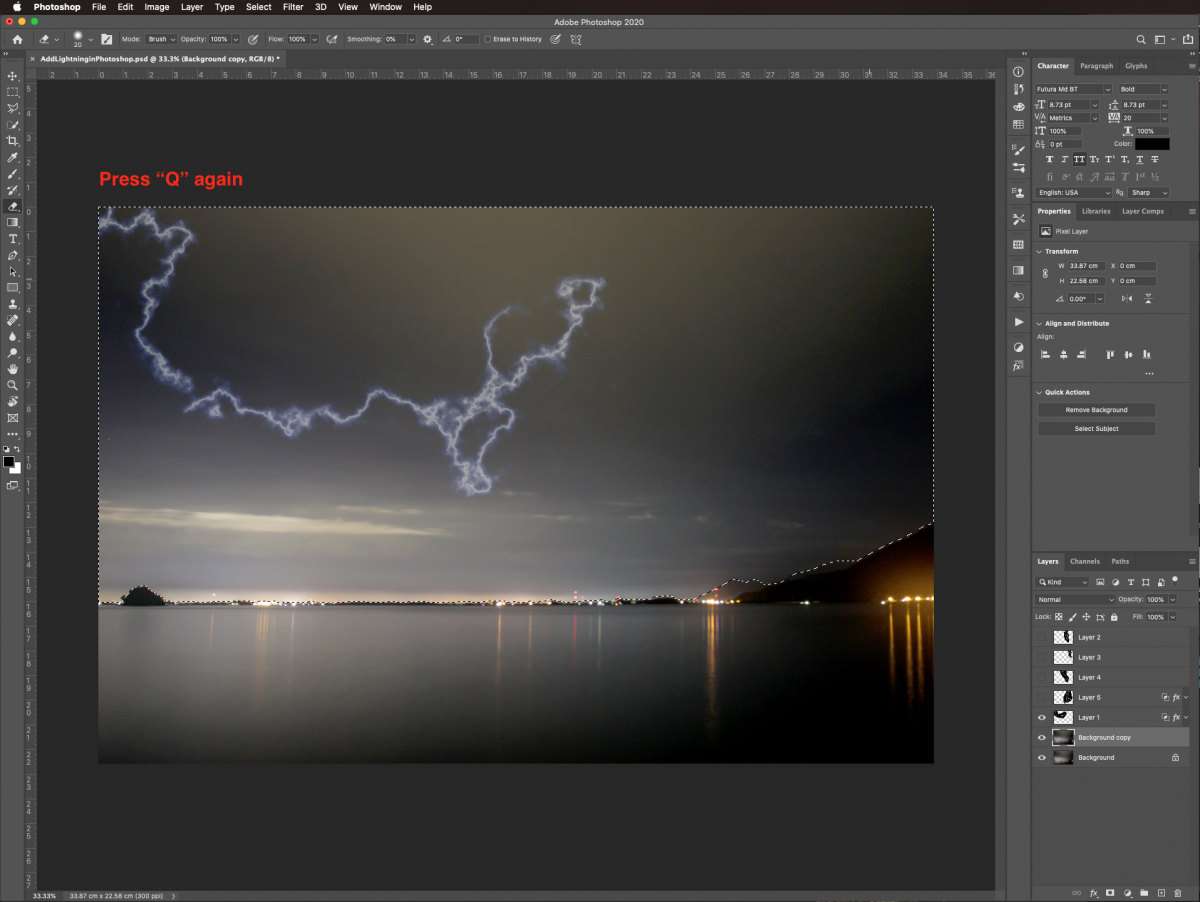
Without deselecting, click on the small icon at the bottom of the Layers menu. This will turn your selection into a Layer Mask. Make sure that the Foreground and Background colors are set to the default ones (black and white).
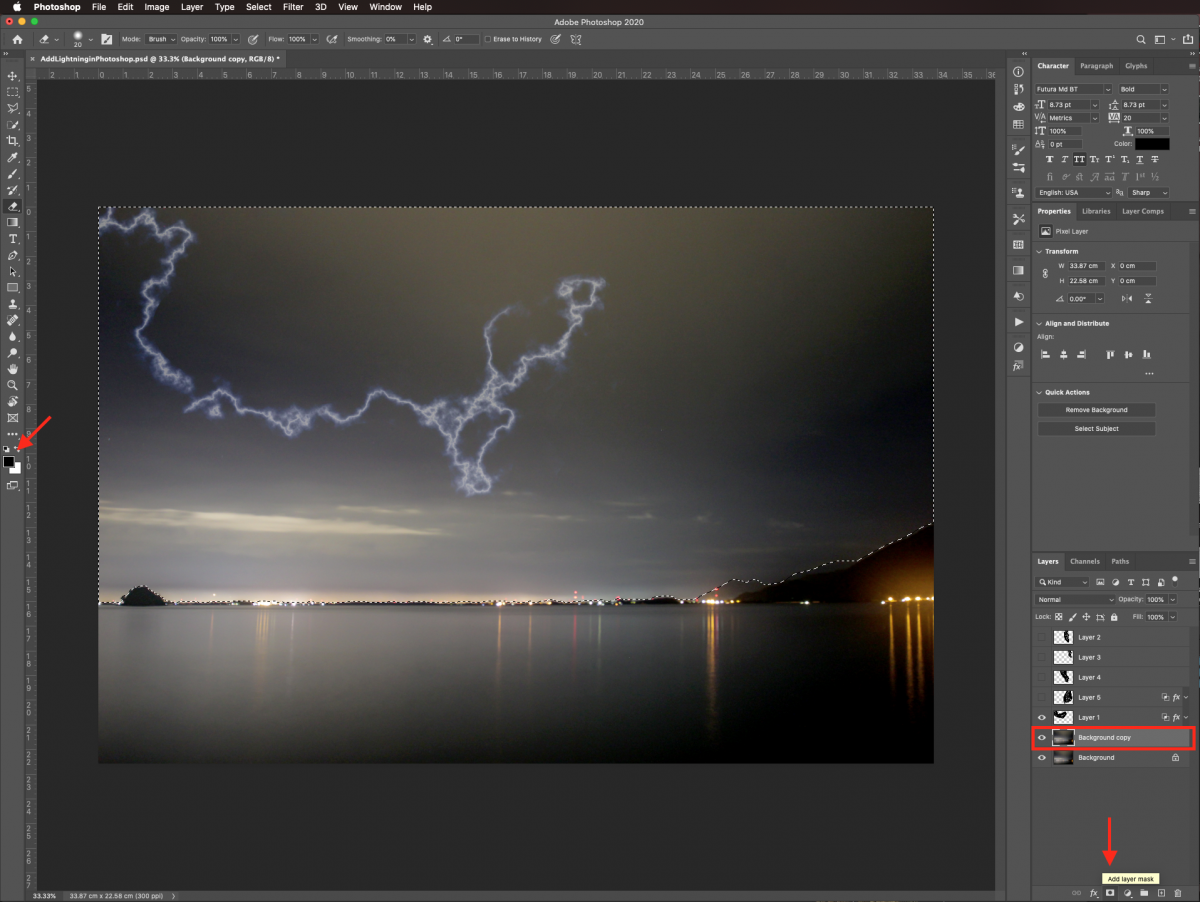
We need to add the same mask to one of our lightning bolts to make it look like a cut out. Command/Control-Click on top of the mask thumbnail to create a selection.
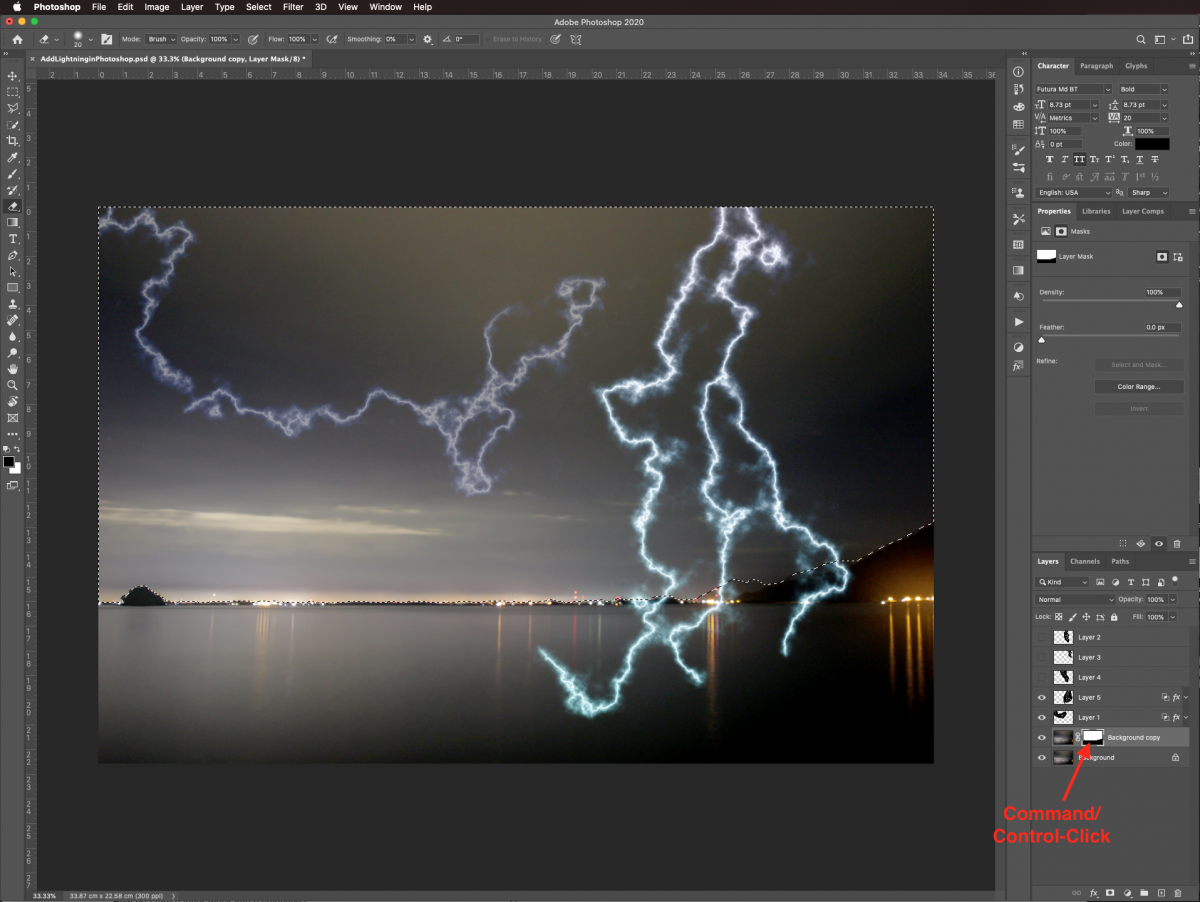
Then, select the lightning bolt thumbnail and click on the Add Layer Mask button again.
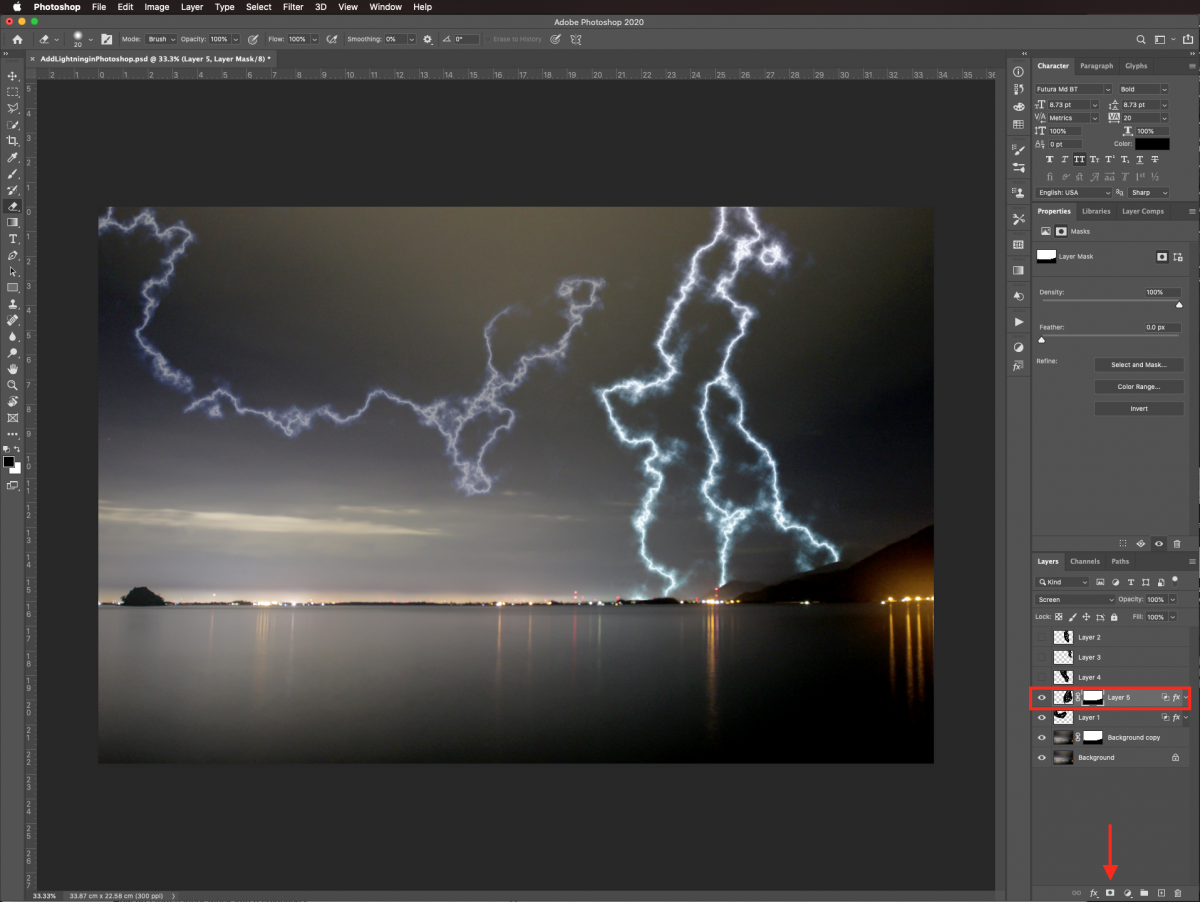
This should hide a portion of the lightning bolt and make it look like it disappears behind the horizon.
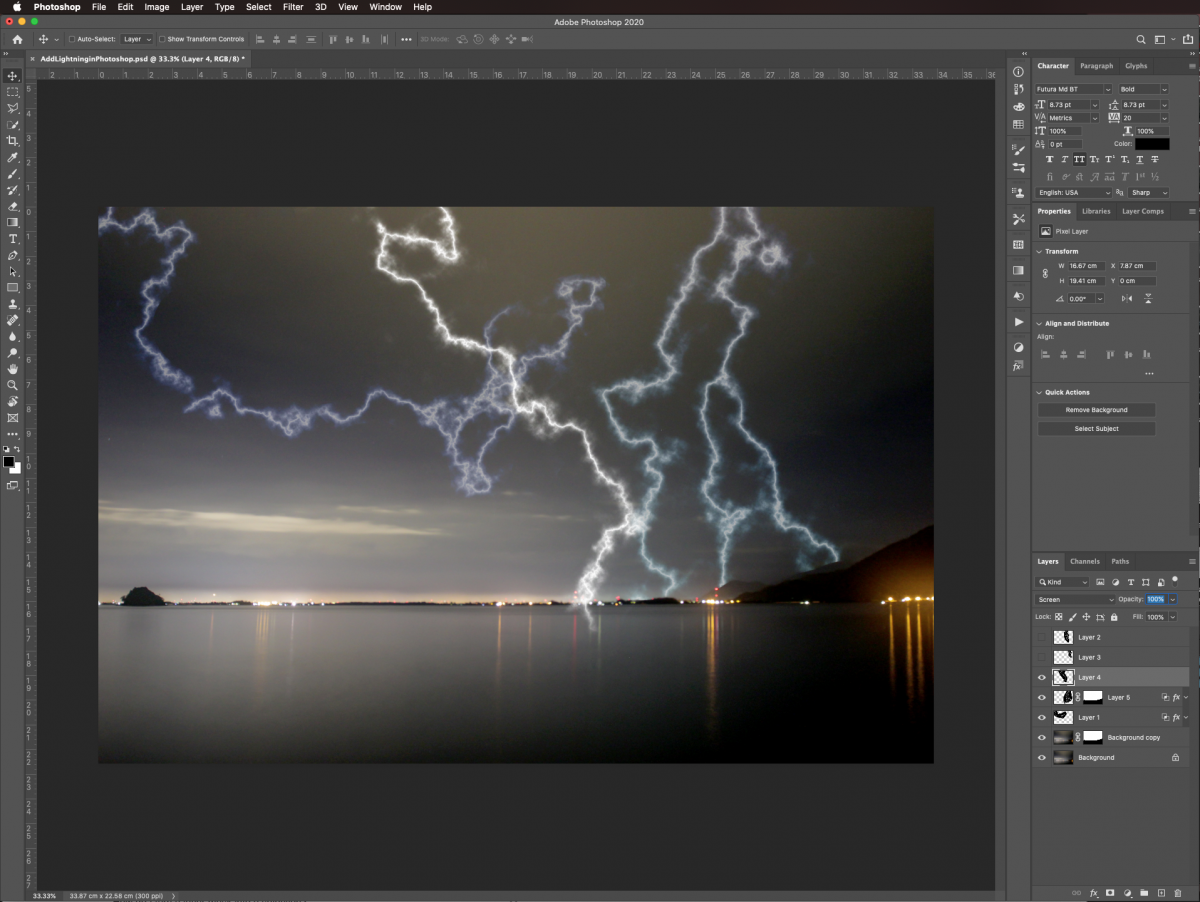
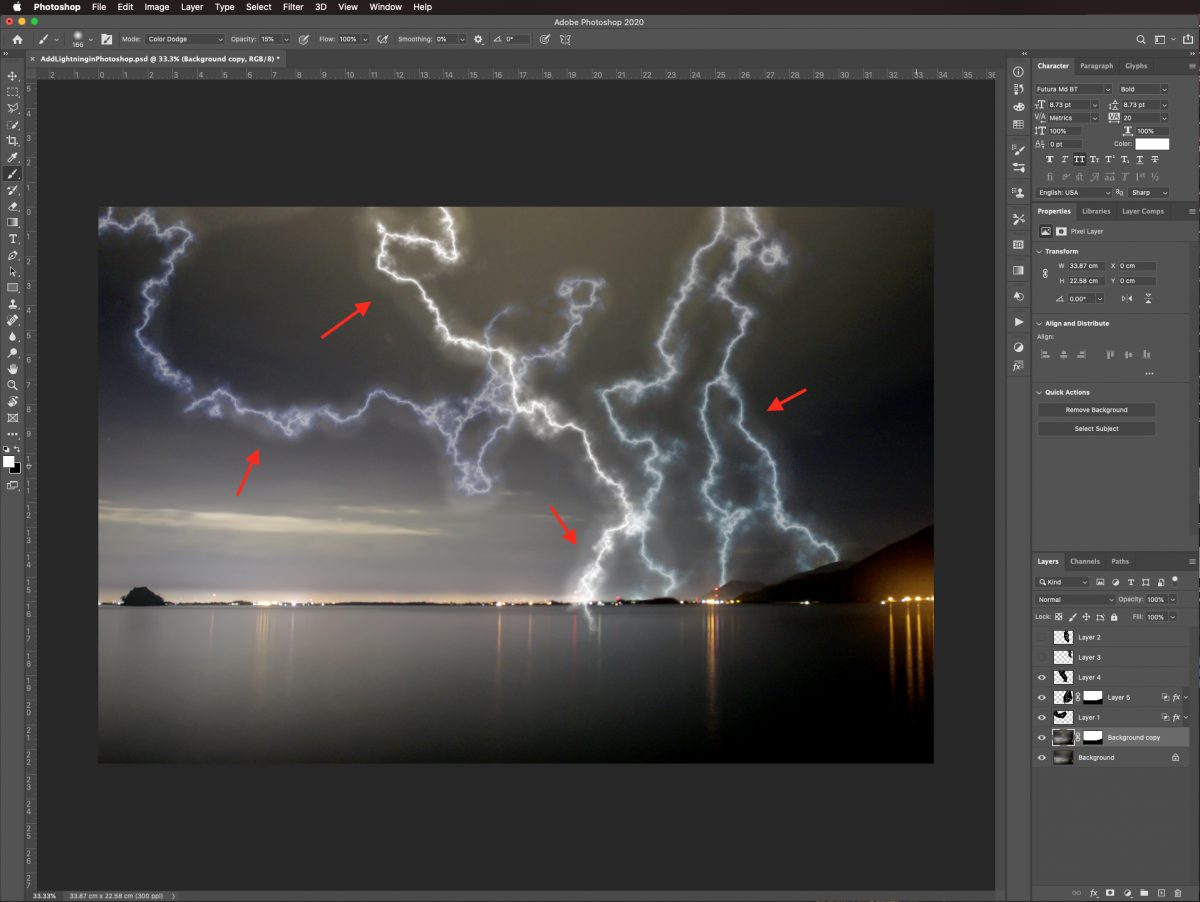
To give the idea that some of the bolts are far away, you can lower their Opacity a bit in the Layers panel. In this case, we made it 55%.

Keep adding more bolts until you are satisfied with your composition. We added one more lightning bolt, left it white without adding further color or gradient overlay to it. We also made it look like it was closer to us and almost falling on the water.
Select the masked background layer. Make sure that you are working on the image and not the mask. Invert the Foreground and Background colors so they are white and black. Then, use a medium brush with a size of 150 px. Change the Mode to Color Dodge and use a 15% Opacity.
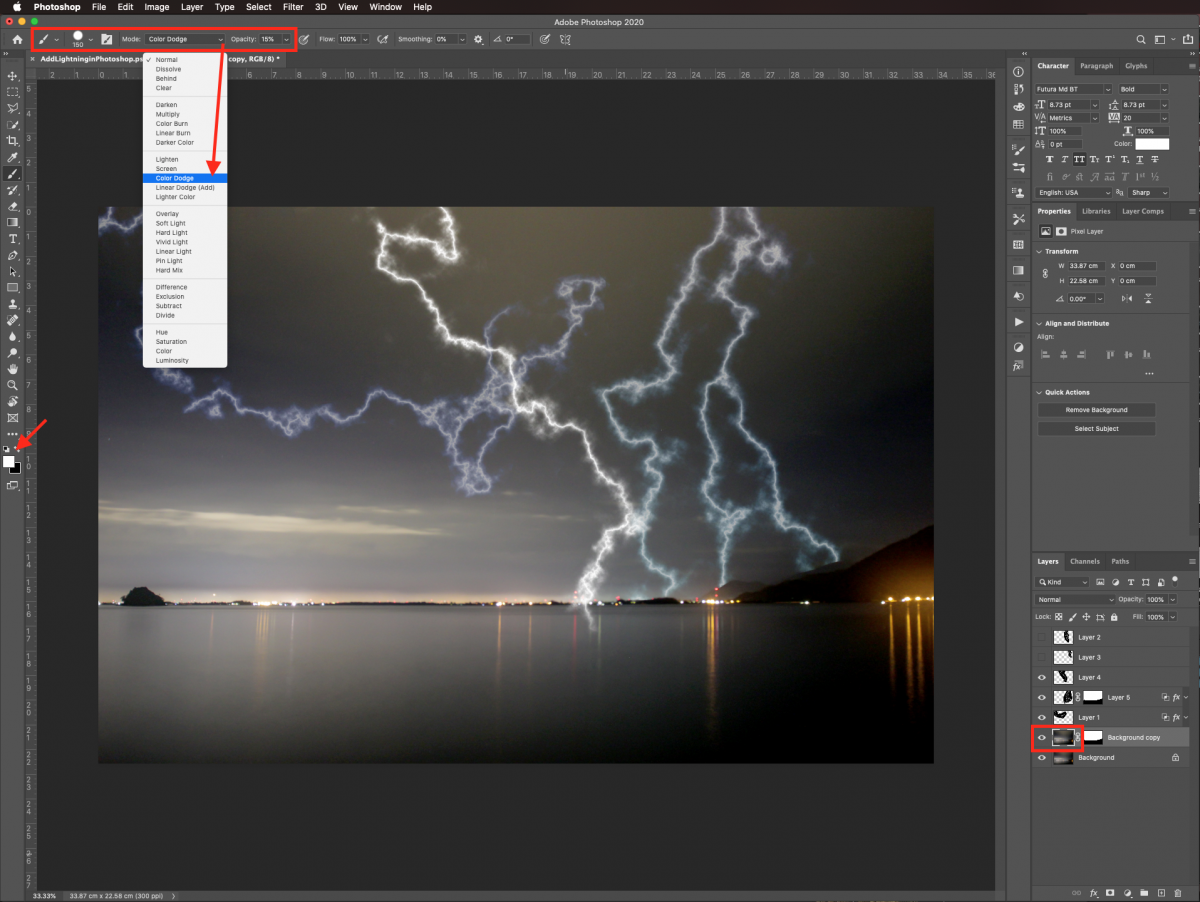
With this brush, create some light around the lightning bolts. It should appear as if they are illuminating the sky behind them.
Add some dark regions close to the light ones by using the Burn tool (O) with a similar sized brush. We used a 15% Exposure and Shadows as the Range.
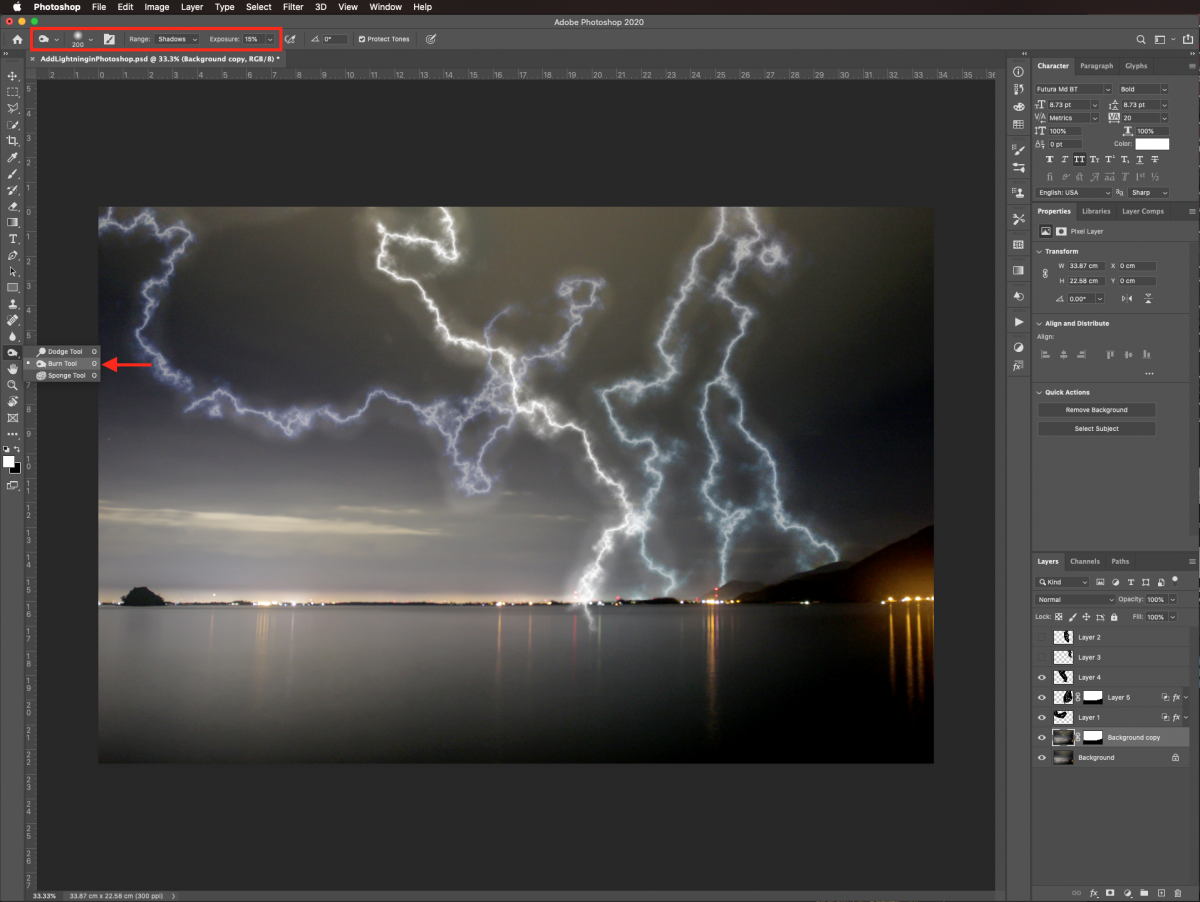
This will give more depth while adding some contrast between the lightning bolts and the sky around them.
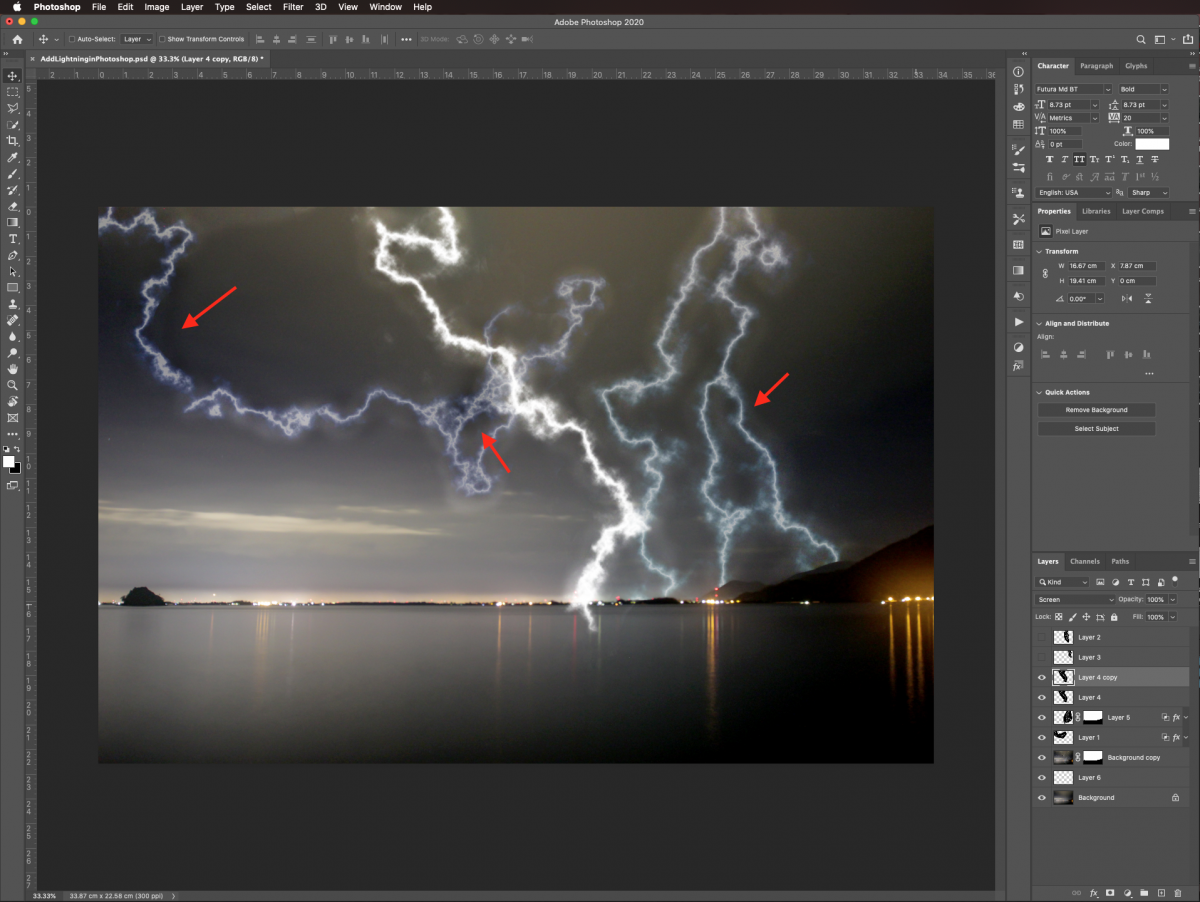
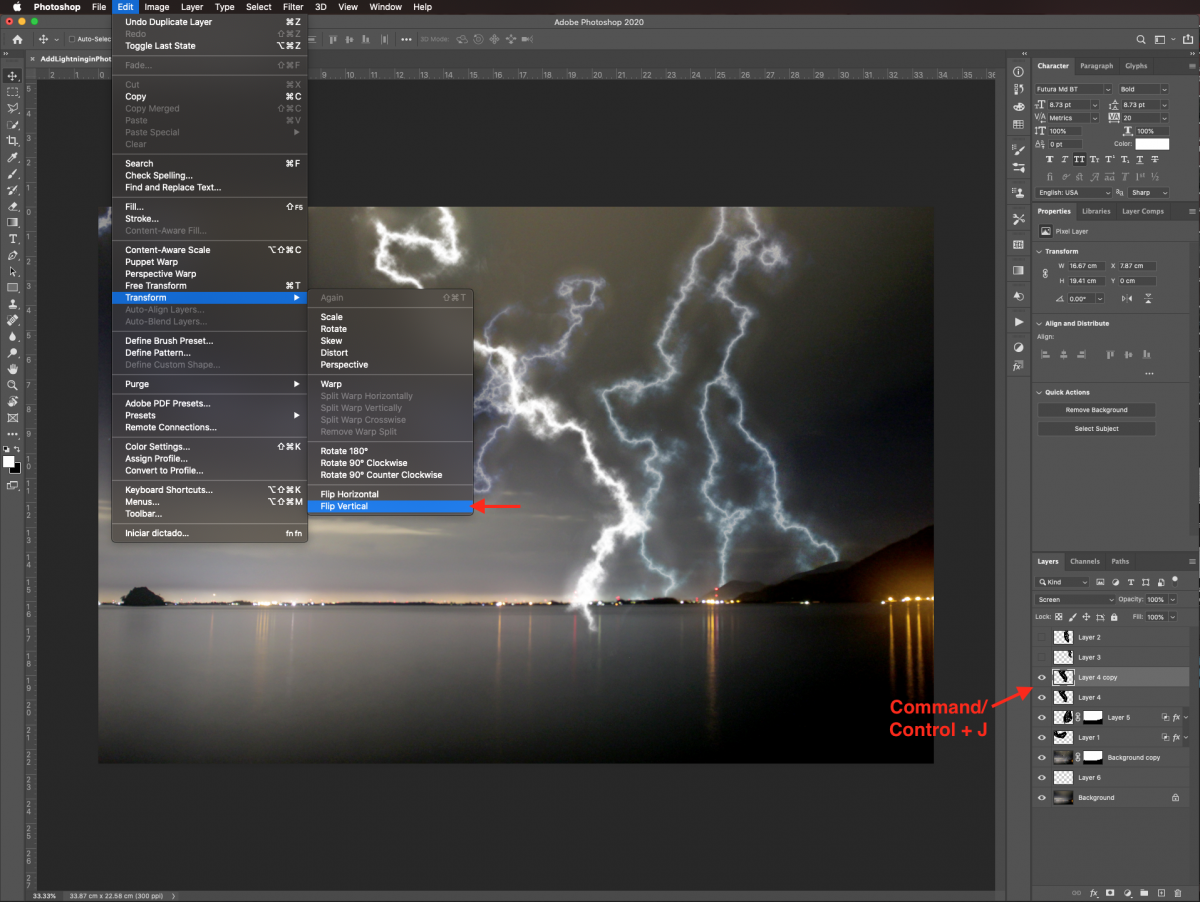
Since our background image has water, we need to add a reflection of the closest lightning bolt.
First, create a duplicate (Command/Control + J). We need to flip it since reflections are normally like mirror images. Go to Edit > Transform > Flip Vertical.
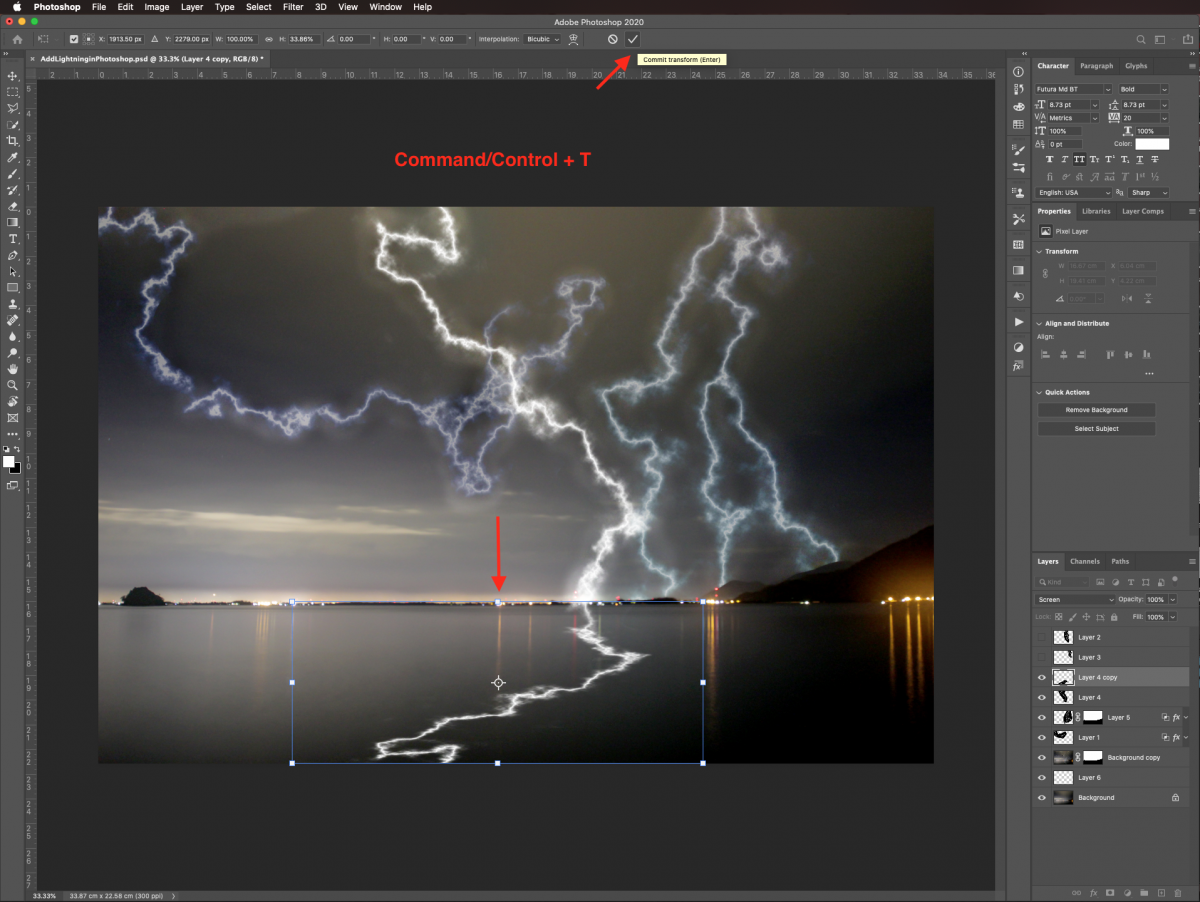
Then, enter Free Transform (Command/Control + T). Distort the lightning bolt by squishing it down so it has the same height as the body of water. This will give a more accurate proportion. Once you are done, click Enter or the check mark on the top menu to commit the changes.
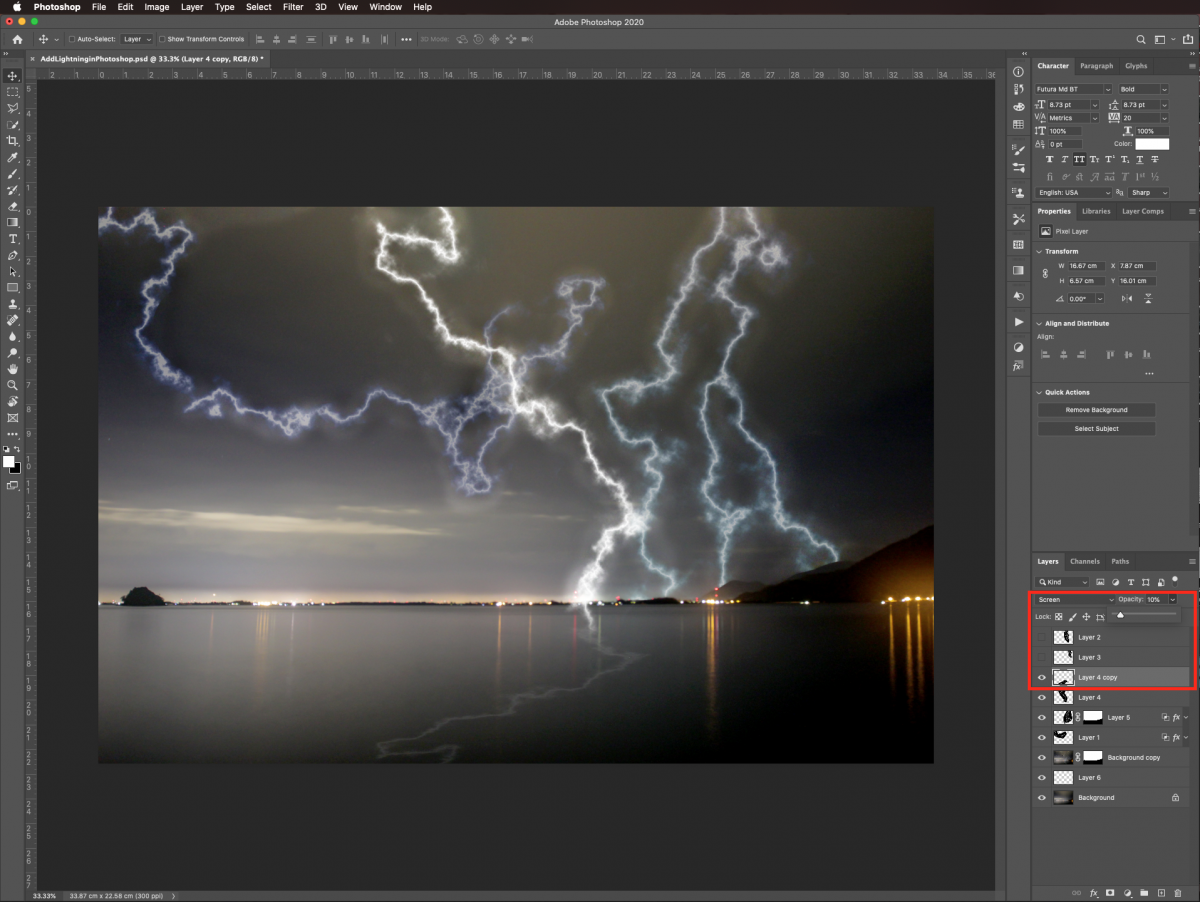
To make it more realistic, lower the Opacity of the reflection layer to about 10%.
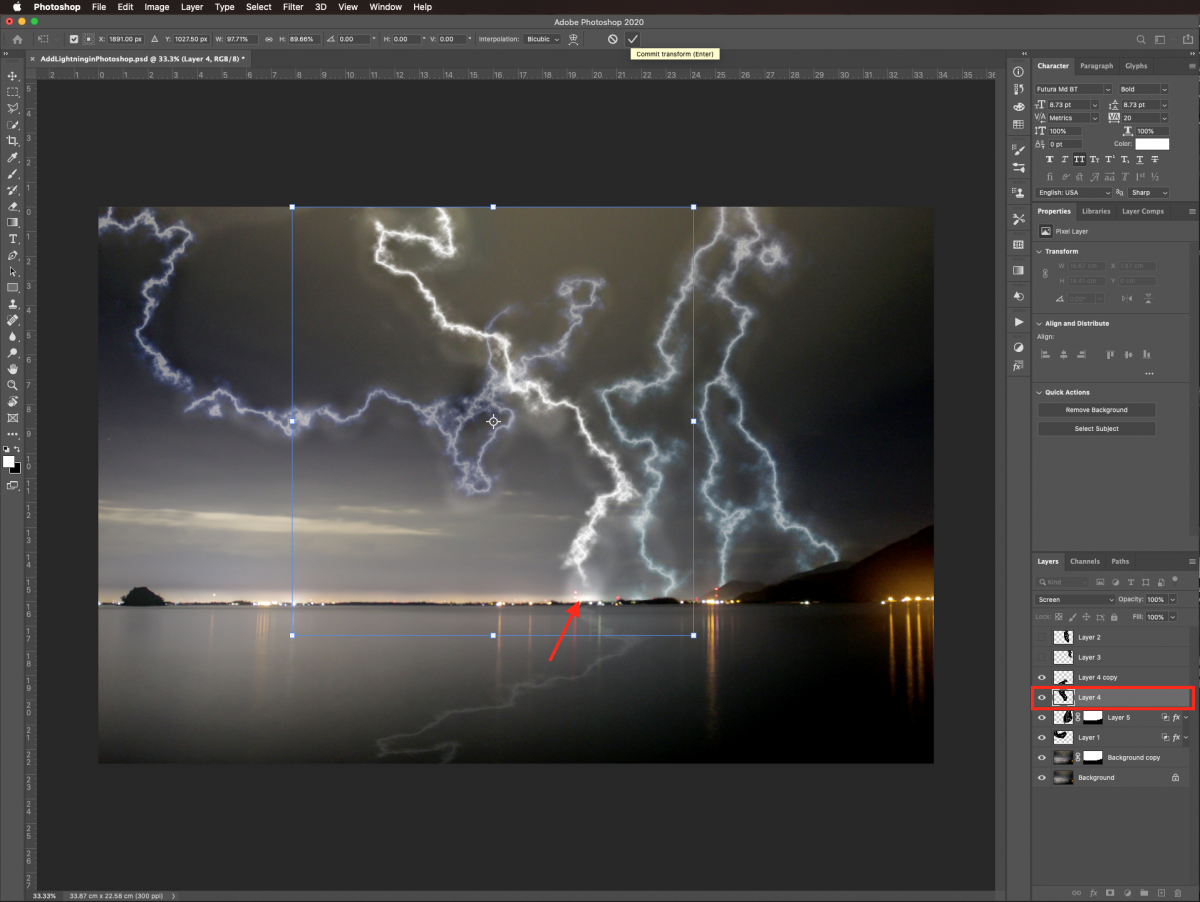
Check on your composition and adjust anything that may need it. For example, we resized the closest lightning bolt a bit using Free Transform.
Our artwork is now finally complete.
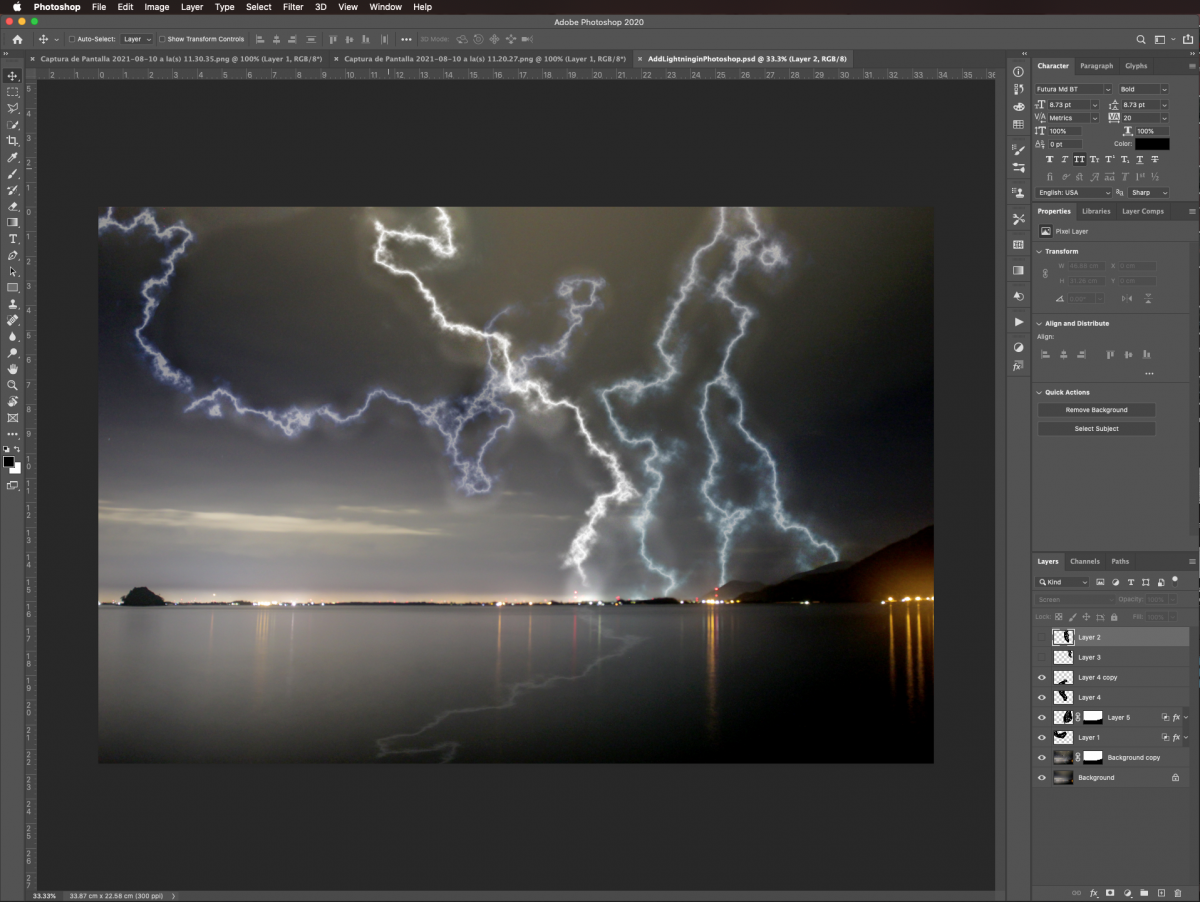
Below are the before and after images for better comparison.
If you liked this tutorial make sure you don't miss our other guides like how to perspective crop and how to use the spot healing brush in Photoshop.
We will use a night sky photo to apply the effect to, but there are tons of other great nature photos available on Design Bundles to check out.
Step 1 - Add a new layer and gradient fill
We will begin by adding a new layer and a gradient fill. In Photoshop, open the image you want to edit. Create a new layer by clicking on the small button at the bottom of the Layers panel.
To create the lightning bolts, we are going to modify a gradient by applying some filters. Use the Gradient tool (G) on the new layer to create a Foreground to Background (black to white) gradient.
Click with your cursor on the top right side of the canvas. Then drag down until you reach the bottom left corner and release.
Step 2 - Apply Render filters to the Gradient
To start creating the effect, Render filters will be applied to the gradient. Make sure that the default Foreground and Background colors are selected (black and white). Next, go to Filter > Render > Clouds.
The resulting image should look similar to the one below.
To keep adding to the effect, go to Filter > Render > Difference Clouds.
After adding the filter your image should resemble the one below.
Step 3 - Invert the lightning layer and add more contrast
The color of the lightning needs to be white so we are going to invert the image. Go to Image > Adjustments > Invert to invert the layer (Command/Control + I).
The color of the lightning bolts will now be white.
We need to give the image more contrast and make the lightning bolts more defined. Do this by clicking on Image > Adjustments > Levels (Command/Control + L). In the Levels panel, move the left (blacks) and center (greys) levers almost all the way to the right. The idea is to have white lightning bolts over a black background.
Step 4 - Isolate the lightning bolts
We don’t want lightning all over the image. So we are going to remove the majority of the lightning ‘bolts’ and only keep a few.
Use the Brush tool (B) with a big and soft brush to erase some of the excess lightning leaving just one or two. We used a brush size of 450 px and 0% Hardness. Remember to make sure that black is set as the Foreground color.
Adjust the size of your brush as needed to clean up some of the areas.
Step 5 - Isolate each lightning bolt
In this step, we will be isolating each lightning bolt. Use the Polygonal Lasso tool (L) and make a selection around one. Copy (Command/Control + C) or Cut (Command/Control + X) your selection.
Then, Paste (Command/Control + V) the selection so it ends up in a separate layer.
Repeat this with the rest of the lightning bolts.
Step 6 - Resize and blend lightning bolts with background image
To make the scene more realistic, the lightning bolts need to be blended in with the background. Select the Free Transform (Command/Control + T) to resize and/or rotate the bolts to better fit with the background image. Once you are done, hit Enter or click on the small check mark on the top menu.
Blend the lightning with the background image by changing its Blending Mode to Screen. If needed, lower the Opacity of the layer a bit. To create an effective blend we used 50% opacity.
Step 7 - Add color to the lightning bolts
We want to add some color to the lightning bolts. Double-click on top of the one lightning bolt layer thumbnail to open the Layer Style panel. Add a Color Overlay using a dark blue (#011B7B), choose Color as the Blending Mode and 55% Opacity. We want to be certain that this overlay affects only the lightning bolt. Go to the Blending Options tab and check the Blend Interior Effects as a Group box.
You can also use a Gradient Overlay. Choose a gradient from the presets in the Gradient Editor. Next, choose Color as the Blending Mode then experiment with the different values to achieve the results you want. Remember to check the Blend Interior Effects as a Group box in the Blending Options tab.
Step 8 - Isolate the sky of the background image
In order to apply some effects to the image and to better position the lightning bolts, we need to isolate the sky.
First, duplicate the background layer (Command/Control + J).
With the duplicate layer selected, enter Quick Mask mode by clicking Q. The thumbnail should have a slight red shade now.
Use the Brush tool (B) with a medium brush to create a selection of the areas you want to keep unchanged.
In our case, the sea, mountains, and land on the horizon were selected. Only the sky should be left out of the selection.
Exit Quick Mask mode by clicking Q again to create a selection.
Without deselecting, click on the small icon at the bottom of the Layers menu. This will turn your selection into a Layer Mask. Make sure that the Foreground and Background colors are set to the default ones (black and white).
We need to add the same mask to one of our lightning bolts to make it look like a cut out. Command/Control-Click on top of the mask thumbnail to create a selection.
Then, select the lightning bolt thumbnail and click on the Add Layer Mask button again.
This should hide a portion of the lightning bolt and make it look like it disappears behind the horizon.
To give the idea that some of the bolts are far away, you can lower their Opacity a bit in the Layers panel. In this case, we made it 55%.
Keep adding more bolts until you are satisfied with your composition. We added one more lightning bolt, left it white without adding further color or gradient overlay to it. We also made it look like it was closer to us and almost falling on the water.
Step 9 - Add some light around the lightning bolts
Select the masked background layer. Make sure that you are working on the image and not the mask. Invert the Foreground and Background colors so they are white and black. Then, use a medium brush with a size of 150 px. Change the Mode to Color Dodge and use a 15% Opacity.
With this brush, create some light around the lightning bolts. It should appear as if they are illuminating the sky behind them.
Add some dark regions close to the light ones by using the Burn tool (O) with a similar sized brush. We used a 15% Exposure and Shadows as the Range.
This will give more depth while adding some contrast between the lightning bolts and the sky around them.
Step 10 - Create a reflection on top of the water
Since our background image has water, we need to add a reflection of the closest lightning bolt.
First, create a duplicate (Command/Control + J). We need to flip it since reflections are normally like mirror images. Go to Edit > Transform > Flip Vertical.
Then, enter Free Transform (Command/Control + T). Distort the lightning bolt by squishing it down so it has the same height as the body of water. This will give a more accurate proportion. Once you are done, click Enter or the check mark on the top menu to commit the changes.
To make it more realistic, lower the Opacity of the reflection layer to about 10%.
Check on your composition and adjust anything that may need it. For example, we resized the closest lightning bolt a bit using Free Transform.
Our artwork is now finally complete.
Below are the before and after images for better comparison.
If you liked this tutorial make sure you don't miss our other guides like how to perspective crop and how to use the spot healing brush in Photoshop.


