
How to Create Sublimation Designs in Silhouette Studio
Learn to create Sublimation Designs in Silhouette Studio in 6 easy steps!
Sublimation designs are a lot of fun. You can create your own design to make unique products like tote bags, shirts, ornaments and many other projects. In this tutorial, we will learn how to create sublimation designs in Silhouette Studio.
If you are a visual learner, check out the video below.
This is an intermediate tutorial, so knowing how to import backgrounds would be a plus. You also would need the Designer Edition of Silhouette Studio to export as a PNG.
We will be using a bright watercolor background and a hand written script font. Lets get started by opening Silhouette Studio.
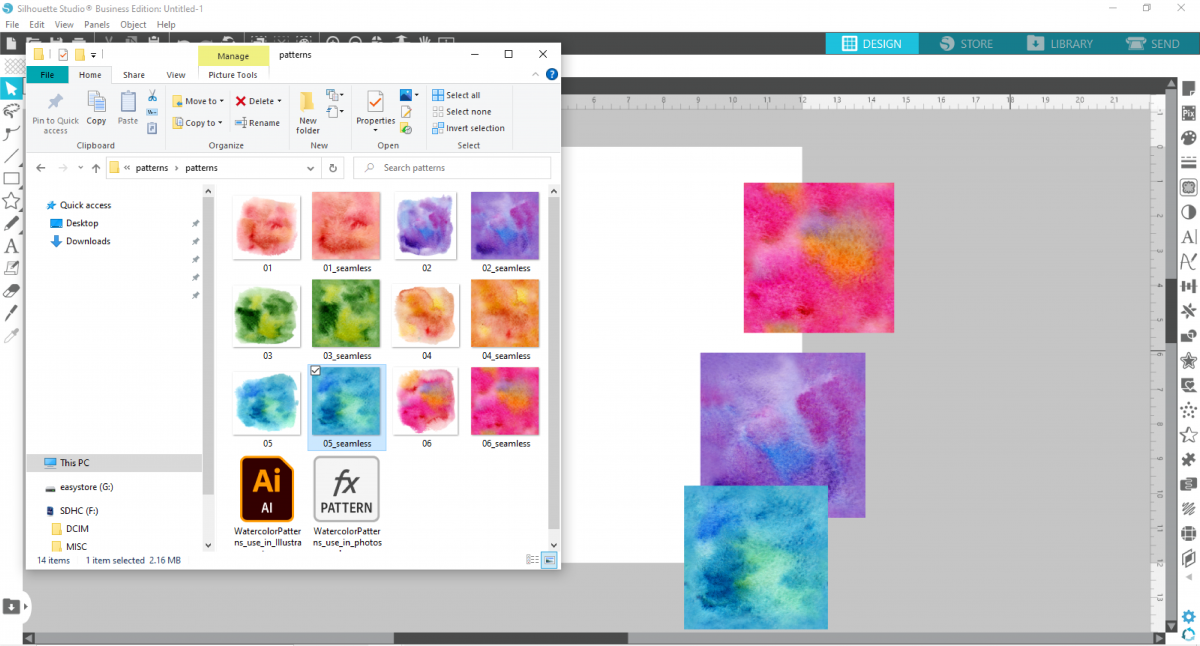
The size of your artboard does not matter, as you can adjust the size at the end when saving as a PNG. For reference, in this tutorial we will be using a 12 x 12 artboard. Locate and open the folder that contains the backgrounds. Drag and drop the backgrounds you will use into your Silhouette Studio artboard.
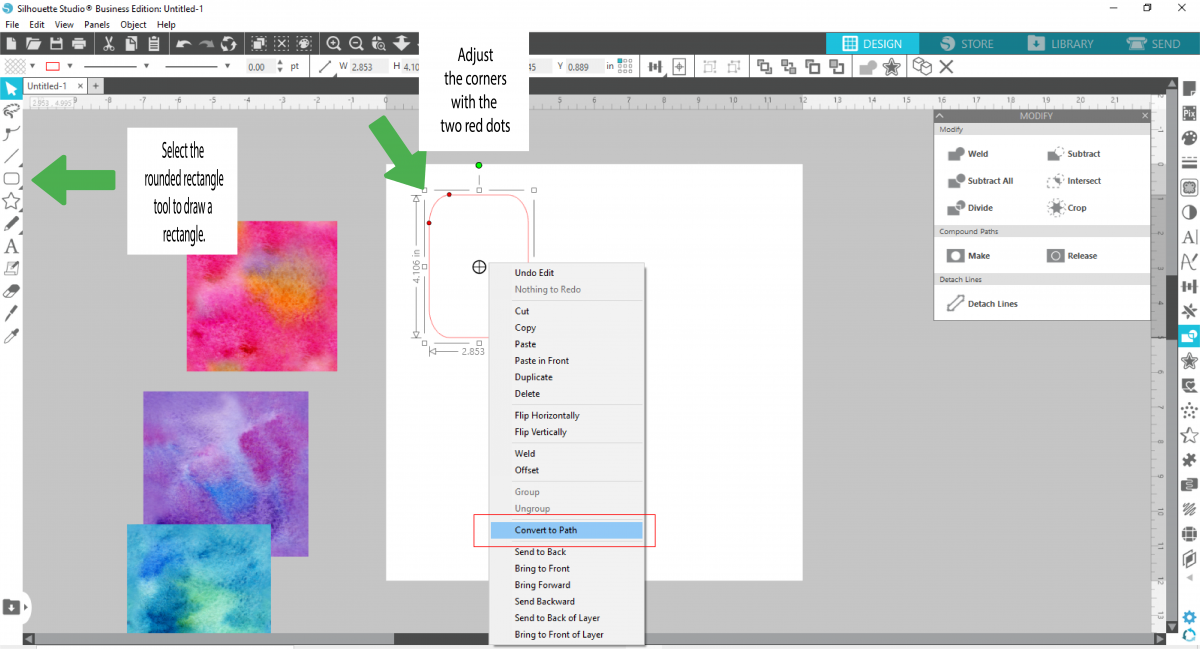
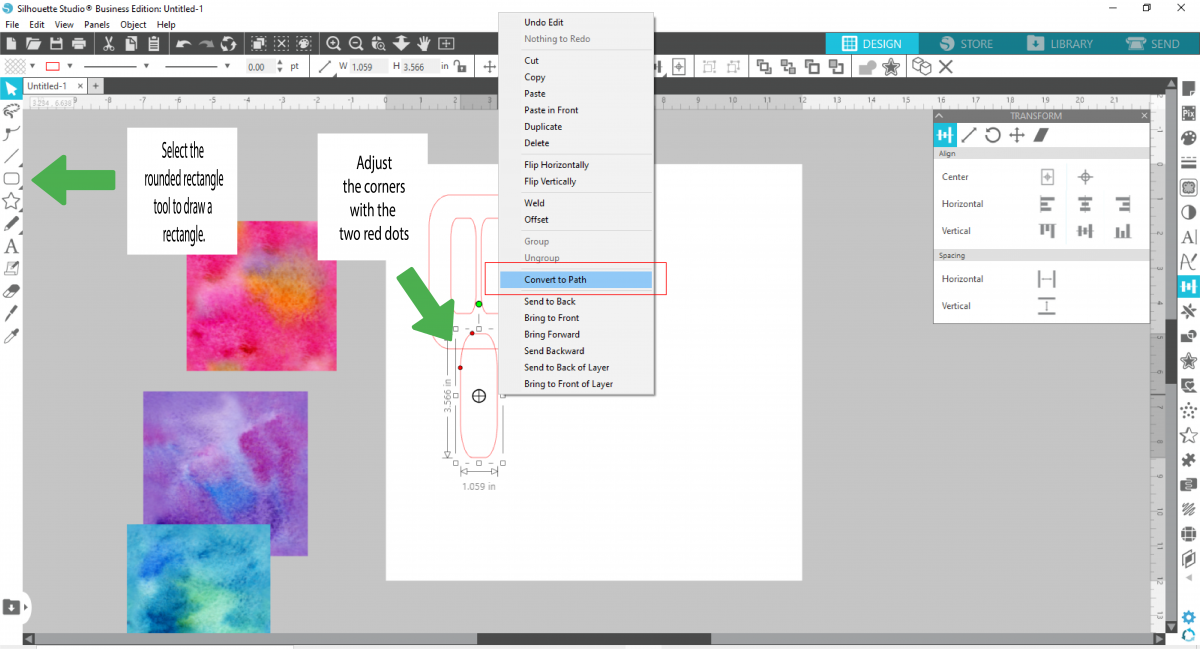
Select the Rounded Rectangle tool under the Drawing Tools on the left side menu. Draw the top portion as a downward rectangle. You can change the roundness of the corners by adjusting the two red dots at the top of the rectangle. Once the shape is as you want, select the rectangle then right click > Convert to path.
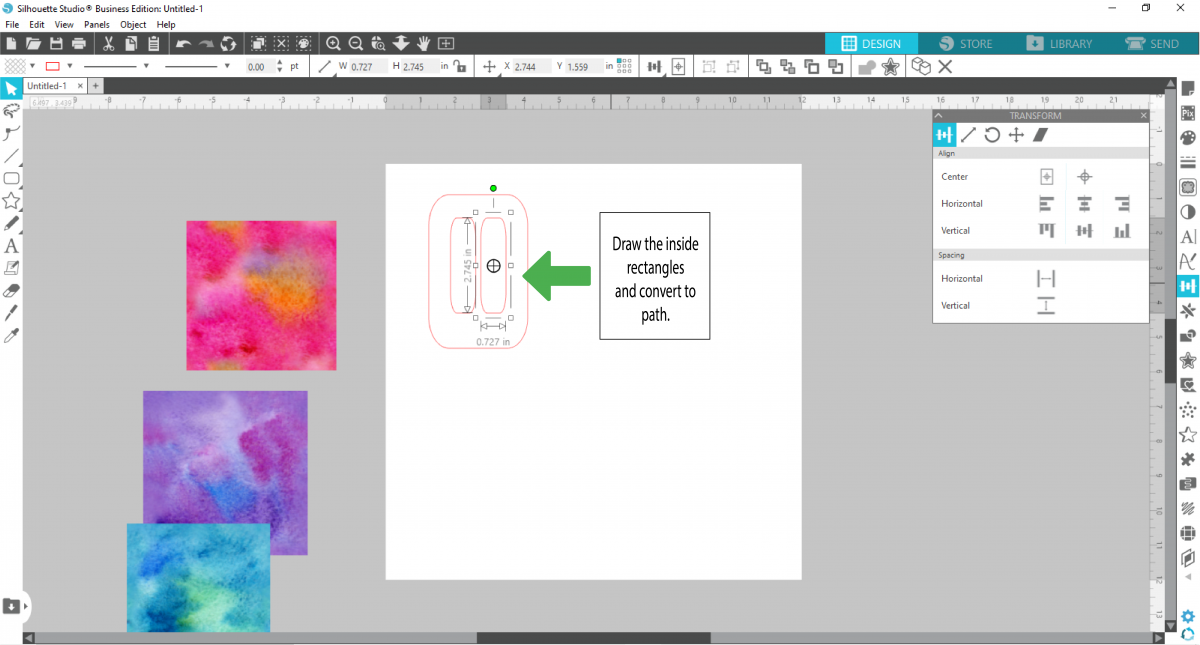
Draw a smaller rectangle inside of the larger rounded rectangle. Adjust the corners accordingly with the red dots. Then select the rectangle and right click > Convert to path. Repeat with a second rectangle inside the top portion. The inside rectangles do not have to be identical.
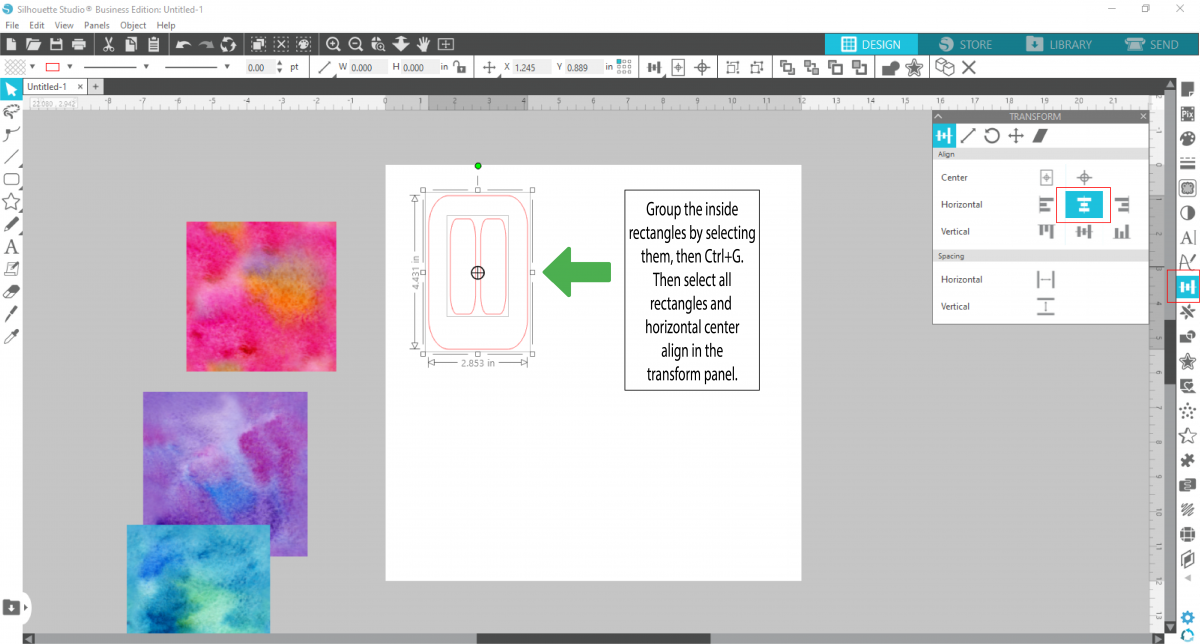
Select both inside rectangles and group by selecting Ctrl + G. You can also do this by right clicking and selecting Group. Next, select all of the rectangles and click on the Transform Panel on the right hand side. Click Align to open the options then click on the Horizontal Align Center.
Using the rounded rectangle, draw the stick. Use the red dots to adjust the corners. Make sure that it is overlapping, so that you can create a even straight line. Right click and select Convert to path. While making sure it is selected, right click and Send to back.
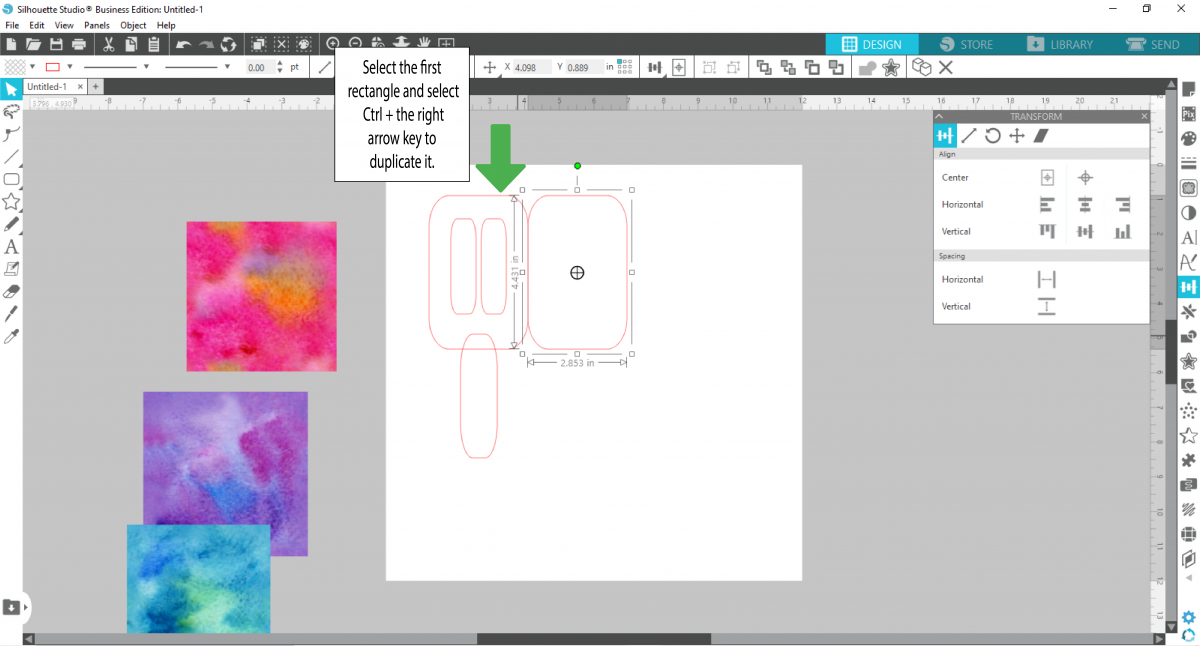
Always make a duplicate of the original portion that is being modified. Do this by selecting the top rectangle portion and press Ctrl + the right arrow key. This will duplicate it to the right.
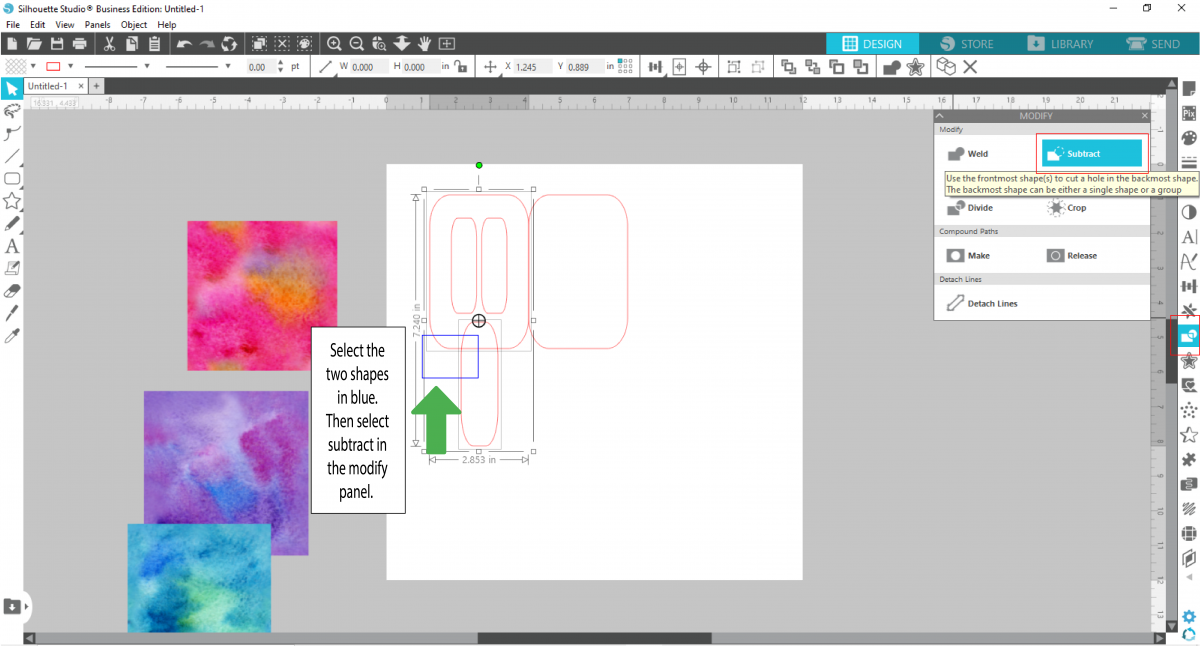
Select the top portion of the popsicle and the stick. Click on the Modify panel on the right side to open then click on Subtract. You should be left with the center and the stick.
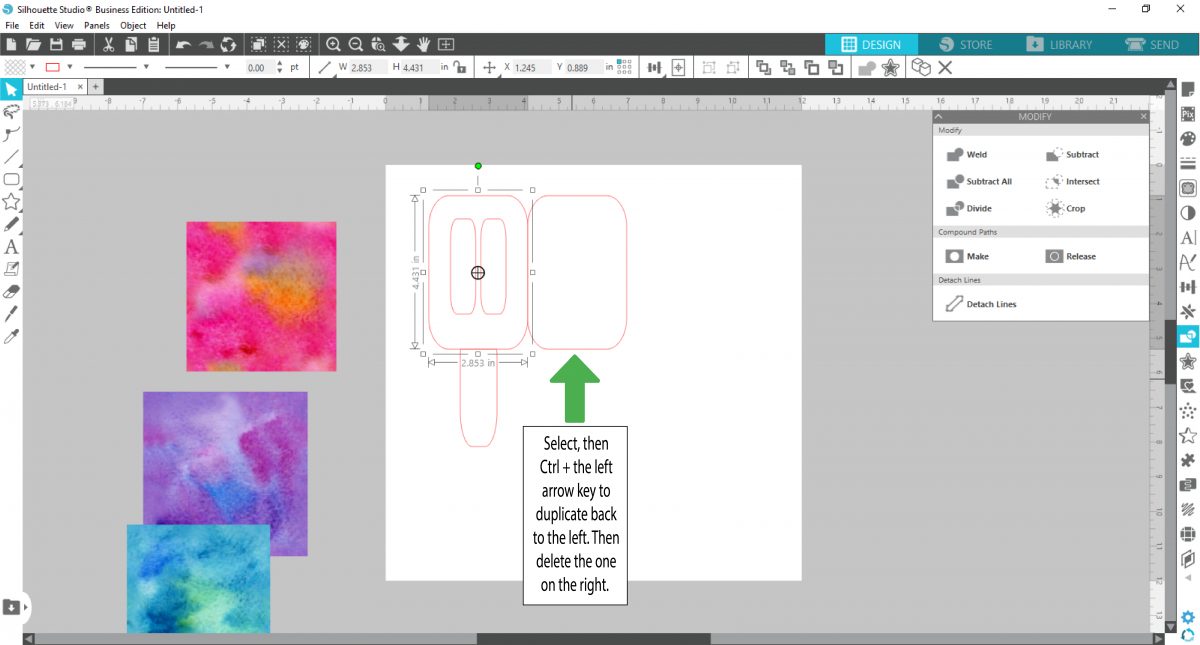
You will notice that the original top portion is no longer there. We will change this by moving the duplicated rectangle back over the original top portion. Do this by selecting the duplicate rectangle then Ctrl + the left arrow key. Delete the rectangle on the right side as it's no longer needed. You should be left with a popsicle.
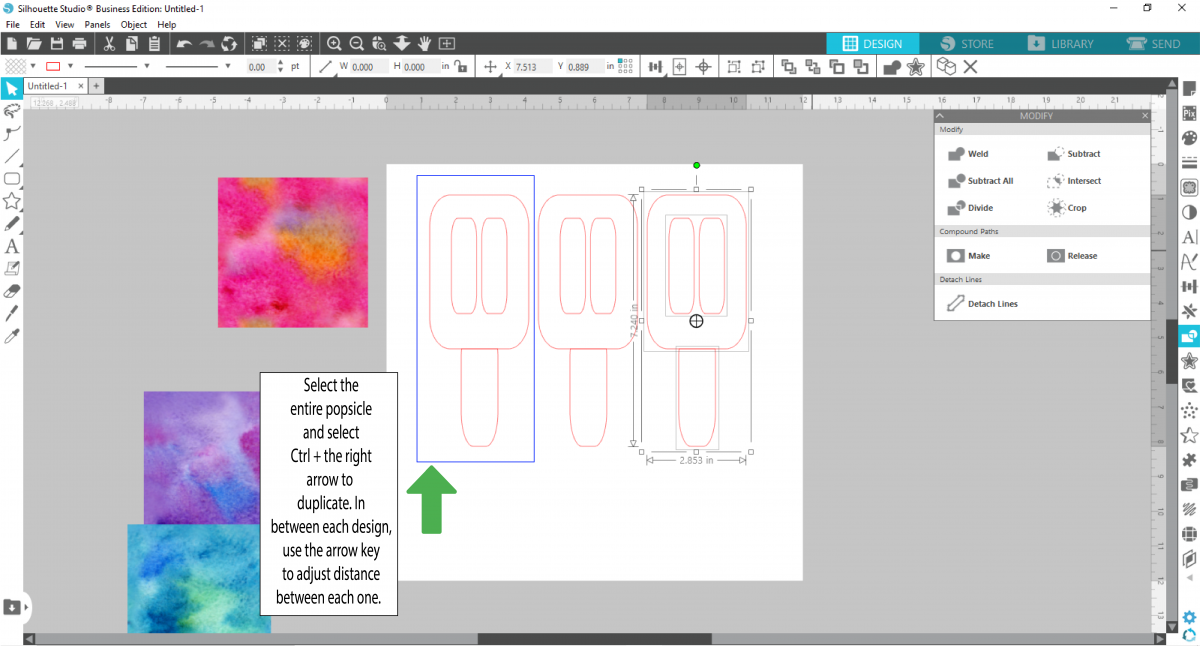
Select the entire popsicle, then press Ctrl + the right arrow key. This will duplicate the whole design. You can use the arrow key to adjust the distance between each popsicle. Do this two more times so that you have three popsicles.
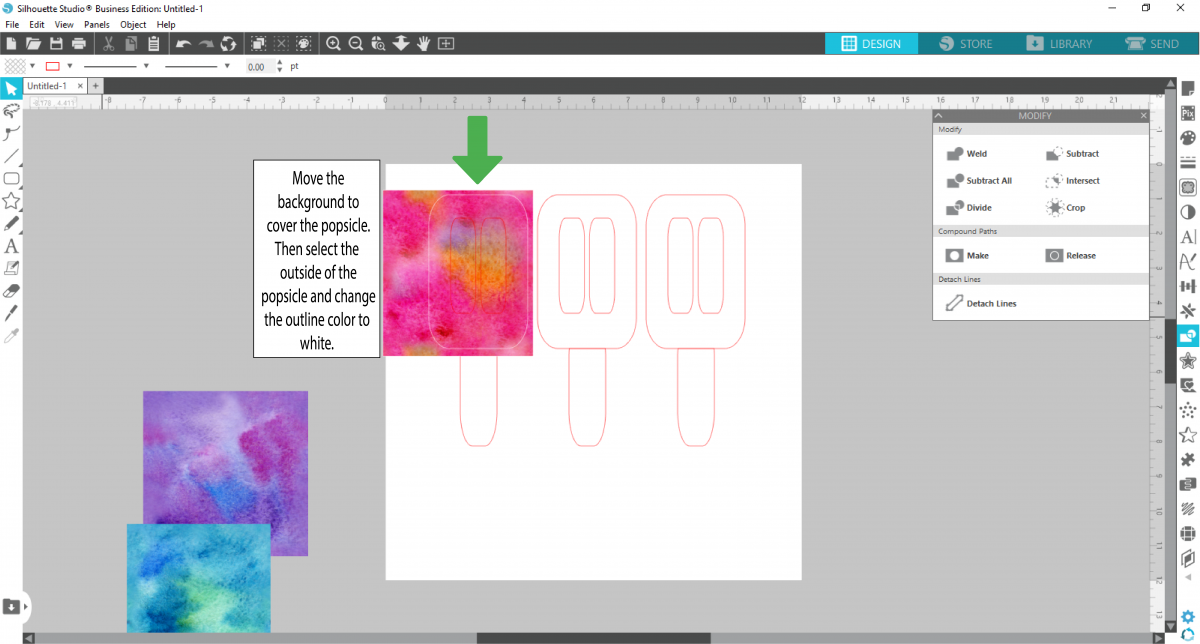
Here you will place a watercolor background over the top of one popsicle. Make sure the background covers the entire top portion of the popsicle. Change the red outlines for the outside to white. This will help to see the line better.
Select both the background and the outside white line. Then, select the Modify tool and choose Crop. Right click and Send to the back.

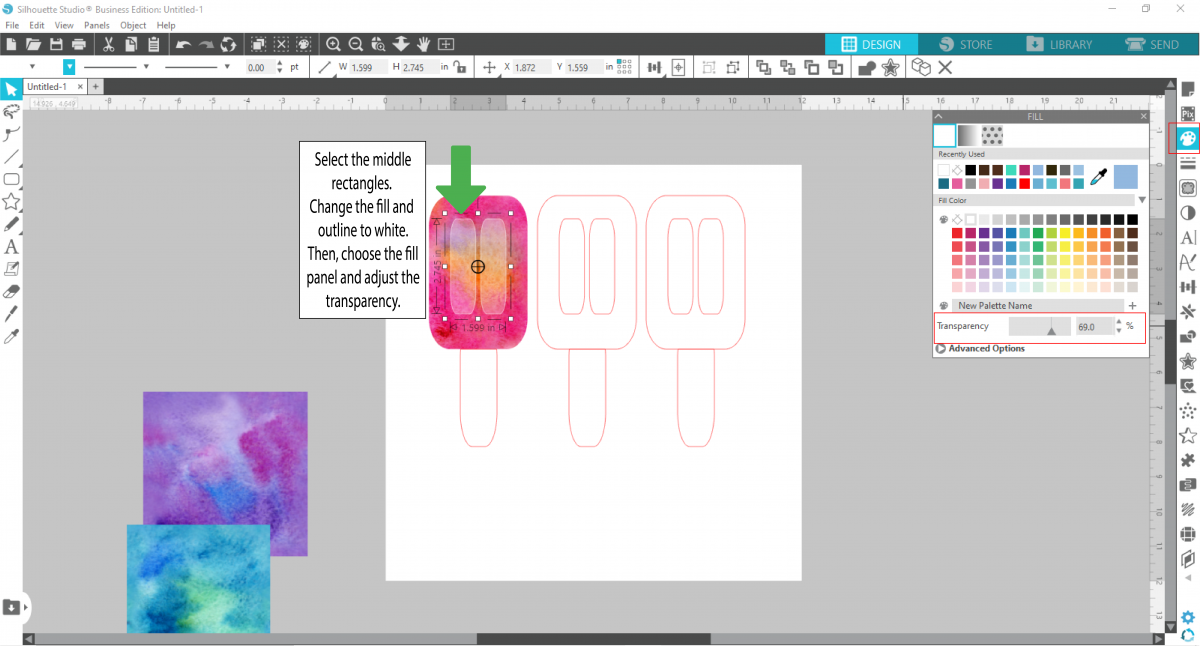
Select the rectangles inside the portion of the popsicle. Change the color and outline to white. Click on the Open fill panel on the right hand side. Adjust the Transparency to your liking. This will allow the background to show through.
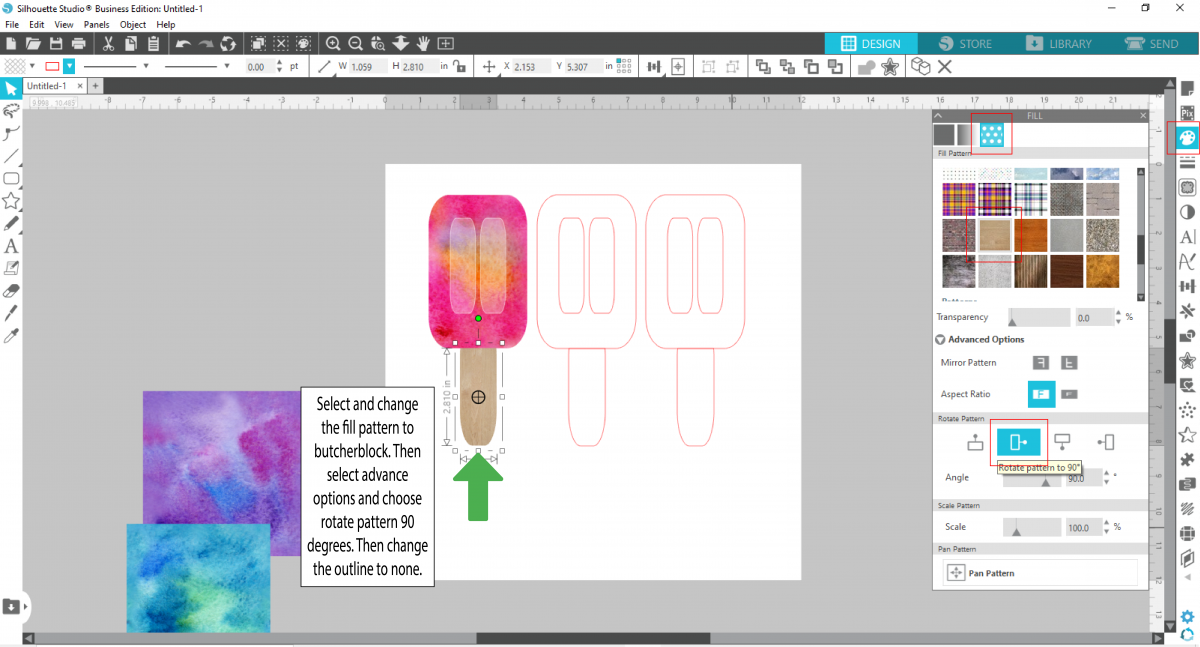
Select the stick and click on the Fill pattern under the Fill Panel. Choose the butcherblock option in the preloaded patterns and click Advance options. Here you can adjust the rotation of the wood grains. Under Rotate, select Rotate pattern 90 degrees to change the pattern to vertical. Change the line color to none.
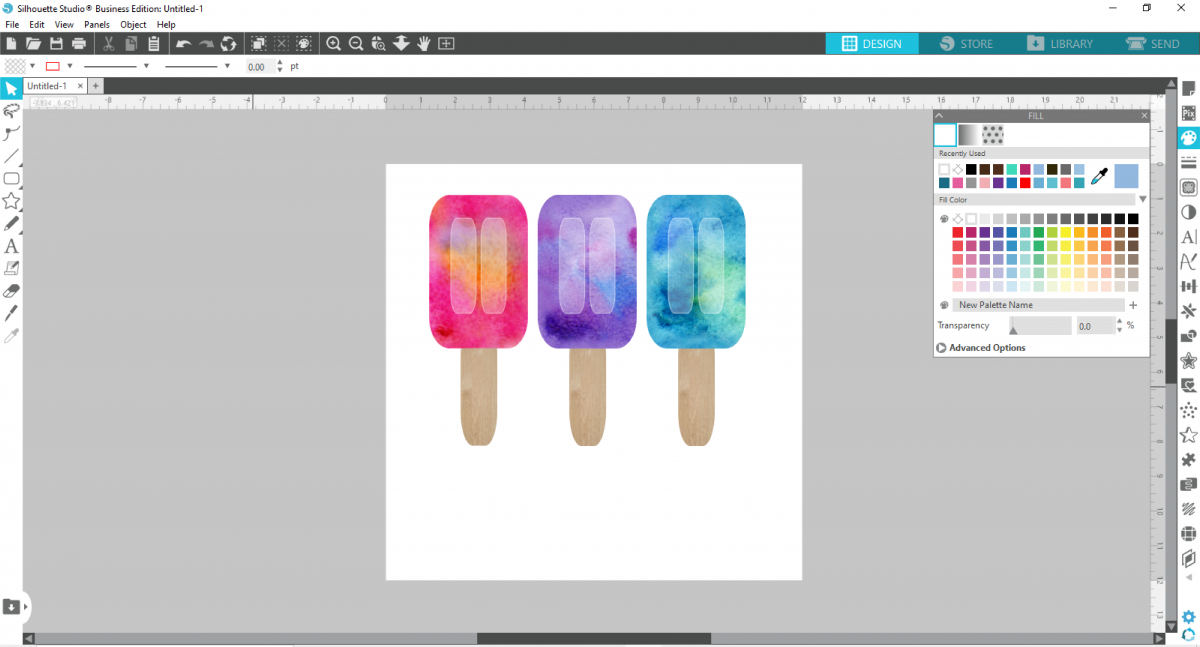
Repeat to add backgrounds to the other popsicles. You should now have three completed popsicles.
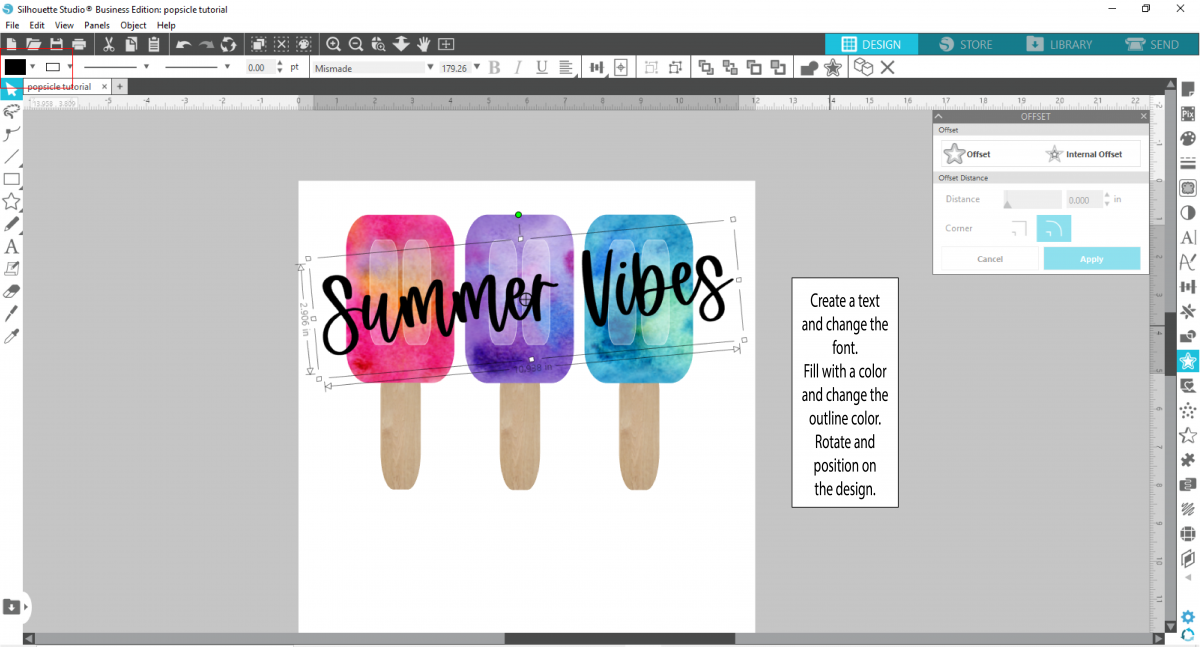
Create a text you would like to use. I will be using the text 'Summer Vibes' and the font Mismade. Type out the text then change the color fill and outline to black. Reposition the text over the design. You can rotate the direction however you would like.
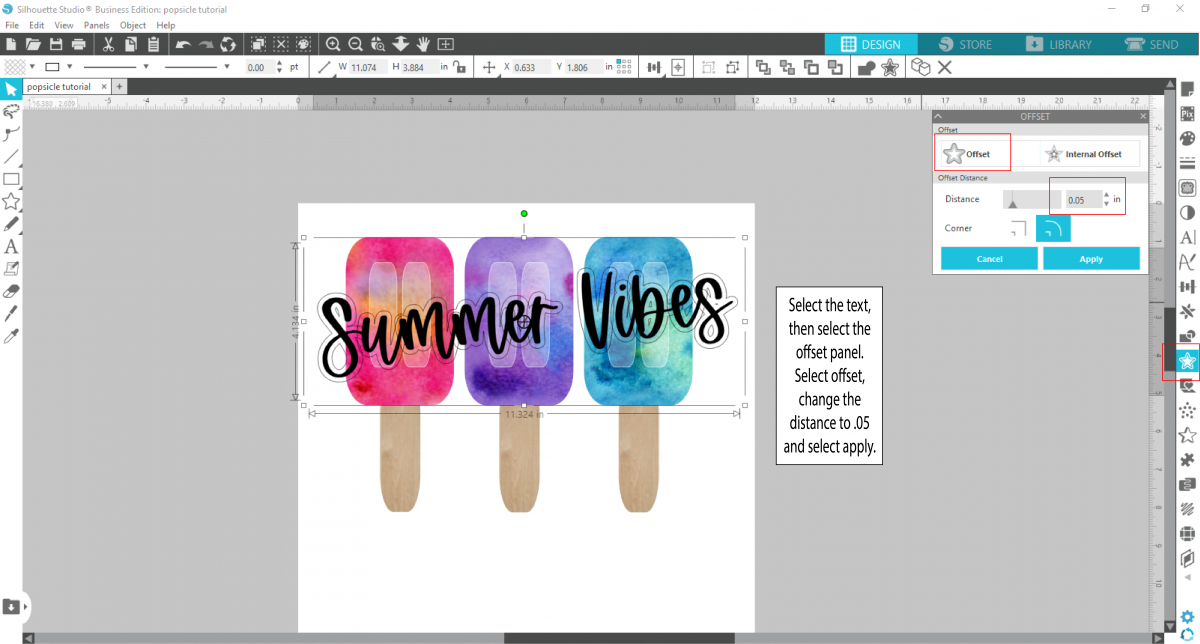
Select the text and open the Offset panel. Select Offset and choose your Distance. I chose a distance of .05, which is what I normally start with. Select Apply.
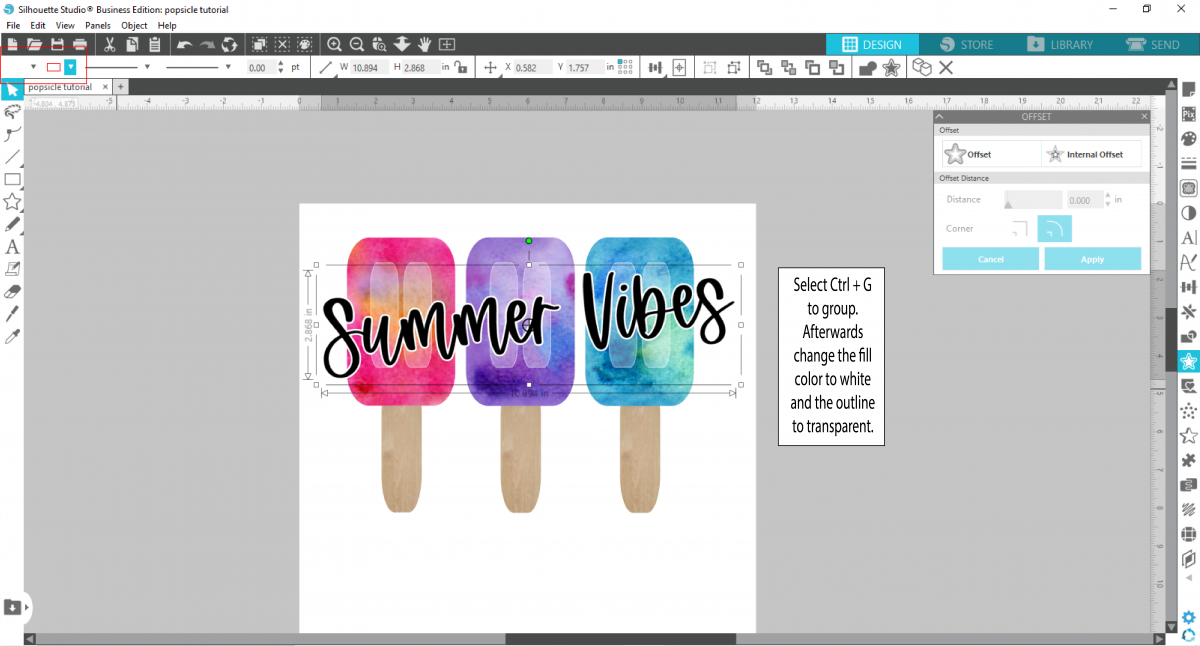
Then, select Ctrl + G to group. Afterwards, change the fill color to white and the outline to transparent.
You now have a design that would work great for sublimation. You can print directly from silhouette to a sublimation printer or export as a PNG image. To learn more, check out the rest of our Silhouette Tutorials; such as how to make sticker sheets and how to add outlines around text.
If you are a visual learner, check out the video below.
This is an intermediate tutorial, so knowing how to import backgrounds would be a plus. You also would need the Designer Edition of Silhouette Studio to export as a PNG.
We will be using a bright watercolor background and a hand written script font. Lets get started by opening Silhouette Studio.
Step 1 - Import the backgrounds
The size of your artboard does not matter, as you can adjust the size at the end when saving as a PNG. For reference, in this tutorial we will be using a 12 x 12 artboard. Locate and open the folder that contains the backgrounds. Drag and drop the backgrounds you will use into your Silhouette Studio artboard.
Step 2 - Create the popsicle design
Select the Rounded Rectangle tool under the Drawing Tools on the left side menu. Draw the top portion as a downward rectangle. You can change the roundness of the corners by adjusting the two red dots at the top of the rectangle. Once the shape is as you want, select the rectangle then right click > Convert to path.
Draw a smaller rectangle inside of the larger rounded rectangle. Adjust the corners accordingly with the red dots. Then select the rectangle and right click > Convert to path. Repeat with a second rectangle inside the top portion. The inside rectangles do not have to be identical.
Select both inside rectangles and group by selecting Ctrl + G. You can also do this by right clicking and selecting Group. Next, select all of the rectangles and click on the Transform Panel on the right hand side. Click Align to open the options then click on the Horizontal Align Center.
Using the rounded rectangle, draw the stick. Use the red dots to adjust the corners. Make sure that it is overlapping, so that you can create a even straight line. Right click and select Convert to path. While making sure it is selected, right click and Send to back.
Step 3 - Edit the popsicle design
Always make a duplicate of the original portion that is being modified. Do this by selecting the top rectangle portion and press Ctrl + the right arrow key. This will duplicate it to the right.
Select the top portion of the popsicle and the stick. Click on the Modify panel on the right side to open then click on Subtract. You should be left with the center and the stick.
You will notice that the original top portion is no longer there. We will change this by moving the duplicated rectangle back over the original top portion. Do this by selecting the duplicate rectangle then Ctrl + the left arrow key. Delete the rectangle on the right side as it's no longer needed. You should be left with a popsicle.
Step 4 - Duplicate the popsicle design
Select the entire popsicle, then press Ctrl + the right arrow key. This will duplicate the whole design. You can use the arrow key to adjust the distance between each popsicle. Do this two more times so that you have three popsicles.
Step 5 - Use backgrounds as a fill for the design
Here you will place a watercolor background over the top of one popsicle. Make sure the background covers the entire top portion of the popsicle. Change the red outlines for the outside to white. This will help to see the line better.
Select both the background and the outside white line. Then, select the Modify tool and choose Crop. Right click and Send to the back.
Select the rectangles inside the portion of the popsicle. Change the color and outline to white. Click on the Open fill panel on the right hand side. Adjust the Transparency to your liking. This will allow the background to show through.
Select the stick and click on the Fill pattern under the Fill Panel. Choose the butcherblock option in the preloaded patterns and click Advance options. Here you can adjust the rotation of the wood grains. Under Rotate, select Rotate pattern 90 degrees to change the pattern to vertical. Change the line color to none.
Repeat to add backgrounds to the other popsicles. You should now have three completed popsicles.
Step 6 - Add and adjust text
Create a text you would like to use. I will be using the text 'Summer Vibes' and the font Mismade. Type out the text then change the color fill and outline to black. Reposition the text over the design. You can rotate the direction however you would like.
Select the text and open the Offset panel. Select Offset and choose your Distance. I chose a distance of .05, which is what I normally start with. Select Apply.
Then, select Ctrl + G to group. Afterwards, change the fill color to white and the outline to transparent.
You now have a design that would work great for sublimation. You can print directly from silhouette to a sublimation printer or export as a PNG image. To learn more, check out the rest of our Silhouette Tutorials; such as how to make sticker sheets and how to add outlines around text.


