- By Nadine Spires
- 7 Mins
- DesignScape Tutorials
How to Load and Use Photoshop Actions in DesignScape
We'll show you how to load and use Photoshop actions in DesignScape.
You can quickly load and use Photoshop actions in DesignScape. Use your favorite actions in your projects with this online editing software available to Gold Plus Members. Want to give DesignScape a try? Then sign up for a free 30 Day Gold Plus Membership Trial today! With a list of features available, DesignScape is an excellent alternative to Photoshop and Illustrator. Let us guide you through this tutorial on how to upload and use Photoshop actions in DesignScape.

To access DesignScape, go to the Plus Membership page, scroll down a short way and then click on Designscape.

For this tutorial we will be using these summer photoshop actions and a summer beach photo.
Step 1 - Import Photoshop Actions
Once you have opened DesignScape, you need to open your photo. Go to File > Open then select the photo you want to use.
Locate the Actions Panel
Now, to locate the Actions Panel, go to Window > Actions. The Actions Panel will open on the right hand side. You will also be able to access it by clicking on the Play icon on the right side toolbar.
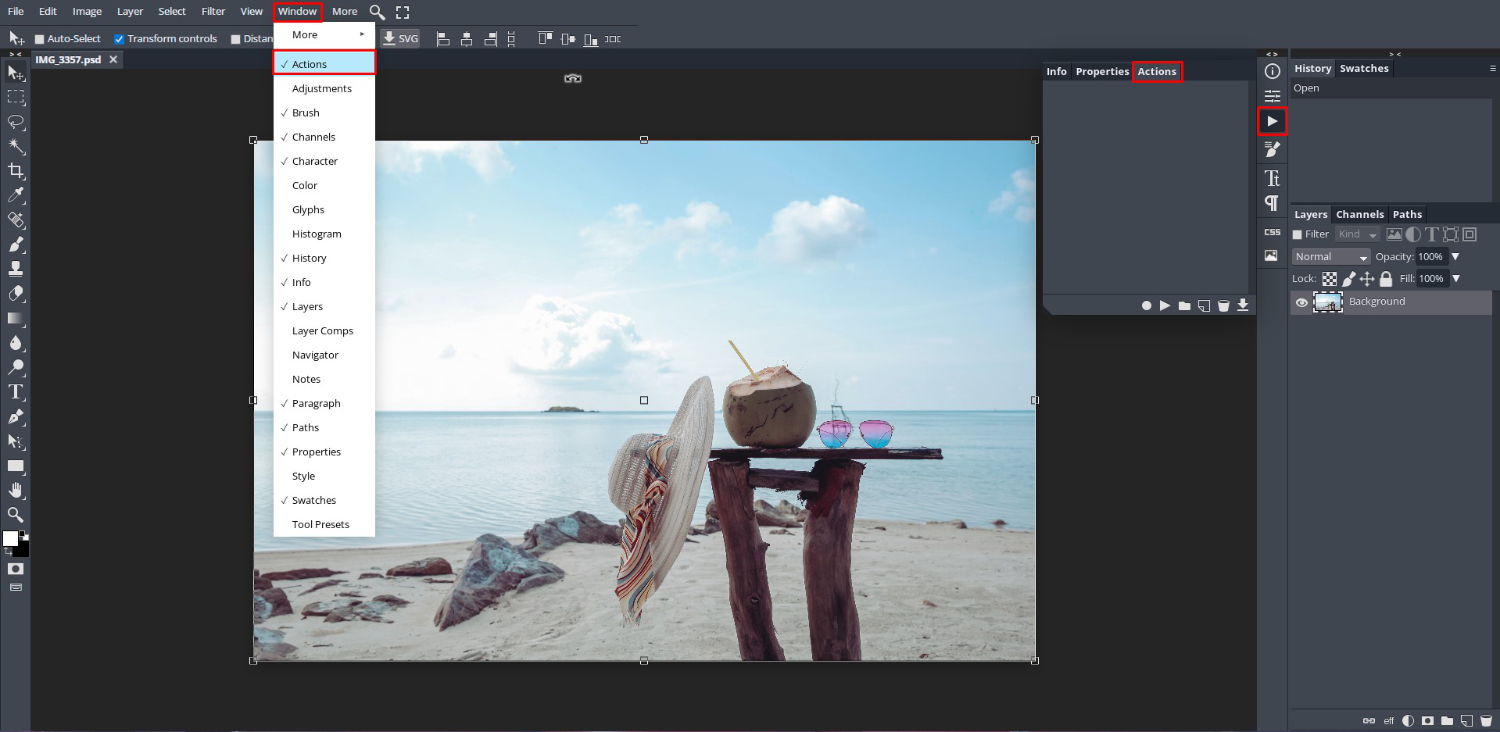
Drag and Drop Photoshop Actions
To load our Photoshop Actions we are going to use the drag and drop method. Open the folder where your actions are stored, then drag and drop the file into DesignScape.

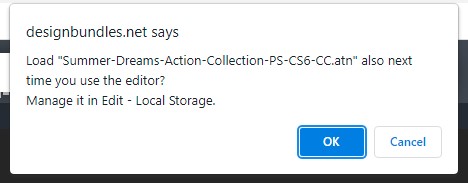
A notification window will ask if you want to load the actions the next time you use DesignScape. Click on Ok.
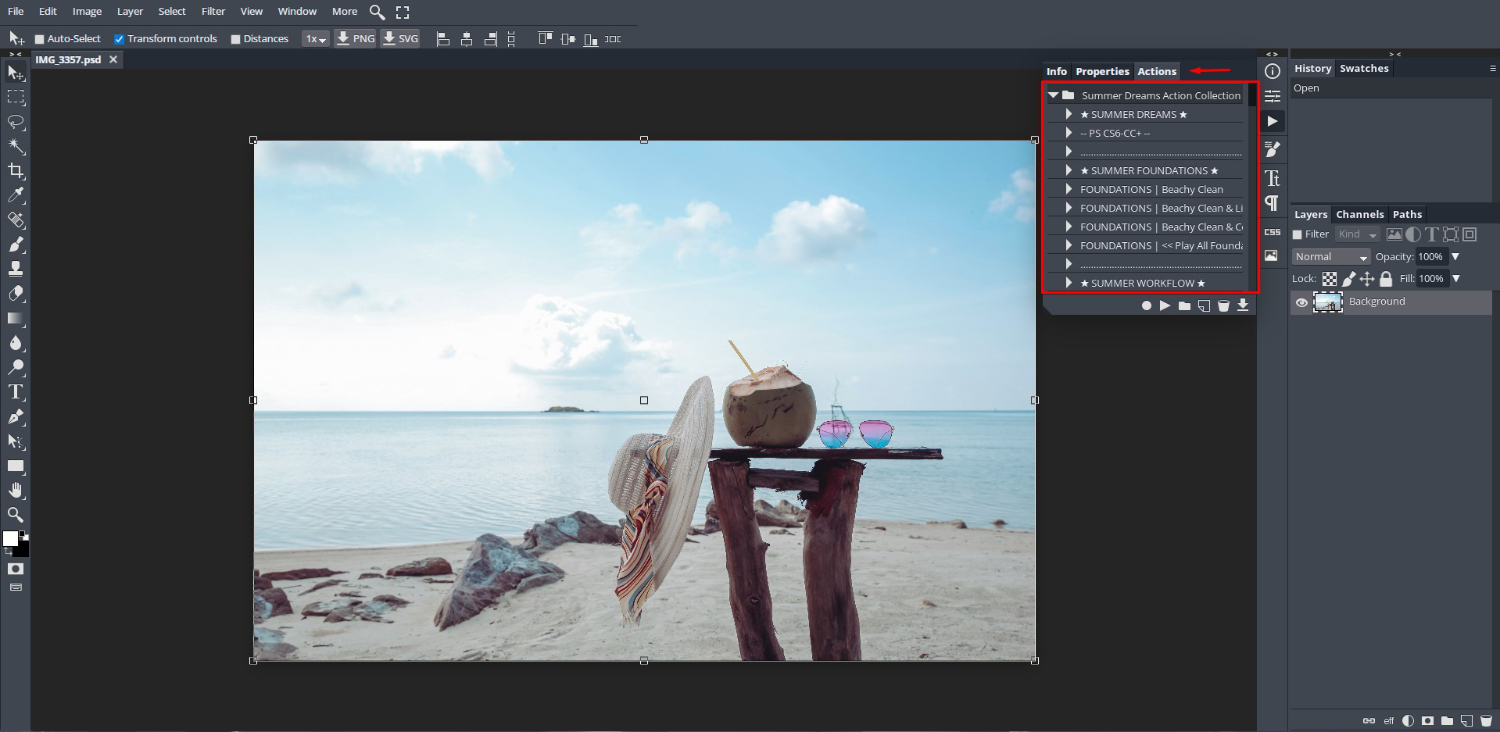
Your Photoshop actions will be loaded into the DesignScape Actions Panel. From here you will be able to select the actions you want to apply.
Step 2 - Apply a Photoshop Action
We are now ready to apply a Photoshop action to the loaded image. Keep in mind that the more steps an action has, the longer it will take to load. You can see how many steps are in an action by clicking on the arrow next to the action name. This will open with a list of the steps.
The action we chose to use is under the Style section called Dreamy Beach. After selecting the action, click on the Play icon at the bottom of the panel.
Any part of the action that can be changed will show as a notification. Click Ok to carry on.
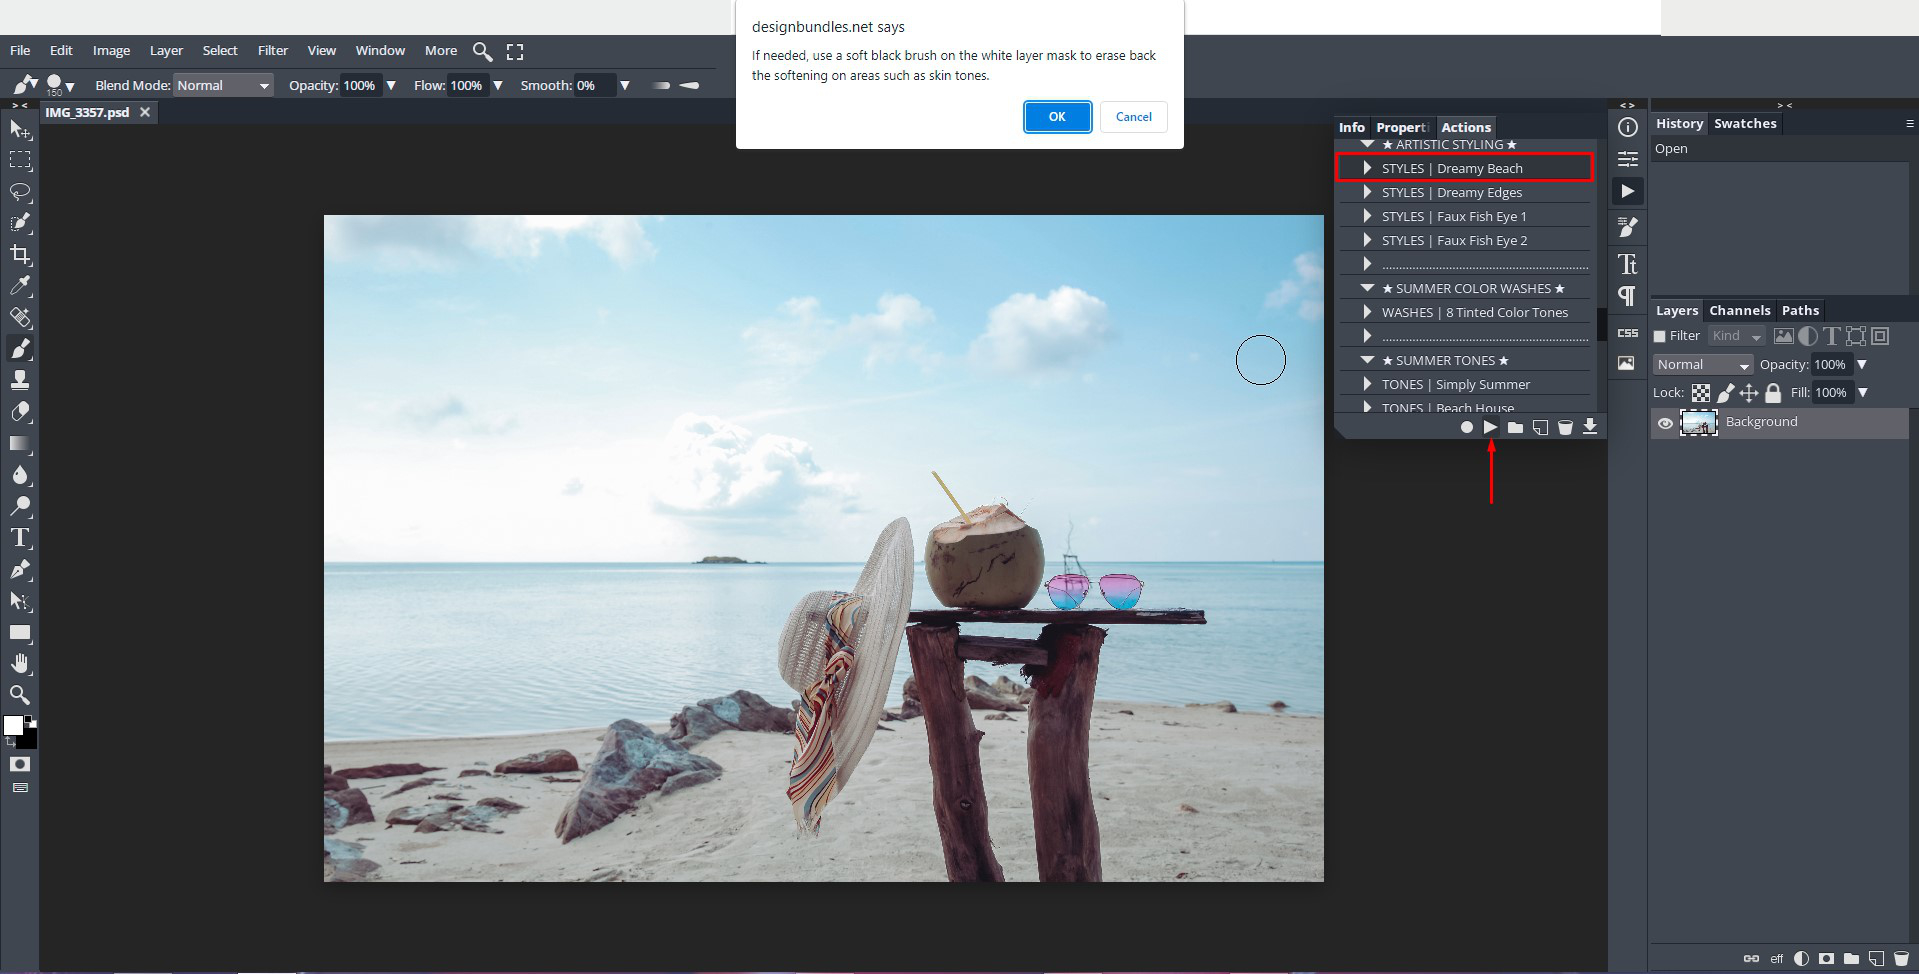
A soft, dreamy glow was added to the photo. The action applied can be found under the Layers Panel on the right hand side. Clicking on the arrow will open up the action options that can be adjusted as needed.

Step 3 - Edit the Photoshop Action
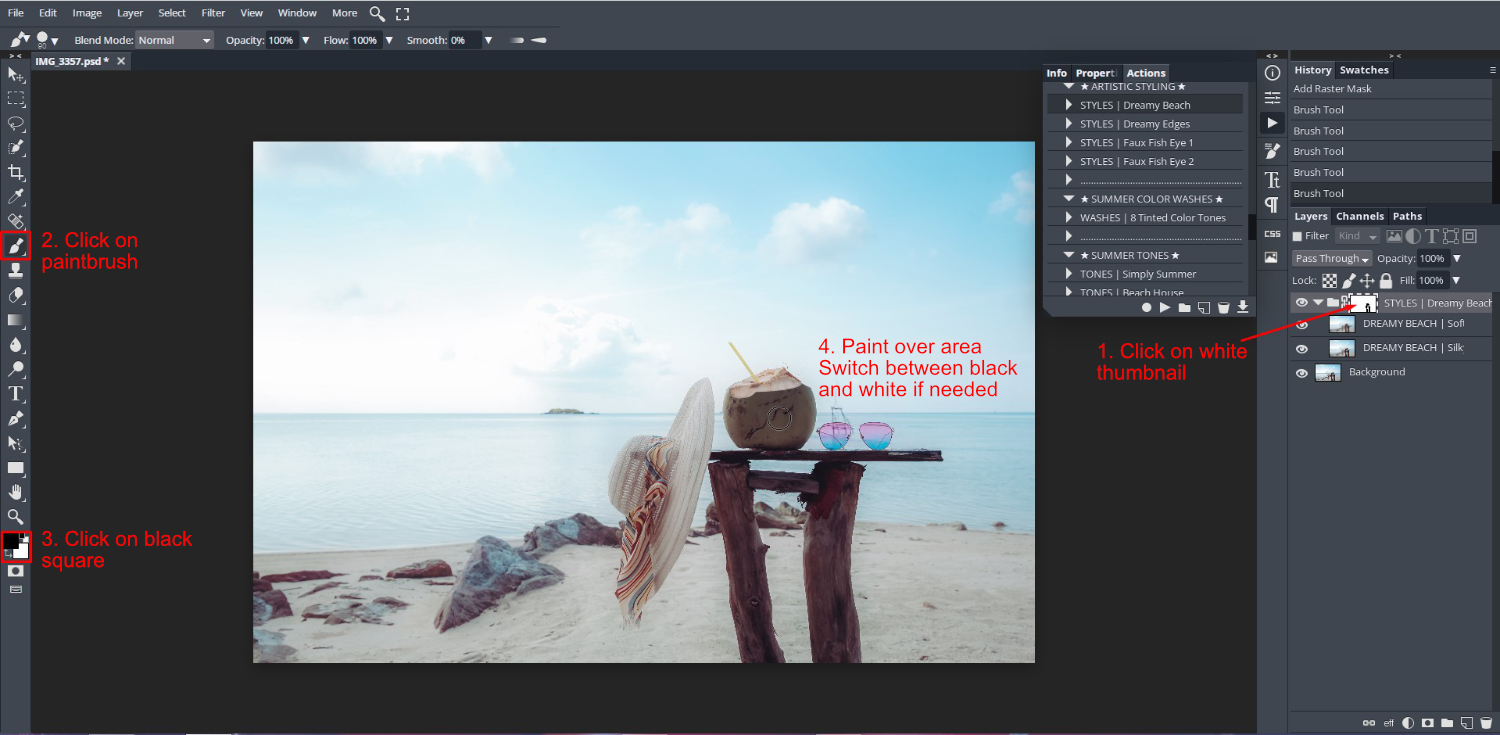
In the Layers Panel, if not done already, click on the drop down arrow for the Dreamy Beach action. We want to paint back some detail in the coconut and table.
Select the white thumbnail in the Layers panel, then click on the paintbrush on the left side toolbar. Further down the toolbar make sure that the black color box is selected. You can switch between white (reveals) and black (conceals) by pressing X on the keyboard.
On the image, use the bracket keys [ and ] to increase or decrease the brush size. Now, start painting over the area with black where you want the action removed (concealed).
Experiment with more actions until you are happy with the result. Here we added more contrast, and brightness then edited the masks. A Pop of Color action was added where individual colors were adjusted. We then ended off with the Tone, Tahitian Dream, to give a faded light blue overlay.

Being able to load and use Photoshop actions in DesignScape couldn’t be more simple. You can use your ever growing collection of Photoshop actions without worry. DesignScape is such a perfect editing companion to your projects, you can even import fonts and use smart object mockups. We hope you enjoyed this tutorial and carry on to learn more about DesignScape.
6 Related DesignScape Tutorials
Did you know you can use Photoshop .abr brushes in DesignScape? DesignScape is an online editing software available to Gold Plus Members. Not a Plus Member yet? Sign up for a free 30 Day Trial of the Gold Plus Membershiptoday! Since there is no need to download any software, it is ...
1- Open up Photoshop And select your image.2-Once your image is in your workspace right click on the background image in the layers palette.3- Select duplicate background and a new box will appear. Name your background copy and click OK4- Go to Filter > Filter Gallery. ( note ...
Because DesignScape is an internet-based software, you can also use it on an iPad. This tutorial will go over some differences between using DesignScape on an iPad versus on a computer.Using DesignScape on an iPad is so convenient, and it's an excellent alternative to Illustrator/Photoshop. DesignScape is available ...
Creating sublimation designs has never been easier using DesignScape! We will go over the steps for creating a simple sublimation design that anyone can make. Sublimation designs can be used on items like mugs, pillowcases, mousepads, bags, and so much more!!DesignScape is available at the Gold Plus Membership level ...
Ensure that your file has been downloaded and unzipped to use.1- Open up Photoshop.2-Open your image.3- Click on the Dodge/Burn/Sponge Tool.4- You can adjust the size of your brush by selecting the size tool or by adjusting it with the Ctrl + [ ] keys.5- By ...
You may be thinking of swapping out Photoshop for Procreate to make digital drawings. But you may be wondering if your brushes will work in Procreate. The good news is, you can take all your Photoshop .abr brushes and move them into Procreate. Awesome right? In this tutorial, we will ...

 All your Font Needs


