
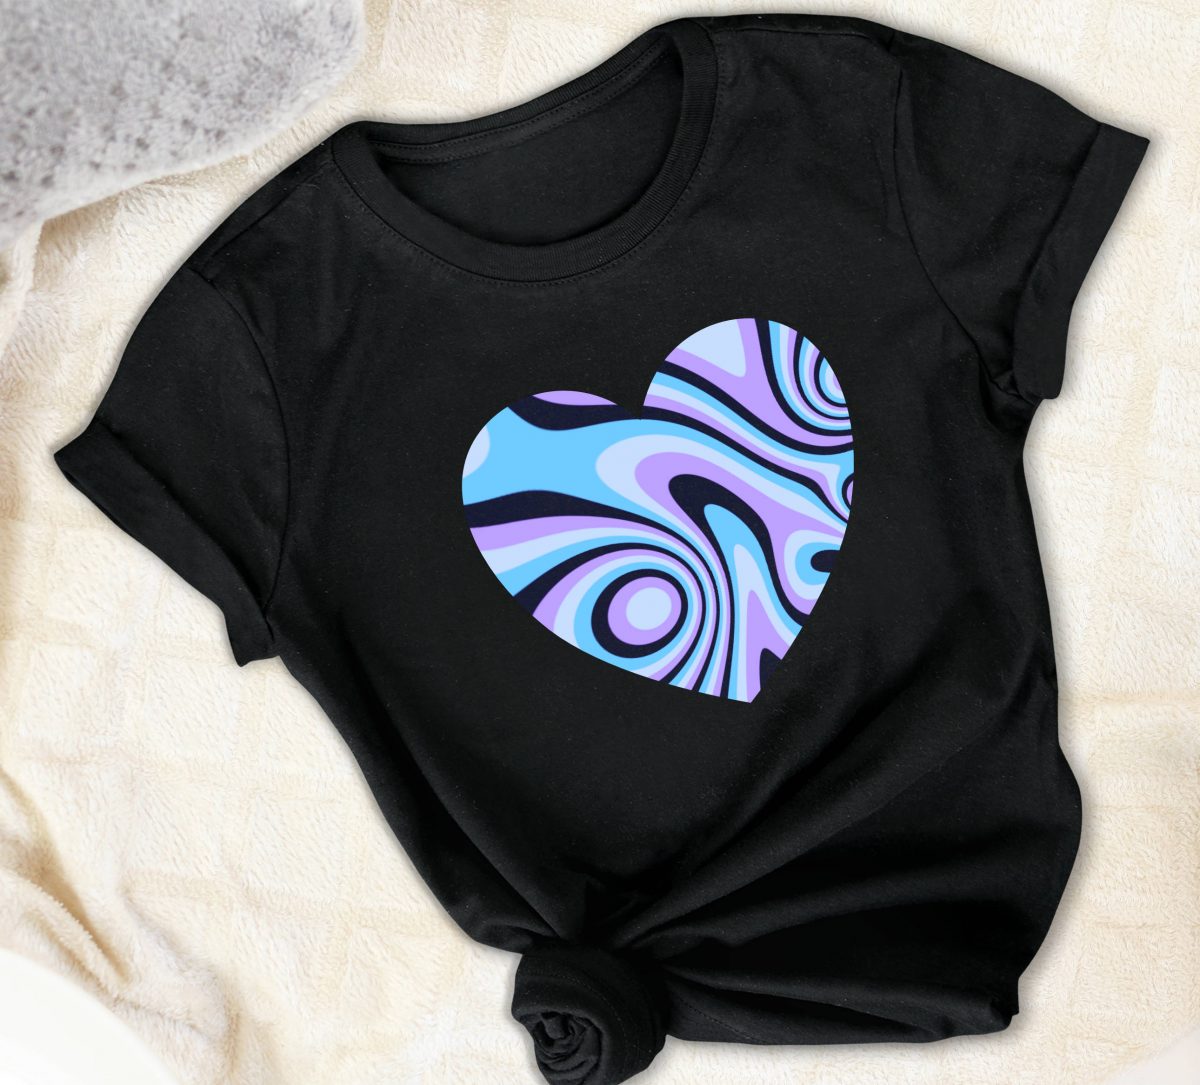
How to Make a Marble Effect in Affinity Photo
A marbled effect can give texture to backgrounds and create eye-catching designs. The effect is great for use in wallpaper, paper crafts and even design fills. Colors can be bold and striking or have a light pastel feel. In Affinity Photo marble effects can be created using the distortion tools.
In this tutorial we are going to create a marble background in Affinity Photo. To start off, open Affinity Photo and select New Document. Once you have adjusted your settings, click Create.
The base design needs to be set up before we can begin distorting it. We will be using the Rectangle tool to create panels and fill them with color. Color choice is completely up to you including how many and the placement. For this tutorial, we filled four panels with blue, purple and black.
Under the Layer panel on the right, click on Add Pixel Layer. We will keep this for a background fill if needed later. This layer serves to fill any white gaps that you may have trouble covering. But if the distortion works well enough, this layer won't be needed.
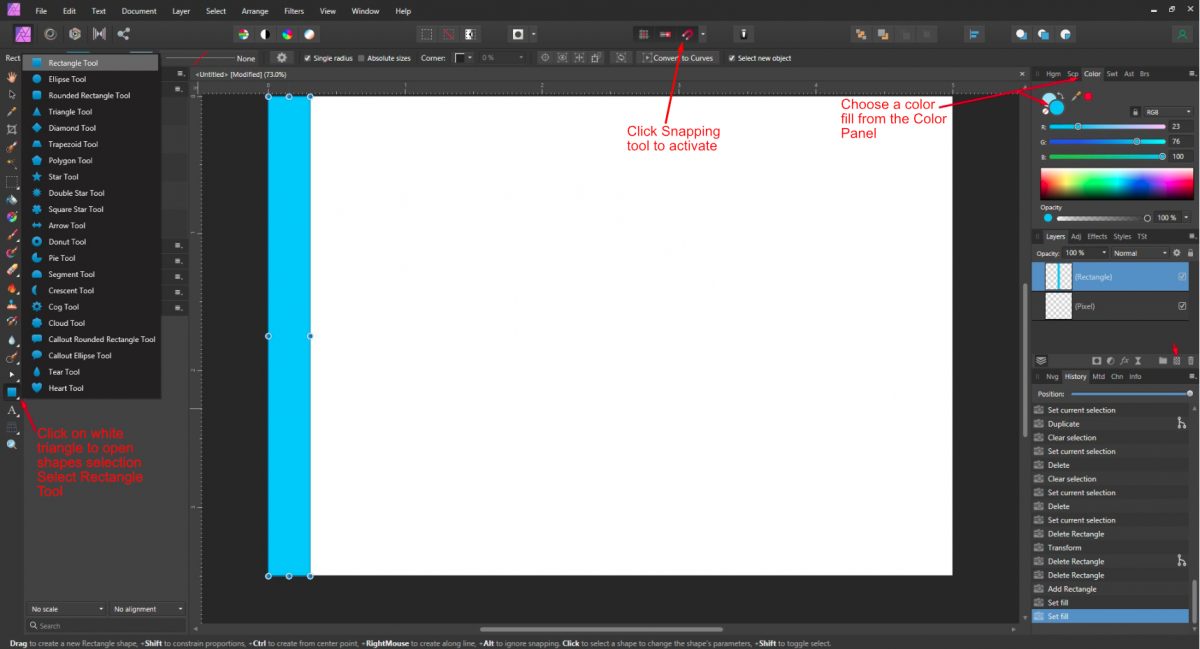
To keep everything aligned nicely, click on the Snapping tool at the top. It looks like a horseshoe magnet. Then, on the left hand side panel, click on the shape tool. It will show the last shape used filled in blue with a white triangle next to it.
Click on the white triangle and select the Rectangle tool from the options. Now, draw out your rectangle as shown in the image below. Affinity Photo will create a new layer for the rectangle
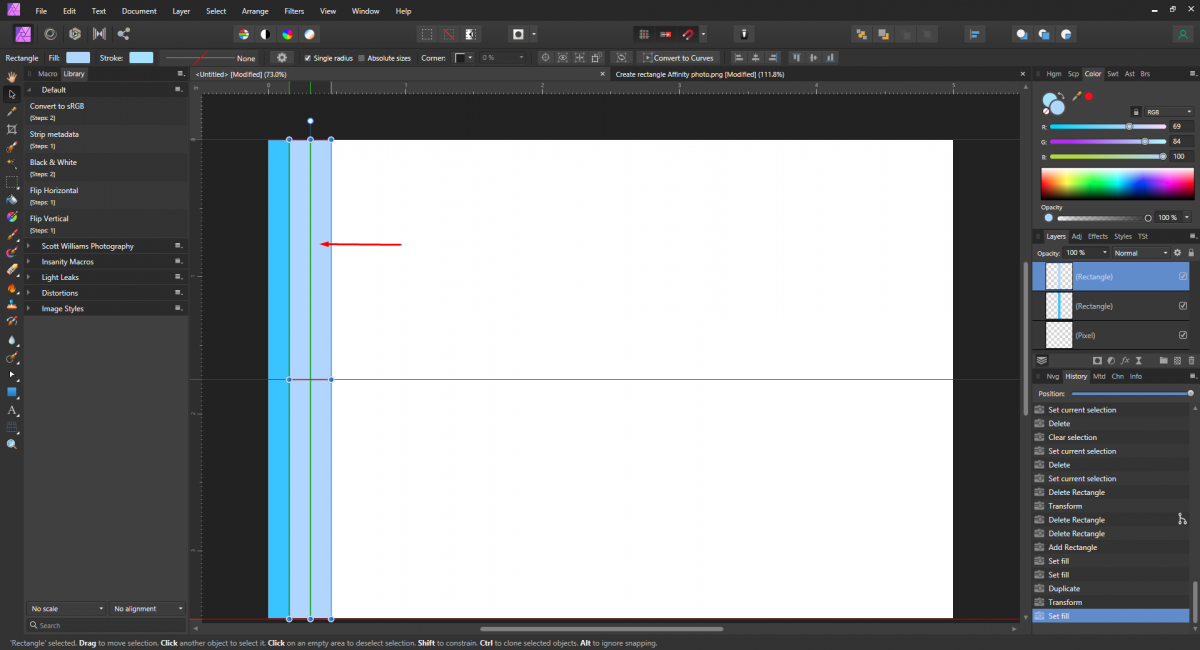
Fill the rectangle with a color of your choice from the Color Panel on the right hand side. Go to the Layers panel and right click the rectangle layer then select Duplicate. Change the color fill then click + drag it to the left until it covers half of the first rectangle. With the Snapping guide in place, a green and red line will show when it's aligned correctly.
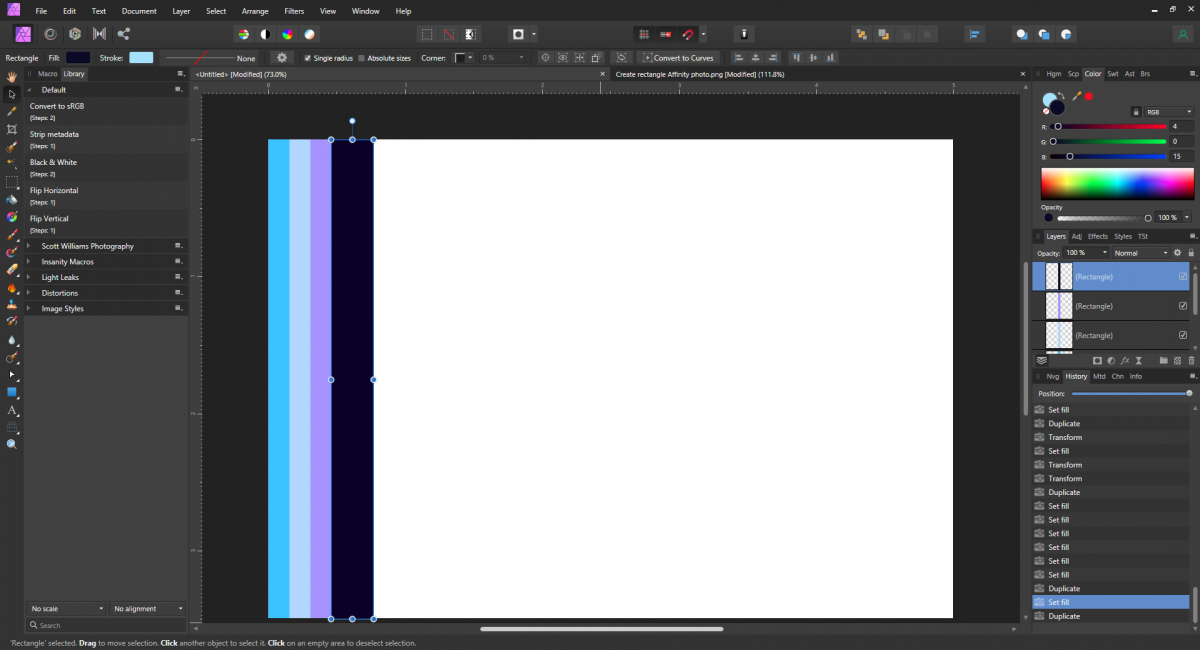
We will need to create another two duplicates, change the color and shift them. There is a quick way to do this. Select the top most rectangle layer then press Ctrl + J. Affinity Photo will automatically move the rectangle into place for you. Remember to give the rectangle another color fill. Repeat for the last rectangle. You will now have four panels, each with a different color.
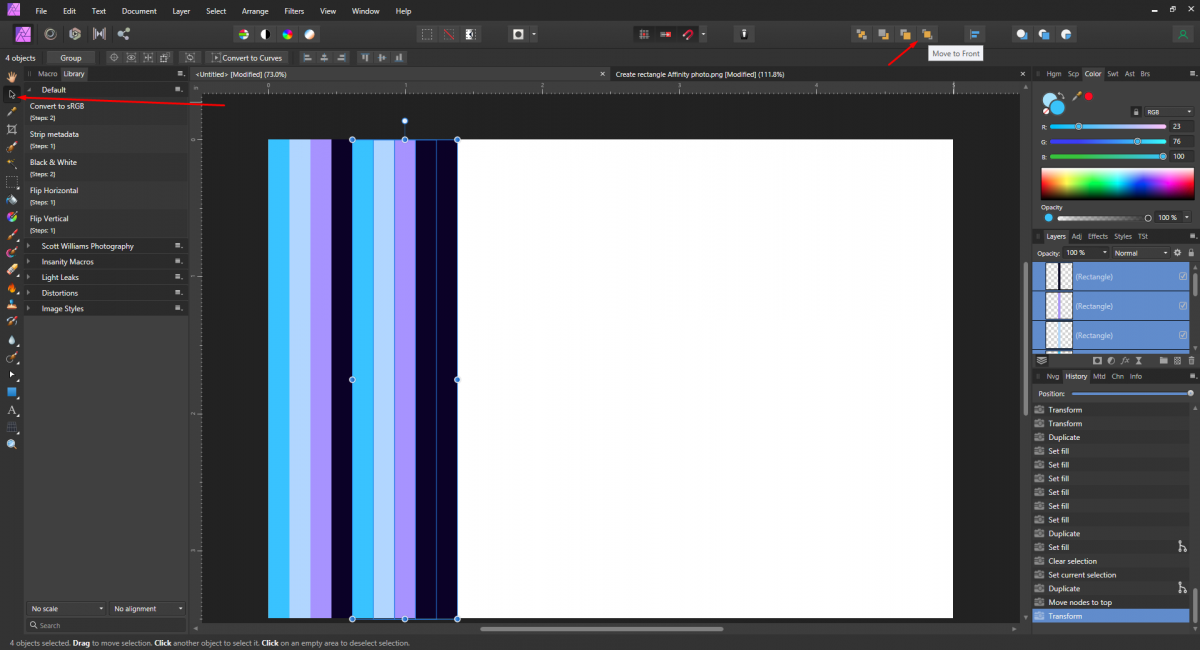
To quickly fill our canvas, we want to duplicate the four panels that we created. Click on the Move tool top left and click + drag a selection box around the four panels. Press Ctrl + J to duplicate all four panels. While still selected click on Move to Front at the top of the screen. Now, click + drag the duplicates to the right until they snap into place.
You will notice that when pressing Ctrl + J, Affinity Photo didn't adjust for you as before. This is because you are creating a new action. When you press Ctrl + J again, Affinity will remember and move the duplicates for you.
The duplicate rectangles should still be selected. If not, go the Layers panel and Shift + click on the four layers at the top. Next, press Ctrl + J to duplicate and Affinity Photo will shift them to the right. Remember to click Move to Front each time you make duplicates. This will move the duplicates to the top of the Layers panel.
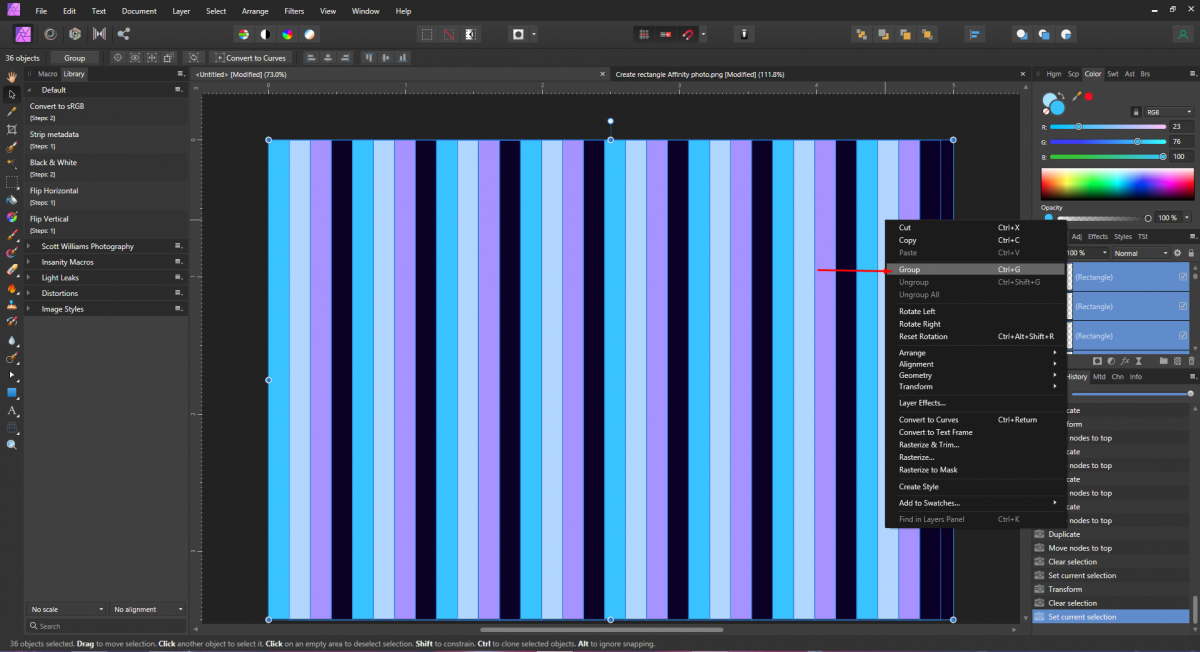
Keep duplicating until your canvas is full. Once done, draw a selection box around all of the panels. Right click and select Group.
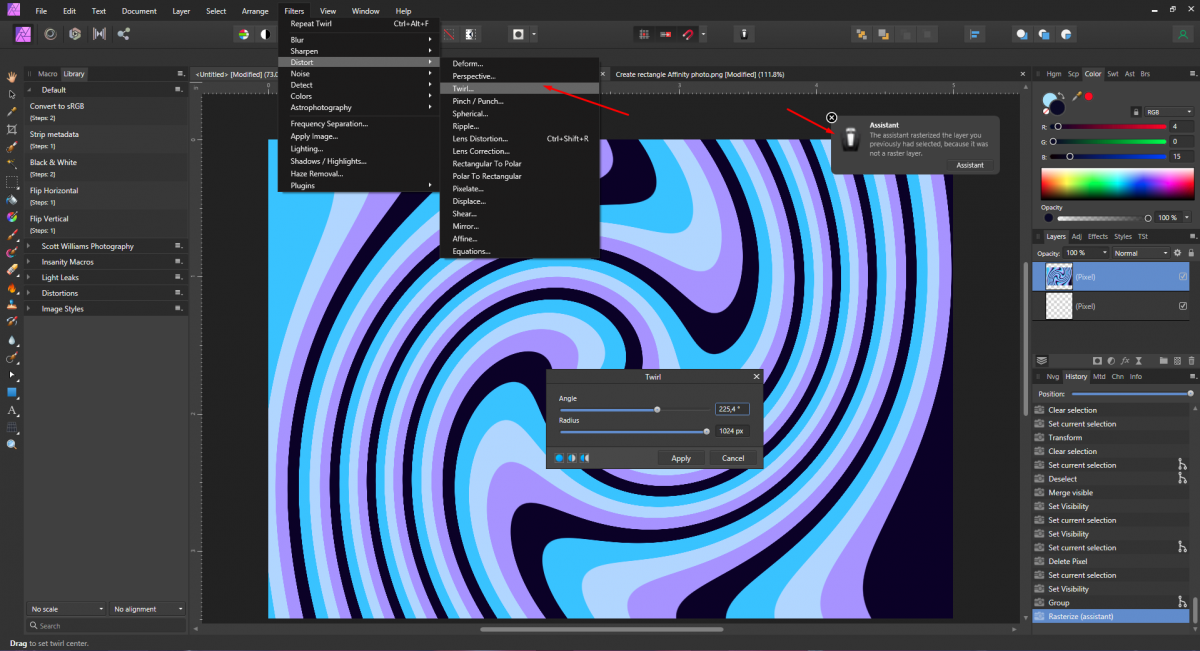
With everything setup, now we can distort the design we have created. First, we will add a Twirl distortion to the design. When you add the distortion, Affinity Photo will change the layer from a grouped layer to a single Pixel layer.
Twirl distortion will create the first 'flow' of the design and help us get started quicker. At the top click on Filters, go to Distort then select Twirl. The Angle was set to 225.4° and the Radius set to 1024 px. Click Apply once done.
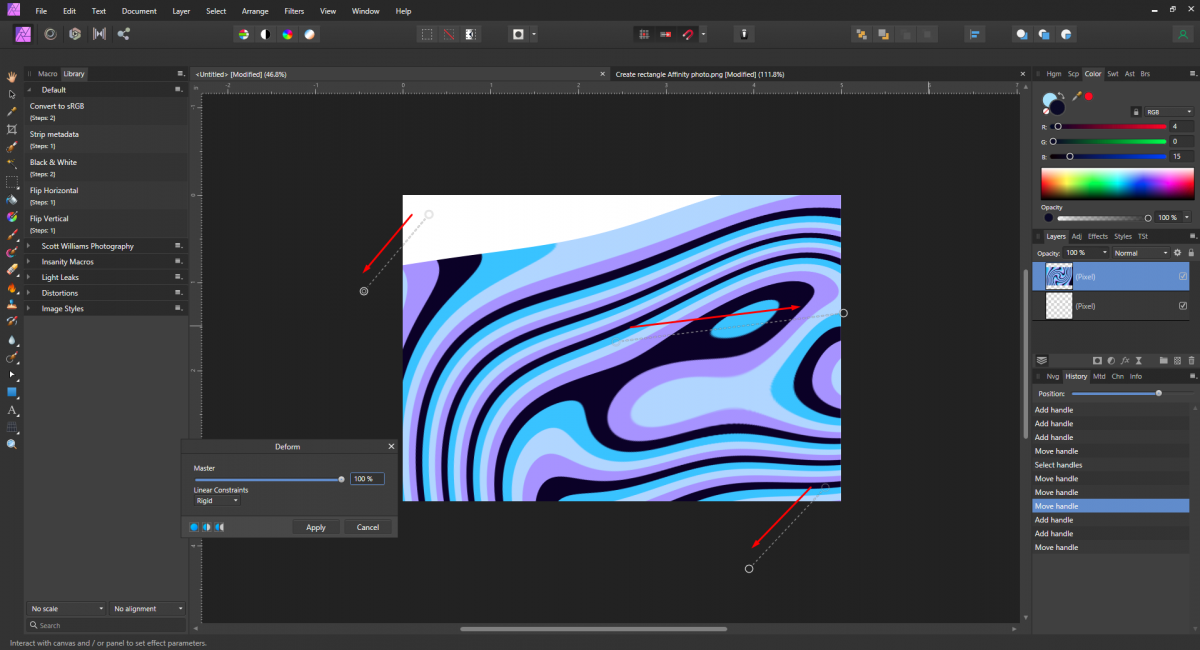
For the next set of distortion we will use the Deform tool. Once again click on Filters, select Distort and then Deform. If you try to adjust anything under the Deform panel, nothing will happen. This is because we need to place at least two anchor points.
Click anywhere on the canvas and a circular anchor will be placed. Every time you click, a new anchor point will be placed. We placed three anchor points, one top left, a middle point and one bottom right. Master is left at 100% and Linear Constraints left on Rigid.

Once the anchor points have been placed click + drag one in any direction. Do the same with the other two anchor points. In the image below, the direction of the red arrows is where the points were dragged. Don't worry about the white areas that show as we will fix this later.
You can add as many anchor points as you want. As more points are added, the more the design is distorted. We added a few more points and used those to pull out the edges. This removed the white areas.
While you are distorting the image, be careful not to extend the anchor points too far. It will cause the area to blur and lose definition. When you are done with your marble effect, click Apply.
Your marble effect is now complete and ready to be exported. At the top left of the screen click on File and select Export. The Export menu with various file format options will open. Select the file format you want then click Export and choose a file location. Finally, click on Save.
Colors and anchor point placements can quickly and easily change the result. So experiment with your marble effect and have fun!
If you liked this tutorial, make sure to check out some of our other Affinity Designer tutorials such as how to make a gradient, how to use the preferences panel, and how to use mockups in Affinity Designer.
In this tutorial we are going to create a marble background in Affinity Photo. To start off, open Affinity Photo and select New Document. Once you have adjusted your settings, click Create.
Set up the base design to create the marble effect
The base design needs to be set up before we can begin distorting it. We will be using the Rectangle tool to create panels and fill them with color. Color choice is completely up to you including how many and the placement. For this tutorial, we filled four panels with blue, purple and black.
Step 1 - Create the panels
Under the Layer panel on the right, click on Add Pixel Layer. We will keep this for a background fill if needed later. This layer serves to fill any white gaps that you may have trouble covering. But if the distortion works well enough, this layer won't be needed.
To keep everything aligned nicely, click on the Snapping tool at the top. It looks like a horseshoe magnet. Then, on the left hand side panel, click on the shape tool. It will show the last shape used filled in blue with a white triangle next to it.
Click on the white triangle and select the Rectangle tool from the options. Now, draw out your rectangle as shown in the image below. Affinity Photo will create a new layer for the rectangle
Step 2 - Fill the panel with color
Fill the rectangle with a color of your choice from the Color Panel on the right hand side. Go to the Layers panel and right click the rectangle layer then select Duplicate. Change the color fill then click + drag it to the left until it covers half of the first rectangle. With the Snapping guide in place, a green and red line will show when it's aligned correctly.
Step 3 - Duplicate the panels
We will need to create another two duplicates, change the color and shift them. There is a quick way to do this. Select the top most rectangle layer then press Ctrl + J. Affinity Photo will automatically move the rectangle into place for you. Remember to give the rectangle another color fill. Repeat for the last rectangle. You will now have four panels, each with a different color.
Duplicate and group marble colors
To quickly fill our canvas, we want to duplicate the four panels that we created. Click on the Move tool top left and click + drag a selection box around the four panels. Press Ctrl + J to duplicate all four panels. While still selected click on Move to Front at the top of the screen. Now, click + drag the duplicates to the right until they snap into place.
You will notice that when pressing Ctrl + J, Affinity Photo didn't adjust for you as before. This is because you are creating a new action. When you press Ctrl + J again, Affinity will remember and move the duplicates for you.
The duplicate rectangles should still be selected. If not, go the Layers panel and Shift + click on the four layers at the top. Next, press Ctrl + J to duplicate and Affinity Photo will shift them to the right. Remember to click Move to Front each time you make duplicates. This will move the duplicates to the top of the Layers panel.
Keep duplicating until your canvas is full. Once done, draw a selection box around all of the panels. Right click and select Group.
Distort the marble design
With everything setup, now we can distort the design we have created. First, we will add a Twirl distortion to the design. When you add the distortion, Affinity Photo will change the layer from a grouped layer to a single Pixel layer.
Step 1 - Use Twirl Distortion
Twirl distortion will create the first 'flow' of the design and help us get started quicker. At the top click on Filters, go to Distort then select Twirl. The Angle was set to 225.4° and the Radius set to 1024 px. Click Apply once done.
Step 2 - Add anchor points for the Deform Tool
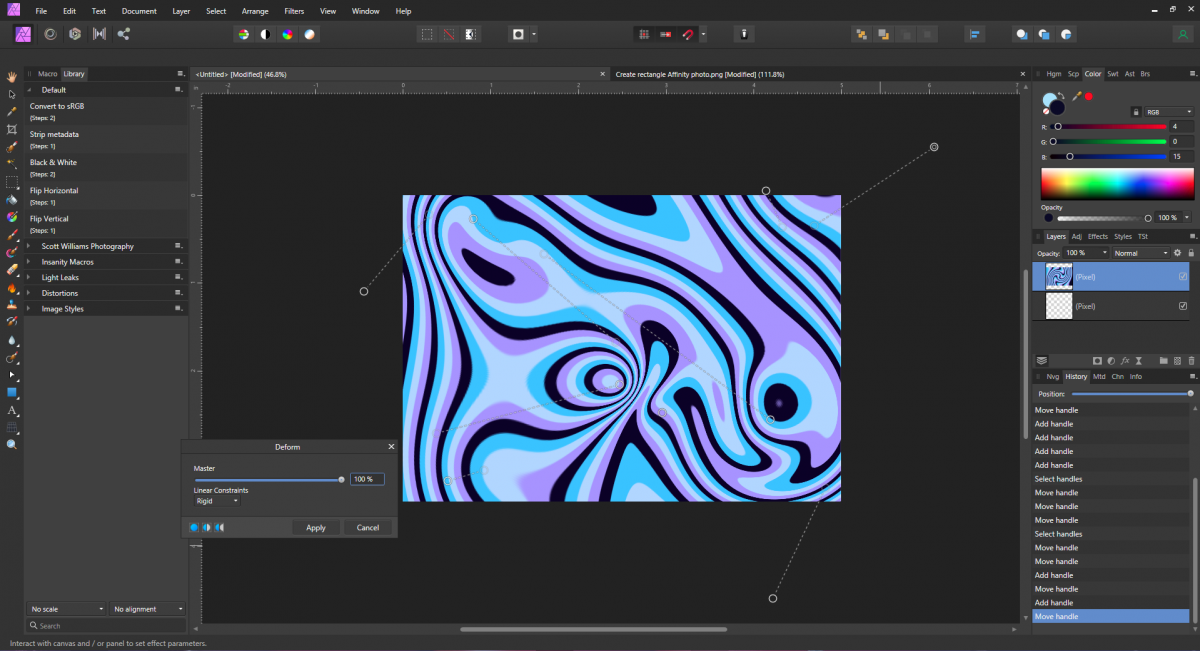
For the next set of distortion we will use the Deform tool. Once again click on Filters, select Distort and then Deform. If you try to adjust anything under the Deform panel, nothing will happen. This is because we need to place at least two anchor points.
Click anywhere on the canvas and a circular anchor will be placed. Every time you click, a new anchor point will be placed. We placed three anchor points, one top left, a middle point and one bottom right. Master is left at 100% and Linear Constraints left on Rigid.
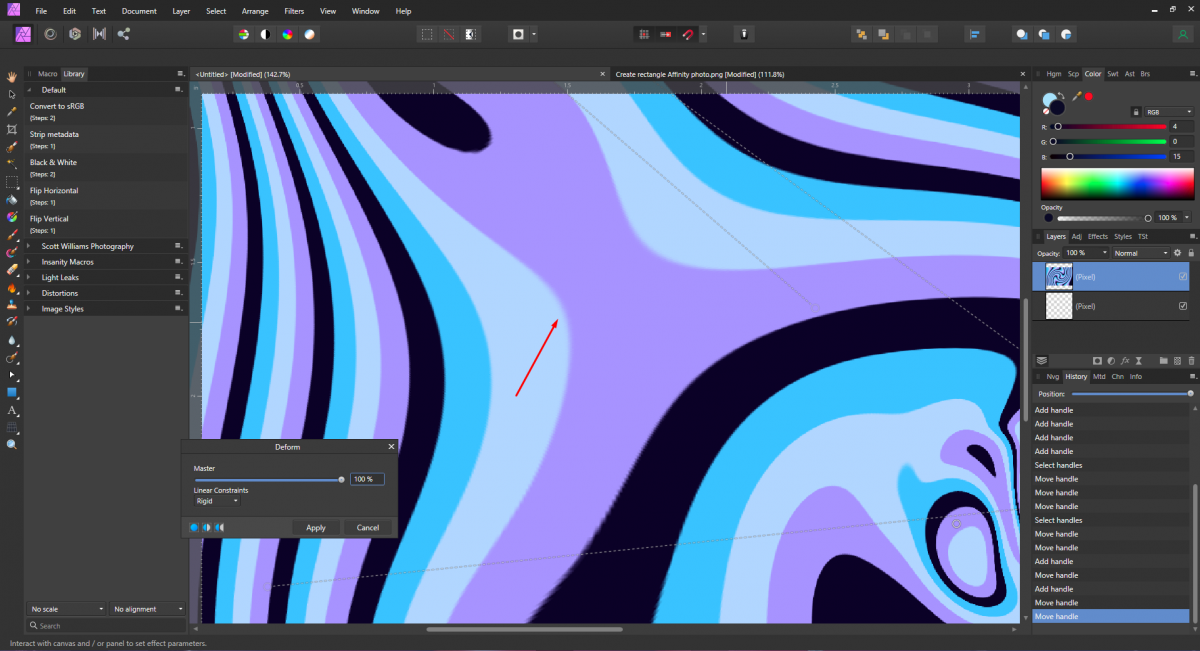
Once the anchor points have been placed click + drag one in any direction. Do the same with the other two anchor points. In the image below, the direction of the red arrows is where the points were dragged. Don't worry about the white areas that show as we will fix this later.
You can add as many anchor points as you want. As more points are added, the more the design is distorted. We added a few more points and used those to pull out the edges. This removed the white areas.
While you are distorting the image, be careful not to extend the anchor points too far. It will cause the area to blur and lose definition. When you are done with your marble effect, click Apply.
Export your marble effect
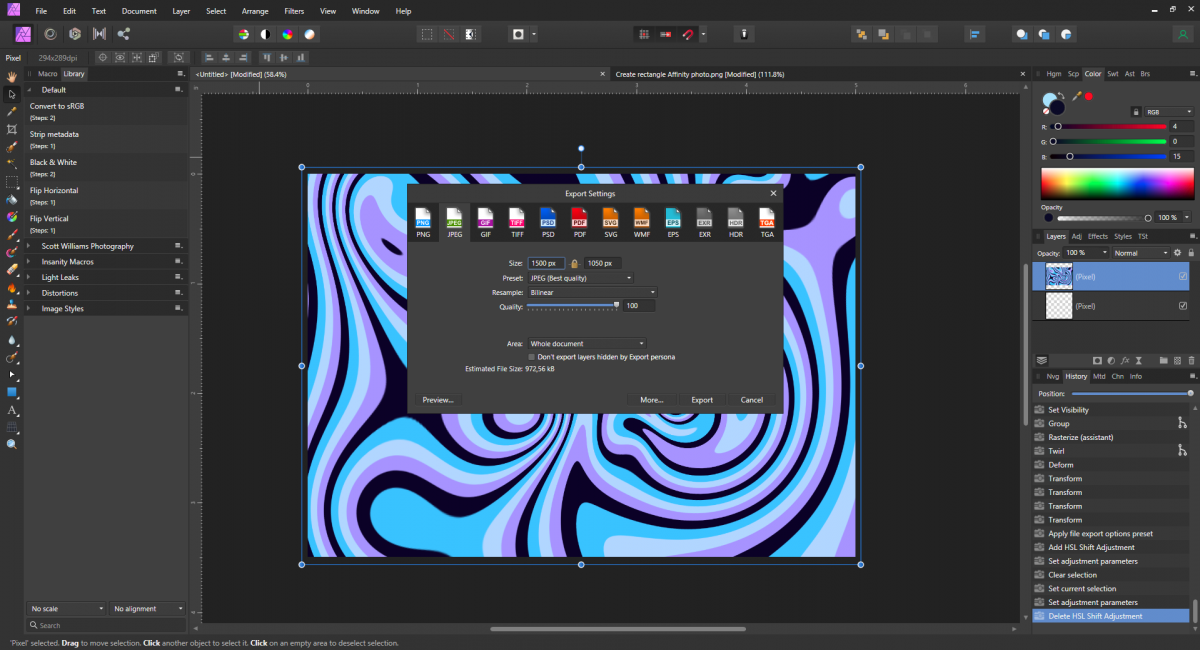
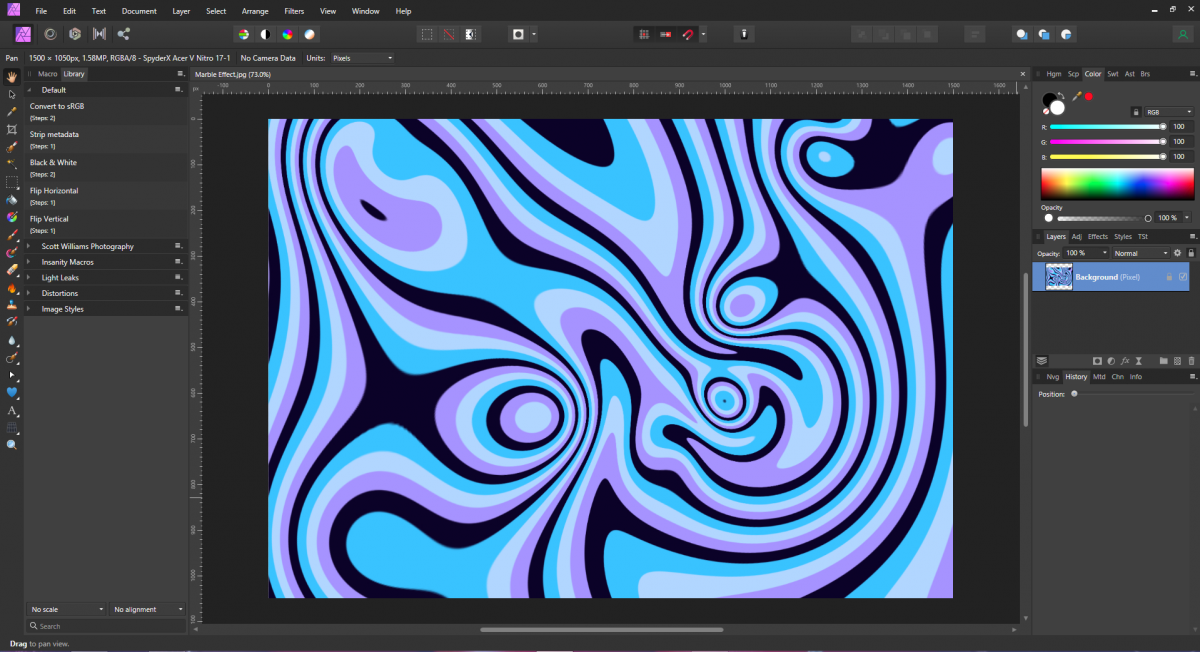
Your marble effect is now complete and ready to be exported. At the top left of the screen click on File and select Export. The Export menu with various file format options will open. Select the file format you want then click Export and choose a file location. Finally, click on Save.
Colors and anchor point placements can quickly and easily change the result. So experiment with your marble effect and have fun!
If you liked this tutorial, make sure to check out some of our other Affinity Designer tutorials such as how to make a gradient, how to use the preferences panel, and how to use mockups in Affinity Designer.


