- By Nadine Spires
- 11 Mins
- DesignScape Tutorials
How to Make a Simple Seamless Pattern in DesignScape
Learn how to create your own seamless patterns in DesignScape today.
In our tutorial we will show you how to make a simple seamless pattern in DesignScape. A great online editing option to Photoshop and Illustrator, DesignScape gets you creating in no time. Want to try DesignScape but not a Gold Plus Member yet? Then check out our free 30 Day Trial of the Gold Plus Membership today!
A seamless pattern is created by placing copies of an image side by side without any seams being visible. So let’s get started making a simple seamless pattern in DesignScape. To create our pattern we will be using a cute flower svg bundle from the Plus Hub. We also have a selection of flower designs to choose from on Design Bundles.
Step 1 - Setup your Seamless Pattern Canvas
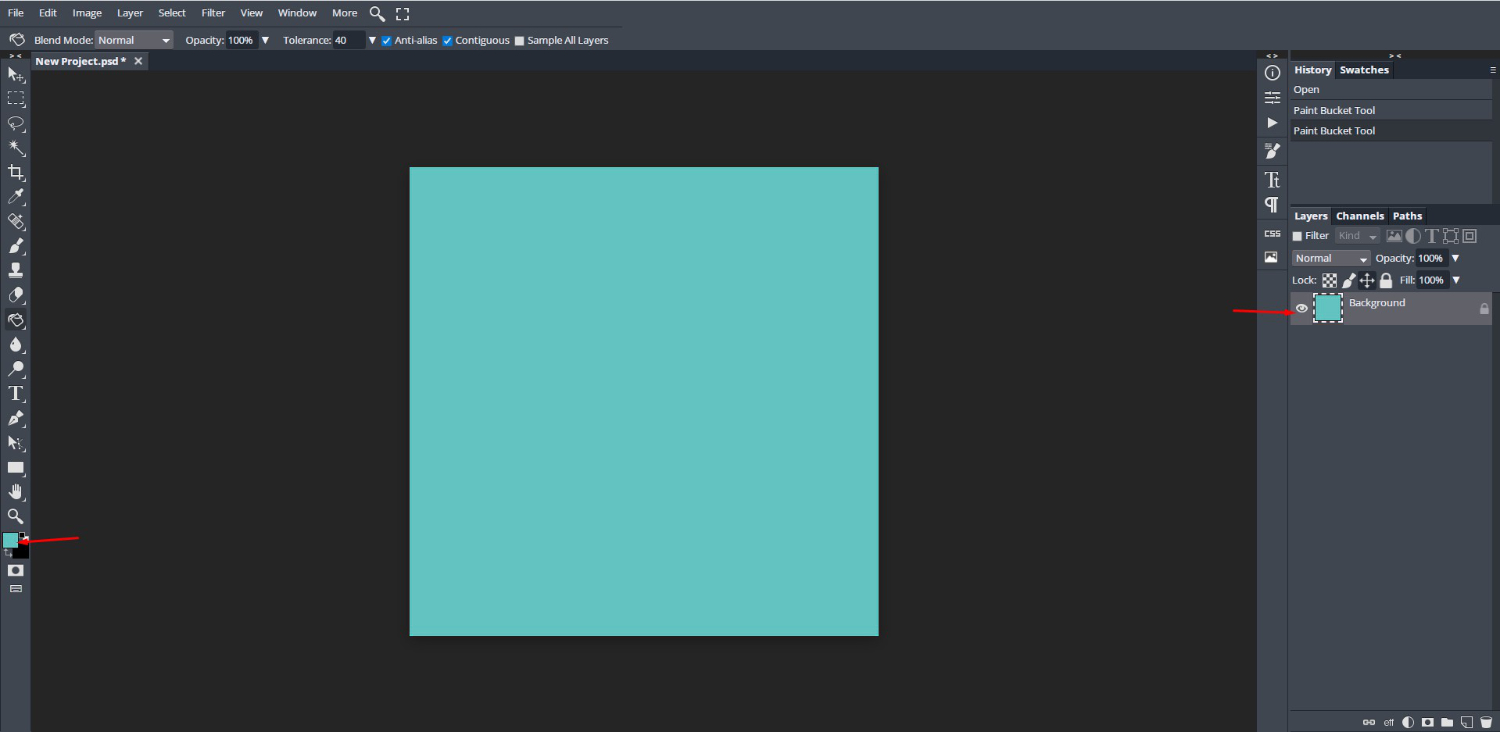
We will begin by starting a new project before importing our elements. For our canvas size we chose 1200 x 1200 pixels with 300 DPI.Next, we want to add a background color. On the left side toolbar, click on the top square to open the Color Picker tool. Choose a color then click Ok.

To add the background color we need to use the Paint Bucket. This can be found under the same menu as the Gradient Tool. If the Gradient Tool is selected, click and hold your mouse over the tool to open the menu. Then click on Paint Bucket.

Now, click anywhere on the canvas to apply the color as your background. If you want to change the color, just click back on the Color Picker and choose another color. Click back on the canvas to change it. We decided on this Teal color.
Step 2 - Add your Pattern Elements
The quickest way to add your flowers is to drag and drop them into DesignScape. Locate where your flowers are stored, then drag and drop each one onto your canvas.

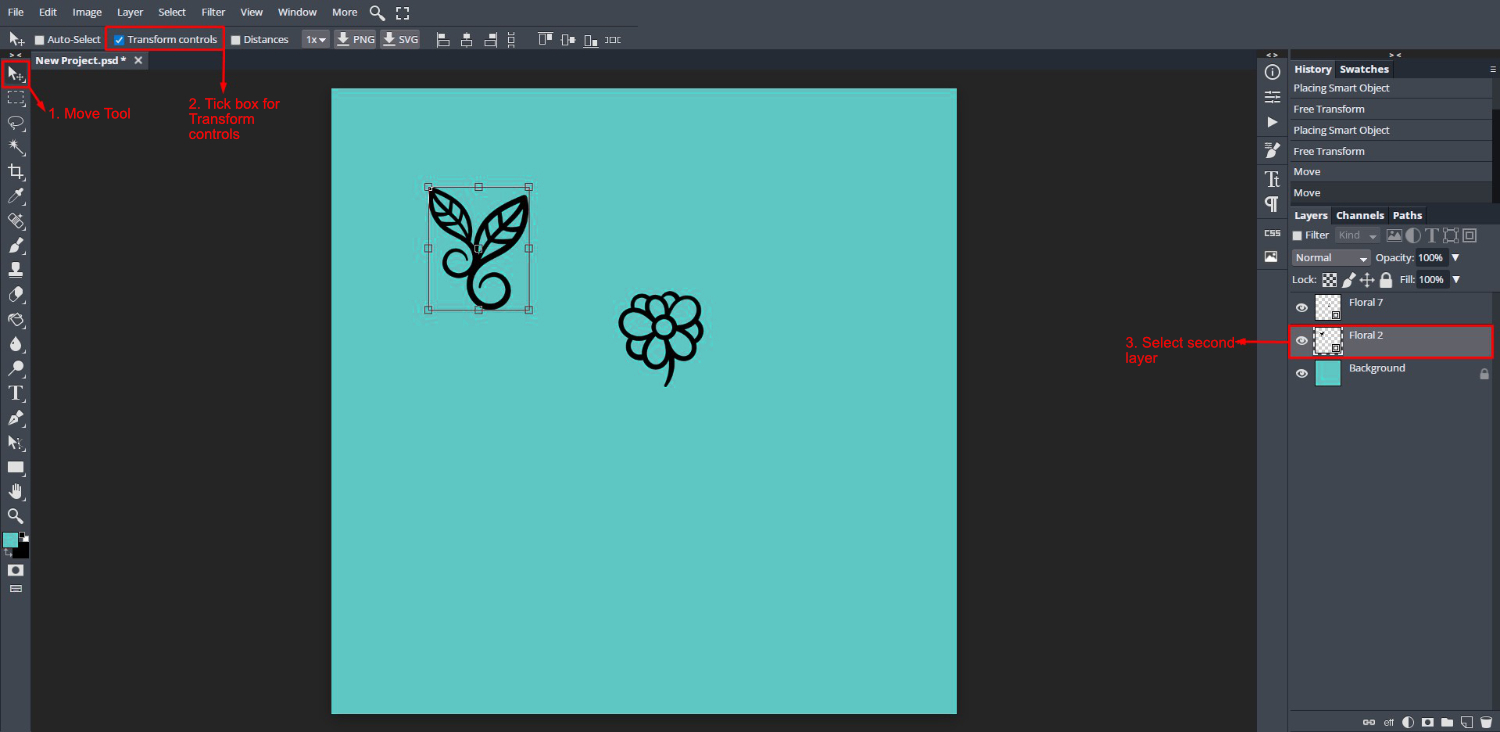
You can shift your flowers around by clicking on the Move Tool top left. Make sure that the Transform controls box is ticked on the top toolbar. Then click on a flower layer in the Layers panel to select and shift the design around. The second layer is the selected flower with a bounding box in the image below.
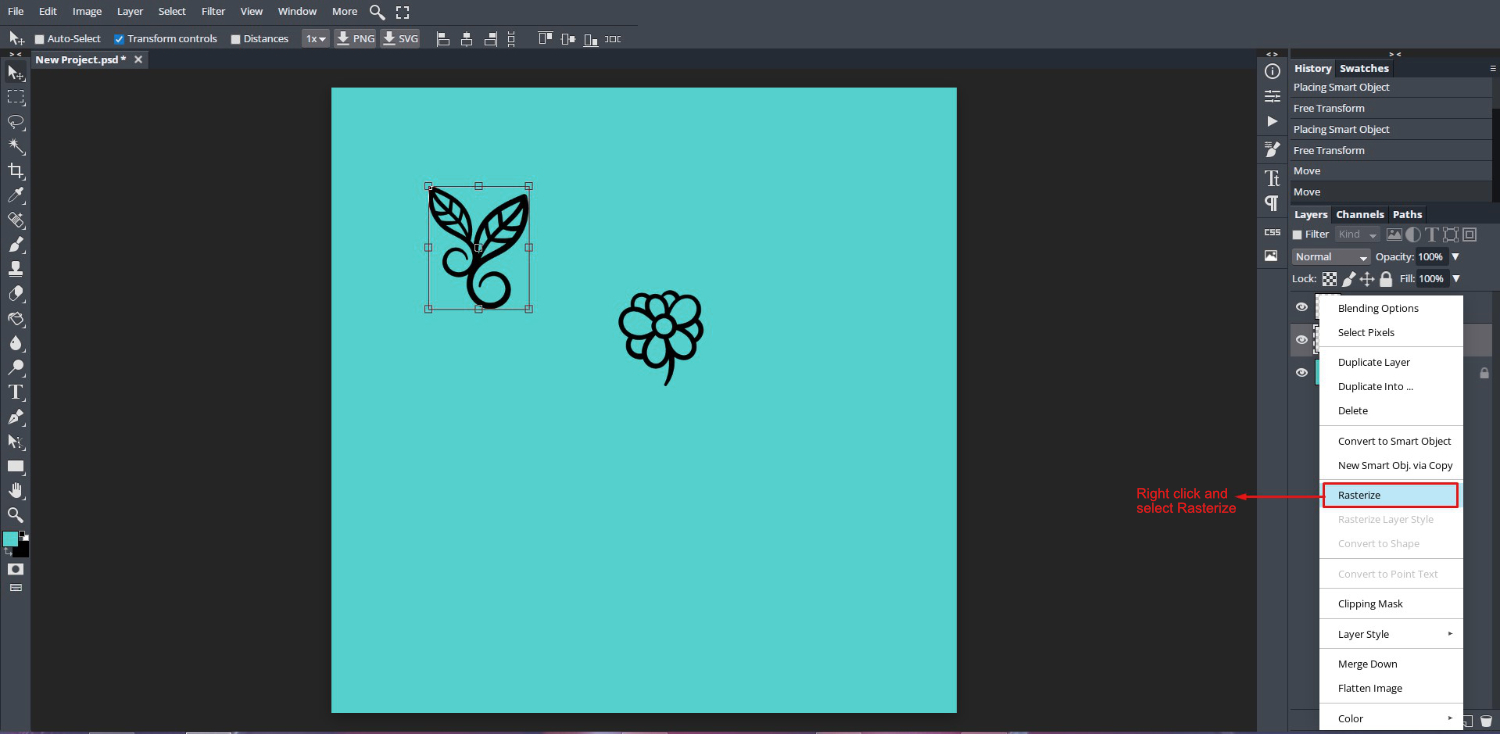
We want to change the color of the flower designs but we need to Rasterize them first. Right click a flower layer, then select Rasterize. Do this for all of the flower layers.
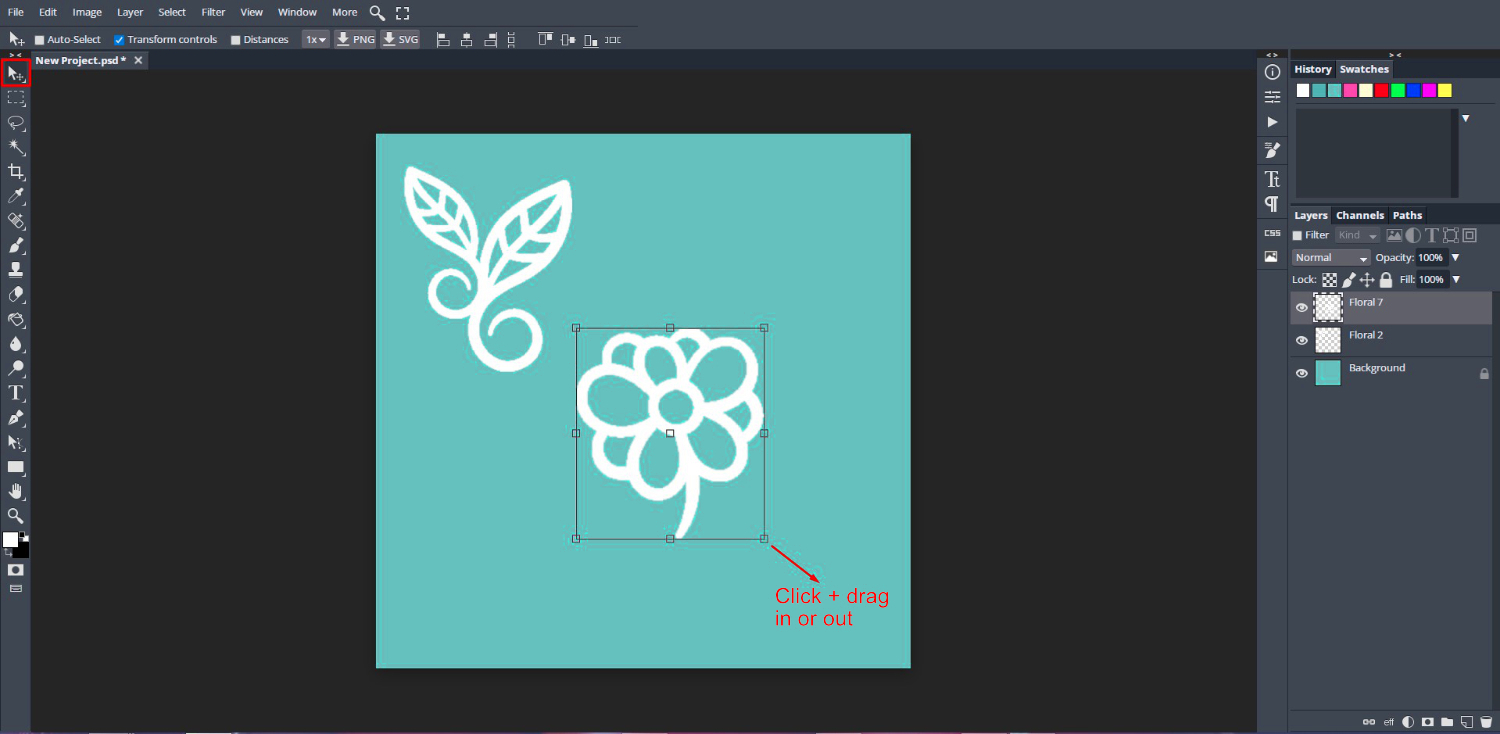
Go back to the Color Picker, choose white and click on the Paint Bucket. Select a flower layer then place your mouse over the selected flower. Now click to change the flower to a white. Repeat for all of the flower elements.

Adjust the size of your flowers by selecting the Move tool. Now click + drag a corner handle in or out.
Step 3 - Create a Seamless Pattern
In this step we will create our seamless pattern. We first need to center all of our elements.
Center Flower Elements
In the Layers panel, click on the top flower layer then hold Shift + click the second flower layer. With both layers selected, click Center Horizontally and Center Vertically on the top toolbar.
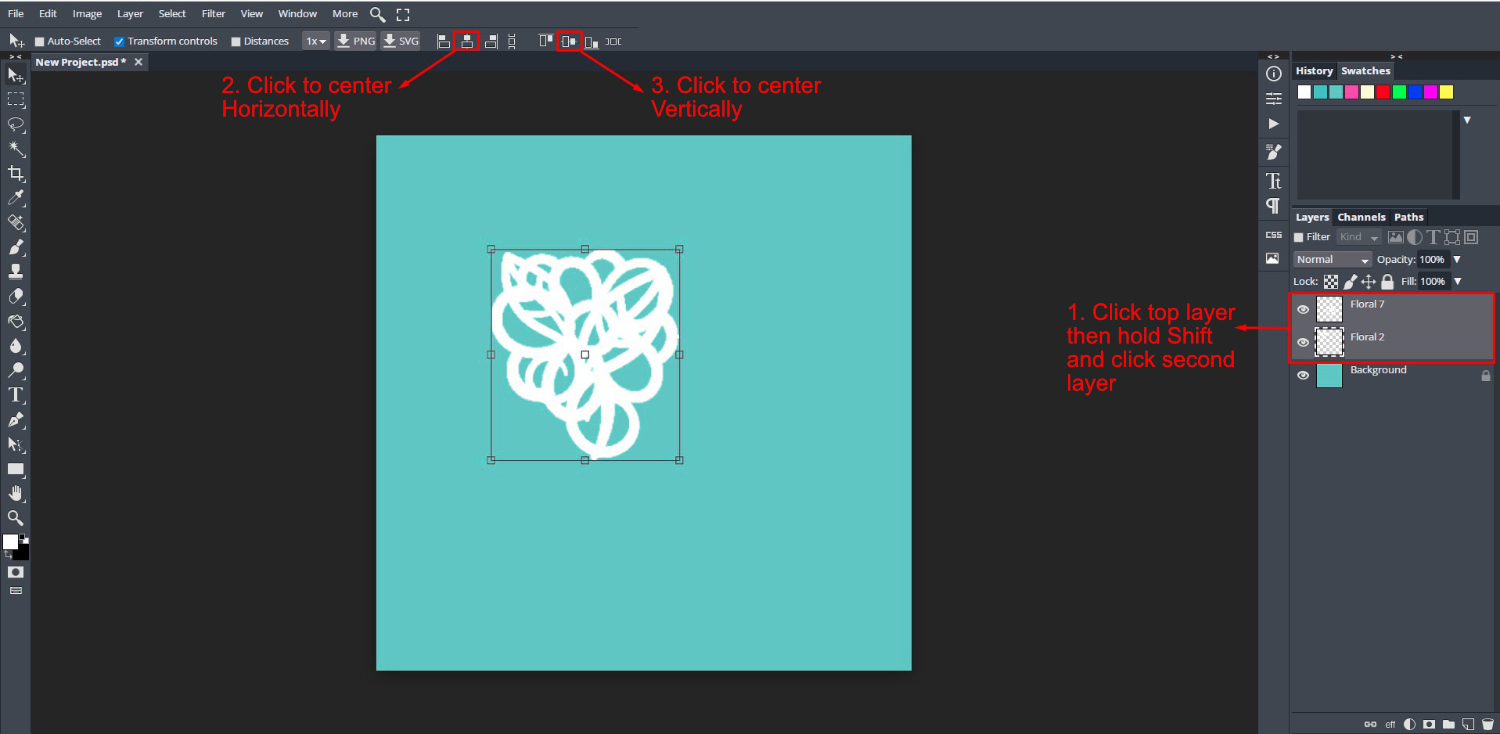
Next, we want to center the flower layers to the background. With the layers still selected, click + drag them to the middle of the canvas until you see two red lines appear. Release your mouse button as both layers are now completely centered.
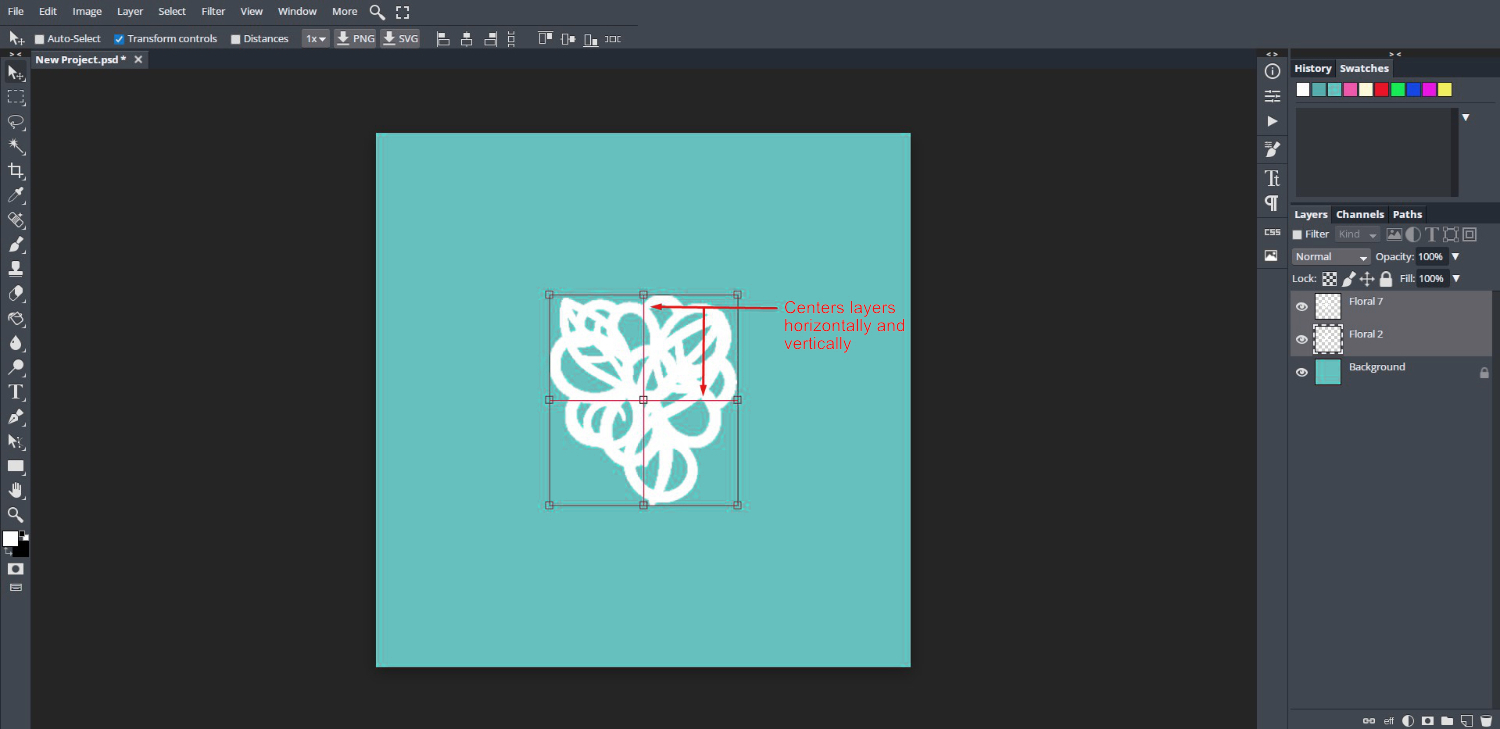
Use the Offset Function
Now for the fun part, creating the seamless pattern. Choose a flower layer from the Layers panel. We chose to use the second flower layer. Go to Filter > Other > Offset.

The Offset window will pop up. As our canvas is 1200 x 1200 pixels, we want to use half that for the Horizontal and Vertical values. So we used 600 px for Horizontal and Vertical then clicked Ok. The flower layer was then added to all four corners of the design.

Add the Pattern to the Library
The pattern now needs to be added to our pattern library. Go to Edit > Define > Pattern. A pop up message will tell you that the pattern has been added.

Step 4 - Use the New Pattern
Now that our pattern is ready, we can use it and see how it turned out. Create a new project, this time using a bigger canvas like 3600 x 3600 pixels. Next, go to Layer > New Fill Layer > Pattern Fill.

By default a yellow patterned background will be added. Click on the pattern box drop down menu and scroll down to the bottom to find your newly added pattern. Once you click on this pattern it will be added to your canvas. As you can see, it is perfectly seamless.

The final step is to save the seamless pattern so that it can be used in other projects. We went to File > Export as > PNG.
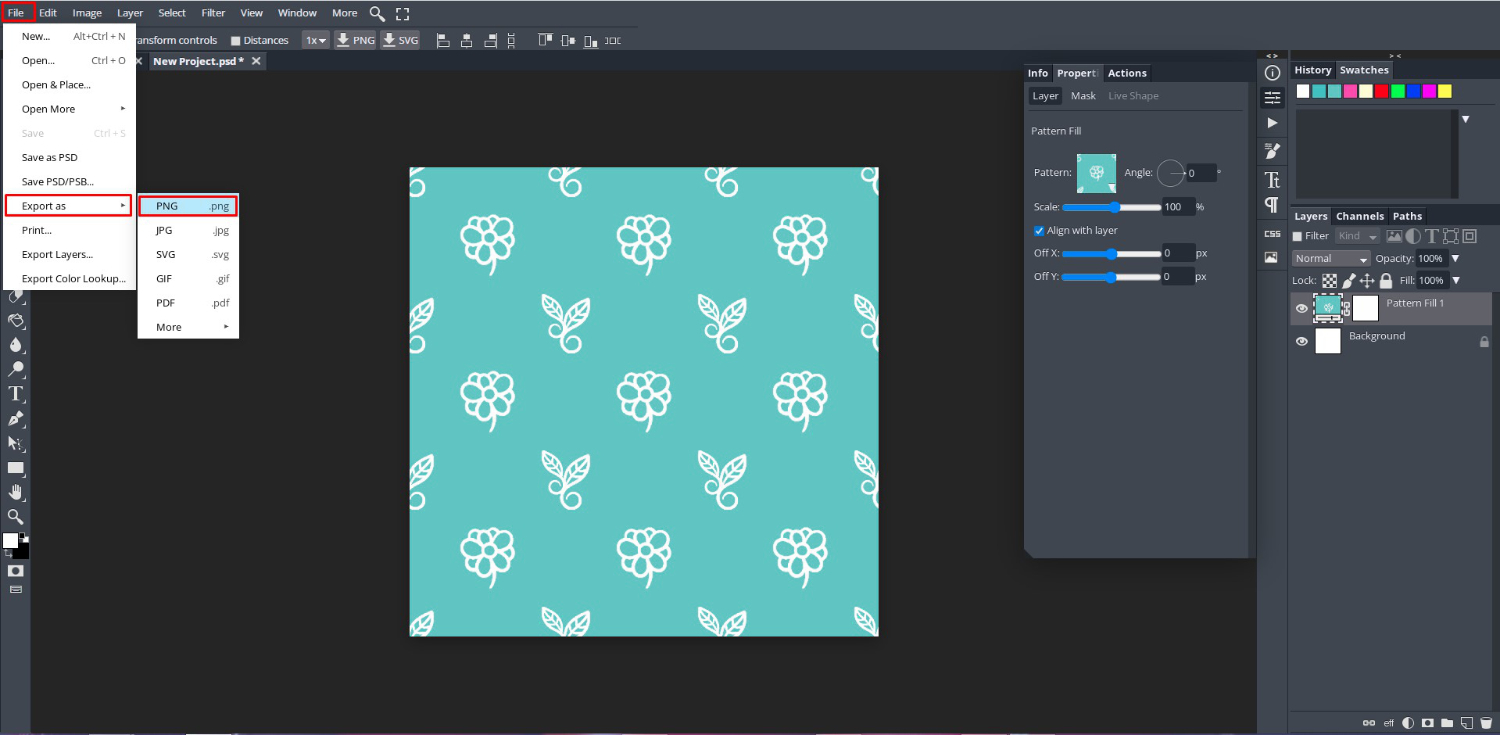
You can experiment further with colors and add additional flowers to create a complex pattern. In the image below, we added more flowers then adjusted the Horizontal and Vertical values in the Offset panel for each flower.

You have just made a simple seamless pattern in DesignScape! You can use the pattern to create a tiled background for your projects or add as a fill to your text. There is so much more to learn about the awesome features in DesignScape, like using Smart Object mockups or adding an offset to text.
6 Related DesignScape Tutorials
Seamless Patterns are very useful design elements. They can have multiple applications like fabric for cushions and other home decor items, tote bags, or phone cases, and even as web elements. In this tutorial we will show you how to make a seamless pattern in Illustrator. Basic information about Illustrator ...
Let's learn how to create a Seamless Pattern in Procreate. You can use your patterns for many exciting purposes like fabric design, wrapping paper design, etc.In this tutorial, we are using Summer Clipart by Paper Starr Studio.Step 1: Create the base documentFirst, we need to create our base document ...
For this tutorial we are making a seamless repeat pattern that you could use to print at home to make scrapbook paper, use with printable vinyl, or sublimation. If you are using an outside source like a print company or manufacturer, you would need to make sure you follow the ...
For this tutorial, we are making a seamless pattern. You can use it to print at home to make scrapbook paper, use with printable vinyl, or sublimation. A seamless pattern allows you to join multiple copies side by side without a visible seam to make a larger design.If you ...
For this tutorial we are making a seamless repeating pattern that you could use to print at home to make scrapbook paper, use with printable vinyl, or sublimation. If you are using an outside source like a print company or manufacturer, you would need to make sure you follow the ...
Have you ever wanted to learn how to make a repeating pattern in Procreate? Want to turn bought or made elements into fun digital paper, backgrounds, or sublimation patterns? Then this tutorial is just for you, as we take you through the steps to make a repeating pattern in Procreate....

 All your Font Needs


