
How to Make Instagram Highlight Covers in Affinity Designer
Creating your own Instagram Highlight covers adds a touch of flare to your story line. Custom highlight covers can also boost the look of your brand. Artboards in Affinity Designer are a great way to create multiple highlight covers.
In this tutorial we will be making Instagram highlight covers in Affinity Designer. We also have a tutorial on making highlight covers in Canva if that is your preferred program.
We will be using abstract highlight covers and an elegant font duo called Fadelyn.
As we want to create multiple designs we will use the Artboards feature and batch export. This is a more efficient way of quickly creating designs.
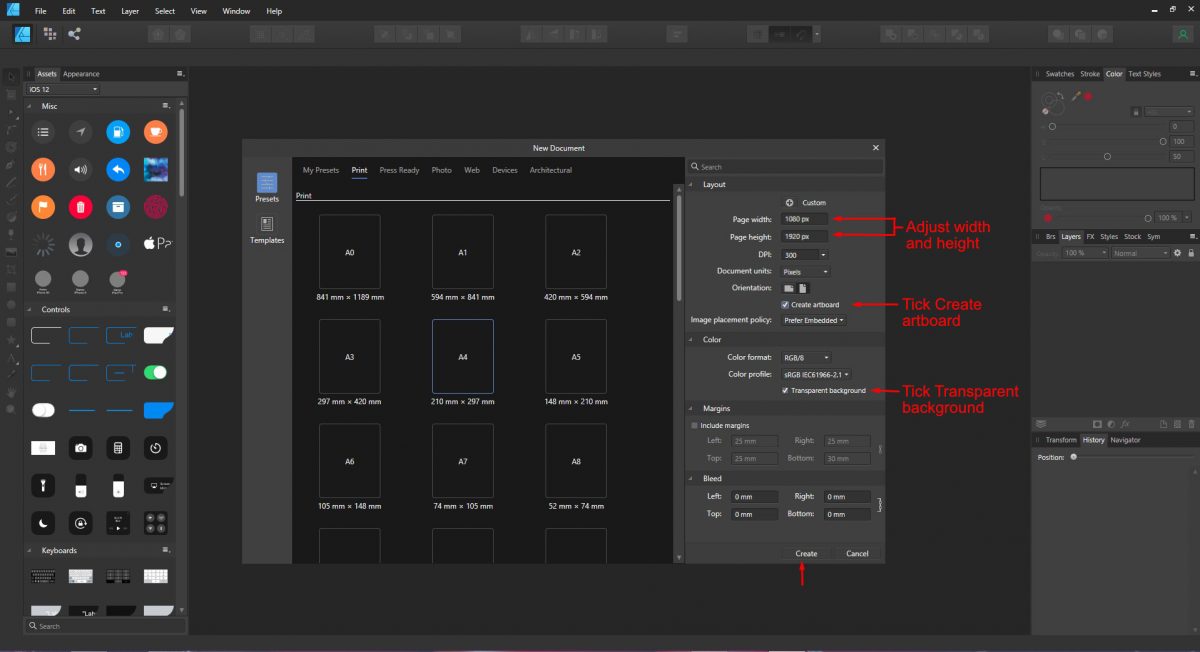
Open Affinity Designer and click on New Document. Under the New Document settings, adjust Width and Height. For Instagram Highlight covers the recommended size is 1080 x 1920 px. Be sure that the Document Units is set to Pixels.
Tick the box next to Create Artboard and under Color tick the box next to Transparent background. Click Create at the bottom.
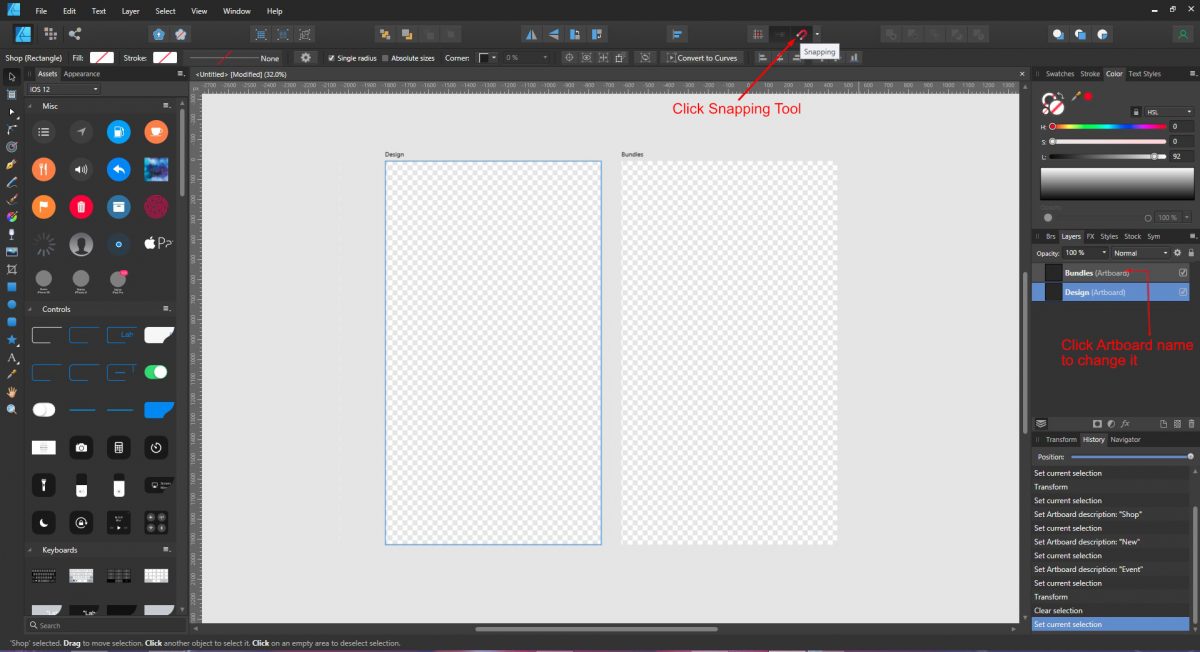
Under the Layers Panel click the artboard layer then right click and Duplicate. At the top of the screen click on the Snapping Tool. This will help in aligning the designs on artboards. Click on the duplicate artboard to select, then drag it to the right.
Rename the artboards by clicking on the layer name under the Layers Panel. The name of the artboard will be the document name when batch saving.
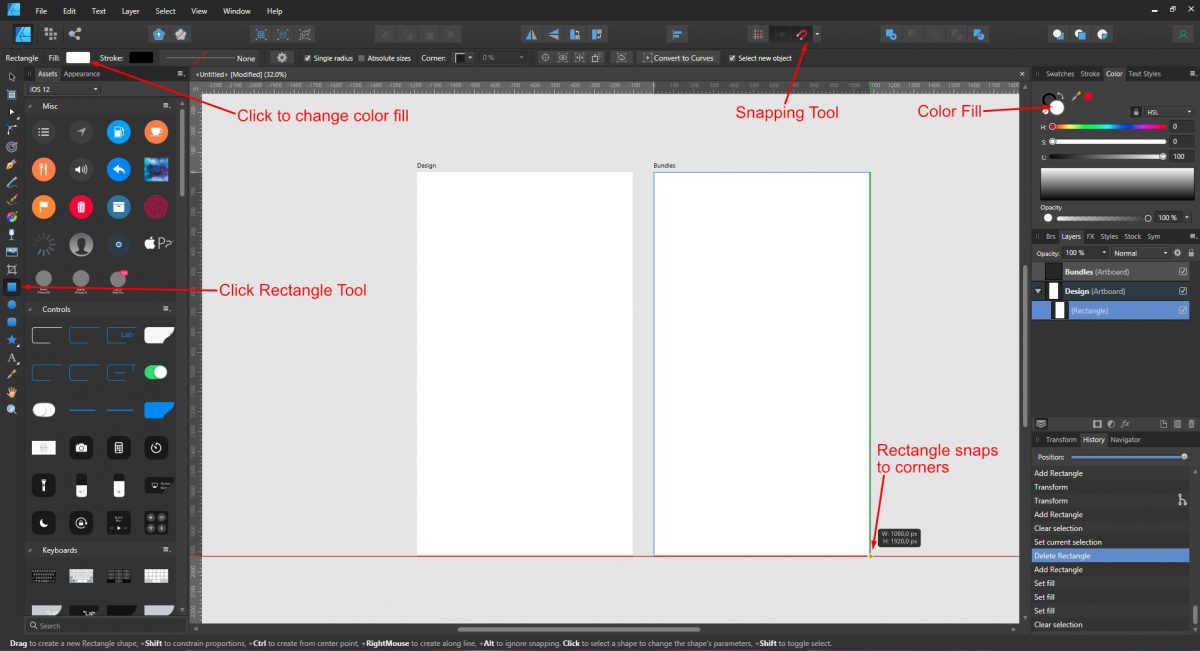
The artboards will be our Instagram Highlight Covers. For this tutorial we want to create a textured circle with wording on a white background. Add a rectangle background by clicking on the Rectangle tool on the left side panel.
Start at one corner and click + drag the rectangle out. You will see the rectangle snap to the corners because the Snapping Tool is turned on. Change the color to white by using the Color fill option on the top right or top left.
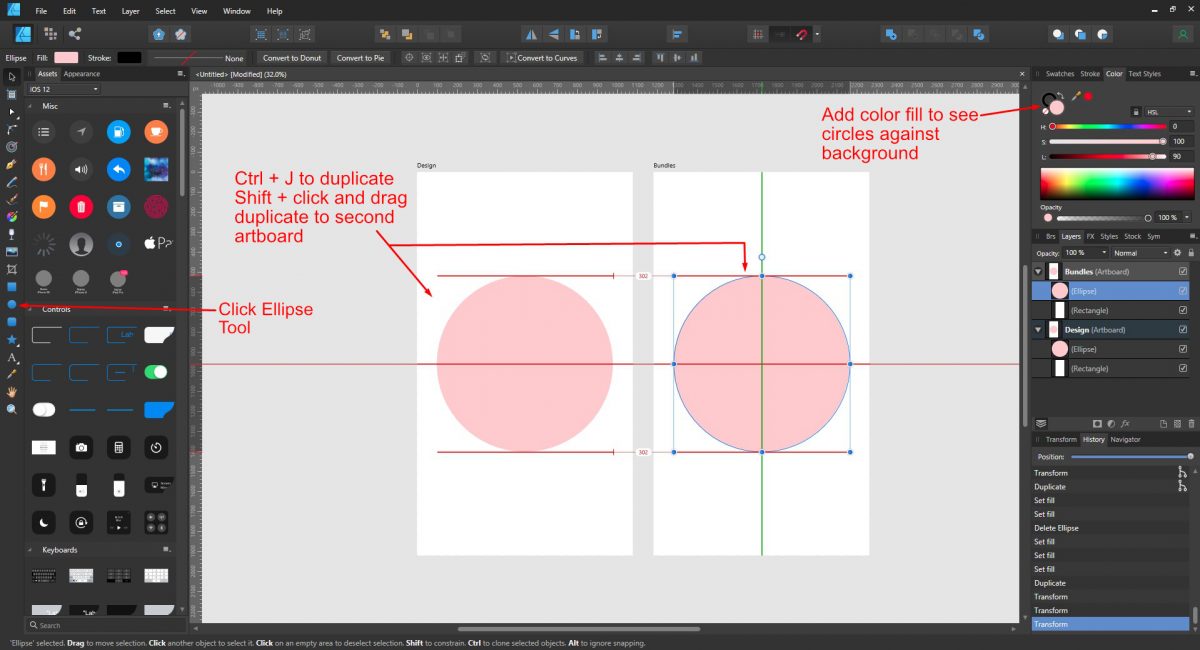
Next we will add the circles. Click on the Ellipse Tool on the left side panel and draw out a circle on one of the artboards. Add a color fill for now so that you can see the circle. Position the circle in the middle of the artboard. With the Snapping Tool activated, when you move the circle, a green and red line will appear. When these two lines cross the circle will be centered.
Press Ctrl + J to duplicate then hold Shift + click and drag the duplicate to the second artboard. Use the red and green guidelines to center the circle.
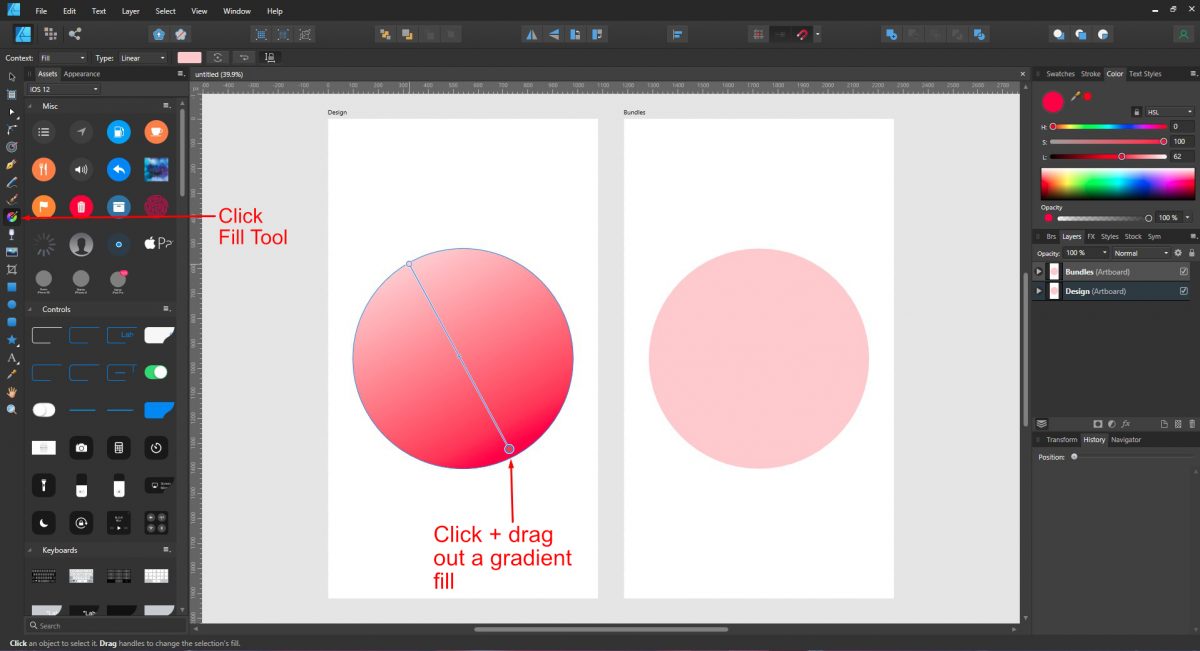
For this step we will use the Fill Tool to add a gradient then change it to a bitmap. We have a great tutorial on creating gradients in Affinity designer if you need some extra help.
Click on the Fill Tool on the left hand side then click + drag a gradient fill over the one circle. Don't worry about the color for now as we will be changing this next.
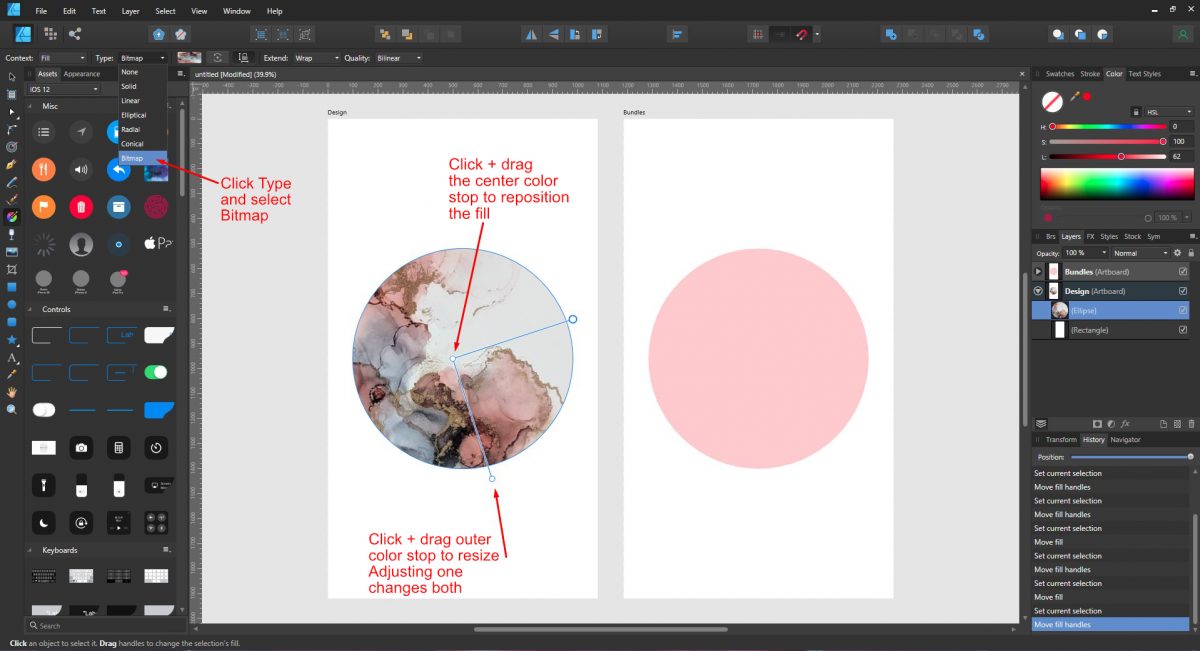
With the gradient still selected, click Type at the top left of the screen. Select Bitmap from the options and a new window will open. Locate your background fill and click Open. The bitmap fill will be automatically applied.
Reposition the fill by clicking and dragging the center color stop. Change the size of the fill by clicking one of the outer color stops and dragging in any direction. This will also adjust the other color stop on the opposite side. As you click and drag you can also change the orientation.
At the top panel are the editing options for the gradient. For this tutorial we left the options such as Extend and Quality as is.
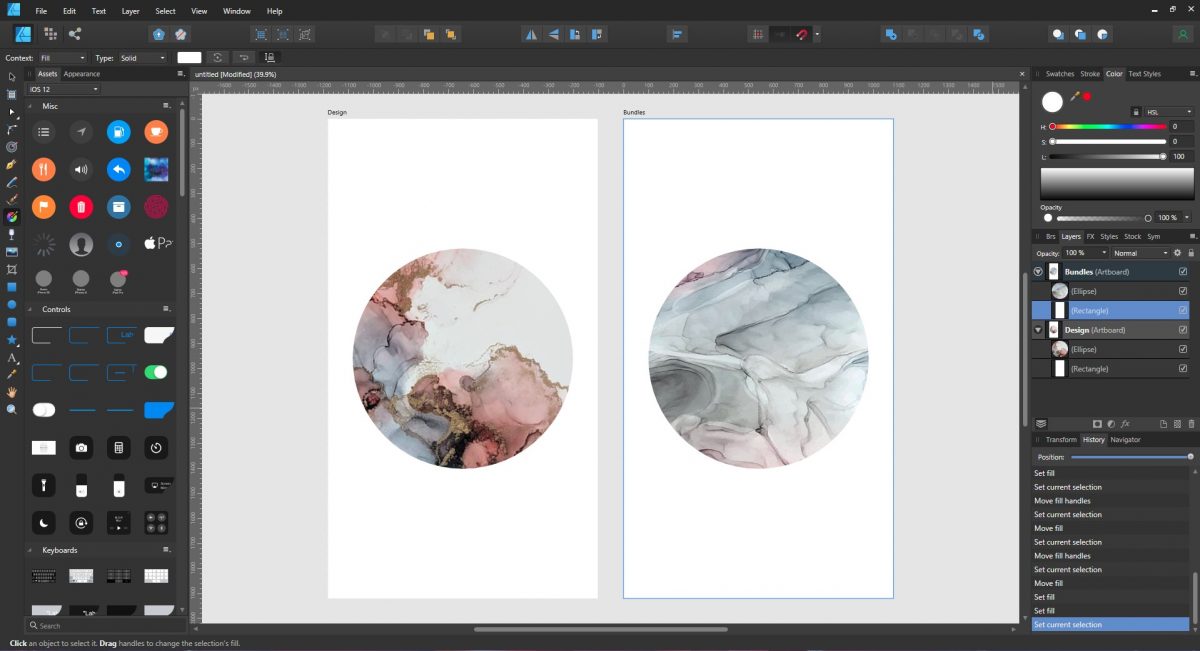
Repeat this process for the second circle but with a different background. Click the Fill Tool, add a gradient then select Bitmap next to Type. If, at any point, you want to change the bitmap, click Bitmap again and choose a new background.
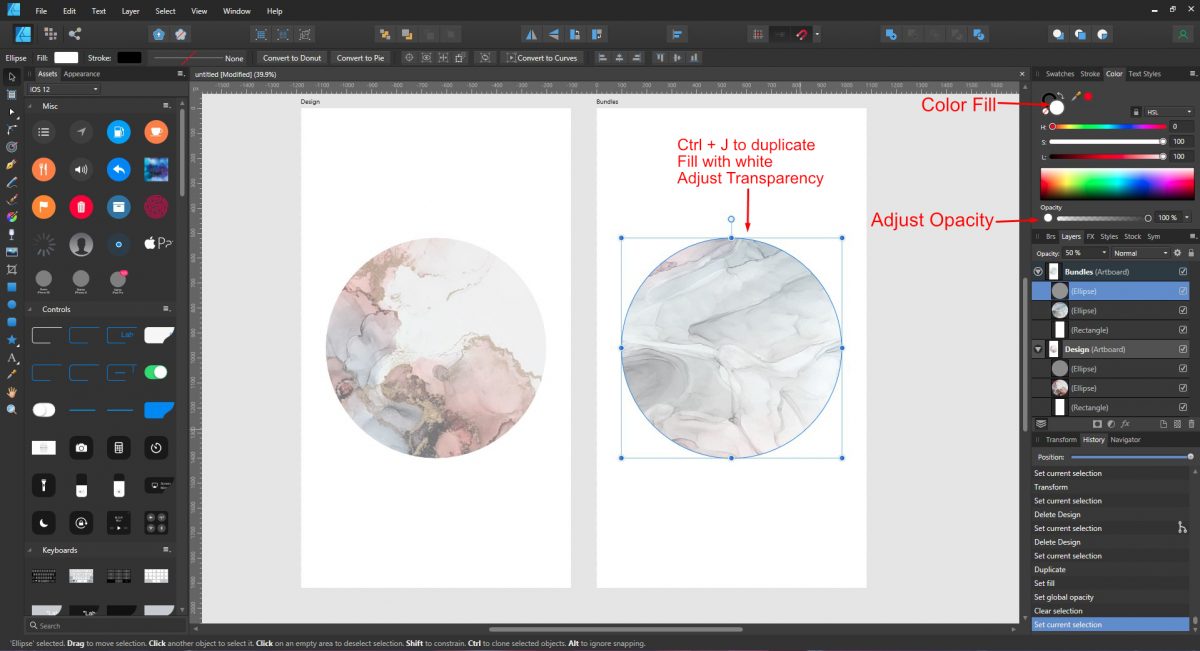
For Instagram Highlight covers you can have text or icons as part of the design. In this tutorial we are using text to create impact. First, we want to decrease the contrast of the background fill in the circle. A quick and easy way is to select one of the circles and press Ctrl + J to duplicate. If you are familiar with editing Levels or Curves, go right ahead.
Next, fill the duplicate circle with white from the Color Panel then change the Opacity to 50%. The background will show through. Repeat this method for the second circle.
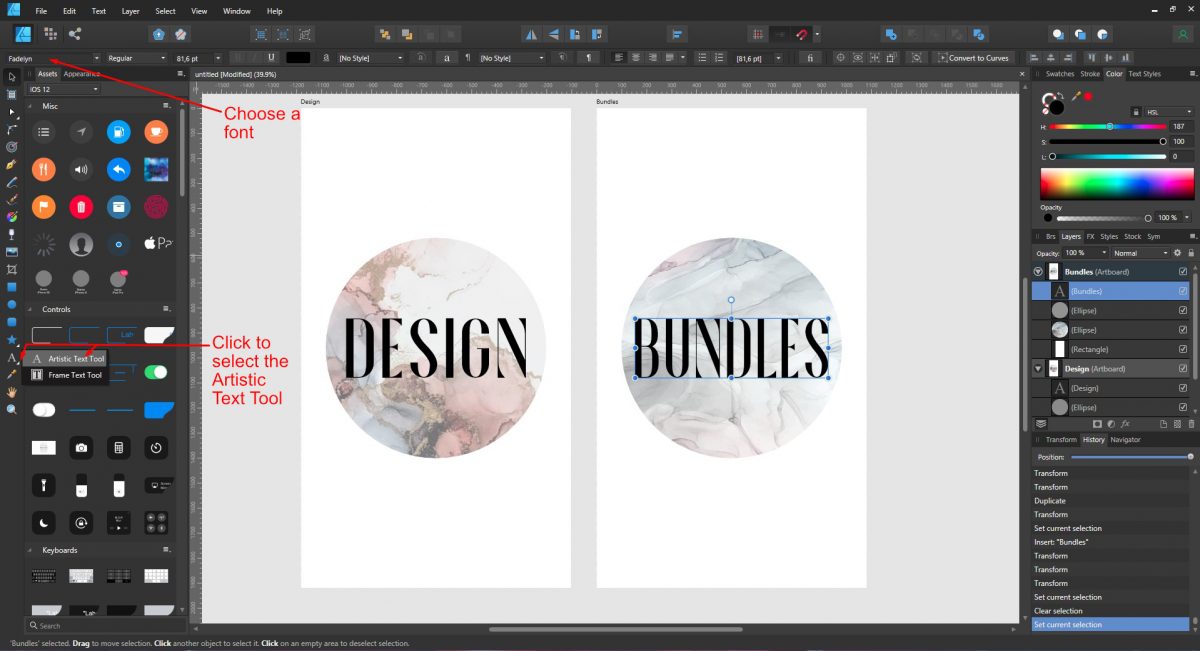
Click on the Artistic Text tool on the left hand side. If you can't see it, click on the white arrow to open the text tool options. Select the one circle and type out your text. Resize and reposition using the red and green guidelines as needed.
Choose a bold font from the font selection at the top left of the screen. Adjust the color as you want. Add text to the second circle as well.
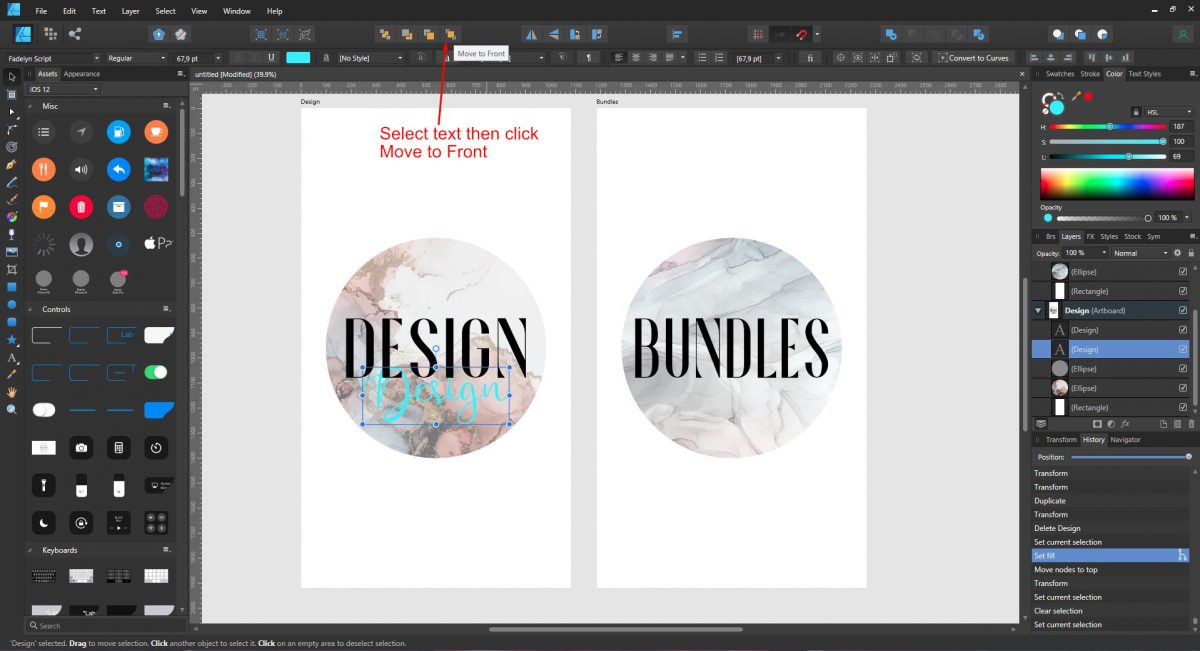
While the highlight covers look nice we want to make it a little more interesting. Once again click on the Artistic Text tool and this time change to a script font. For this tutorial we used the same wording but in different font styles.
Type out your text, reposition and resize then fill with a color of your choice. Be sure to place the second text object above the first. To do this select the text then click on Move to front at the top of the screen.
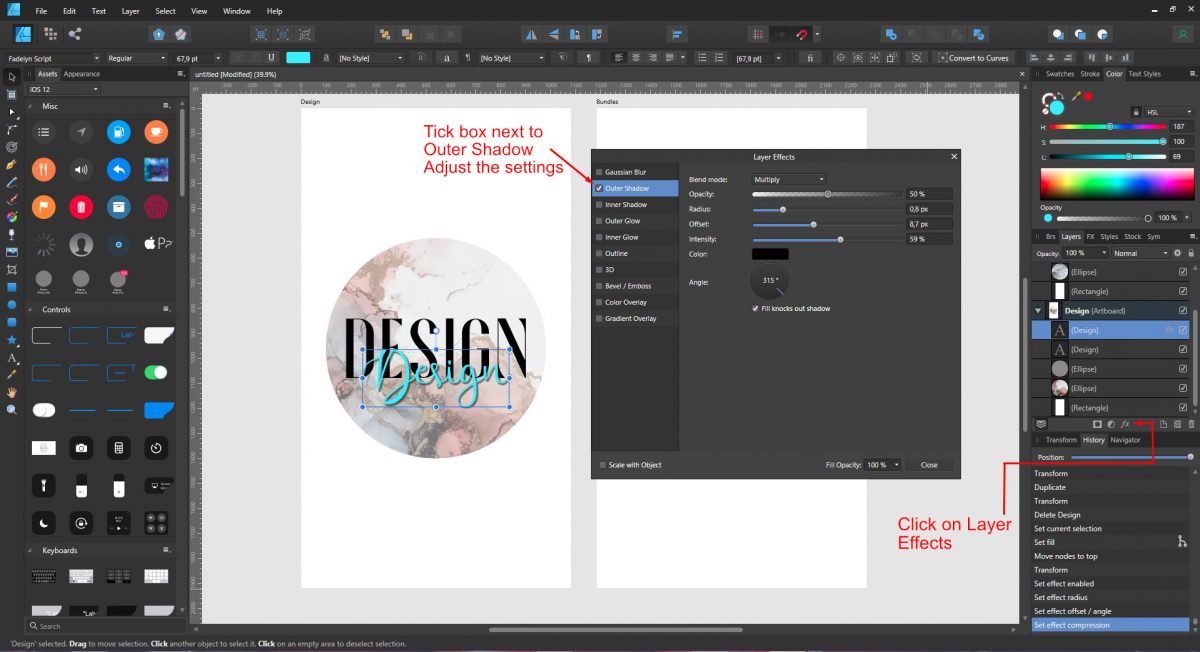
Next we will quickly add a shadow. Click on the fx symbol at the bottom of the Layers Panel to open the Layer Effects panel. Tick the box next to Outer shadow and click to access the options. Adjust the Radius, Offset and Intensity as you want. You may want a darker or a lighter shadow but this is up to you.
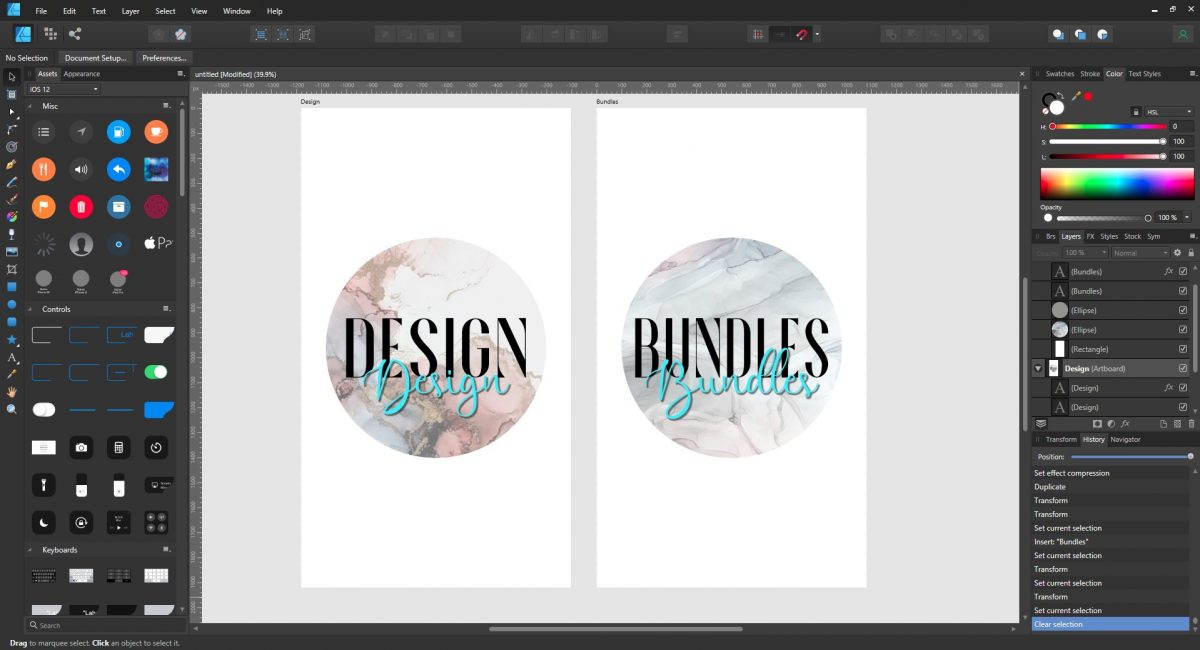
Repeat for the second highlight cover. You can always adjust the text objects at any point.
For the final step we will batch export the designs. We will be able export quickly and with different file formats. We have a great tutorial on how to batch export files in Affinity Designer to get you started.
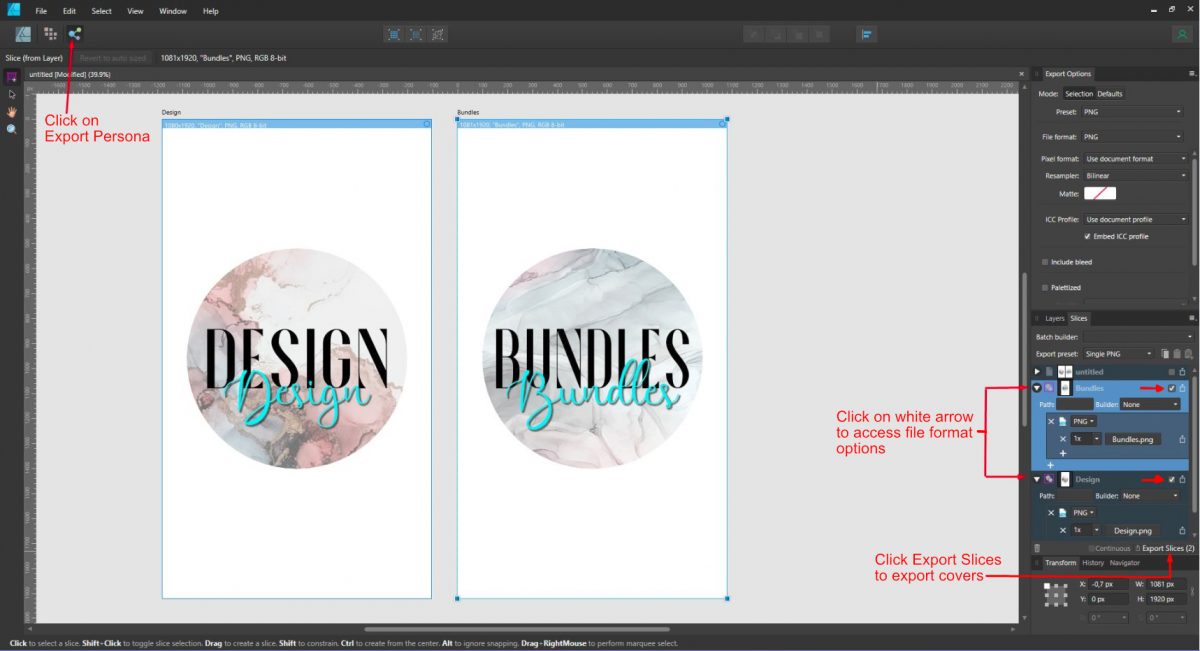
Click on the Export Persona top left of the screen. On the right hand side click on Slices, which will be next to the Layers panel.
Under the Slices panel you will find the artboards with file format options. Click on the white arrow next to each artboard, in this case Design and Bundles. We will leave the file format as PNG for both artboards. Be sure that the box on the far right for each artboard is ticked. Click on Export Slices at the bottom.
The export window will open, choose your location and click Export. Your Instagram Highight covers are now ready to be uploaded to your Instagram profile.

You can create Instagram Highlight covers with any design, any color that best fits your needs. With Batch exporting, you can create multiple covers in a fraction of the time.
If you enjoyed this tutorial you may also like these other tutorials on making clipping masks and using brushes in Affinity Designer.
In this tutorial we will be making Instagram highlight covers in Affinity Designer. We also have a tutorial on making highlight covers in Canva if that is your preferred program.
We will be using abstract highlight covers and an elegant font duo called Fadelyn.
Step 1 - Set up the Artboards for the designs
As we want to create multiple designs we will use the Artboards feature and batch export. This is a more efficient way of quickly creating designs.
Open Affinity Designer and click on New Document. Under the New Document settings, adjust Width and Height. For Instagram Highlight covers the recommended size is 1080 x 1920 px. Be sure that the Document Units is set to Pixels.
Tick the box next to Create Artboard and under Color tick the box next to Transparent background. Click Create at the bottom.
Under the Layers Panel click the artboard layer then right click and Duplicate. At the top of the screen click on the Snapping Tool. This will help in aligning the designs on artboards. Click on the duplicate artboard to select, then drag it to the right.
Rename the artboards by clicking on the layer name under the Layers Panel. The name of the artboard will be the document name when batch saving.
Step 2 - Add and adjust shapes for highlight covers
The artboards will be our Instagram Highlight Covers. For this tutorial we want to create a textured circle with wording on a white background. Add a rectangle background by clicking on the Rectangle tool on the left side panel.
Start at one corner and click + drag the rectangle out. You will see the rectangle snap to the corners because the Snapping Tool is turned on. Change the color to white by using the Color fill option on the top right or top left.
Next we will add the circles. Click on the Ellipse Tool on the left side panel and draw out a circle on one of the artboards. Add a color fill for now so that you can see the circle. Position the circle in the middle of the artboard. With the Snapping Tool activated, when you move the circle, a green and red line will appear. When these two lines cross the circle will be centered.
Press Ctrl + J to duplicate then hold Shift + click and drag the duplicate to the second artboard. Use the red and green guidelines to center the circle.
Step 3 - Add a background fill to shapes
For this step we will use the Fill Tool to add a gradient then change it to a bitmap. We have a great tutorial on creating gradients in Affinity designer if you need some extra help.
Click on the Fill Tool on the left hand side then click + drag a gradient fill over the one circle. Don't worry about the color for now as we will be changing this next.
With the gradient still selected, click Type at the top left of the screen. Select Bitmap from the options and a new window will open. Locate your background fill and click Open. The bitmap fill will be automatically applied.
Reposition the fill by clicking and dragging the center color stop. Change the size of the fill by clicking one of the outer color stops and dragging in any direction. This will also adjust the other color stop on the opposite side. As you click and drag you can also change the orientation.
At the top panel are the editing options for the gradient. For this tutorial we left the options such as Extend and Quality as is.
Repeat this process for the second circle but with a different background. Click the Fill Tool, add a gradient then select Bitmap next to Type. If, at any point, you want to change the bitmap, click Bitmap again and choose a new background.
Step 4 - Edit background and add text objects
For Instagram Highlight covers you can have text or icons as part of the design. In this tutorial we are using text to create impact. First, we want to decrease the contrast of the background fill in the circle. A quick and easy way is to select one of the circles and press Ctrl + J to duplicate. If you are familiar with editing Levels or Curves, go right ahead.
Next, fill the duplicate circle with white from the Color Panel then change the Opacity to 50%. The background will show through. Repeat this method for the second circle.
Click on the Artistic Text tool on the left hand side. If you can't see it, click on the white arrow to open the text tool options. Select the one circle and type out your text. Resize and reposition using the red and green guidelines as needed.
Choose a bold font from the font selection at the top left of the screen. Adjust the color as you want. Add text to the second circle as well.
Step 5 - Enhance the highlight covers
While the highlight covers look nice we want to make it a little more interesting. Once again click on the Artistic Text tool and this time change to a script font. For this tutorial we used the same wording but in different font styles.
Type out your text, reposition and resize then fill with a color of your choice. Be sure to place the second text object above the first. To do this select the text then click on Move to front at the top of the screen.
Next we will quickly add a shadow. Click on the fx symbol at the bottom of the Layers Panel to open the Layer Effects panel. Tick the box next to Outer shadow and click to access the options. Adjust the Radius, Offset and Intensity as you want. You may want a darker or a lighter shadow but this is up to you.
Repeat for the second highlight cover. You can always adjust the text objects at any point.
Step 6 - Batch export highlight cover
For the final step we will batch export the designs. We will be able export quickly and with different file formats. We have a great tutorial on how to batch export files in Affinity Designer to get you started.
Click on the Export Persona top left of the screen. On the right hand side click on Slices, which will be next to the Layers panel.
Under the Slices panel you will find the artboards with file format options. Click on the white arrow next to each artboard, in this case Design and Bundles. We will leave the file format as PNG for both artboards. Be sure that the box on the far right for each artboard is ticked. Click on Export Slices at the bottom.
The export window will open, choose your location and click Export. Your Instagram Highight covers are now ready to be uploaded to your Instagram profile.
You can create Instagram Highlight covers with any design, any color that best fits your needs. With Batch exporting, you can create multiple covers in a fraction of the time.
If you enjoyed this tutorial you may also like these other tutorials on making clipping masks and using brushes in Affinity Designer.


