
How to Use Motion Blur Effect to Create 3D Typography in Procreate
In this tutorial, we will learn how to create a cool and smooth looking 3D text effect using motion blur in Procreate. It is a fairly detailed rendition of this particular method of creating 3D text in the app. But the techniques are simple to use and easy to follow by novices or more experienced users alike.
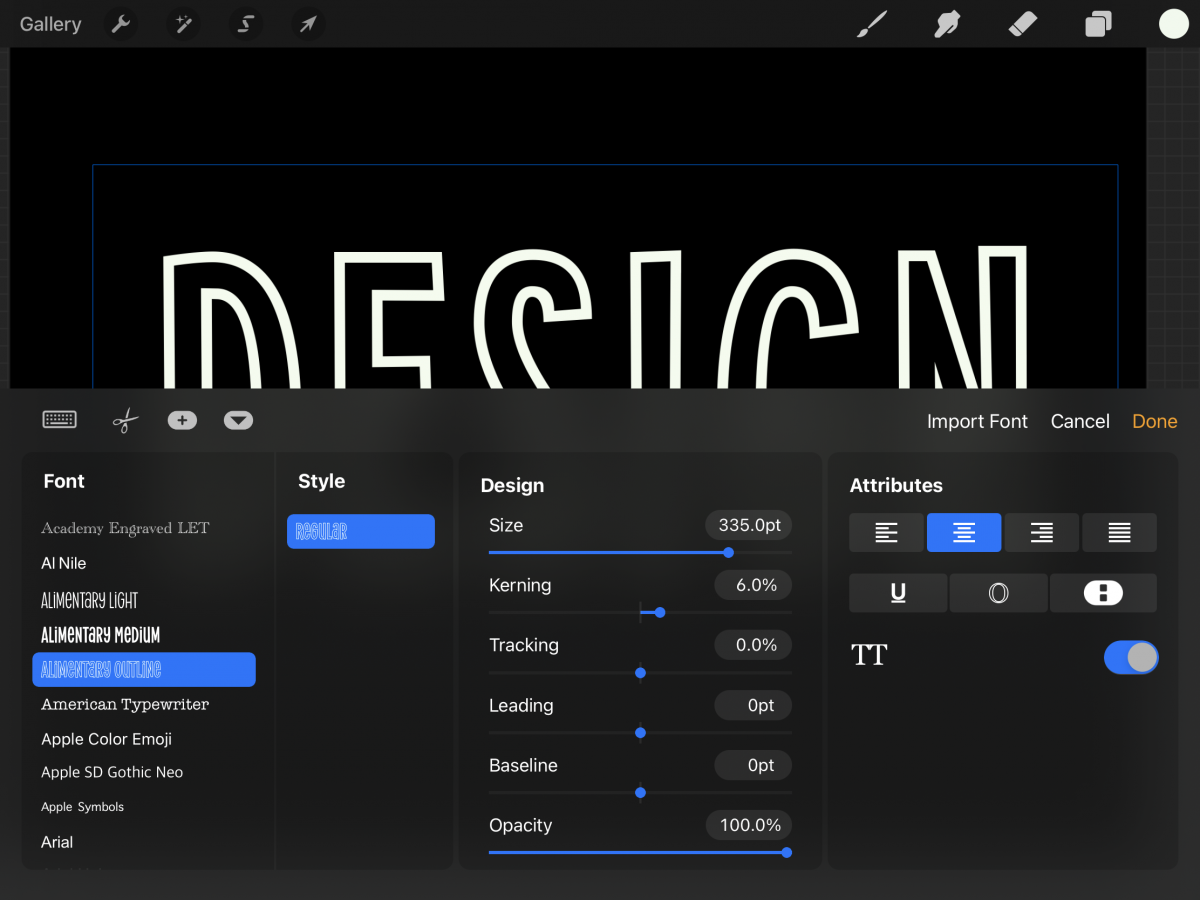
We have imported our font to Procreate. We will be using the Alimentary font from Missy Meyer, but there are also tons of great bold fonts to choose from if you prefer.
Step 1 - Add text to your document
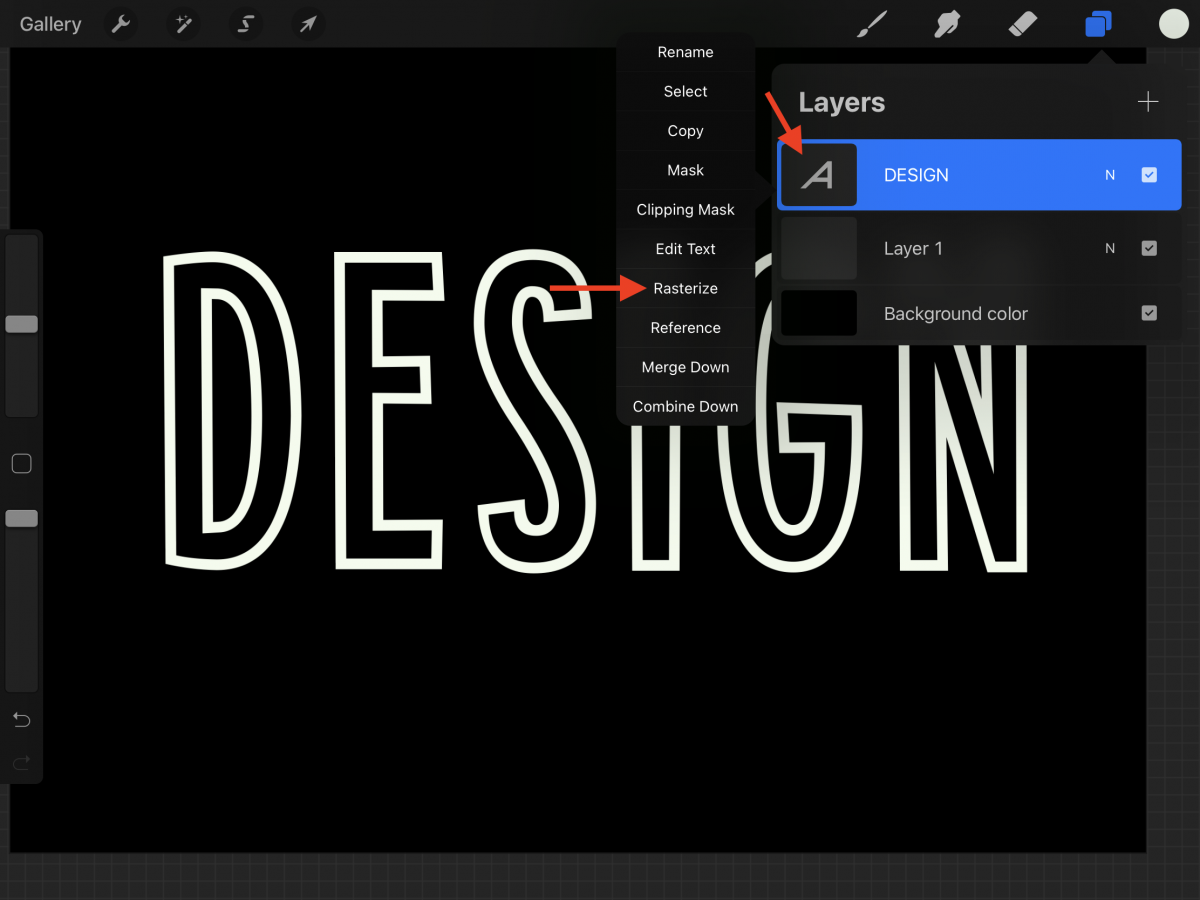
Step 2 - Rasterize your text
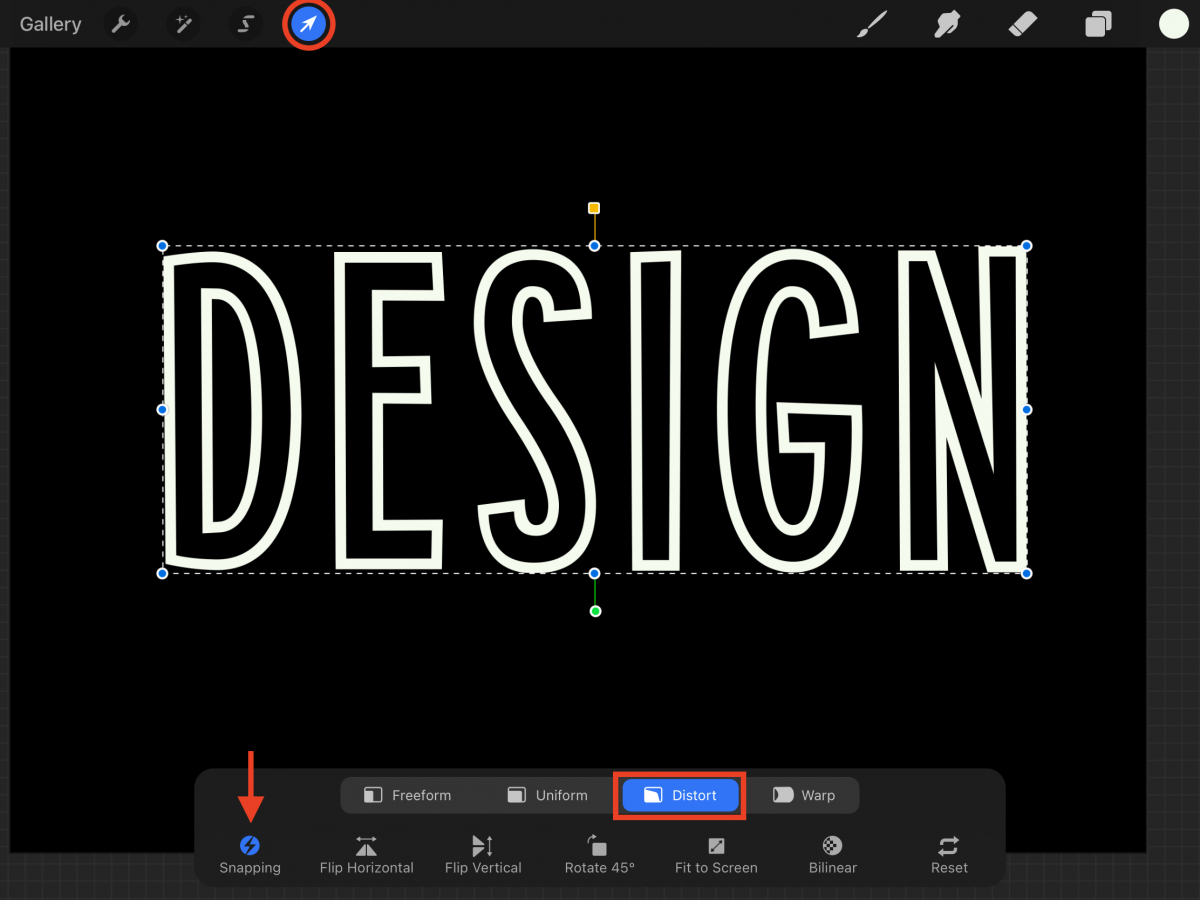
Step 3 - Distort your text to change its perspective
Step 4 - Create the 3D effect using Motion Blur
Step 5 - Add more layers to make the text more defined>
Step 6 - Merge the layers together
Step 7 - Adjust the text appearance and edges
Step 8 - Colorize the blurred portion of your text
Step 9 - Colorize the top of your text
Step 10 - Add light to the top of your text
Step 11 - Add light to the body of your text
We are going to use black as the background color for our canvas. The text will be filled with white to make it pop more.
Type the text you want to apply the 3D effect to. The font we chose has an outlined version. If the one you are using doesn’t have one, just create the outline in a separate layer using a monoline brush.
Once you have typed your text, click on top of its thumbnail and choose Rasterize from the menu. This will convert it into a raster object (pixels) so you can apply the modifications needed to create the 3D effect.
We are going to distort our text to give it perspective and appear as if it is coming from the bottom left side of the canvas. But you can use a different angle if you prefer. Use the Selection tool shown as a small arrow icon on the top menu. Next, choose Distort from the selection panel, making sure that Snapping is enabled.
Distort your word using the blue and green handles located around it until you get the desired perspective. To save your changes, click again on the Selection tool icon.
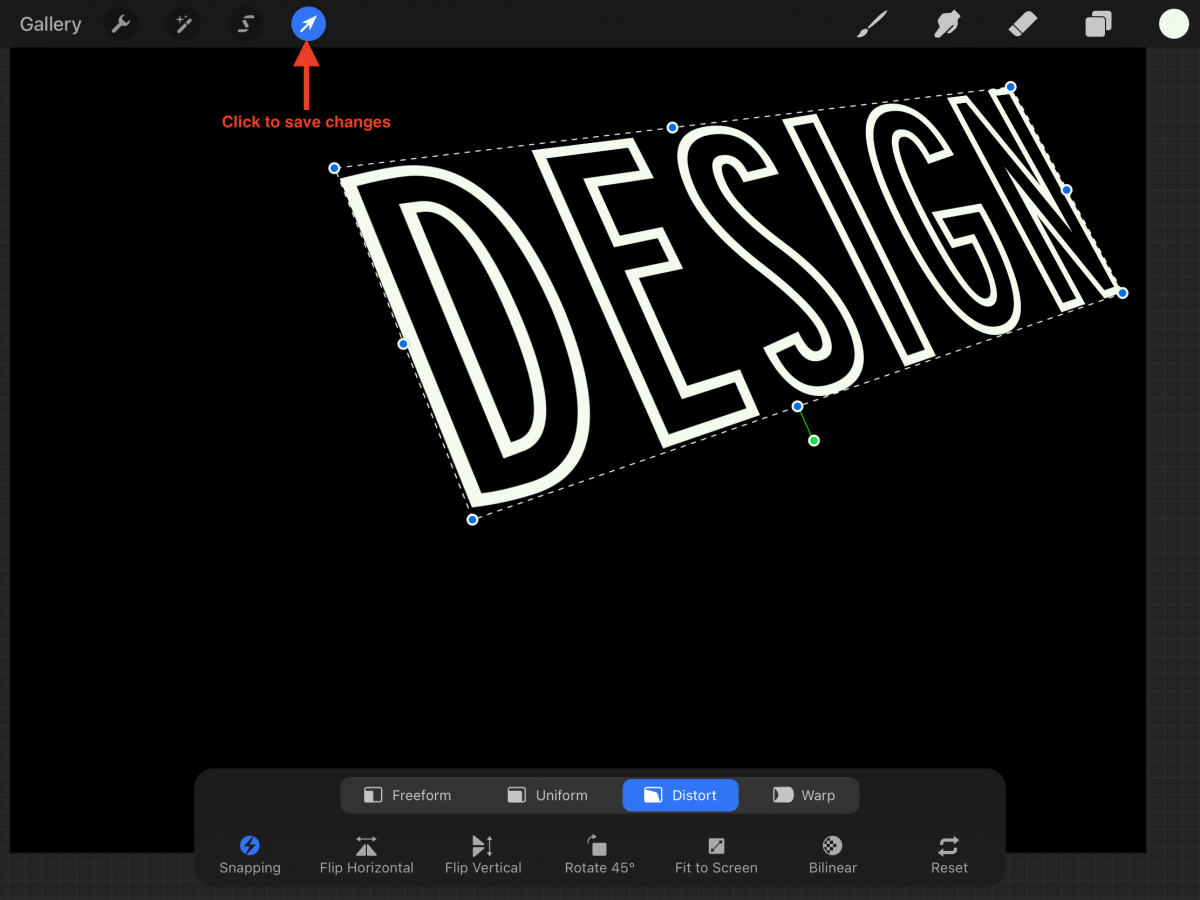
Once you are done, center the word to your canvas.
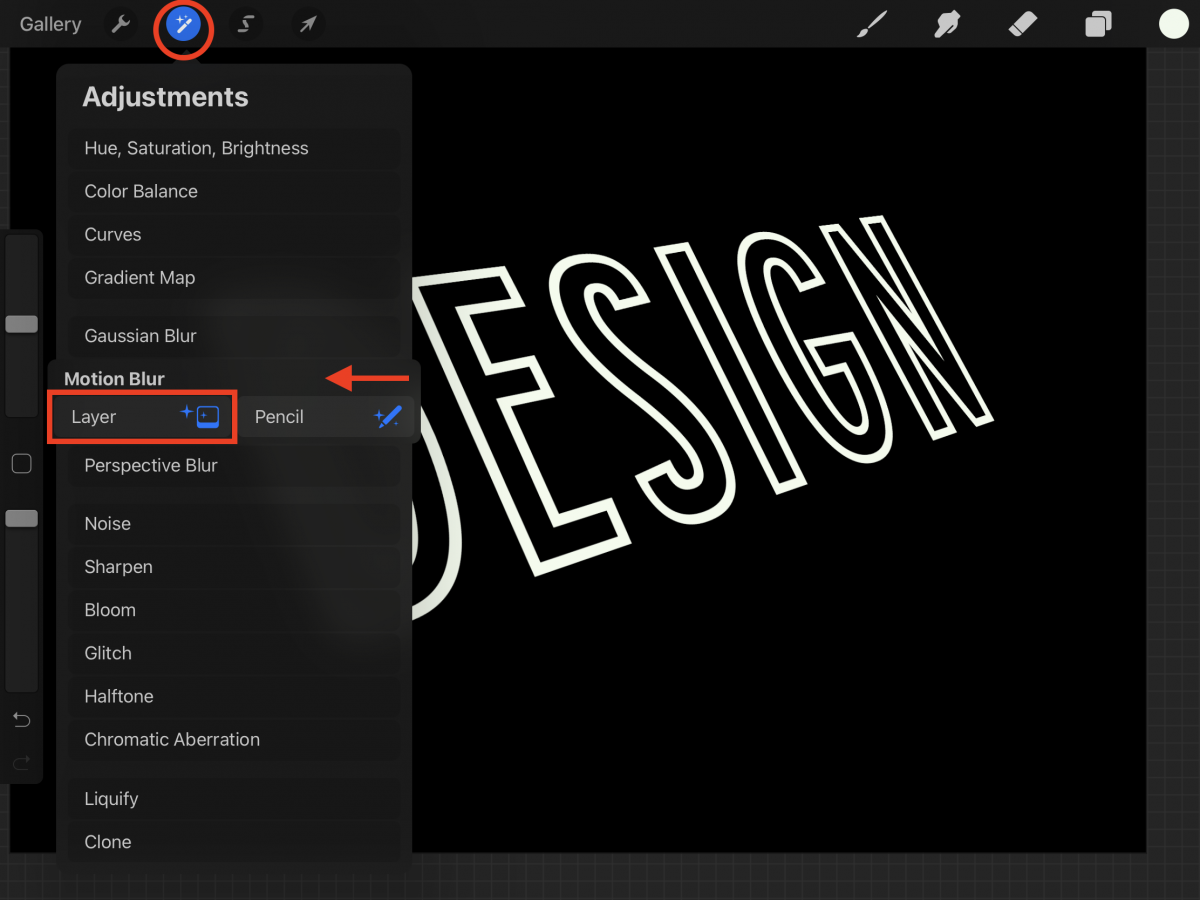
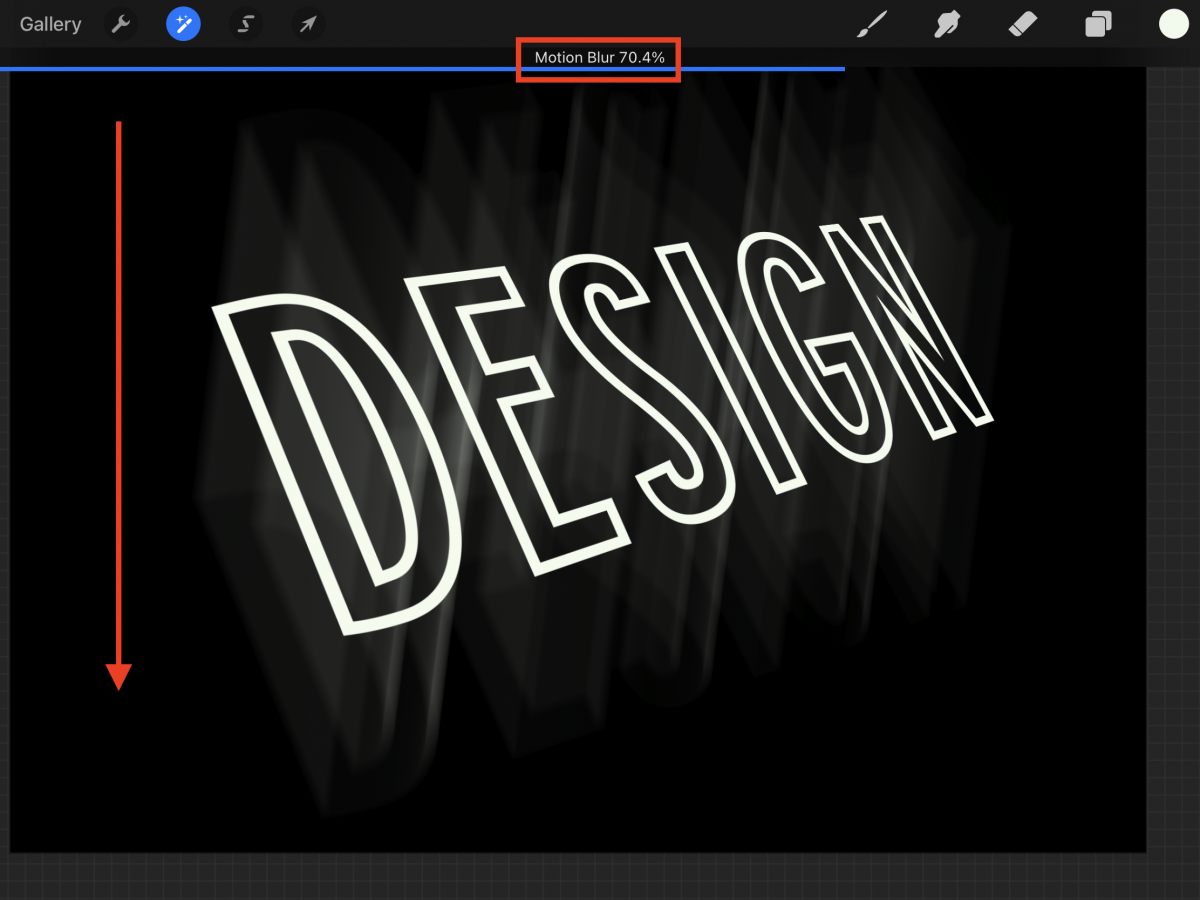
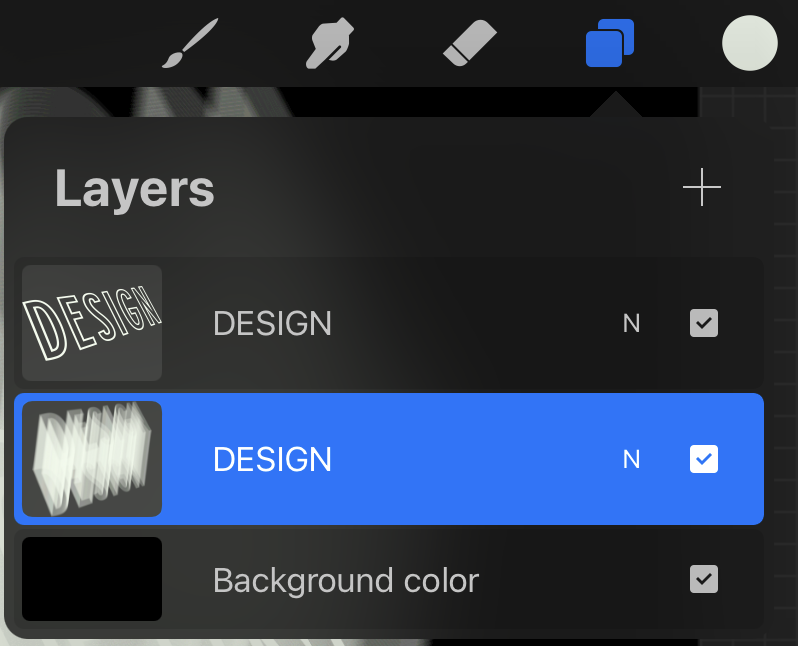
In this step we will use Motion Blue to create the 3D effect. We will duplicate the layer and select the bottom instance. We have a great guide on how to duplicate in Procreate for beginners.
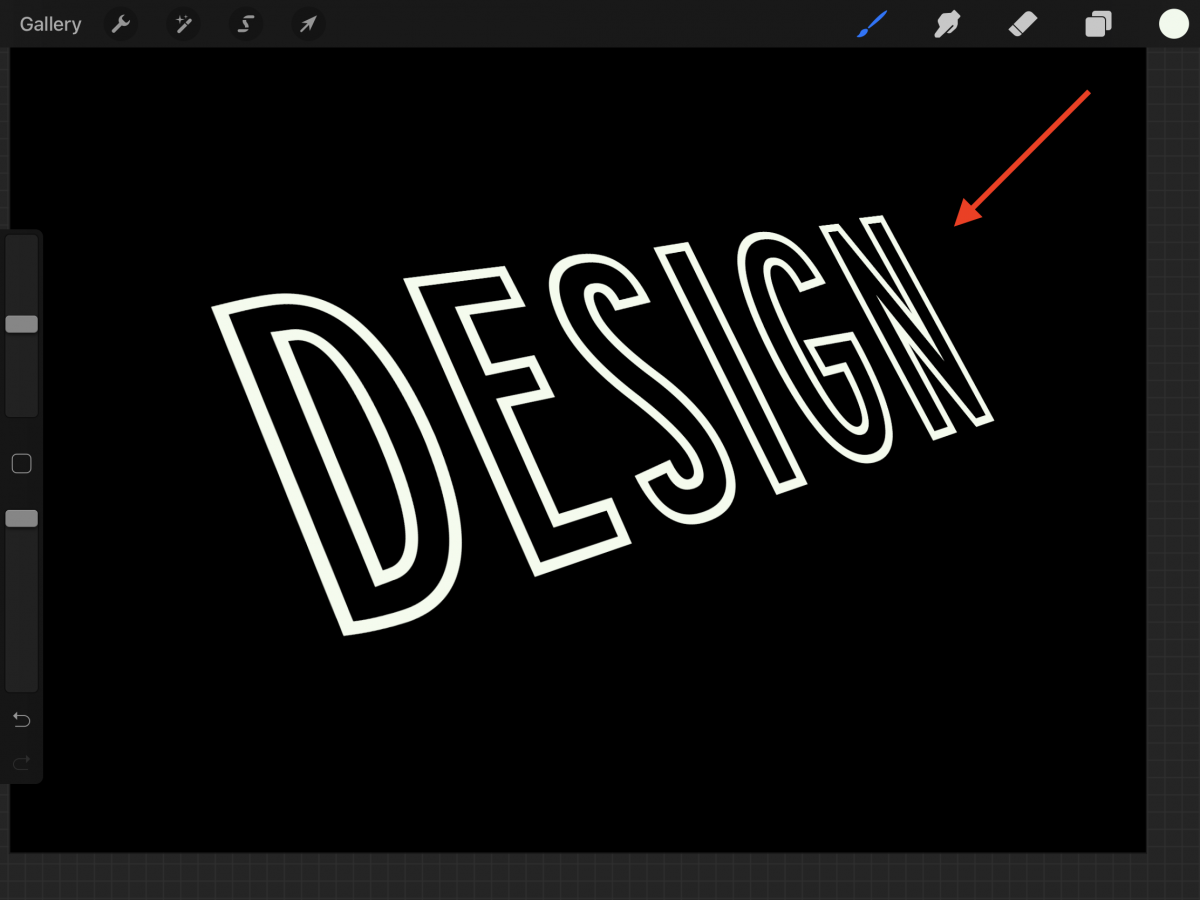
Go to the Adjustments panel that looks like a magic wand icon on the top menu. Next, click on Motion Blur and then select Layer.
To create the 3D look, press and drag down on the screen until about 70%. You can drag in any other direction you want the text to move and use a different motion blur percentage.
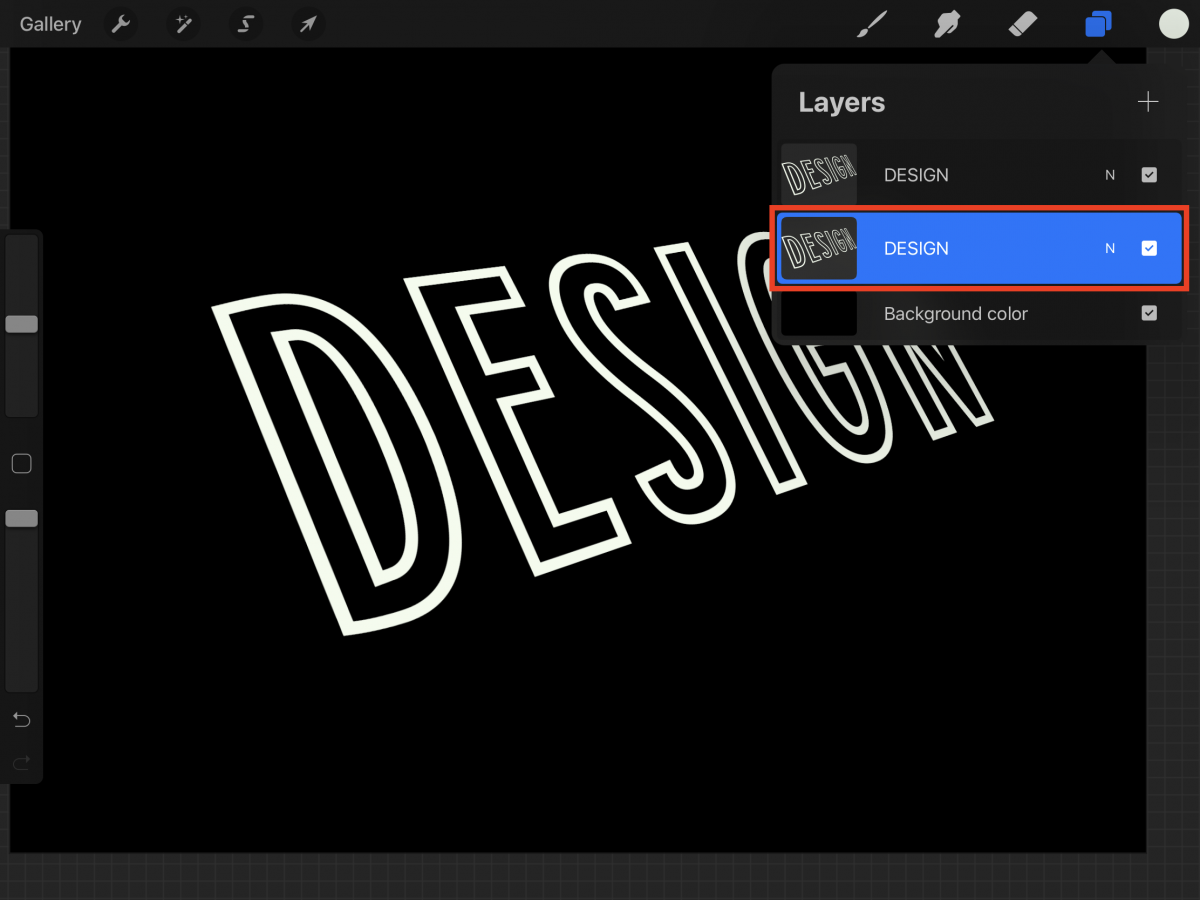
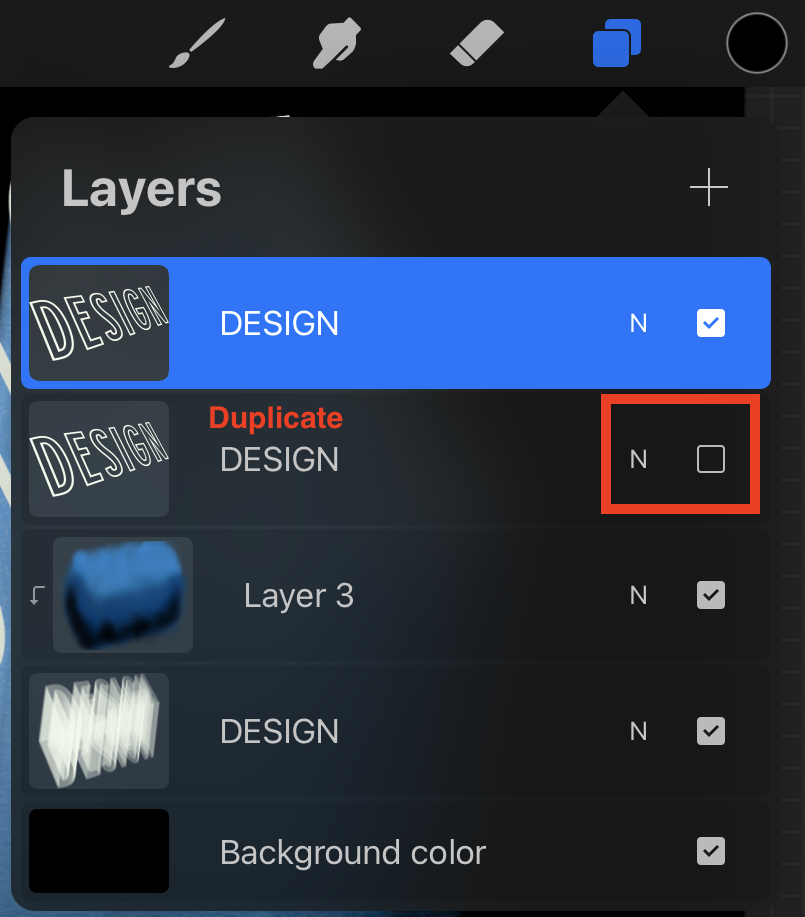
To make the 3D look more defined, we need to duplicate the distorted layer a few times. In this case we made 7 duplicates.
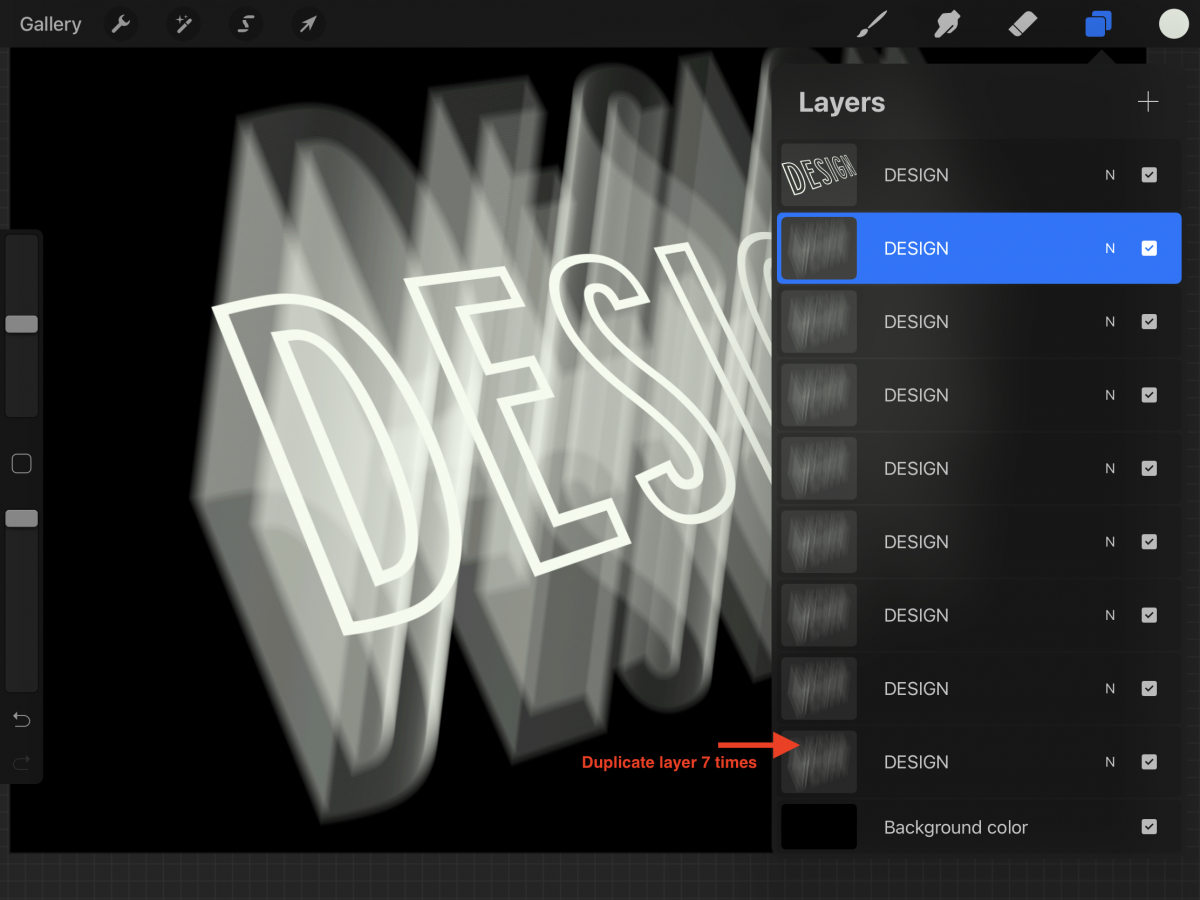
Our 3D text is still a bit transparent. In order to fill it up a bit more, we are going to merge it and duplicate it again. Select all the blurred text layers by first tapping on one of them. Then, swipe to the right on each layer you want to select. Group them together by clicking on Group on the top right side of the Layers panel.
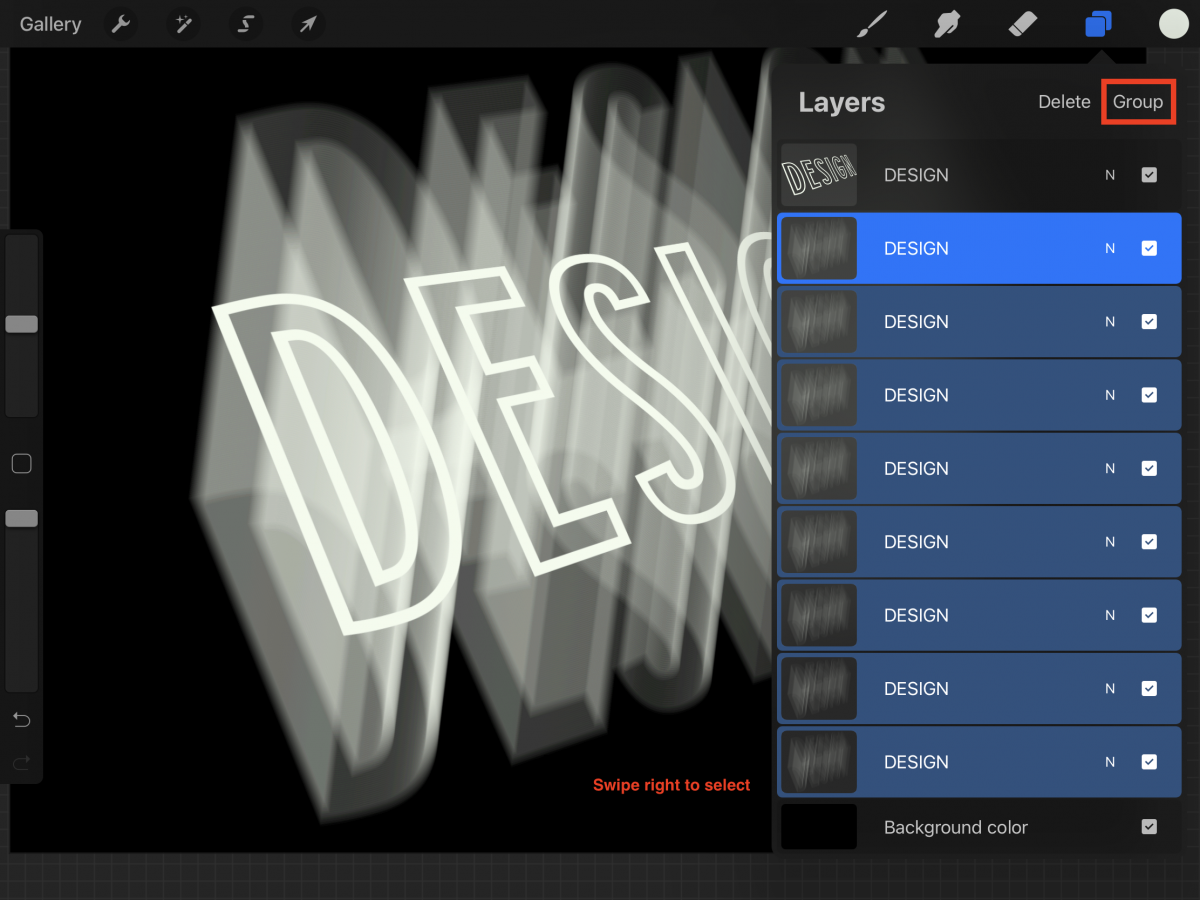
Click on top of the group layer icon and choose Flatten from the small menu.
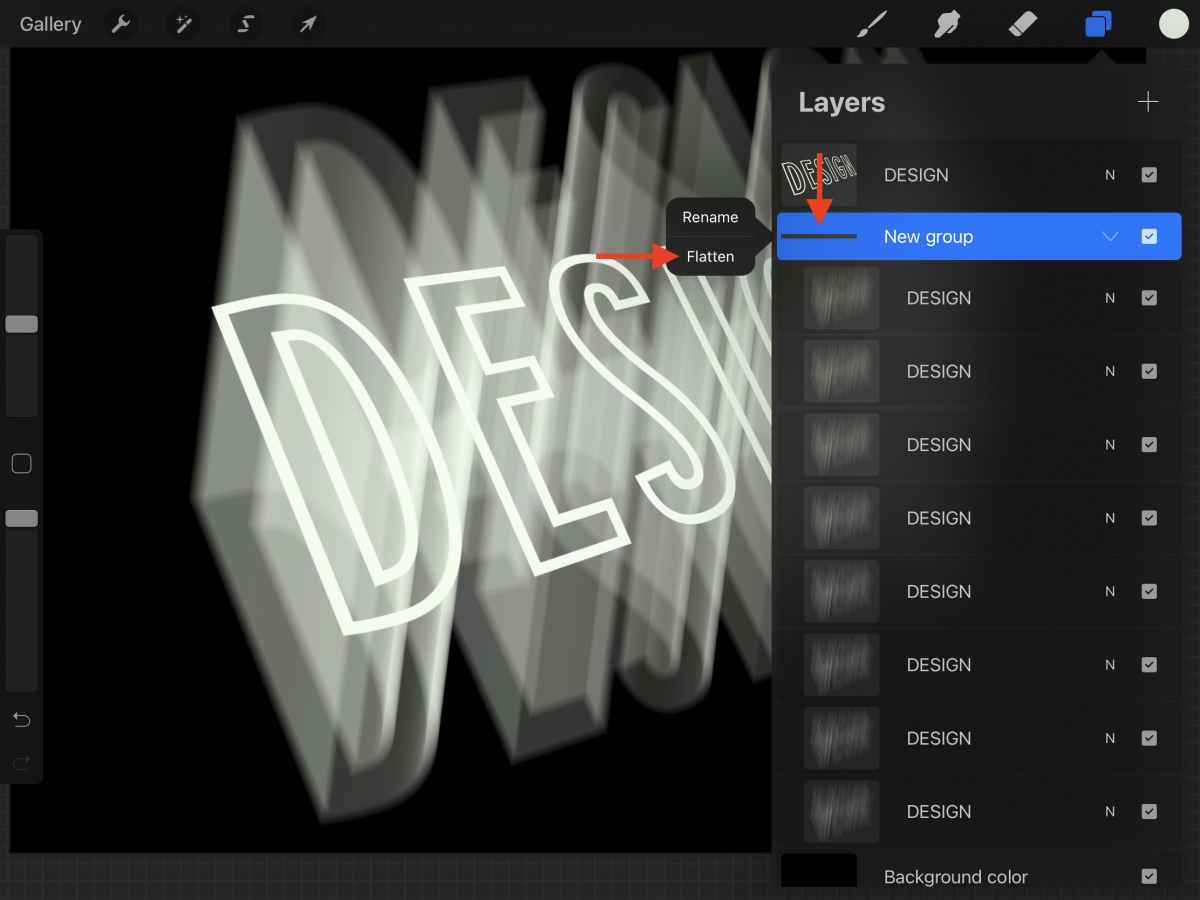
Finally, duplicate the resulting layer one or two times. Flatten the duplicates again until you are satisfied with the look of your text.
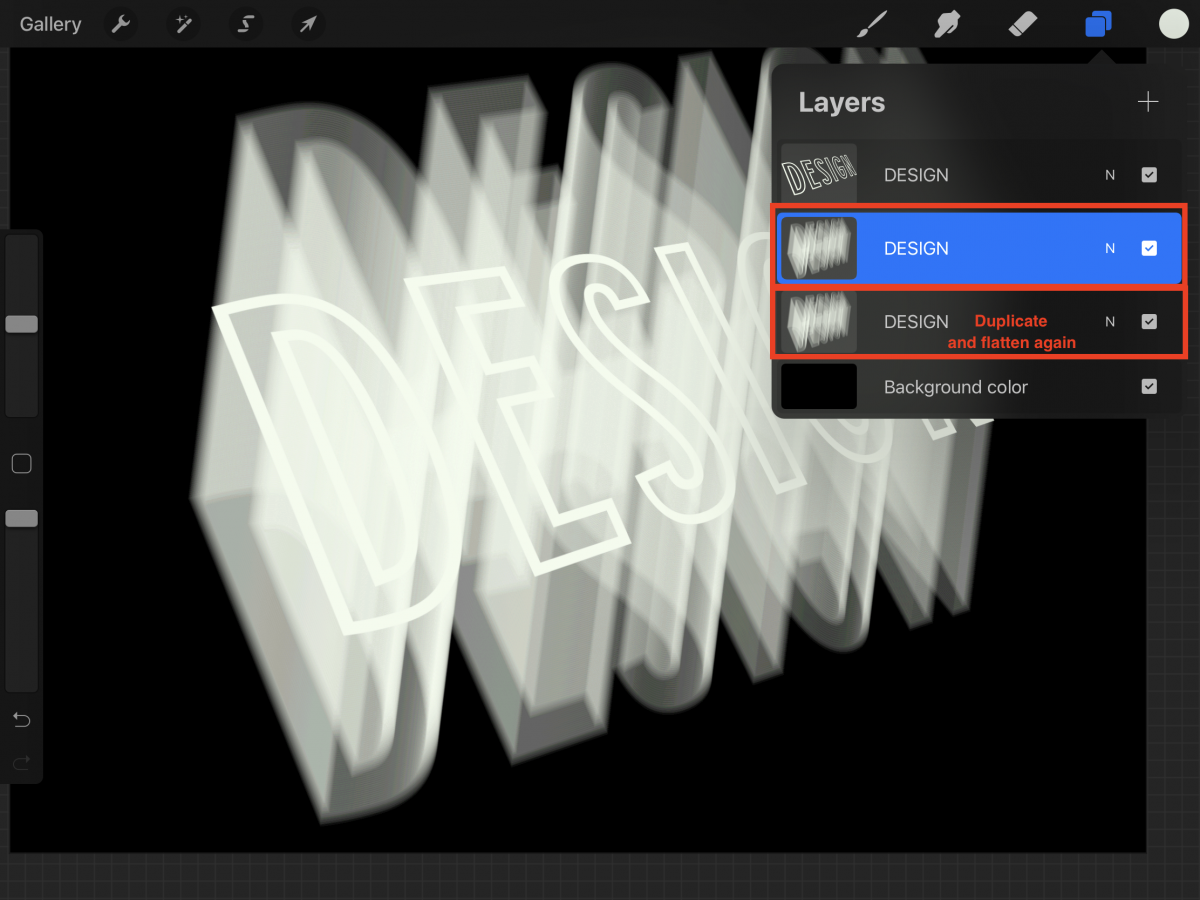
Your resulting layer thumbnail should look similar to the following image.
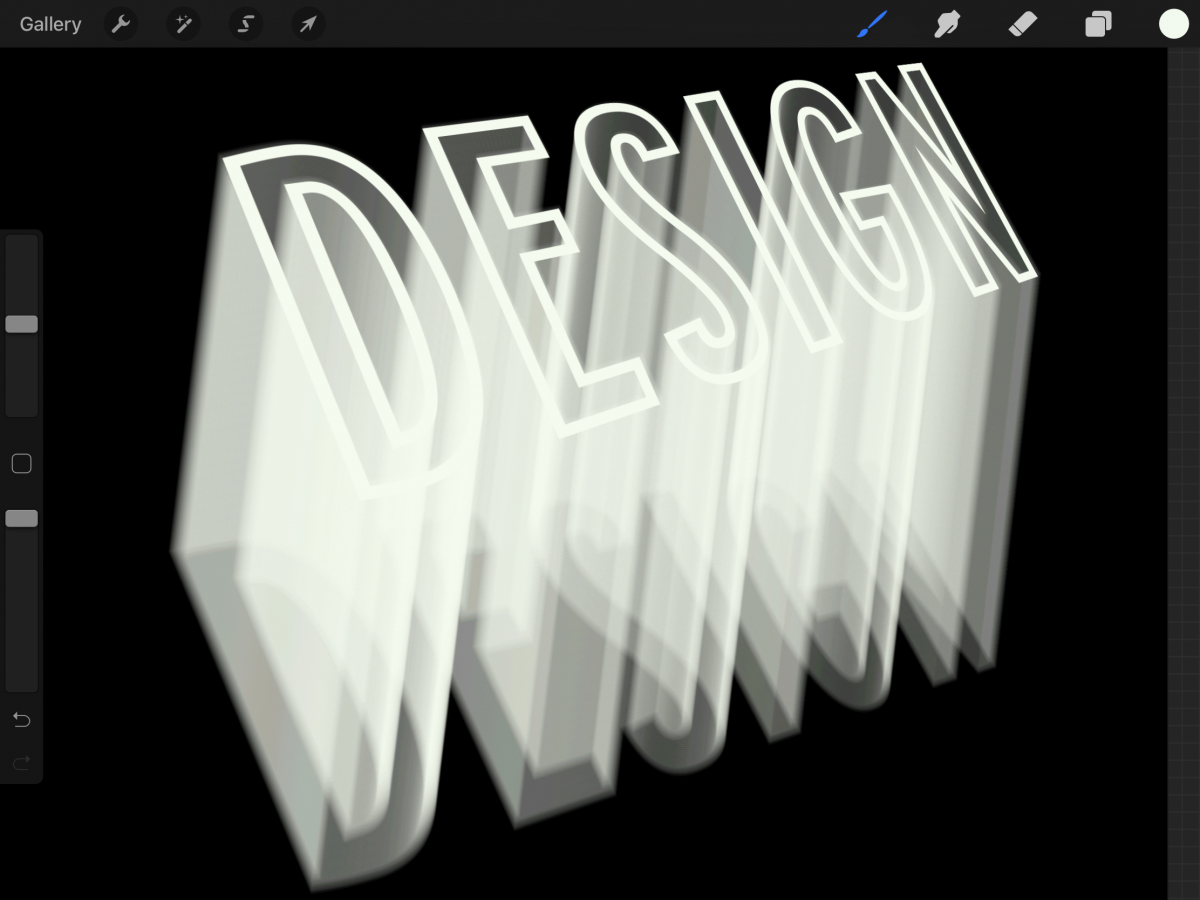
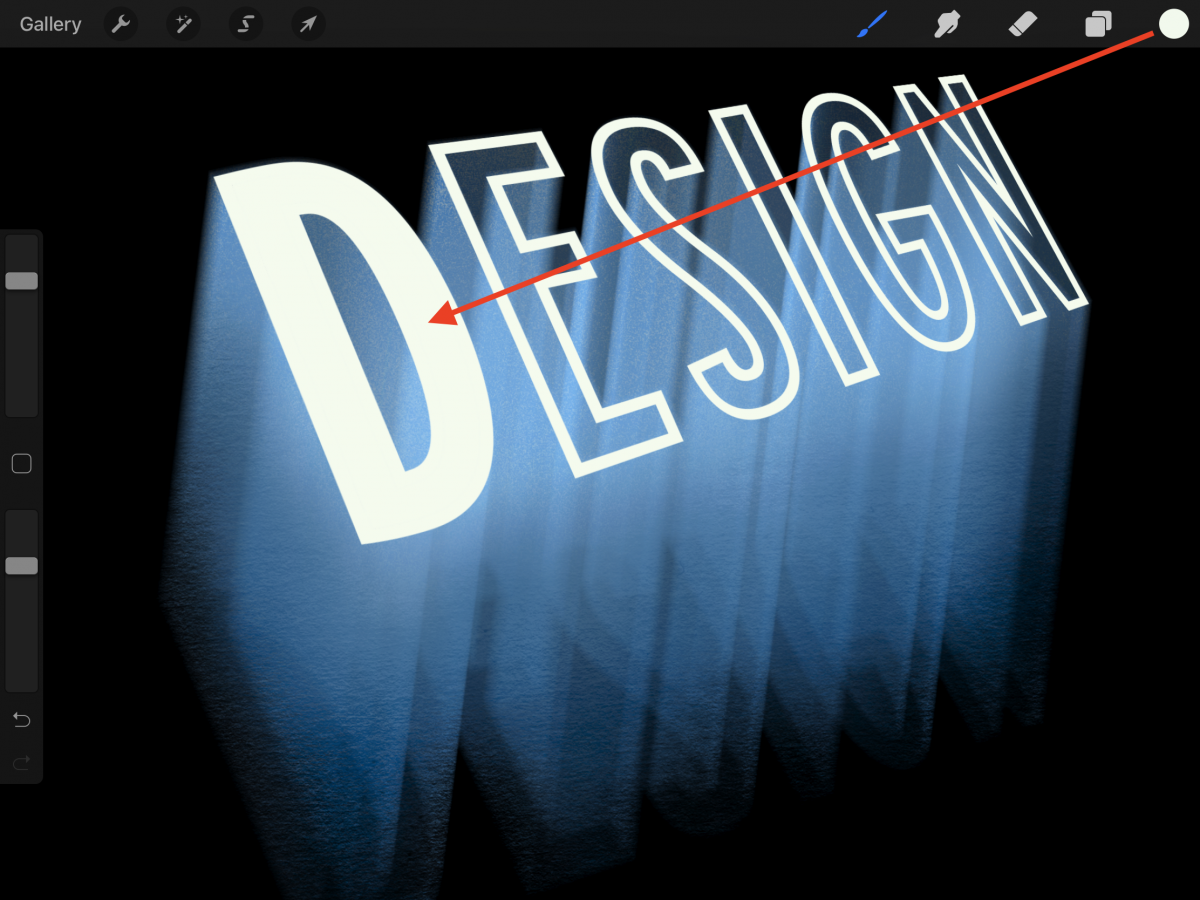
We need to place the 3D text so it seems to be coming from under the original text layer. Using the Selection tool freeform option, first move the top text layer (the one without the blur effect) so it sits on top of the blurred one.
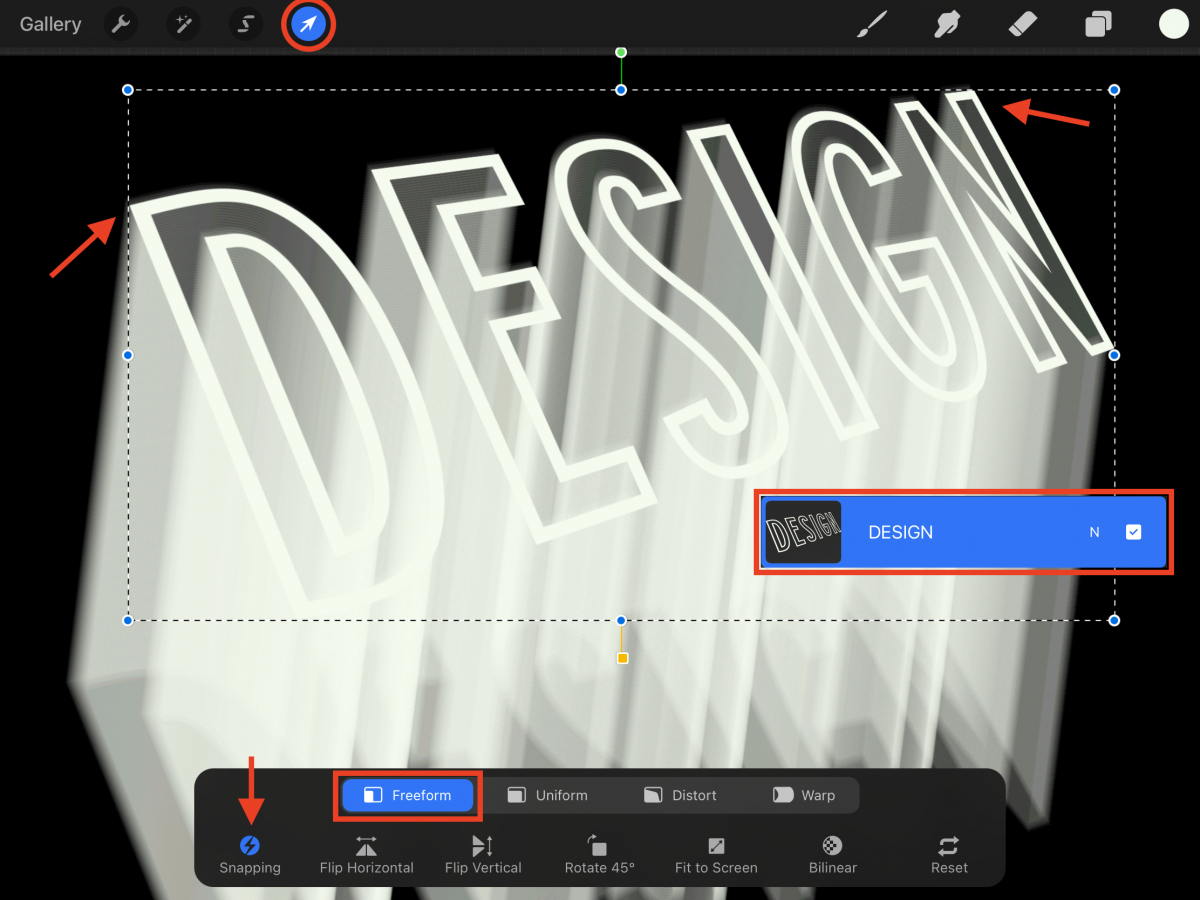
Then, select the blurred text layer and use the distort option to adjust the edges of the text so they match the one on top.
The Snapping feature will help you get a better alignment while distorting. Click on the icon, uncheck Magnetic and adjust the other values to your liking.
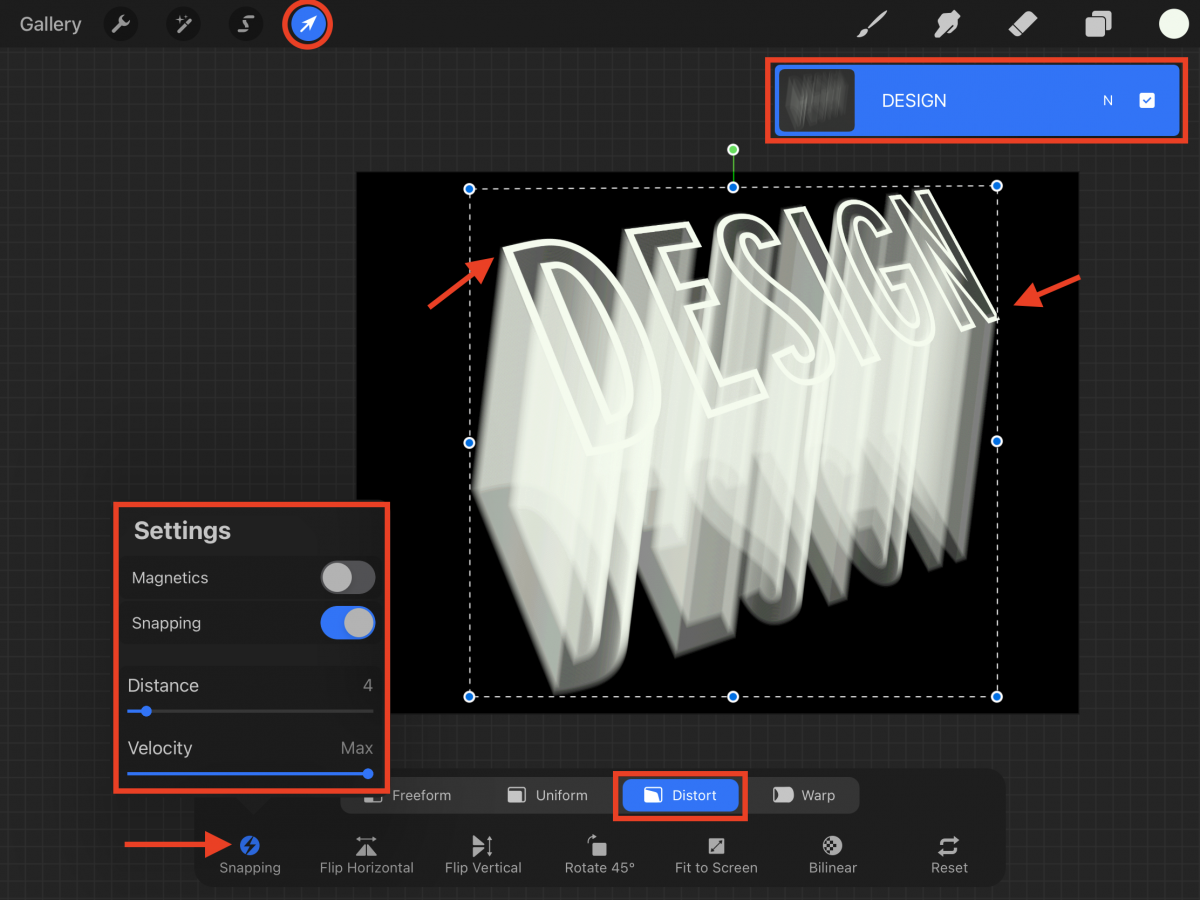
Once you are done, your text should look like it has a semi-transparent 3D shadow coming down from it.
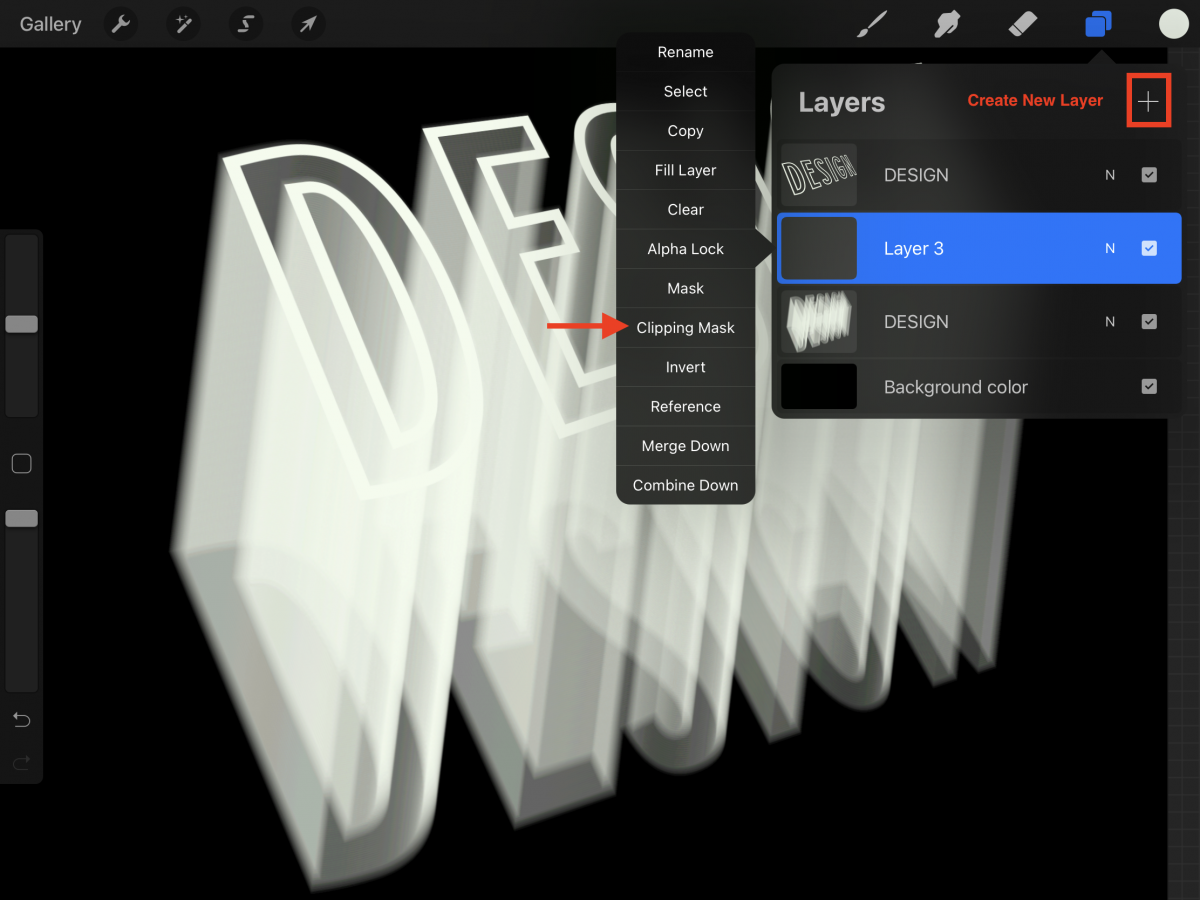
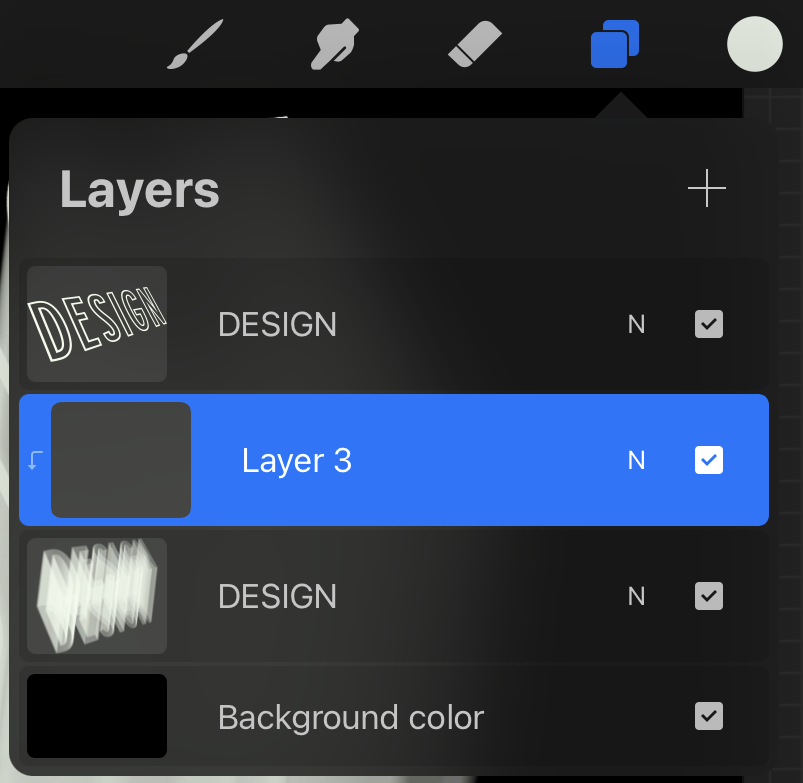
We are going to colorize our text and give it a nice progression from light to dark. Create a new layer between the two text layers. Turn this new layer into a Clipping Mask. Check out our great tutorial on using a Clipping Mask in Procreate.
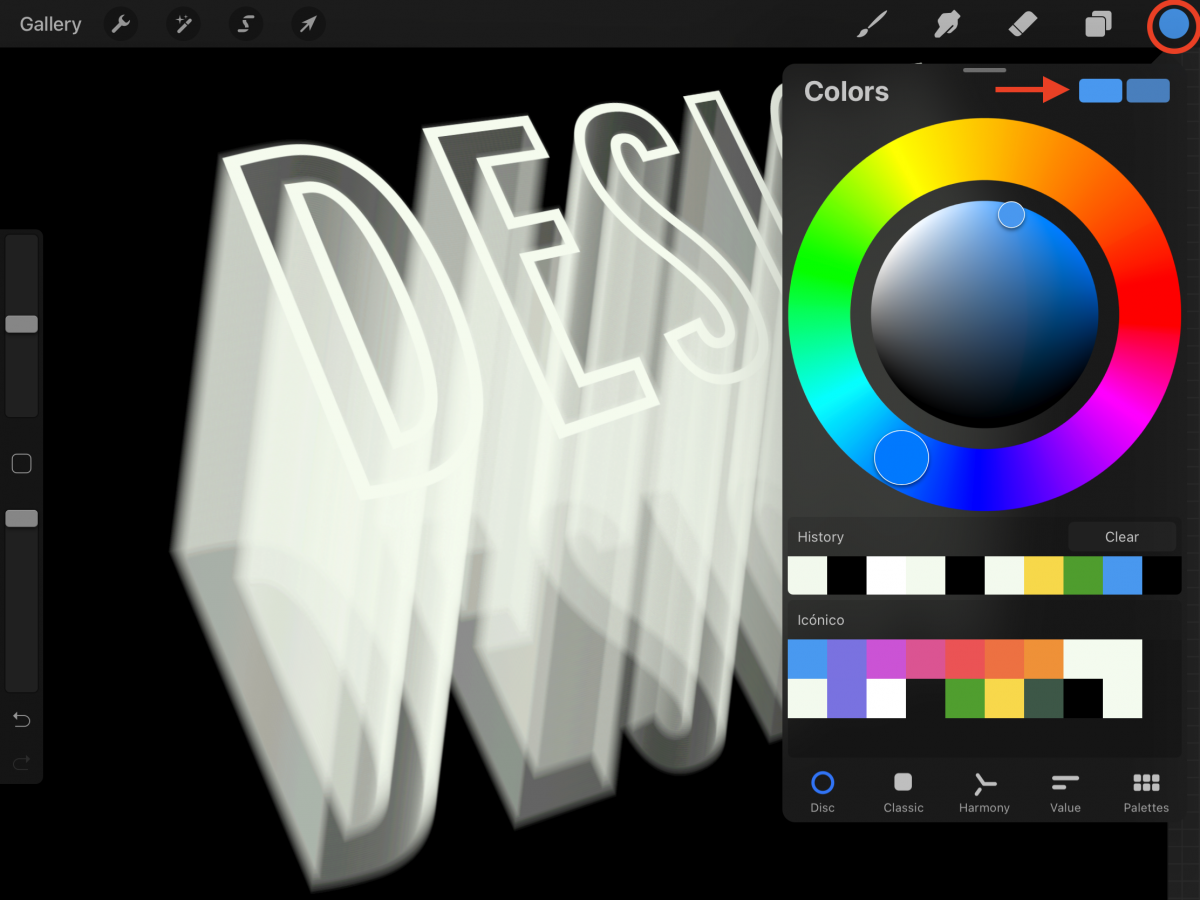
Select a nice light color for the base of your color gradient. We chose a light shade of blue.
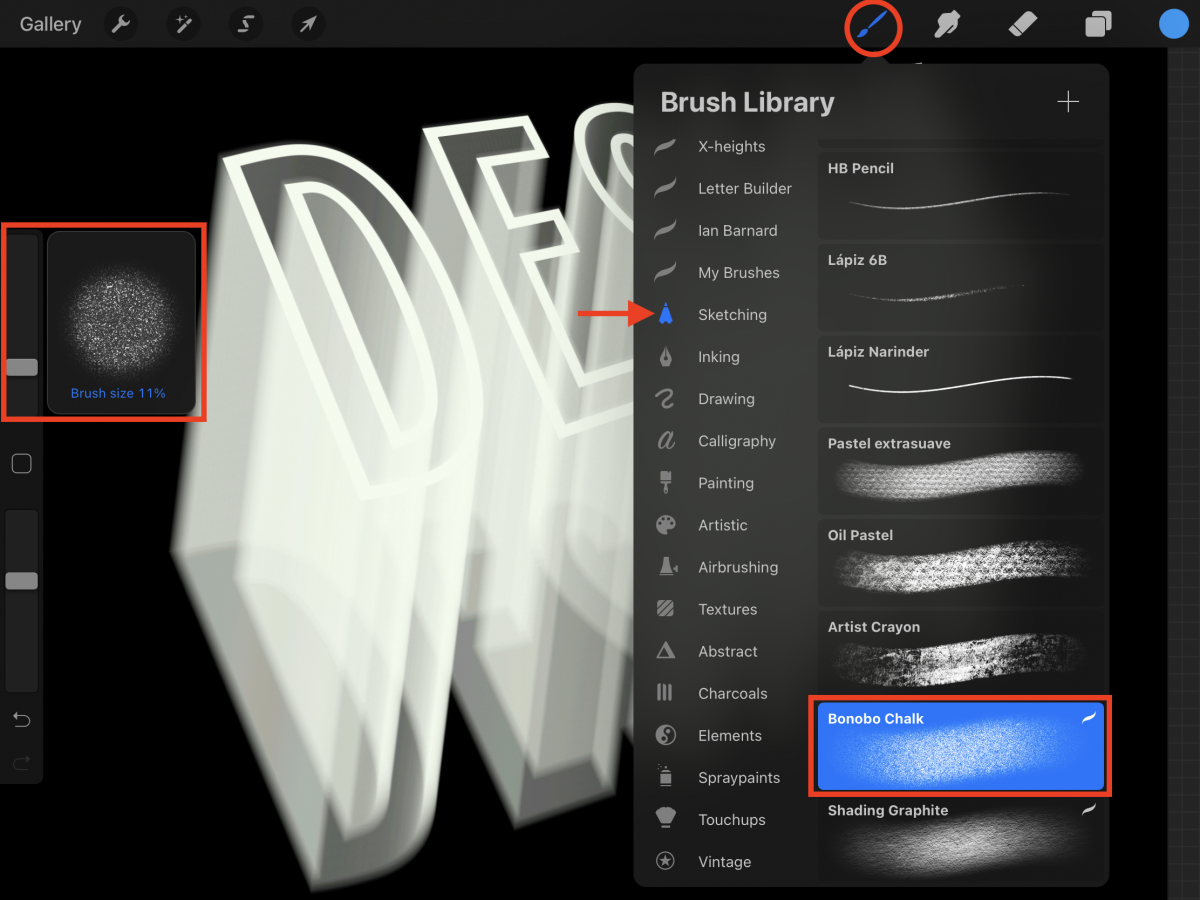
Go to the Brushes panel and choose the Bonobo Chalk brush from the Sketching folder. The Size should be around 10 or 11%.
With a circular motion apply that color to your text from the top to about ¾ of its length. Leave the bottom portion empty.
To smooth the color a bit and tone down the grainy look of the brush we will use the Smudge tool (top menu). From the Water folder in the brush library, select the Wash brush (use a 15% brush size).

Swipe on top of the colored portions slightly to smooth them out.
To finish with the progression, change the fill to a darker shade of the same color. Select the Bonobo Chalk brush used before.
This time, start coloring from the bottom of the text until you reach the end of the lighter shade and blend them together a bit.
Use the Smudge tool with the same brush and settings used for the lighter color here too.
Finally, choose black or the same color as the background. Use the same Bonobo Chalk brush to erase some of the text at the very bottom. This will make it look like it is disappearing.

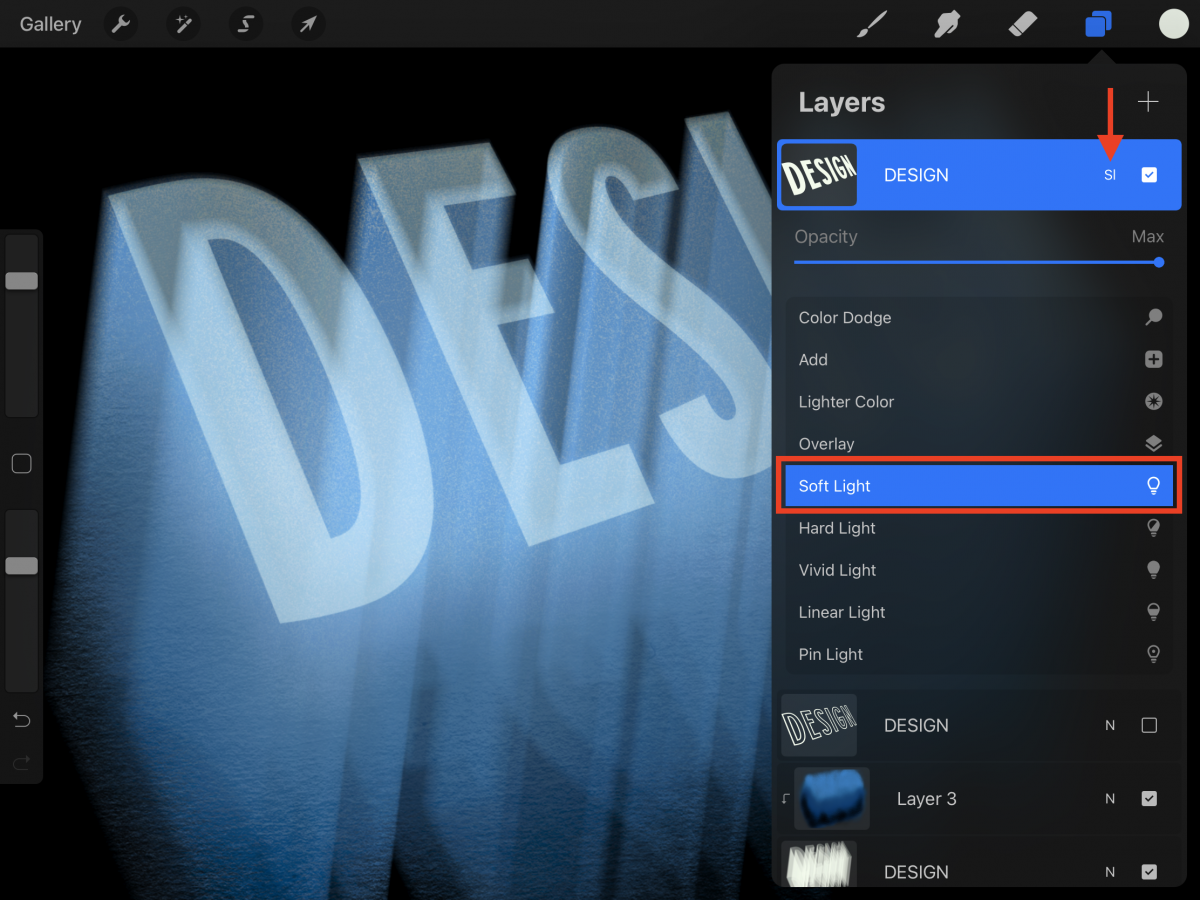
In this step we will add color to the top of your text. Start by duplicating the layer and turning off the visibility of the original one. Do this by un-checking the small box on the right side of its thumbnail.
Change the fill color to the same one used when creating your text and fill each color. We used white for our fill.
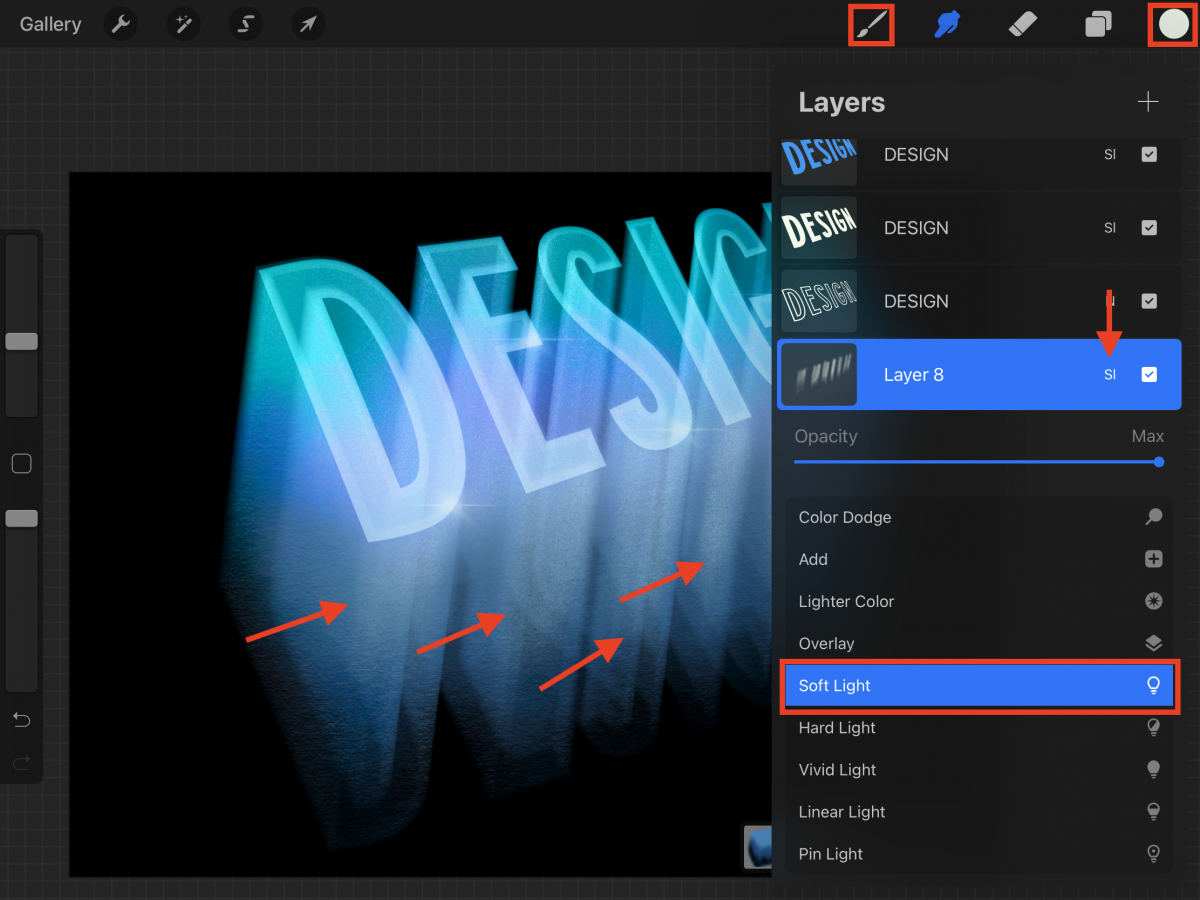
To make the filled text blend better with the rest we are going to change the Blending Mode. Click on top of the small letter on the layer thumbnail and change the blending mode to Soft Light.
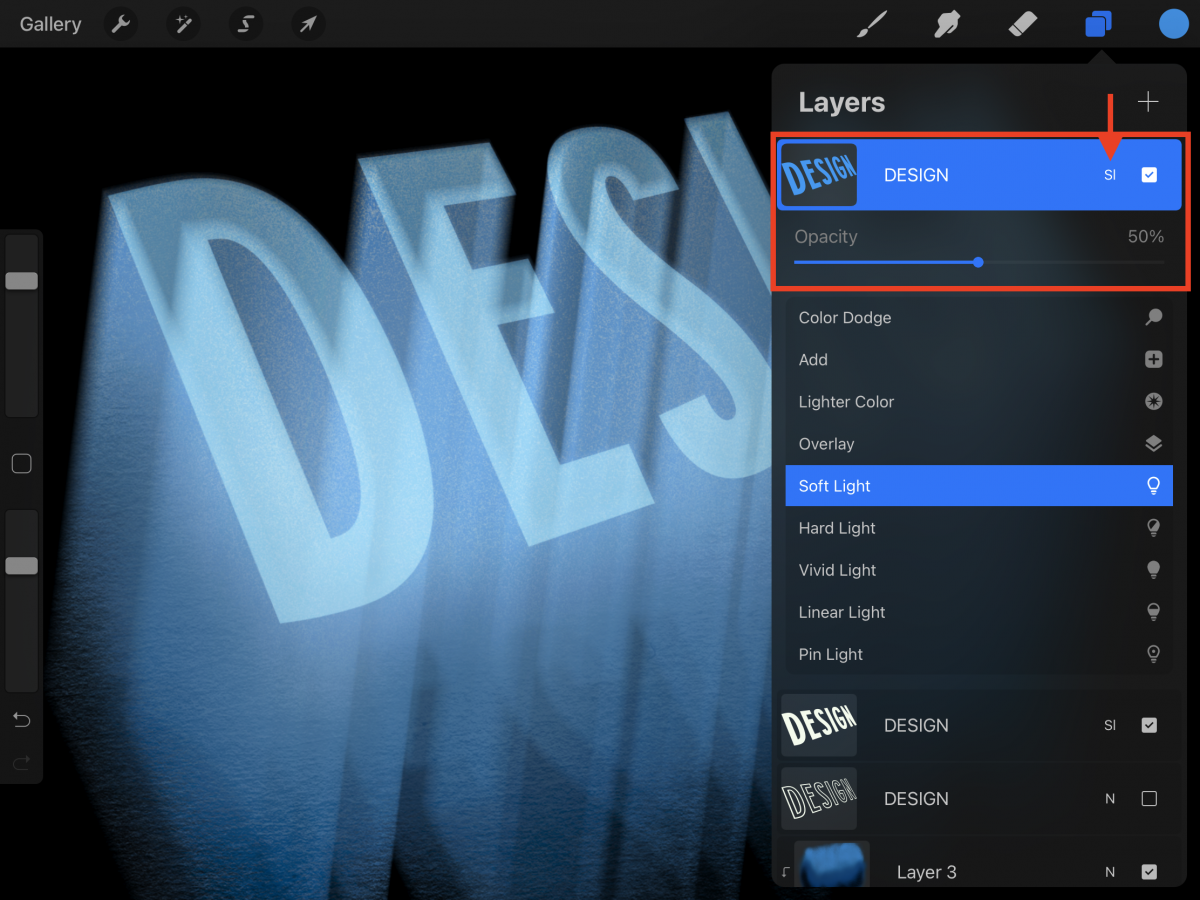
Duplicate this layer, change the color to the lighter blue used before and fill the letters of this layer with it.
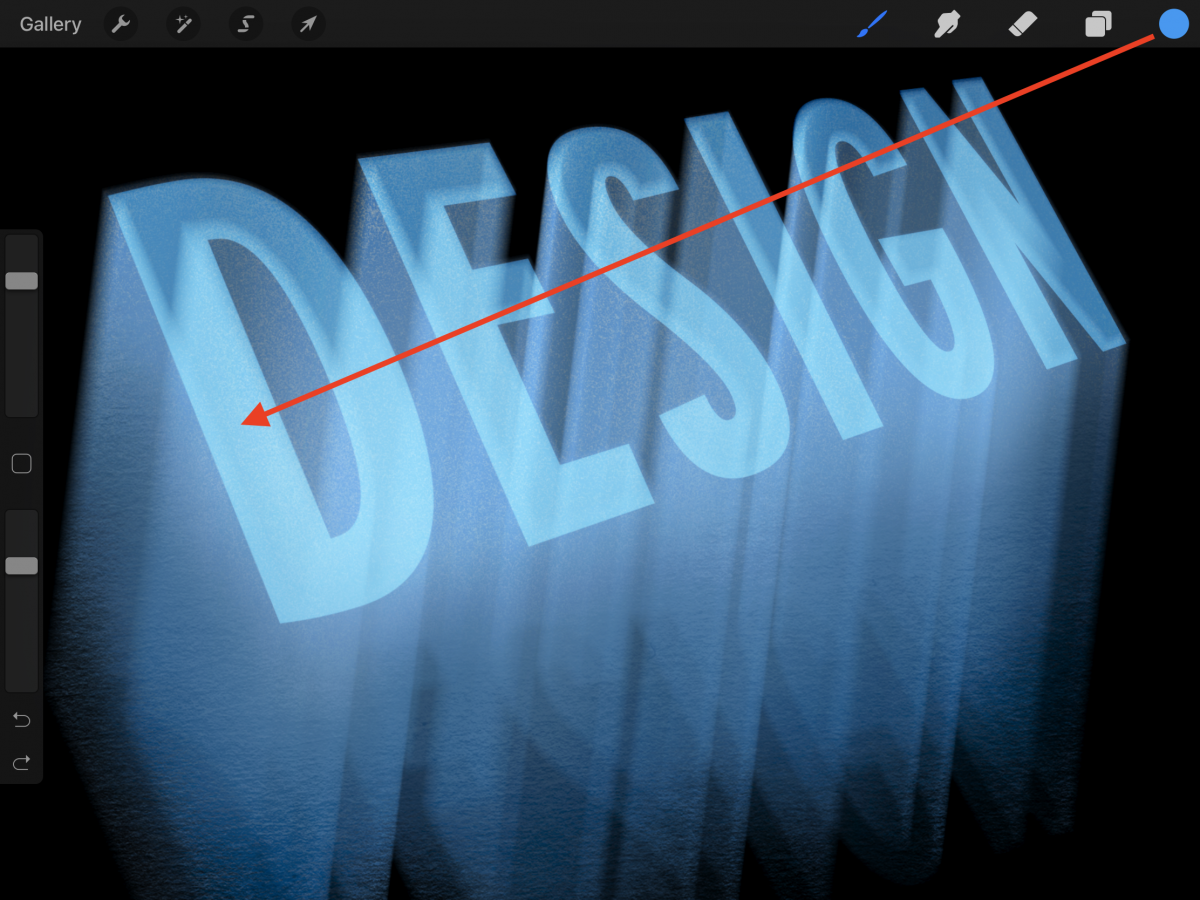
Keep Soft Light as the blending mode, but lower the Opacity of this layer to around 50%.
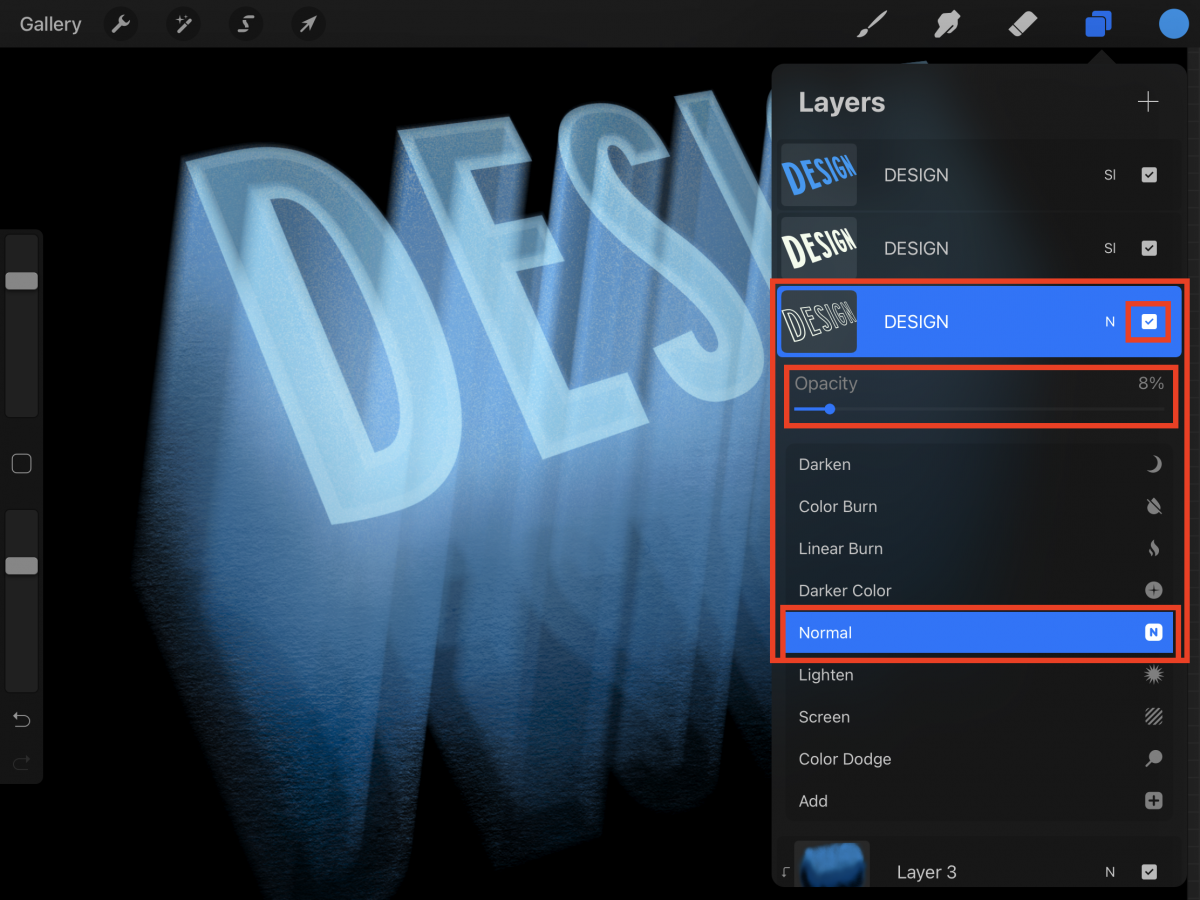
Finally, turn back on the visibility of the original text layer shown as the outlined one. Make sure that its blending mode is set to Normal and lower the Opacity to about 8%.
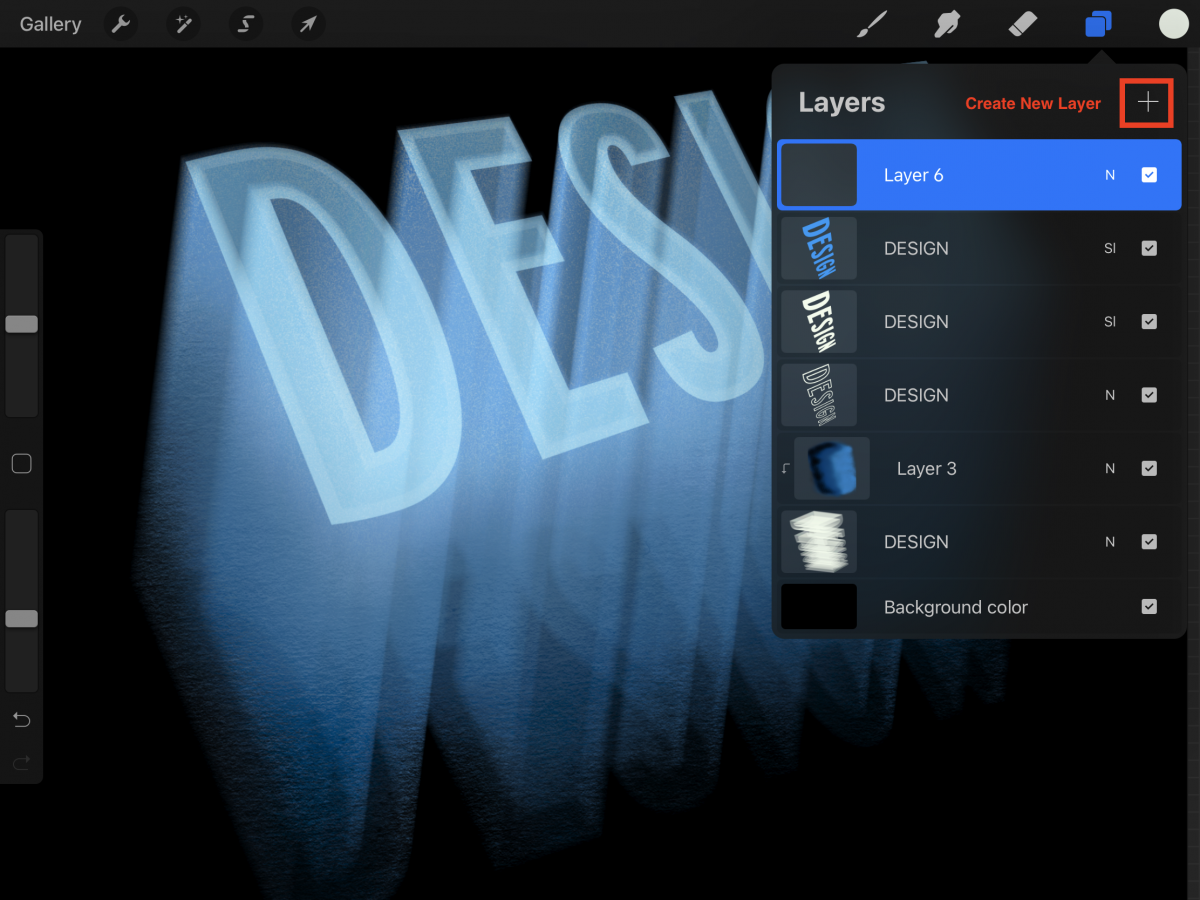
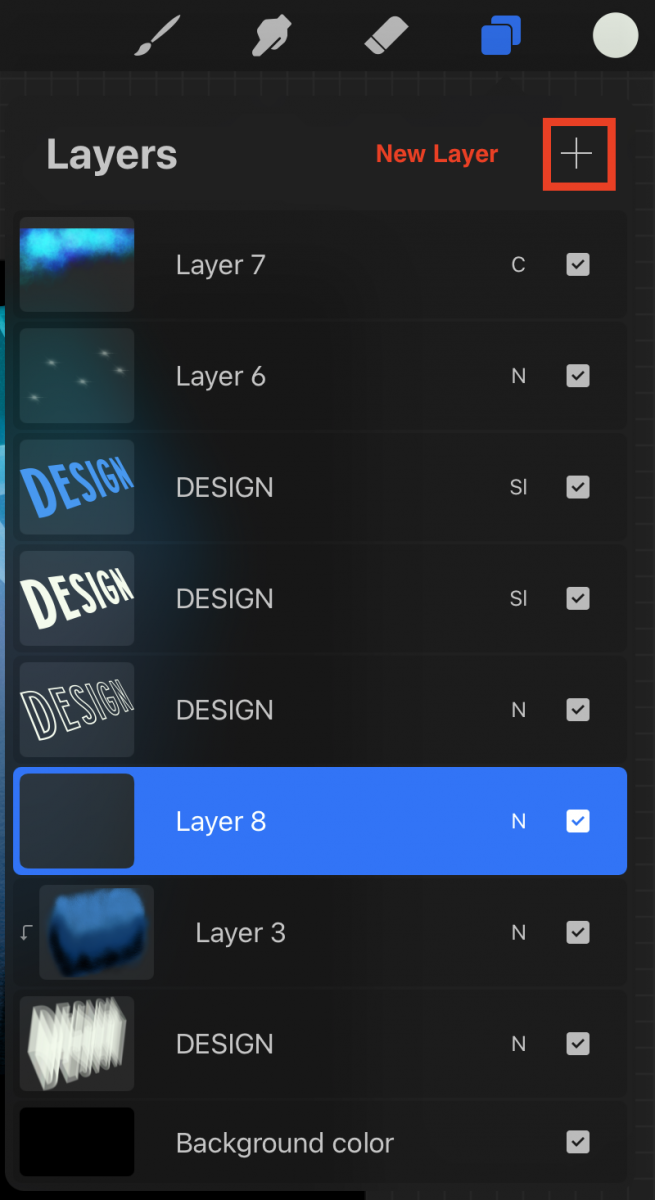
We are going to add some lighting effects to the text, so first create a new layer on top of everything.
In the Brushes panel, head to the Luminance folder, choose the Flare brush with a 9% brush size.
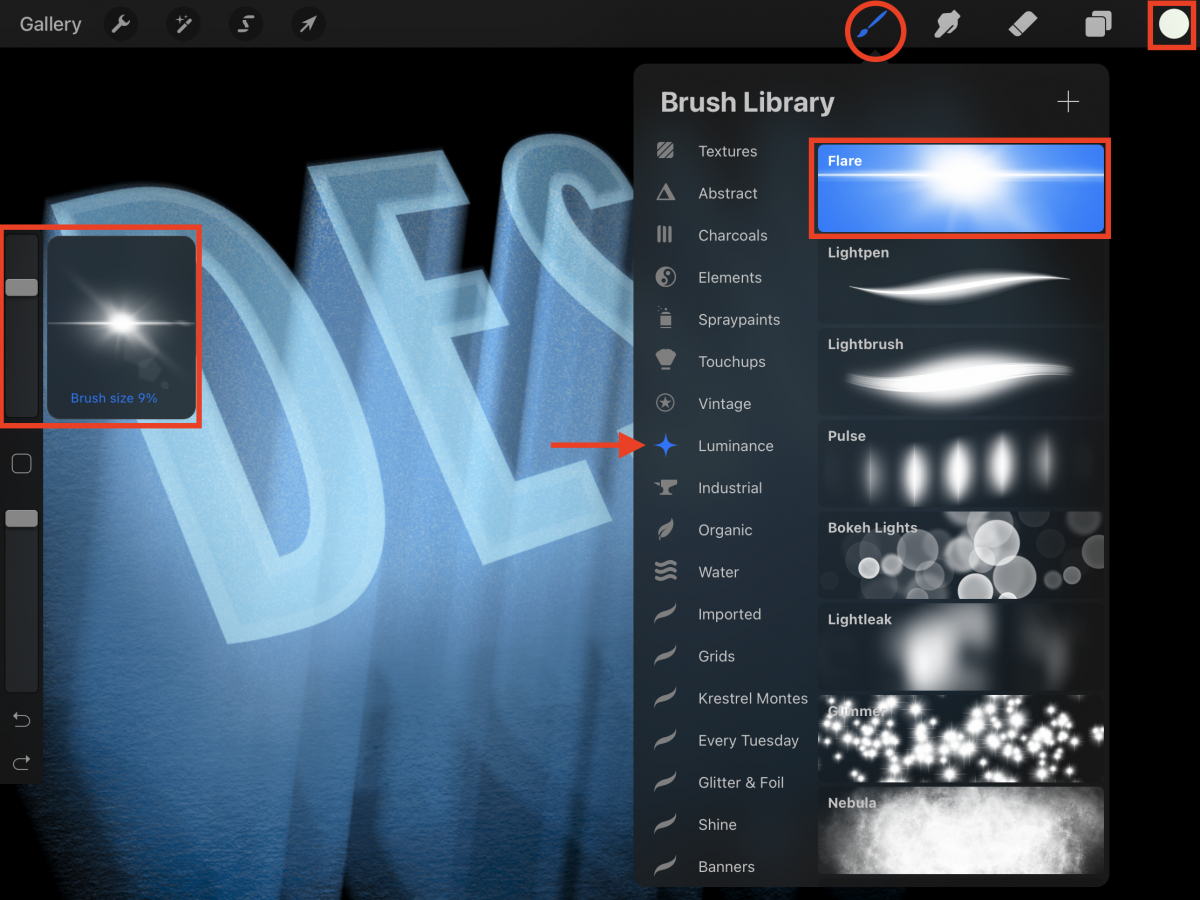
Using white as the fill color, add some light bursts to your text.
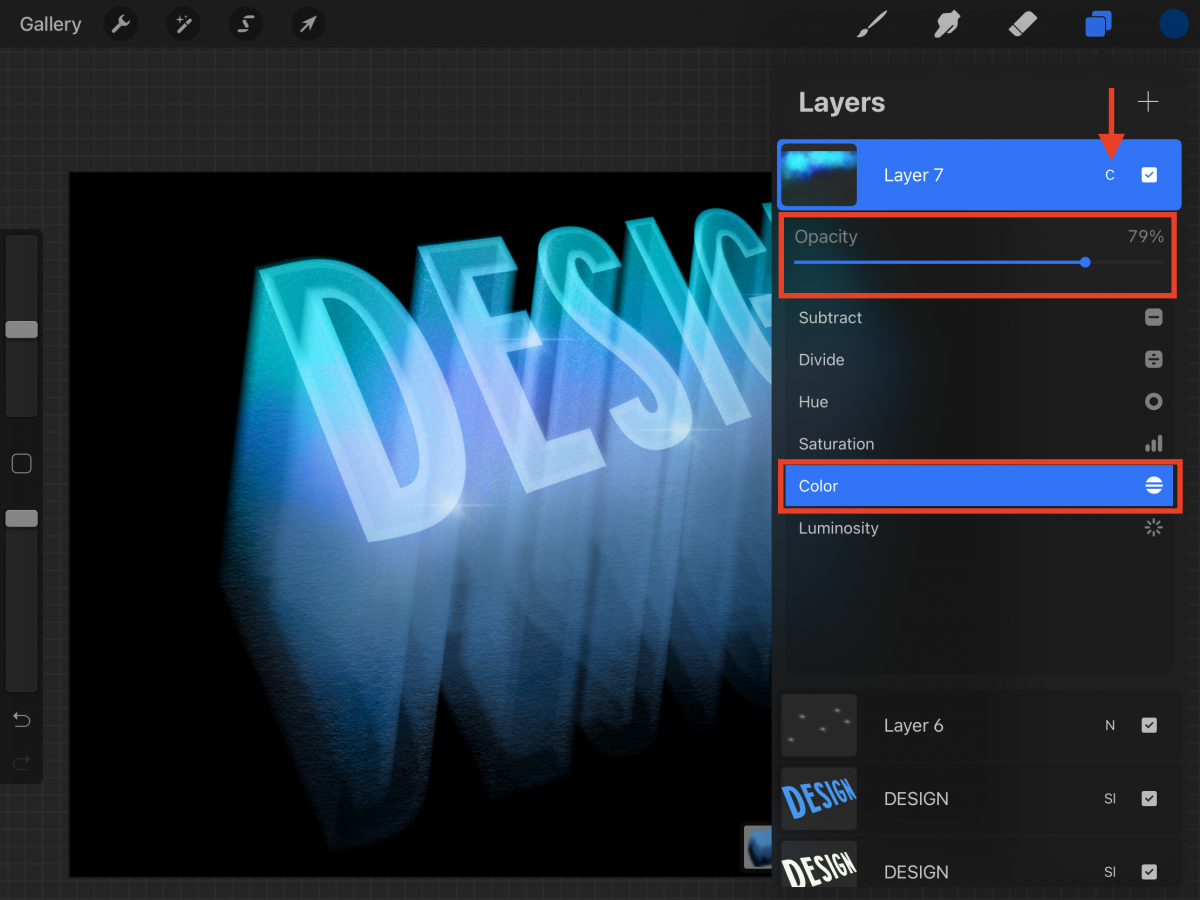
Create another layer on top. Change the fill color to the darker shade used on the blurred text and also change your brush to Nebula (from the Luminance folder).
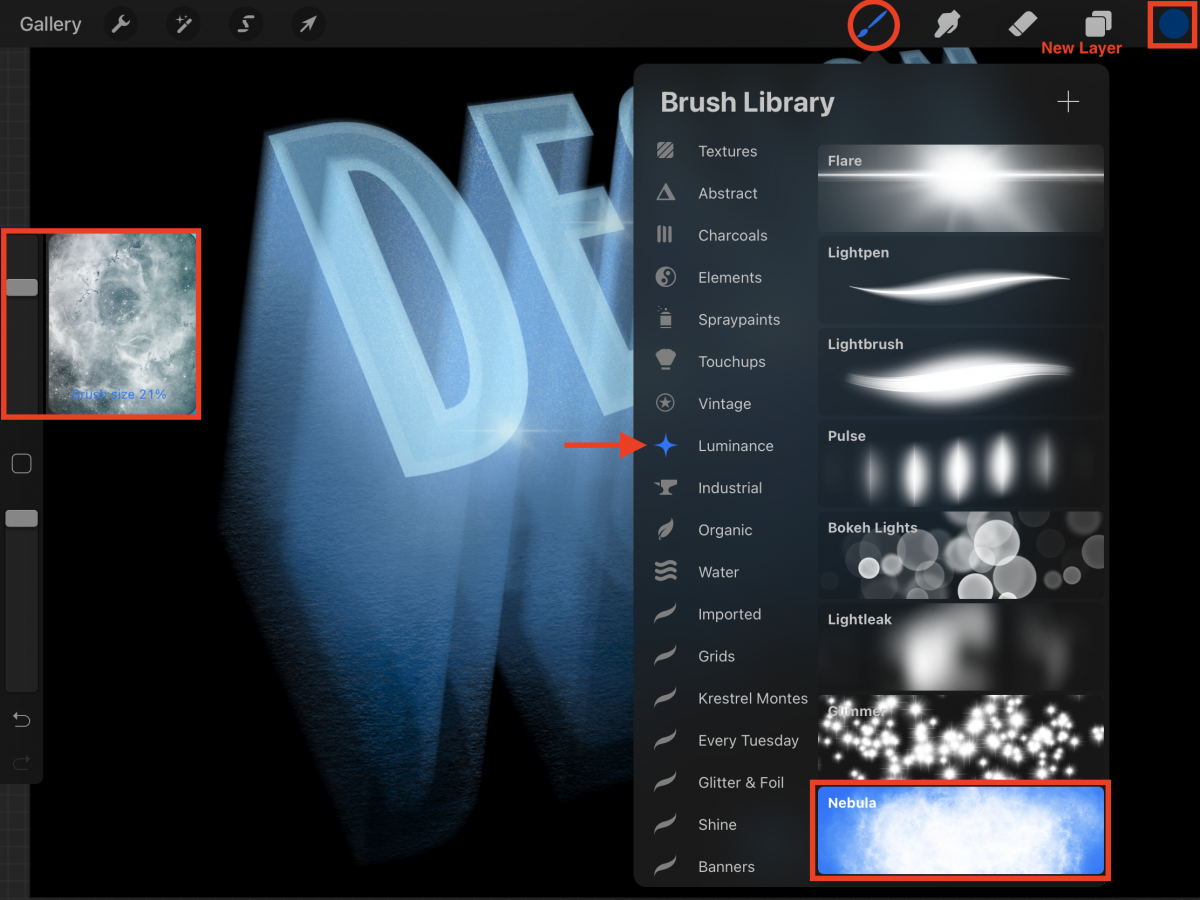
Adjust the brush size to your needs and paint on the top portion of the canvas almost covering your text. We set our brush size to 21%.
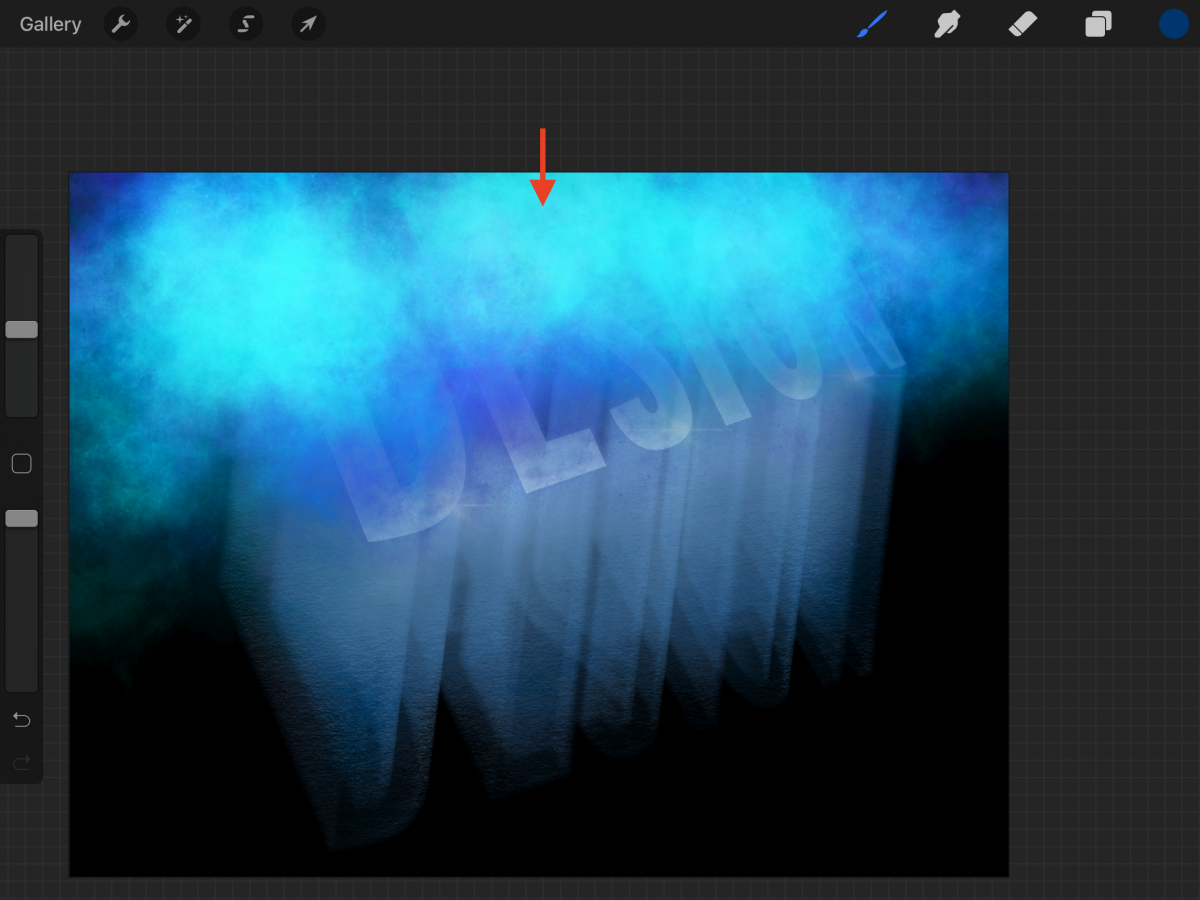
Change the blending mode of the layer to Color and lower the Opacity to about 79%.
Finally, we will add some detail to the blurred or 3D portion of the text. Create a new layer just on top of the Clipping mask layer.
Use the Bonobo Chalk brush with white as fill color. Paint some light from top to bottom on the portions of blurred text that are on the front. These should be a bit more illuminated. To make them more subtle, change the blending mode of the layer to Soft Light and lower the Opacity if needed.
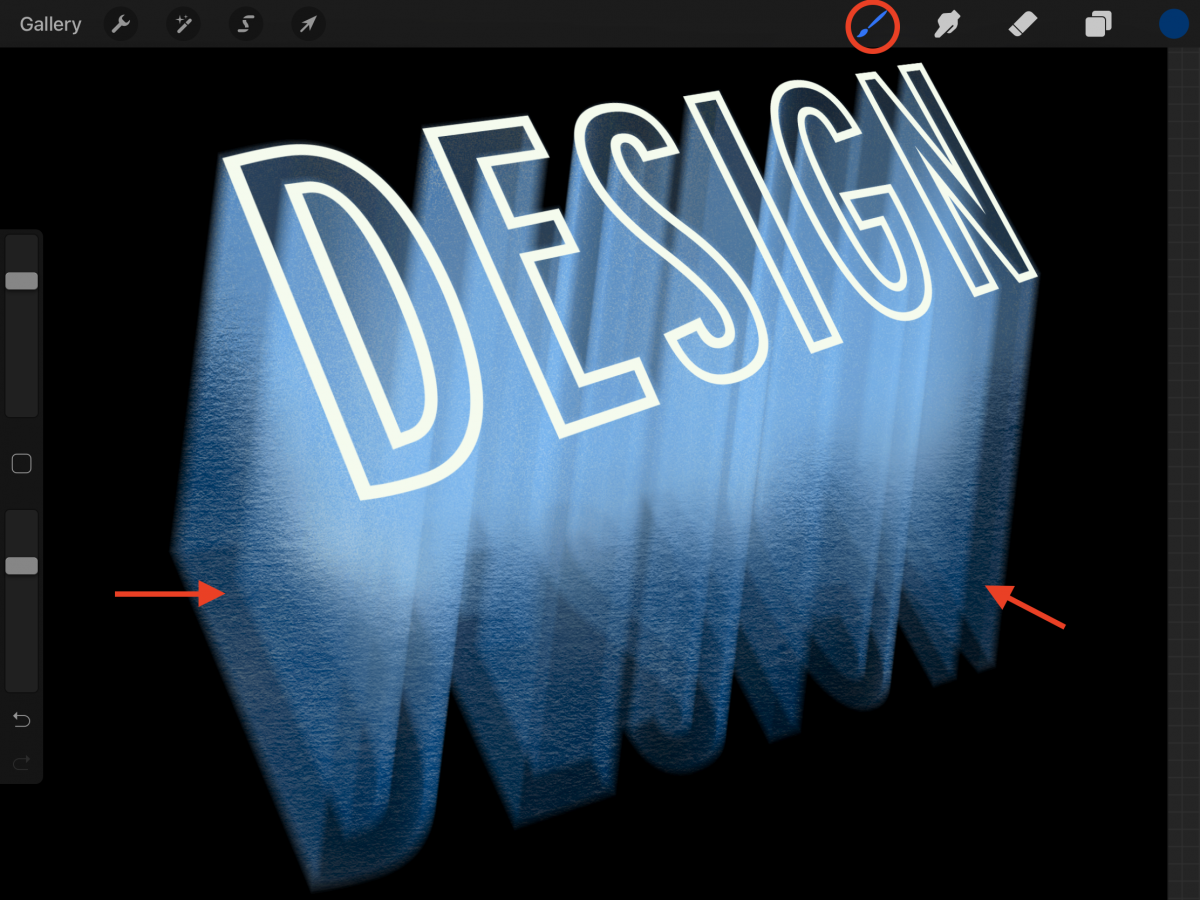
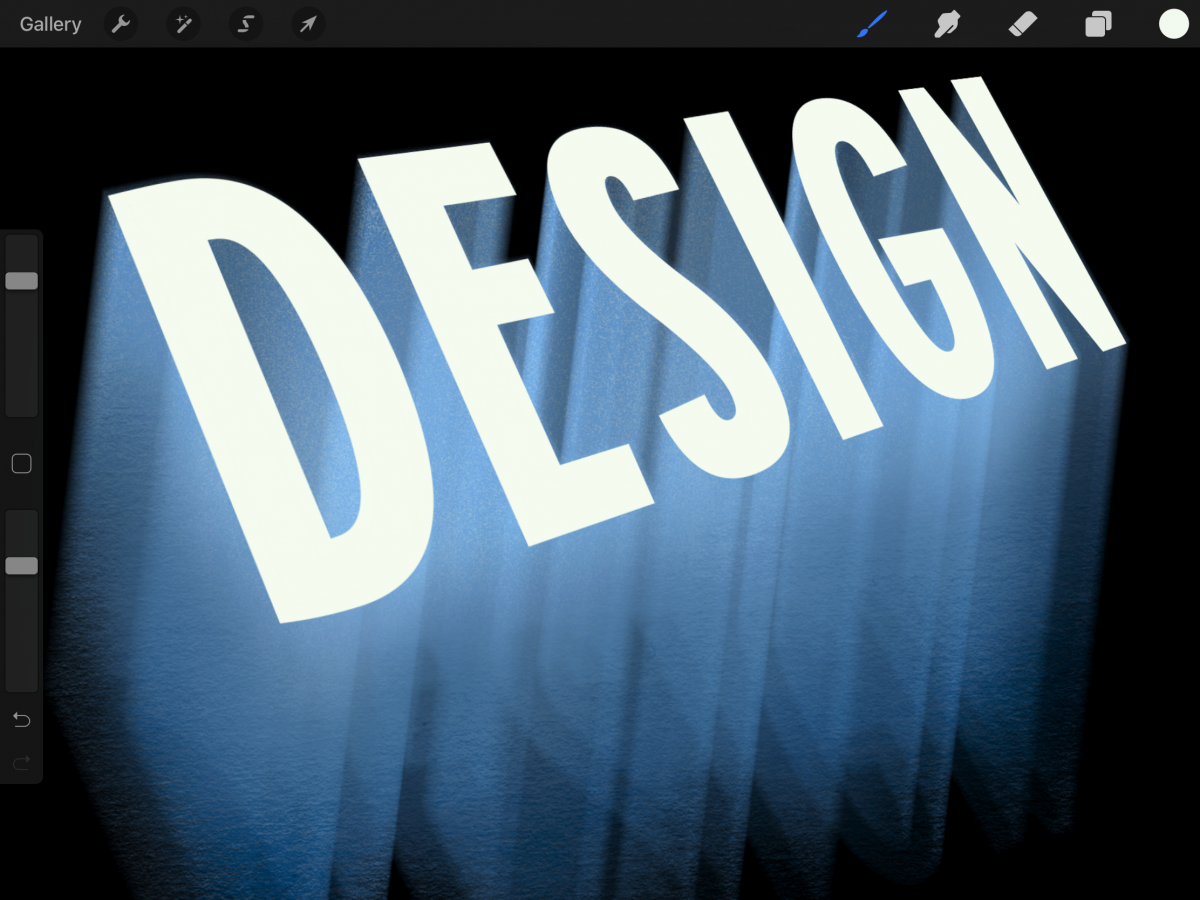
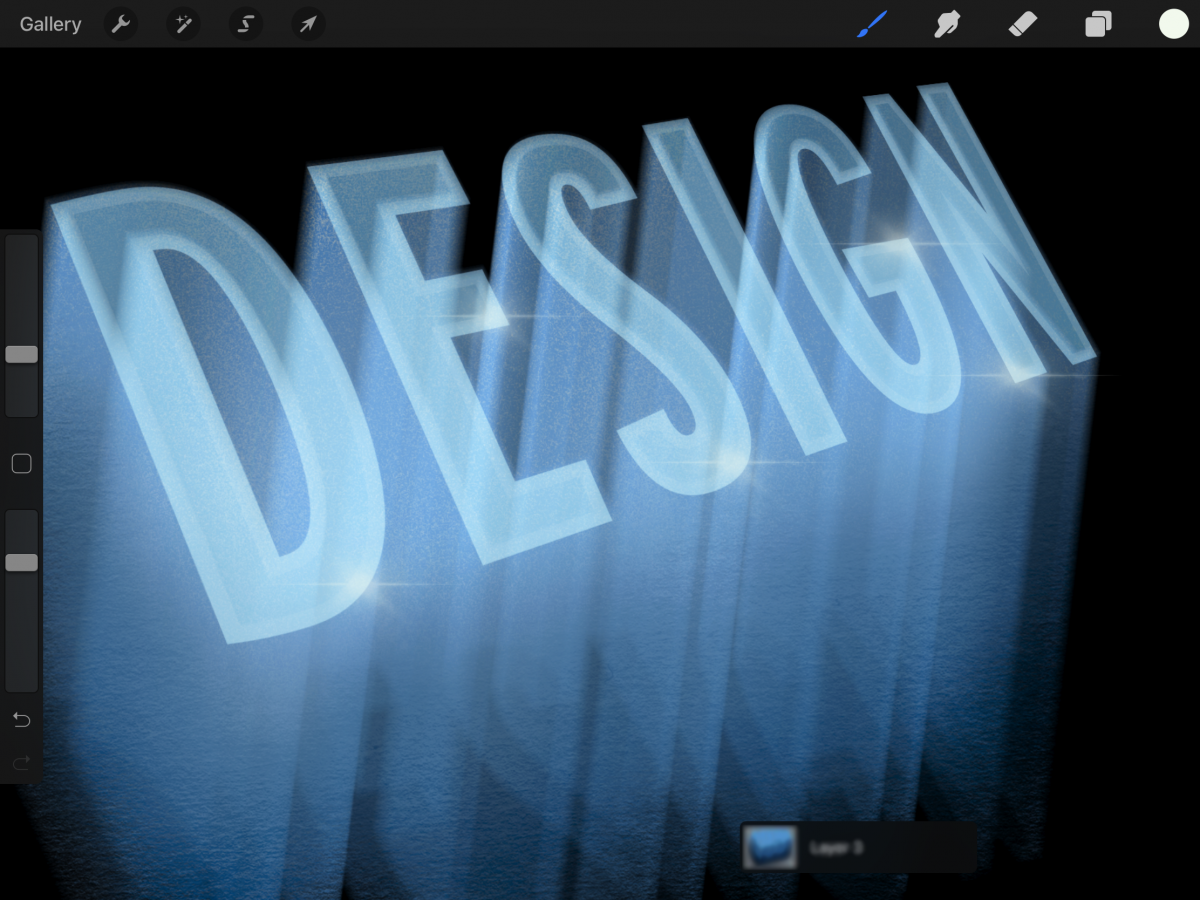
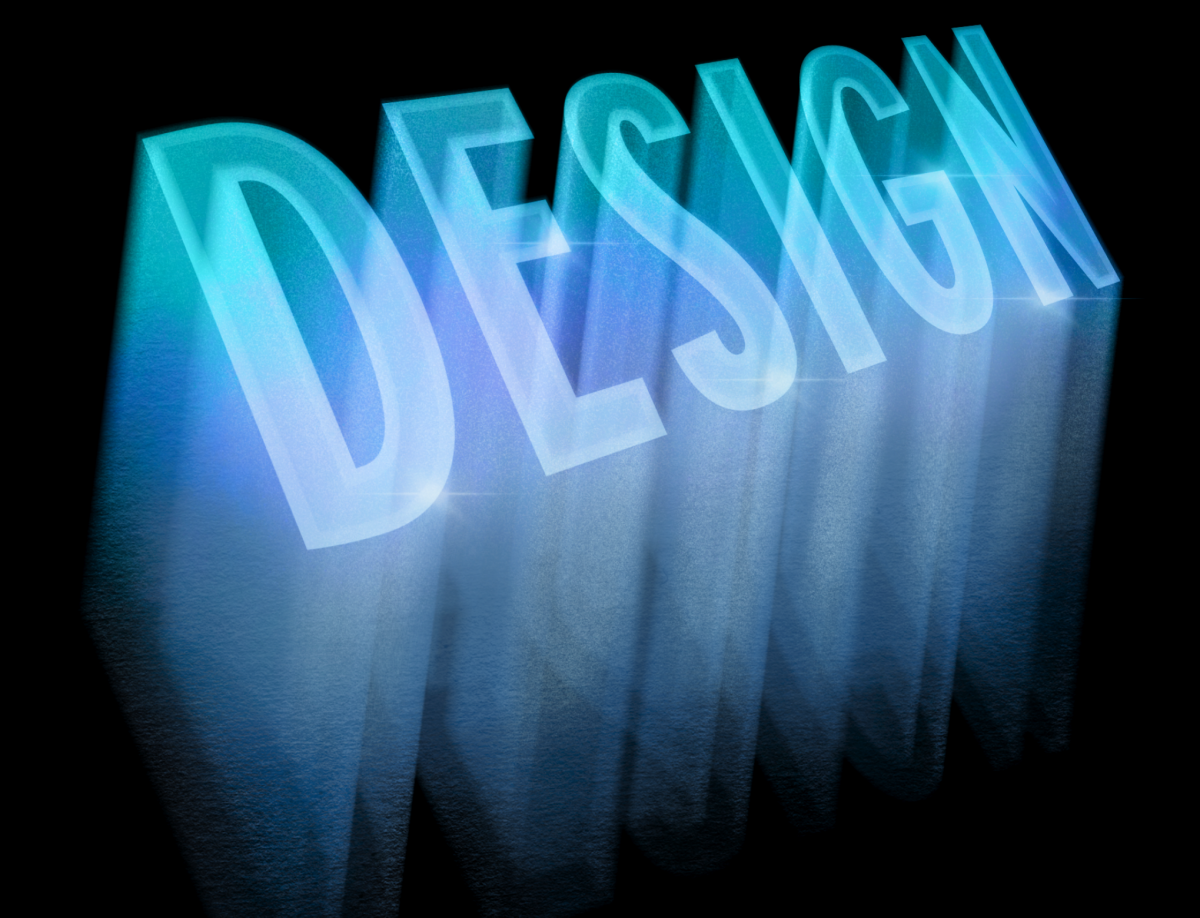
This is how our 3D text looks like after all the work.
Congratulations on creating 3D typography in Procreate. We have more excellent tutorials like editing text and creating a Neon text effect in Procreate.
We have imported our font to Procreate. We will be using the Alimentary font from Missy Meyer, but there are also tons of great bold fonts to choose from if you prefer.
Step 1 - Add text to your document
Step 2 - Rasterize your text
Step 3 - Distort your text to change its perspective
Step 4 - Create the 3D effect using Motion Blur
Step 5 - Add more layers to make the text more defined>
Step 6 - Merge the layers together
Step 7 - Adjust the text appearance and edges
Step 8 - Colorize the blurred portion of your text
Step 9 - Colorize the top of your text
Step 10 - Add light to the top of your text
Step 11 - Add light to the body of your text
Step 1 - Add text to your document
We are going to use black as the background color for our canvas. The text will be filled with white to make it pop more.
Type the text you want to apply the 3D effect to. The font we chose has an outlined version. If the one you are using doesn’t have one, just create the outline in a separate layer using a monoline brush.
Step 2 - Rasterize your text
Once you have typed your text, click on top of its thumbnail and choose Rasterize from the menu. This will convert it into a raster object (pixels) so you can apply the modifications needed to create the 3D effect.
Step 3 - Distort your text to change its perspective
We are going to distort our text to give it perspective and appear as if it is coming from the bottom left side of the canvas. But you can use a different angle if you prefer. Use the Selection tool shown as a small arrow icon on the top menu. Next, choose Distort from the selection panel, making sure that Snapping is enabled.
Distort your word using the blue and green handles located around it until you get the desired perspective. To save your changes, click again on the Selection tool icon.
Once you are done, center the word to your canvas.
Step 4 - Create the 3D effect using Motion Blur
In this step we will use Motion Blue to create the 3D effect. We will duplicate the layer and select the bottom instance. We have a great guide on how to duplicate in Procreate for beginners.
Go to the Adjustments panel that looks like a magic wand icon on the top menu. Next, click on Motion Blur and then select Layer.
To create the 3D look, press and drag down on the screen until about 70%. You can drag in any other direction you want the text to move and use a different motion blur percentage.
Step 5 - Add more layers to define the text
To make the 3D look more defined, we need to duplicate the distorted layer a few times. In this case we made 7 duplicates.
Step 6 - Merge the layers together
Our 3D text is still a bit transparent. In order to fill it up a bit more, we are going to merge it and duplicate it again. Select all the blurred text layers by first tapping on one of them. Then, swipe to the right on each layer you want to select. Group them together by clicking on Group on the top right side of the Layers panel.
Click on top of the group layer icon and choose Flatten from the small menu.
Finally, duplicate the resulting layer one or two times. Flatten the duplicates again until you are satisfied with the look of your text.
Your resulting layer thumbnail should look similar to the following image.
Step 7 - Adjust the text appearance and edges
We need to place the 3D text so it seems to be coming from under the original text layer. Using the Selection tool freeform option, first move the top text layer (the one without the blur effect) so it sits on top of the blurred one.
Then, select the blurred text layer and use the distort option to adjust the edges of the text so they match the one on top.
The Snapping feature will help you get a better alignment while distorting. Click on the icon, uncheck Magnetic and adjust the other values to your liking.
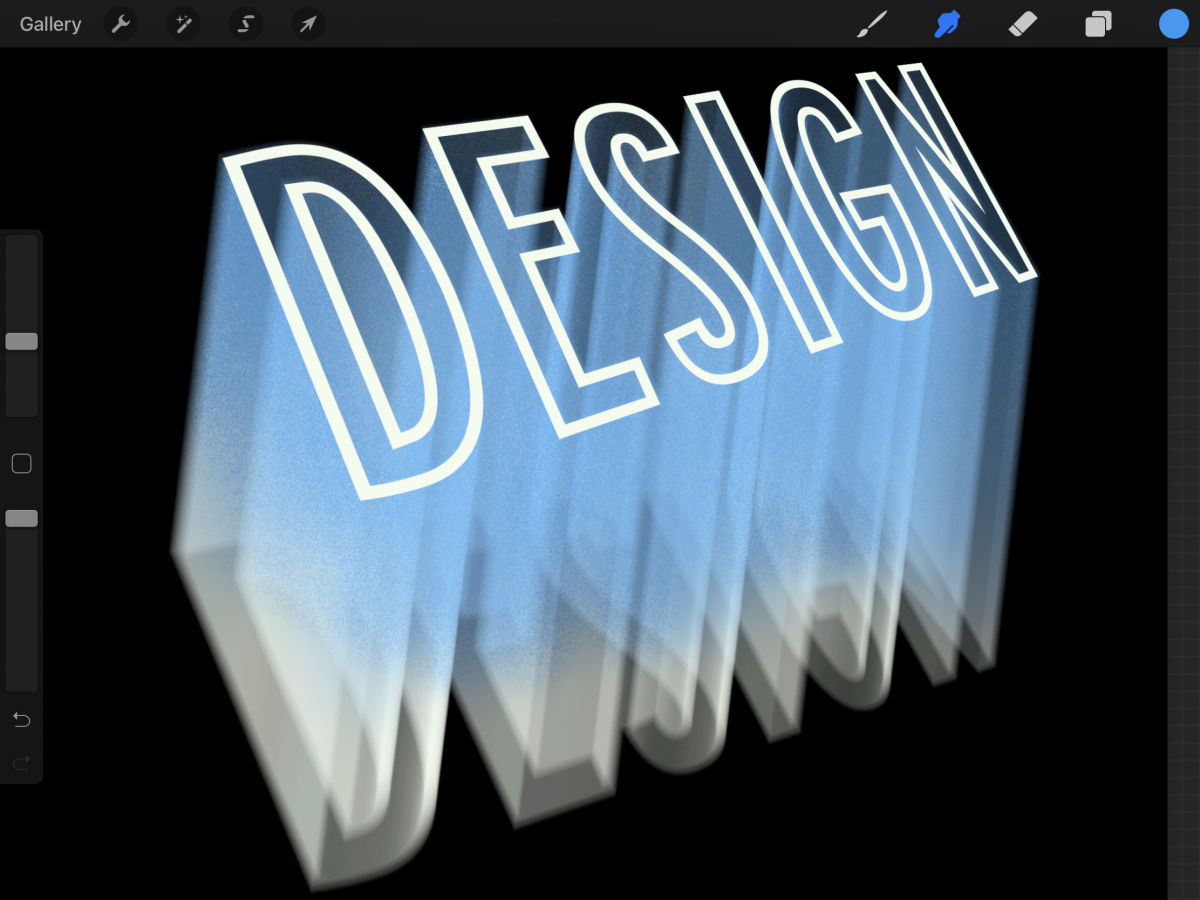
Once you are done, your text should look like it has a semi-transparent 3D shadow coming down from it.
Step 8 - Colorize the blurred portion of your text
We are going to colorize our text and give it a nice progression from light to dark. Create a new layer between the two text layers. Turn this new layer into a Clipping Mask. Check out our great tutorial on using a Clipping Mask in Procreate.
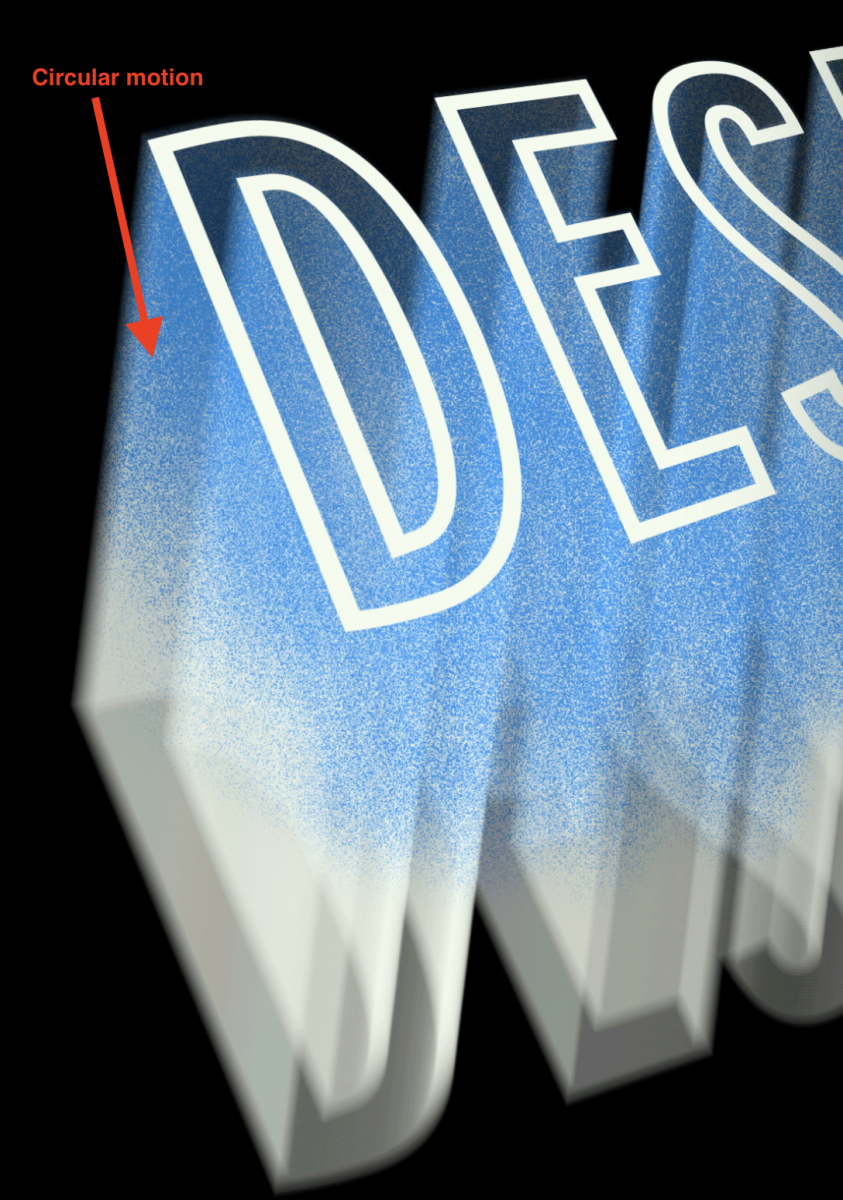
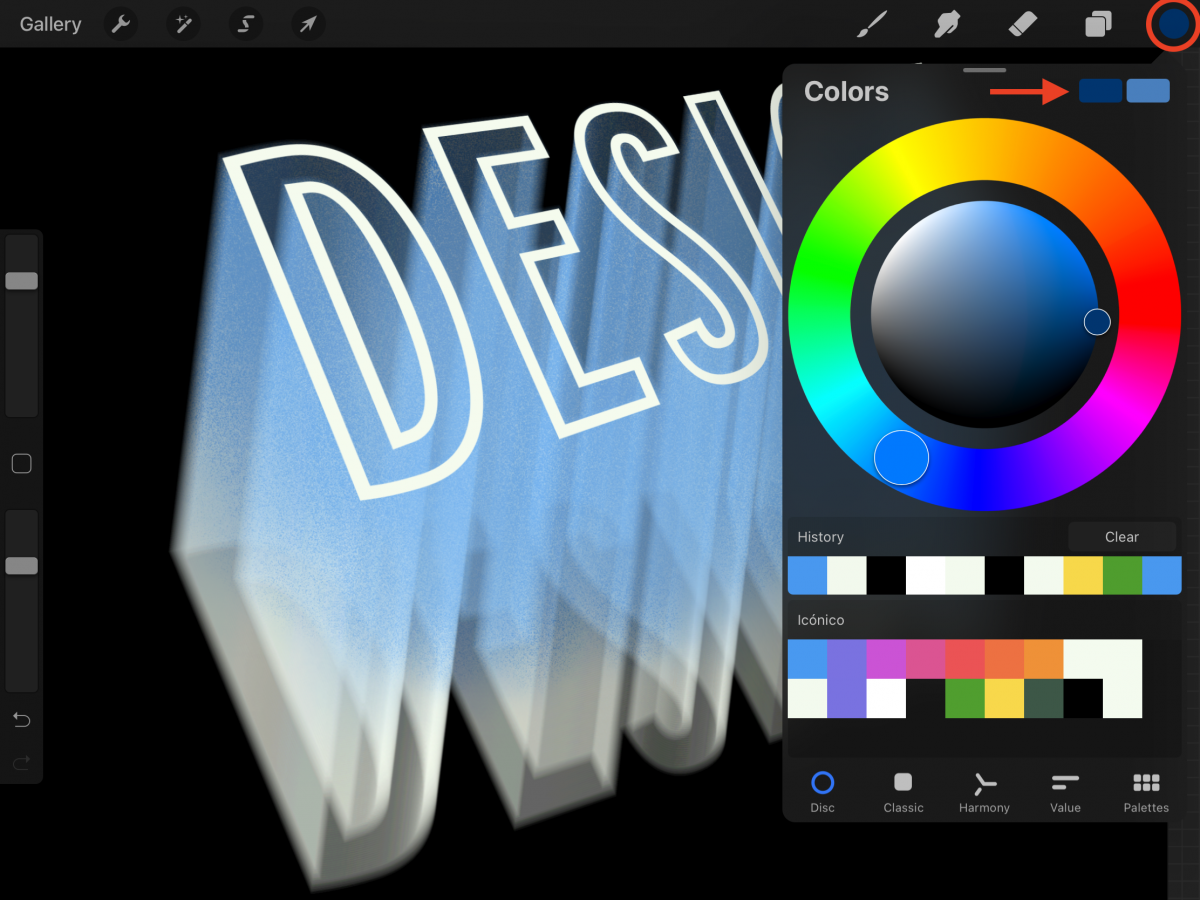
Select a nice light color for the base of your color gradient. We chose a light shade of blue.
Go to the Brushes panel and choose the Bonobo Chalk brush from the Sketching folder. The Size should be around 10 or 11%.
With a circular motion apply that color to your text from the top to about ¾ of its length. Leave the bottom portion empty.
To smooth the color a bit and tone down the grainy look of the brush we will use the Smudge tool (top menu). From the Water folder in the brush library, select the Wash brush (use a 15% brush size).
Swipe on top of the colored portions slightly to smooth them out.
To finish with the progression, change the fill to a darker shade of the same color. Select the Bonobo Chalk brush used before.
This time, start coloring from the bottom of the text until you reach the end of the lighter shade and blend them together a bit.
Use the Smudge tool with the same brush and settings used for the lighter color here too.
Finally, choose black or the same color as the background. Use the same Bonobo Chalk brush to erase some of the text at the very bottom. This will make it look like it is disappearing.
Step 9 - Colorize the top of your text
In this step we will add color to the top of your text. Start by duplicating the layer and turning off the visibility of the original one. Do this by un-checking the small box on the right side of its thumbnail.
Change the fill color to the same one used when creating your text and fill each color. We used white for our fill.
To make the filled text blend better with the rest we are going to change the Blending Mode. Click on top of the small letter on the layer thumbnail and change the blending mode to Soft Light.
Duplicate this layer, change the color to the lighter blue used before and fill the letters of this layer with it.
Keep Soft Light as the blending mode, but lower the Opacity of this layer to around 50%.
Finally, turn back on the visibility of the original text layer shown as the outlined one. Make sure that its blending mode is set to Normal and lower the Opacity to about 8%.
Step 10 - Add light to the top of your text
We are going to add some lighting effects to the text, so first create a new layer on top of everything.
In the Brushes panel, head to the Luminance folder, choose the Flare brush with a 9% brush size.
Using white as the fill color, add some light bursts to your text.
Create another layer on top. Change the fill color to the darker shade used on the blurred text and also change your brush to Nebula (from the Luminance folder).
Adjust the brush size to your needs and paint on the top portion of the canvas almost covering your text. We set our brush size to 21%.
Change the blending mode of the layer to Color and lower the Opacity to about 79%.
Step 11 - Add light to the body of your text
Finally, we will add some detail to the blurred or 3D portion of the text. Create a new layer just on top of the Clipping mask layer.
Use the Bonobo Chalk brush with white as fill color. Paint some light from top to bottom on the portions of blurred text that are on the front. These should be a bit more illuminated. To make them more subtle, change the blending mode of the layer to Soft Light and lower the Opacity if needed.
This is how our 3D text looks like after all the work.
Congratulations on creating 3D typography in Procreate. We have more excellent tutorials like editing text and creating a Neon text effect in Procreate.


