


By Design Bundles
Photoshop Tutorials6 min
How to Change Colors of Objects in Photoshop
Changing the colors of objects in Photoshop is a pretty handy feature to learn. In this step by step tutorial we will show you how quickly this can be done.
In Photoshop, open the image you chose. We are using a purple hyacinth flower image from the Plus hub.

Go to the Adjustments panel and create a new hue/saturation adjustment layer.

Depending on the color (or color range) you are working with, select the color option that better fits your needs in the drop-down menu.

In our case, we selected the blues.

You have two color range indicators at the bottom of the Properties panel. The one on top refers to the original color range in the image and the bottom one shows the colors that they are turning into.

You will see that some extra levers appear between the two color range indicators at the bottom of the Properties panel. Test the colors that will be affected by moving the hue lever.
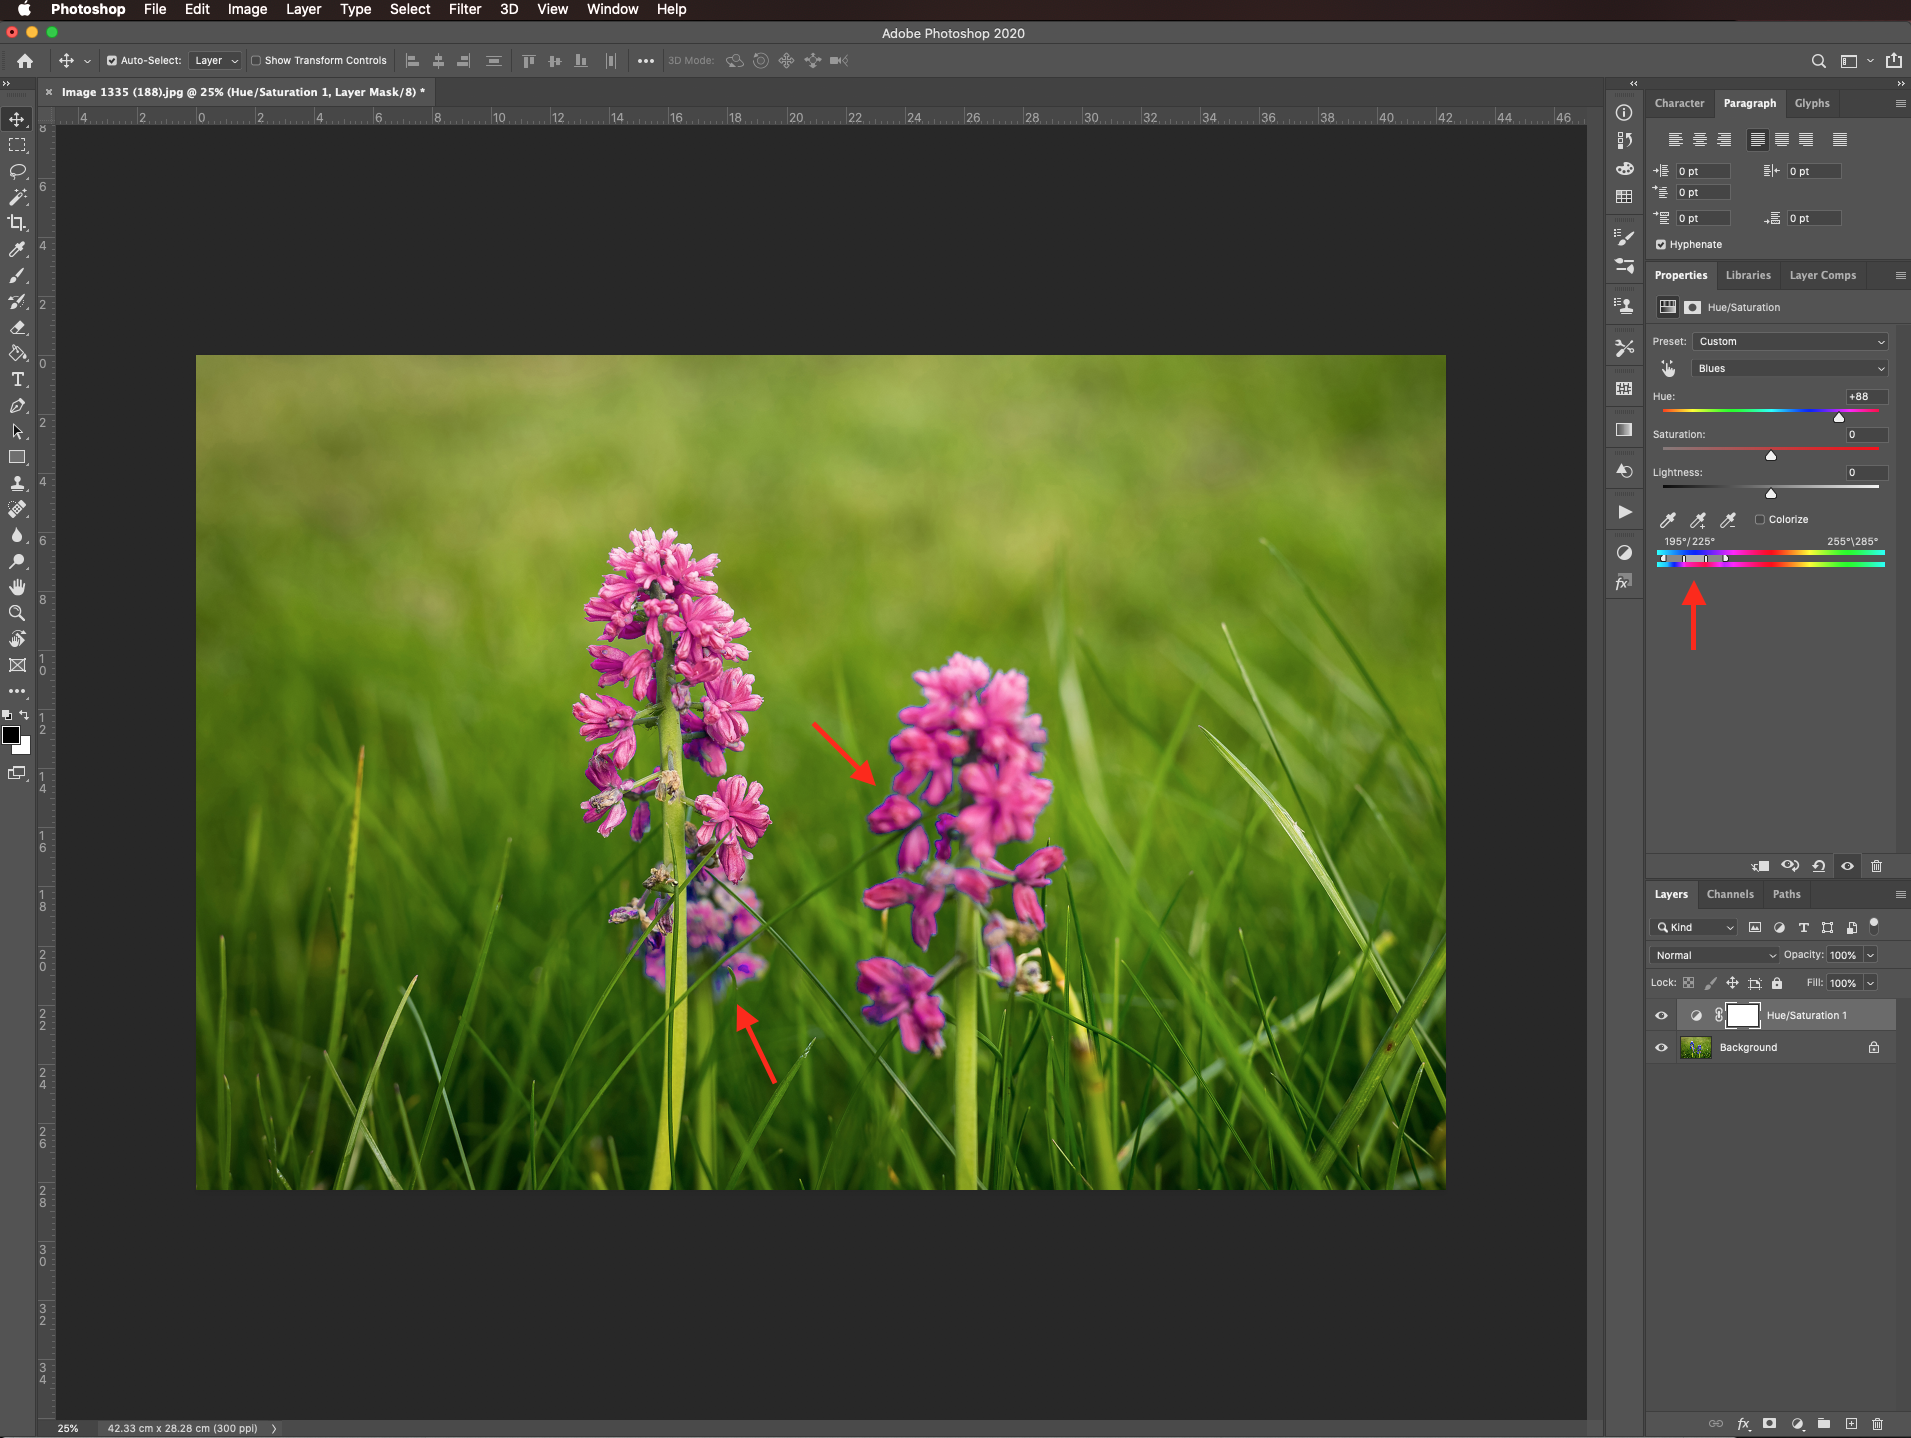
To add more colors to the selection, use the small eyedropper with a + (plus) sign next to it.

To click and drag around the image on top of the colors you want to include. In our case, some of the edges and some darker purple shades.

You will see the levers between the color indicators move and further the included color range.

You may notice that the hue adjustments are affecting unwanted portions of the image.

If this happens, make sure that you are working on the hue/saturation adjustment layer mask and select the Brush tool” (B) with a soft brush cover them using black as foreground color.

Here are our before and after images.

If you liked this tutorial, you can check out some other helpful Photoshop tutorials like how to replace the color of the sky.
Step 1: Open your image
In Photoshop, open the image you chose. We are using a purple hyacinth flower image from the Plus hub.
Step 2: Create a Hue / Saturation layer
Go to the Adjustments panel and create a new hue/saturation adjustment layer.
Depending on the color (or color range) you are working with, select the color option that better fits your needs in the drop-down menu.
In our case, we selected the blues.
Step 3: Test the color selection
You have two color range indicators at the bottom of the Properties panel. The one on top refers to the original color range in the image and the bottom one shows the colors that they are turning into.
You will see that some extra levers appear between the two color range indicators at the bottom of the Properties panel. Test the colors that will be affected by moving the hue lever.
Step 4: Add colors to the selection
To add more colors to the selection, use the small eyedropper with a + (plus) sign next to it.
To click and drag around the image on top of the colors you want to include. In our case, some of the edges and some darker purple shades.
You will see the levers between the color indicators move and further the included color range.
Step 5: Remove unwanted color changes with the layer mask
You may notice that the hue adjustments are affecting unwanted portions of the image.
If this happens, make sure that you are working on the hue/saturation adjustment layer mask and select the Brush tool” (B) with a soft brush cover them using black as foreground color.
Here are our before and after images.
If you liked this tutorial, you can check out some other helpful Photoshop tutorials like how to replace the color of the sky.
Related Tutorials
Photoshop Tutorials
How to Change Pattern of Clothes in Photoshop
Discover how to change or add patterns to clothing in Photoshop.
Procreate Tutorials
How to Change the Opacity of a Layer in Procreate
Learn how to easily change the opacity of a layer in Procreate with these two methods
Canva Tutorials
How to Change the Color of a Logo in Canva
In today's tutorial, we will show you how to change the color of a logo in Canva.
Photoshop Tutorials
How to Change Eye Color in Photoshop
Learn how to change eye color in Photoshop with this quick tutorial.
Photoshop Tutorials
How to Remove Objects from Images with Content Aware Fill in Photoshop
Discover how to move or remove objects in Photoshop using the Content Aware Fill.
Photoshop Tutorials


