Fixing Font Clipping in Microsoft Word
Learn how to fix font clipping issues in Microsoft Word in only 2 Steps with this quick tutorial.

Learn how to fix font clipping issues in Microsoft Word in only 2 Steps with this quick tutorial.
With glyphs in Microsoft Word, you may find that the bottom and top of letters are being cut off. This is known as Font Clipping and can happen when using fancy styled glyphs. In this tutorial we show you a quick and simple solution to fix the problem.
We will be using this script typeface font called Lovely Melissa. If you would like to use another font, have a look at the Modern Calligraphy fonts that we have available.
Before carrying on, make sure that you have downloaded and installed your fonts to your PC or Mac.
Once you have opened Microsoft Word, type out your text and add your glyphs. We have a helpful tutorial on accessing glyphs using the Lovely Melissa Font if needed.
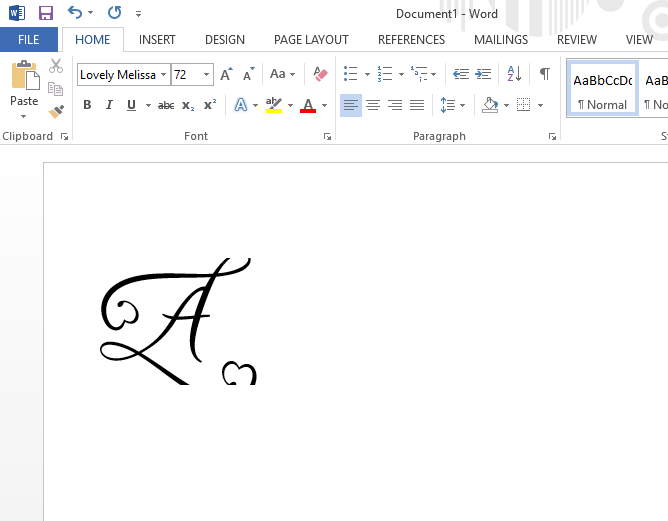
As you can see, the top and bottom of the glyph for the letter “A” has been cut off in Microsoft Word.
 Step 2 - Edit the Line Height
To fix this, starting with the bottom clipped edge, we need to adjust the Line Height. This can be found in the Line and Paragraph Spacing section top toolbar. You can select a number to adjust the height. Some fonts will need a higher value than others.

If you want to add a value, click on the Line Spacing Options under the Line and Paragraph Spacing icon. Then adjust the At: value bottom right.

To edit the Line Height for the top of the glyph, click on the Line Spacing Options. Adjust the Spacing Before to a higher value then click on OK to see the changes. If clipping is still visible, change the values again and click OK.
If you find that your glyph is still clipping at the bottom, input a higher value in the Spacing After box.

The font glyphs should now be fully visible without any clipping, cropping or cutting.

As quick as that the clipping issues have been resolved. Now you know to fix the issue of Microsoft Word cutting off the bottom and top of letters. Font clipping can be very annoying. So we hope that this quick guide has been helpful in maximizing your time.
Today we are going to show you how to fix font clipping in Inkscape. This is sometimes a common issue seen with fonts that have PUA encoded glyphs. The glyphs appear to be clipped or cut off outside of the bounding box. In Inkscape, an open source program for Windows ...
In this tutorial we will show you how to use Font Glyphs and swashes in Microsoft Publisher. Step 1: Open up PublisherThen create a new document.Step 2: Draw a Text BoxStep 3: Change the FontClick the drop down and change the font to one you'd like to use. Step 4: Open Character MapIf ...
In today’s tutorial you will learn how to use clipping masks in Affinity Photo. A clipping mask uses one layer to control the visibility of another. Clipping masks are great for confining an image to a shape such as a frame. Text can also be filled with textures, images ...
In this tutorial you will discover how to download a Font Bundle on your iPad. You will be able to effortlessly install your favorite fonts across all apps, all at once. This is a huge time saver and you will be using your fonts in no time. In only a ...
*Note- SCAL4 Pro used. 1- Open SCAL 4 software.2- Type your text. Make sure the text is selected.3- Go to Text > Font preview.4- A new window will appear. This is the font preview function. It will Show your text in all the fonts loaded in your PC. ...
Follow our easy to use tutorial for using Font Glyphs on the iPad with the Cricut Design Space app.
By using our website you consent to all cookies in accordance with our cookie policy.


