
How to make a Knockout Design in Cricut Design Space
Do you know that you can create two projects out of one design and one cut? It sounds insane but you can do it when you create a knockout design in Cricut Design Space.
A knockout design is when you overlap two layers on top of each other and subtract the top layer from the bottom. This creates two separate layers. Follow the steps below and you'll see exactly what I'm talking about.
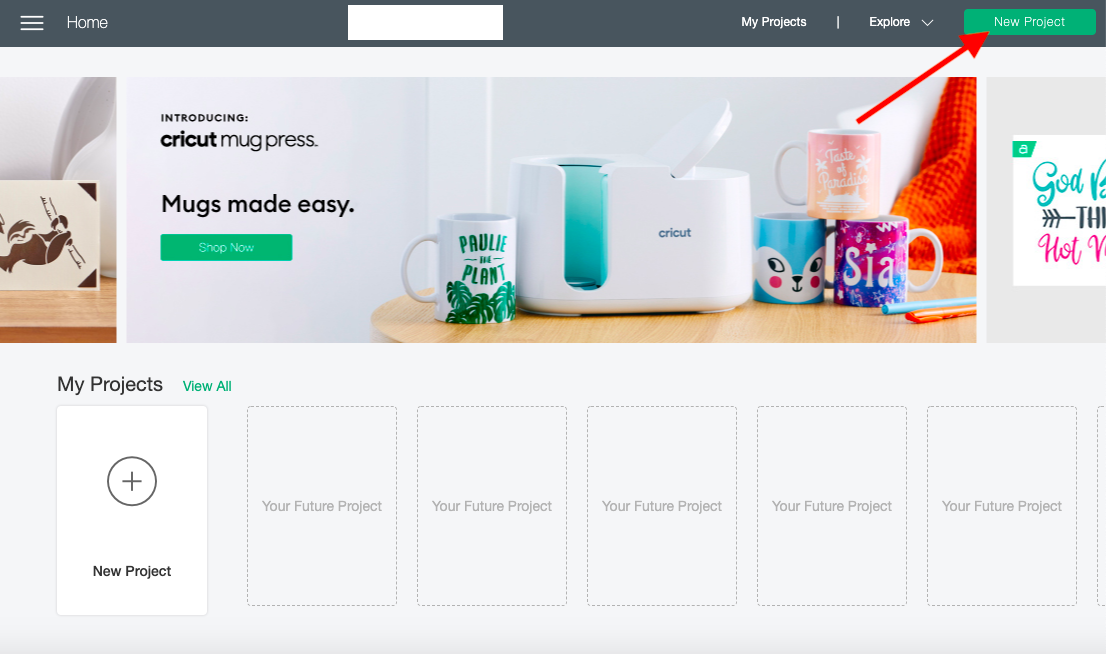
Once you are logged in you will be on the Cricut home page. This is where you will be able to start a new project by simply clicking on the green button that is labeled New Project on the top right hand corner.
Once you click on the button you will be redirected to the canvas page and that's when all the fun happens!
I'll be uploading a SVG that I found in Design Bundles Plus section. This Messy Bun SVG file is totally my feel for today so it's going to be fun to create. Let's start the upload process.
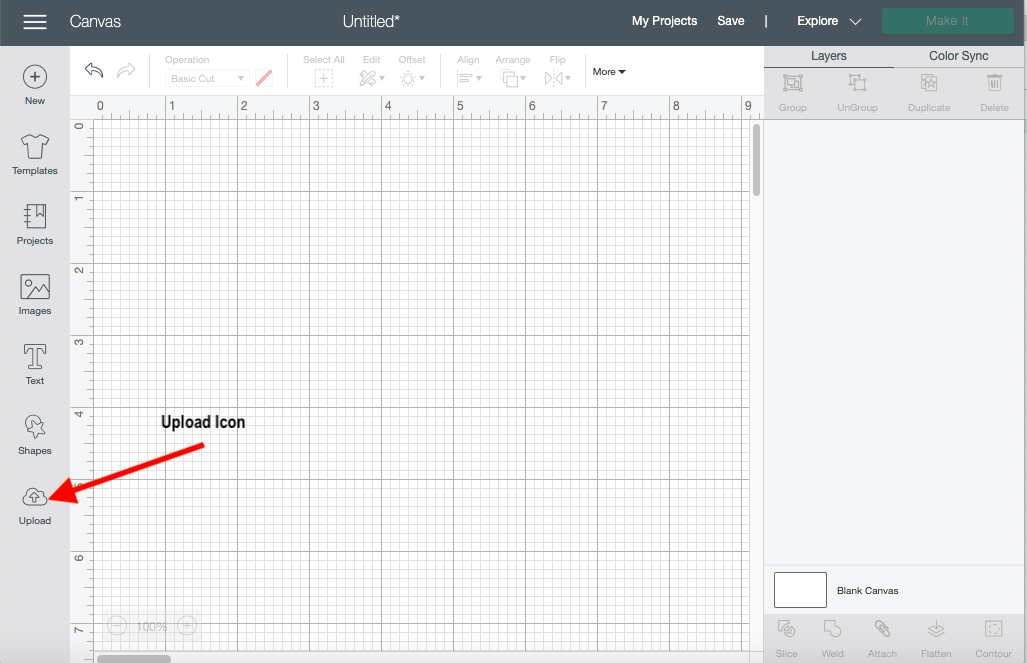
Locate your upload icon. This is usually the last icon on the toolbar located on the left side of your canvas screen. This will navigate you to the next page.
On this page, you will need to click the Upload Image button.

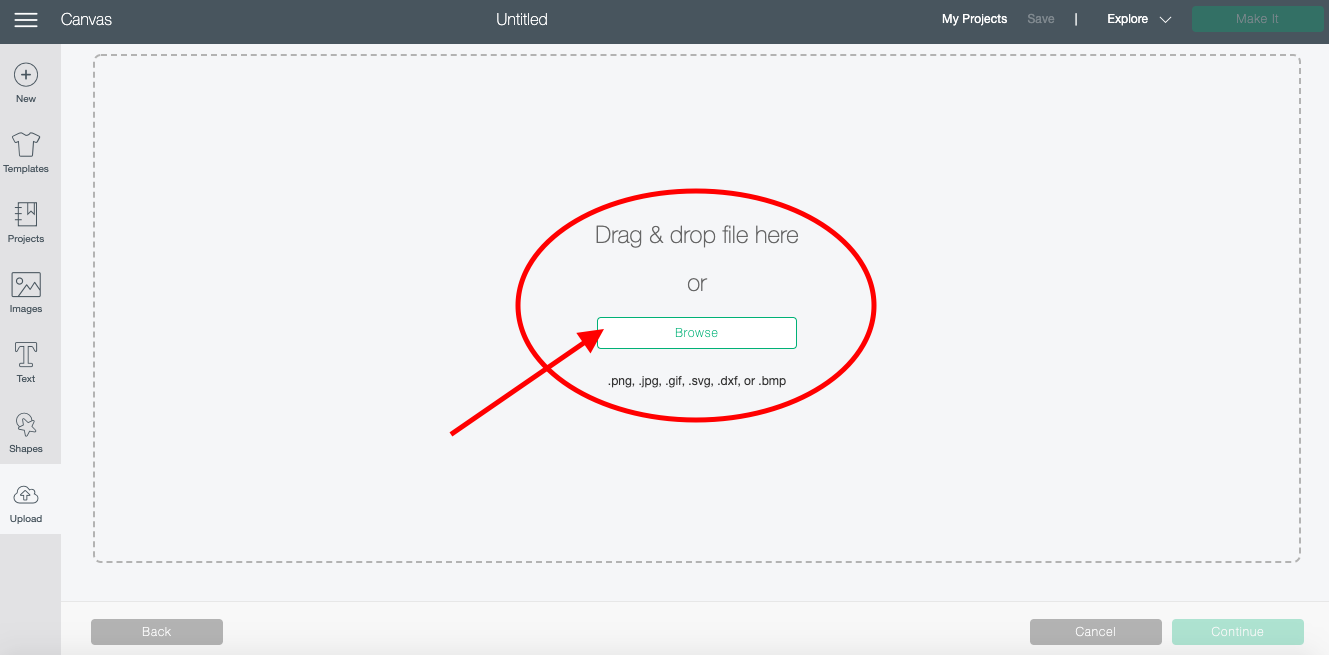
Click on the Browse button which is located in the center of your screen. This will allow you to search through your computer for the file. Once you locate the file you can click on the file then click Open on the lower right-hand corner. To Drag a file simply click and hold on the selected file and drag and drop to the center of the Grey rectangle box.
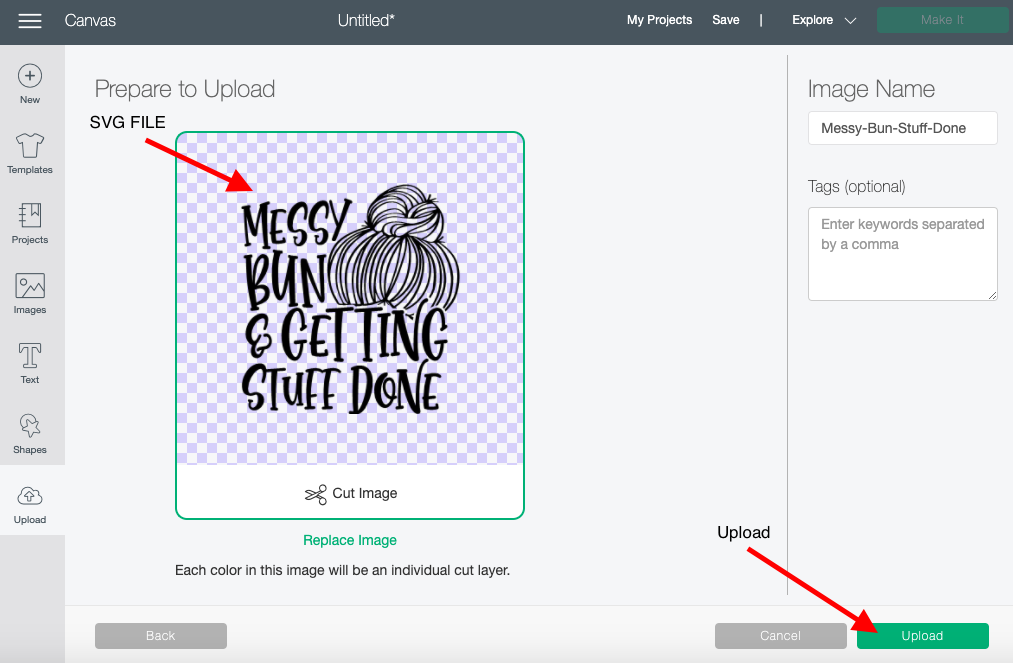
The last page will appear and you will be able to upload your SVG. Click the beautiful green UPLOAD button on the lower right-hand corner and you are finished. You Have successfully uploaded an SVG to Cricut Design Space.
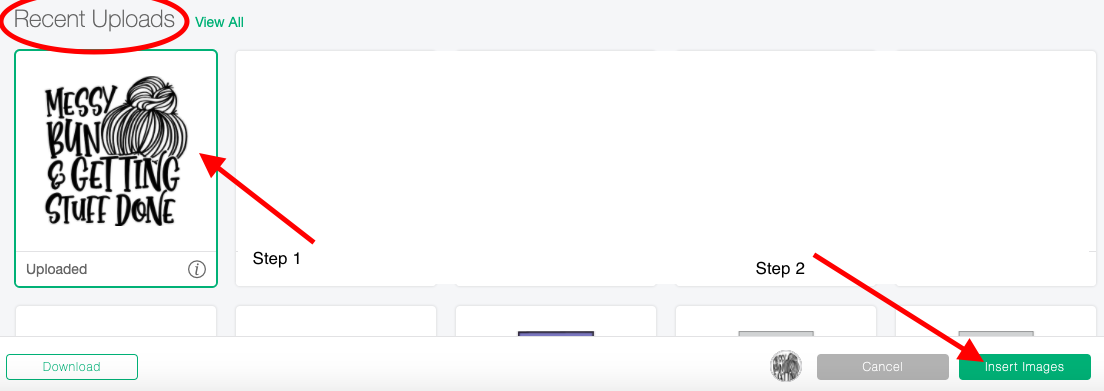
Select the uploaded design which can be found under Recent Uploads.
Click the Insert Image Button on the lower right-hand corner. Your design will now be on your canvas Page.
Select the artwork you are working with. You can do this by clicking and dragging over the design. You can also use your layer panel on the right side of the screen by simply clicking on the layer that has your design.
Weld artwork by clicking on the Weld button in the lower right-hand corner.
Click on the Offset icon on the upper toolbar between edit and align. Immediately a blue preview line will appear around your design along with a box that will allow you to adjust the setting to your offset.
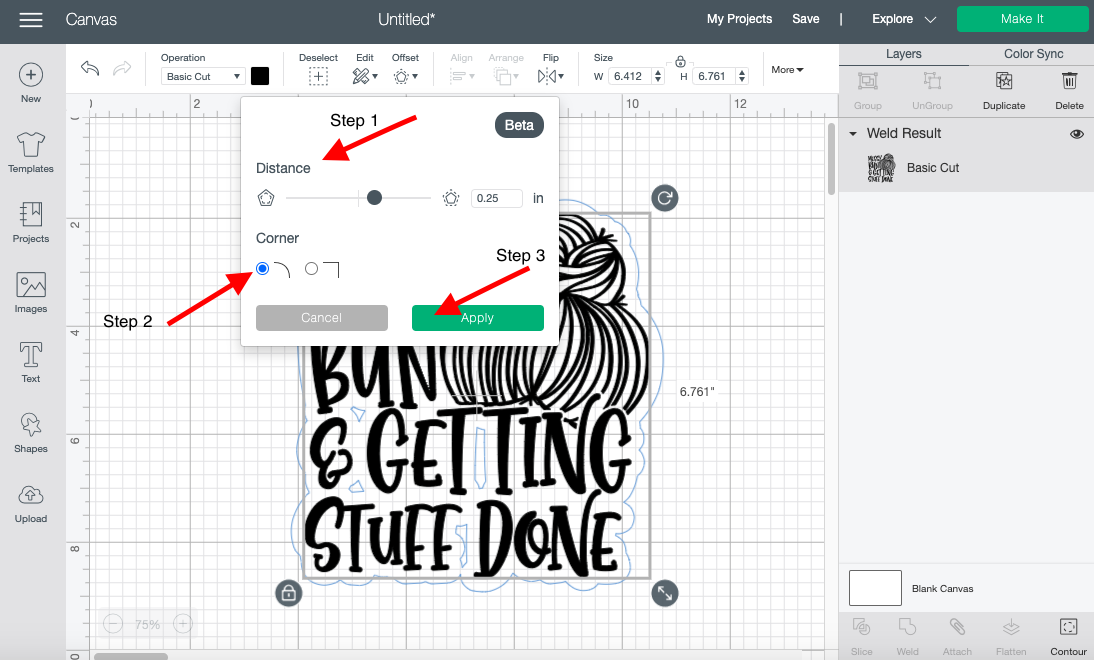
The first setting that you will be able to adjust will be distance. You will notice a thin grey line with a little grey button that you can drag back and forth. Start from the middle of the line where the grey button should be and slowly drag to the right. The further you go toward the right the larger the offset will be around your design. I'll be keeping mine at 0.25".

Once you have adjusted your distance click on the type of corners you want. I always select rounded corners so the offset looks a little smoother. Pick the one that will work the best with your project.
Now that you've gotten your settings perfect click on the green “Apply” button on the lower right-hand corner.
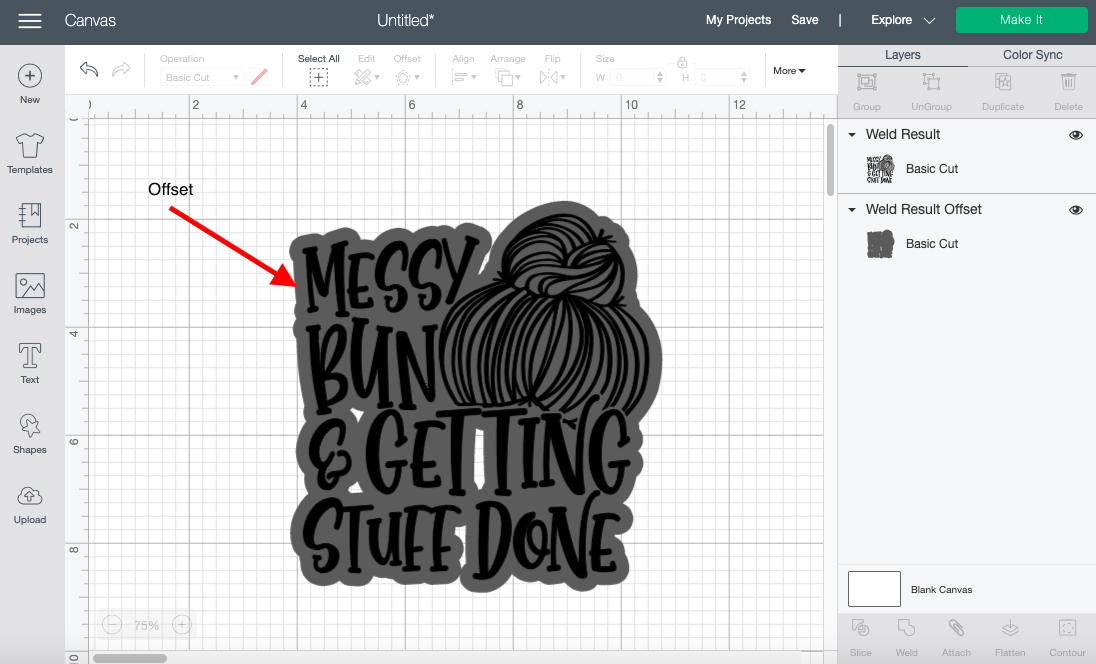
You have successfully created an offset.
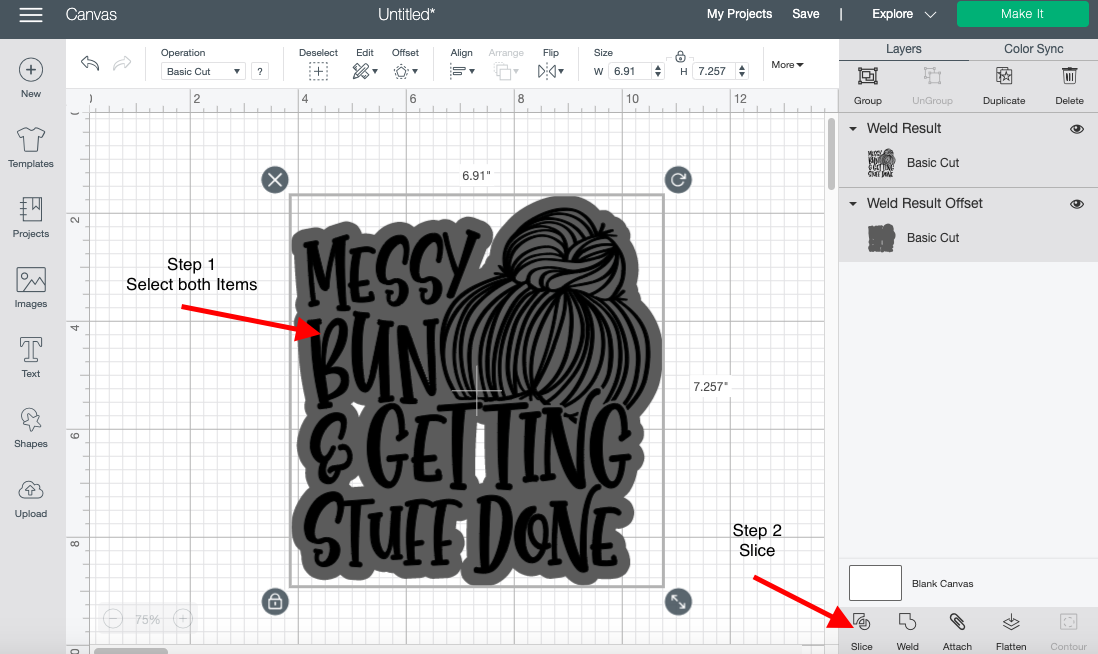
Select both items on your canvas screen. You can do this by clicking and dragging over the design and offset. You can also use your layer tab on the right hand of the screen. Click on the first layer then hold shift and click on the second layer at the same time.
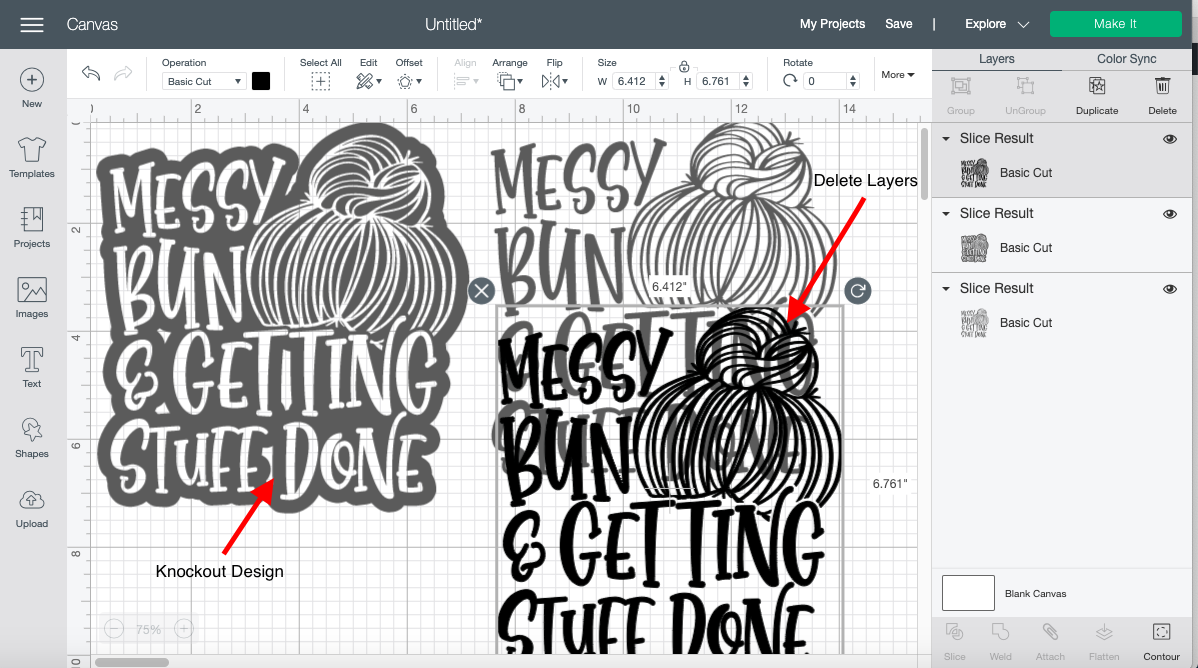
Click on the Slice tool. This can be located at the bottom left side of your canvas screen.
Once you slice the design pull all the layers apart. We will be keeping the offset layer which is now your Knockout design. You can now delete the rest of the layers.
You have successfully created a knock-out design and can finally move on to cutting. This is where you will be able to get your two projects in one if you are willing to put in a little bit of work and have a ton of patience.
Carefully weed out the inner layer of your knock-out design. Be careful to not create any major tears or wholes in the parts you are taking out. We will be using them for the Second Project.
Lay the weeded items front side up on a clean work area where you can start laying them out to the original design.
Once you are finished weeding and laying out the 2nd design you can now transfer the weeded items to a carrier sheet. Simply lay the Sticky layer over the top side of the material.
Next up, learn how to use pattern fill and how to place images in text in Design Space.
A knockout design is when you overlap two layers on top of each other and subtract the top layer from the bottom. This creates two separate layers. Follow the steps below and you'll see exactly what I'm talking about.
Create a New Project in Design Space
Step 1: Open your Cricut Program and log in.
Step 2: Create New Project
Once you are logged in you will be on the Cricut home page. This is where you will be able to start a new project by simply clicking on the green button that is labeled New Project on the top right hand corner.
Once you click on the button you will be redirected to the canvas page and that's when all the fun happens!
Upload an SVG to Cricut Design Space
I'll be uploading a SVG that I found in Design Bundles Plus section. This Messy Bun SVG file is totally my feel for today so it's going to be fun to create. Let's start the upload process.
Step 1: Upload Icon
Locate your upload icon. This is usually the last icon on the toolbar located on the left side of your canvas screen. This will navigate you to the next page.
Step 2: Upload Image
On this page, you will need to click the Upload Image button.
Step 3: Browse or Drag File
Click on the Browse button which is located in the center of your screen. This will allow you to search through your computer for the file. Once you locate the file you can click on the file then click Open on the lower right-hand corner. To Drag a file simply click and hold on the selected file and drag and drop to the center of the Grey rectangle box.
Step 4: Finale Upload
The last page will appear and you will be able to upload your SVG. Click the beautiful green UPLOAD button on the lower right-hand corner and you are finished. You Have successfully uploaded an SVG to Cricut Design Space.
Insert Design to Canvas screen
Step 1: Select design
Select the uploaded design which can be found under Recent Uploads.
Step 2: Insert Image
Click the Insert Image Button on the lower right-hand corner. Your design will now be on your canvas Page.
Offset SVG In Cricut Design Space
Step 1: Select artwork.
Select the artwork you are working with. You can do this by clicking and dragging over the design. You can also use your layer panel on the right side of the screen by simply clicking on the layer that has your design.
Step 2: Weld Artwork
Weld artwork by clicking on the Weld button in the lower right-hand corner.
Step 3: Click Offset Button
Click on the Offset icon on the upper toolbar between edit and align. Immediately a blue preview line will appear around your design along with a box that will allow you to adjust the setting to your offset.
Step 4: Adjust Distance For Offset
The first setting that you will be able to adjust will be distance. You will notice a thin grey line with a little grey button that you can drag back and forth. Start from the middle of the line where the grey button should be and slowly drag to the right. The further you go toward the right the larger the offset will be around your design. I'll be keeping mine at 0.25".
Step 5: Round Corners Of Offset
Once you have adjusted your distance click on the type of corners you want. I always select rounded corners so the offset looks a little smoother. Pick the one that will work the best with your project.
Step 6: Apply Offset To Design
Now that you've gotten your settings perfect click on the green “Apply” button on the lower right-hand corner.
You have successfully created an offset.
Knock Out Design
Step 1: Select art work and offset.
Select both items on your canvas screen. You can do this by clicking and dragging over the design and offset. You can also use your layer tab on the right hand of the screen. Click on the first layer then hold shift and click on the second layer at the same time.
Step 2: Slice Artwork
Click on the Slice tool. This can be located at the bottom left side of your canvas screen.
Step 3: Pull Out Extra Layers and Delete
Once you slice the design pull all the layers apart. We will be keeping the offset layer which is now your Knockout design. You can now delete the rest of the layers.
You have successfully created a knock-out design and can finally move on to cutting. This is where you will be able to get your two projects in one if you are willing to put in a little bit of work and have a ton of patience.
Two Projects Out Of One Design
Step 1: Cut Design
Step 2: Weed out design carefully
Carefully weed out the inner layer of your knock-out design. Be careful to not create any major tears or wholes in the parts you are taking out. We will be using them for the Second Project.
Step 3: Layout weeded Layer
Lay the weeded items front side up on a clean work area where you can start laying them out to the original design.
Step 4: Add Carrier Sheet to design
Once you are finished weeding and laying out the 2nd design you can now transfer the weeded items to a carrier sheet. Simply lay the Sticky layer over the top side of the material.
Next up, learn how to use pattern fill and how to place images in text in Design Space.


