
How to Create a Marquee Sign Text Effect in Illustrator
For this Tutorial, we are going to use a Bold and Rounded Font (we chose Myriad Pro Bold).
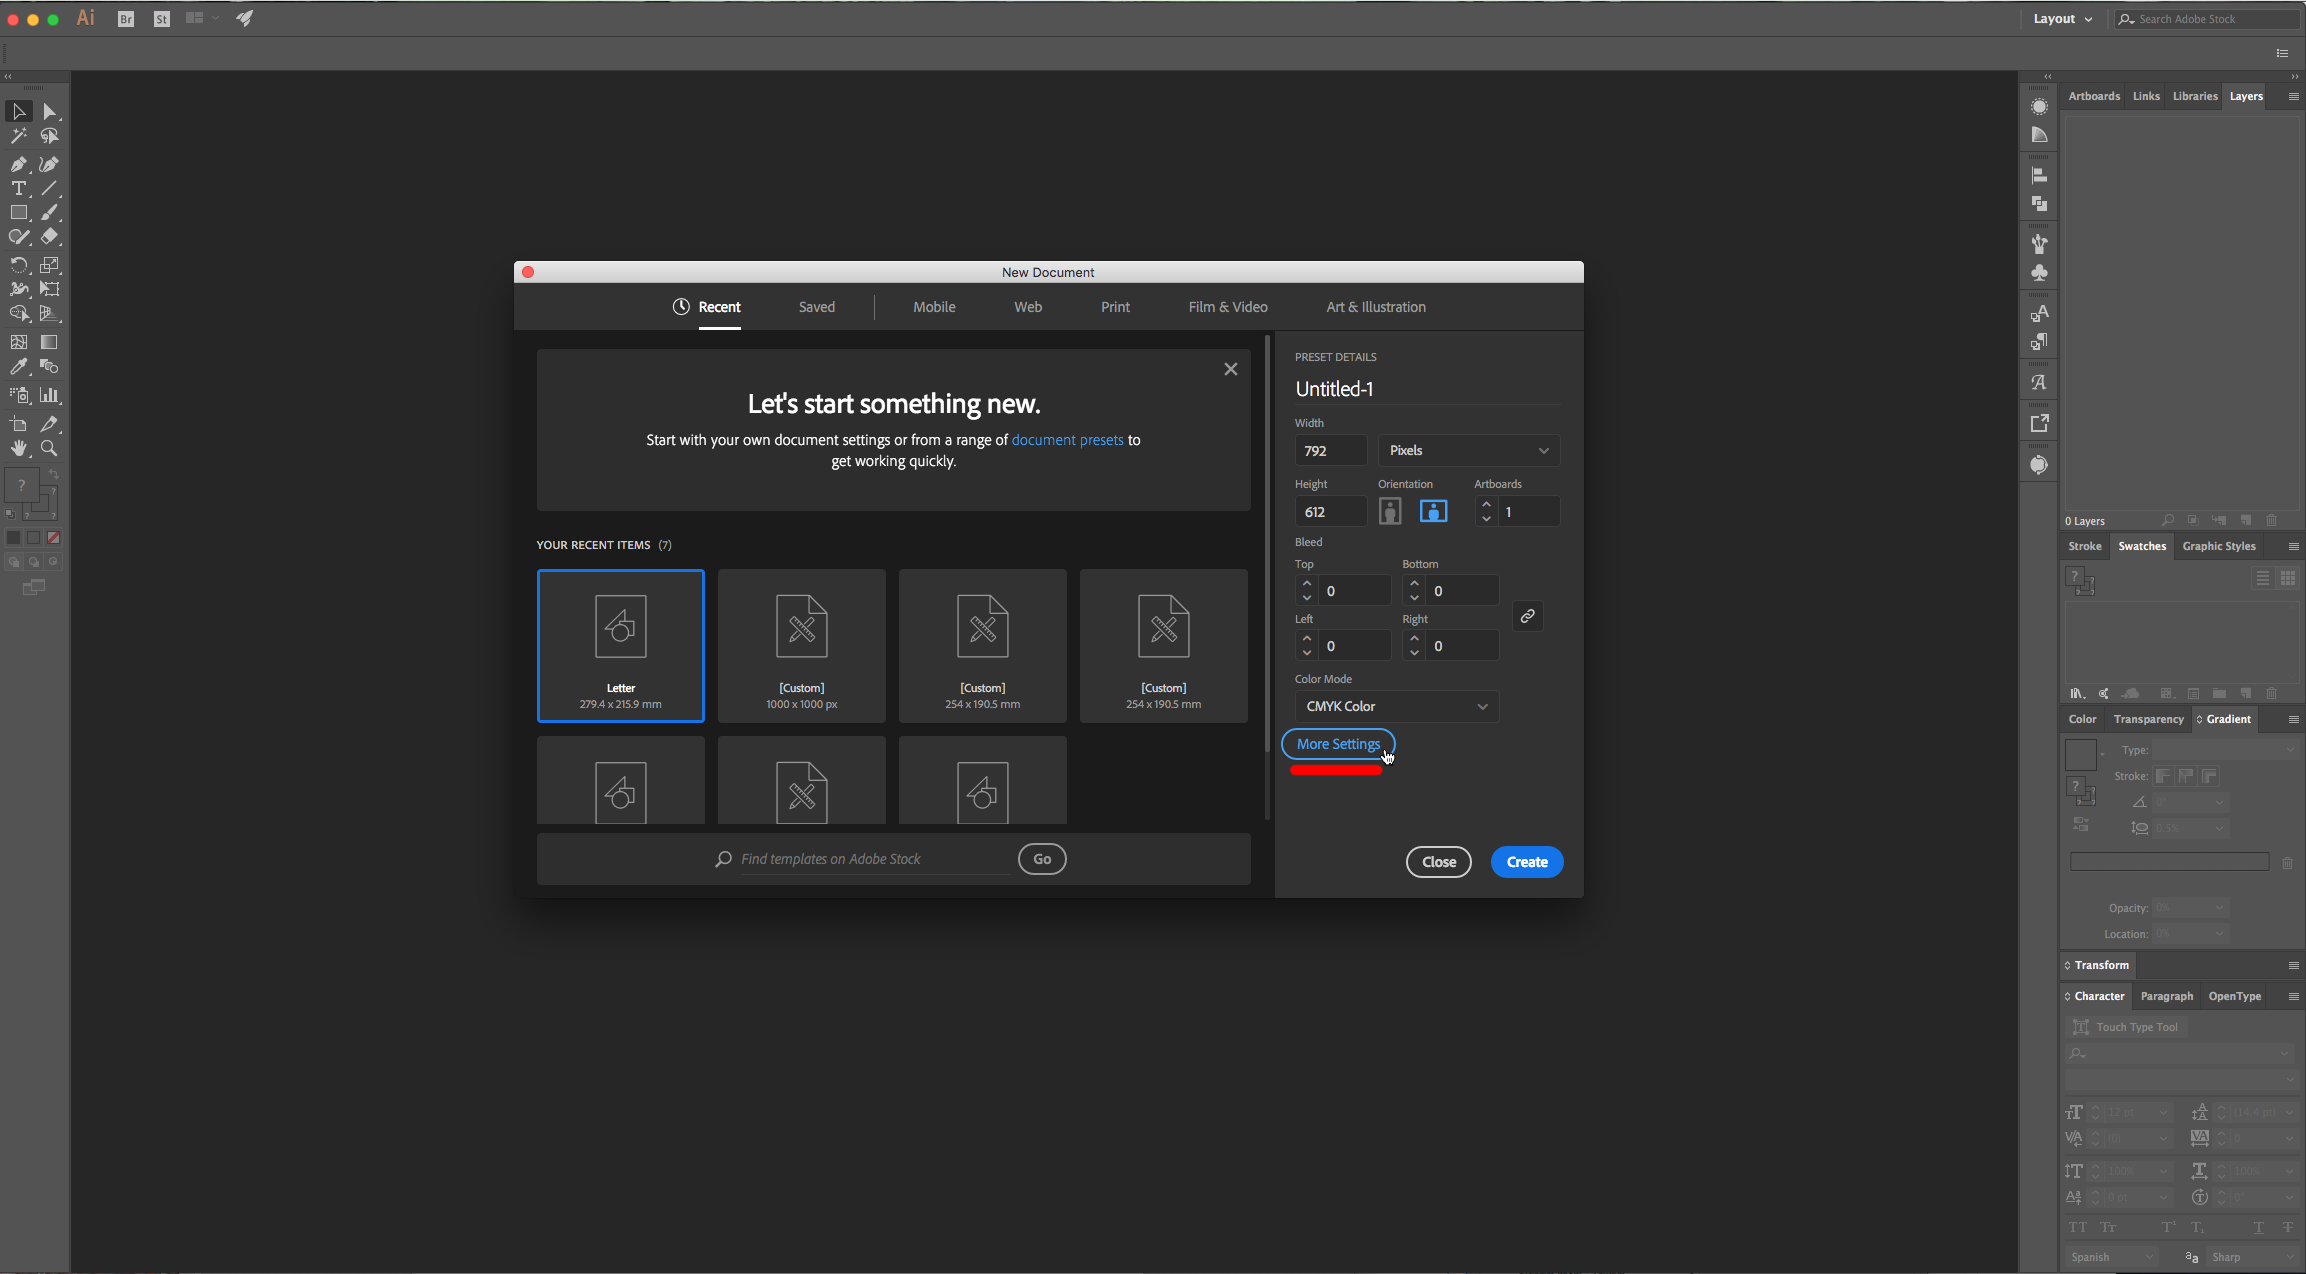
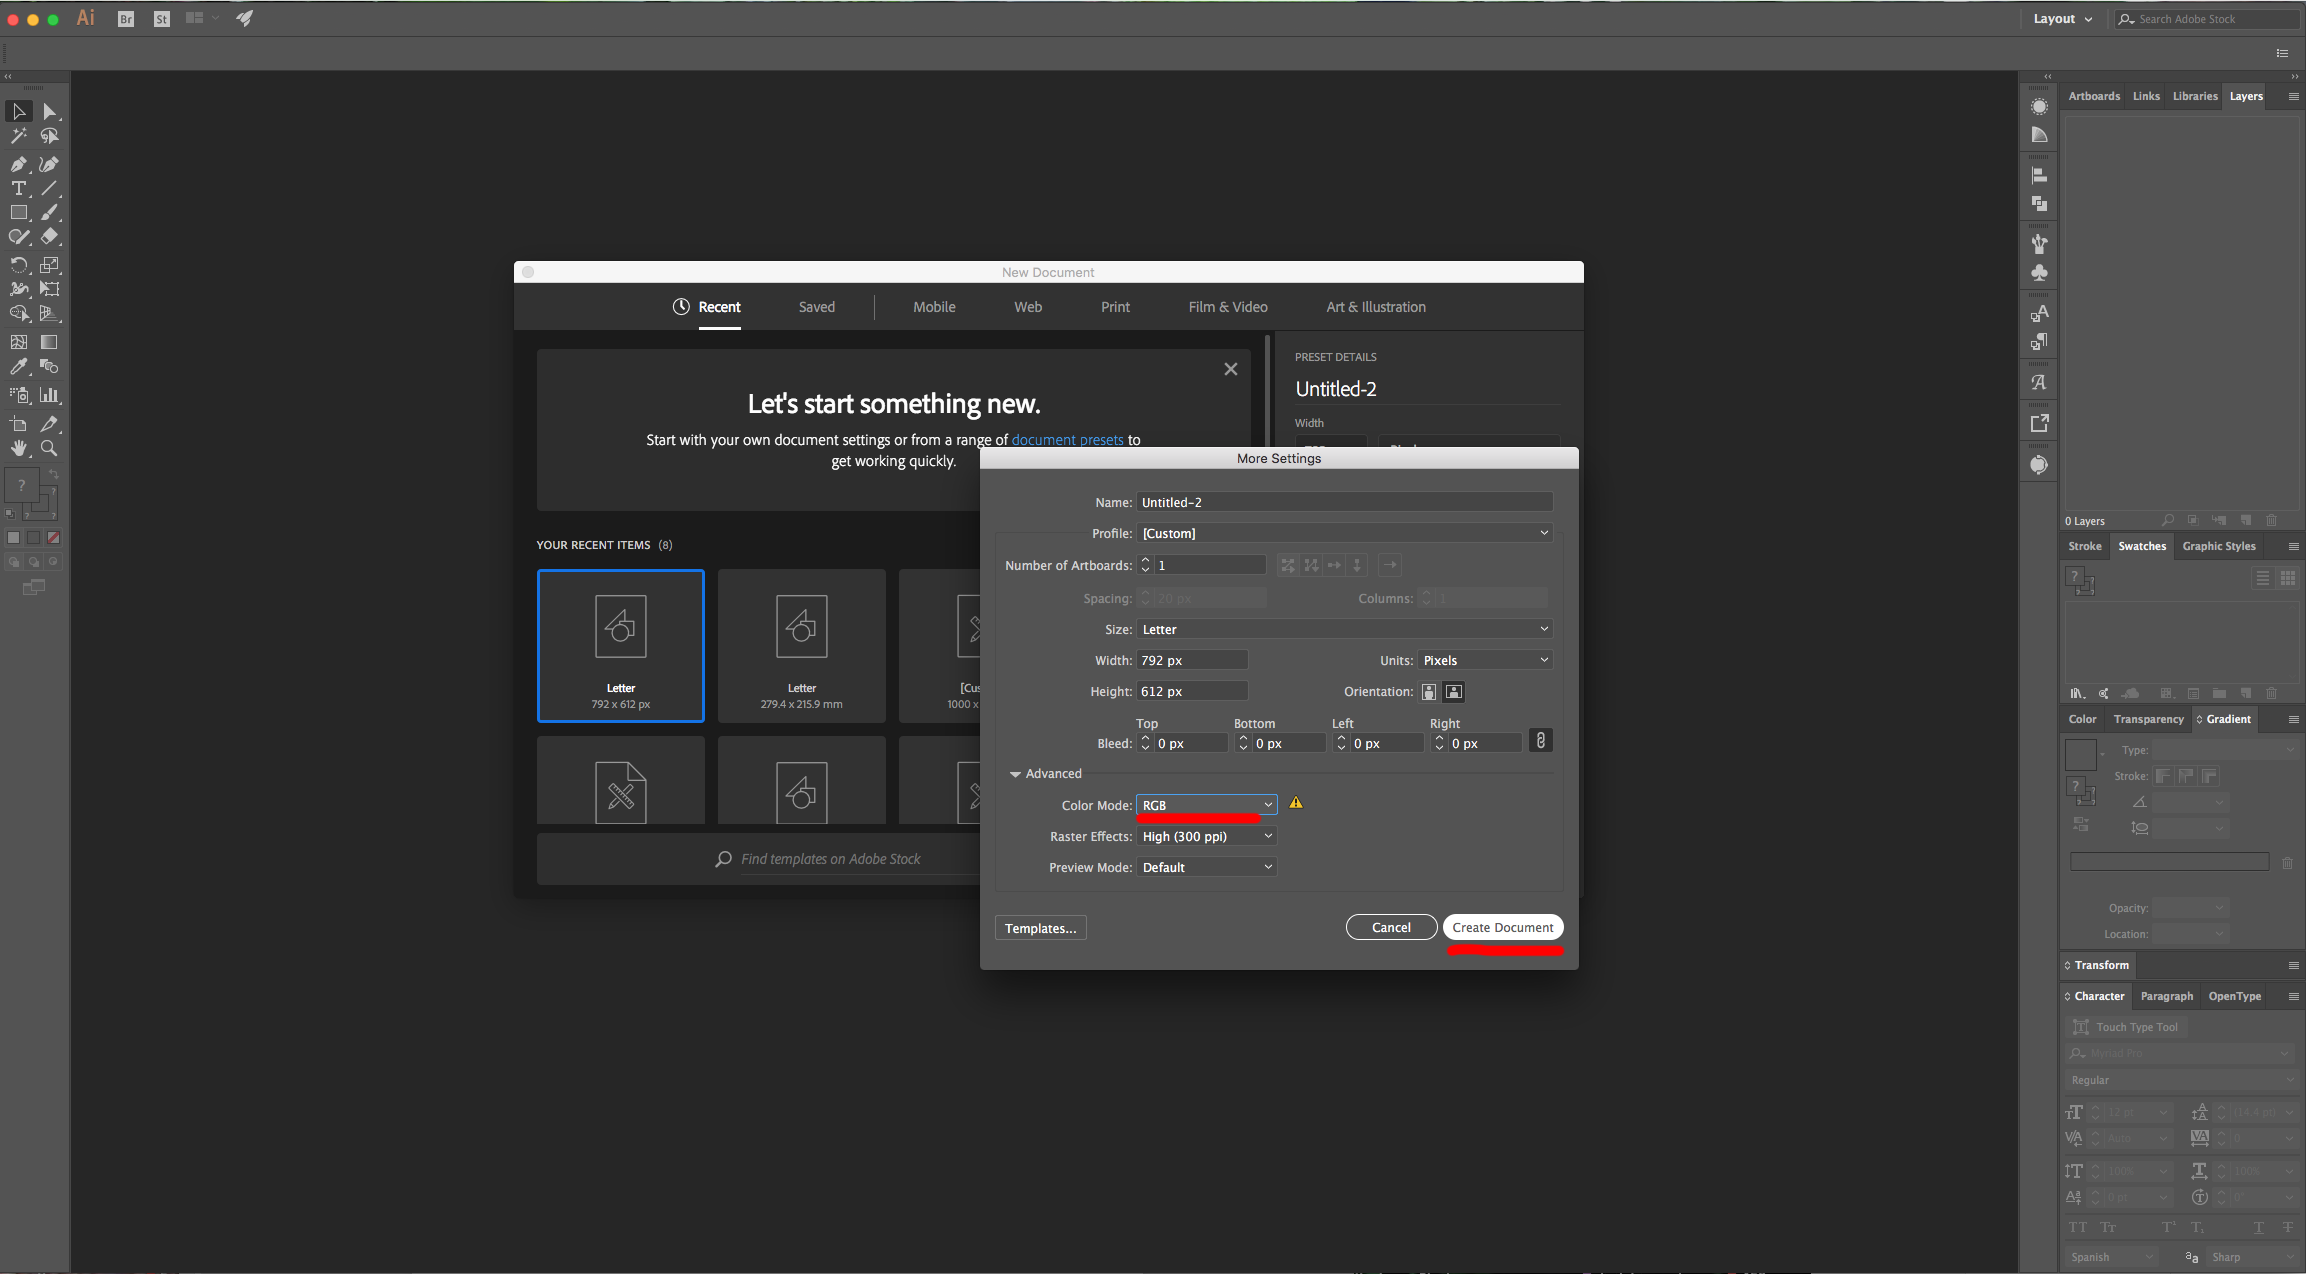
1 - In Illustrator, create a “New Document”. Choose “Pixels” in the “Units” drop-down menu and click on the “More Settings” button. Change the “Color Mode” to RGB and click “Create Document”.
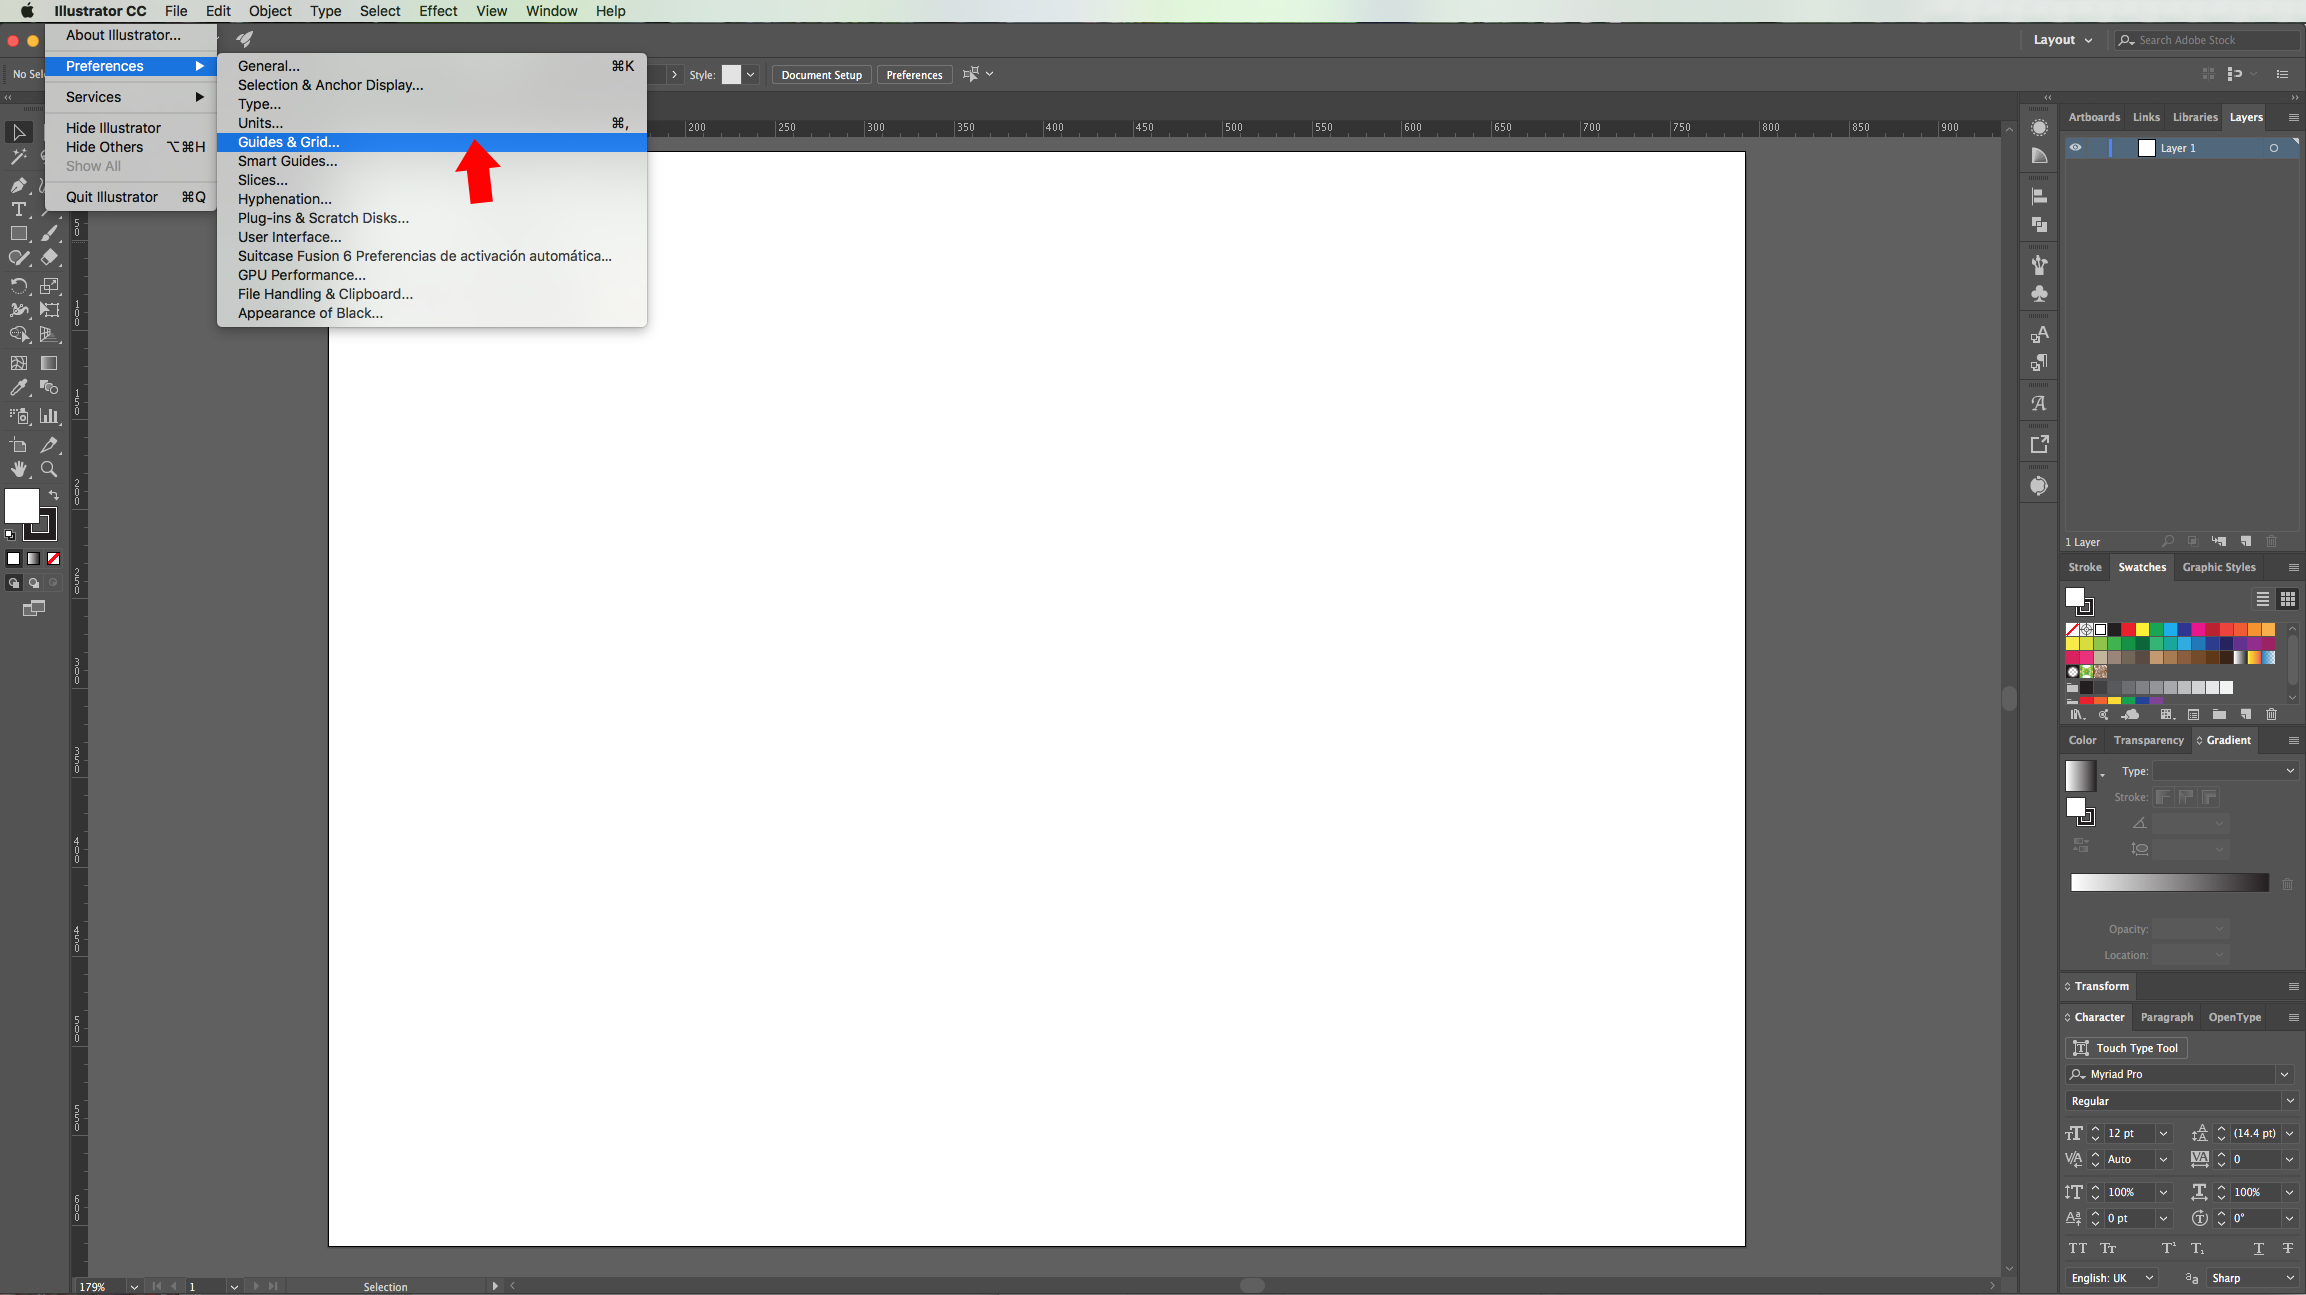
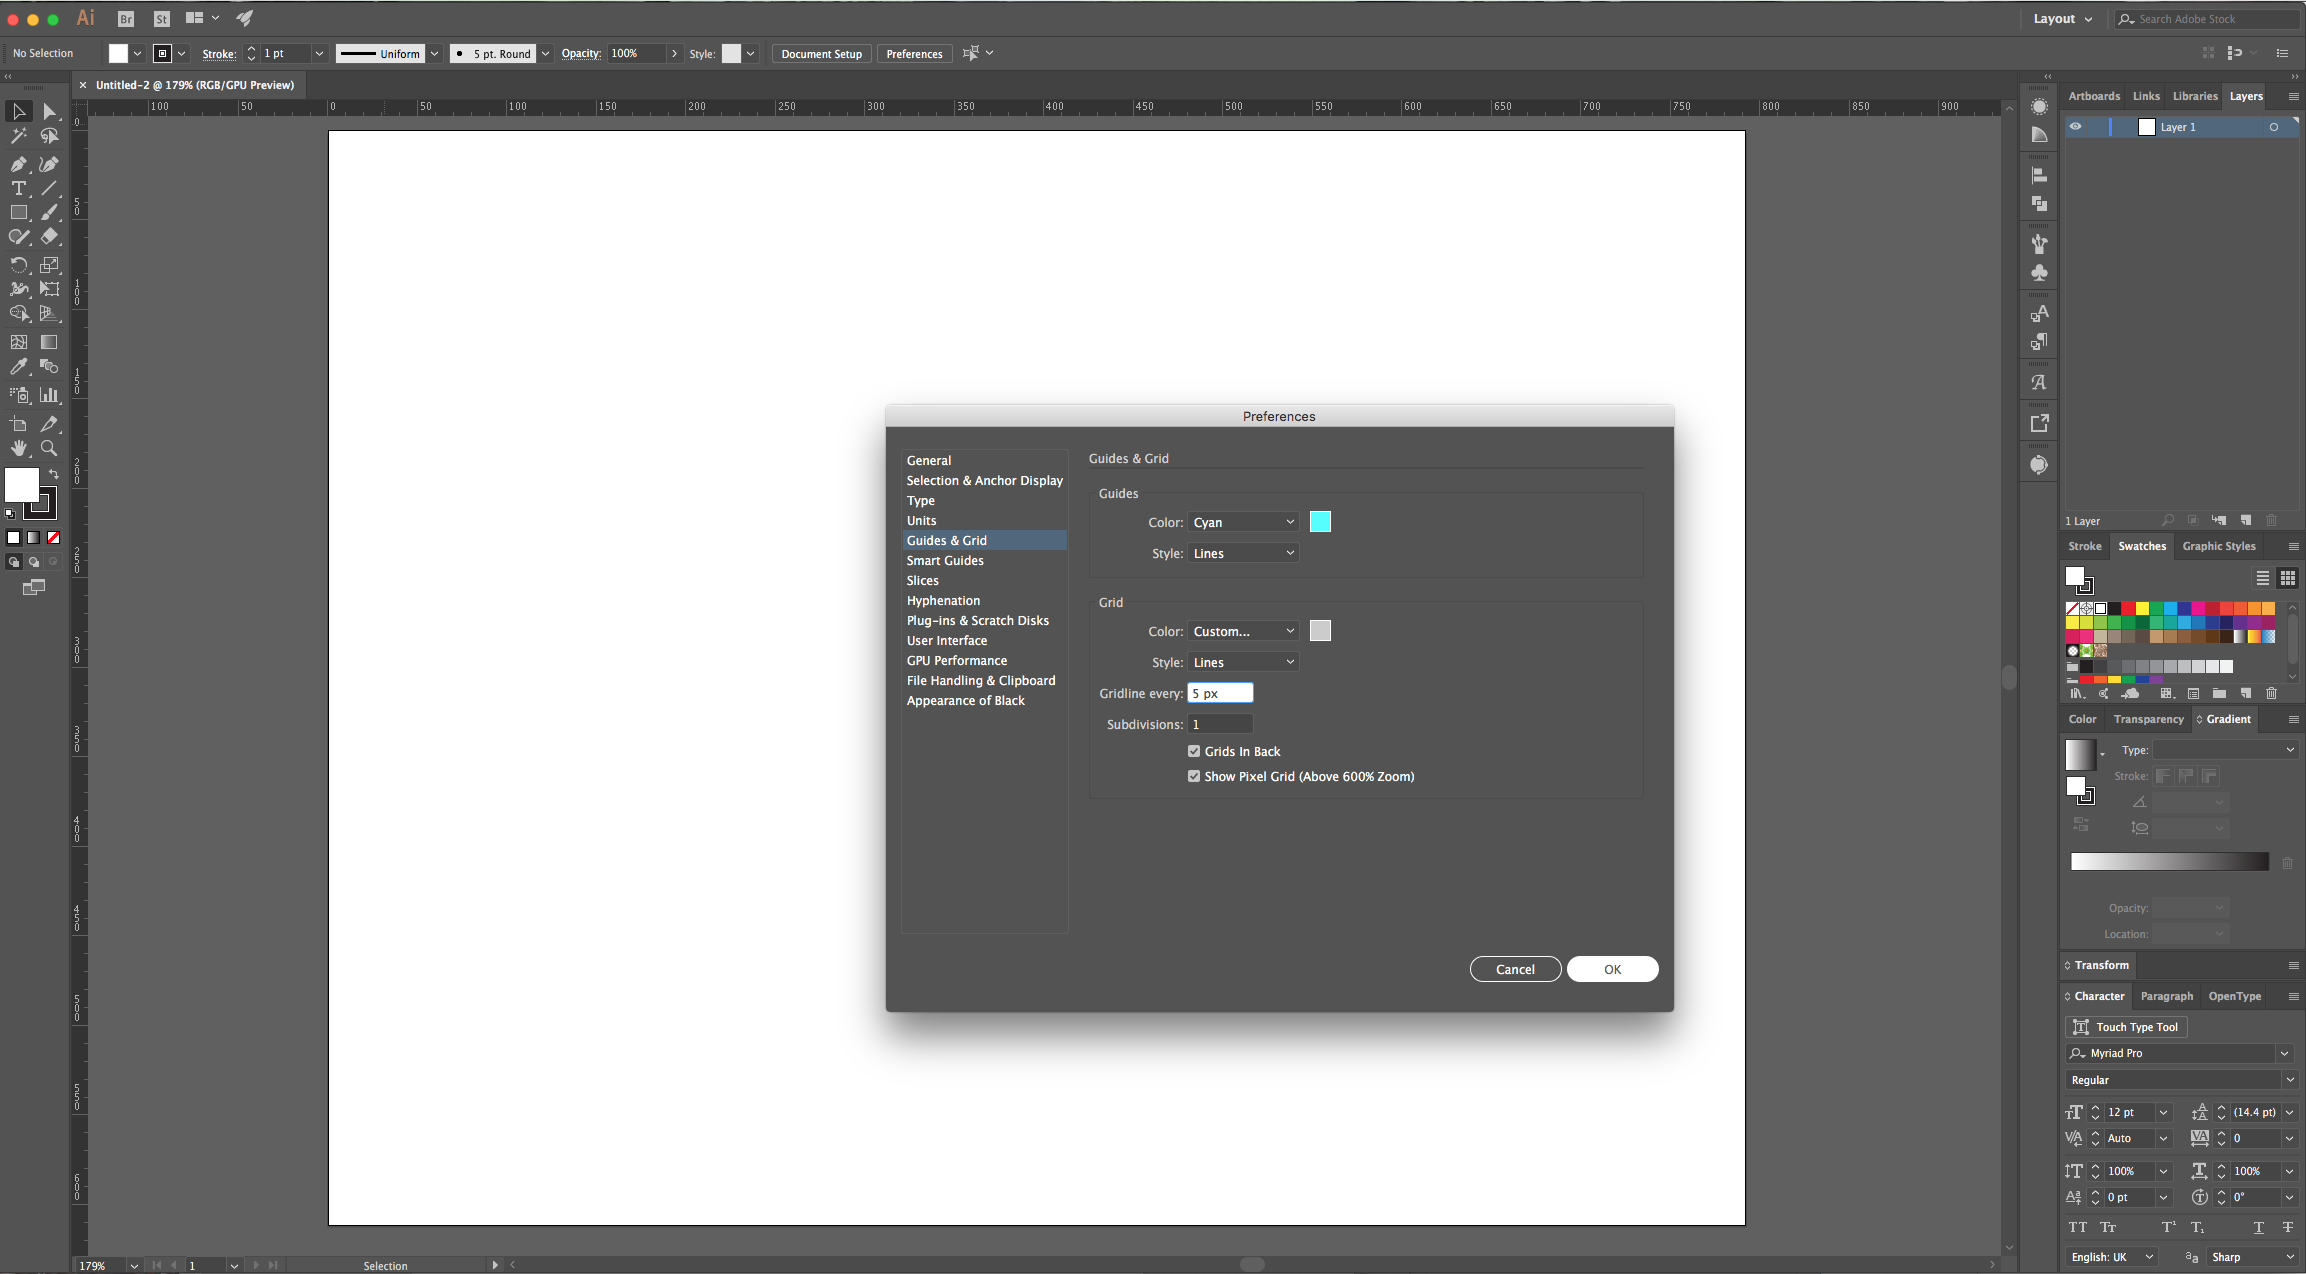
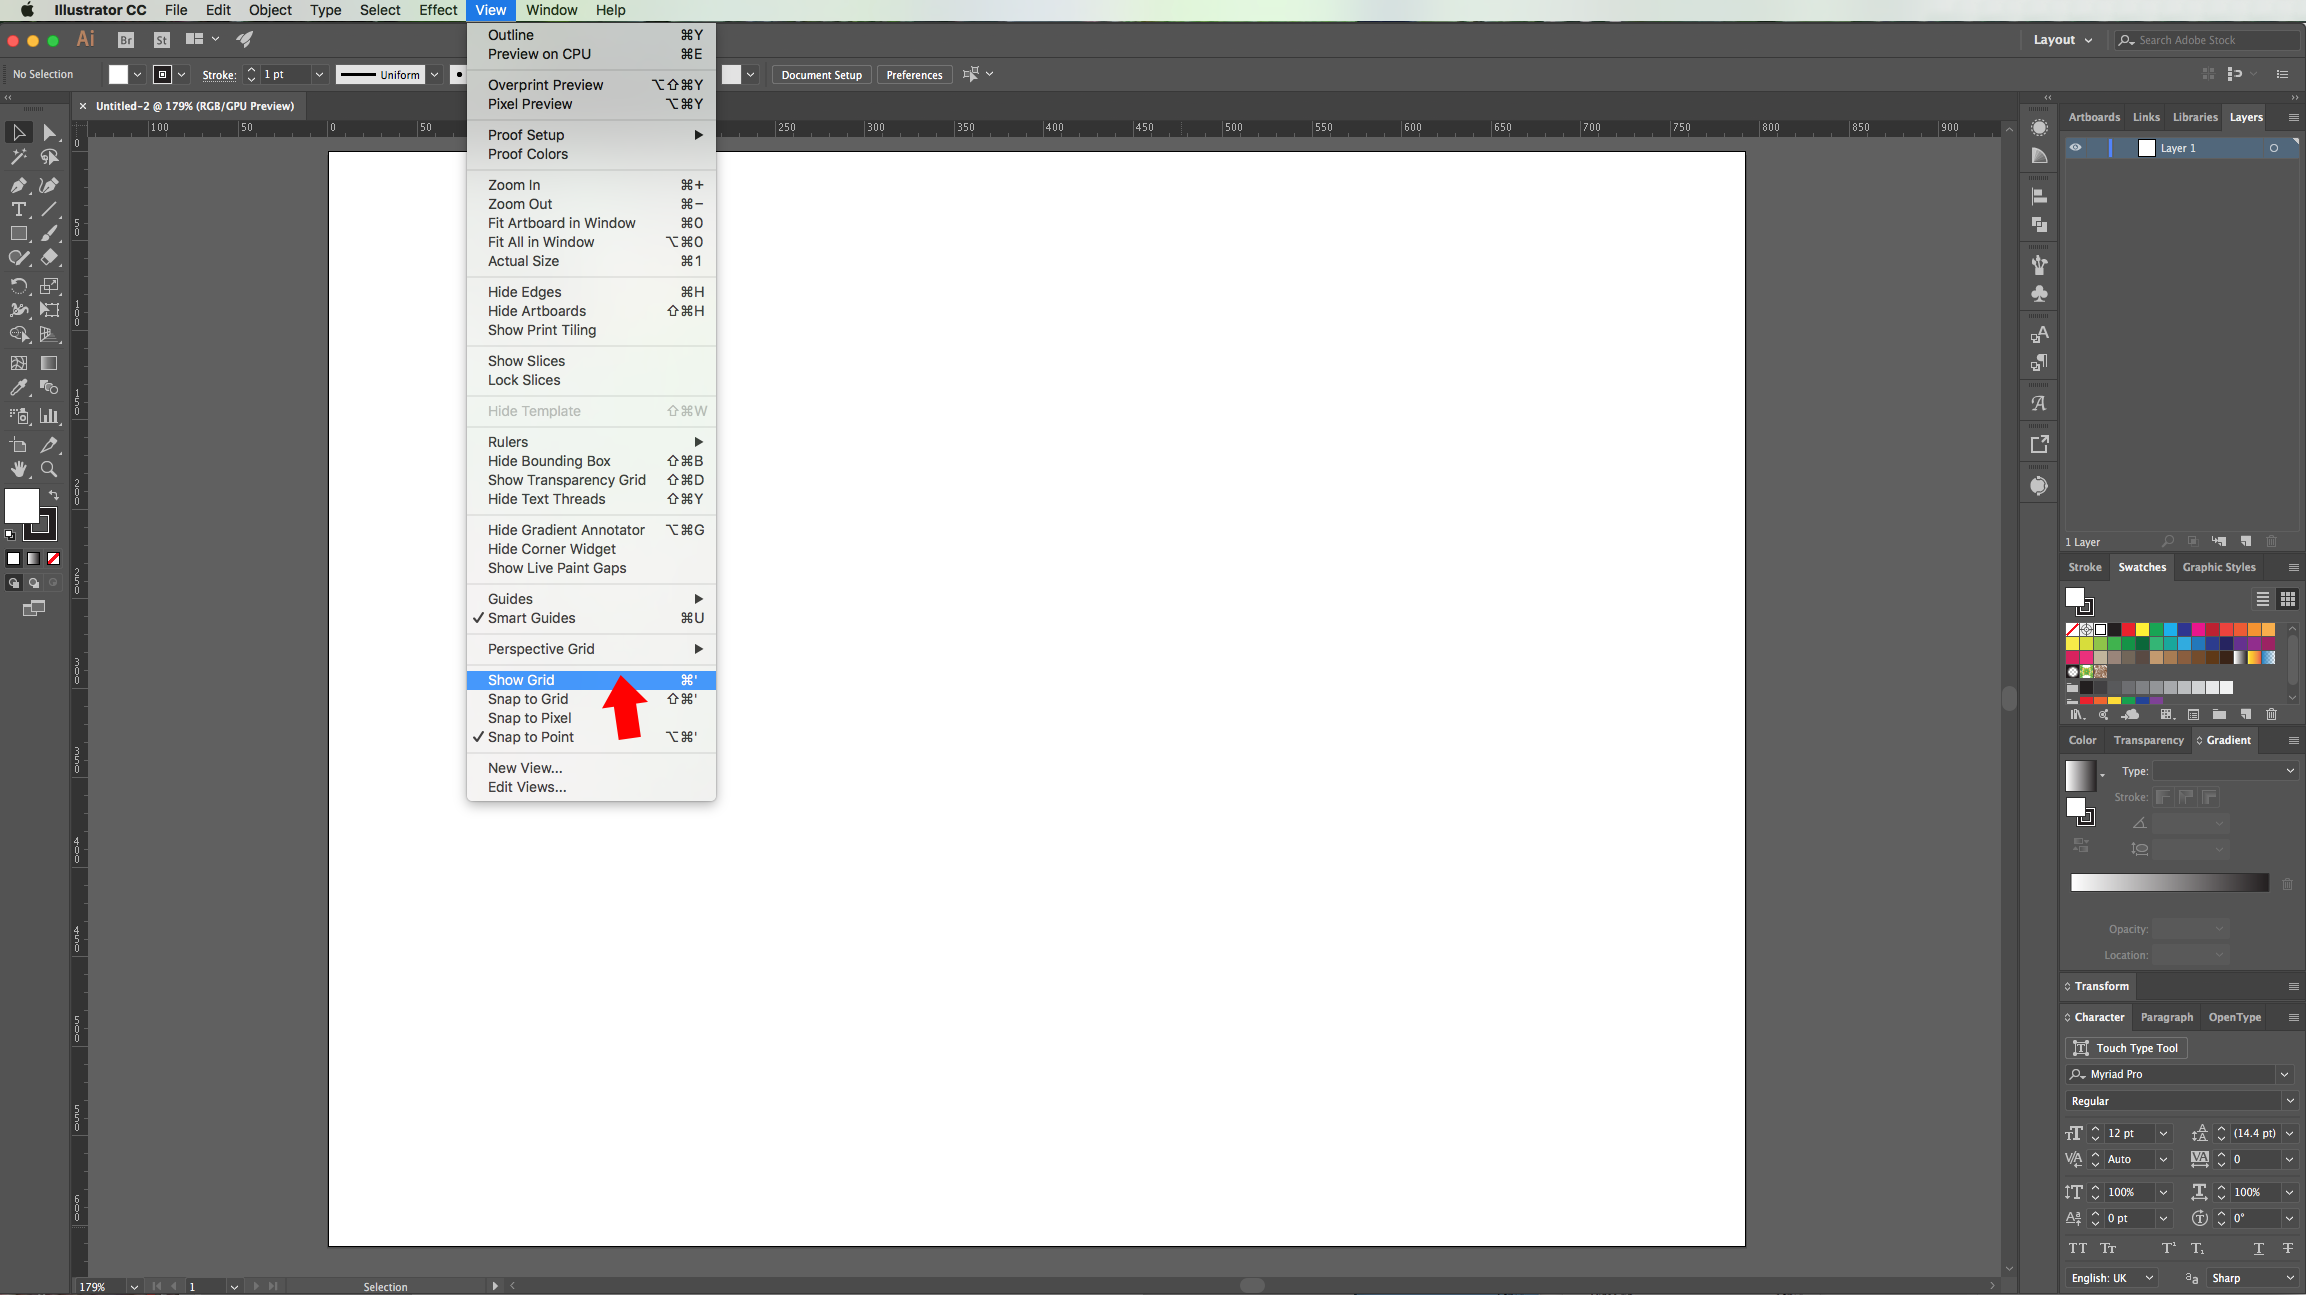
2 - Go to Illustrator CC > Preferences > Guides & Grid and change the “Gridline every” value to 5 px and “Subdivisions” to 1. Then, go to “Units” and make sure “Pixels” is the choice everything.

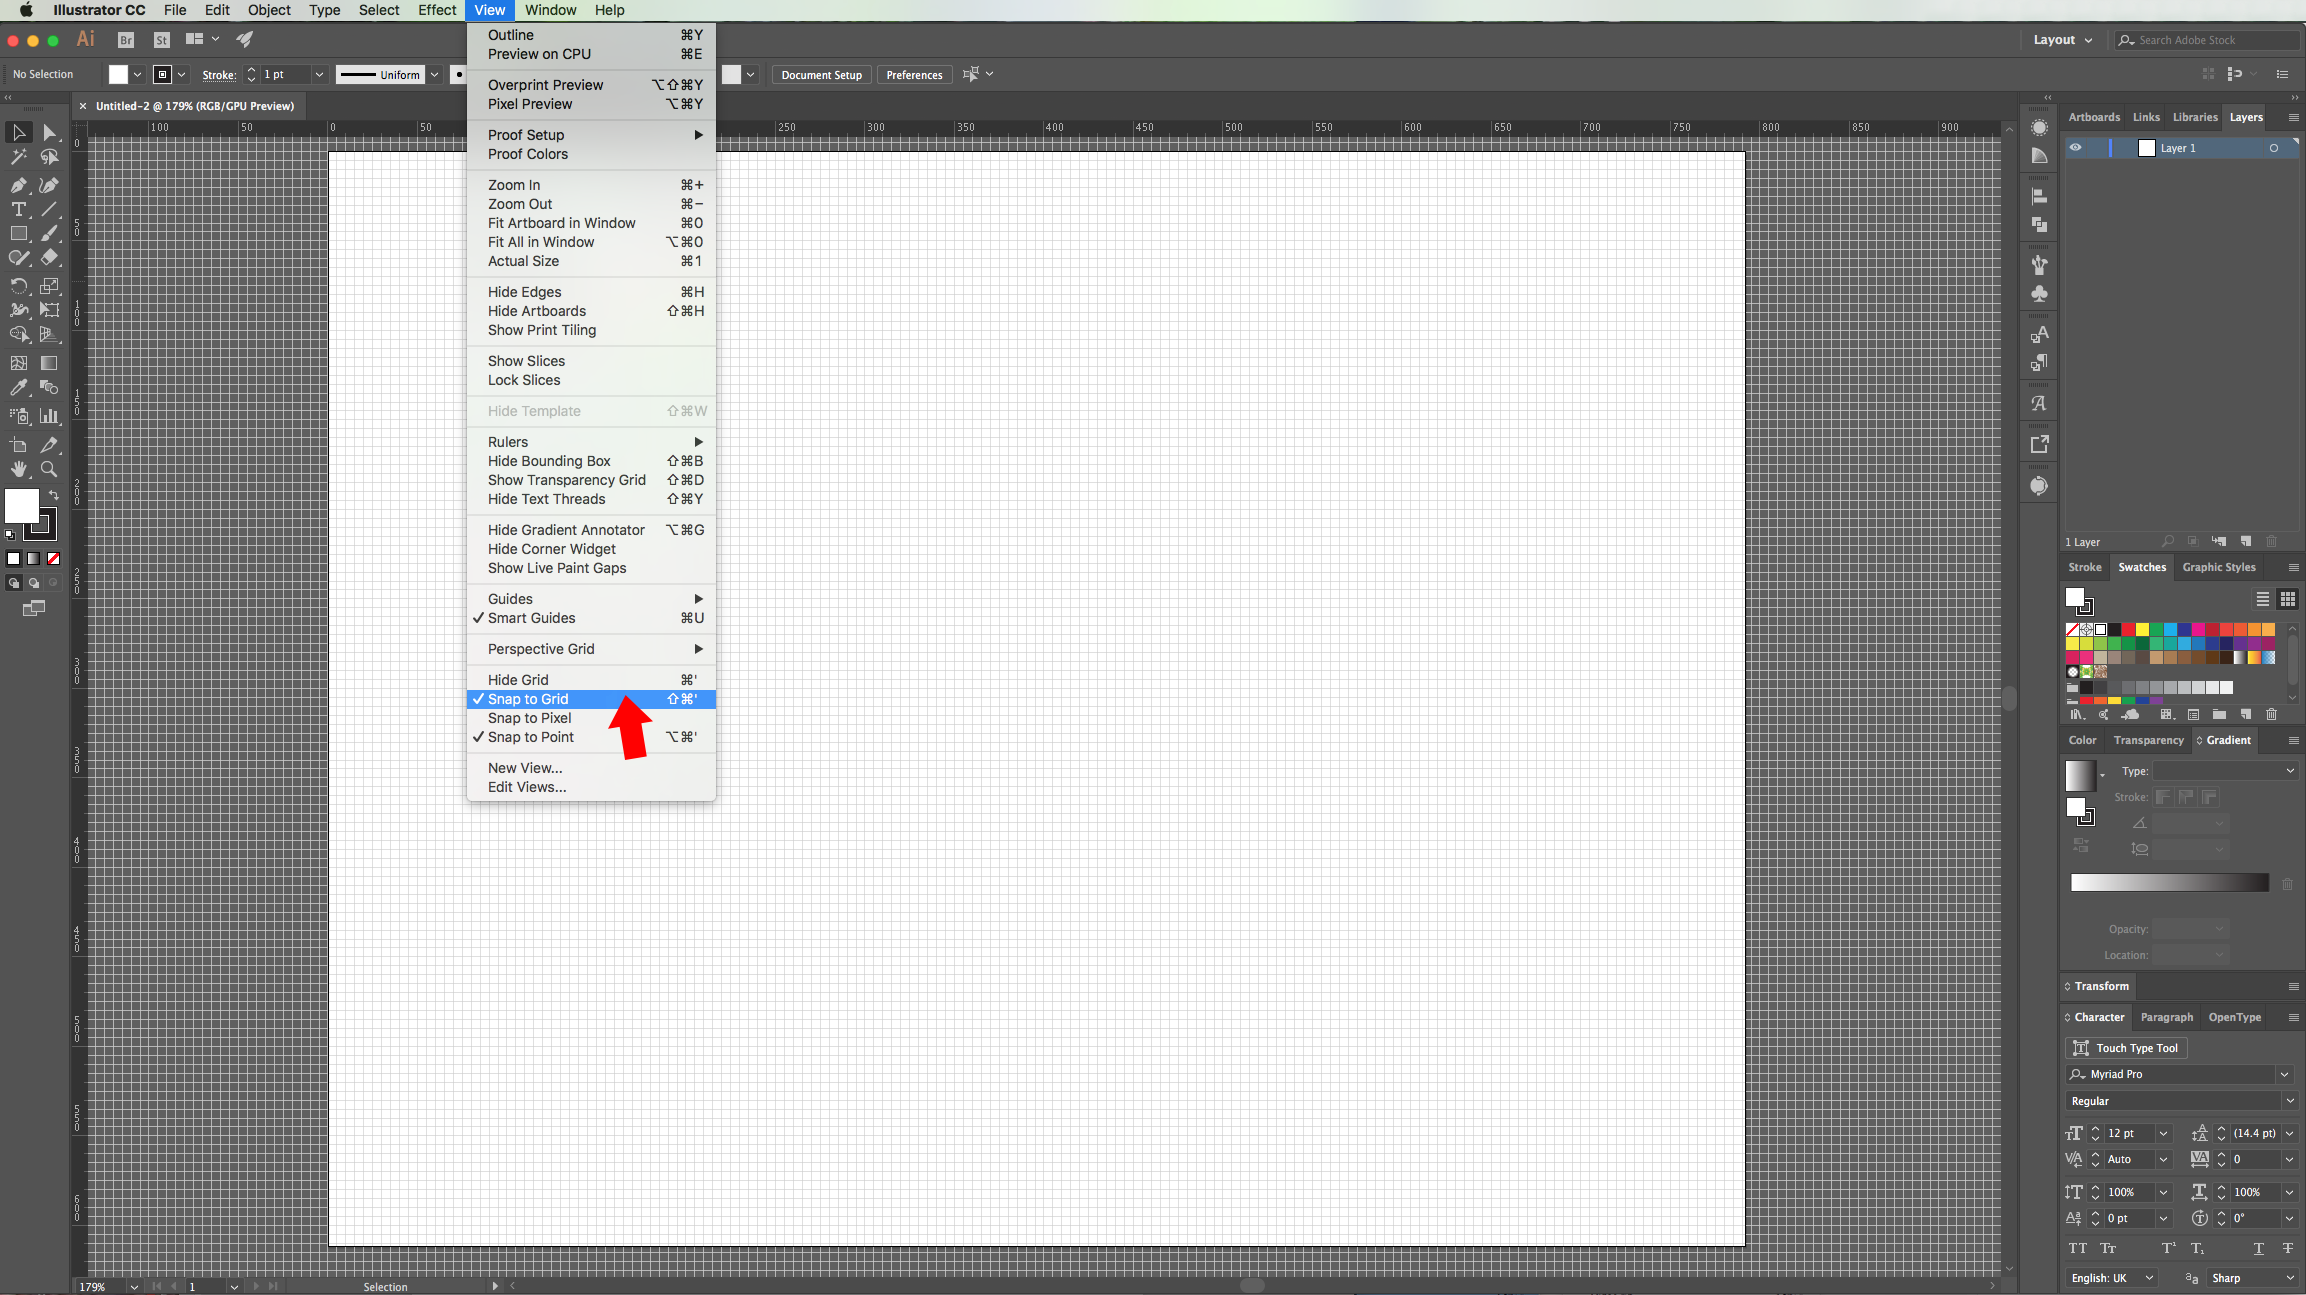
3 - Enable your “Grid” (Command/Control + ‘) and make sure “Snap to Grid” is ON too (Shift + Command/Control + ‘). If you want to hide your “Grid” or to turn “Snap to Grid” OFF, just click the key combinations again.
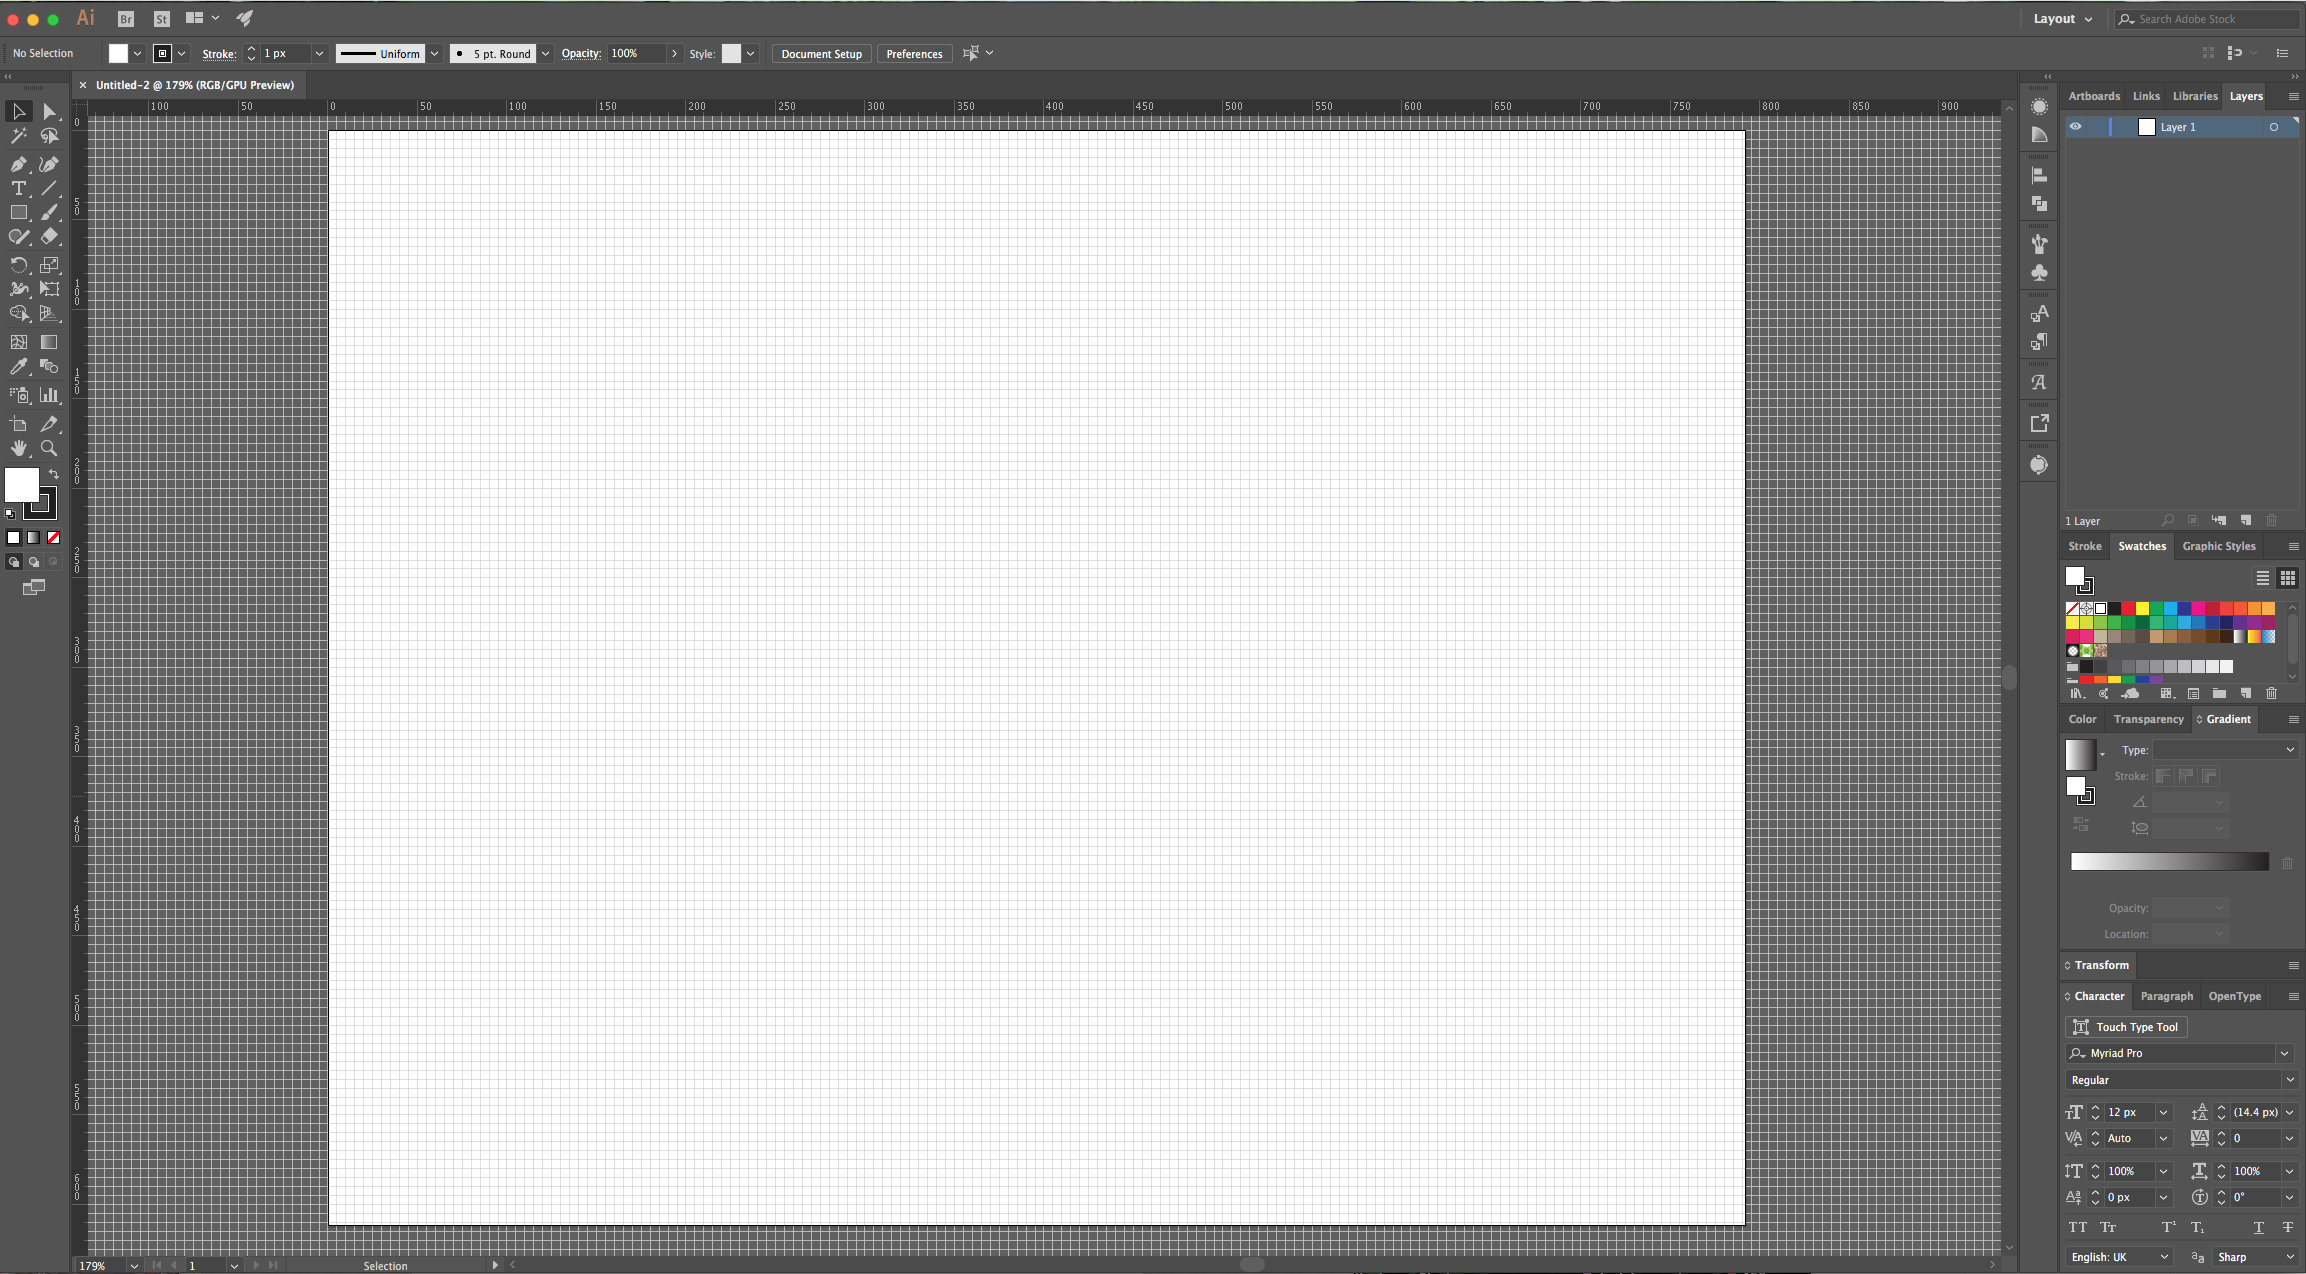
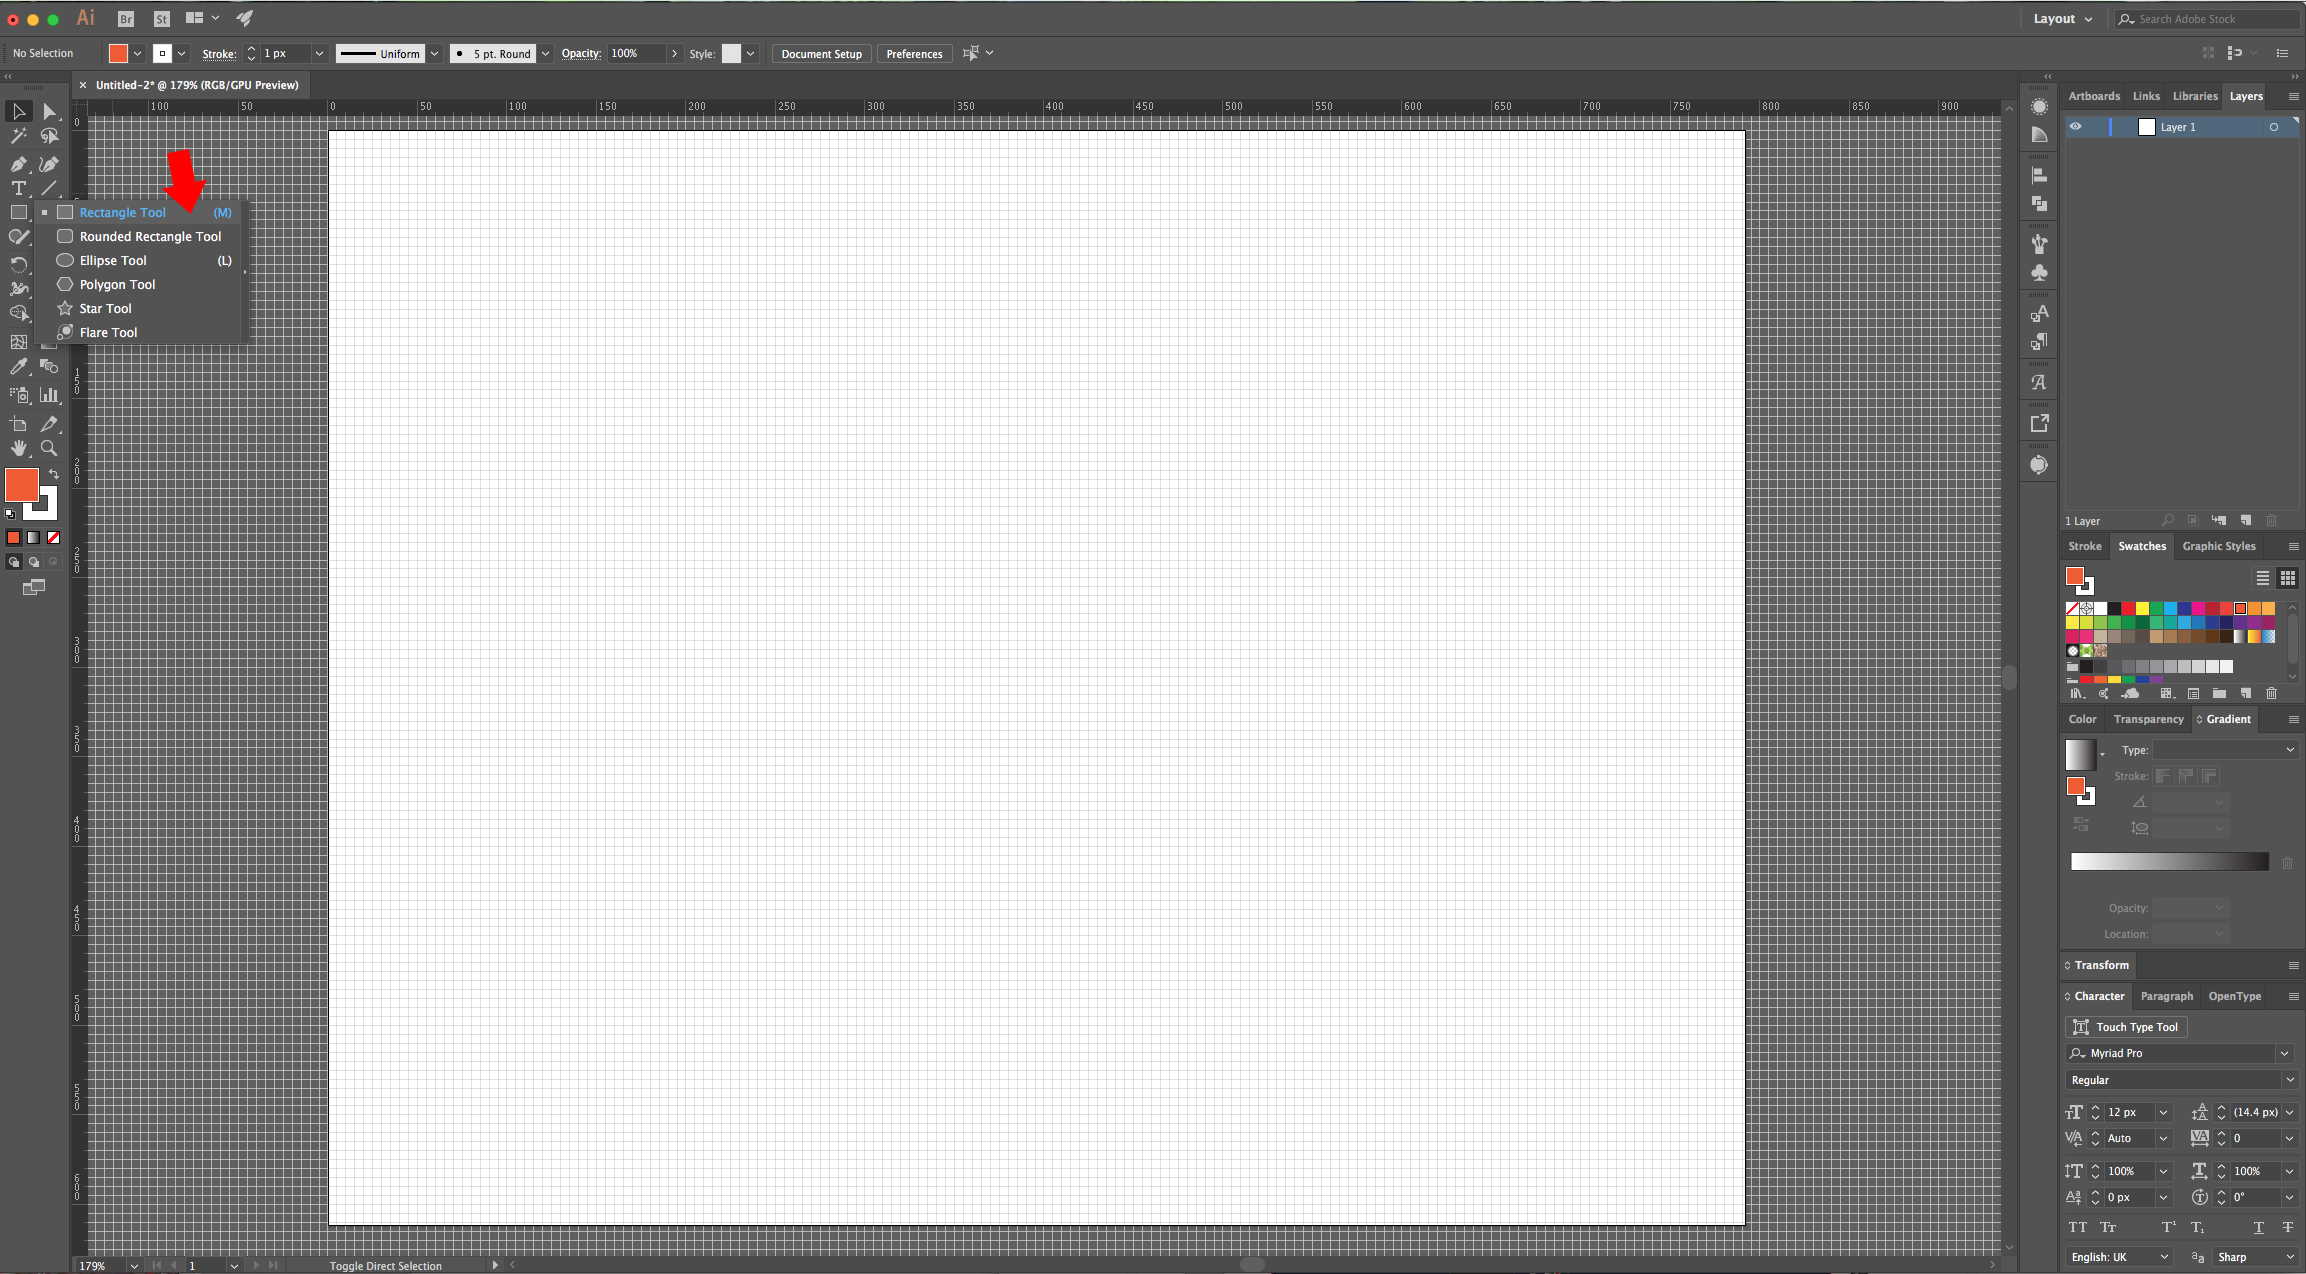
4 - Select the “Rectangle Tool” (M), draw a rectangle covering your entire canvas and fill it with Black.
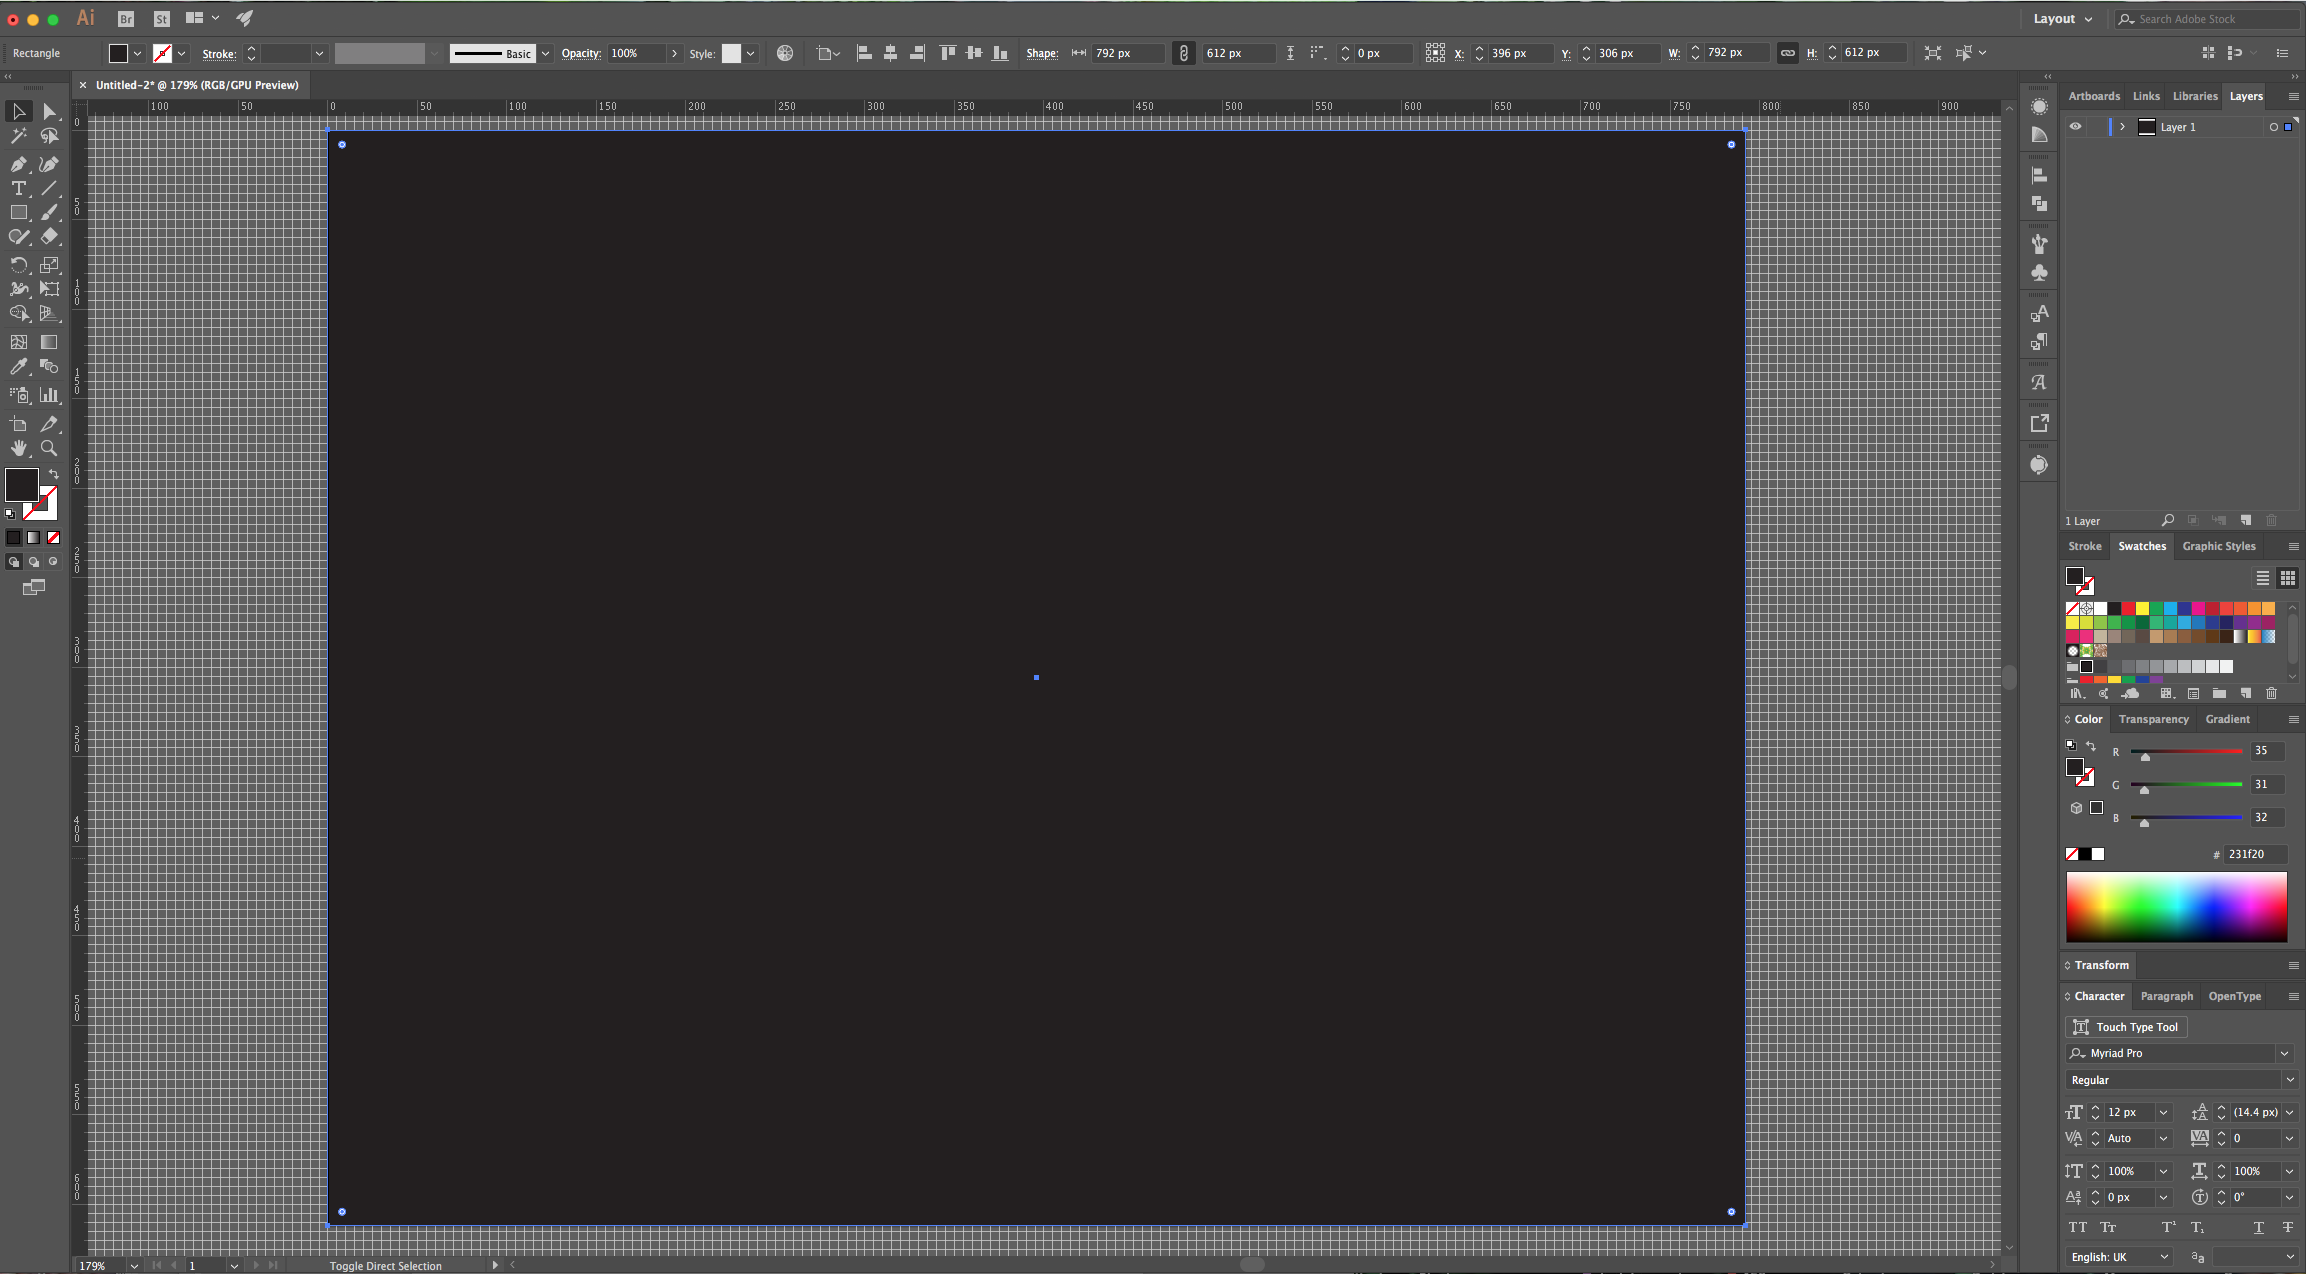
5 - Lock your Layer by clicking on the left side of its Thumbnail and bring out the small padlock. Then, click on the small “Create New Layer” button at the bottom to create a “New Layer”.


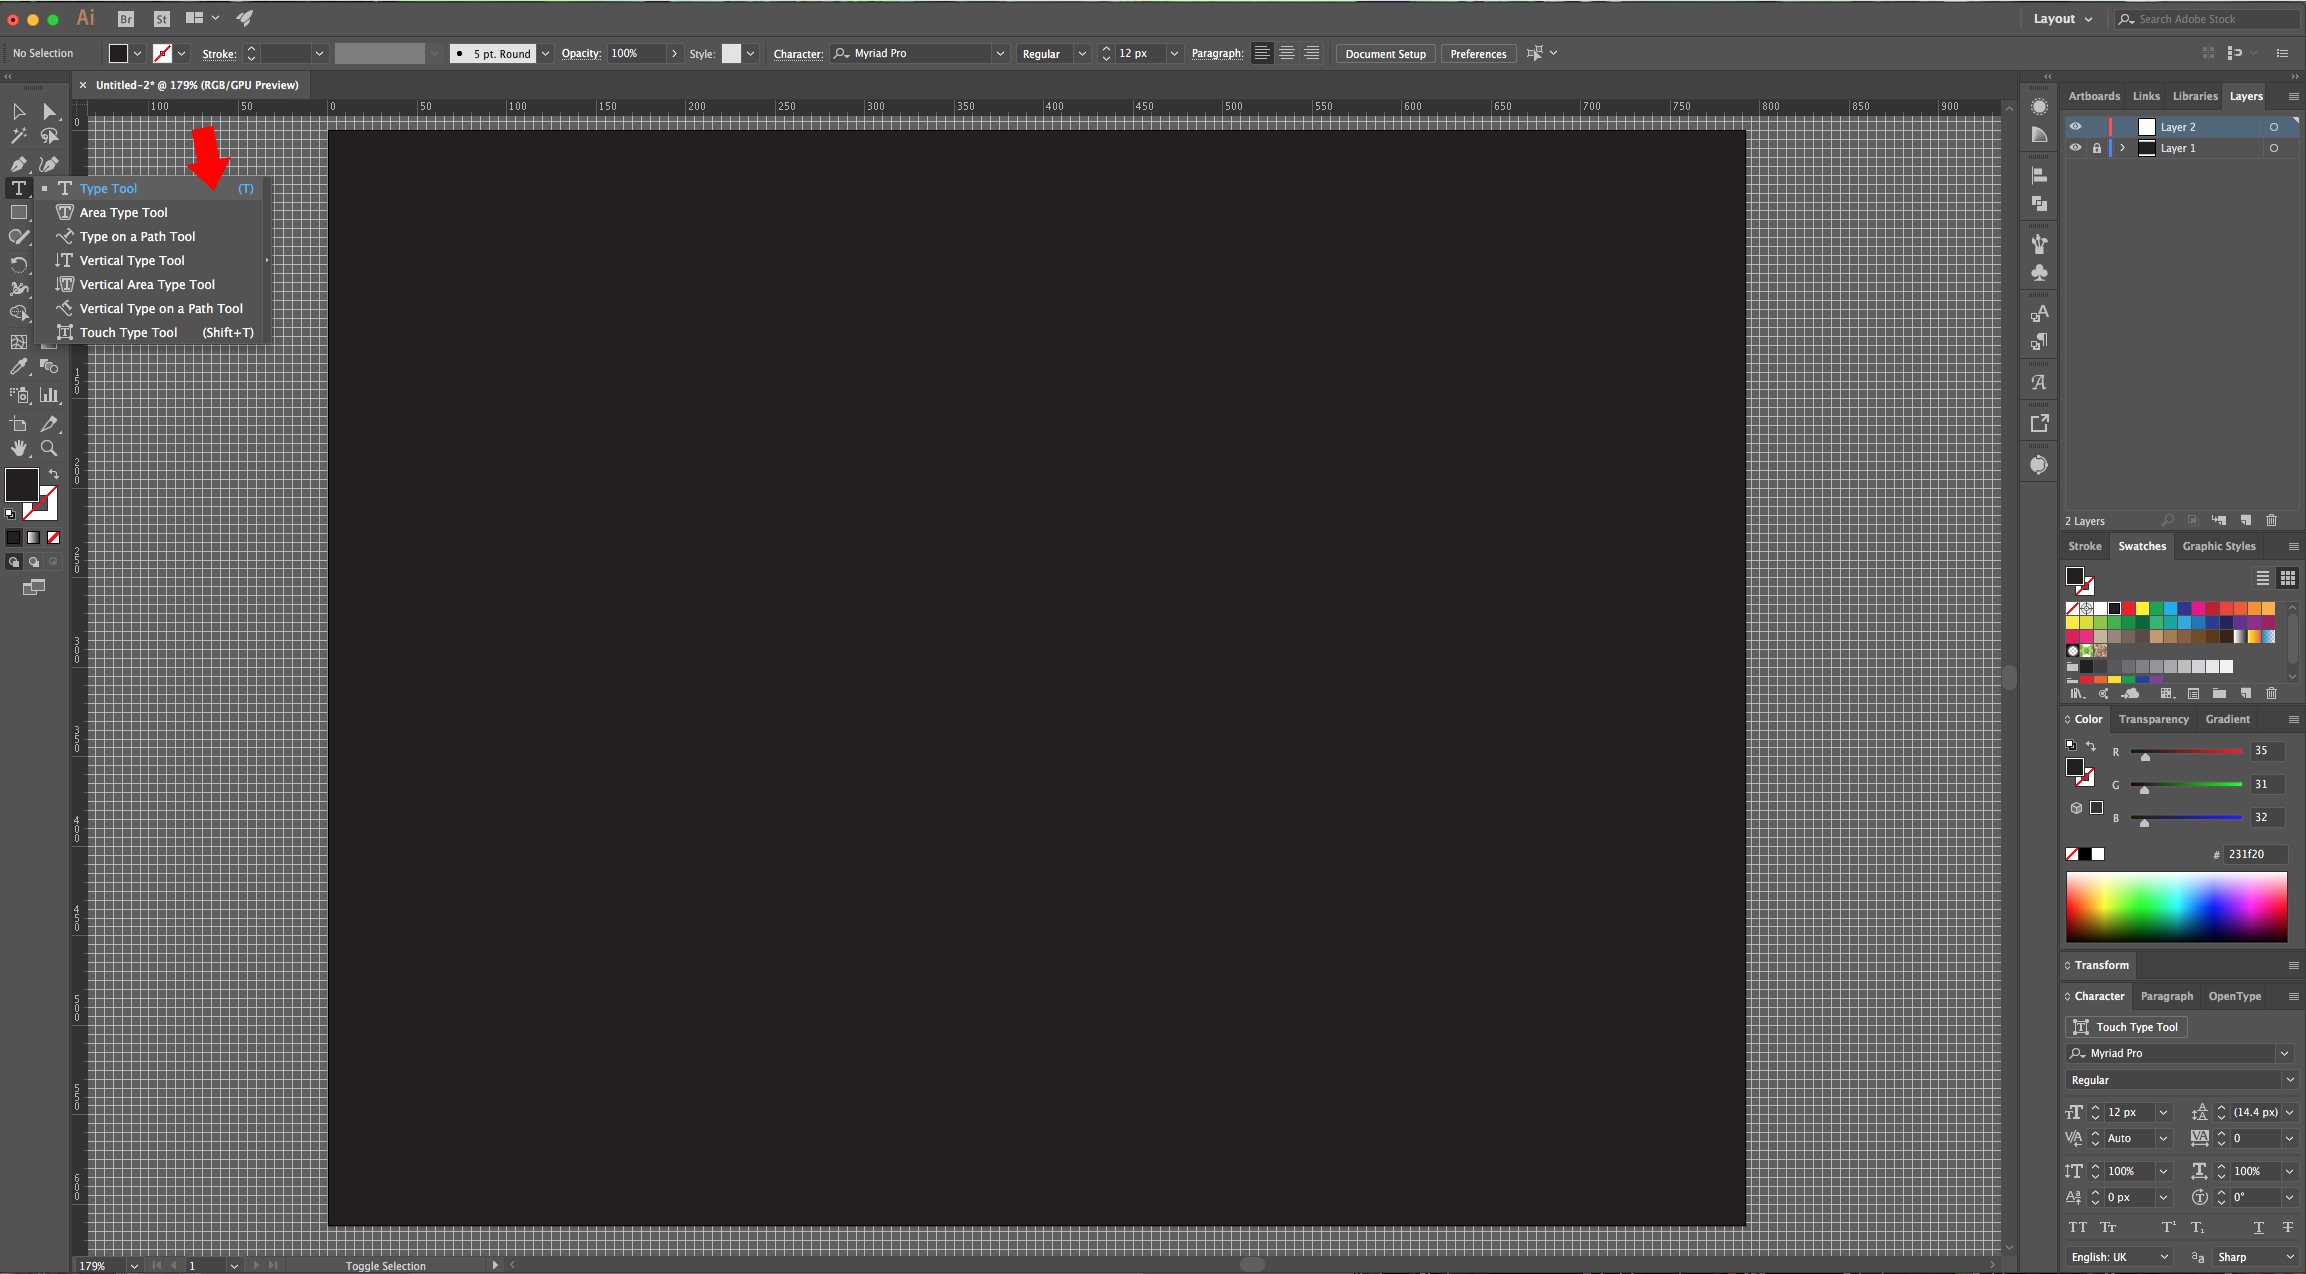
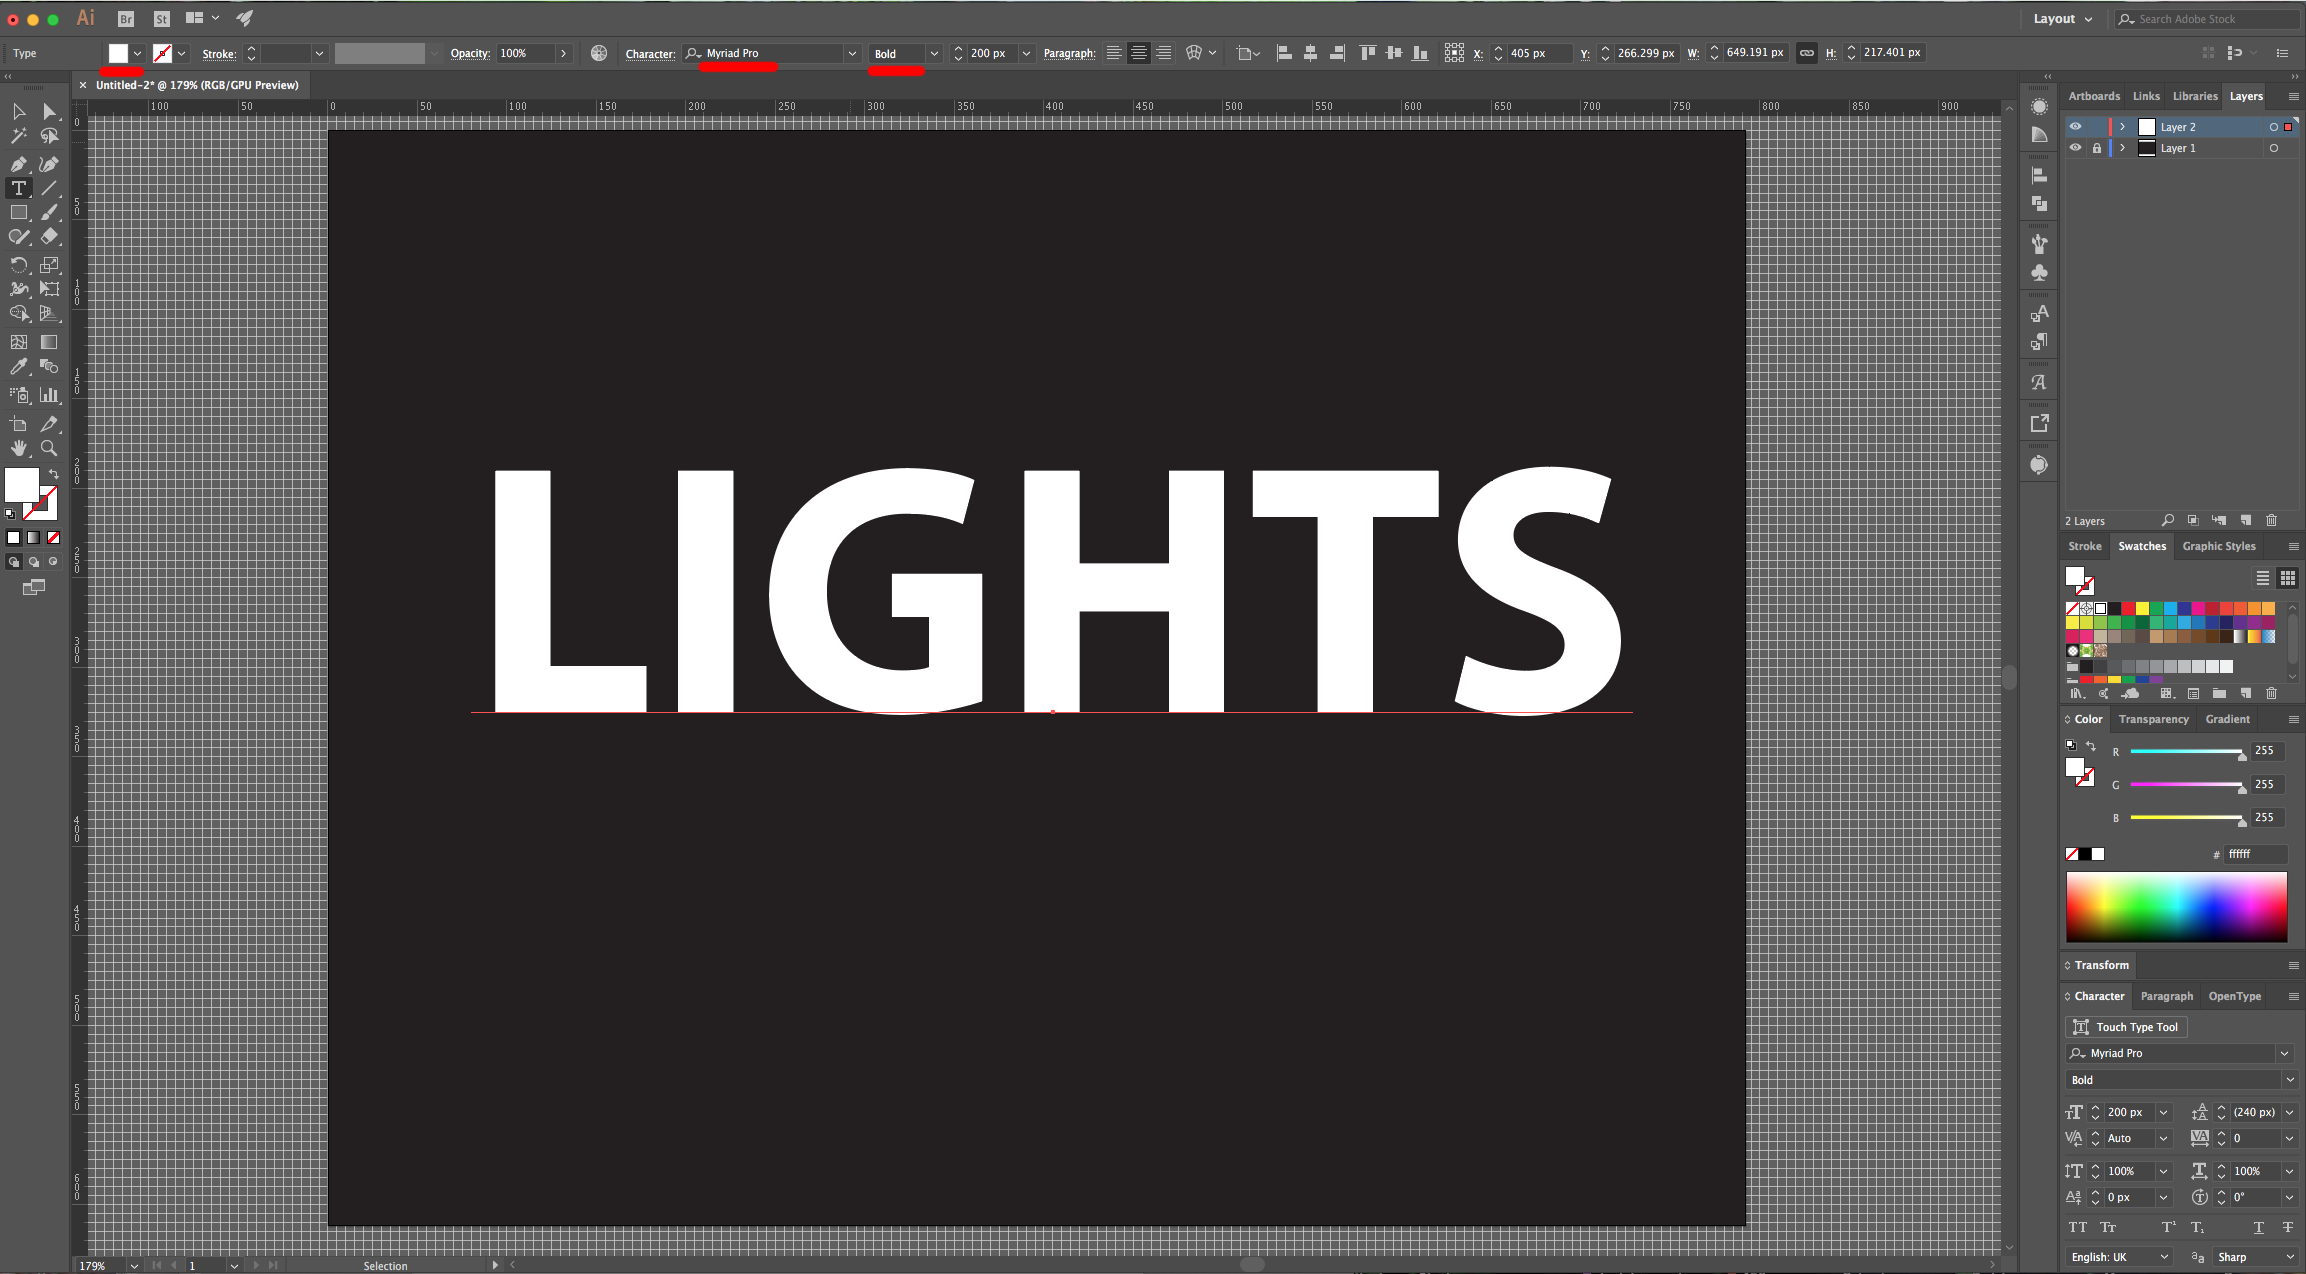
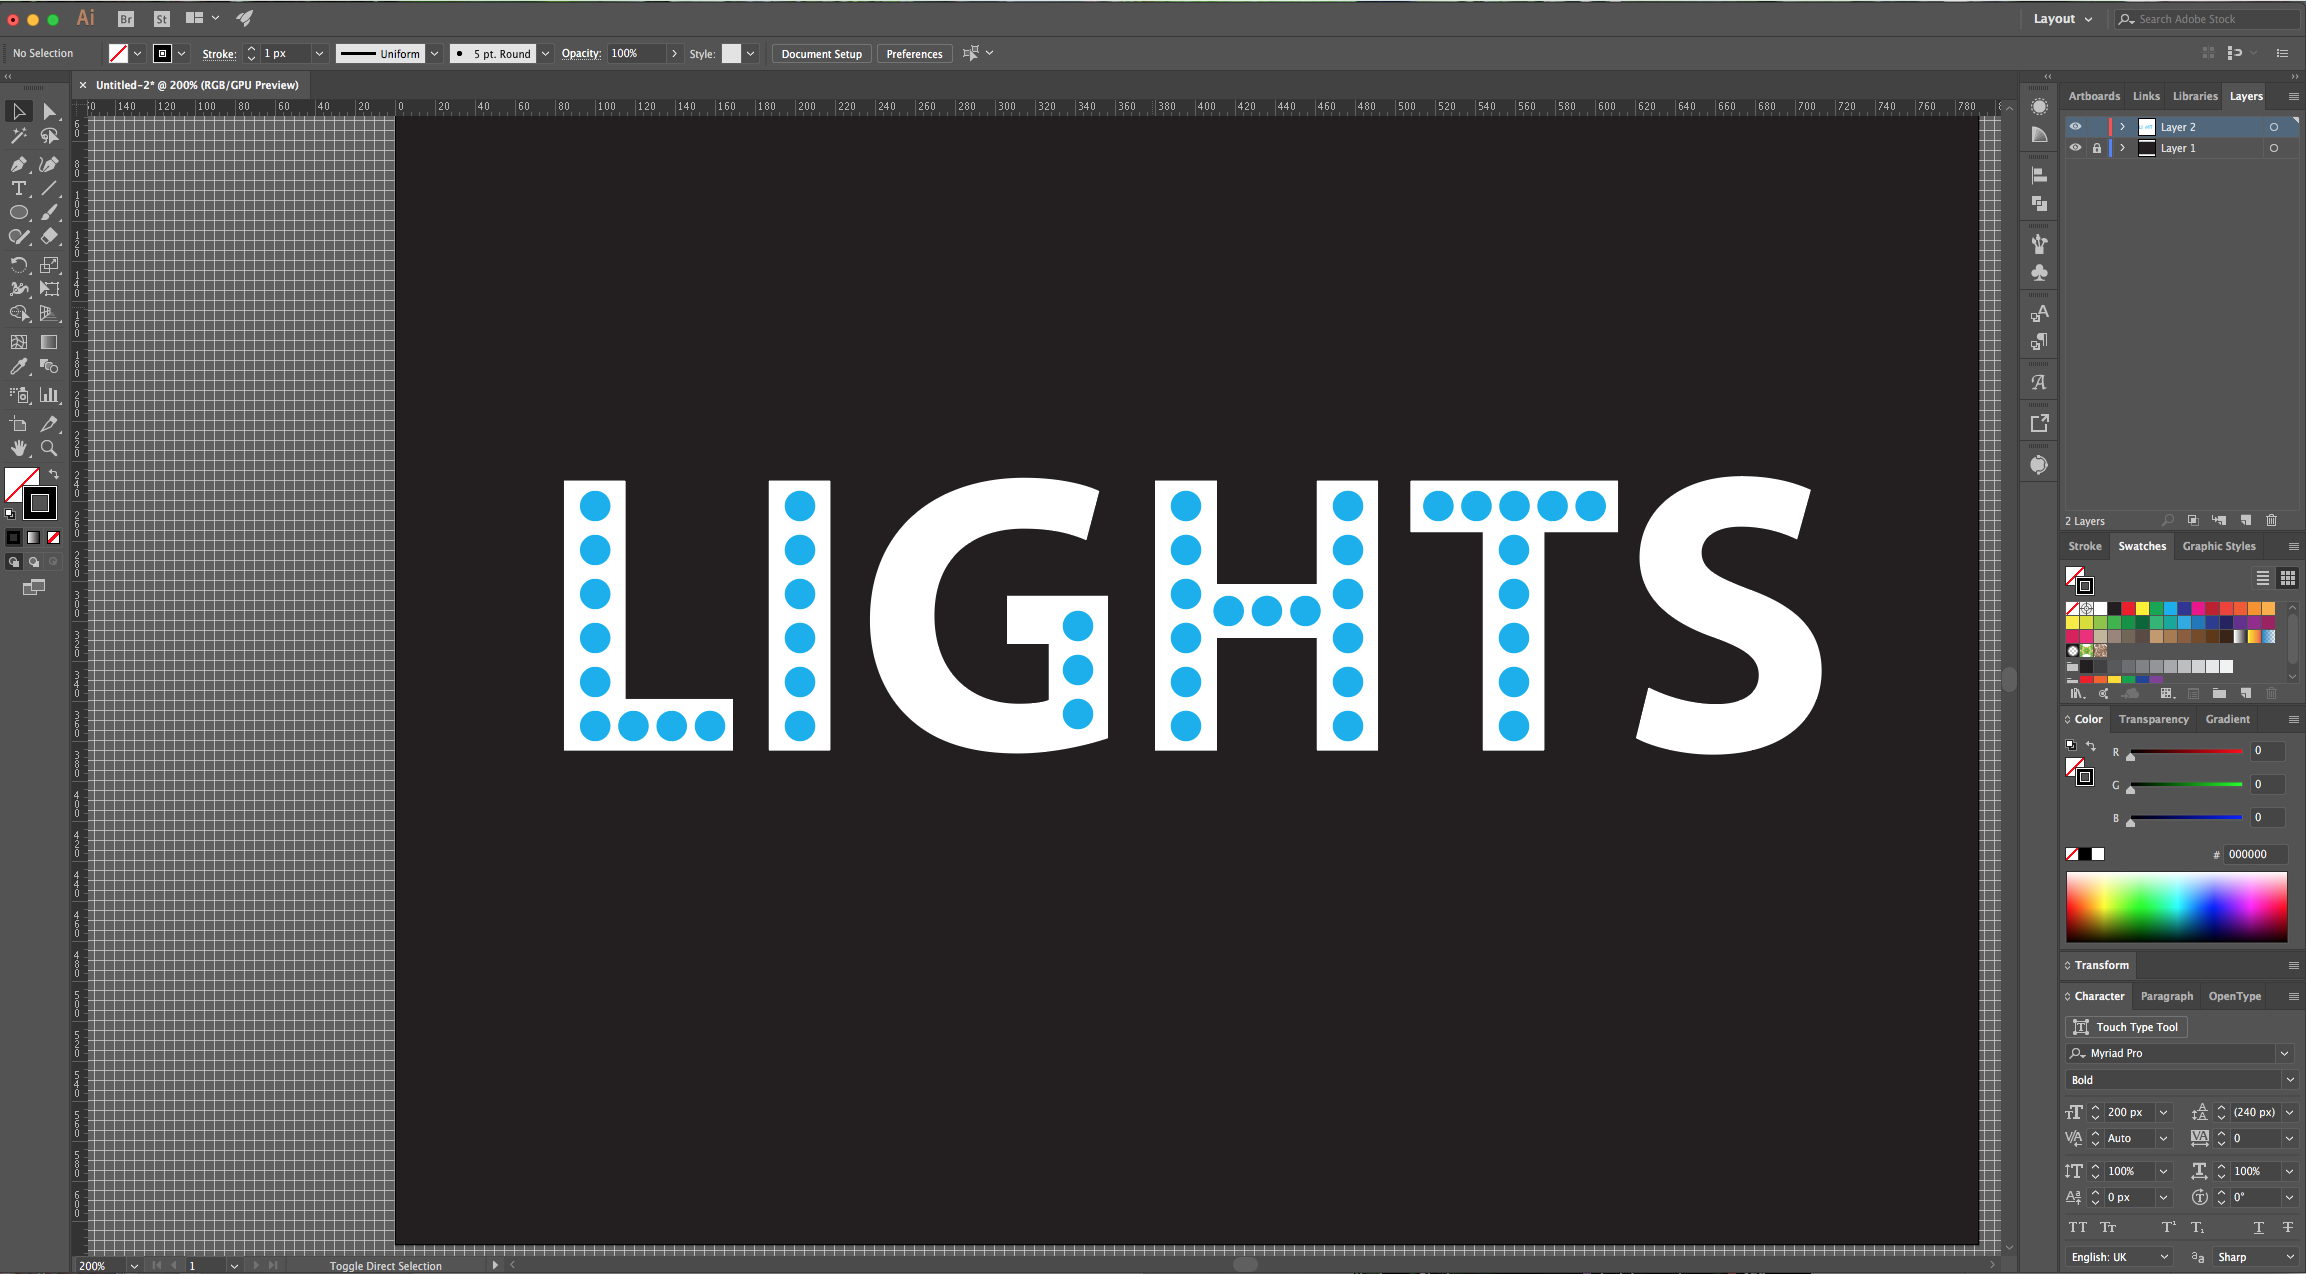
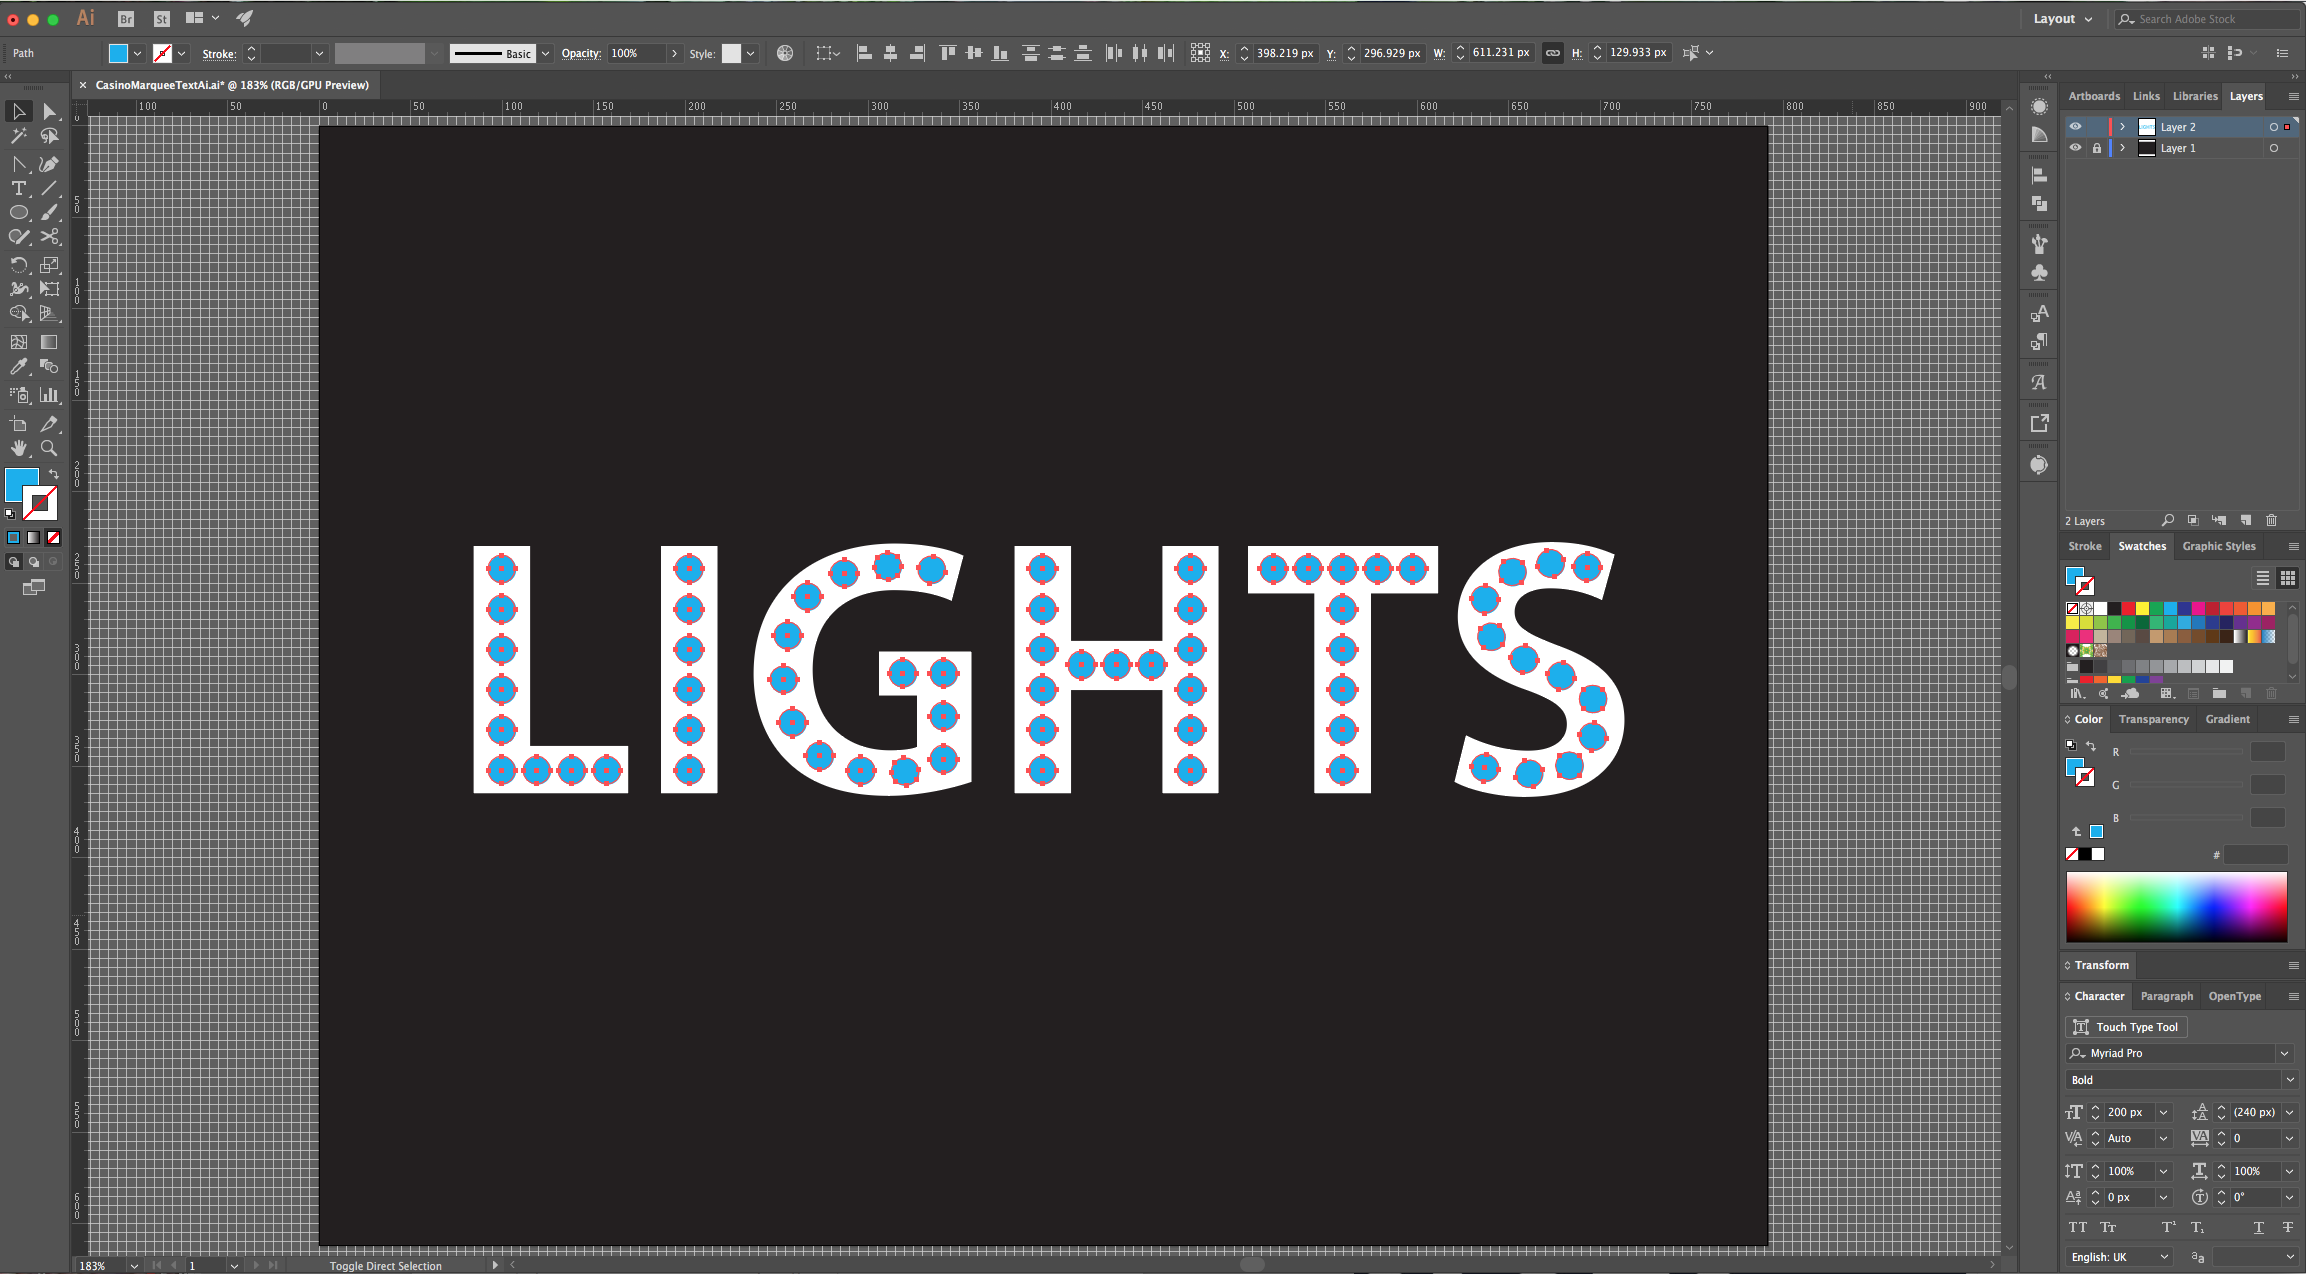
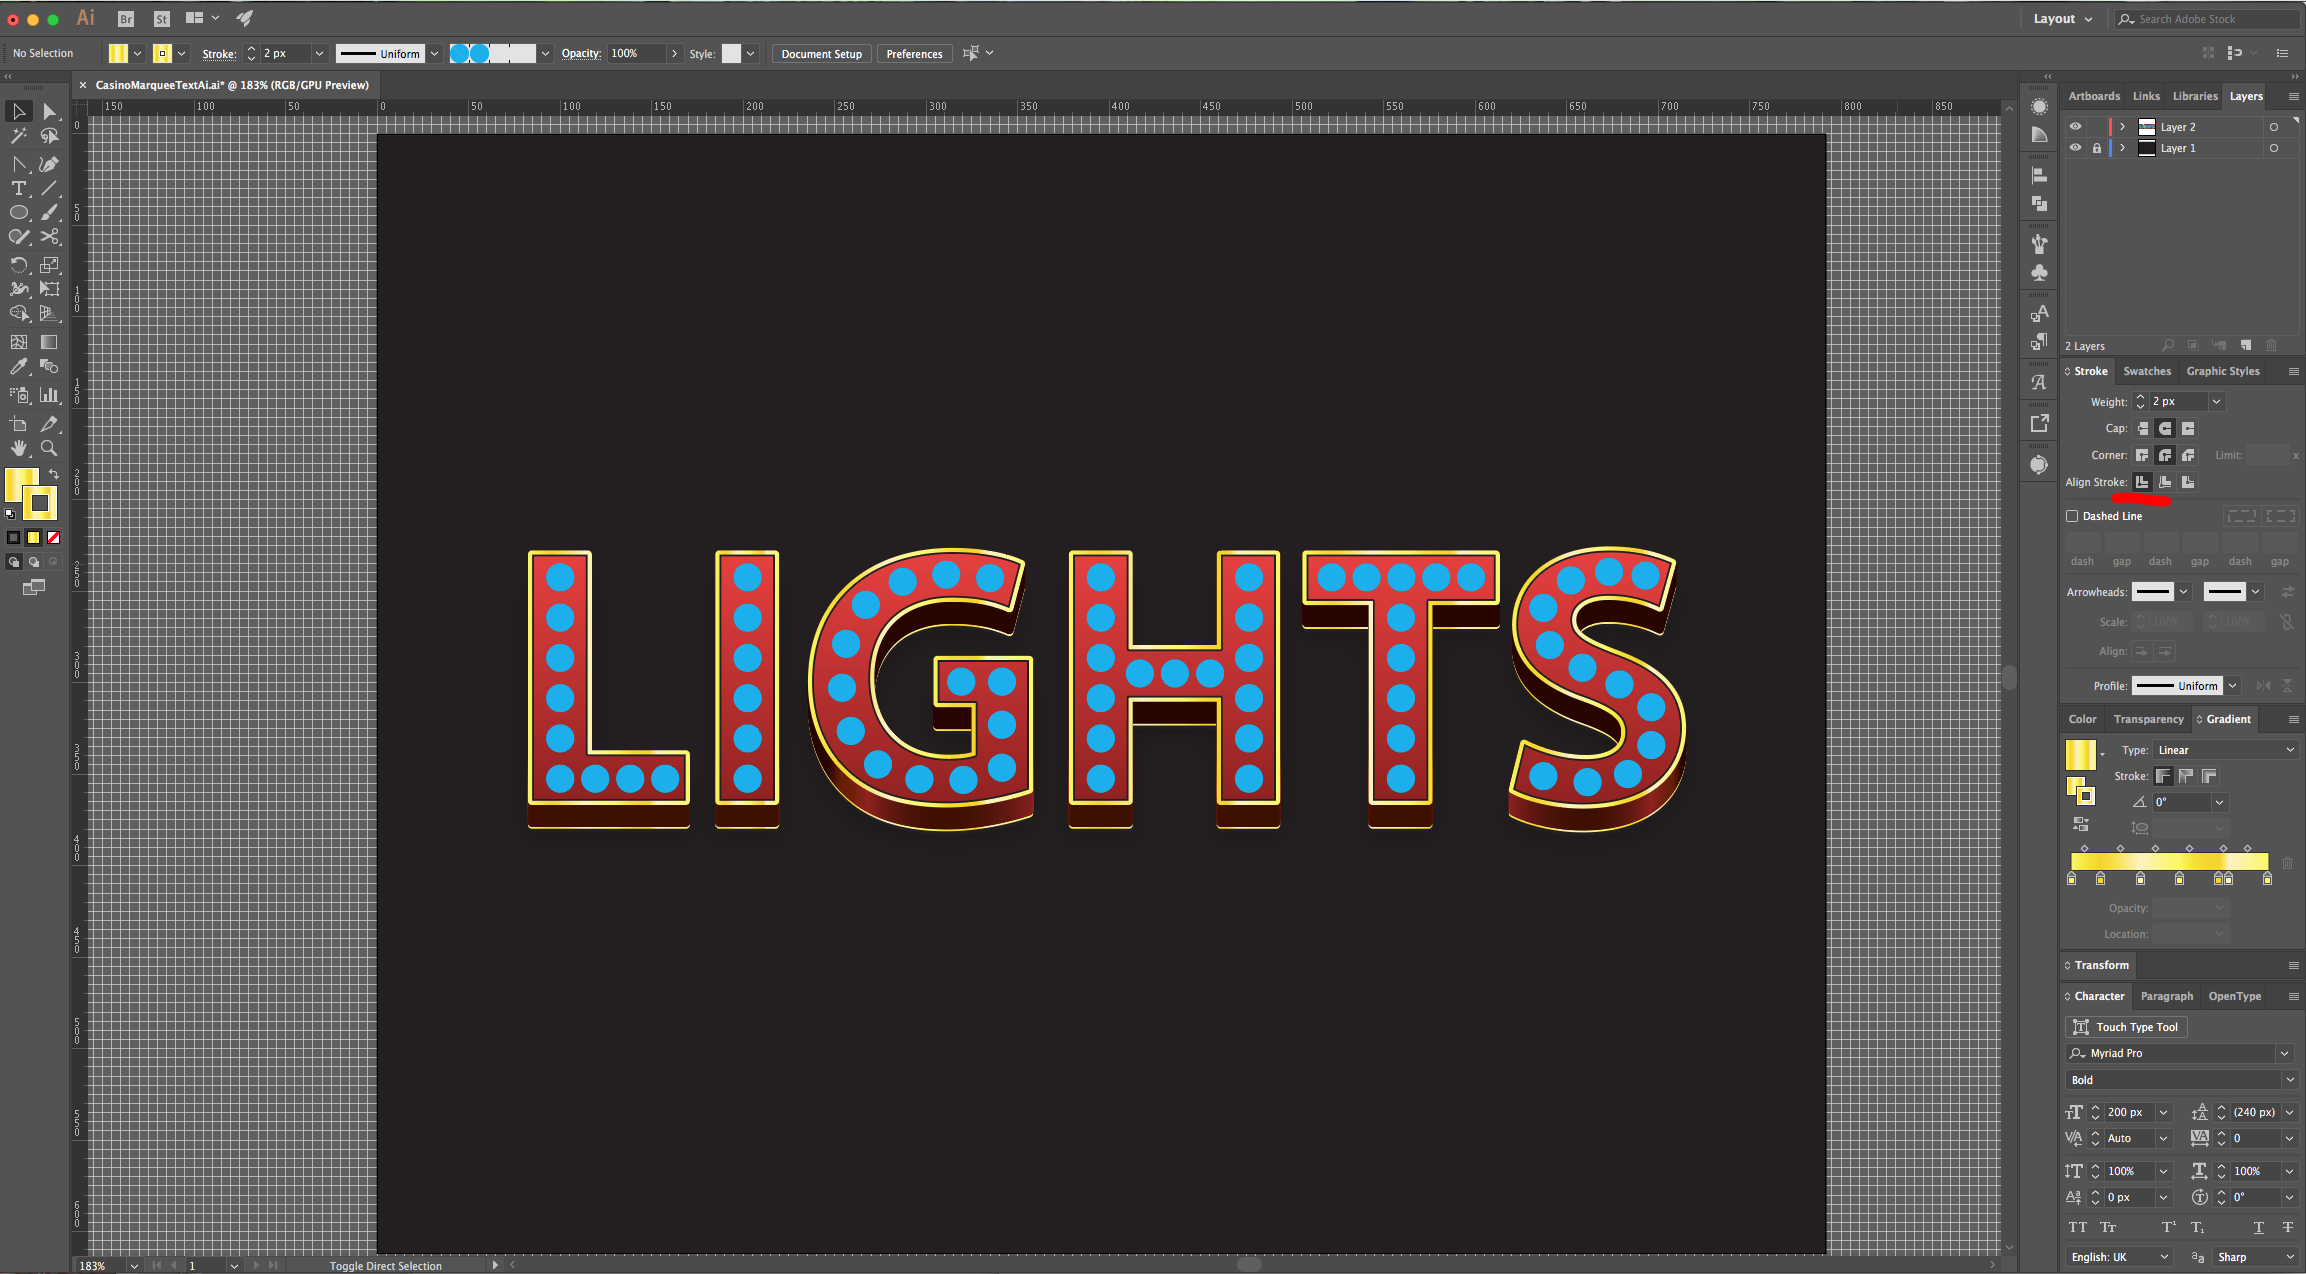
6 - Select the “Type Tool” (T), choose your font (we used “”) and type your text. Fill it with White.
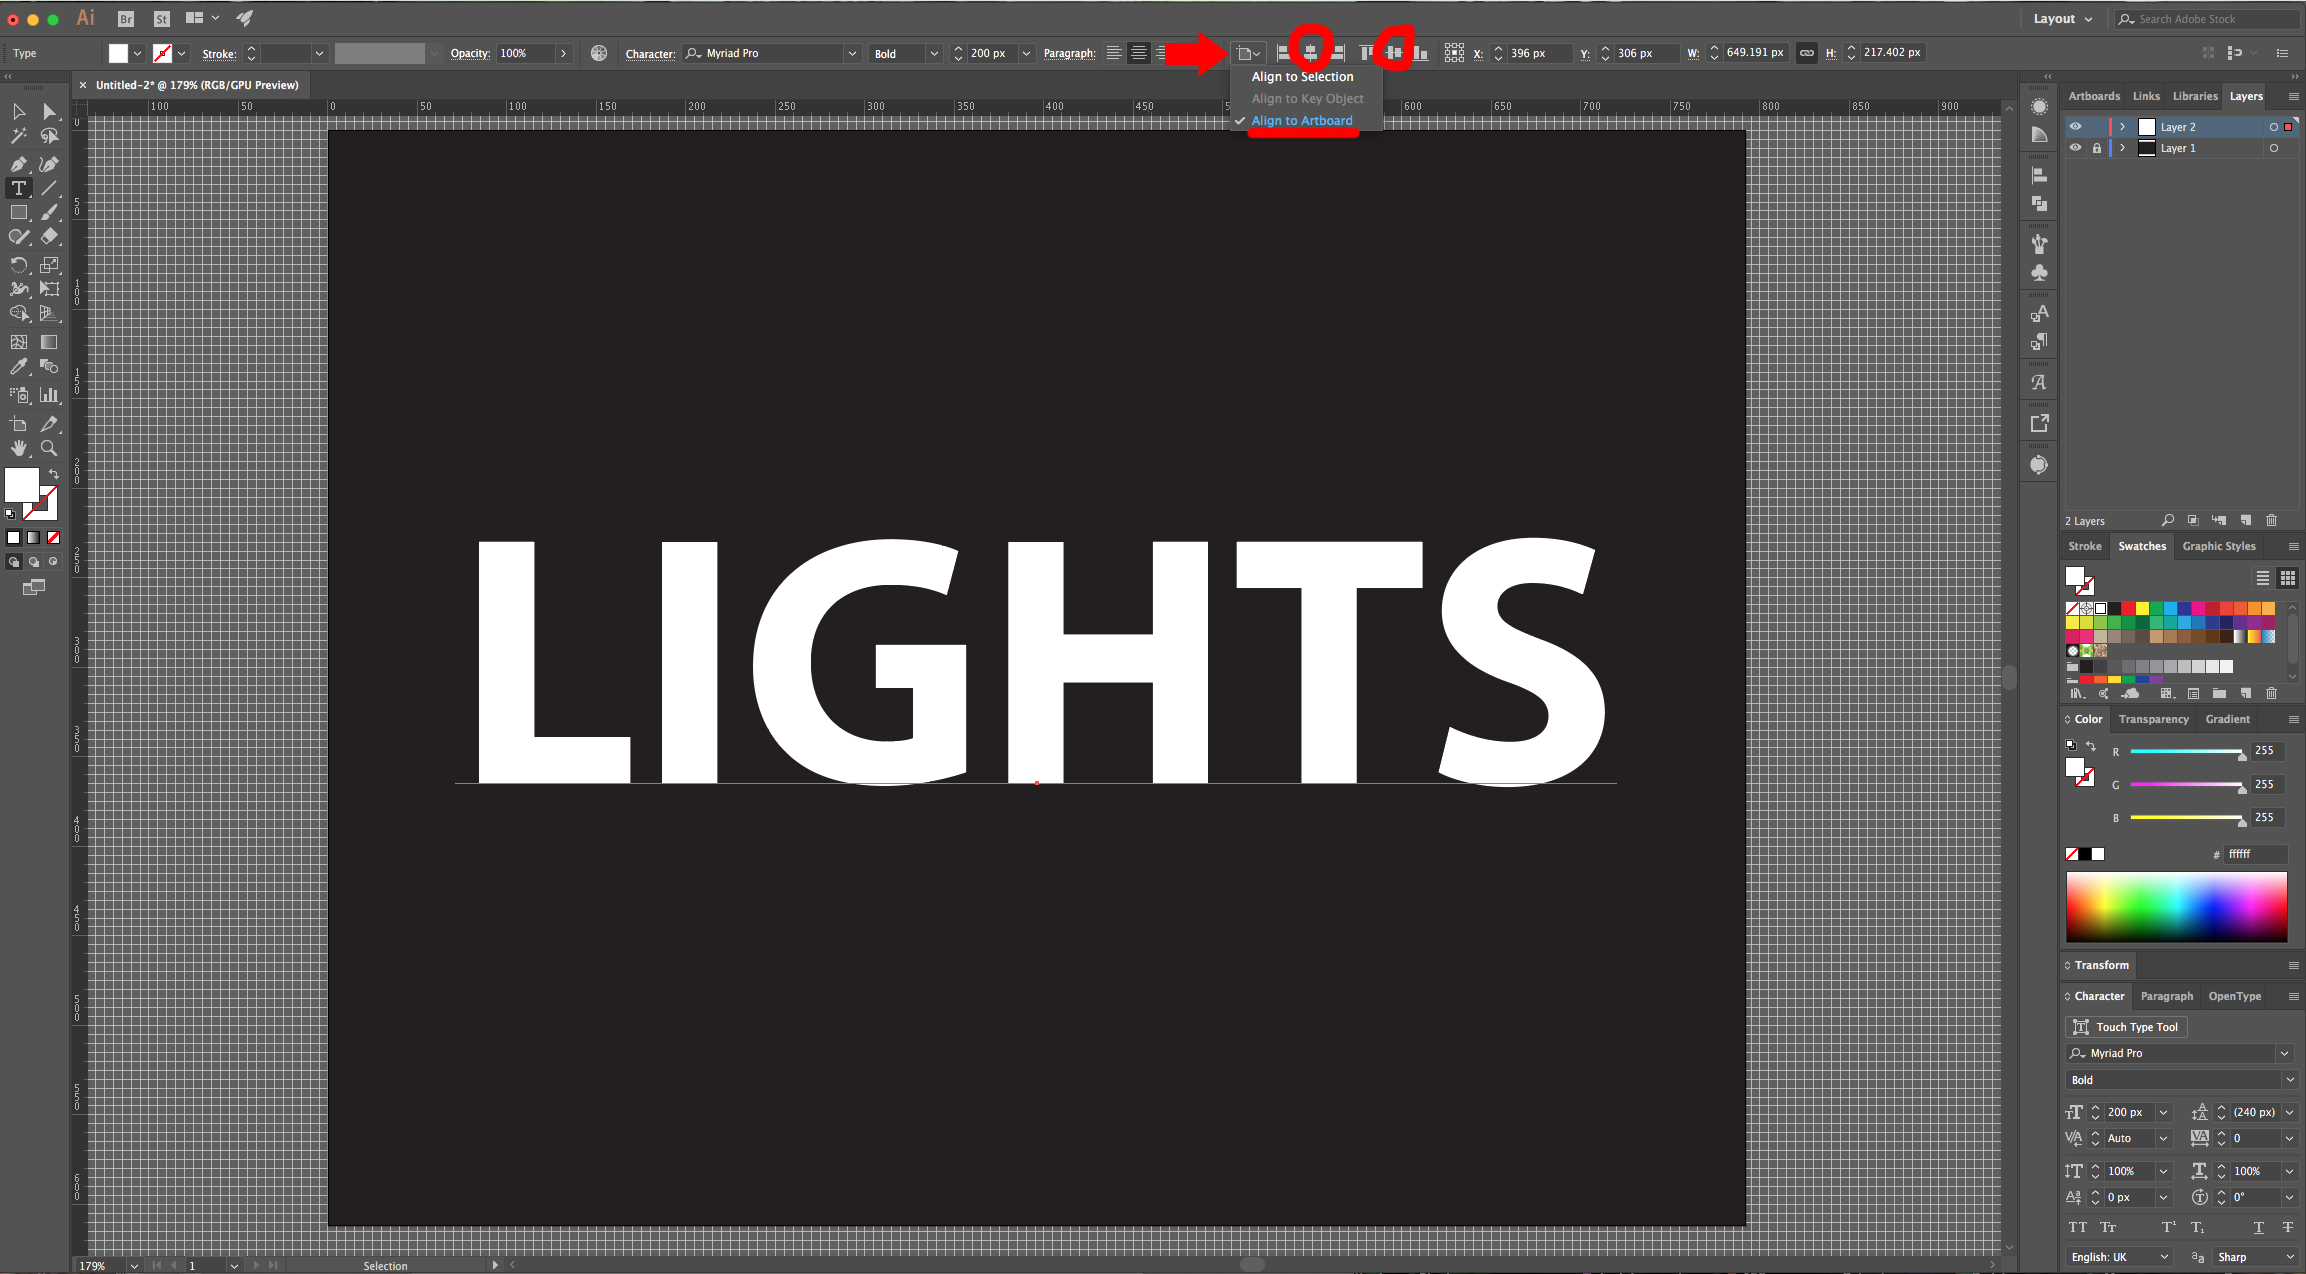
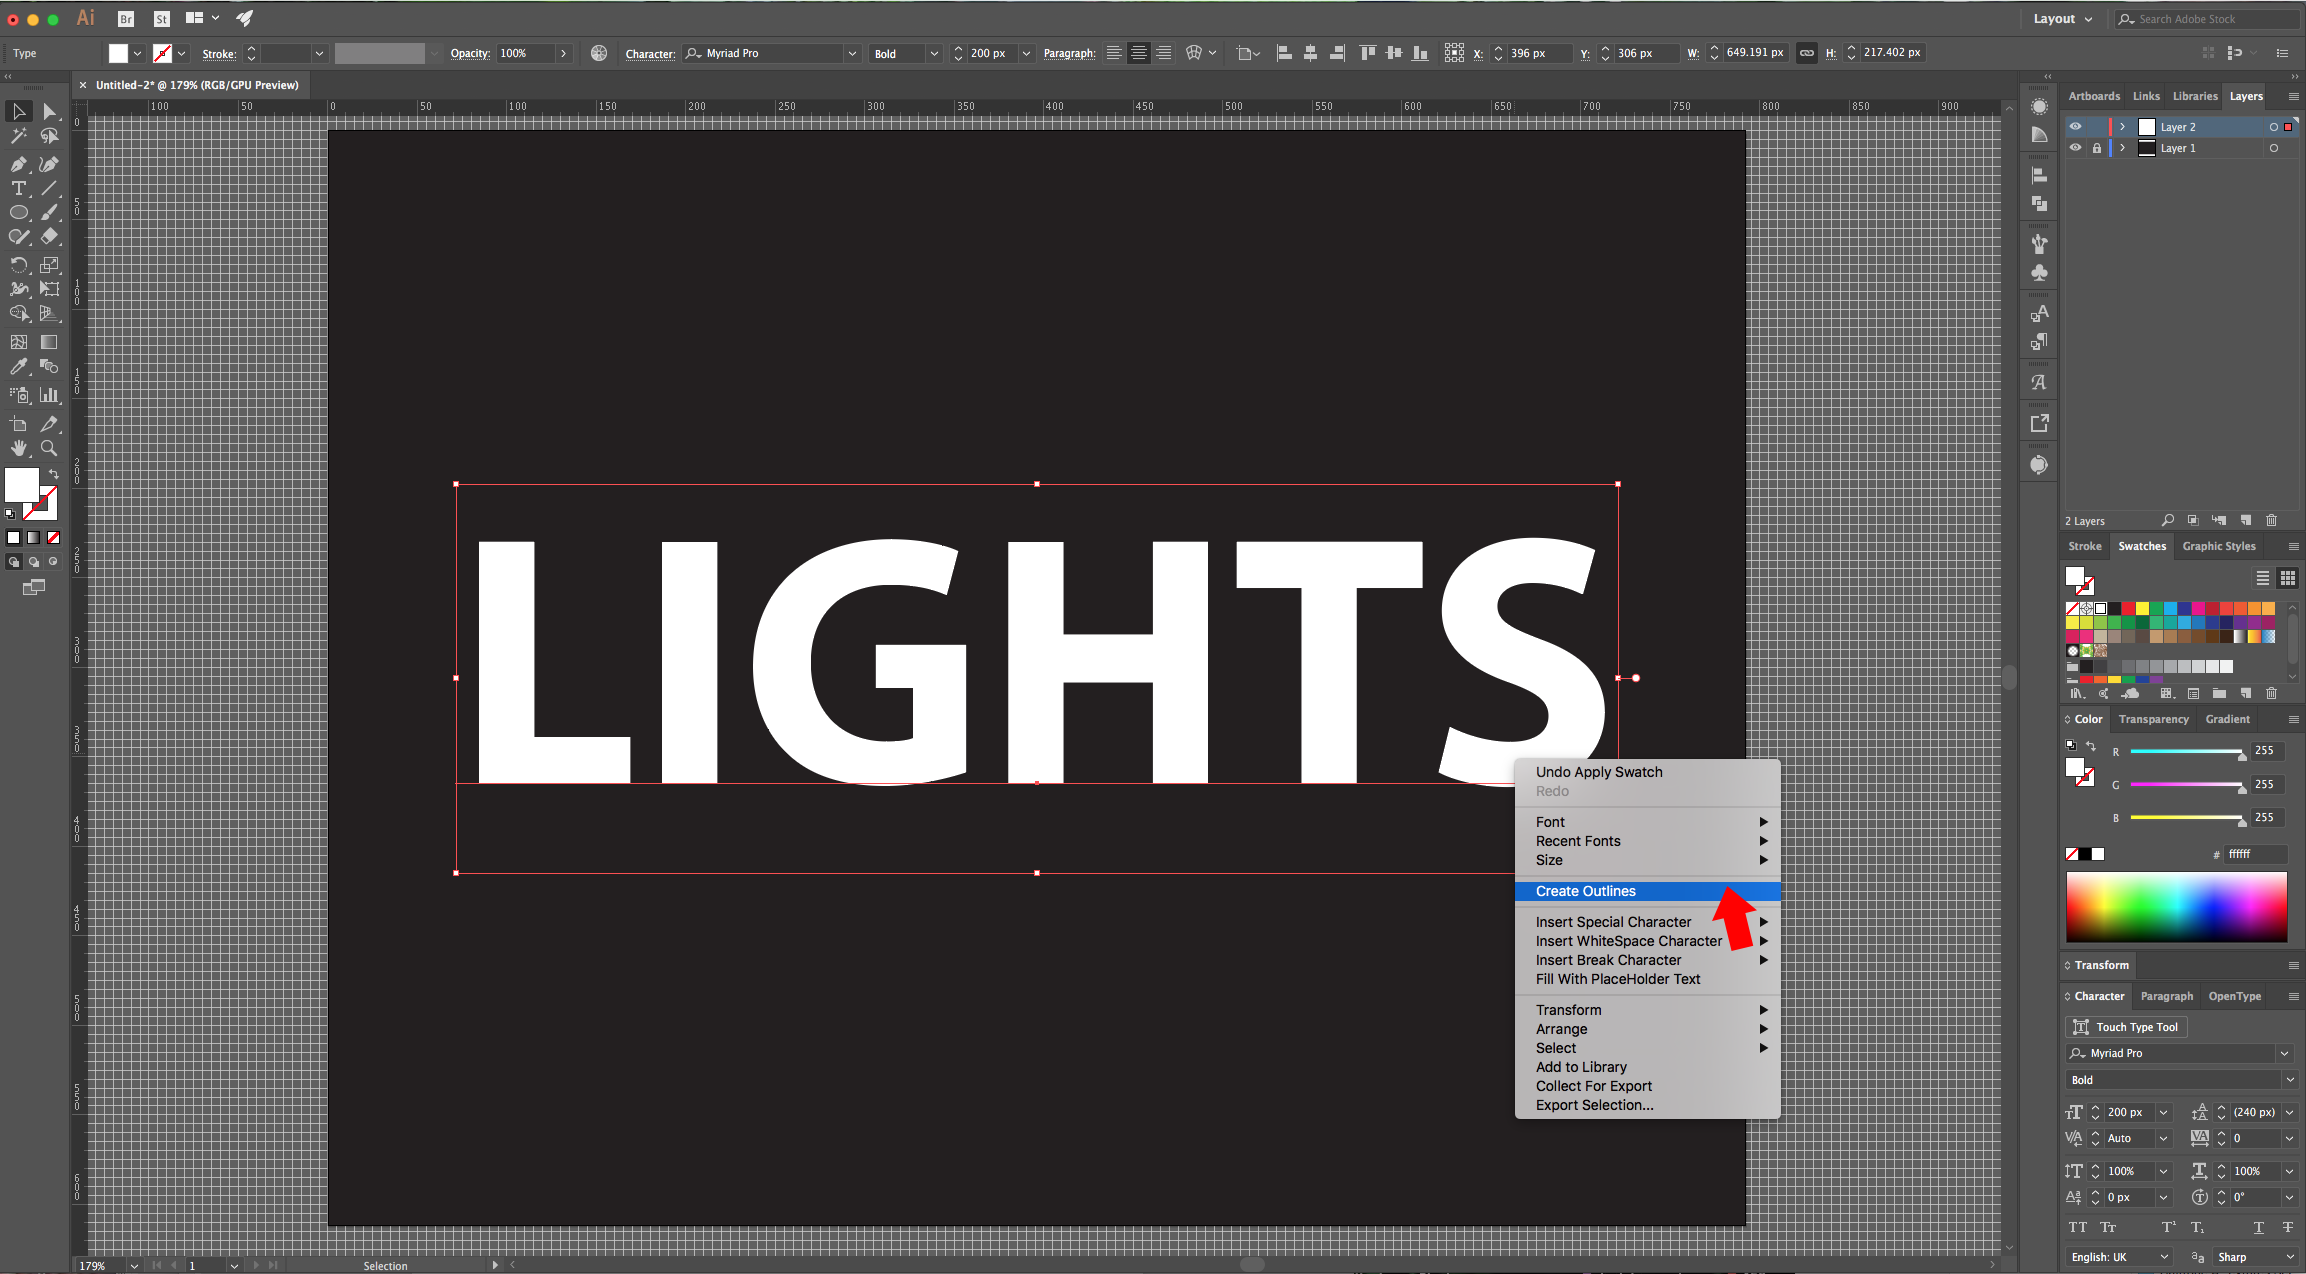
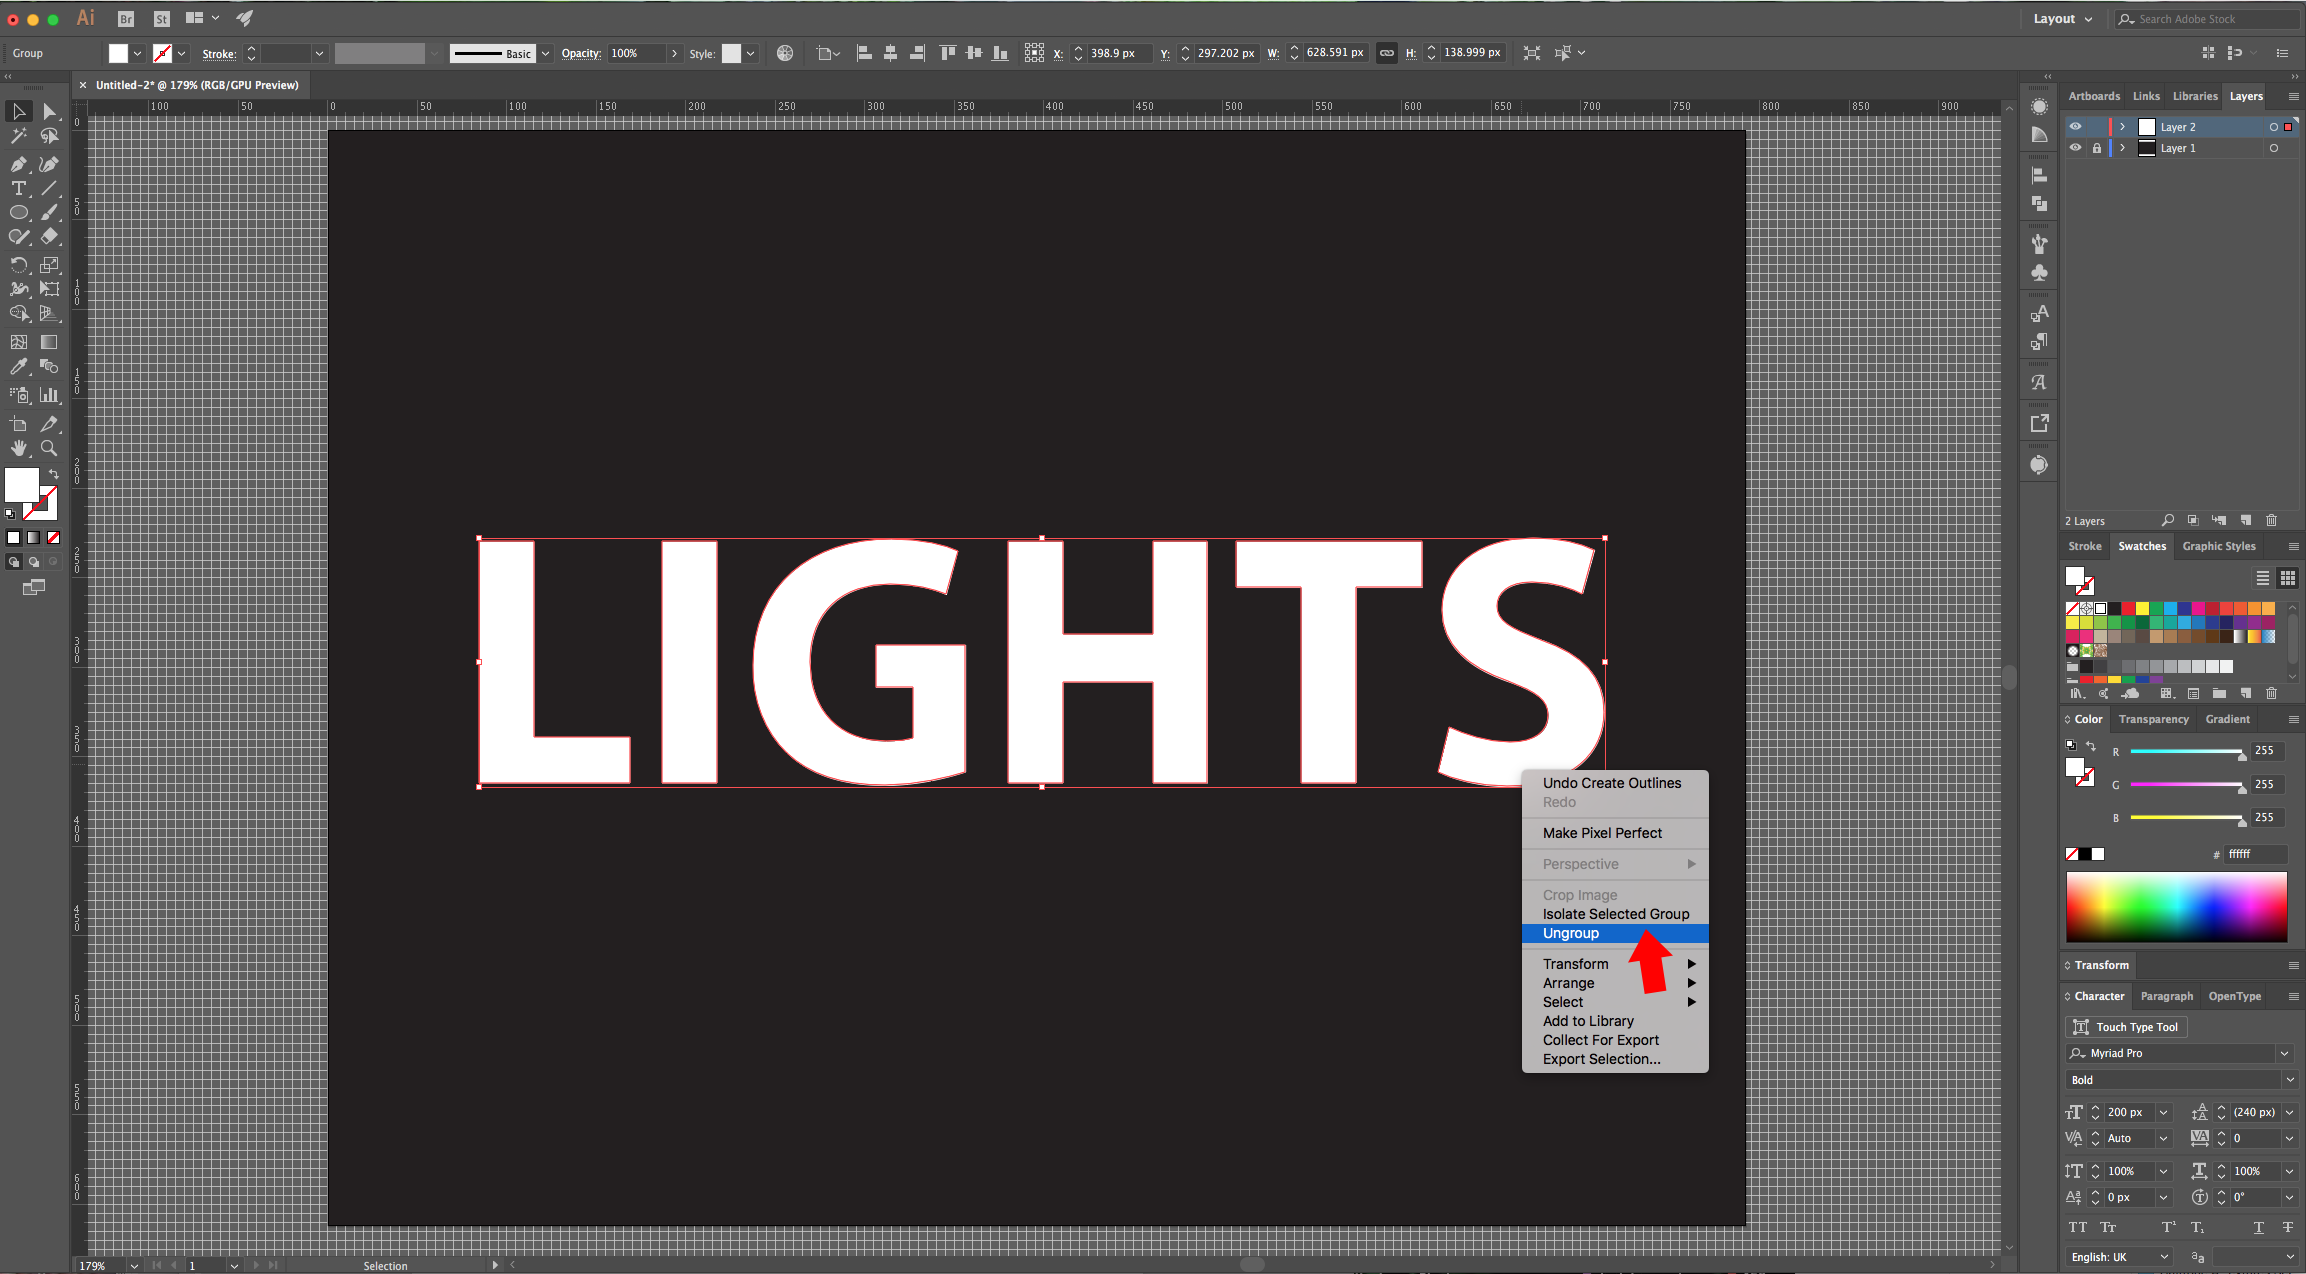
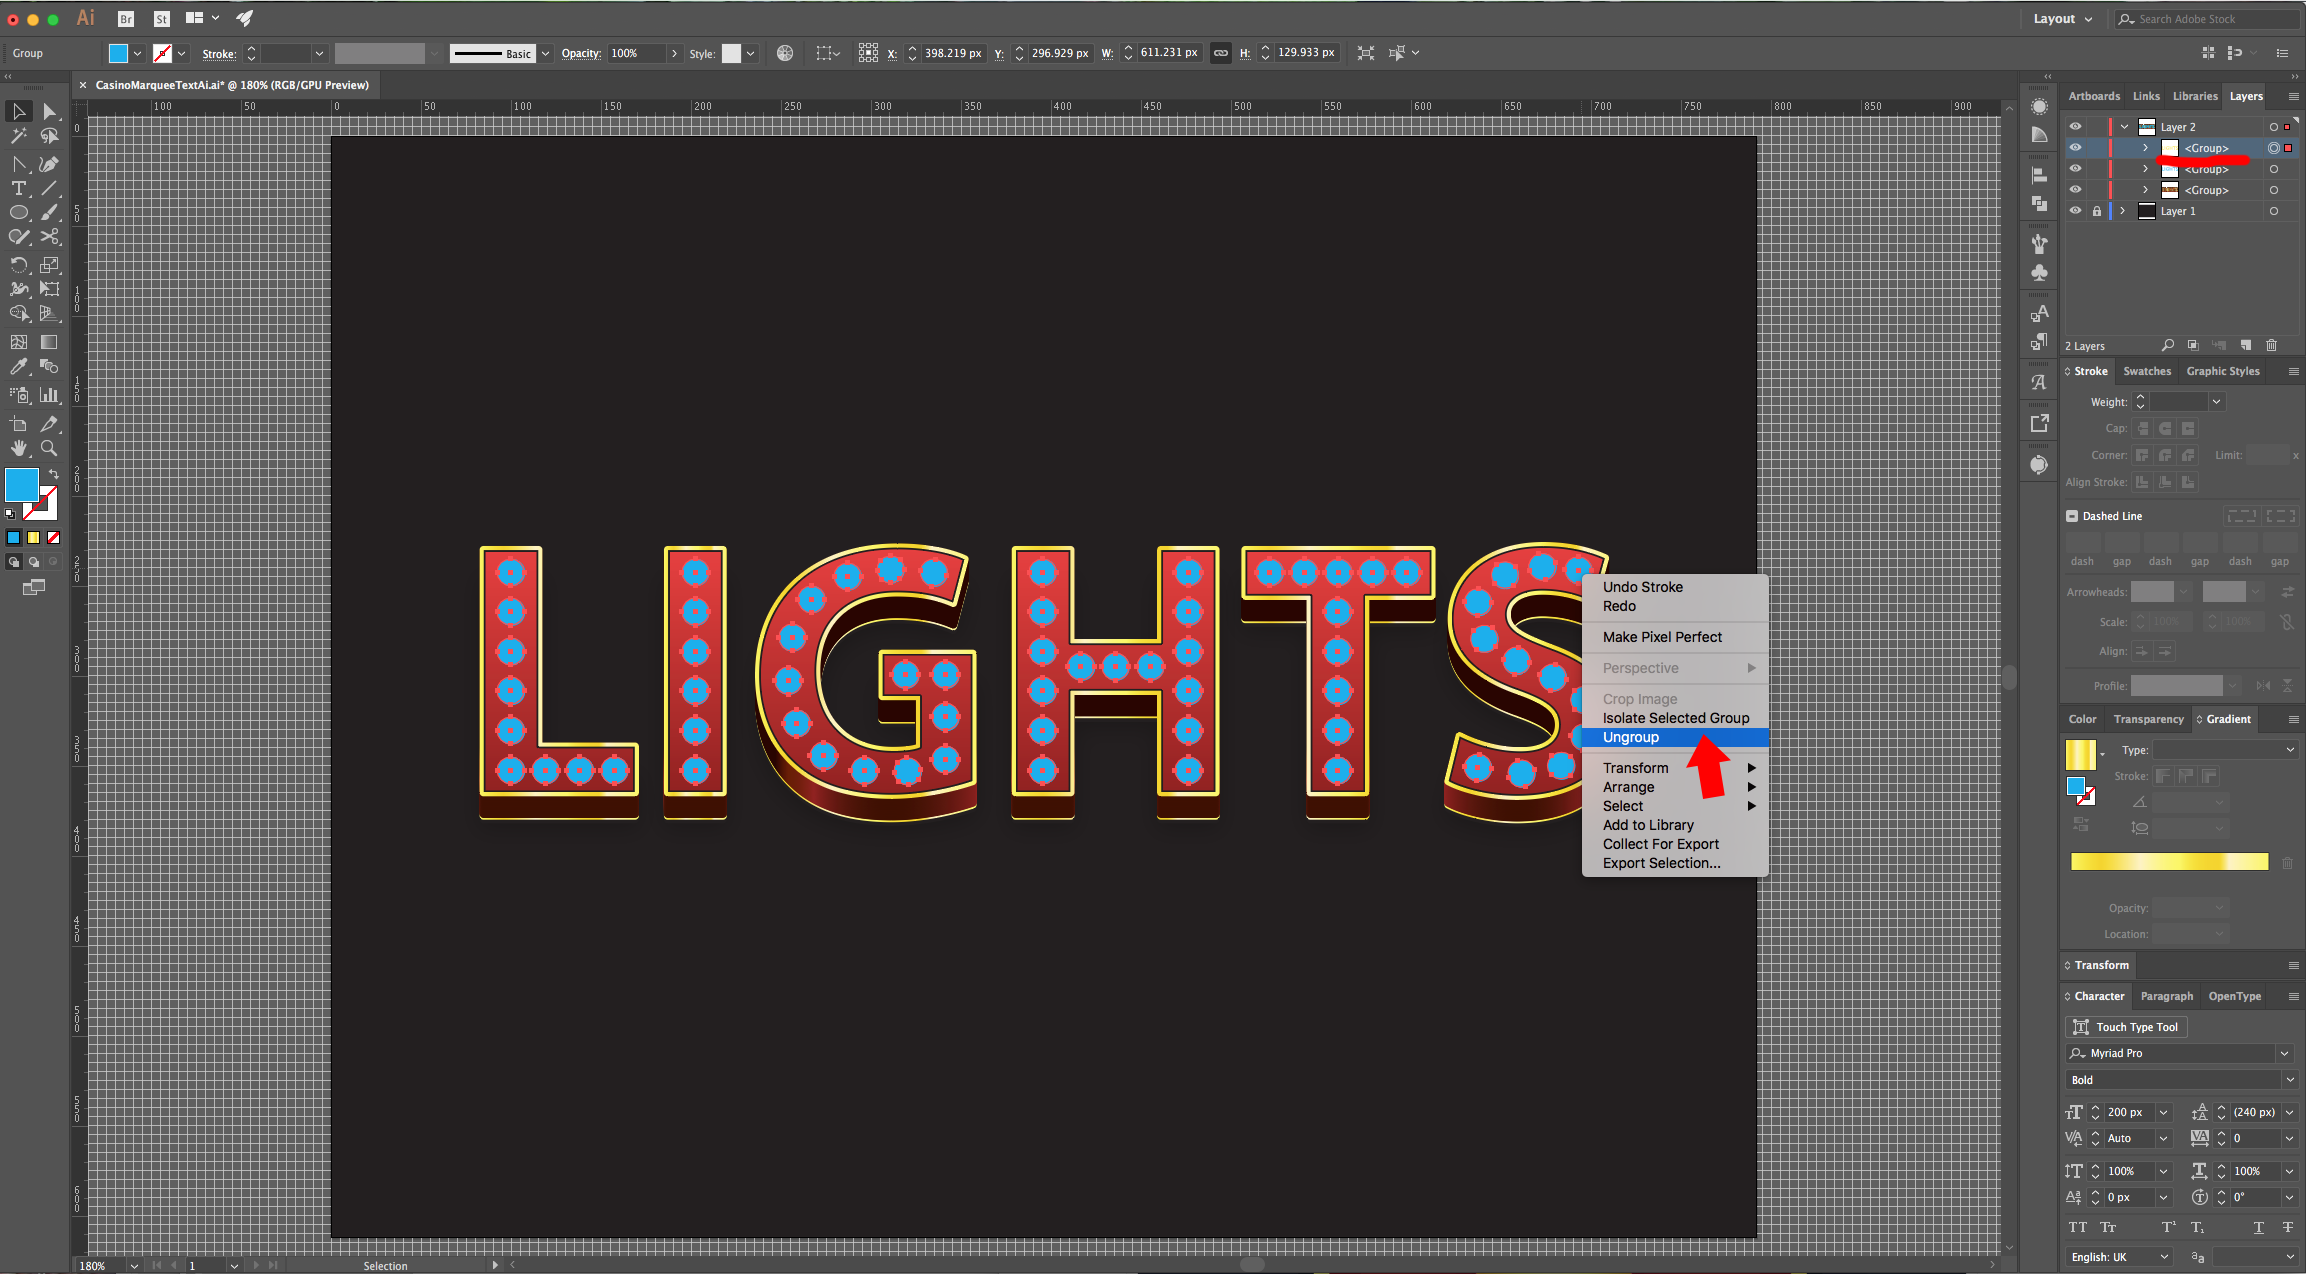
7 - To center your text, go to the “Pathfinder Panel”, use the “Horizontal and Vertical Align Center” options and make sure that “Align to Artboard” is selected to center your text. Right-click on top of it and choose “Create Outlines”. Right-click again and choose “Ungroup”.
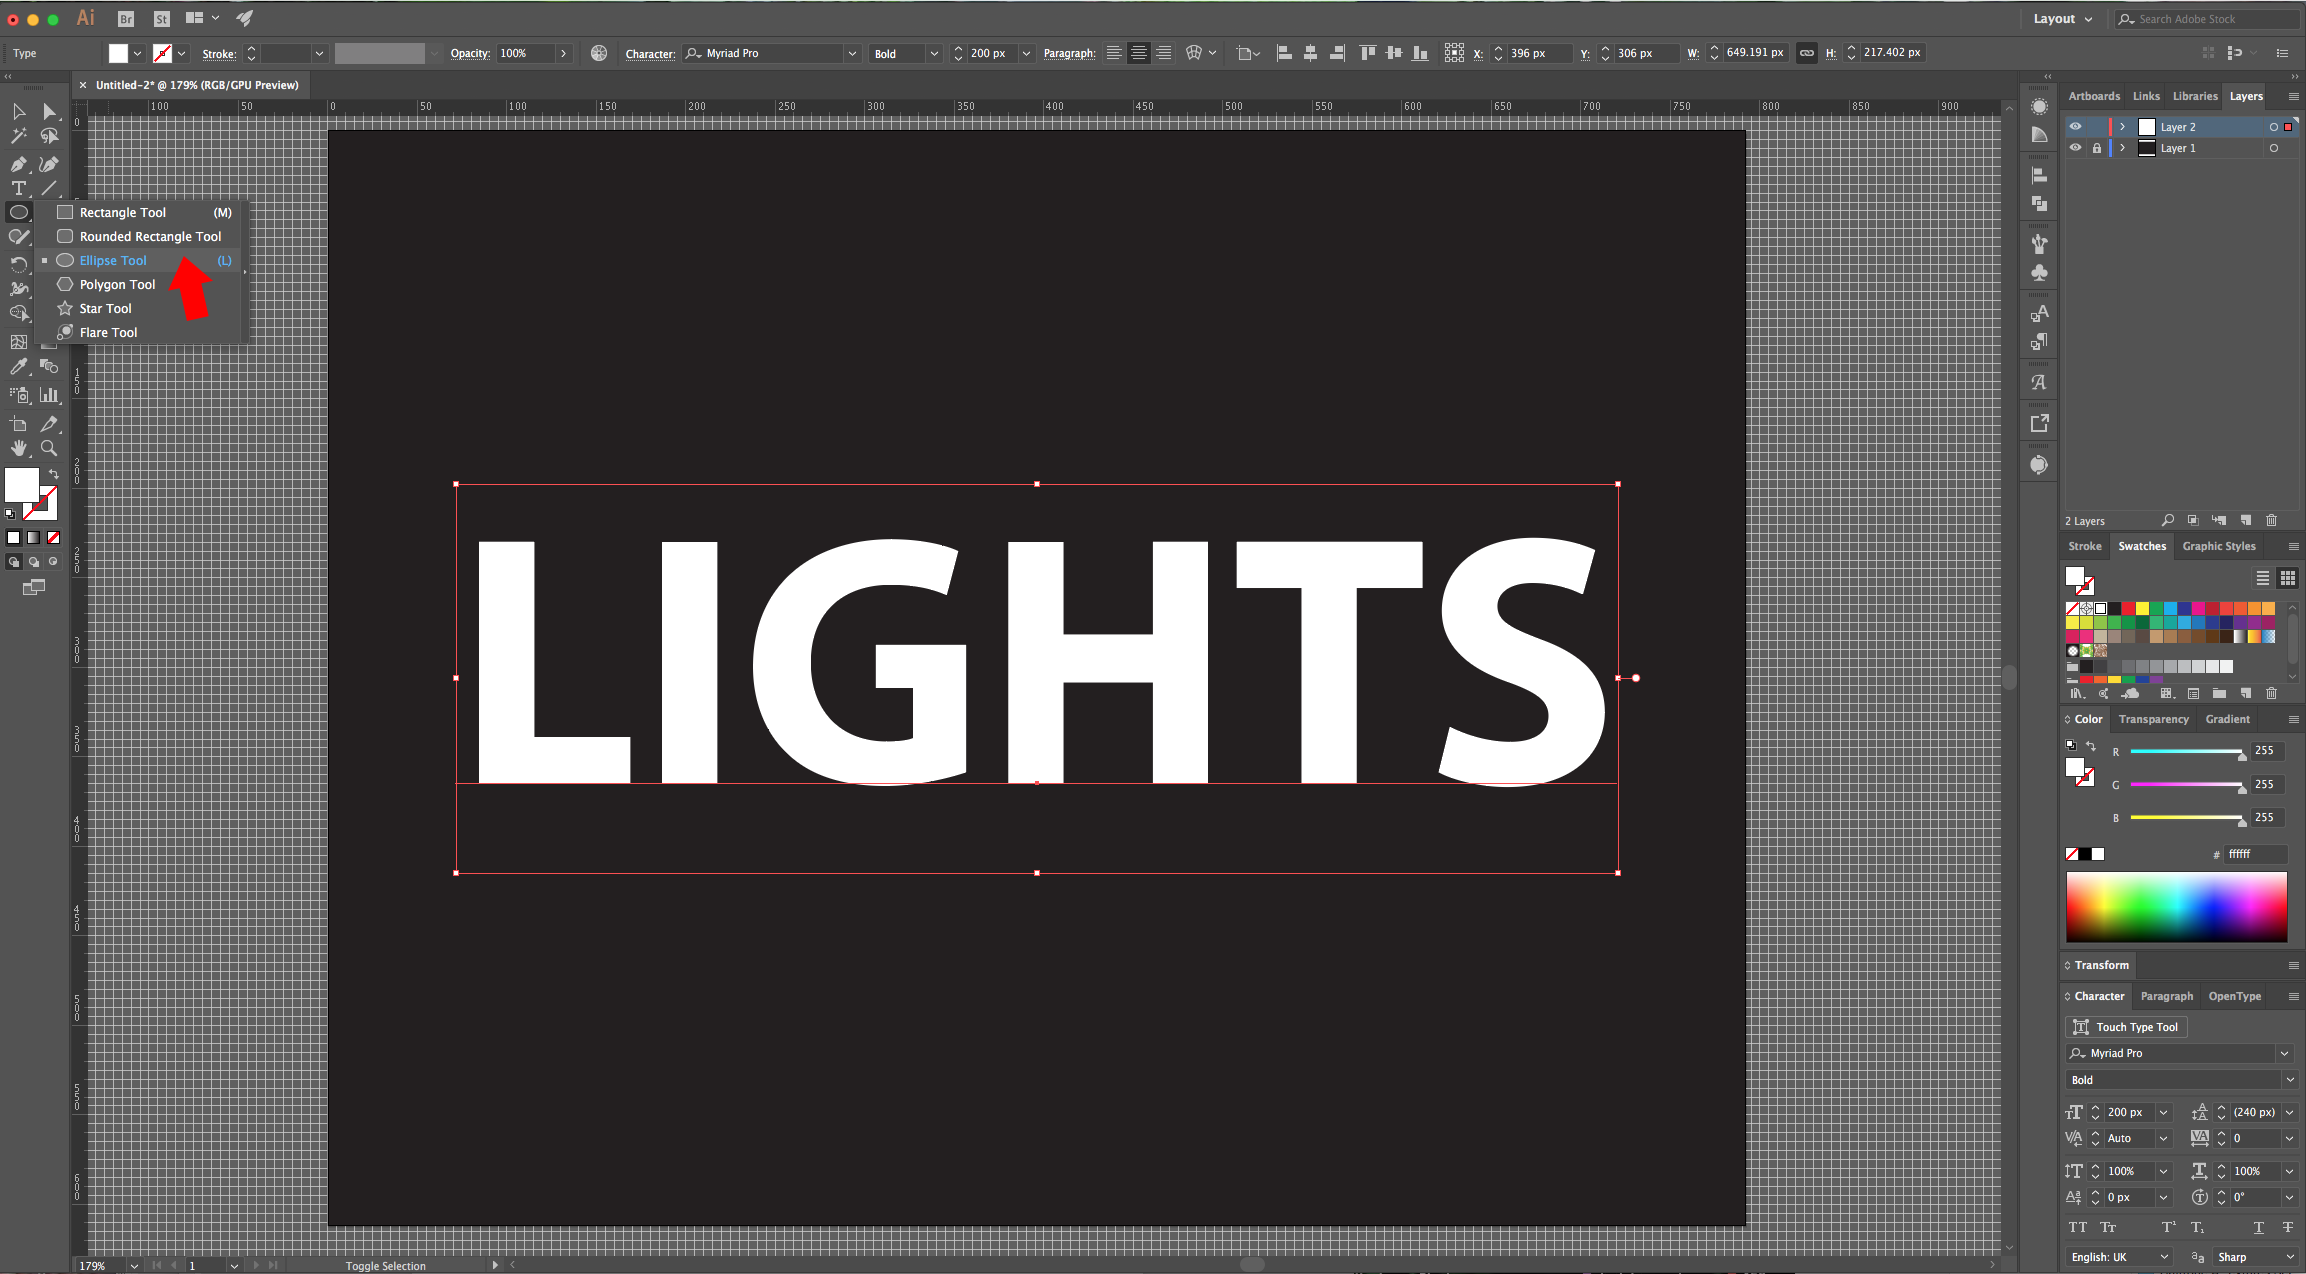
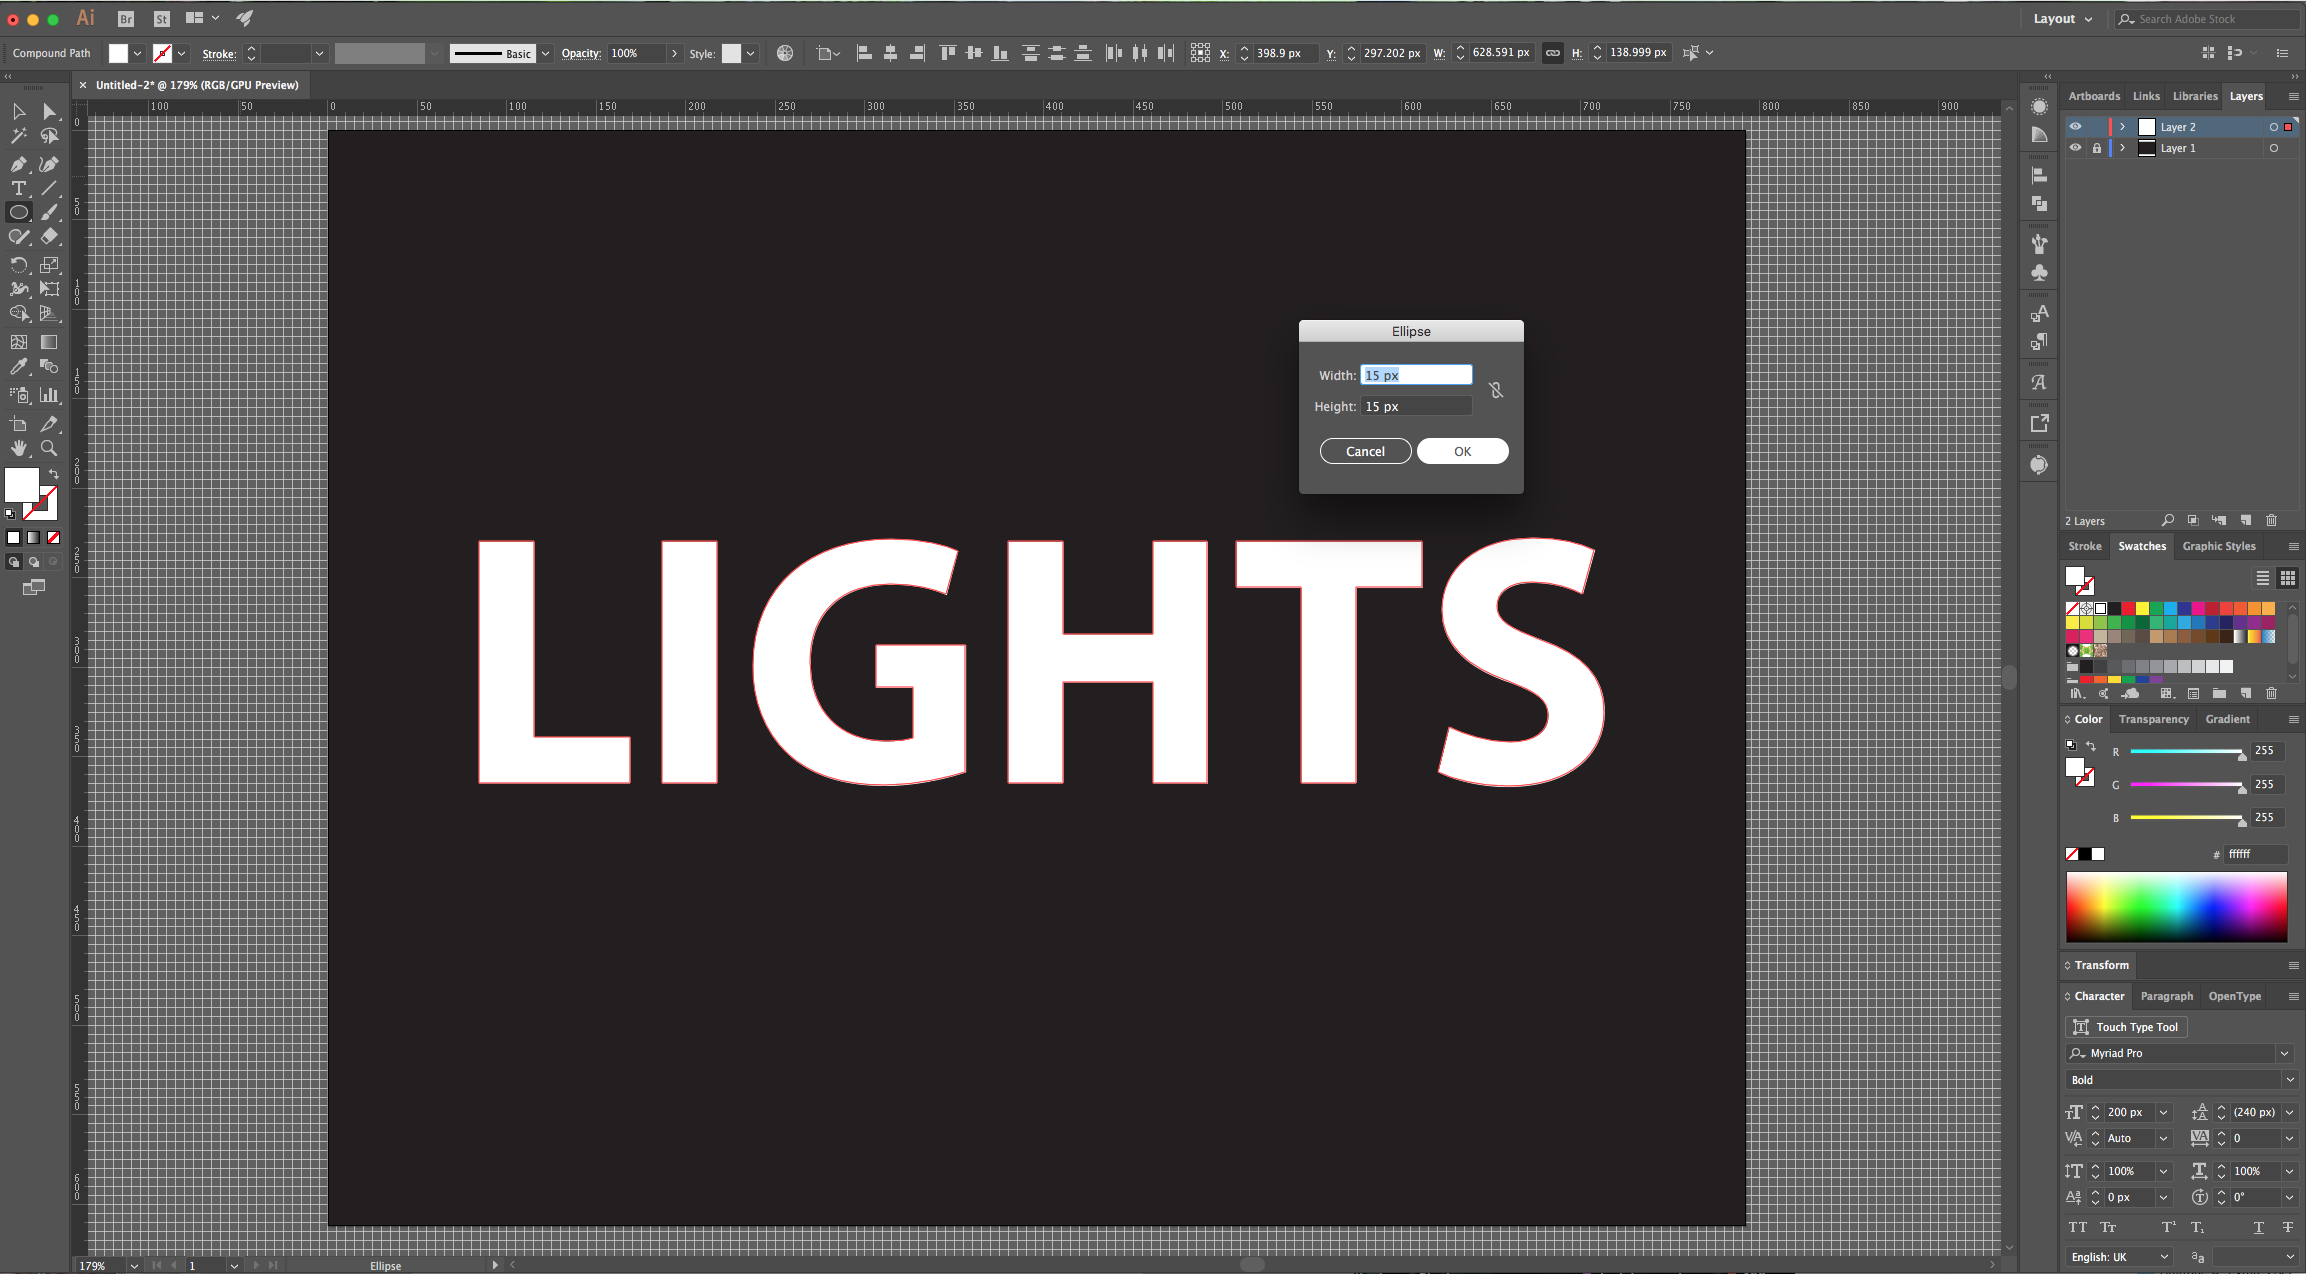
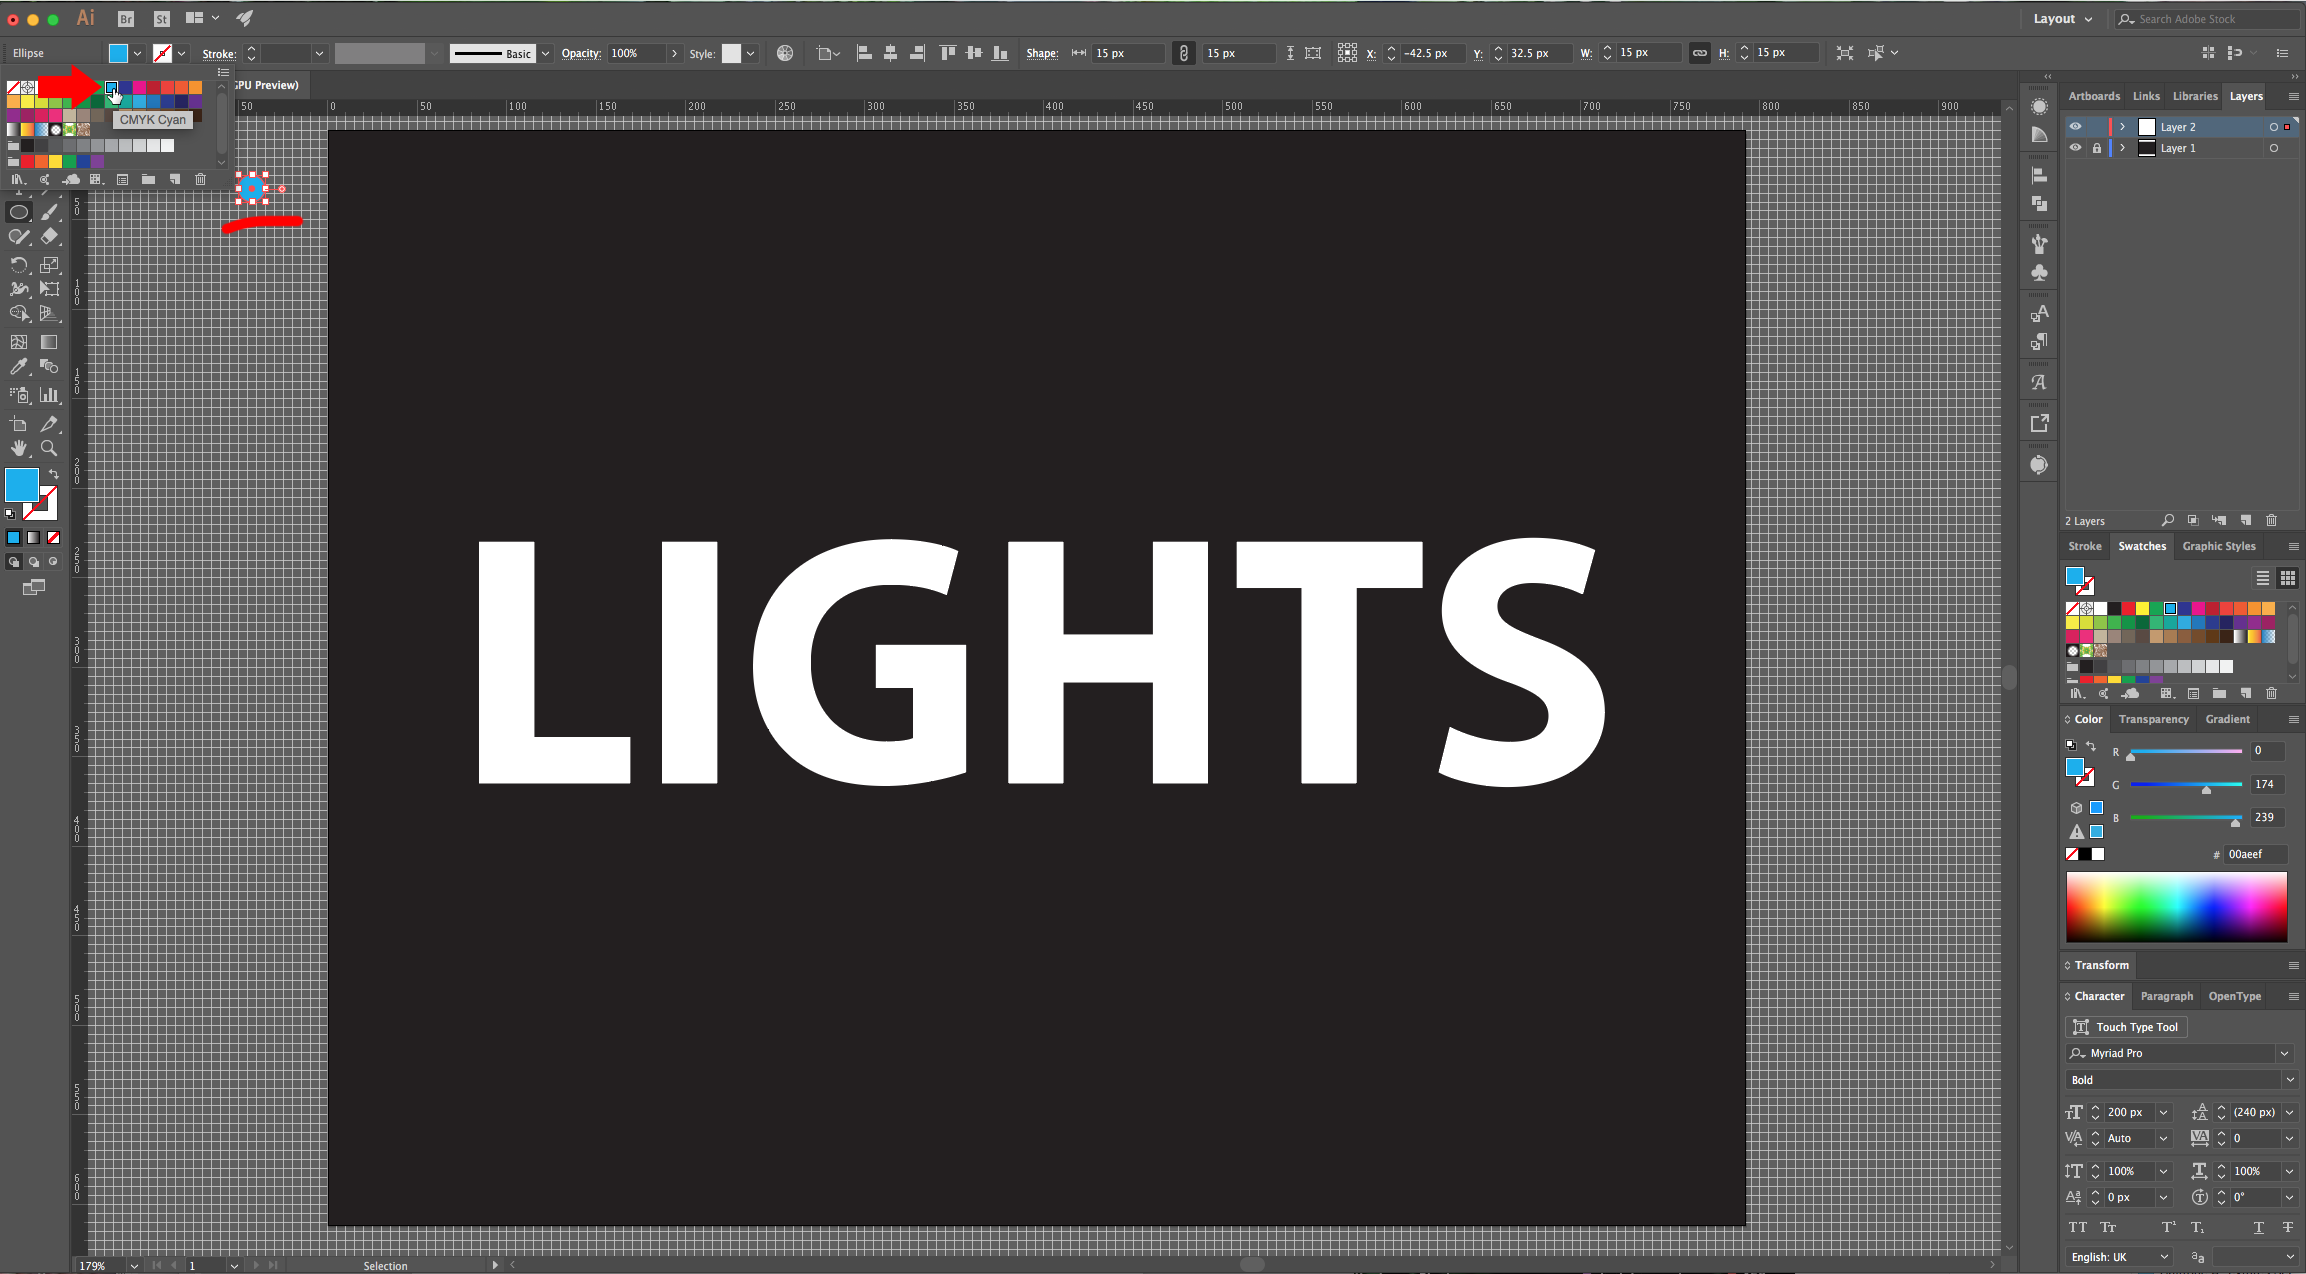
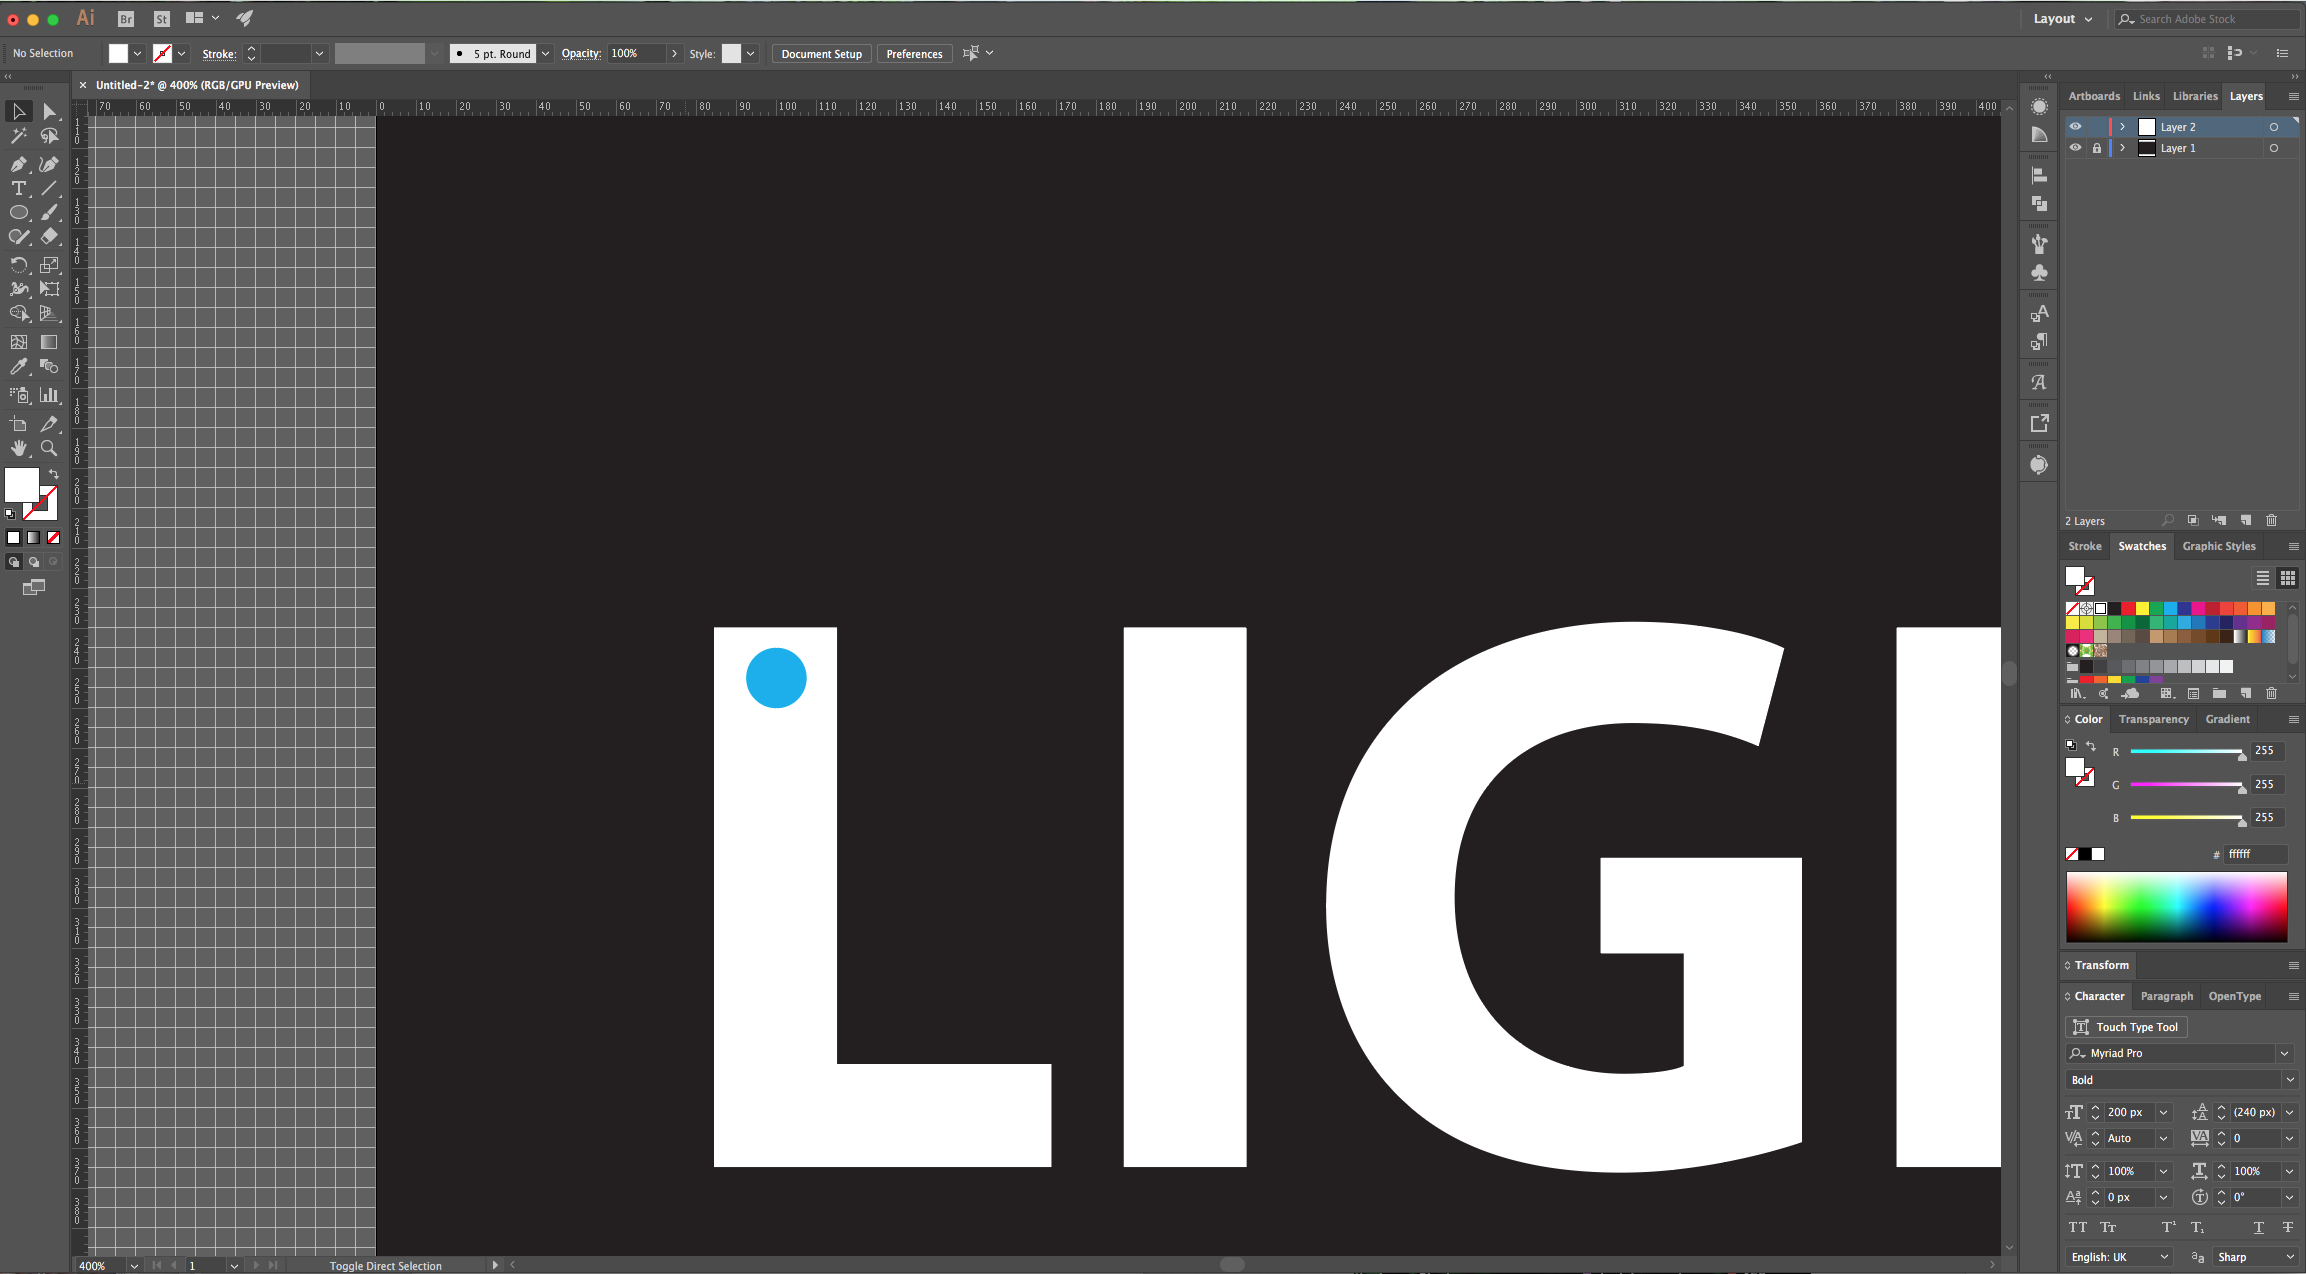
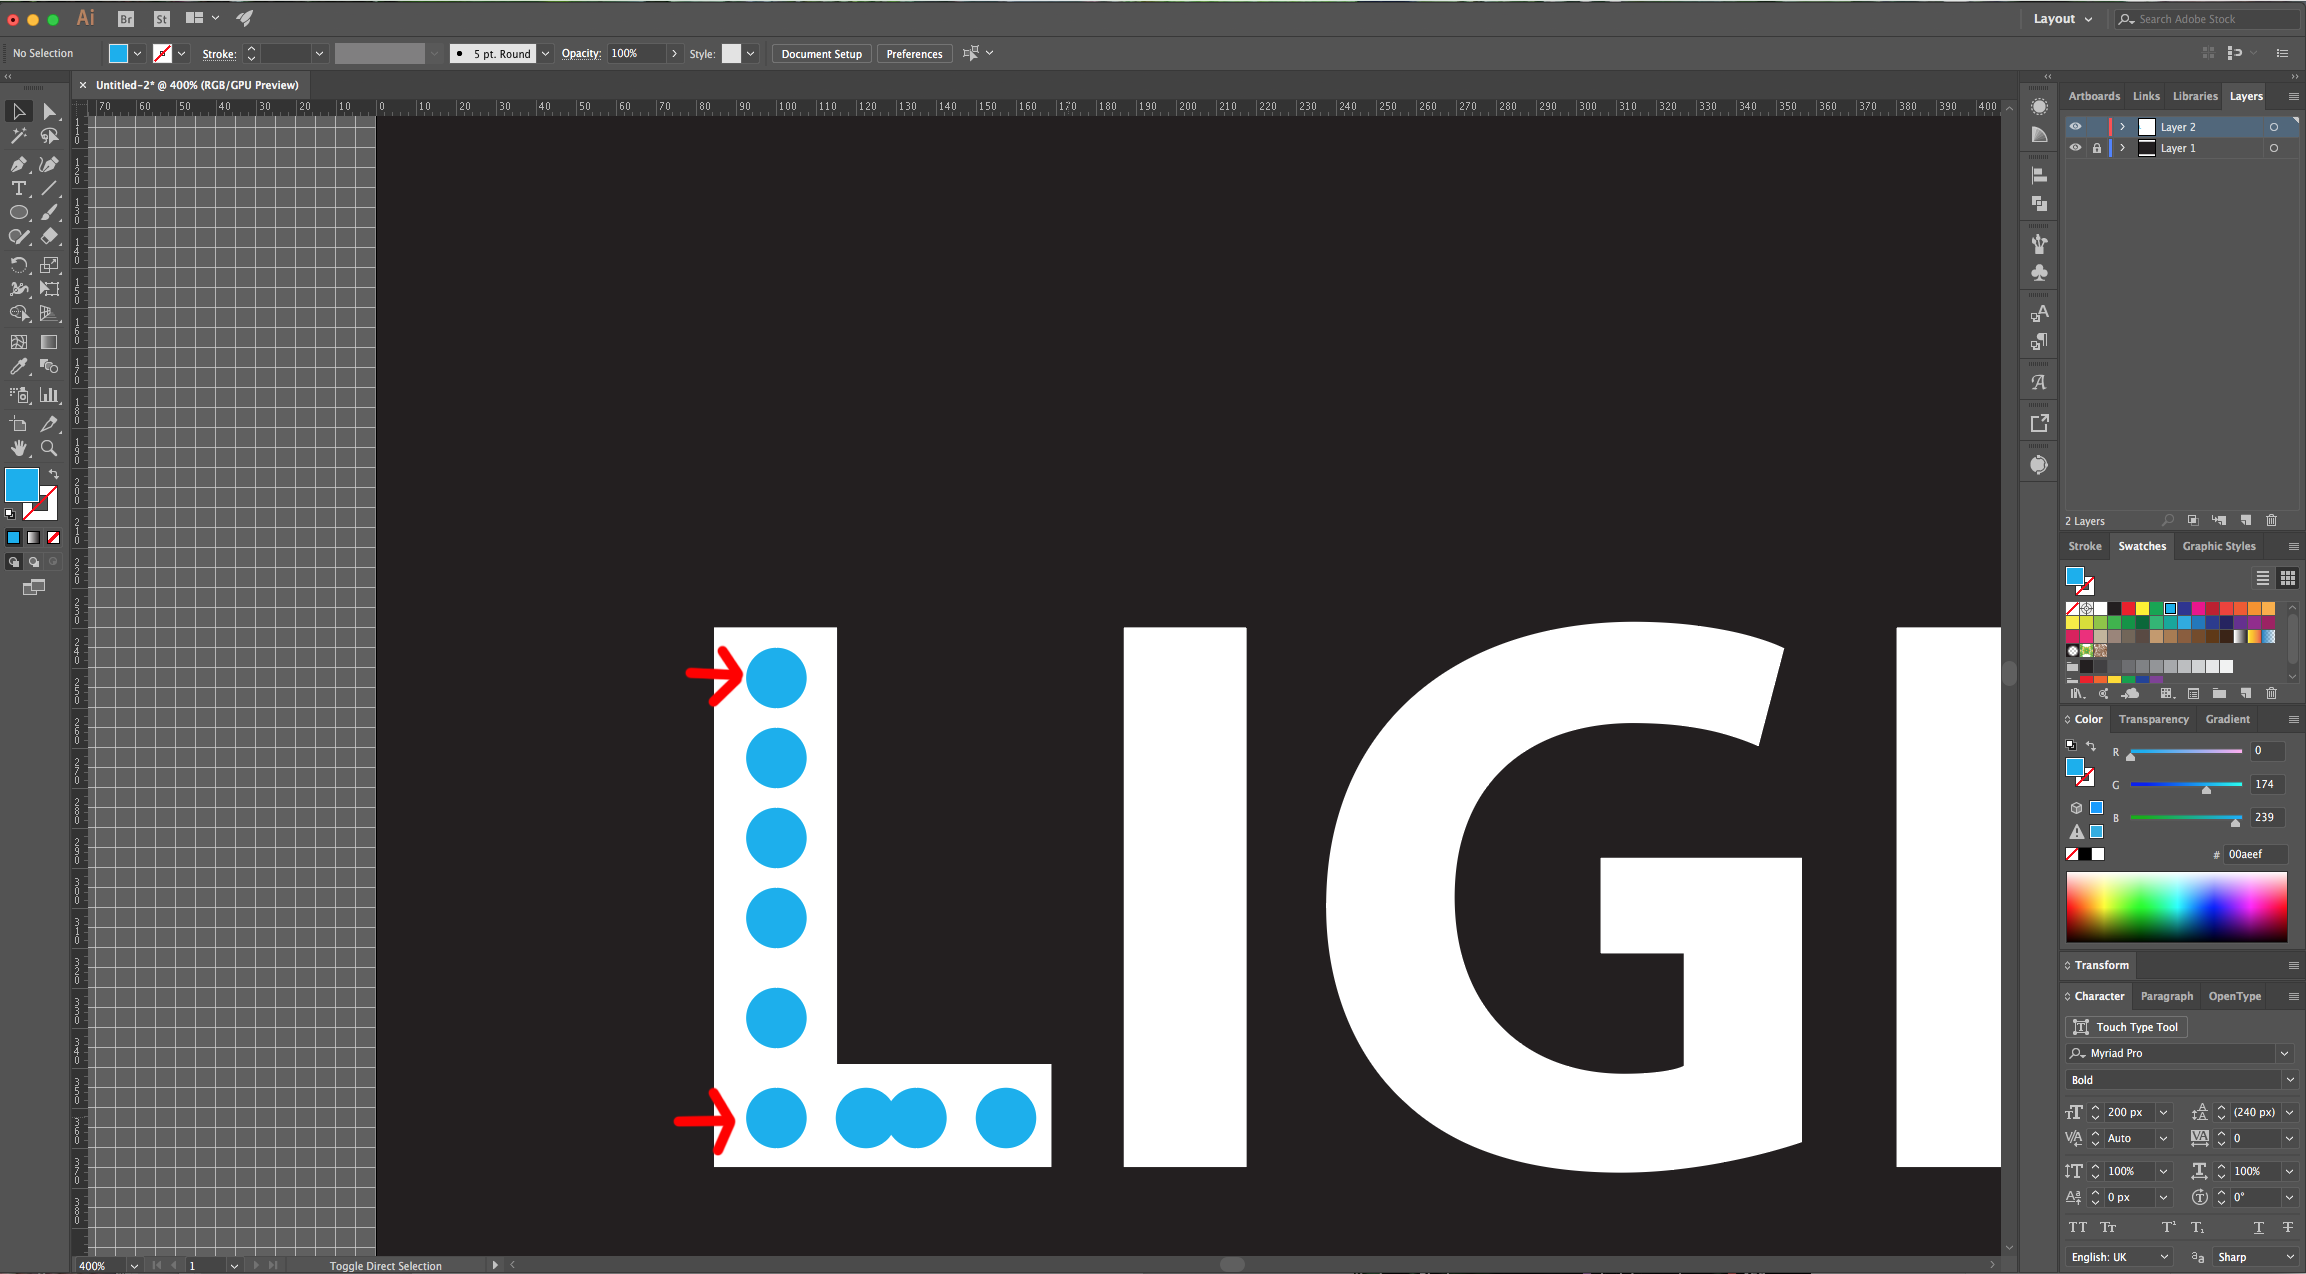
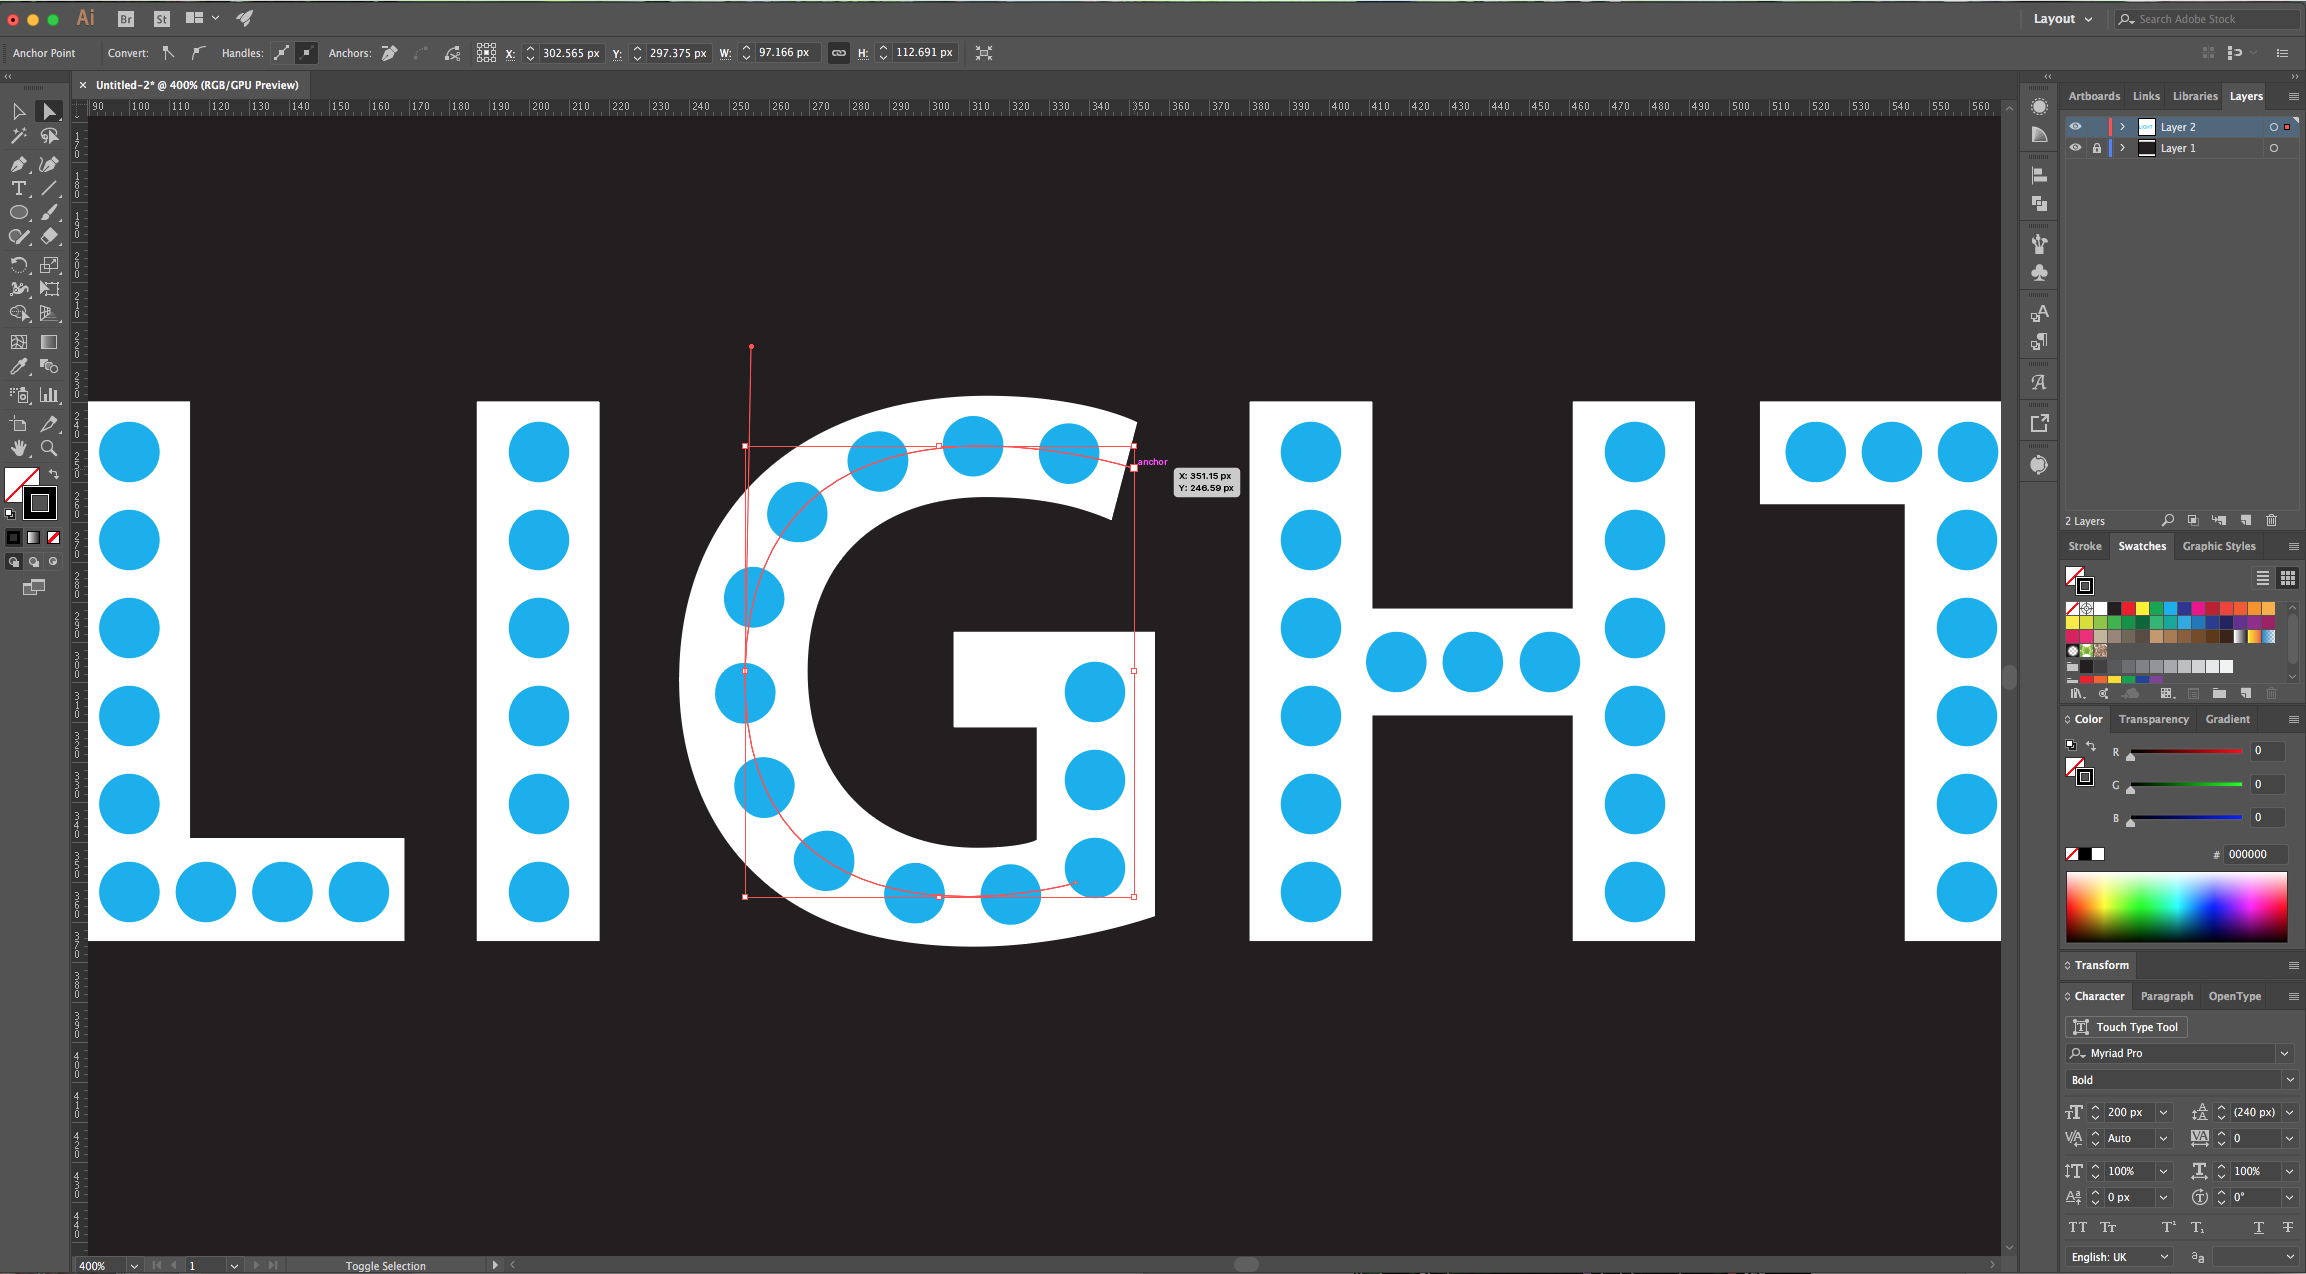
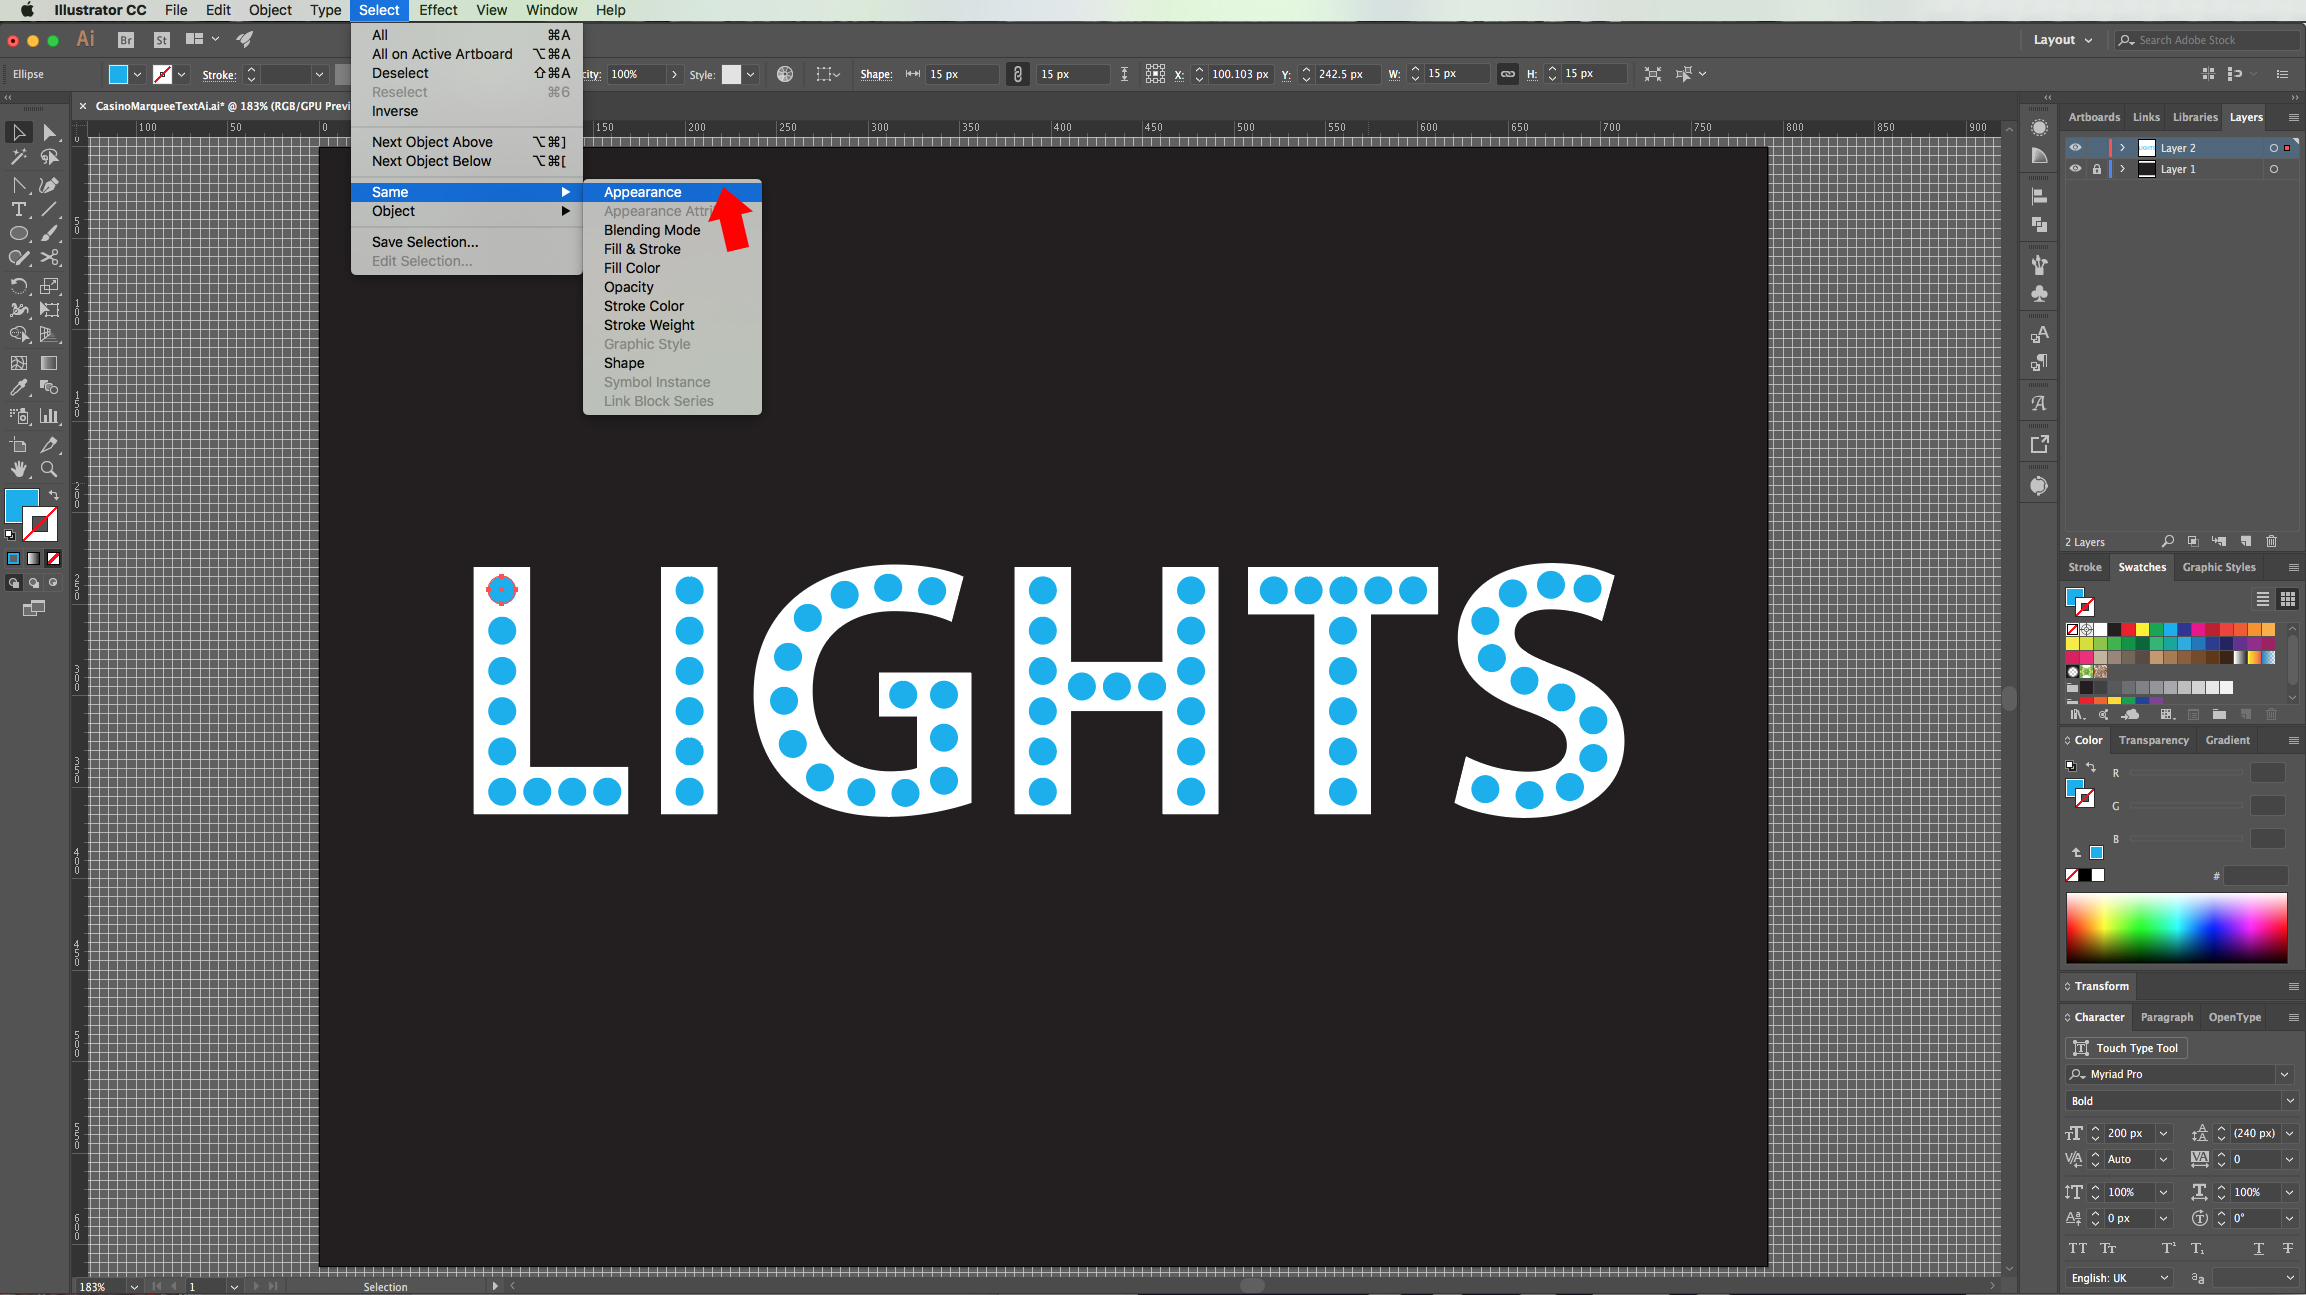
8 - Select the “Ellipse Tool” (L), click inside your document and use a value of 15 px for “With” and “Height”. Fill your circle with Cyan and place it inside one of your letters.
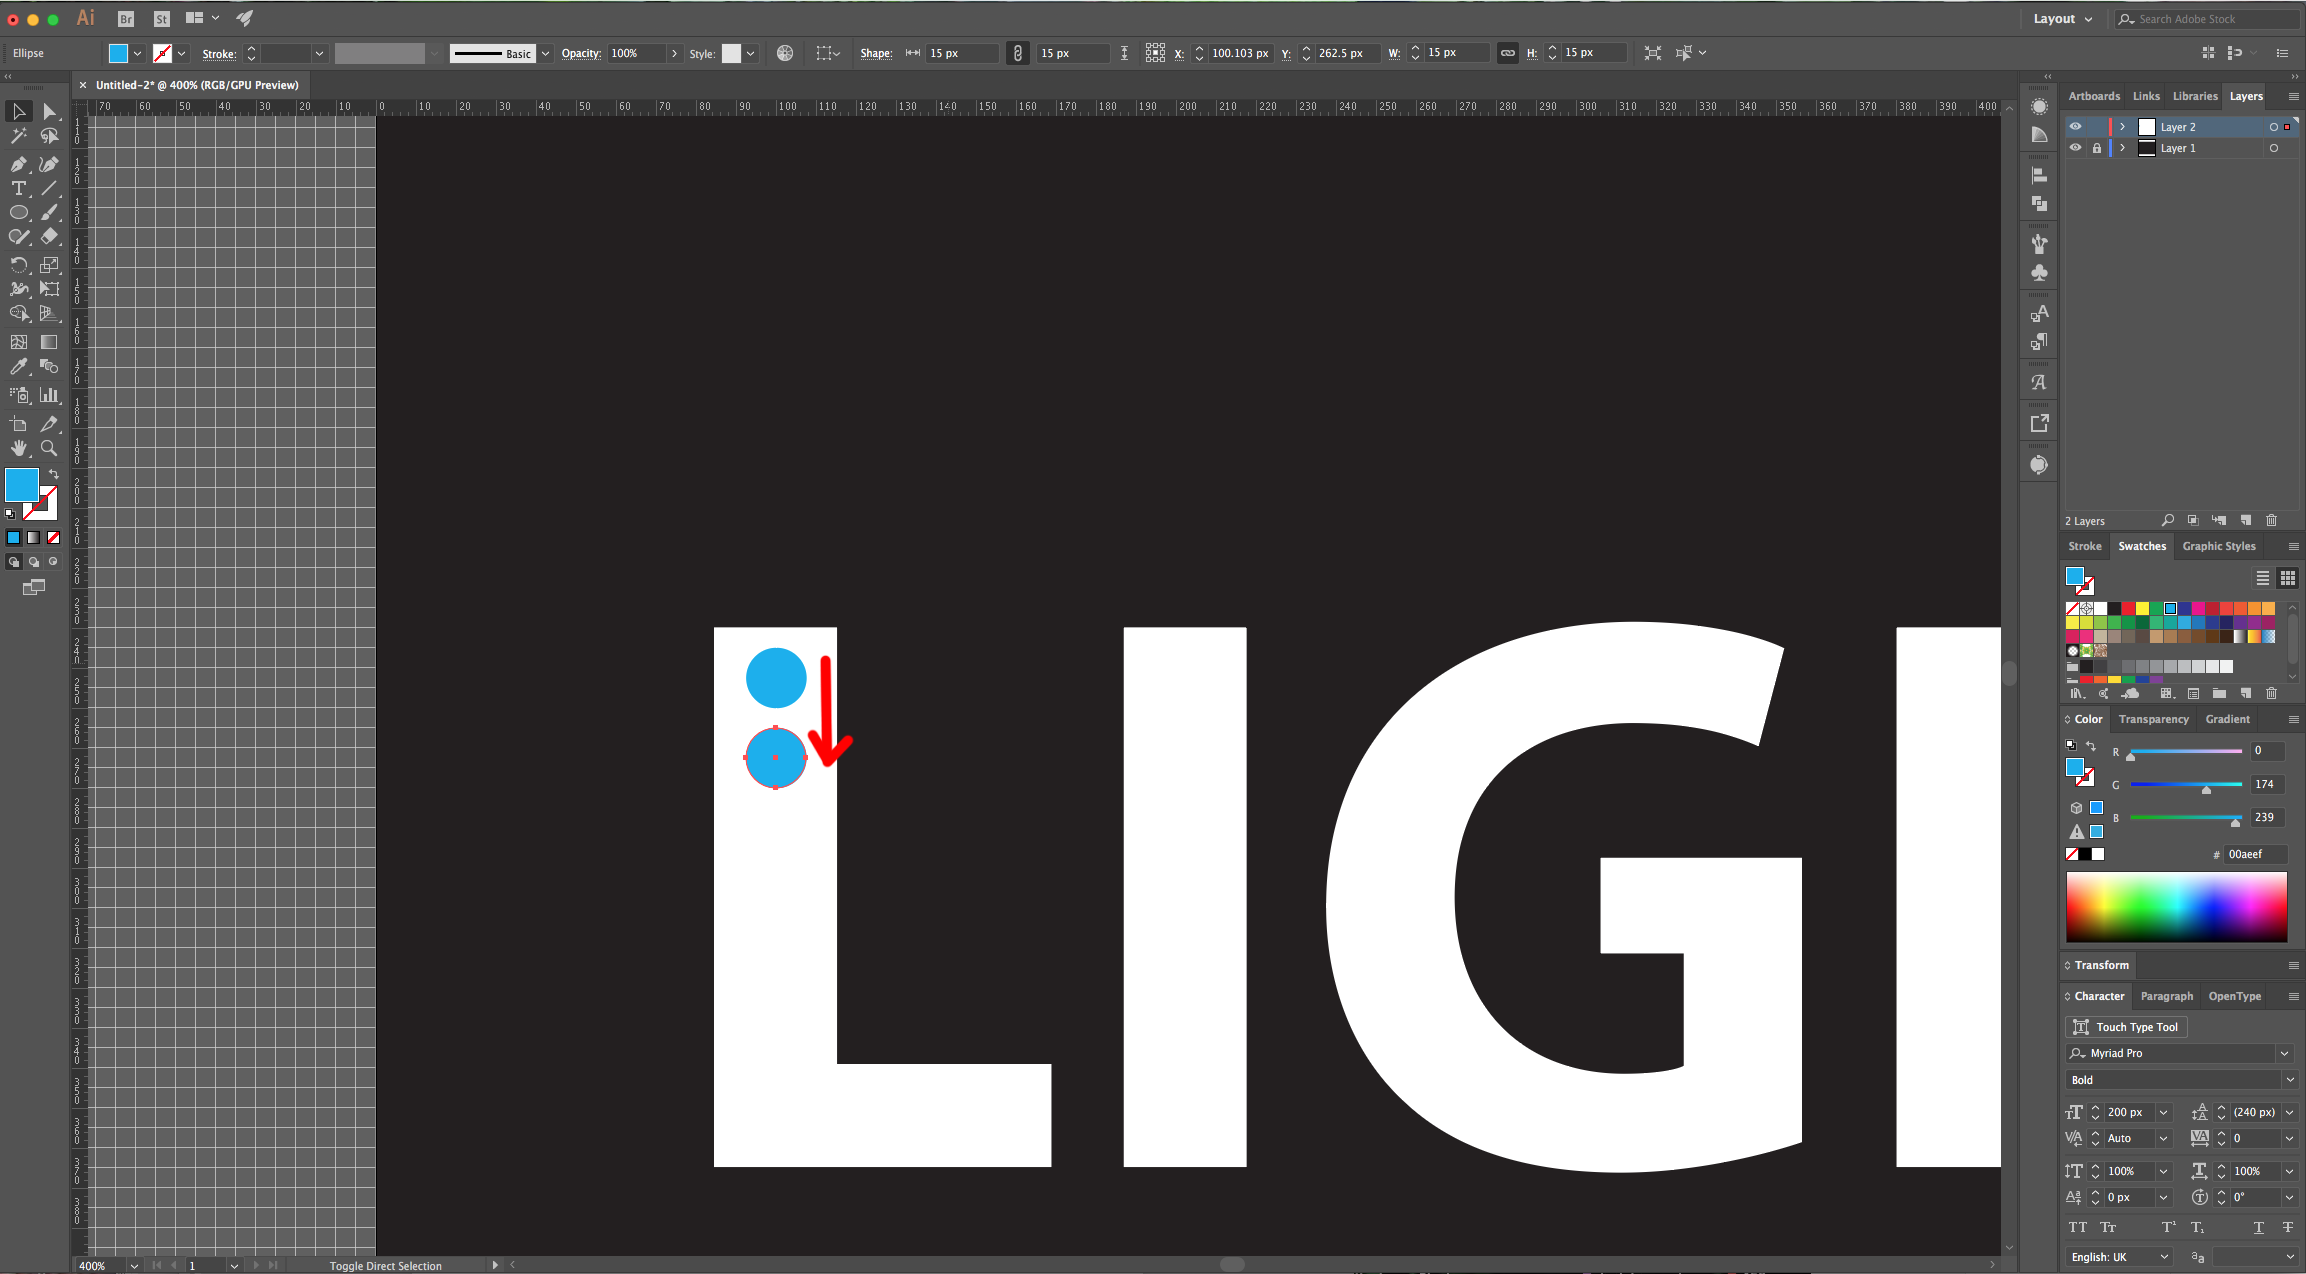
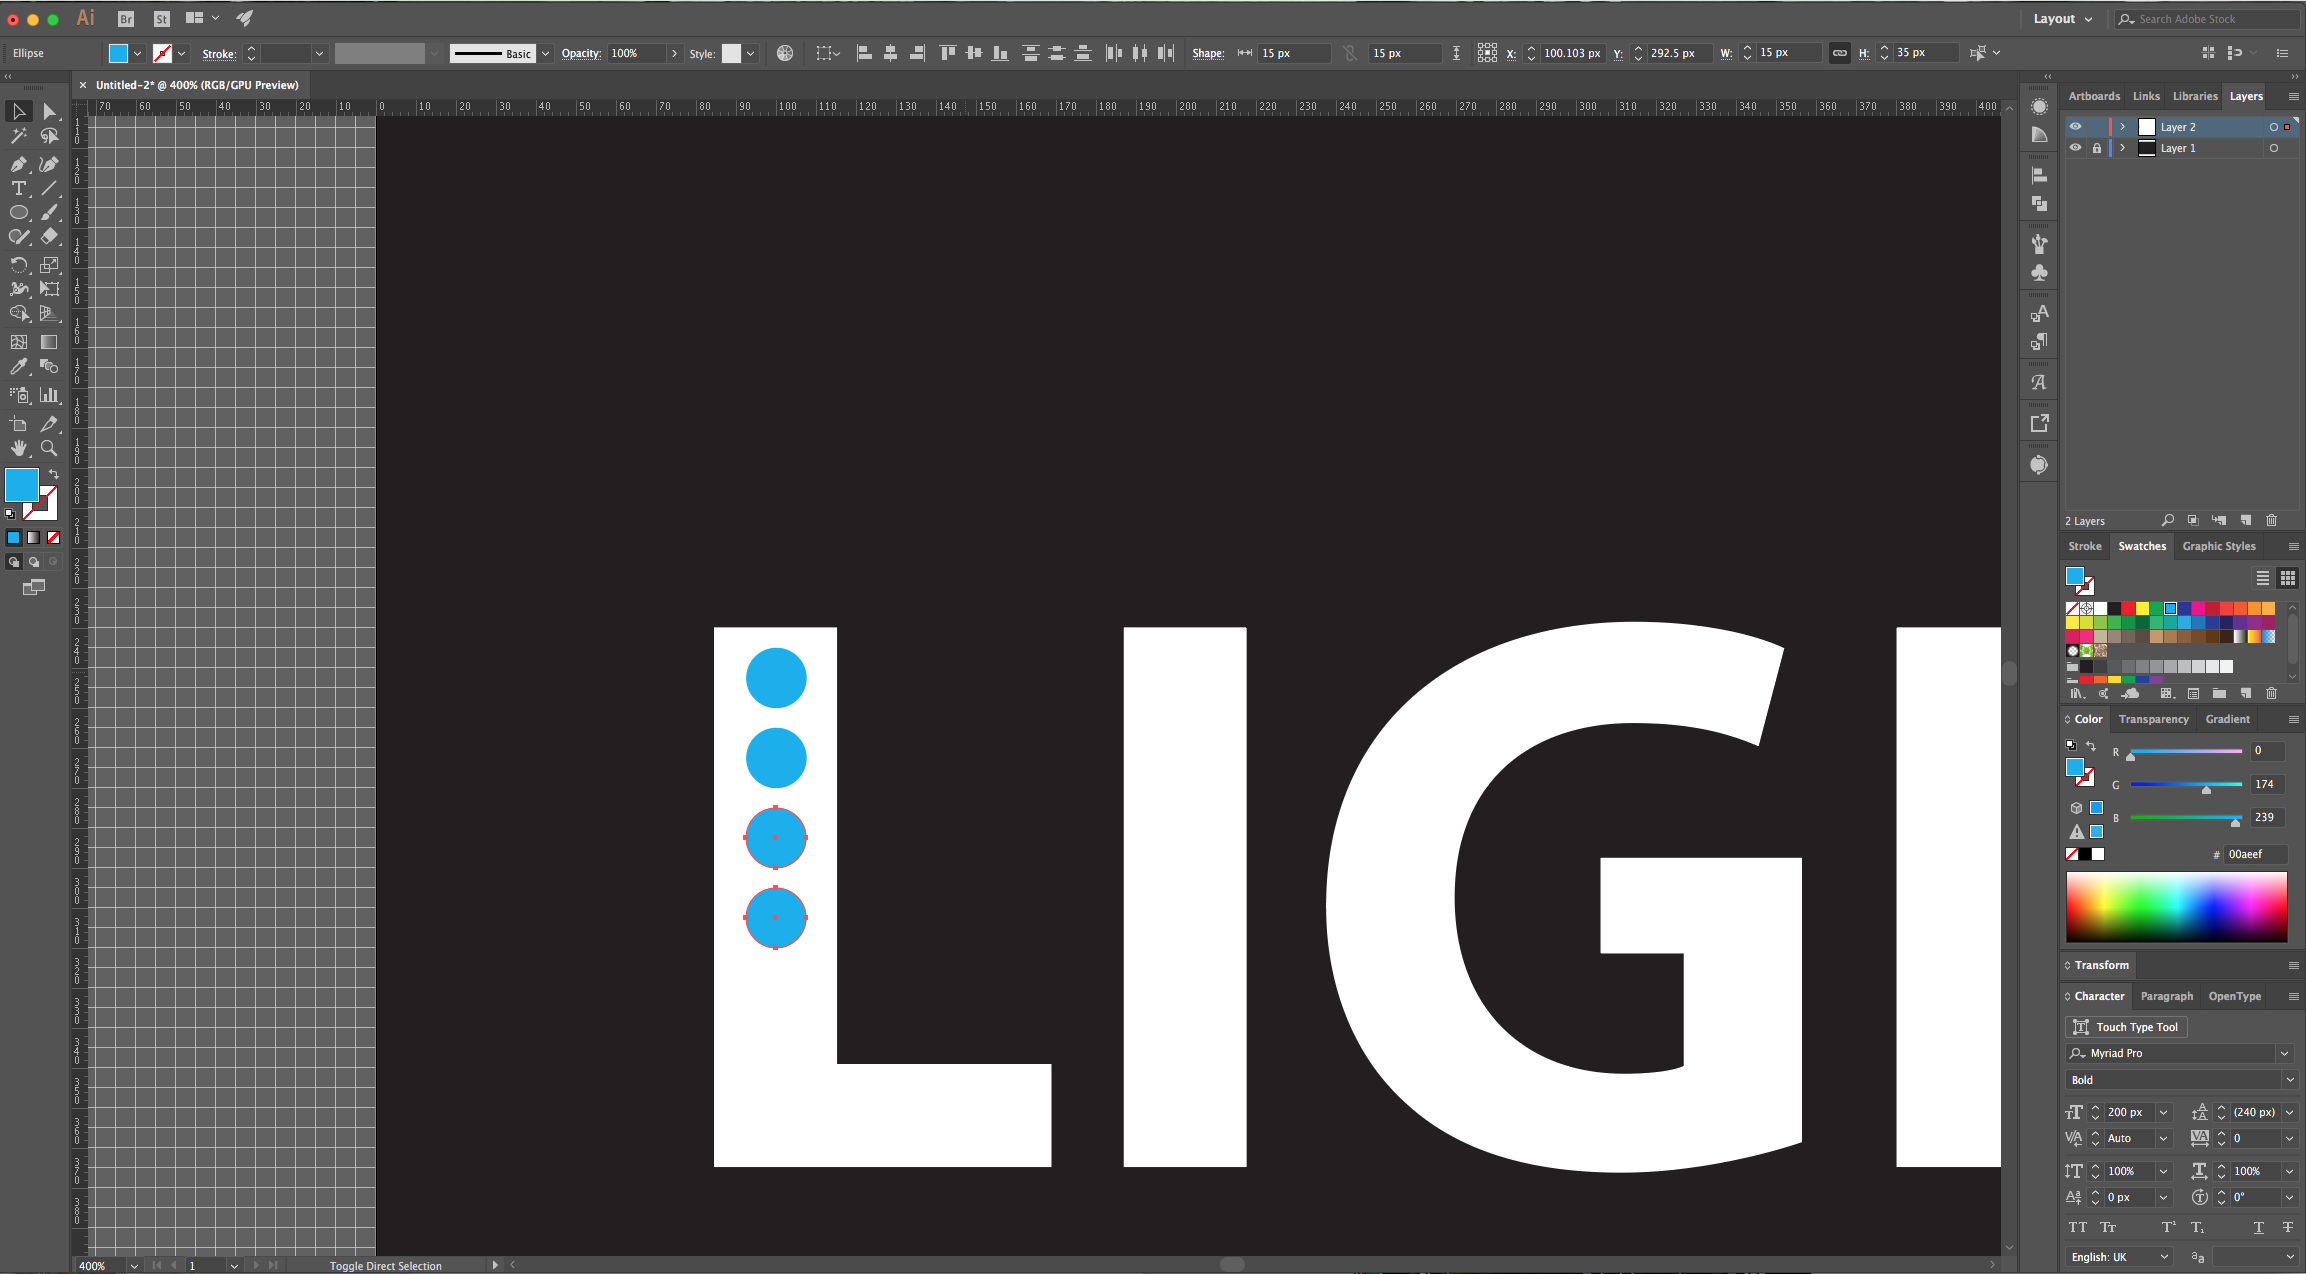
9 - Hold “Shift” and “Alt/Option” keys while dragging your circle down to duplicate it. Select both and repeat until you fill your letter. Do this until you have an internal line made of circles inside all your letters. For now, don’t worry about spacing them evenly.
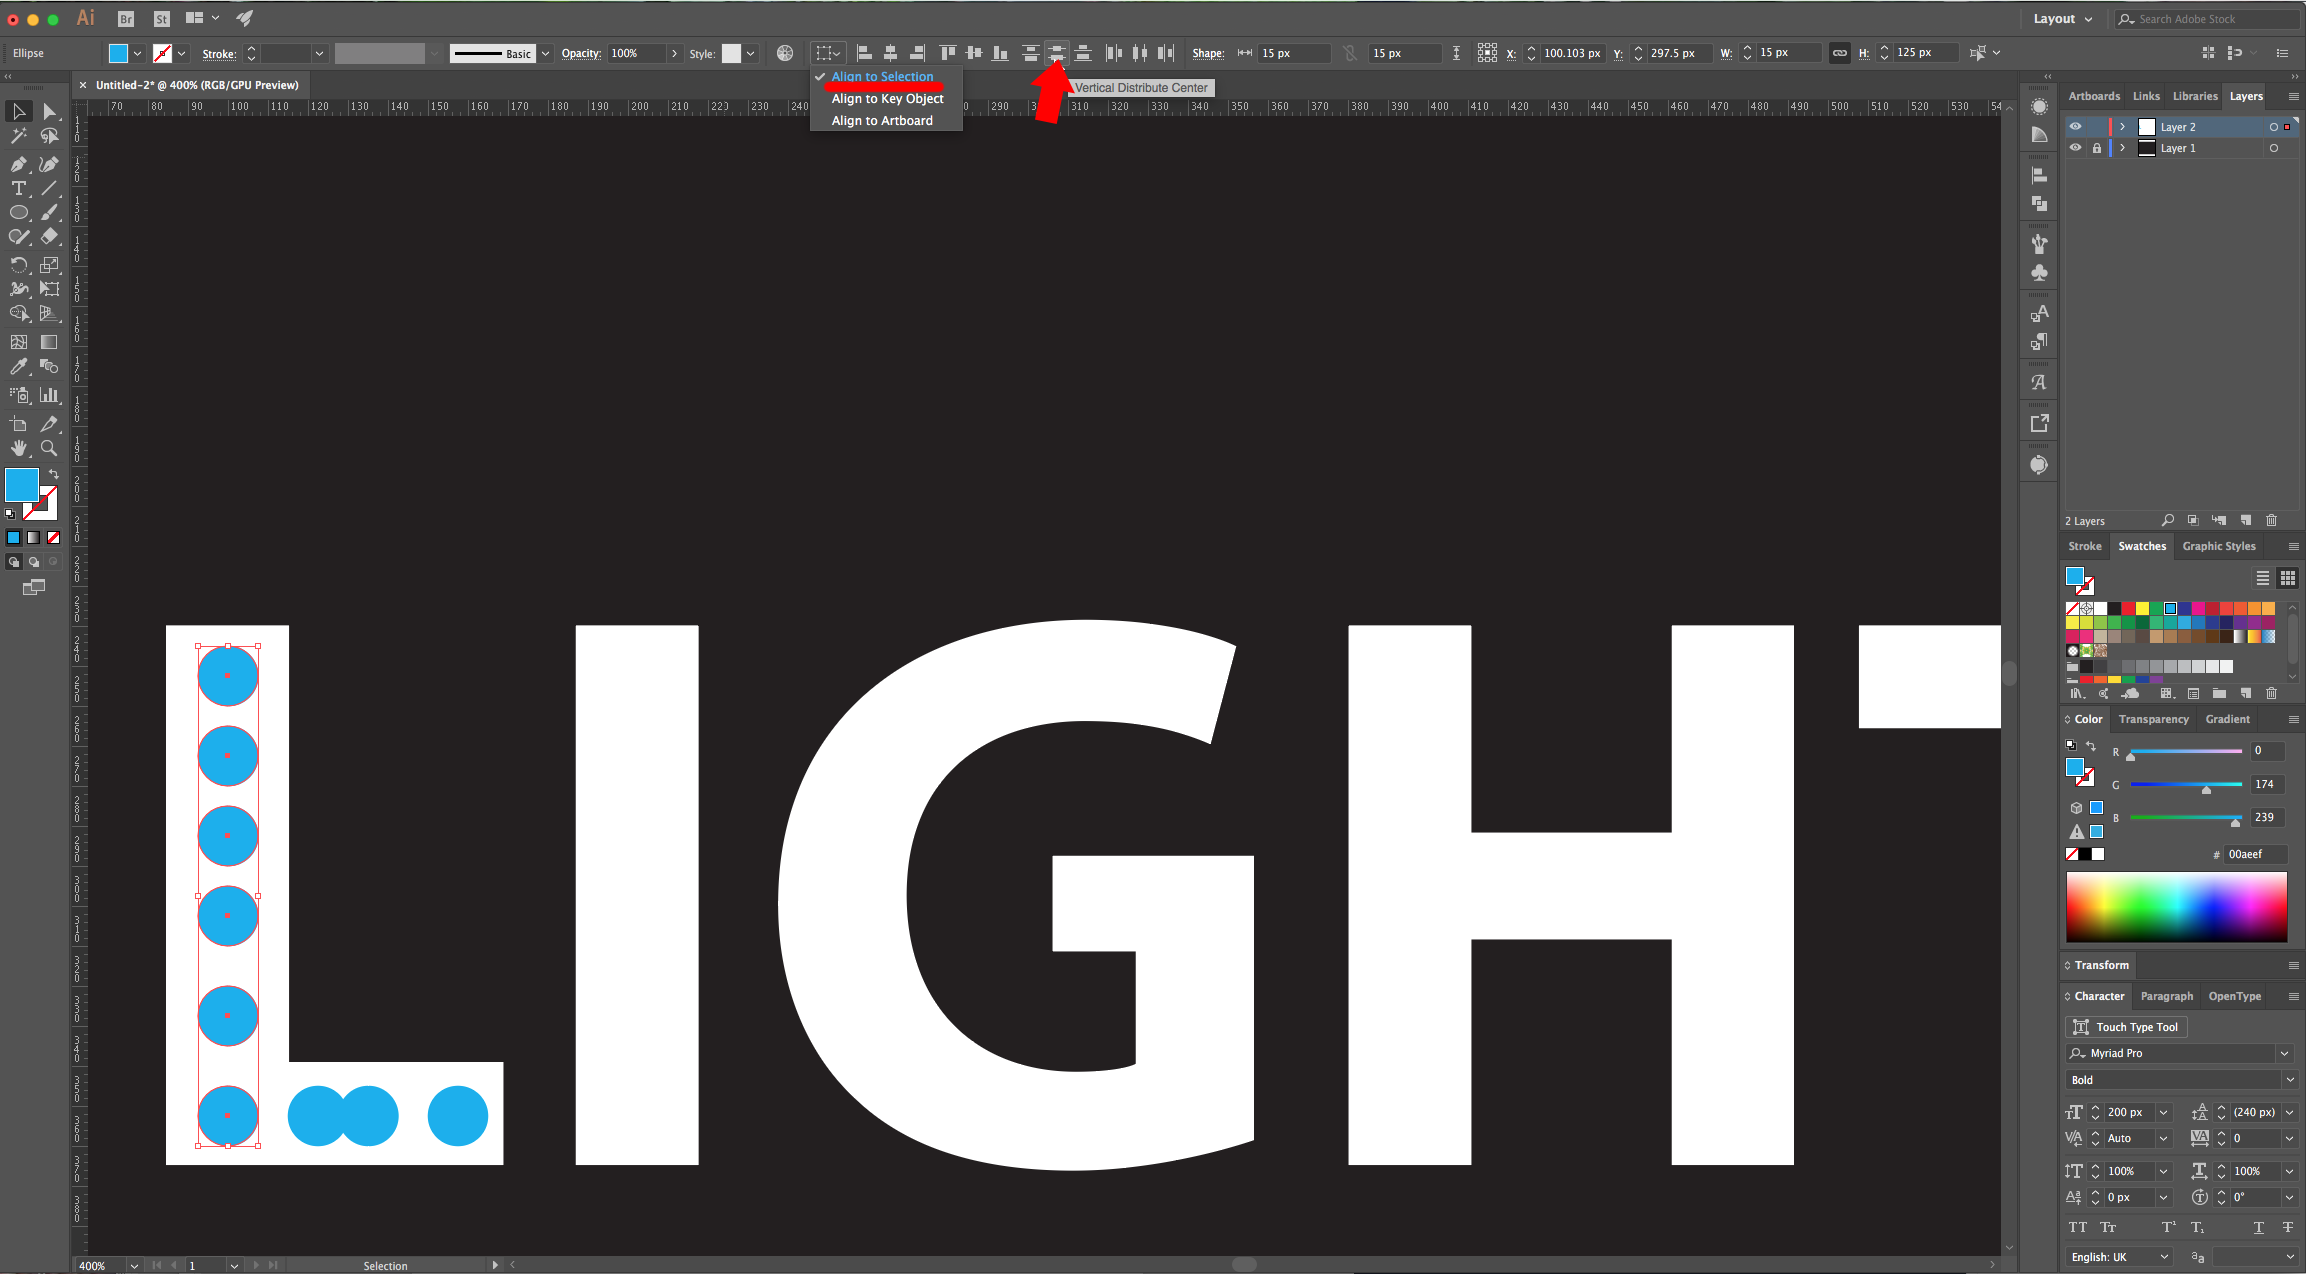
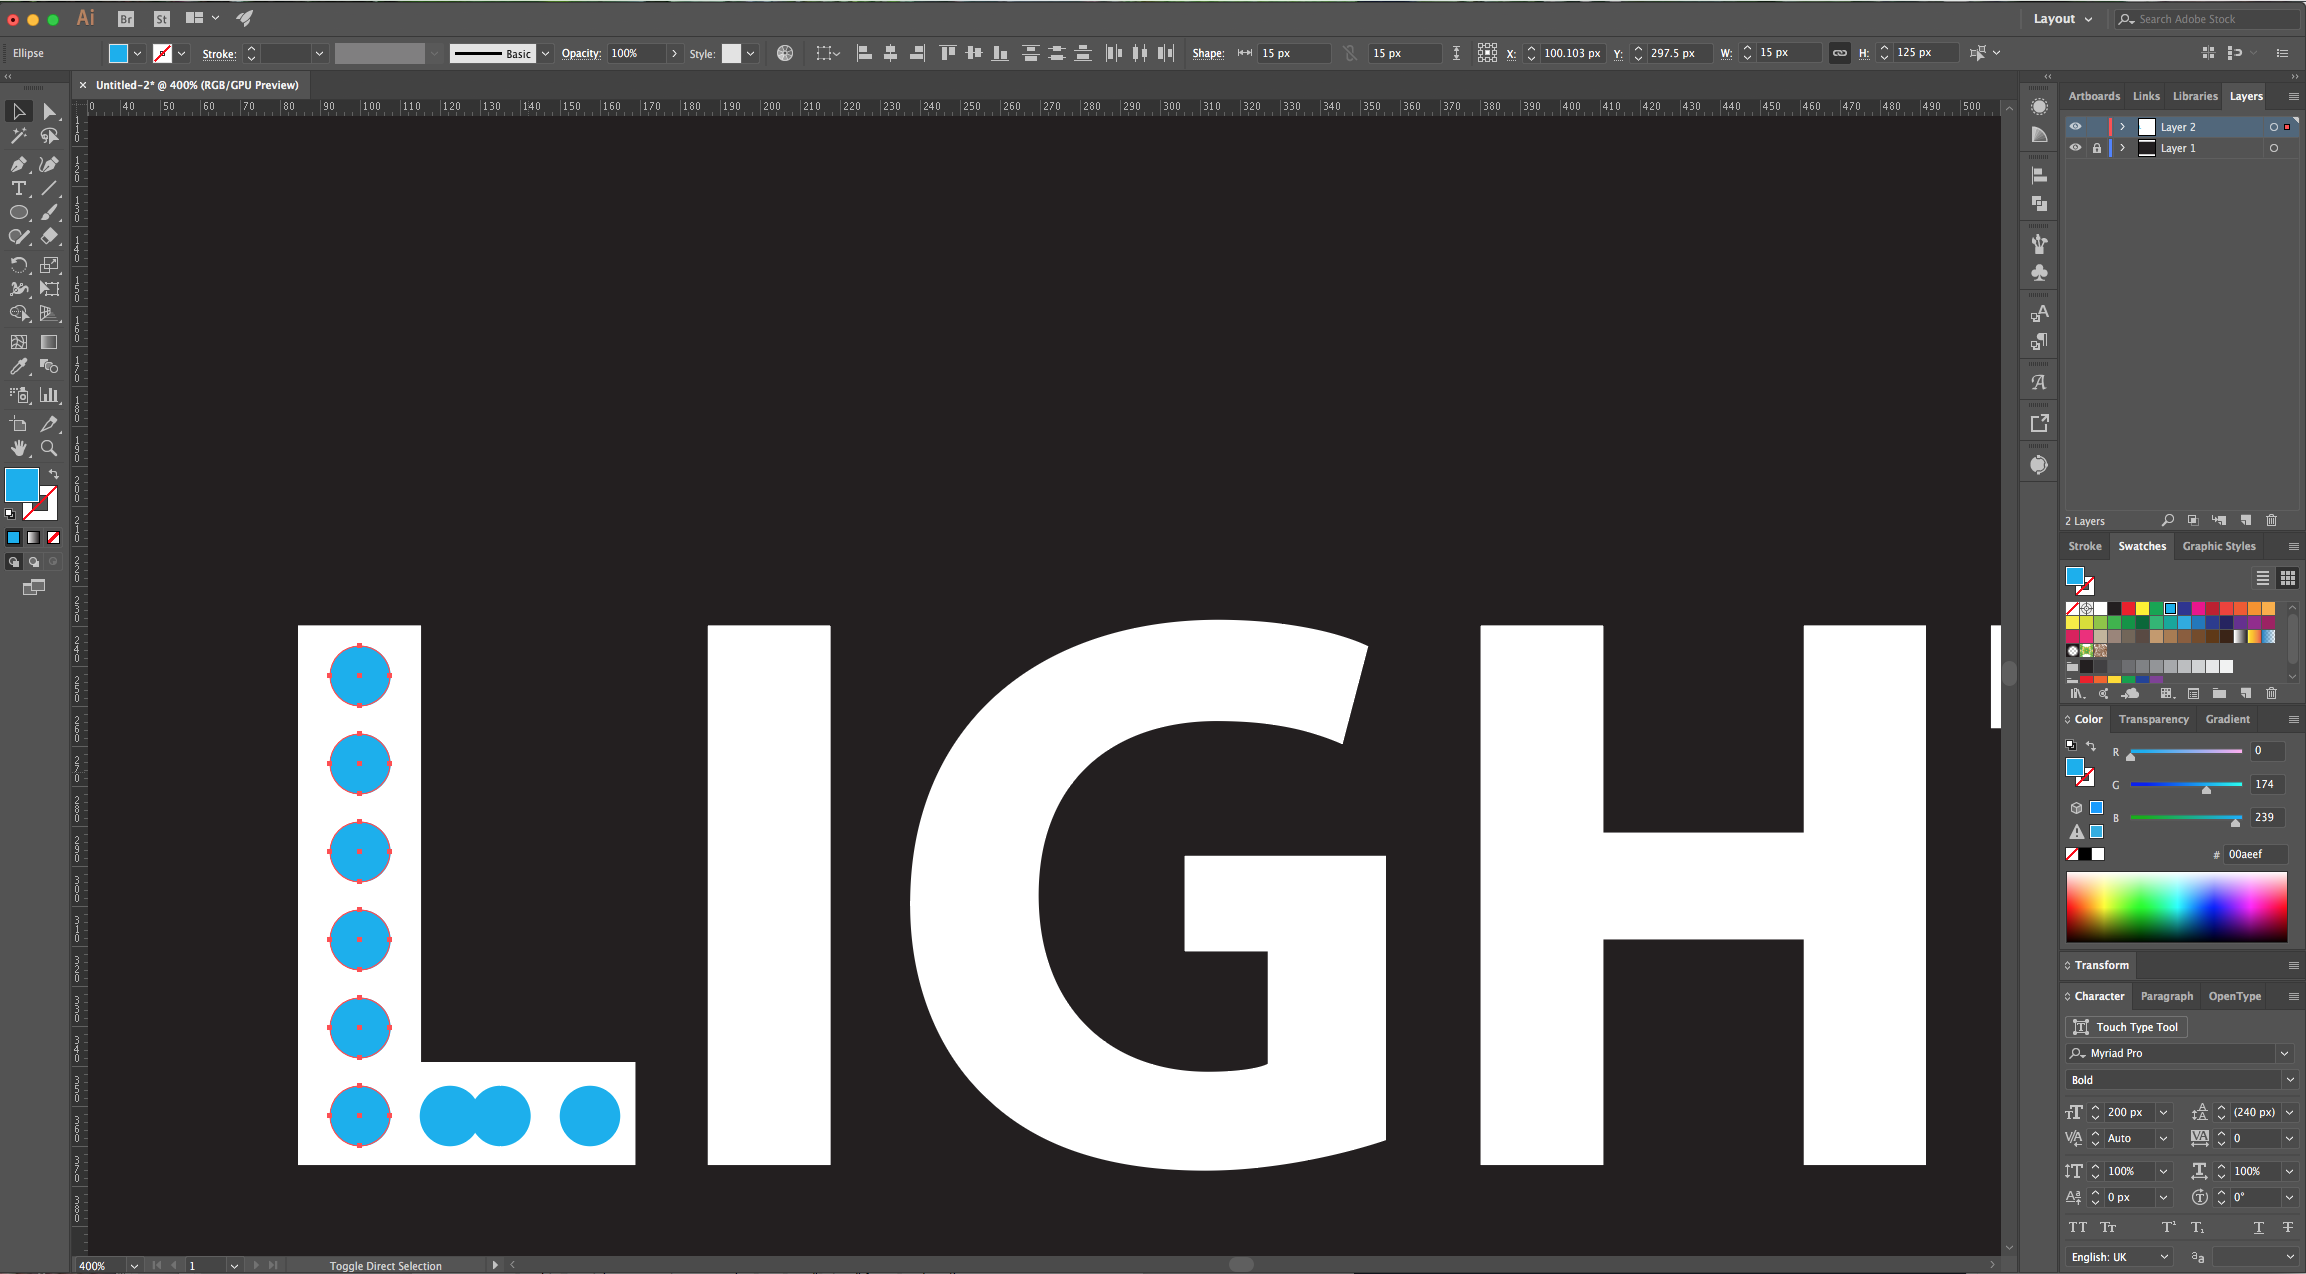
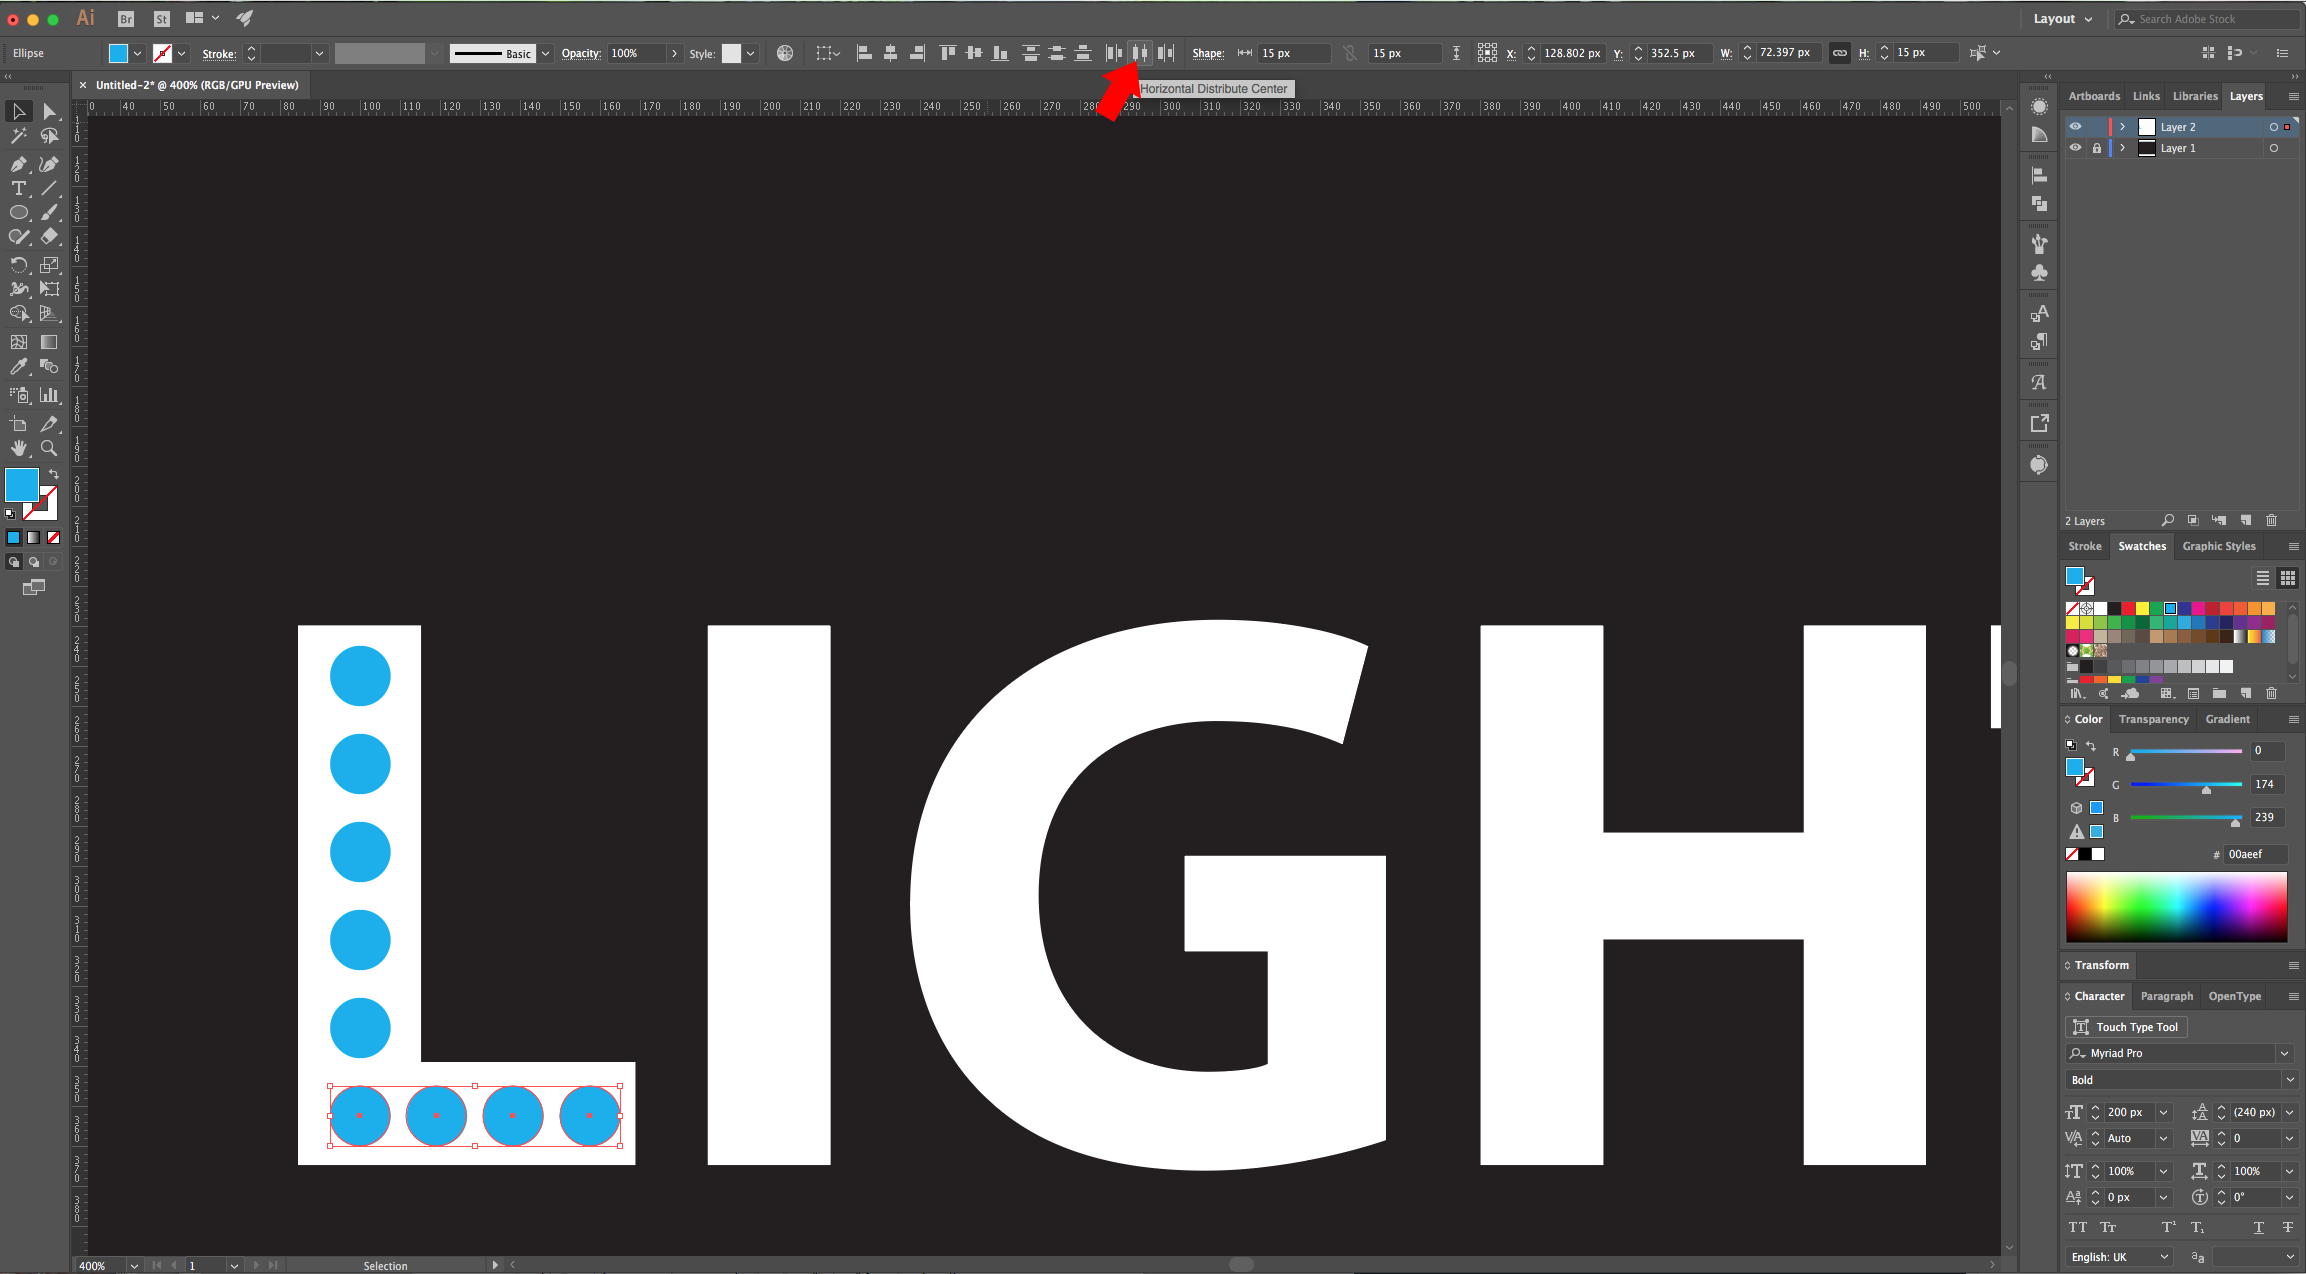
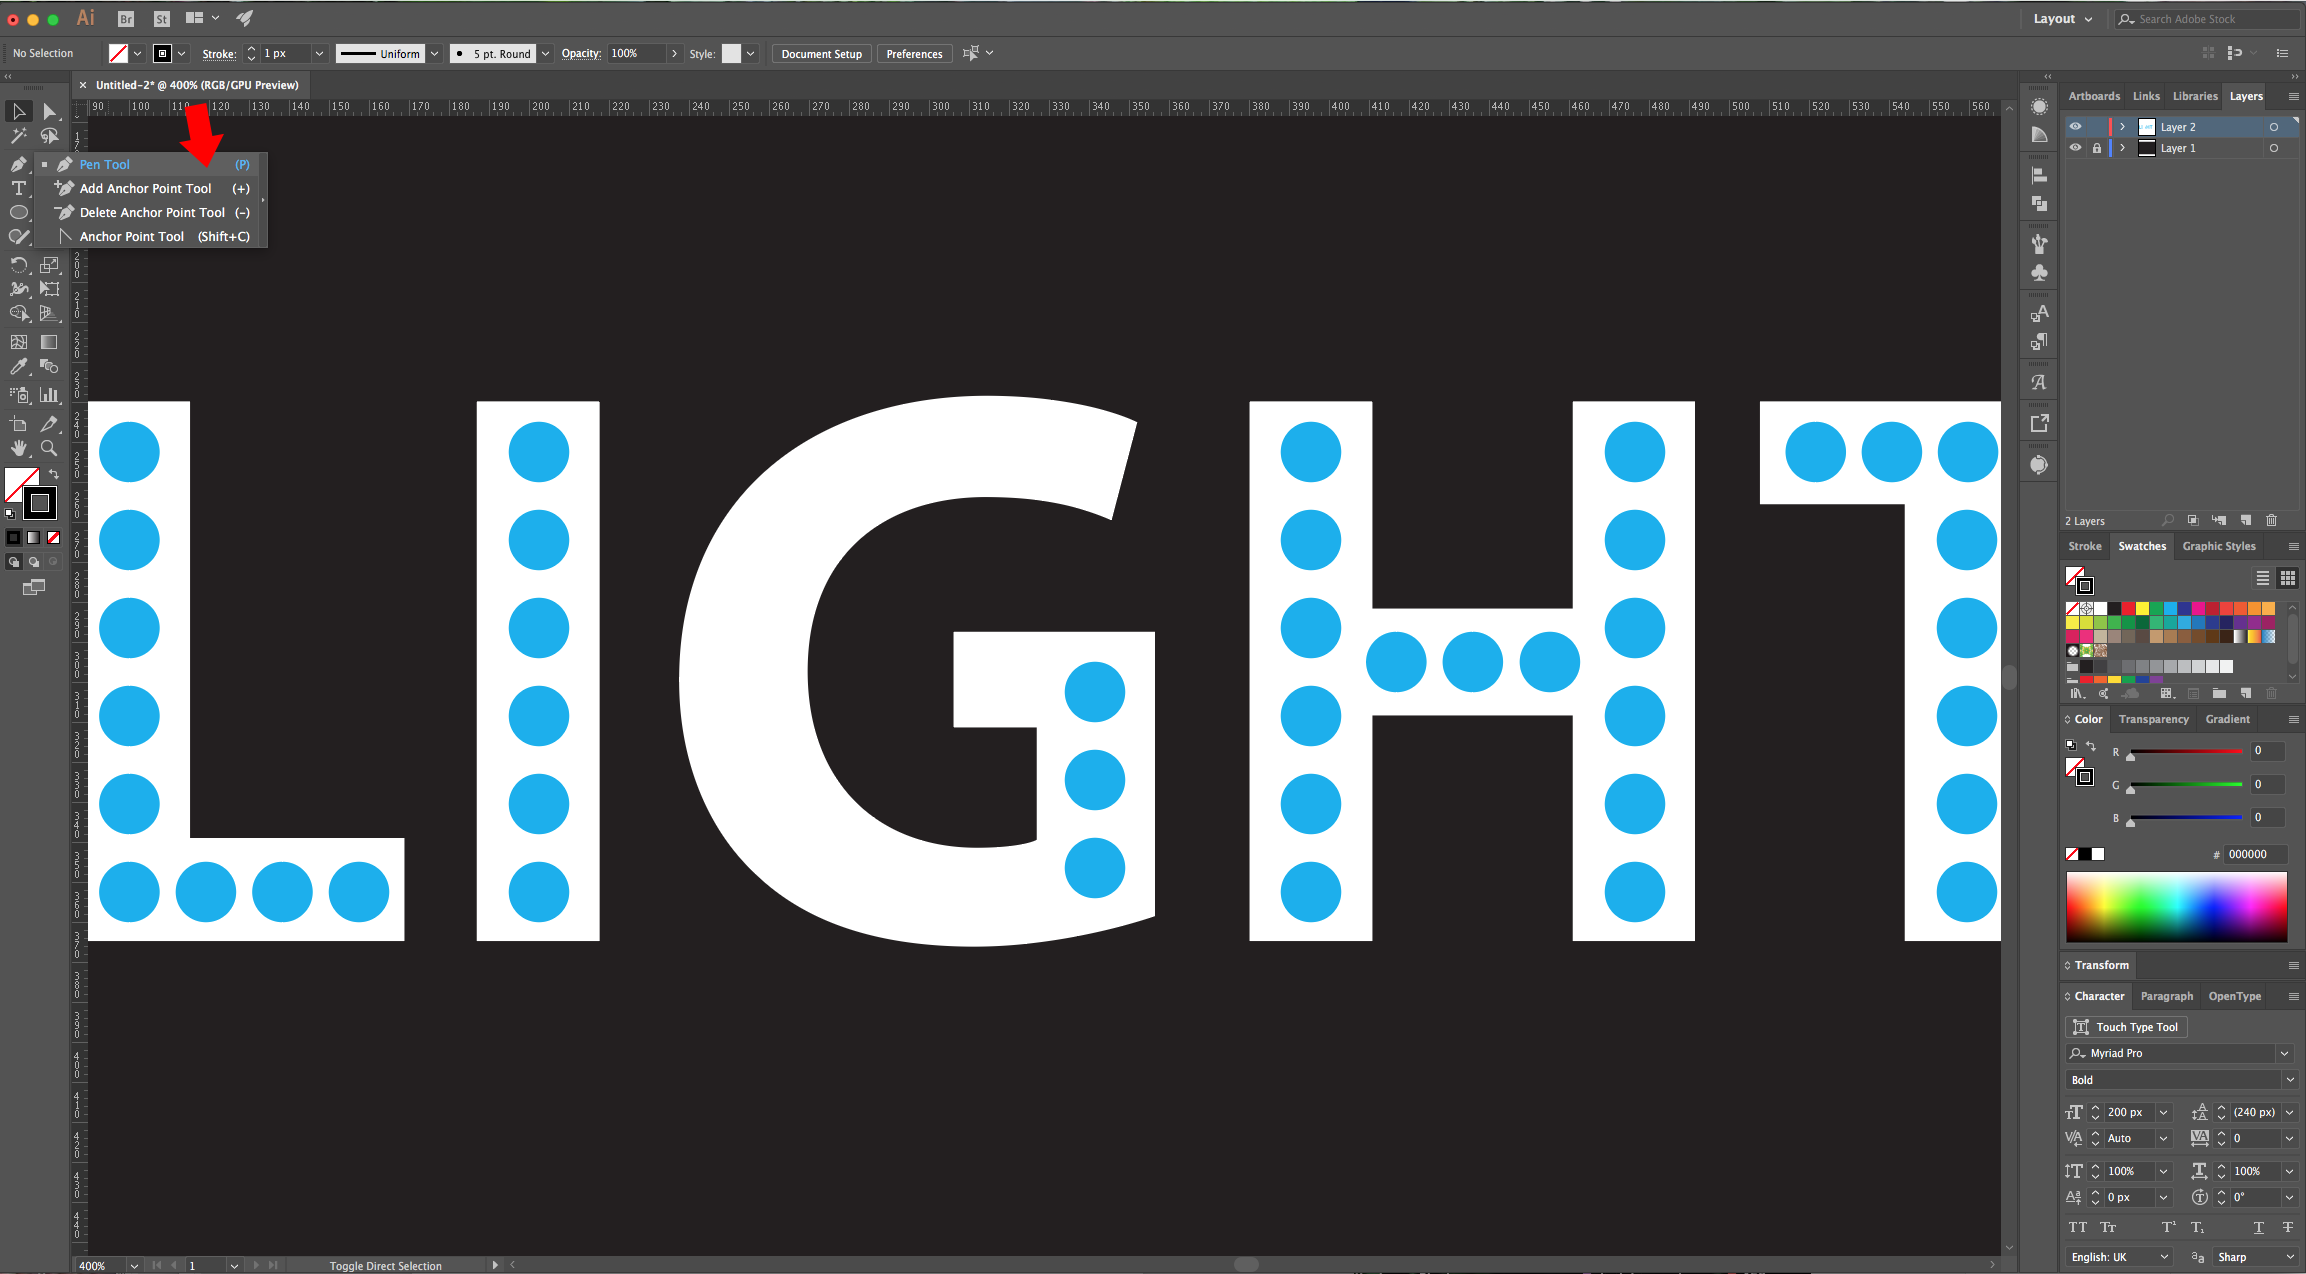
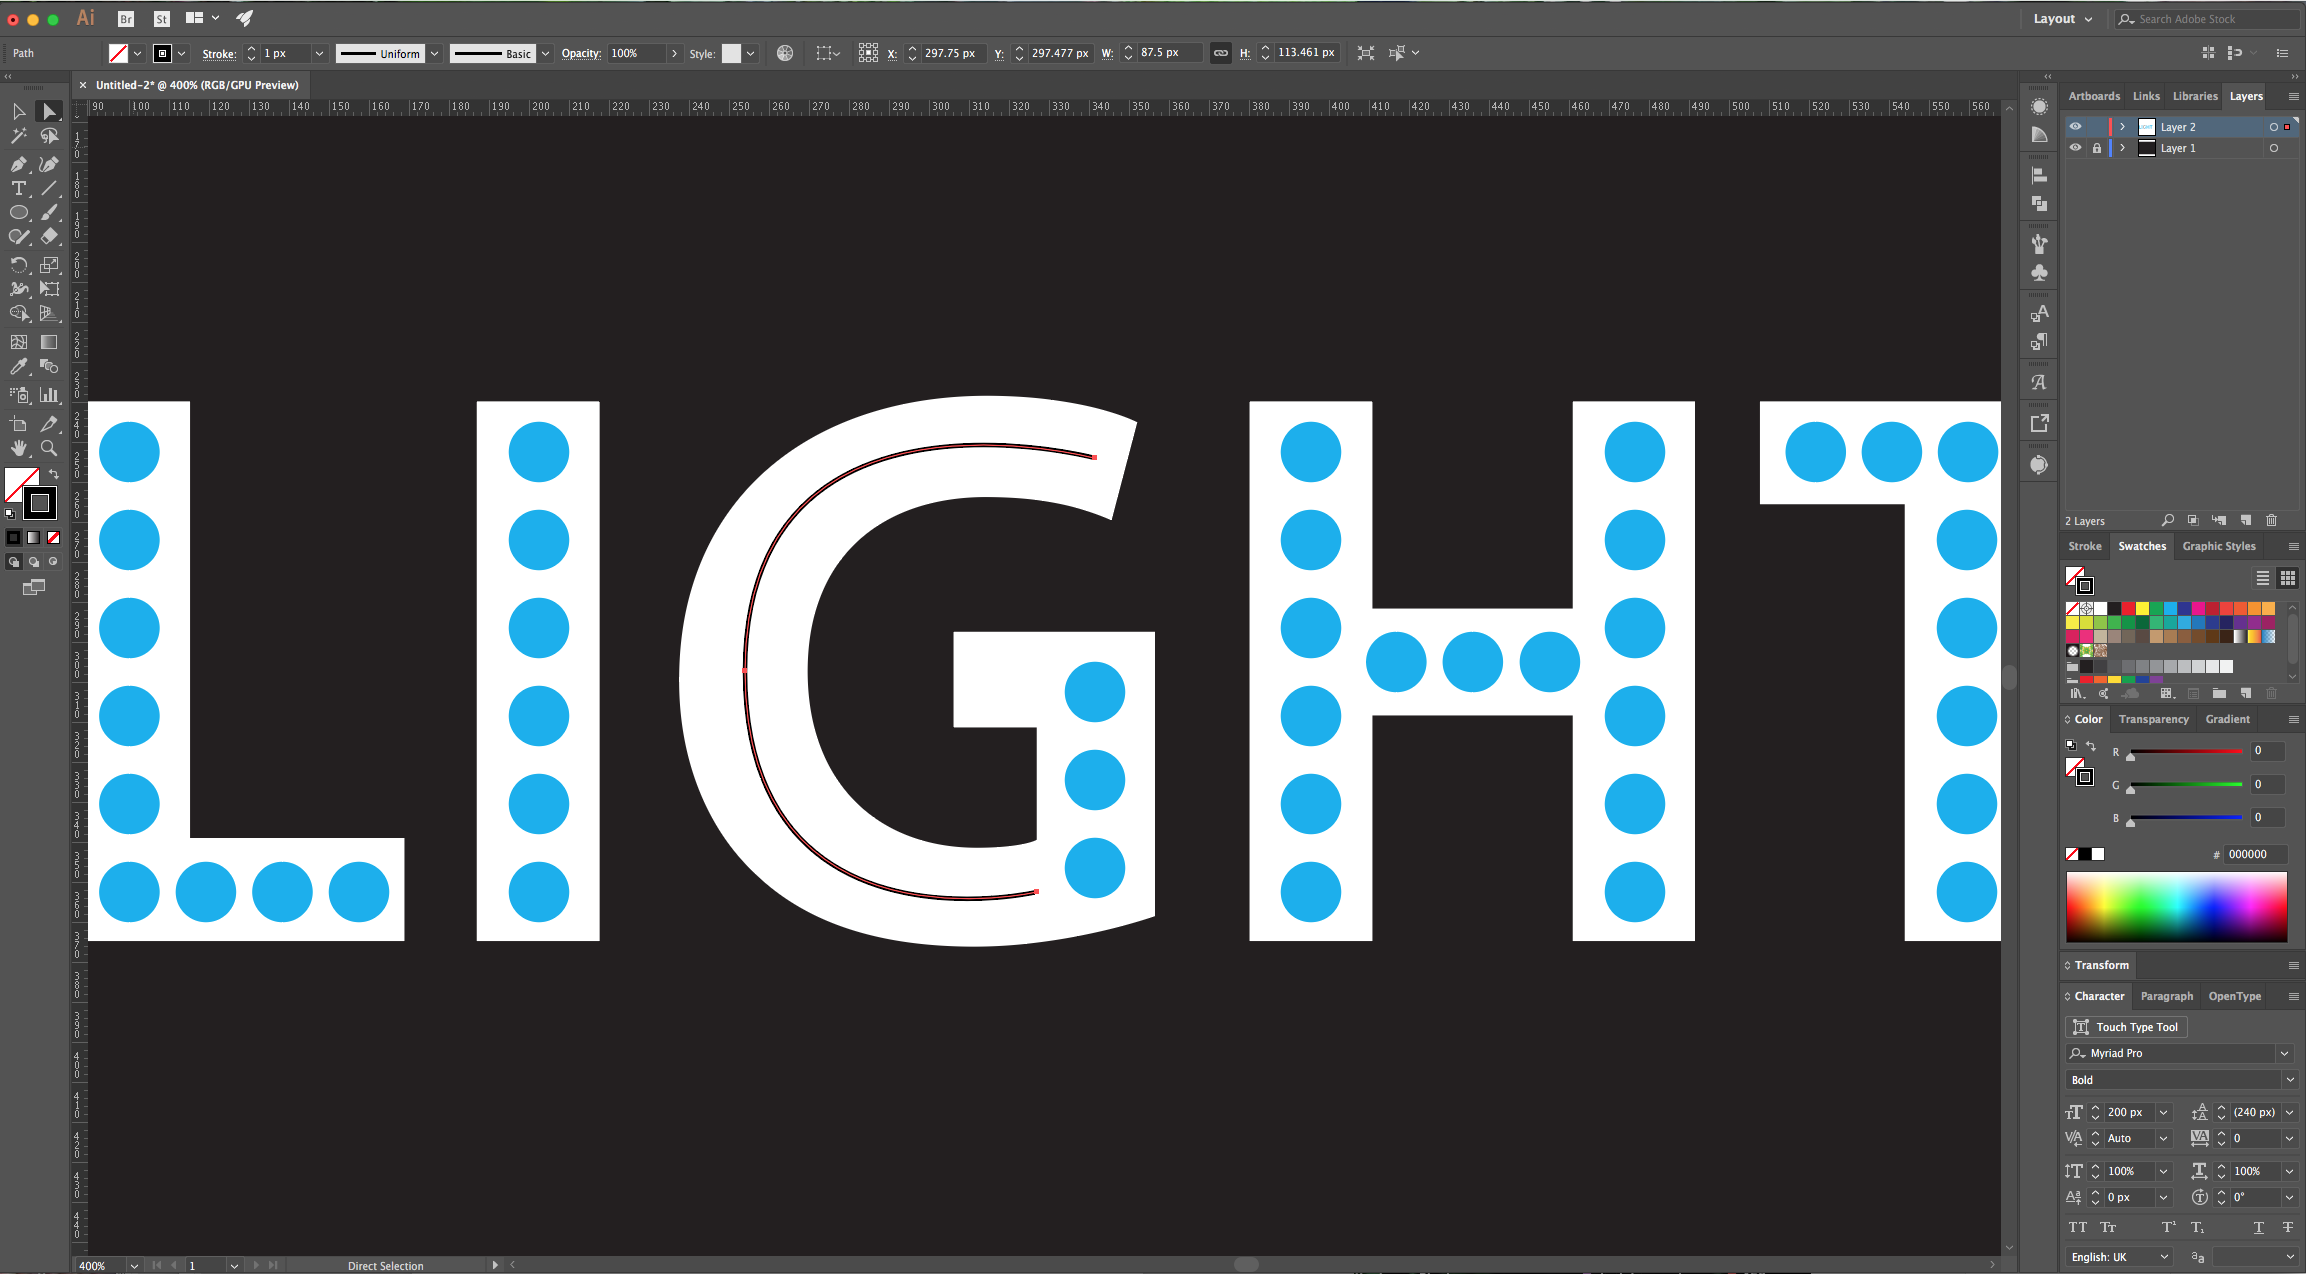
10 - Once you filled all your letter with circles, make sure that the one at the “start” and the one at the “end” of your line are placed where you want them. Then, select them together with the rest of the line (use the “Shift” key) and making sure that “Align to Selection” is selected click on “Vertical Distribute Centers”. If your line is “Horizontal” just choose “Horizontal Distribute Centers” instead.
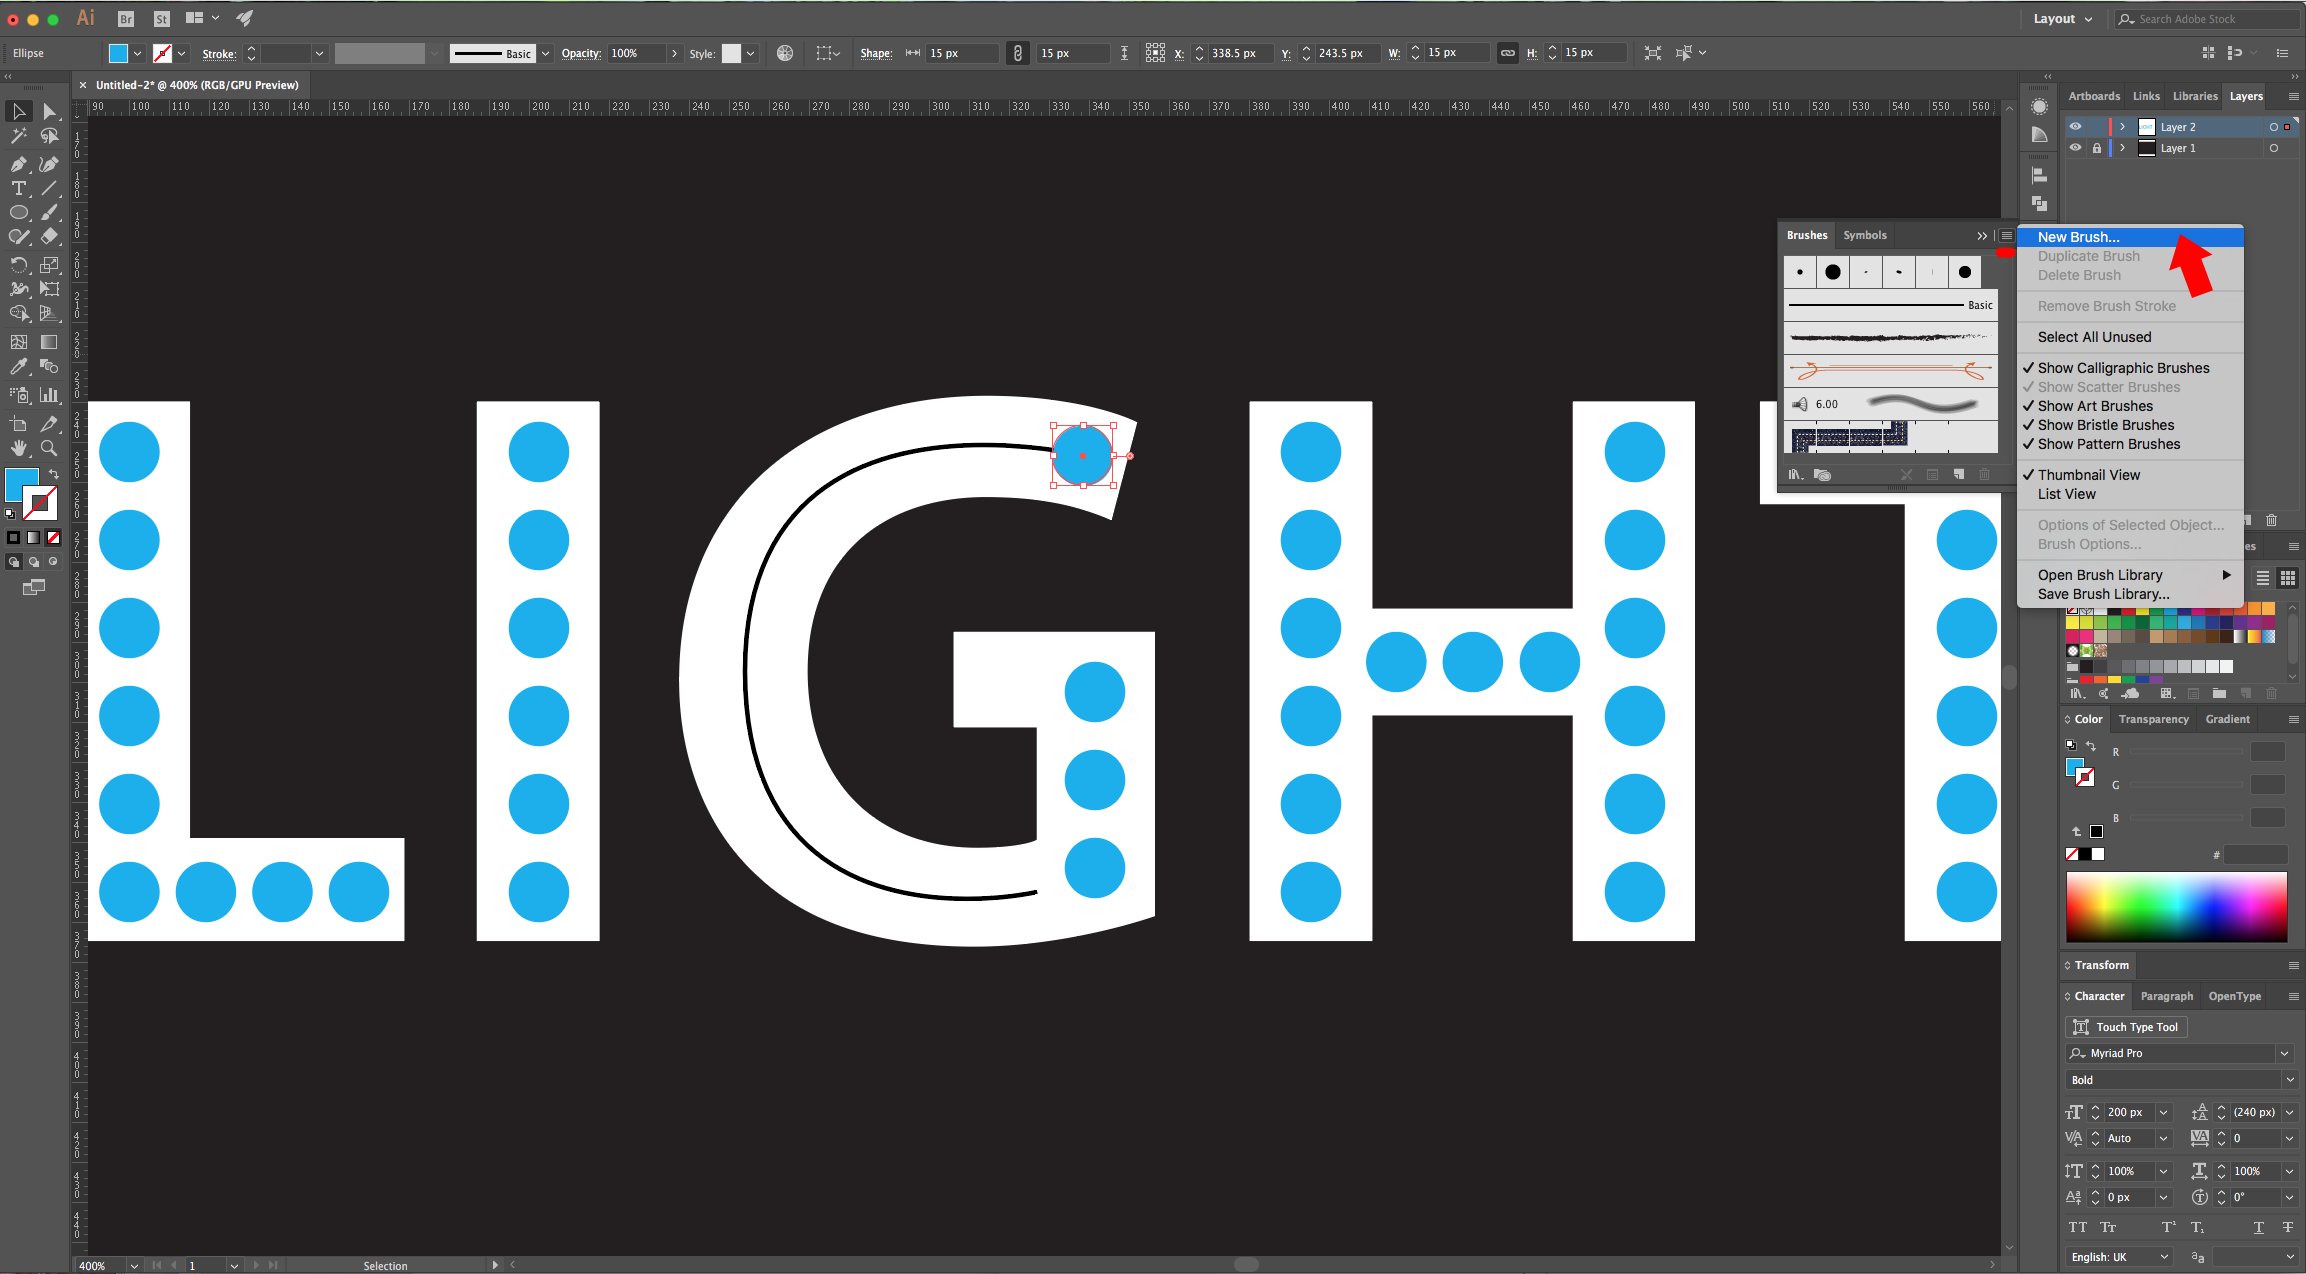
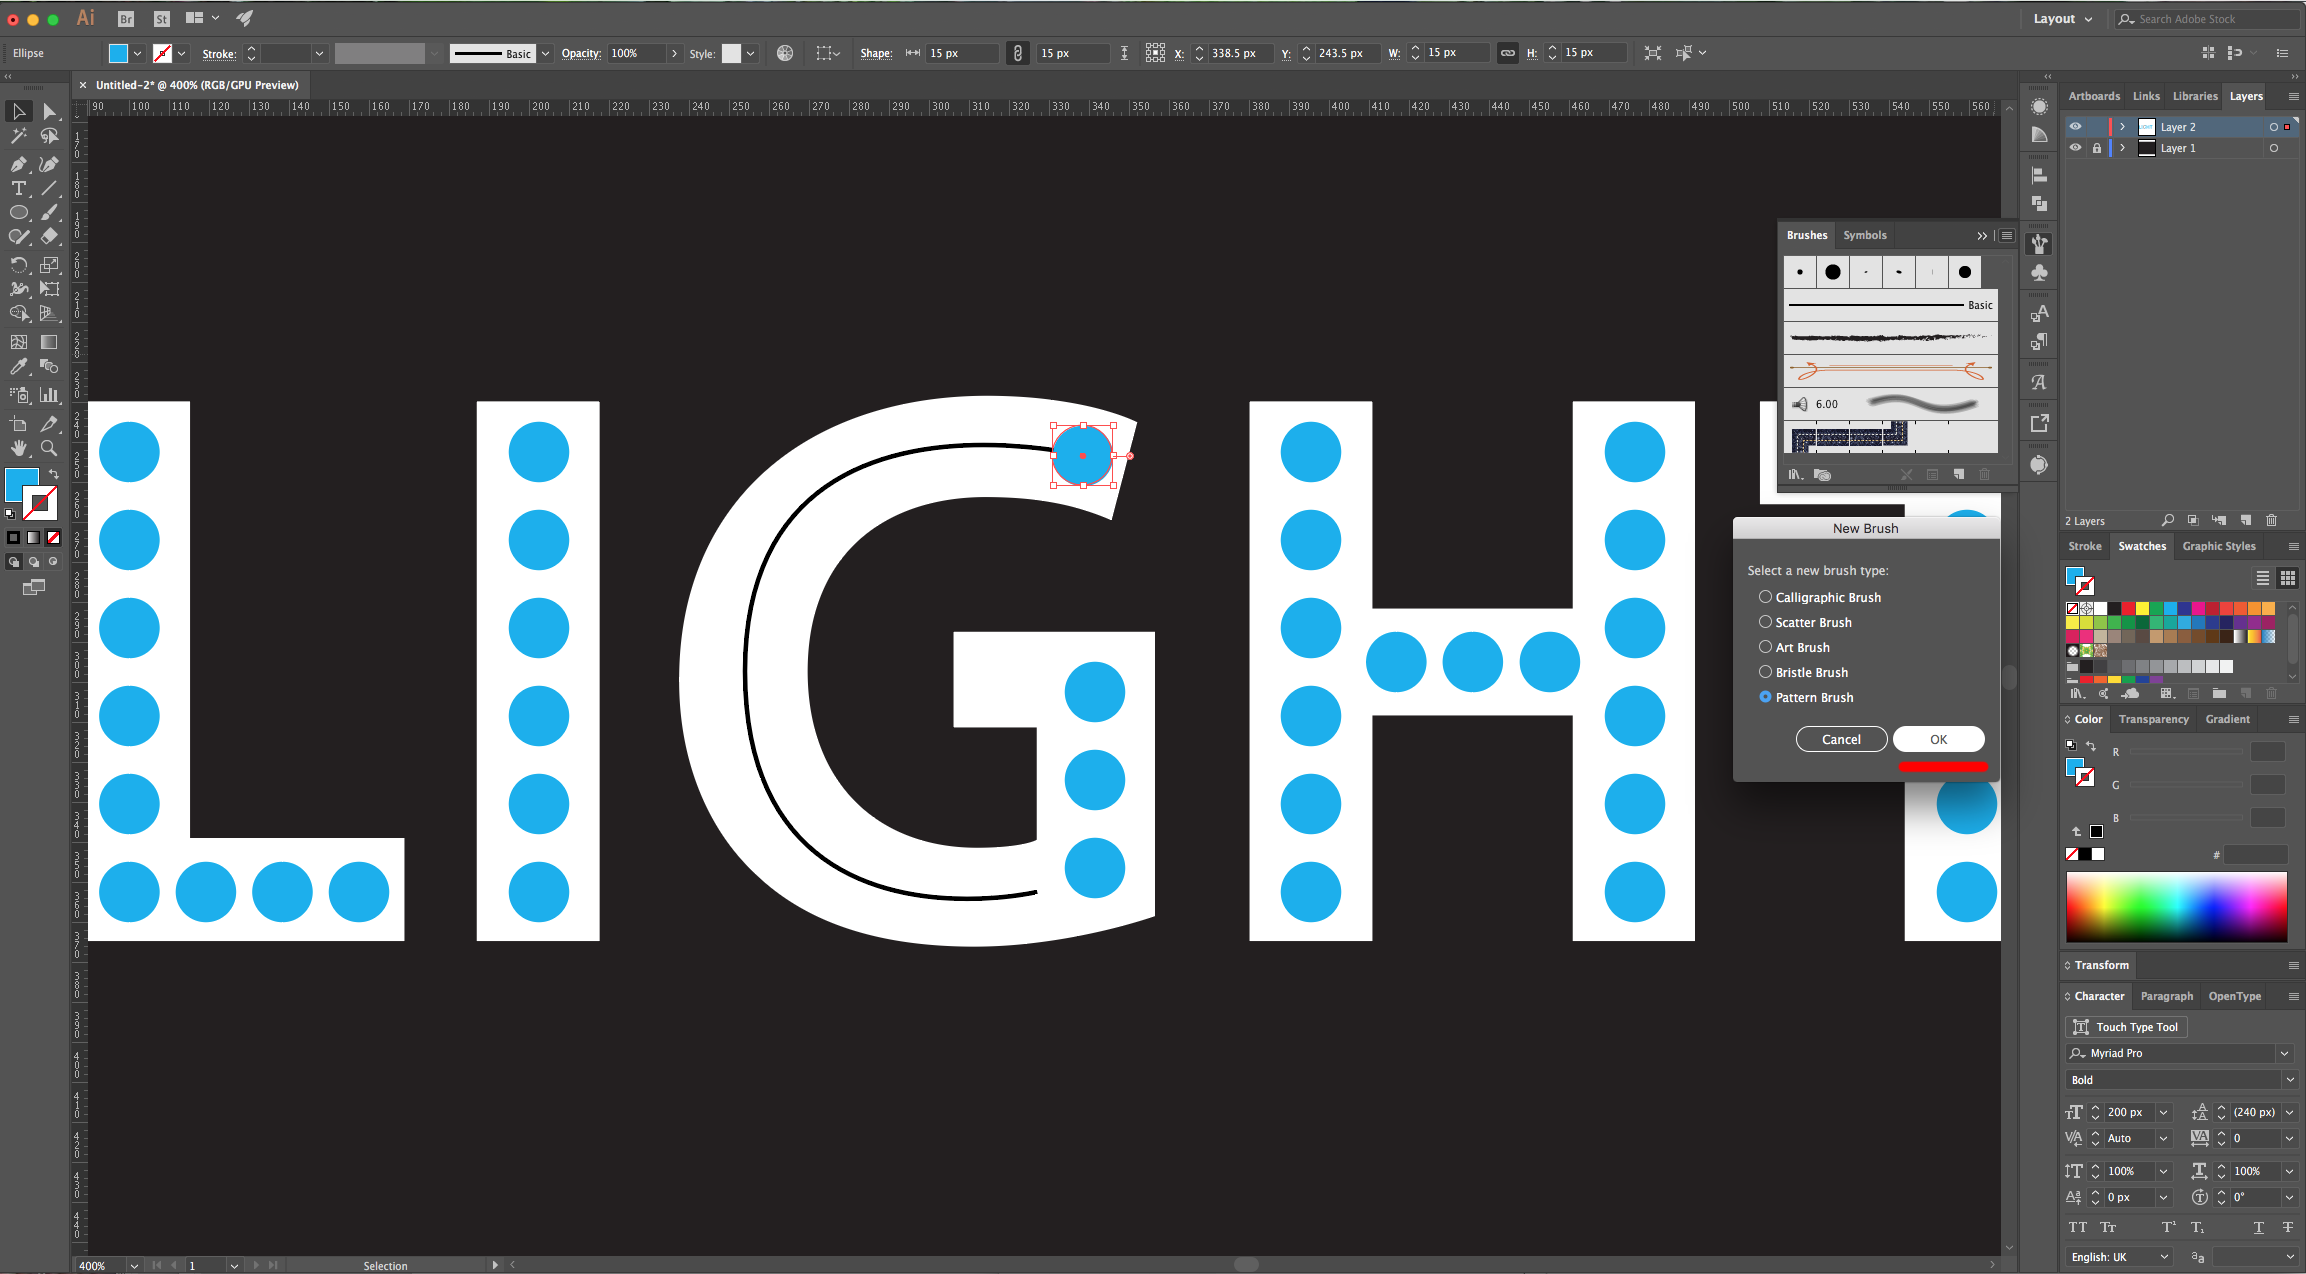
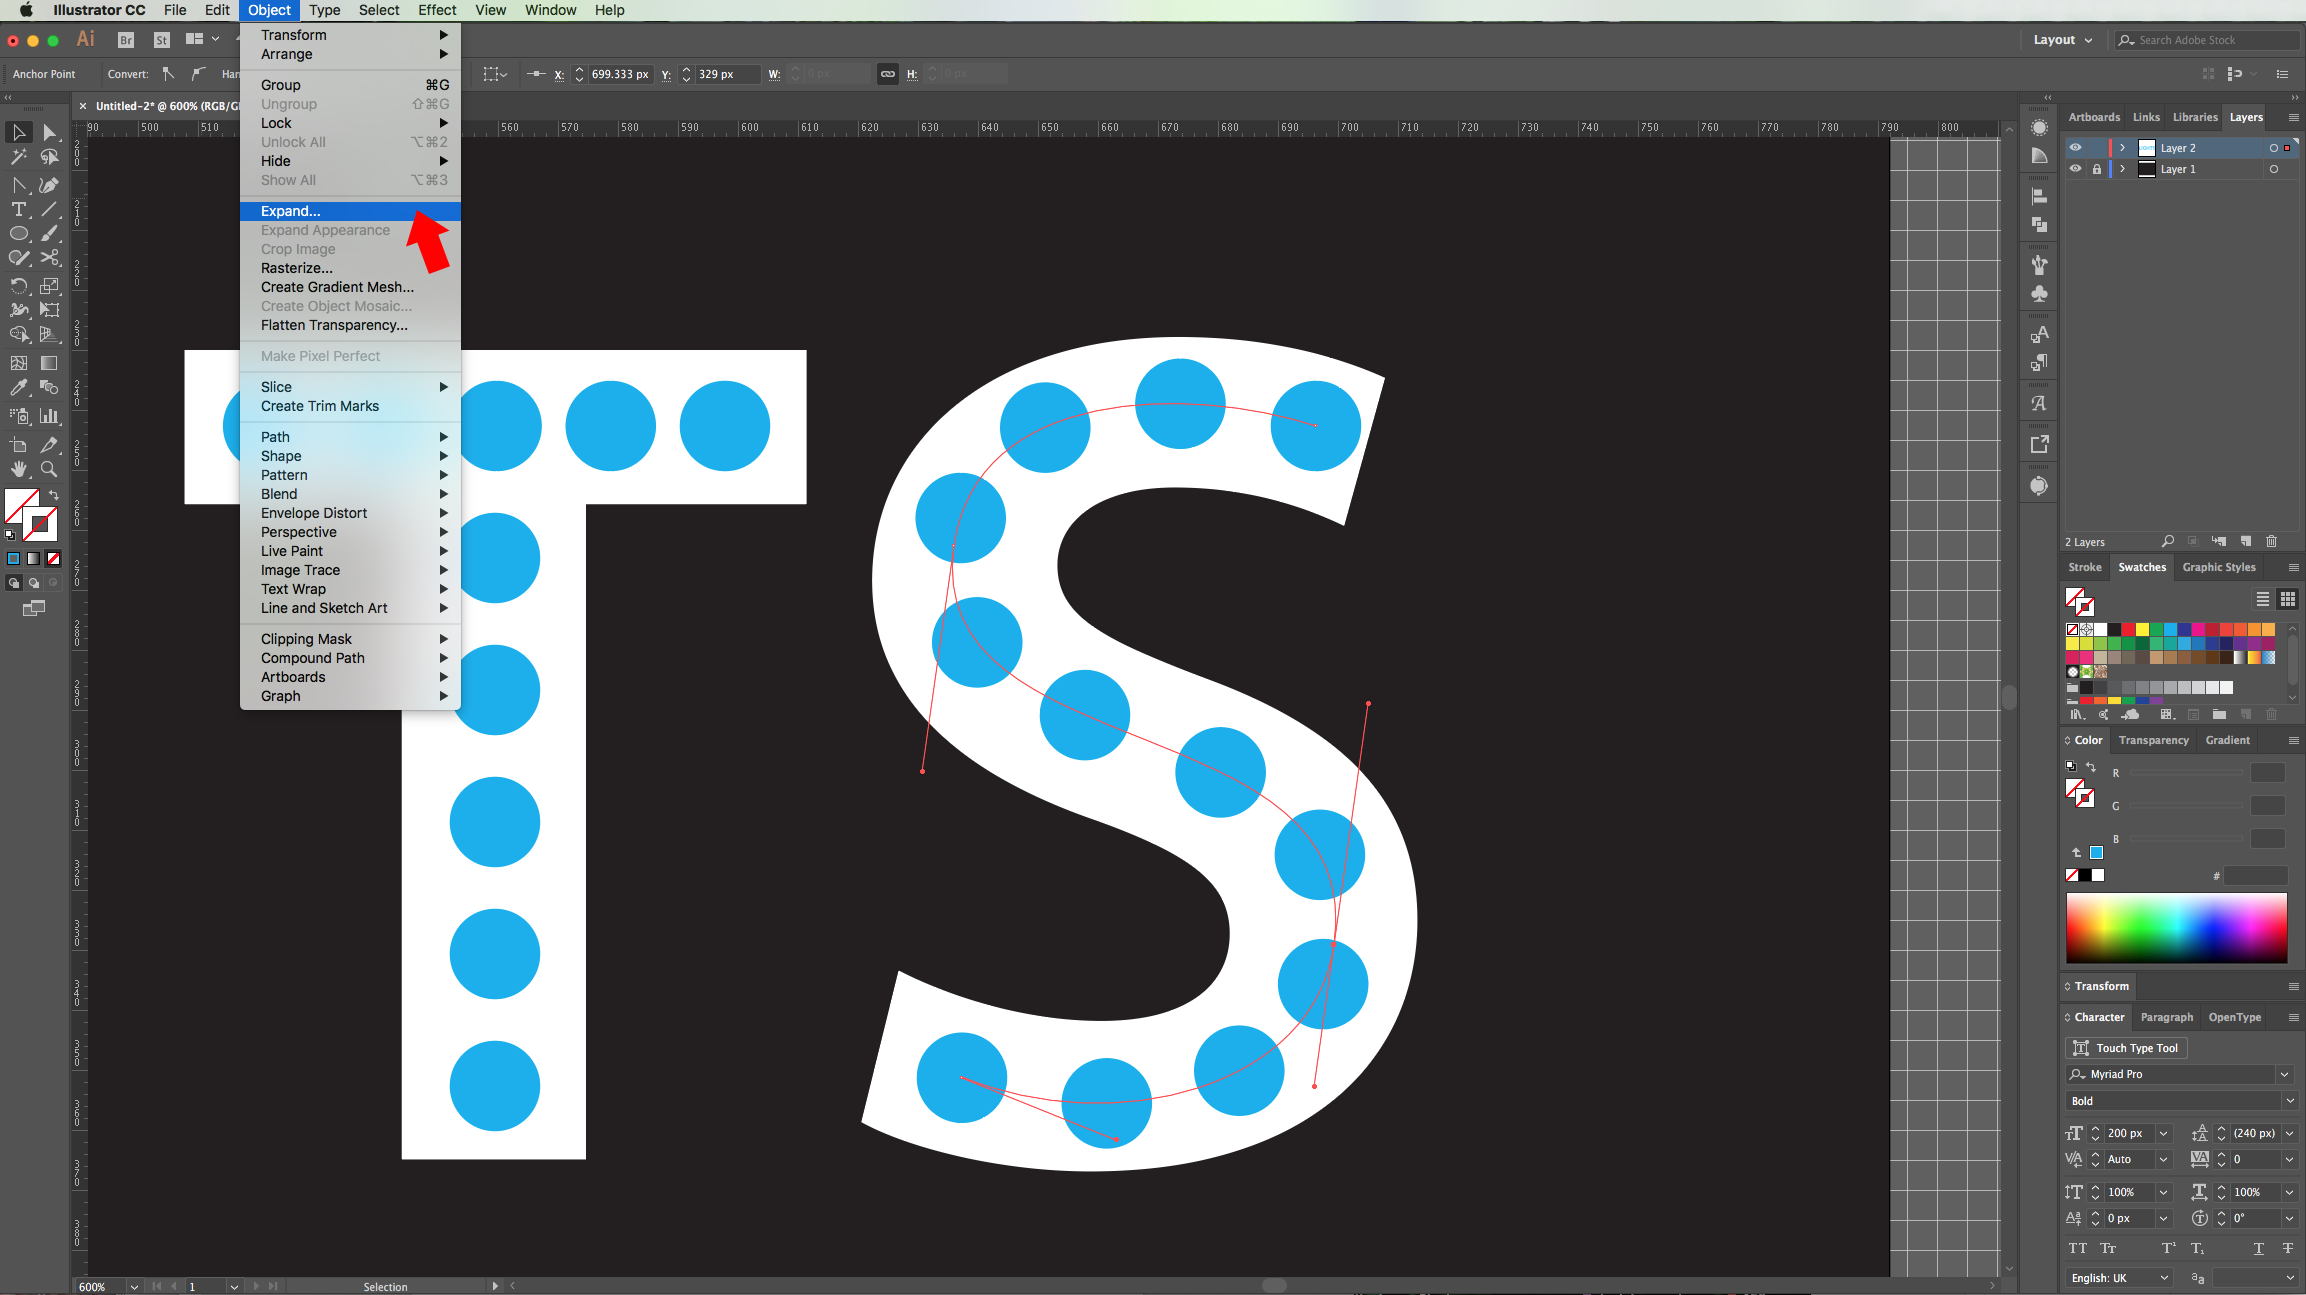
11 - For the curved letters, there are two ways to create the dotted line. First, select the “Pen Tool” (P), draw a path inside your letter (click “Enter” to end the “Path”). Select one of your circles, go to the “Brushes Panel”, click on the Menu icon on the Top-Right corner and choose “New Brush…”.
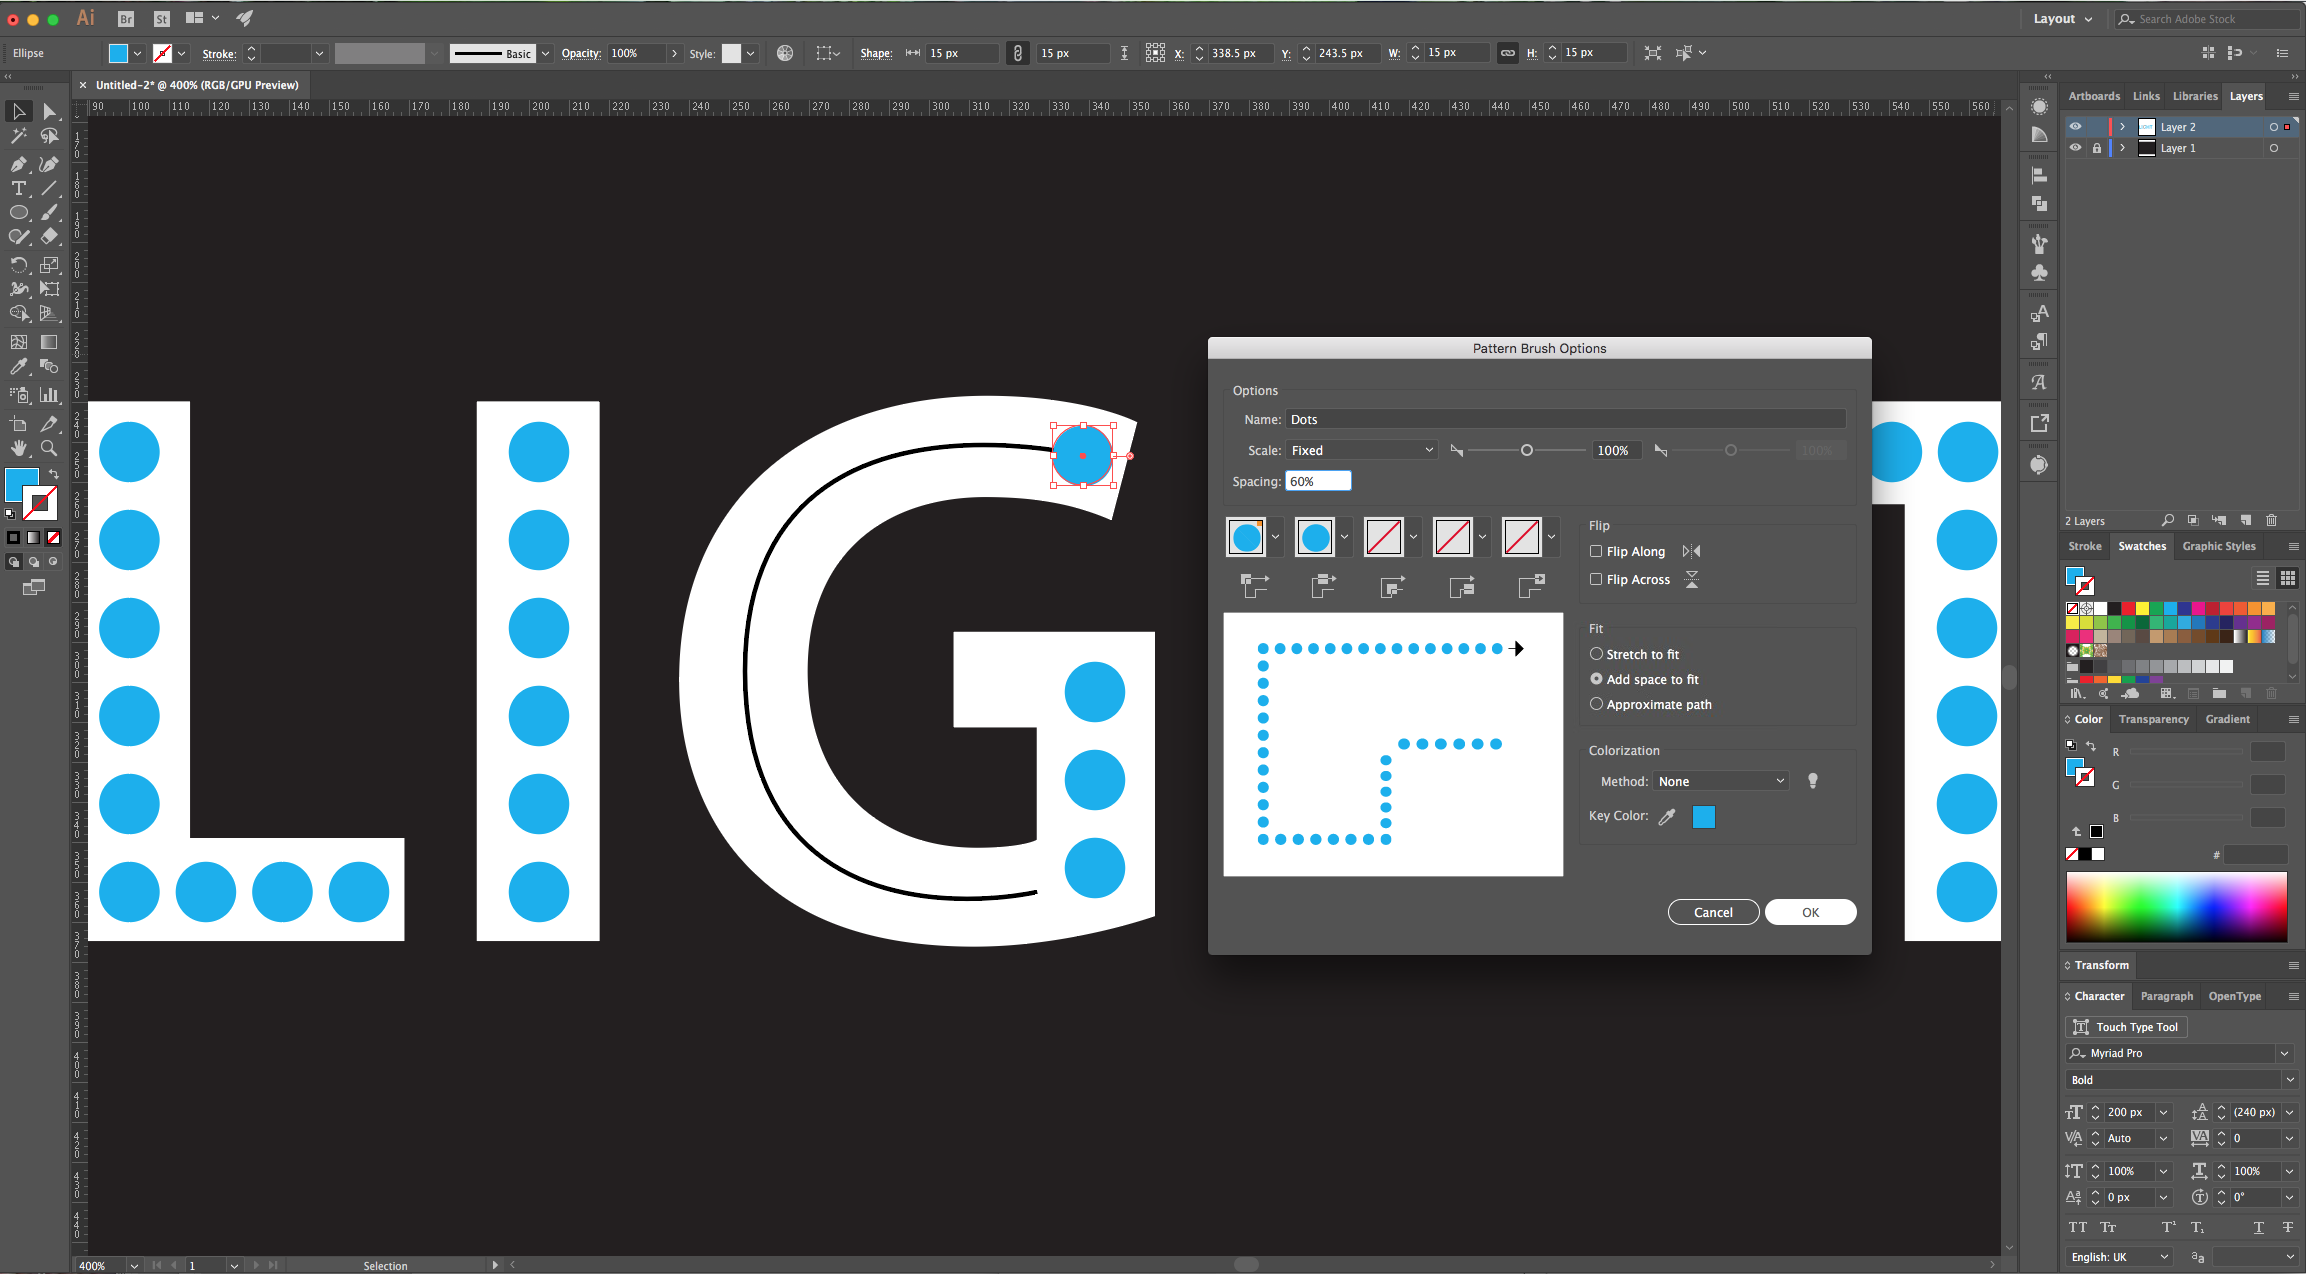
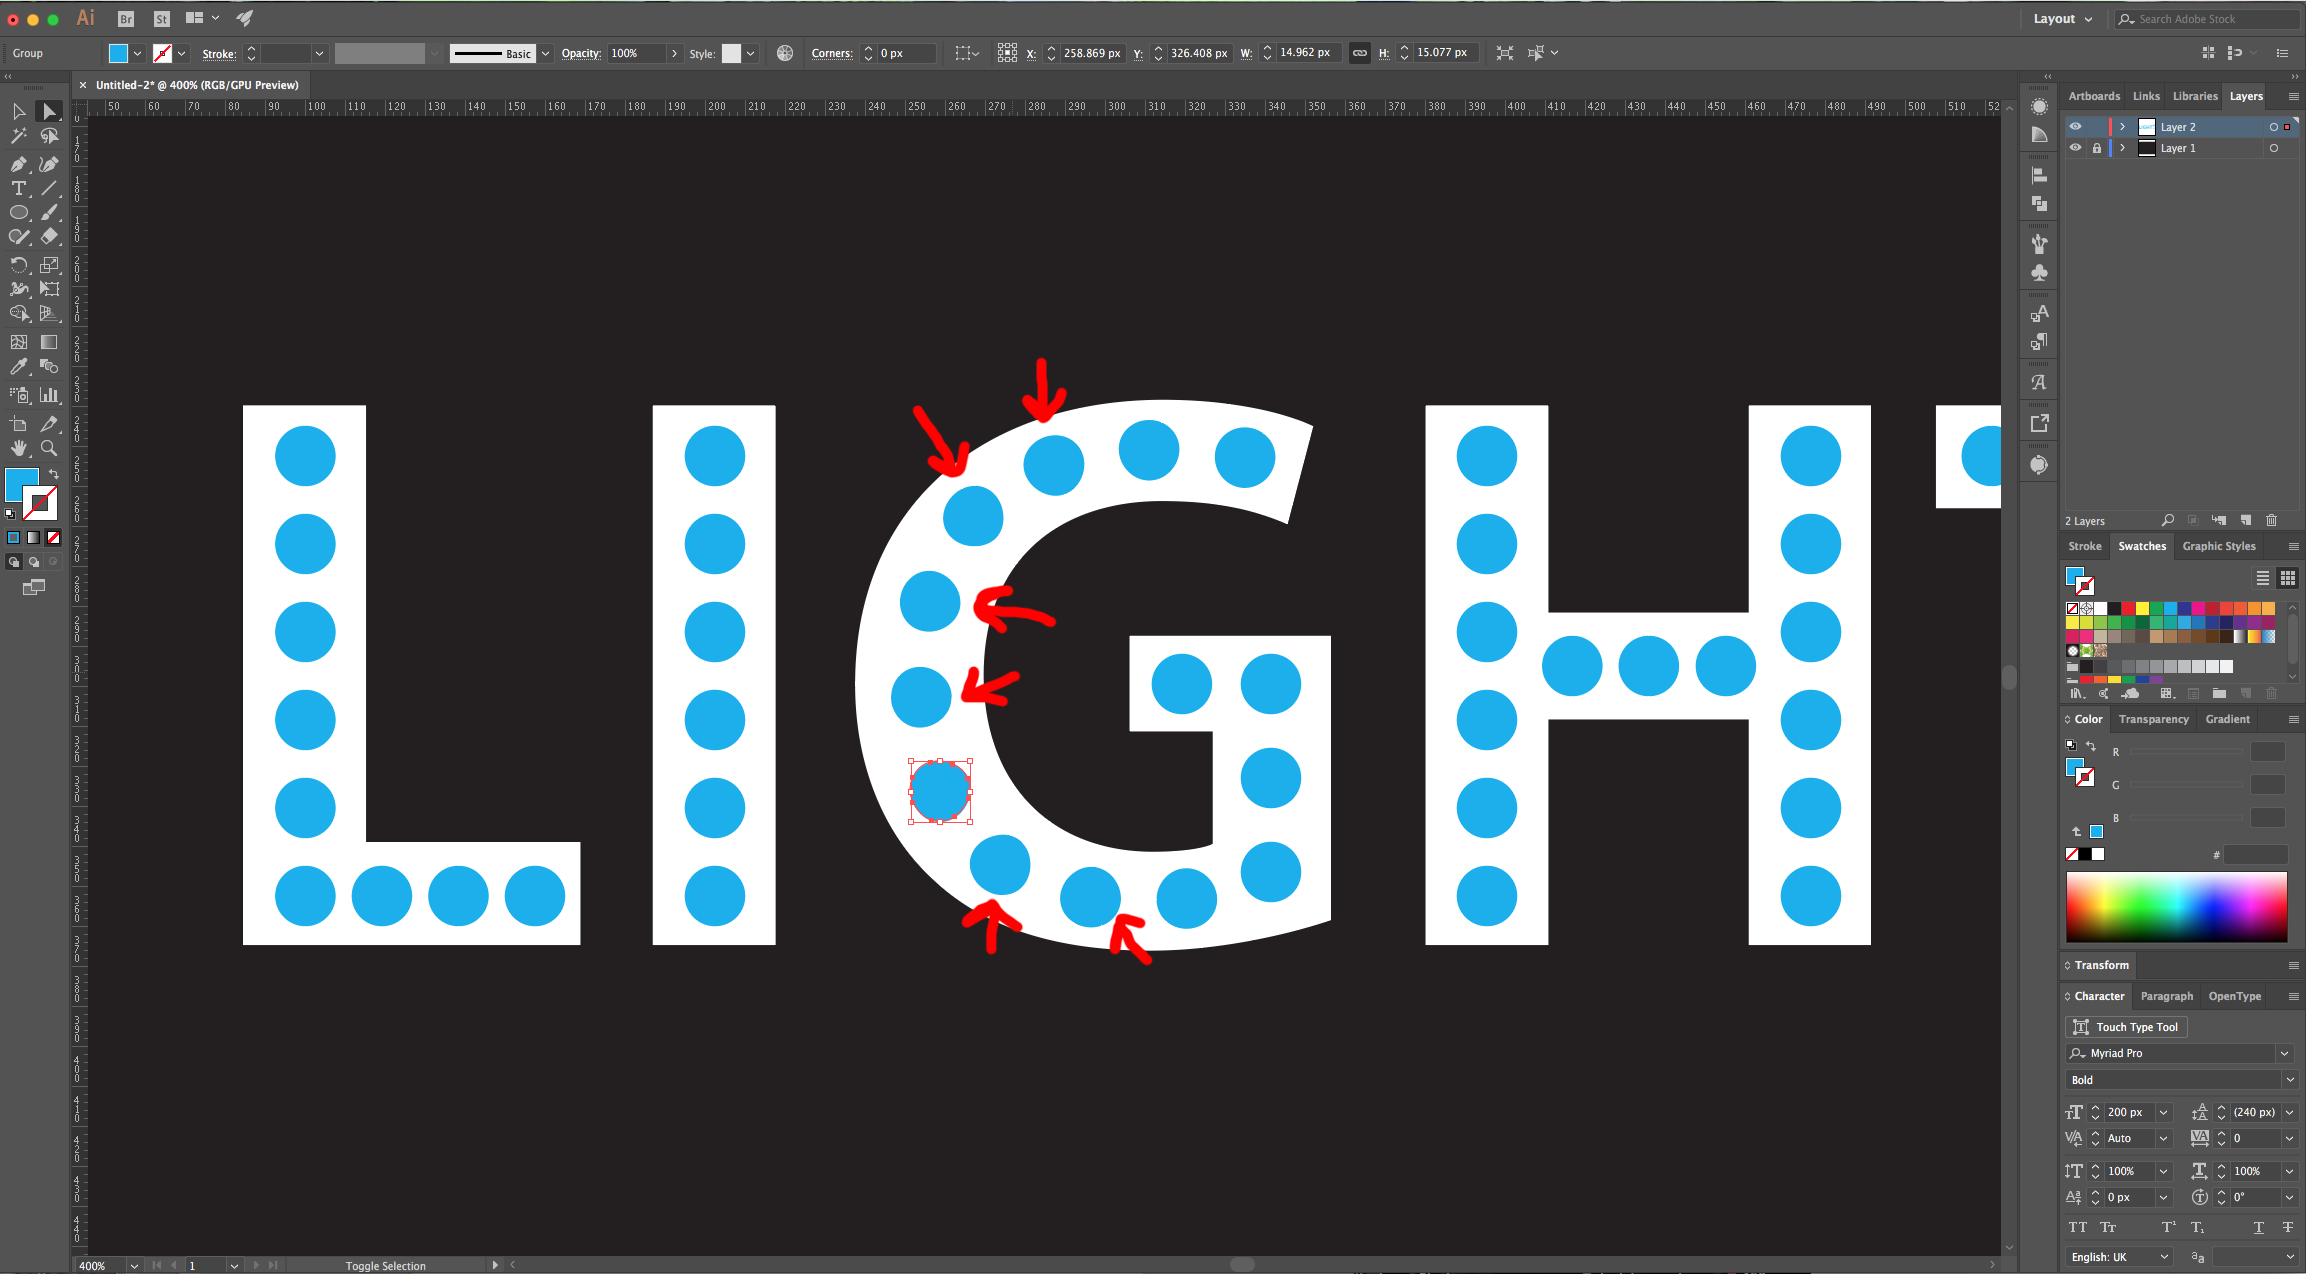
12 - Select “Pattern Brush” and use the following settings. Then, select your “Path”, go to the “Brush Definition” drop-down menu and choose your new brush. If you need to adjust the “Path” ends a bit, use the “Direct Selection Tool” (A). Once you are done, go to Object > Expand Appearance to release the circles.
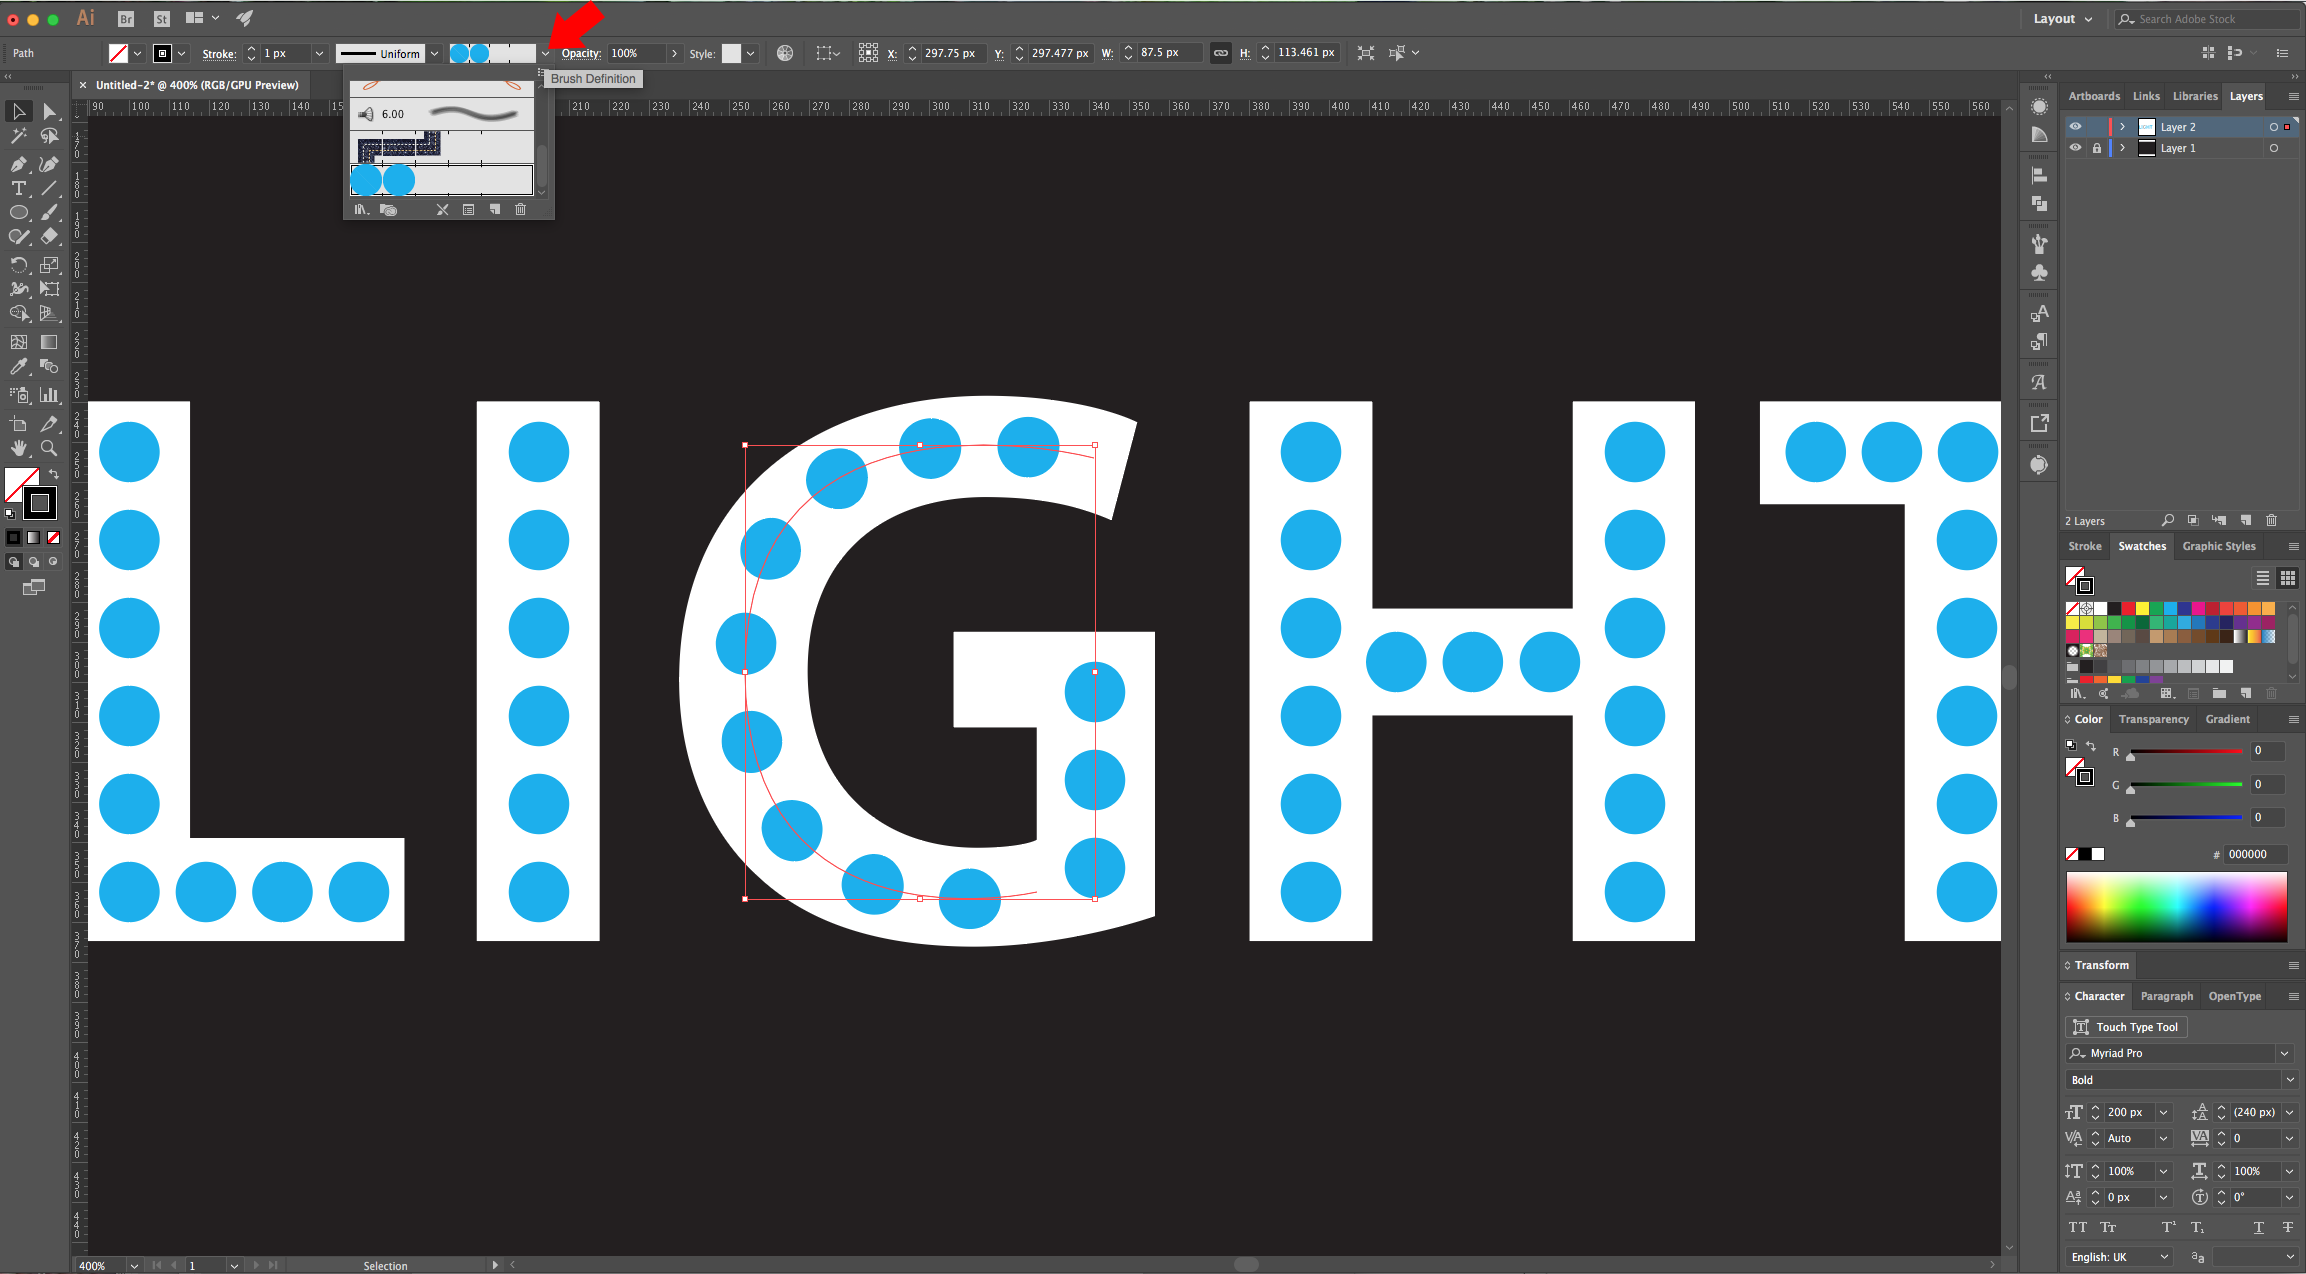


13 - You will notice that some of the circles change its shape and are no longer completely round. You can add a circle on top and erase the wrong one or you can use the second option.
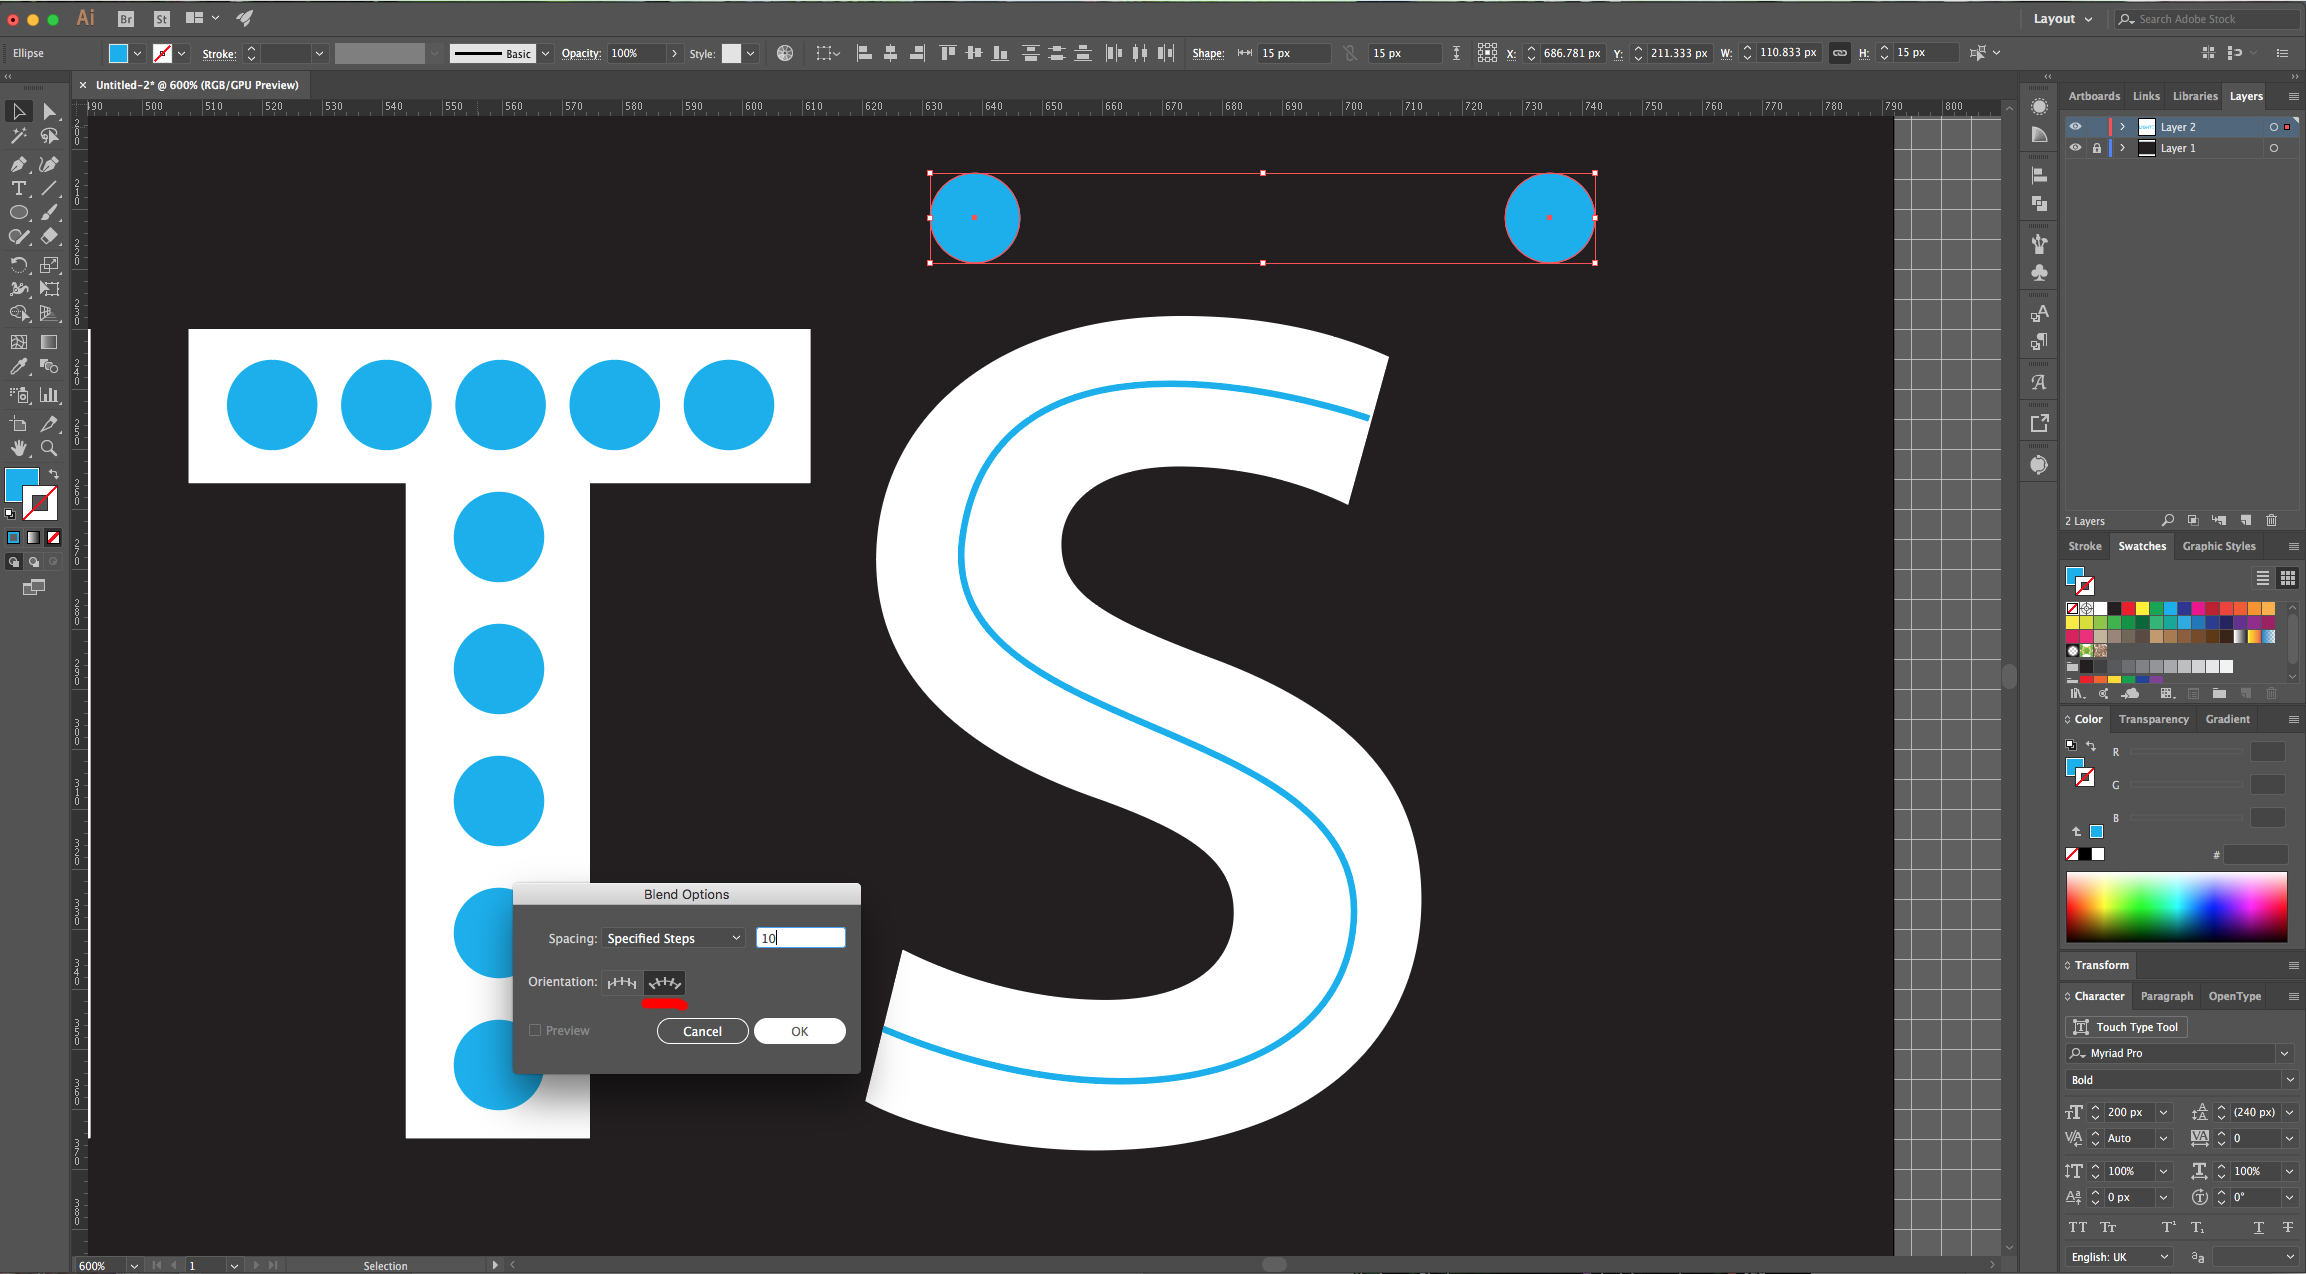
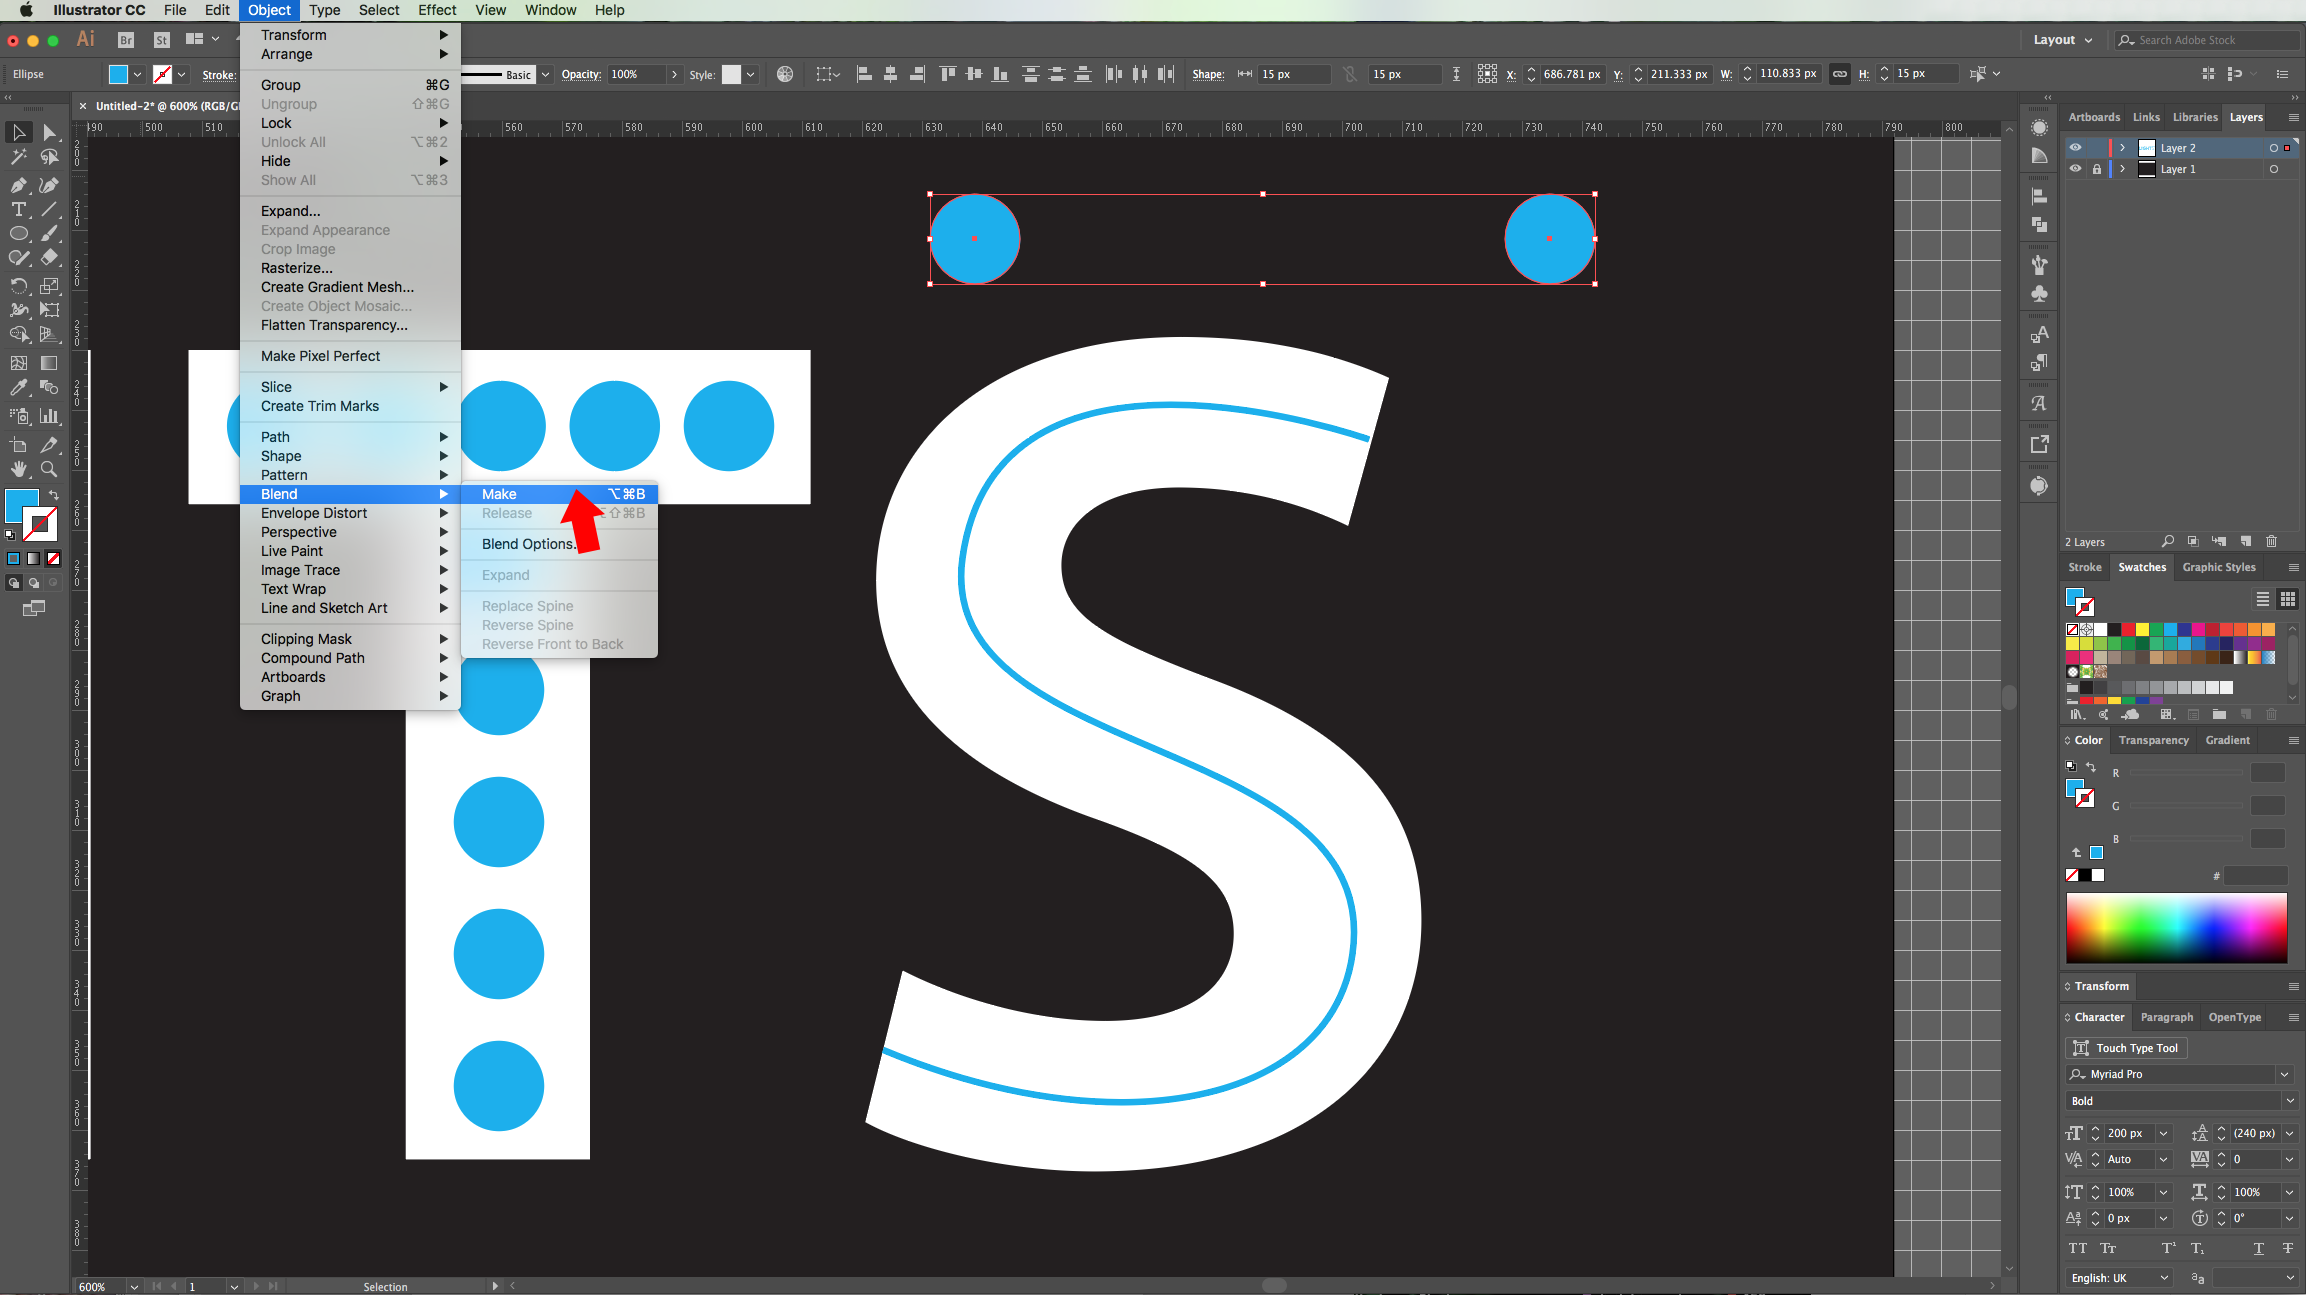
14 - Copy one circle and then place a second one a bit to the right but aligned with the first. Select both and go to Object > Blend > Blend Options. Choose “Specified Steps”, use an approximate amount (we used 10) and choose “Align to Path”, then go to Object > Blend > Make.
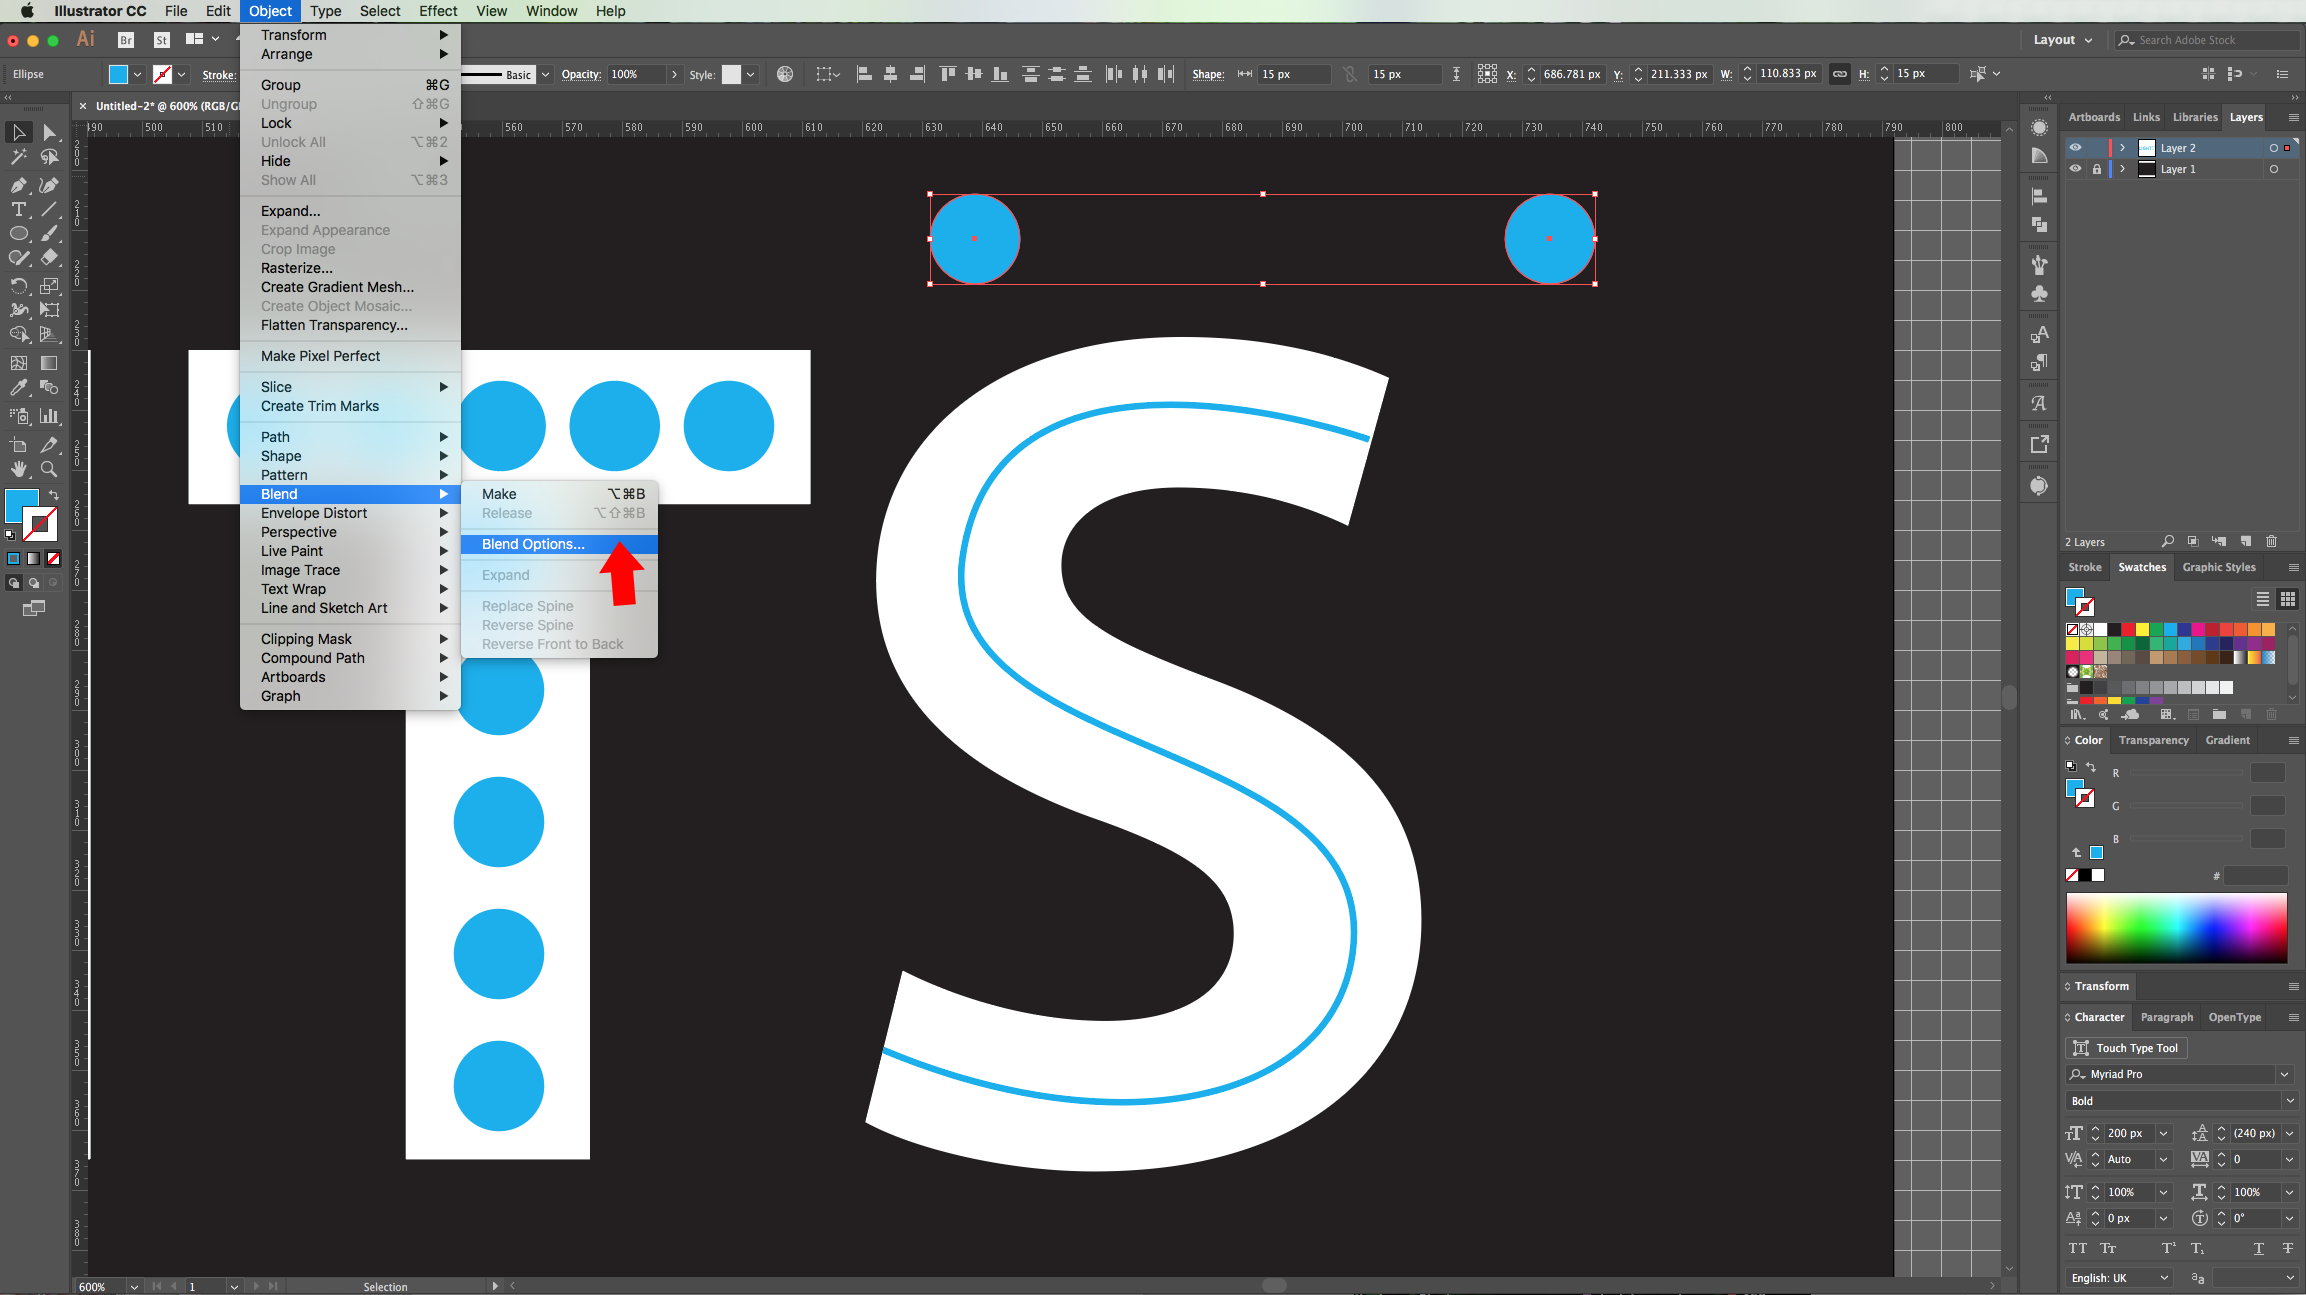
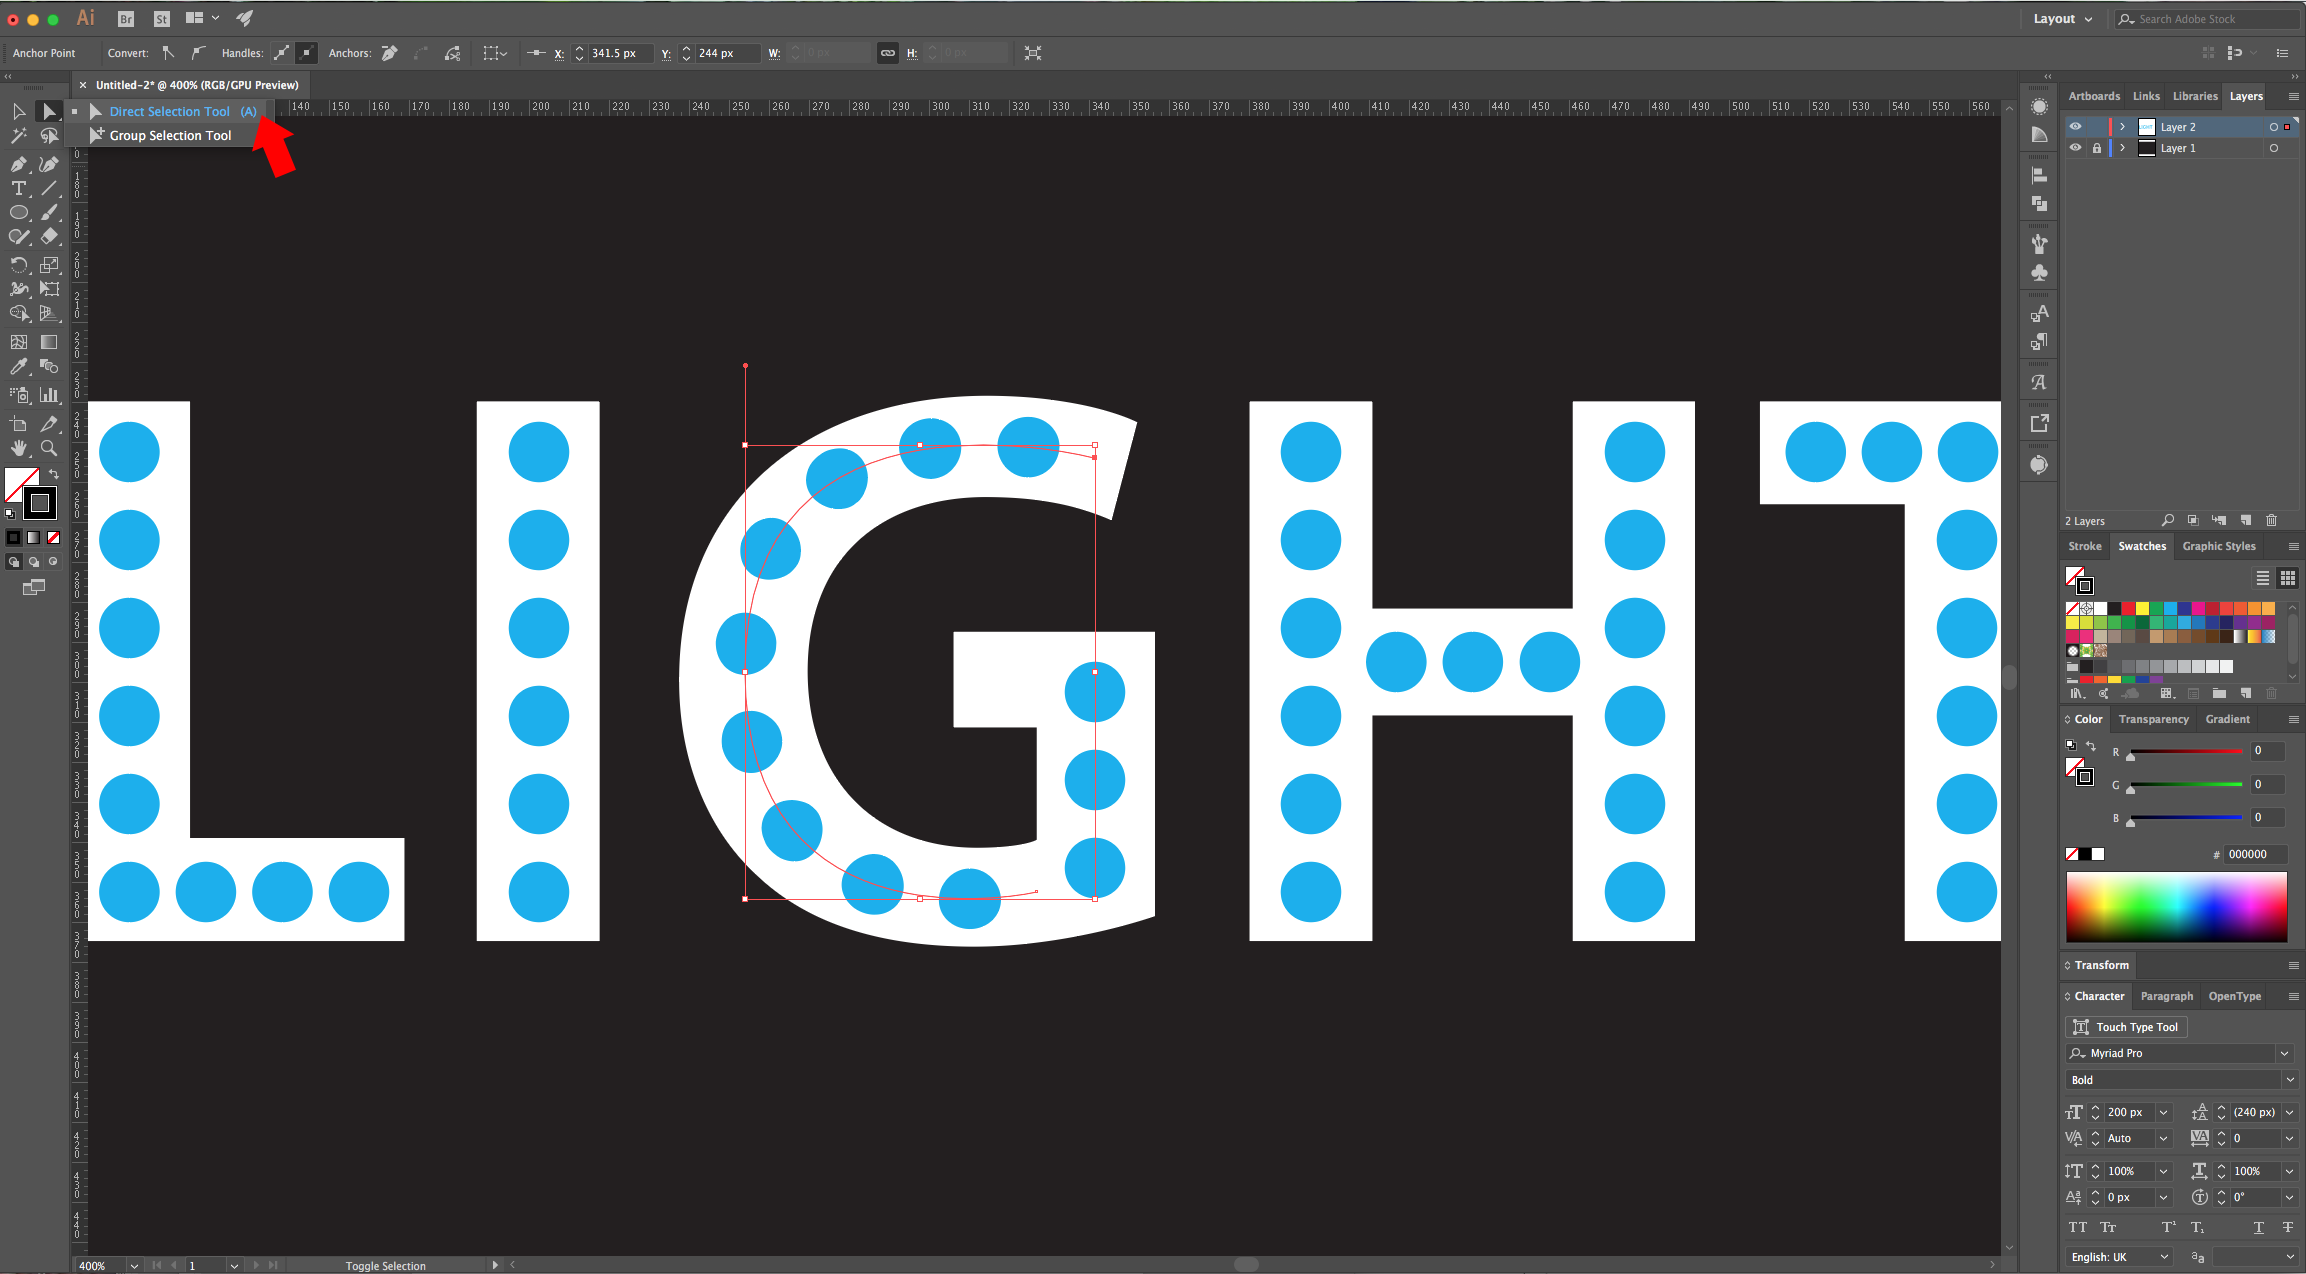
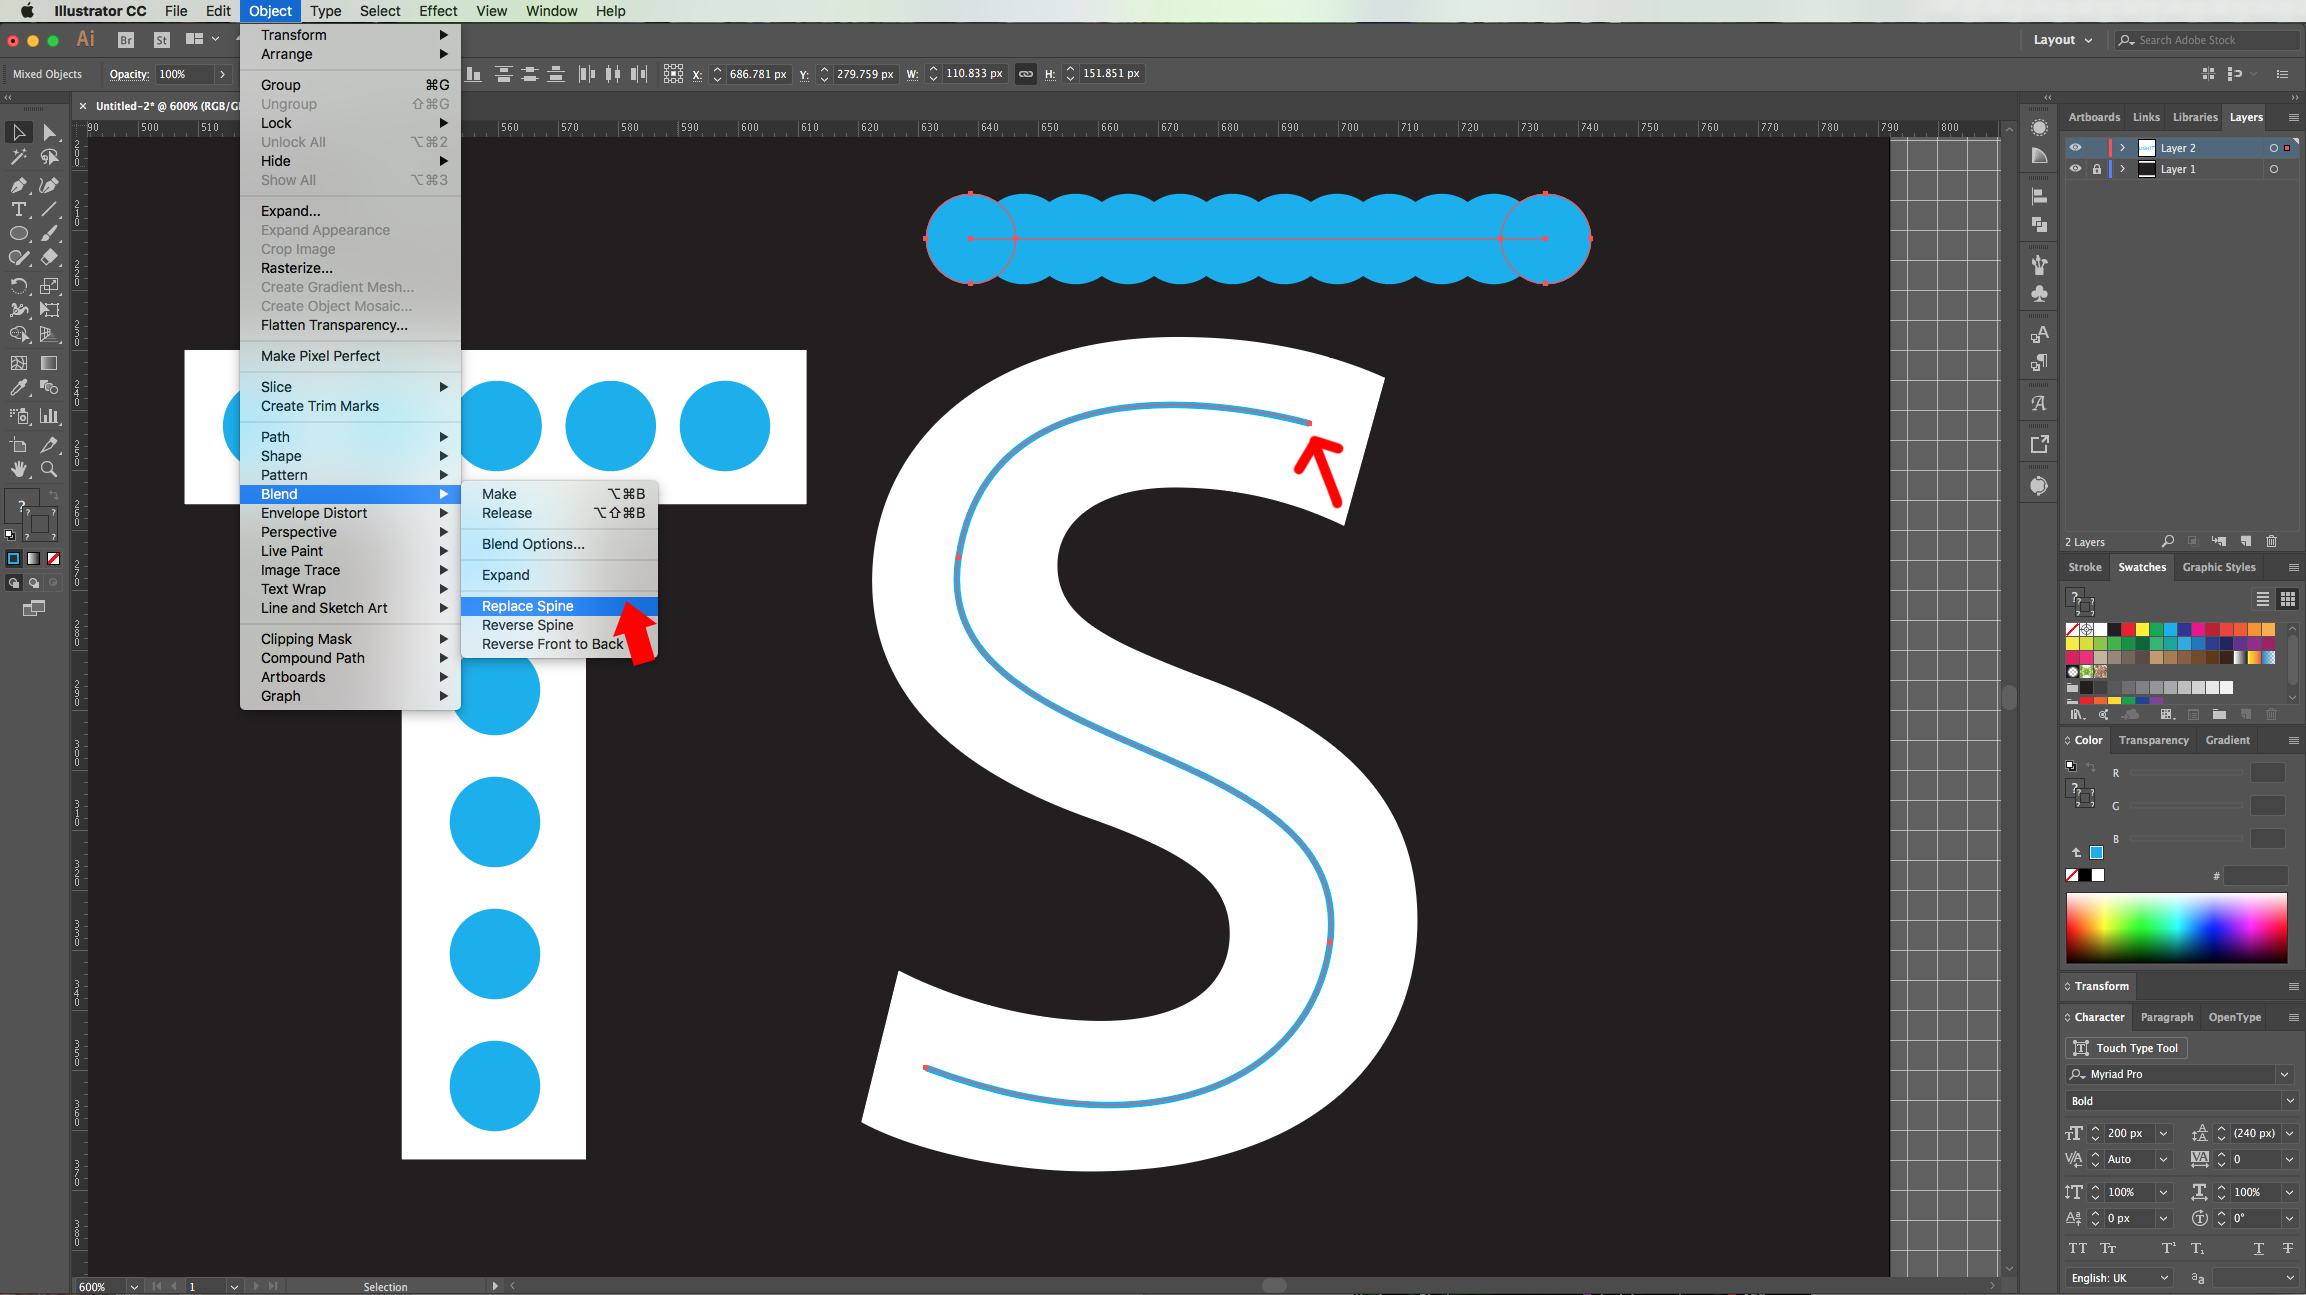
15 - Next, use the “Direct Selection Tool” (A) to fix the path inside your letter. Select the blended circles and the path inside the letter and go to Object > Blend > Replace Spine. You can always modify the amount of “Steps” by going back into the “Blend > Make” dialogue. You can also fix your “Path” with the “Direct Selection Tool” (A).
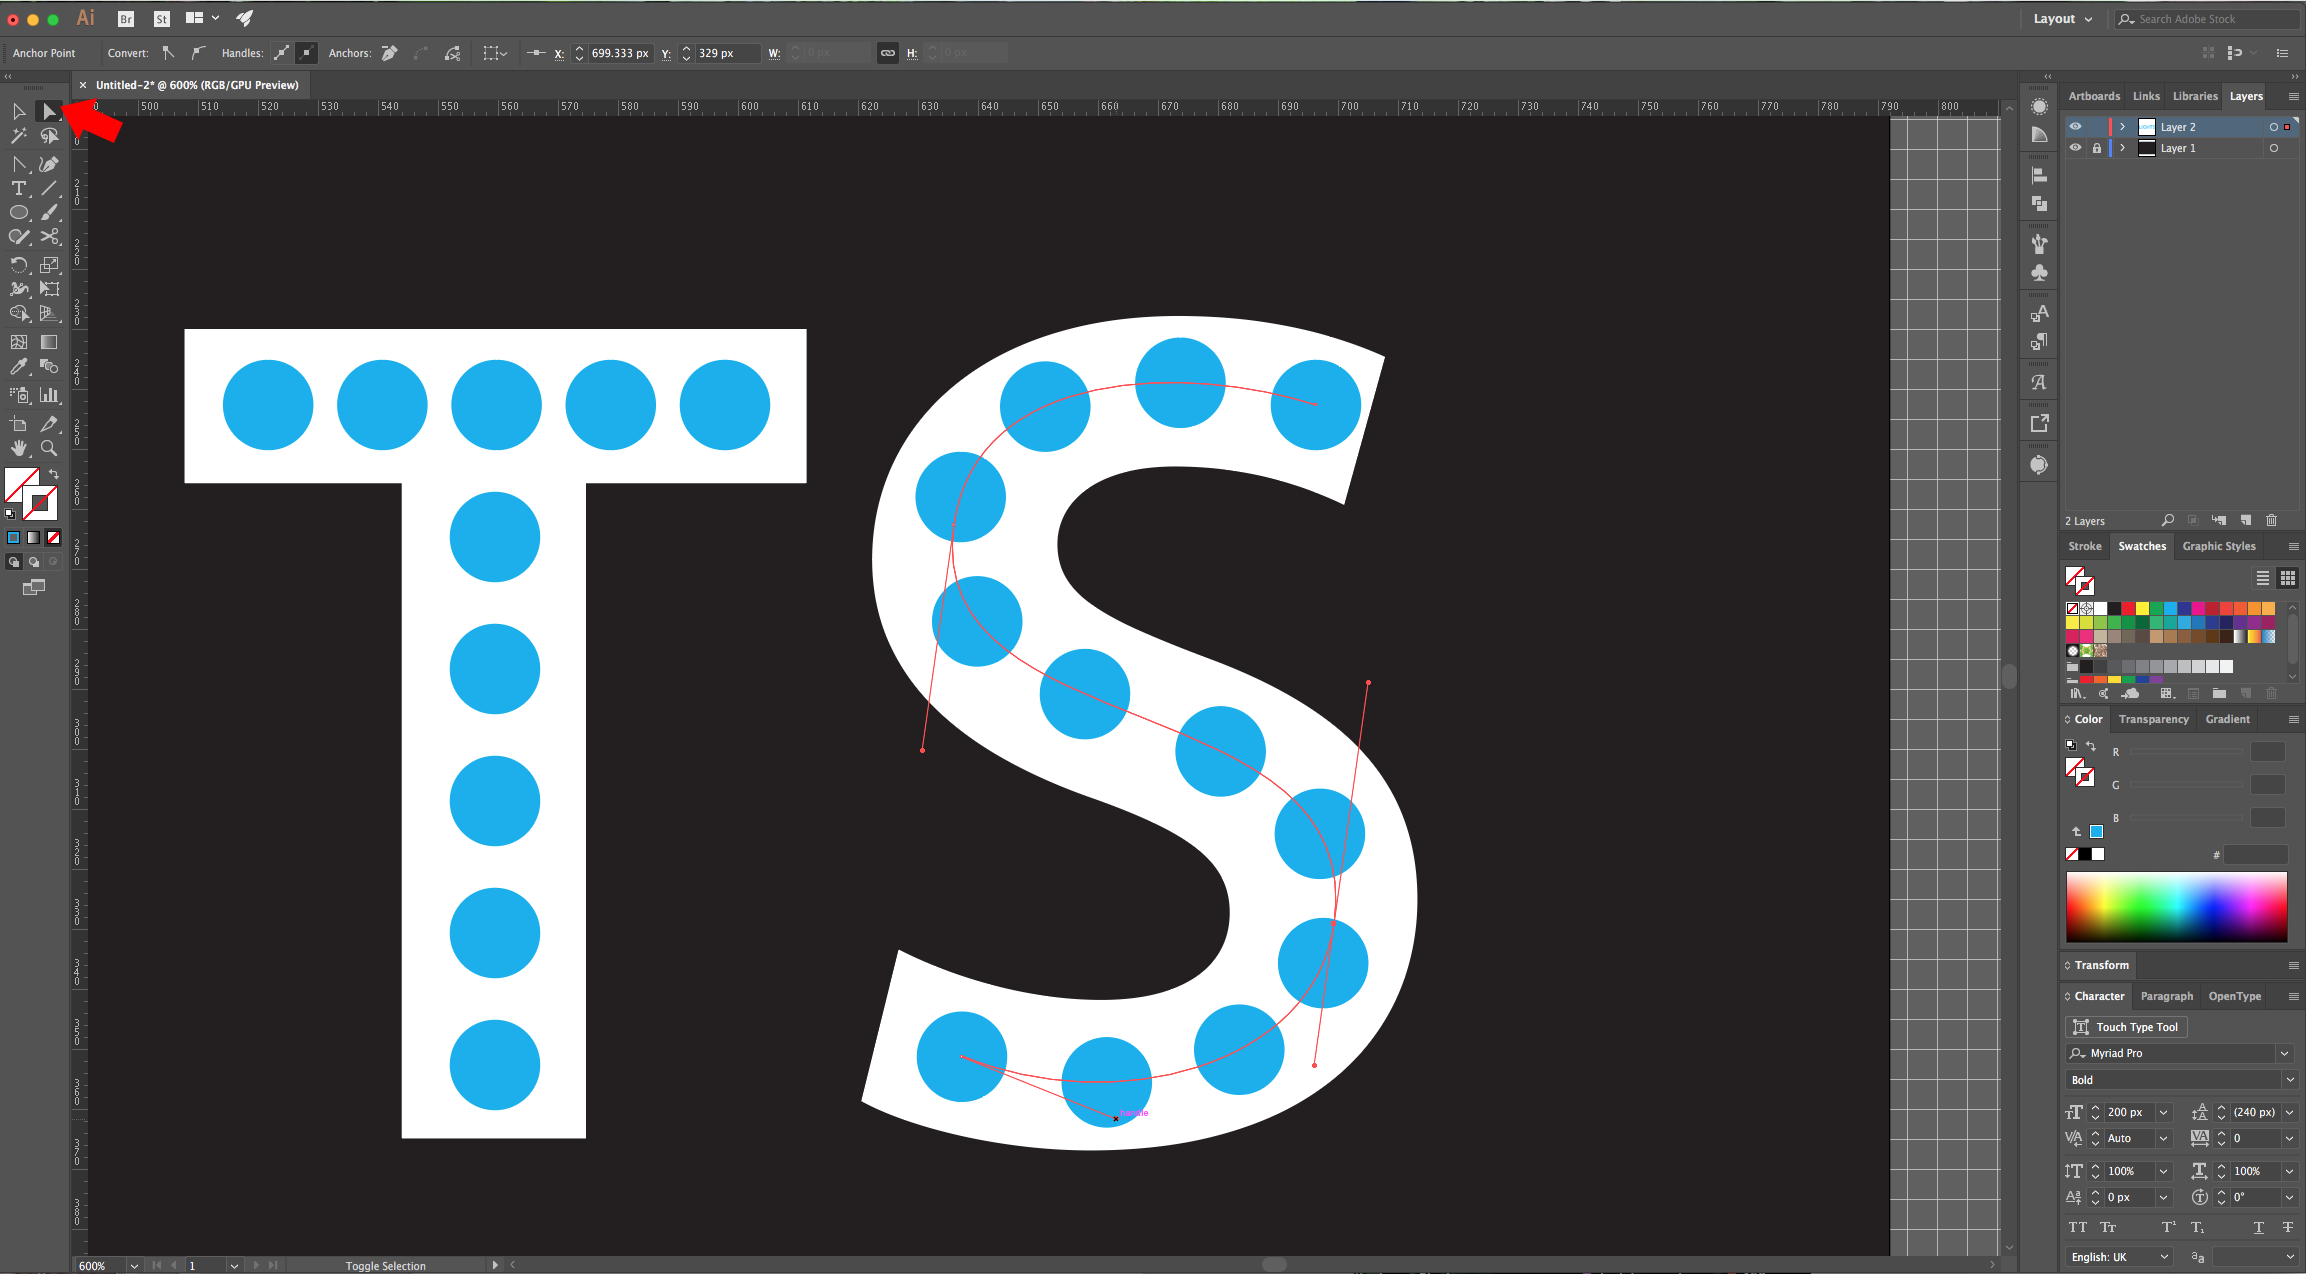
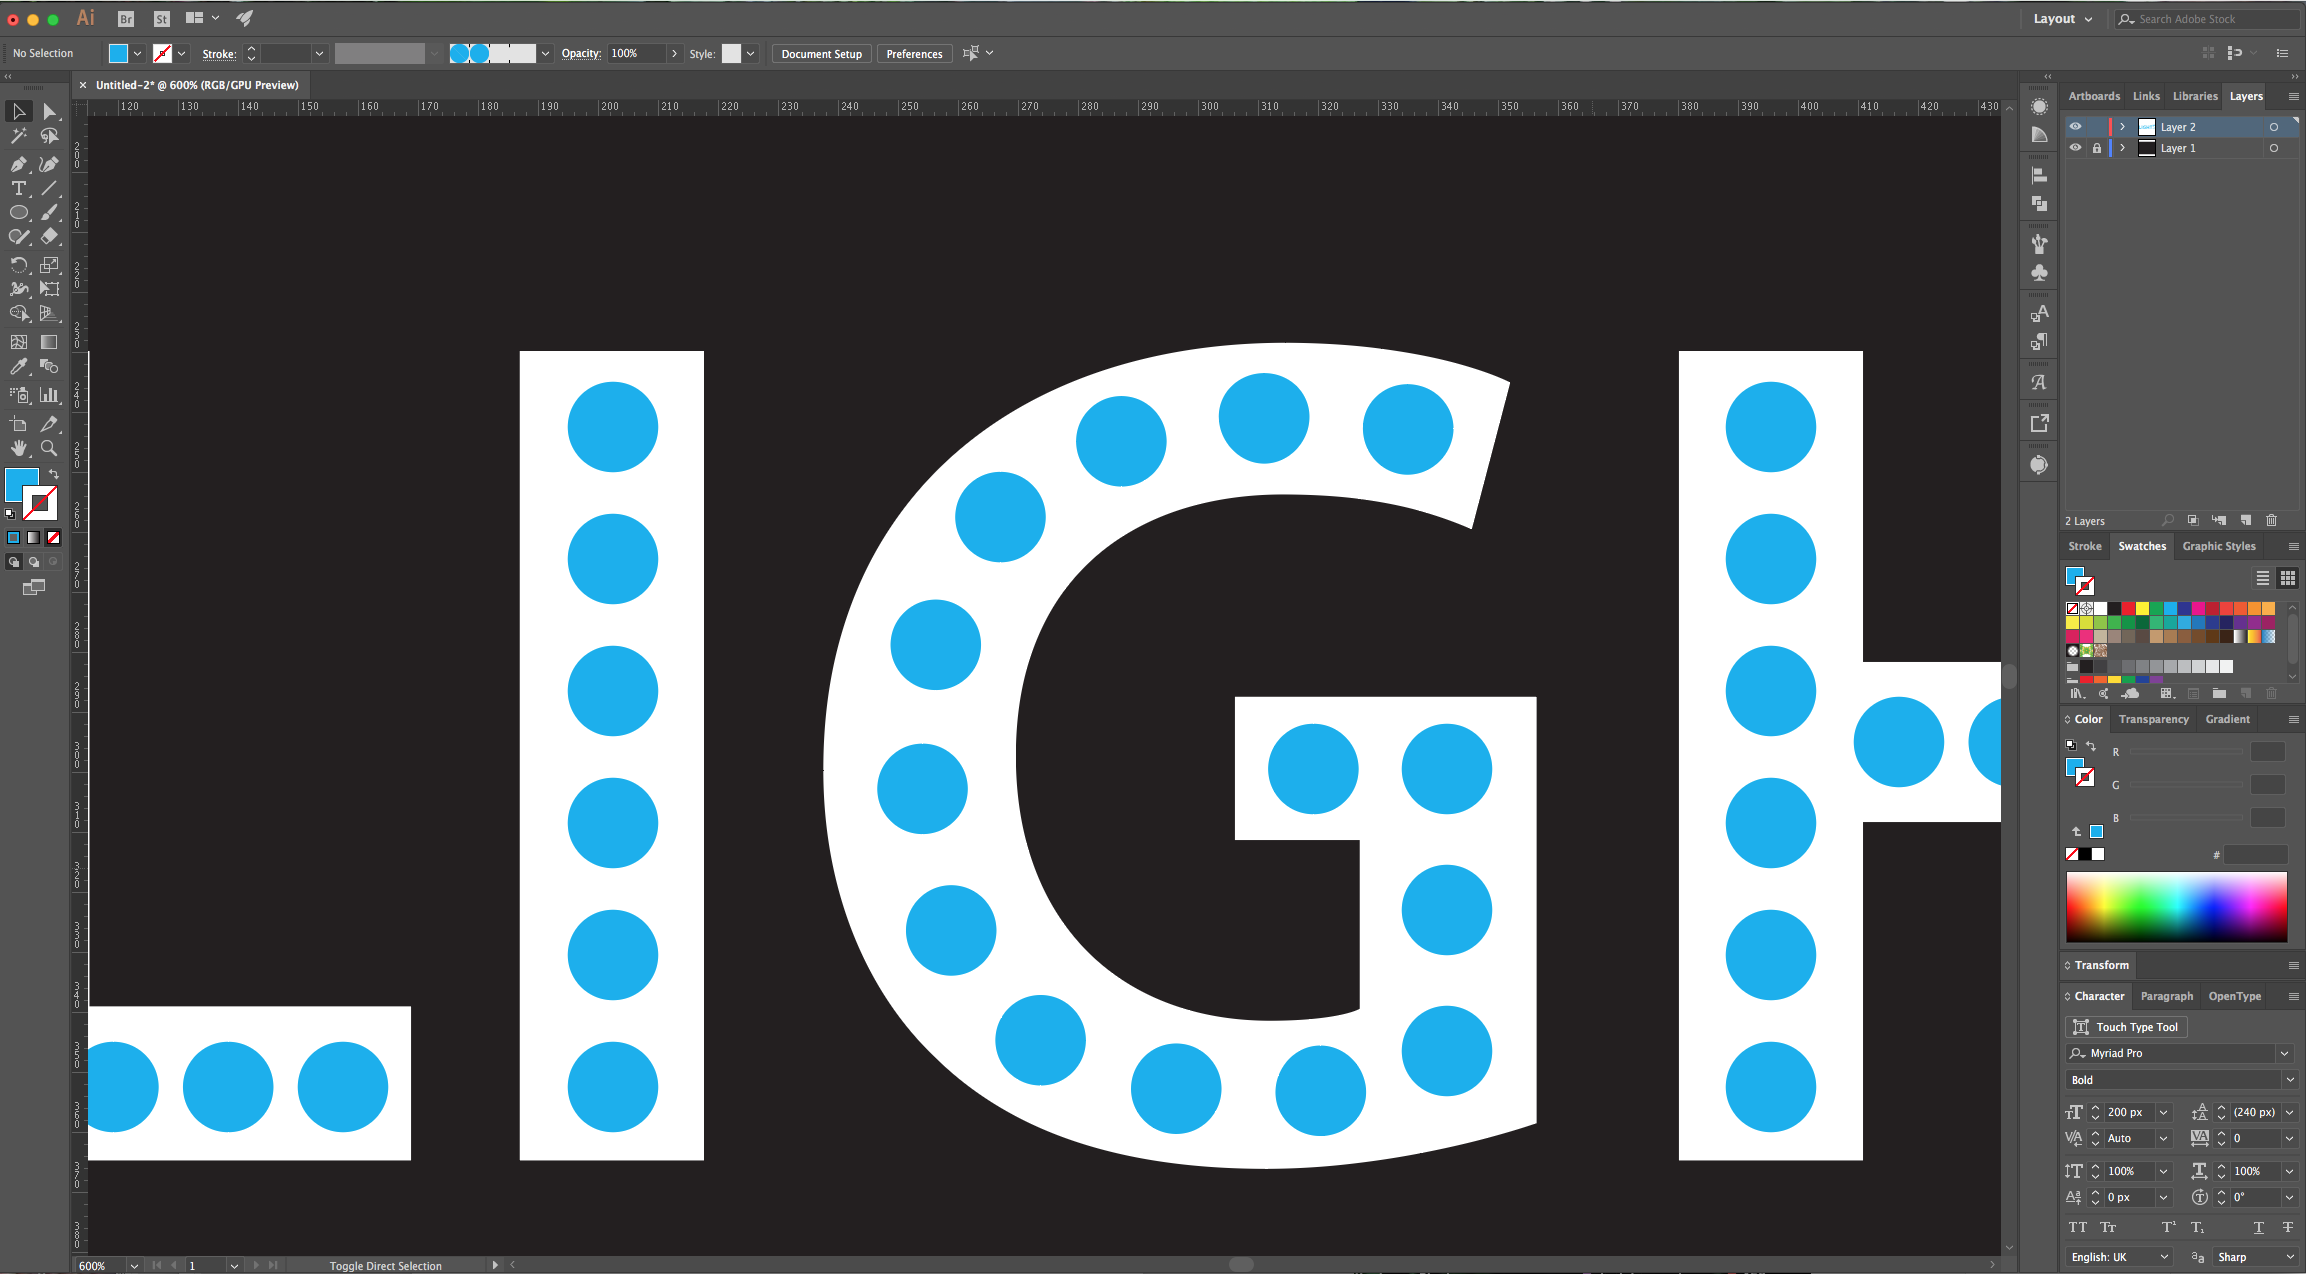
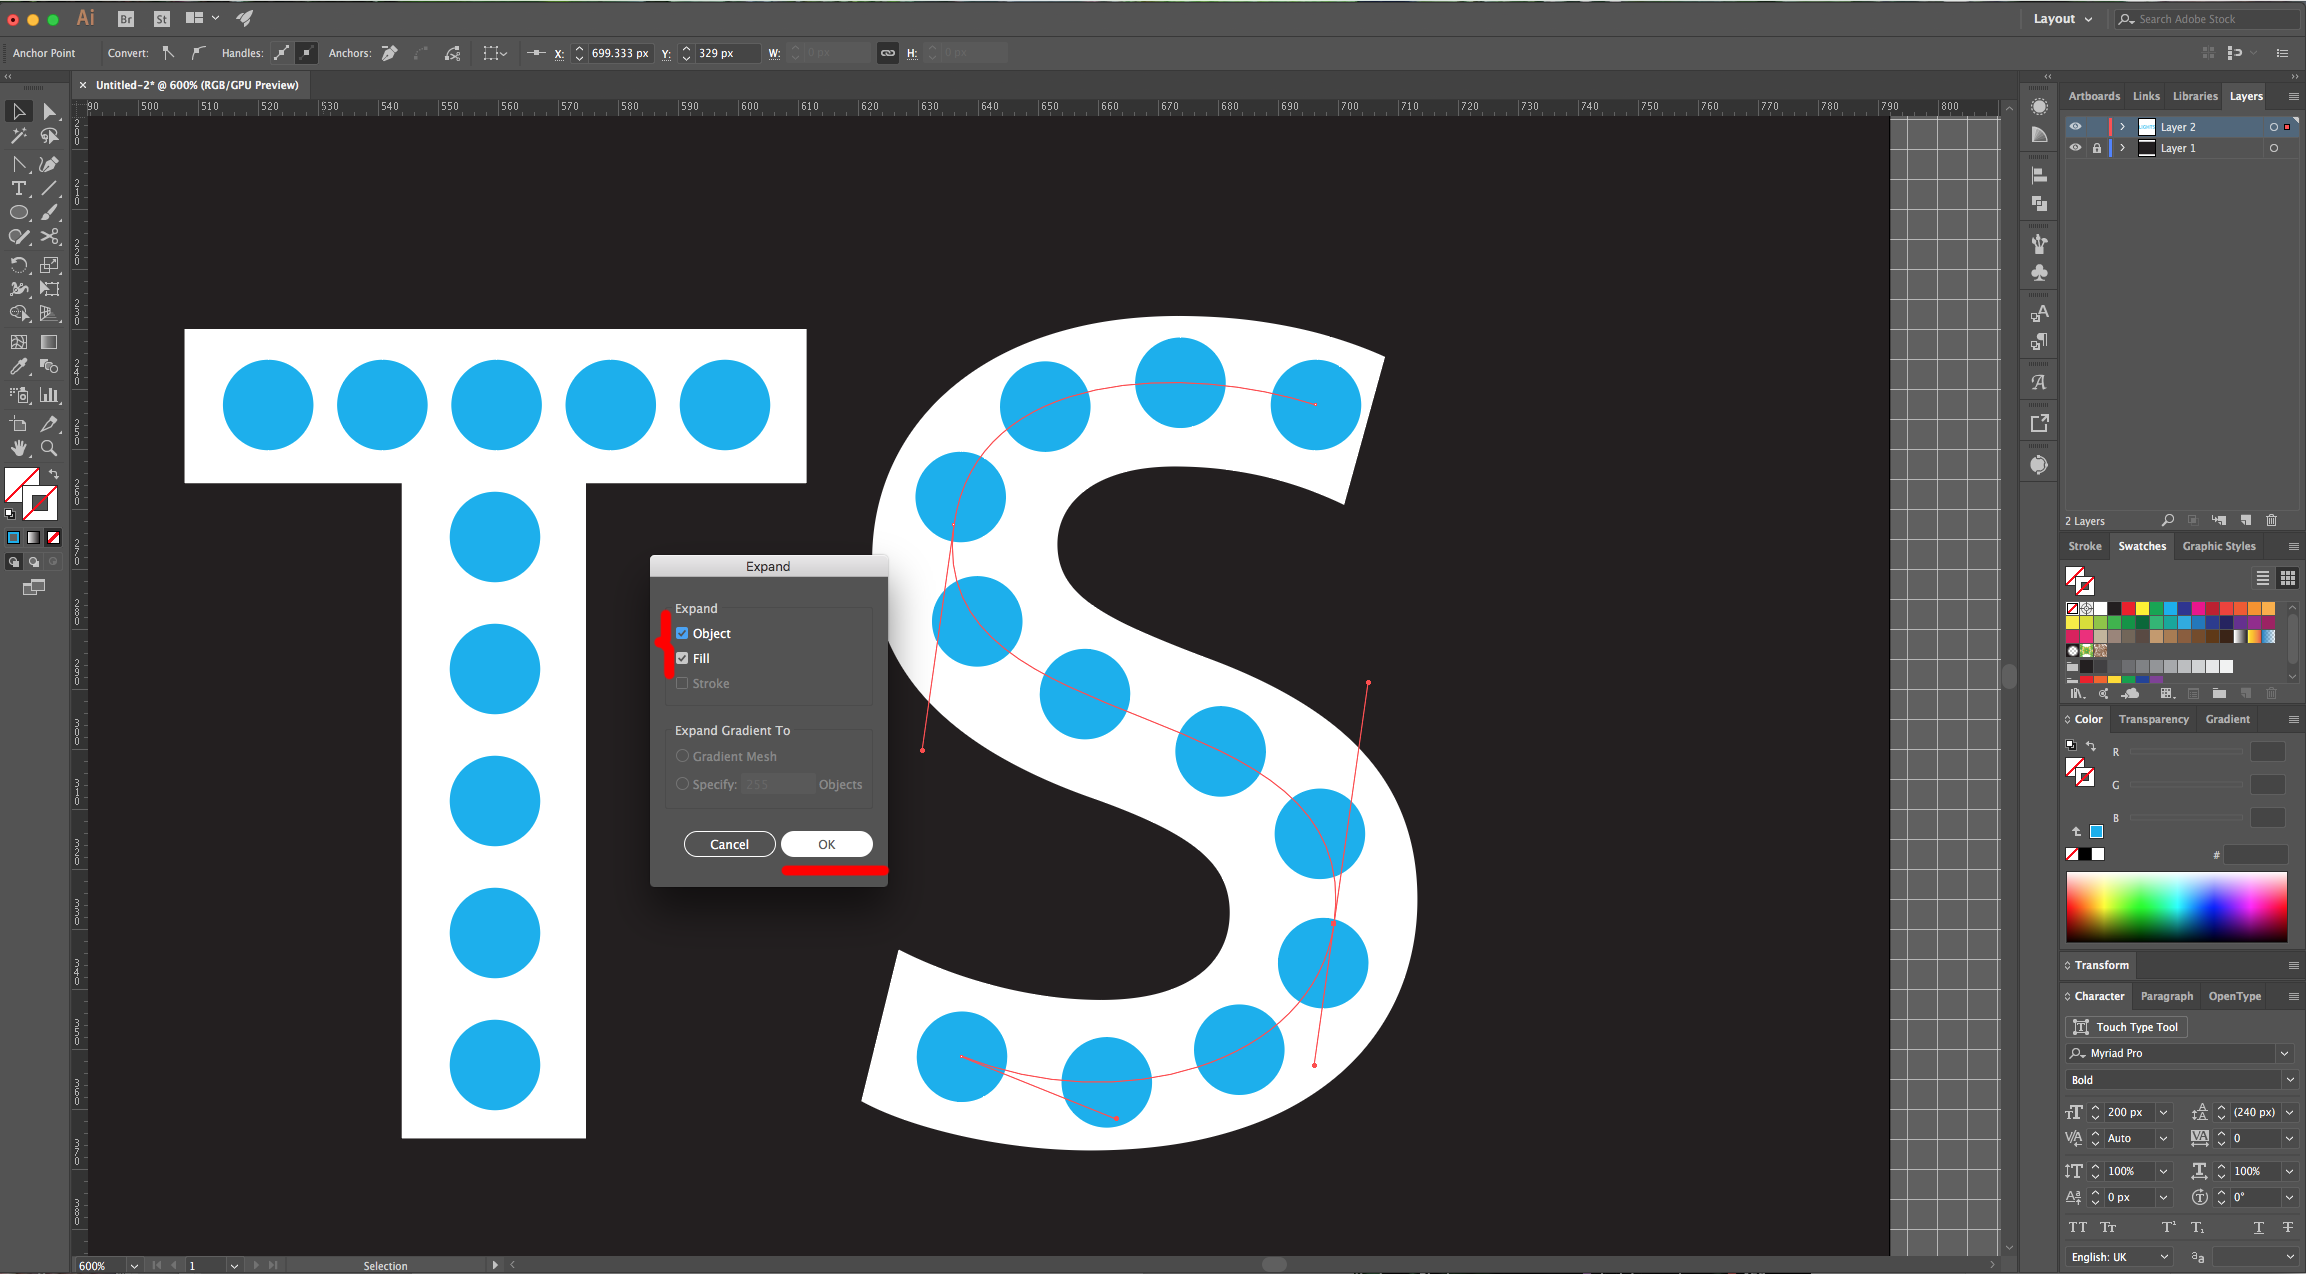
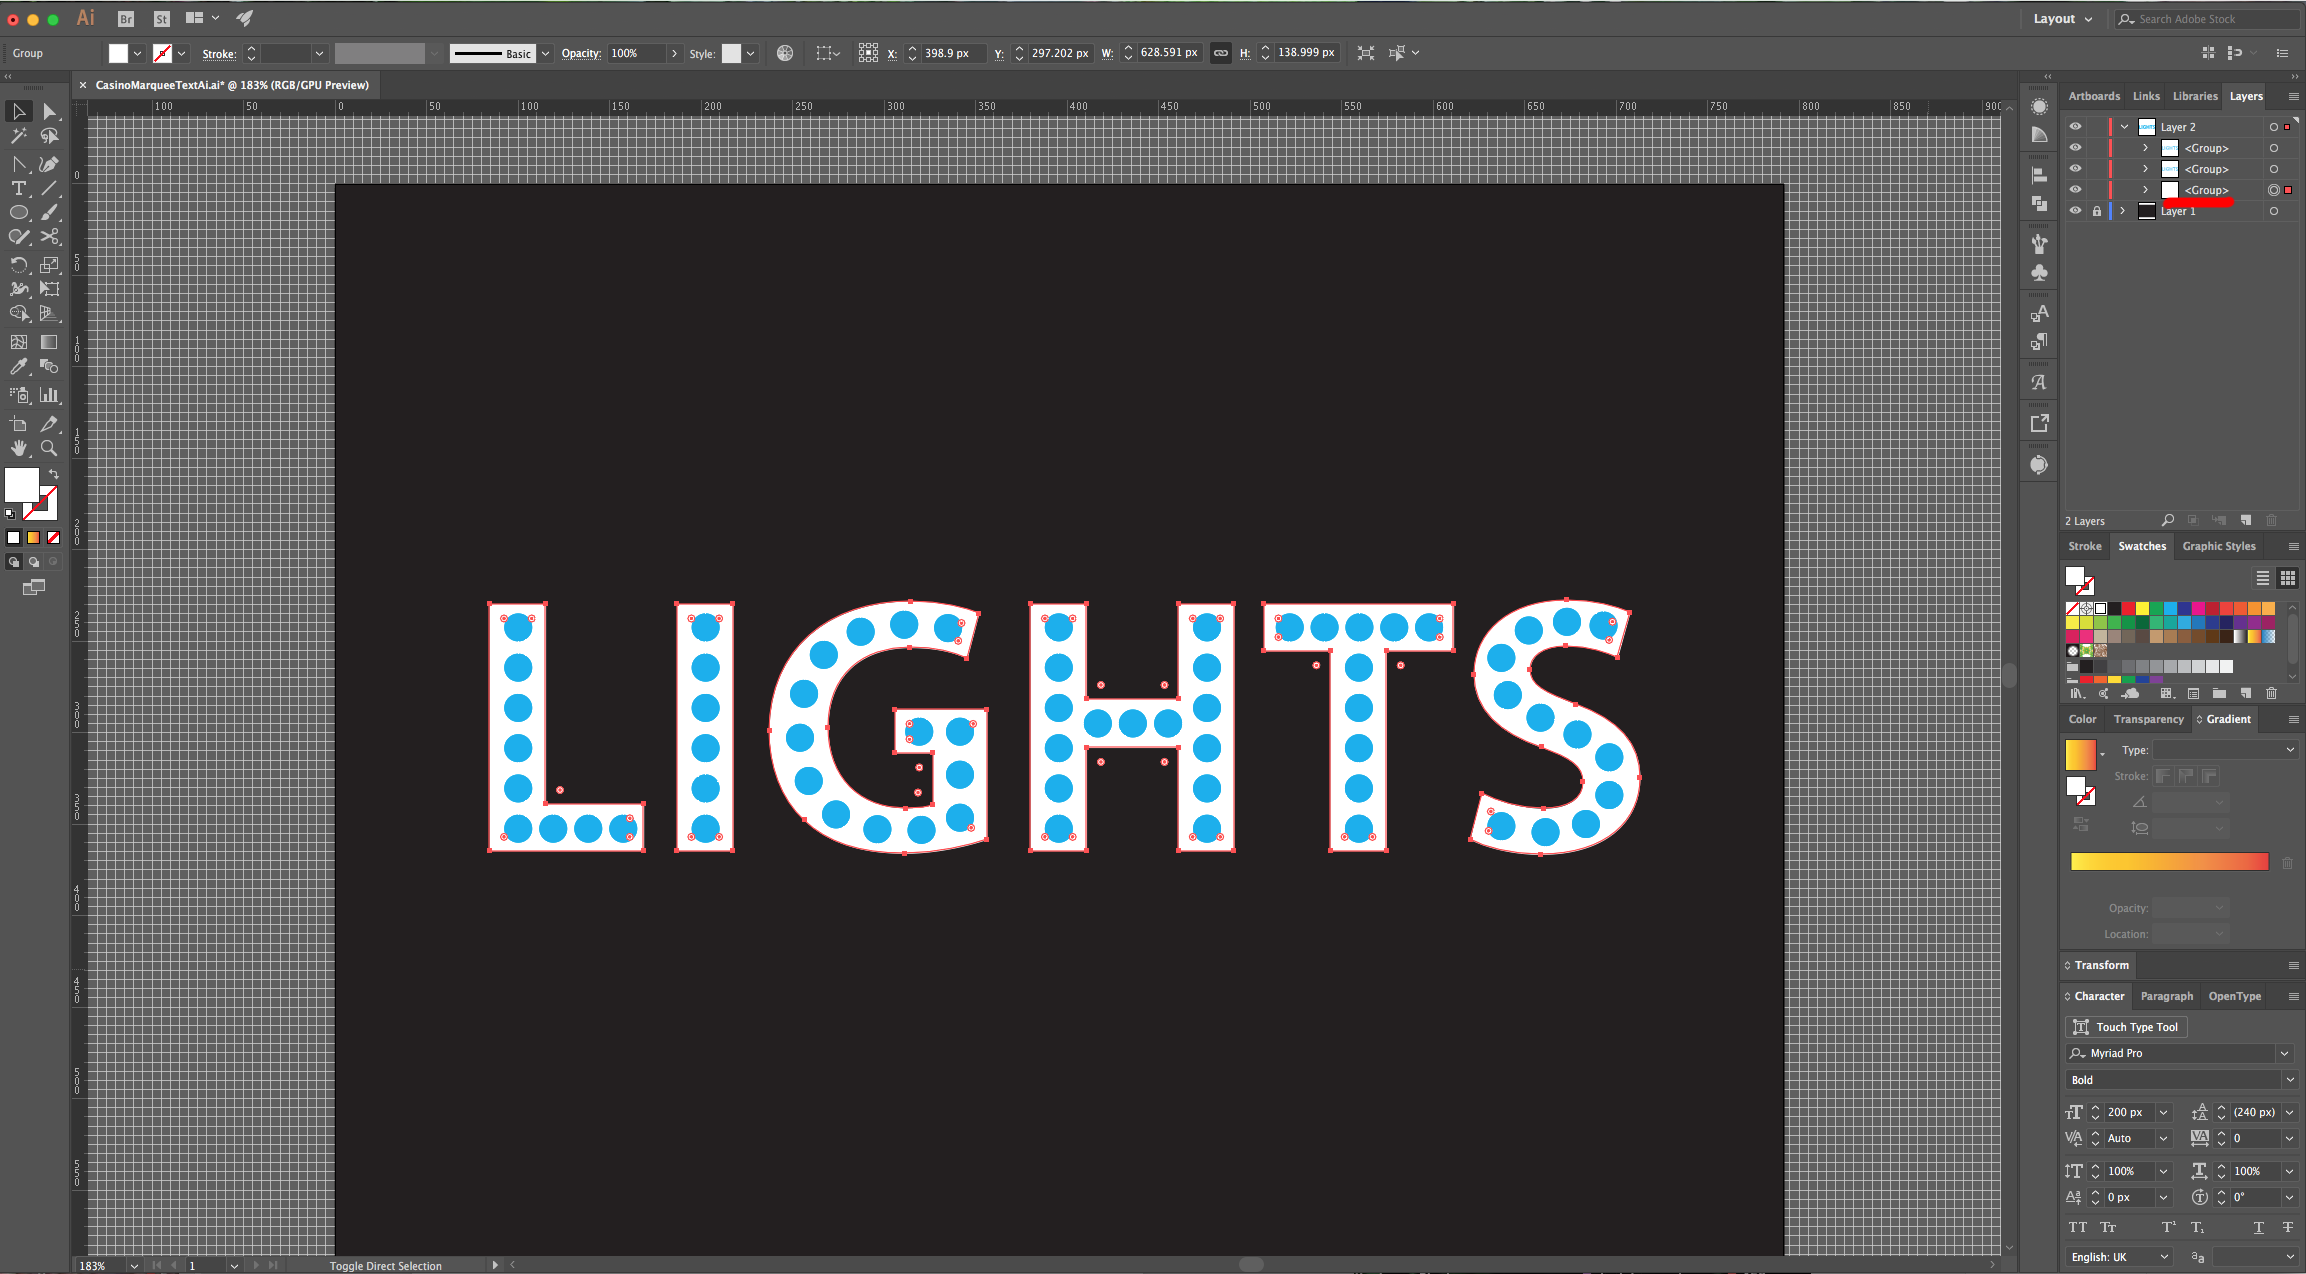
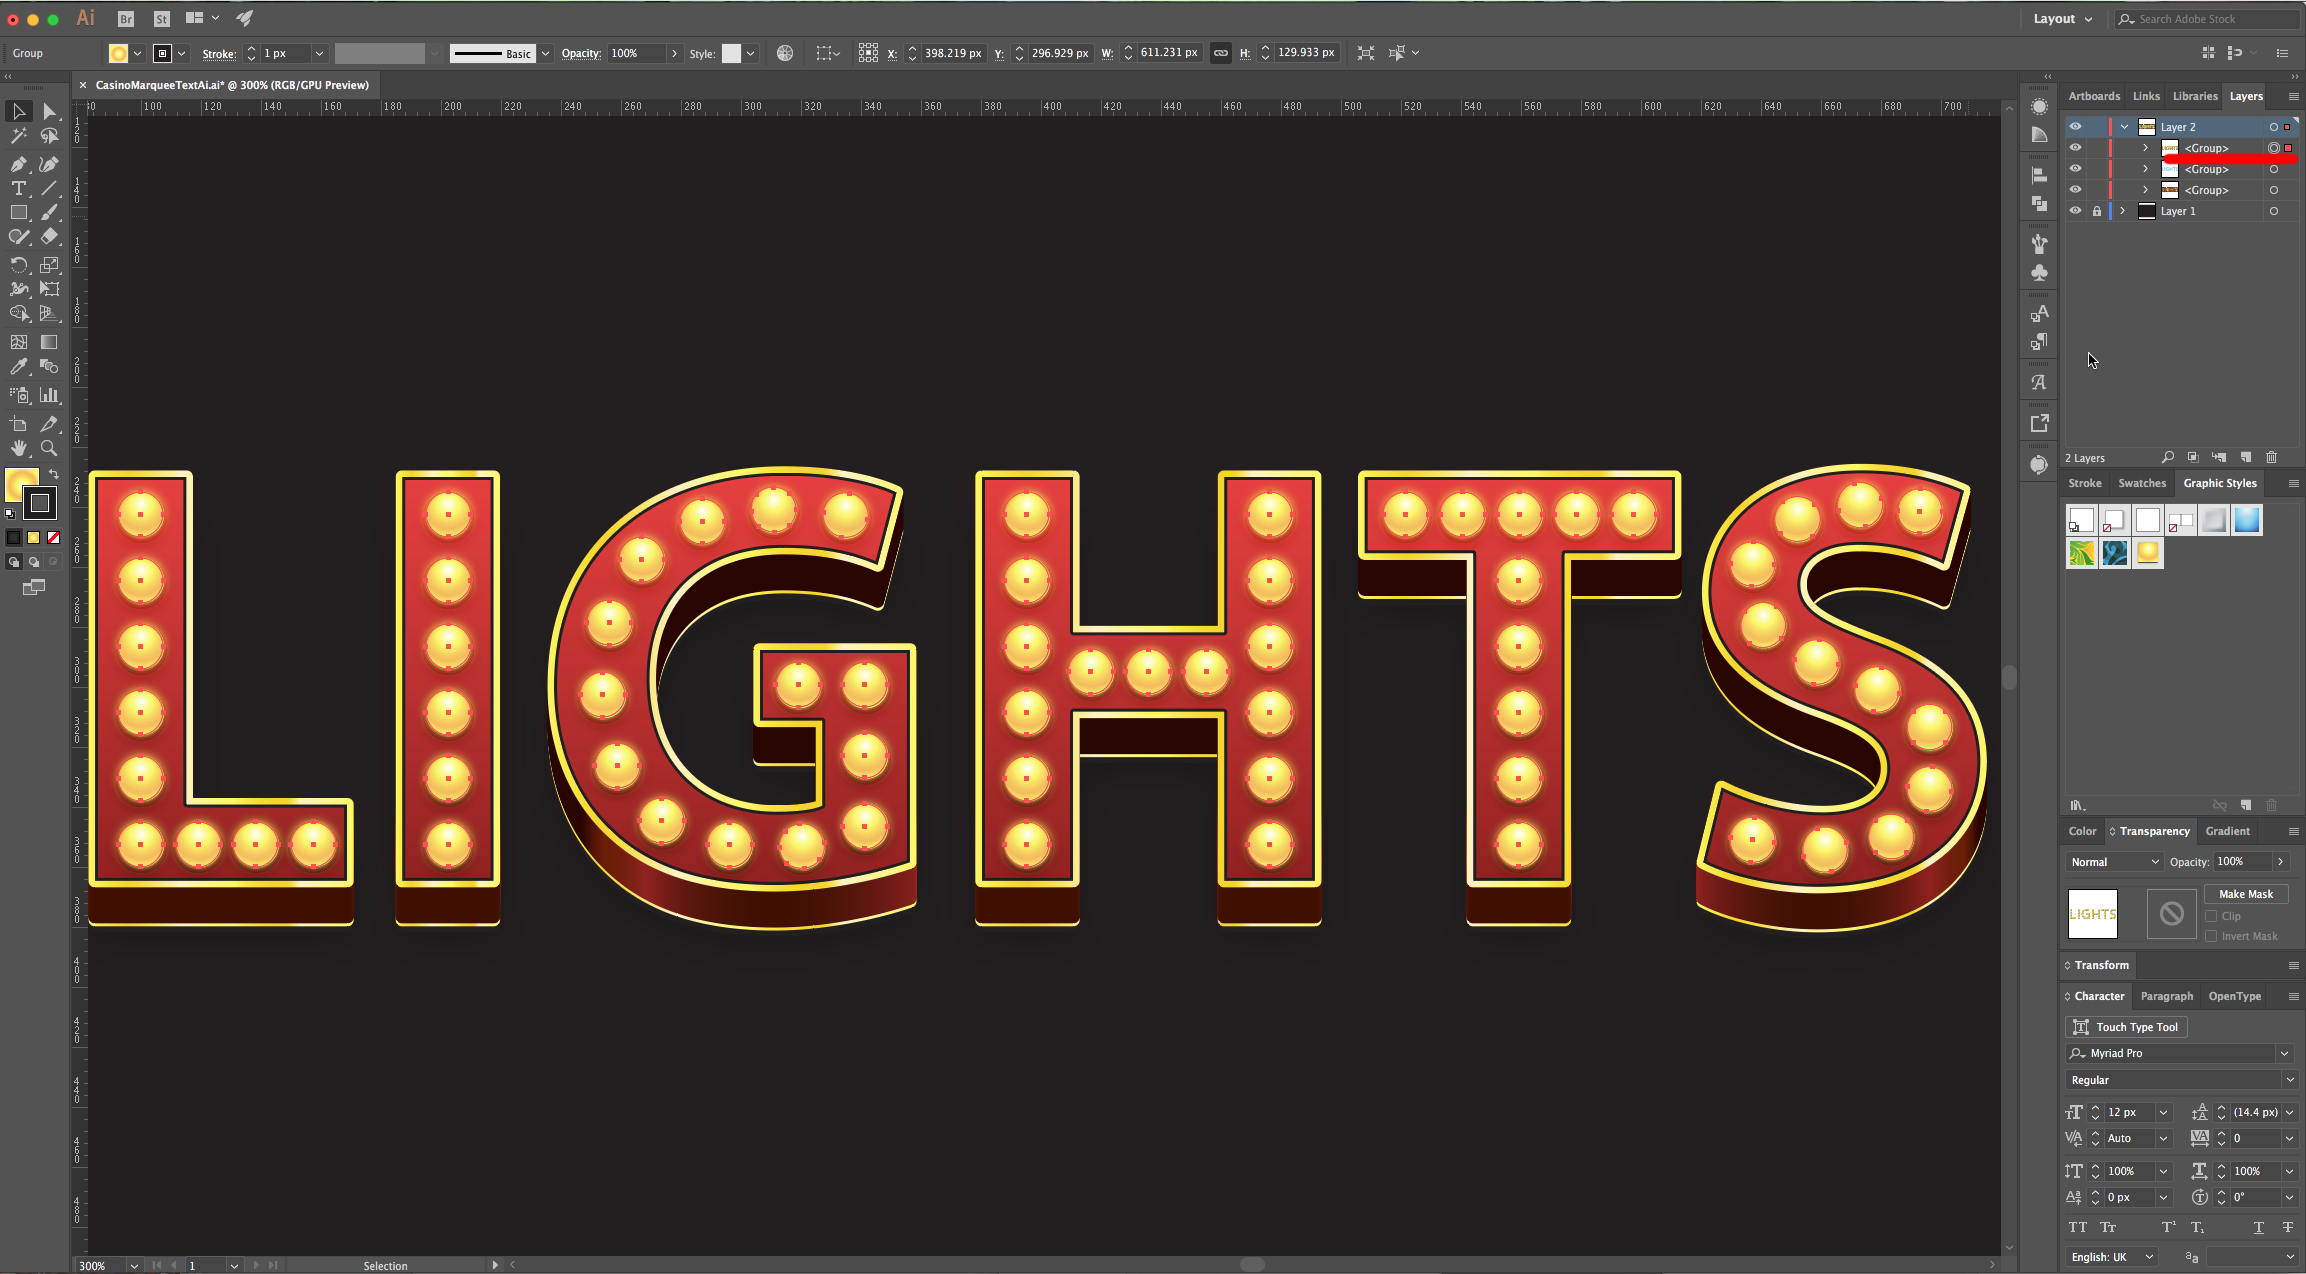
16 - Once you are done, go to Object > Expand, make sure the “Object” and “Fill” boxes are checked and click “OK”. Right-click on top of the letter and choose “Ungroup”.
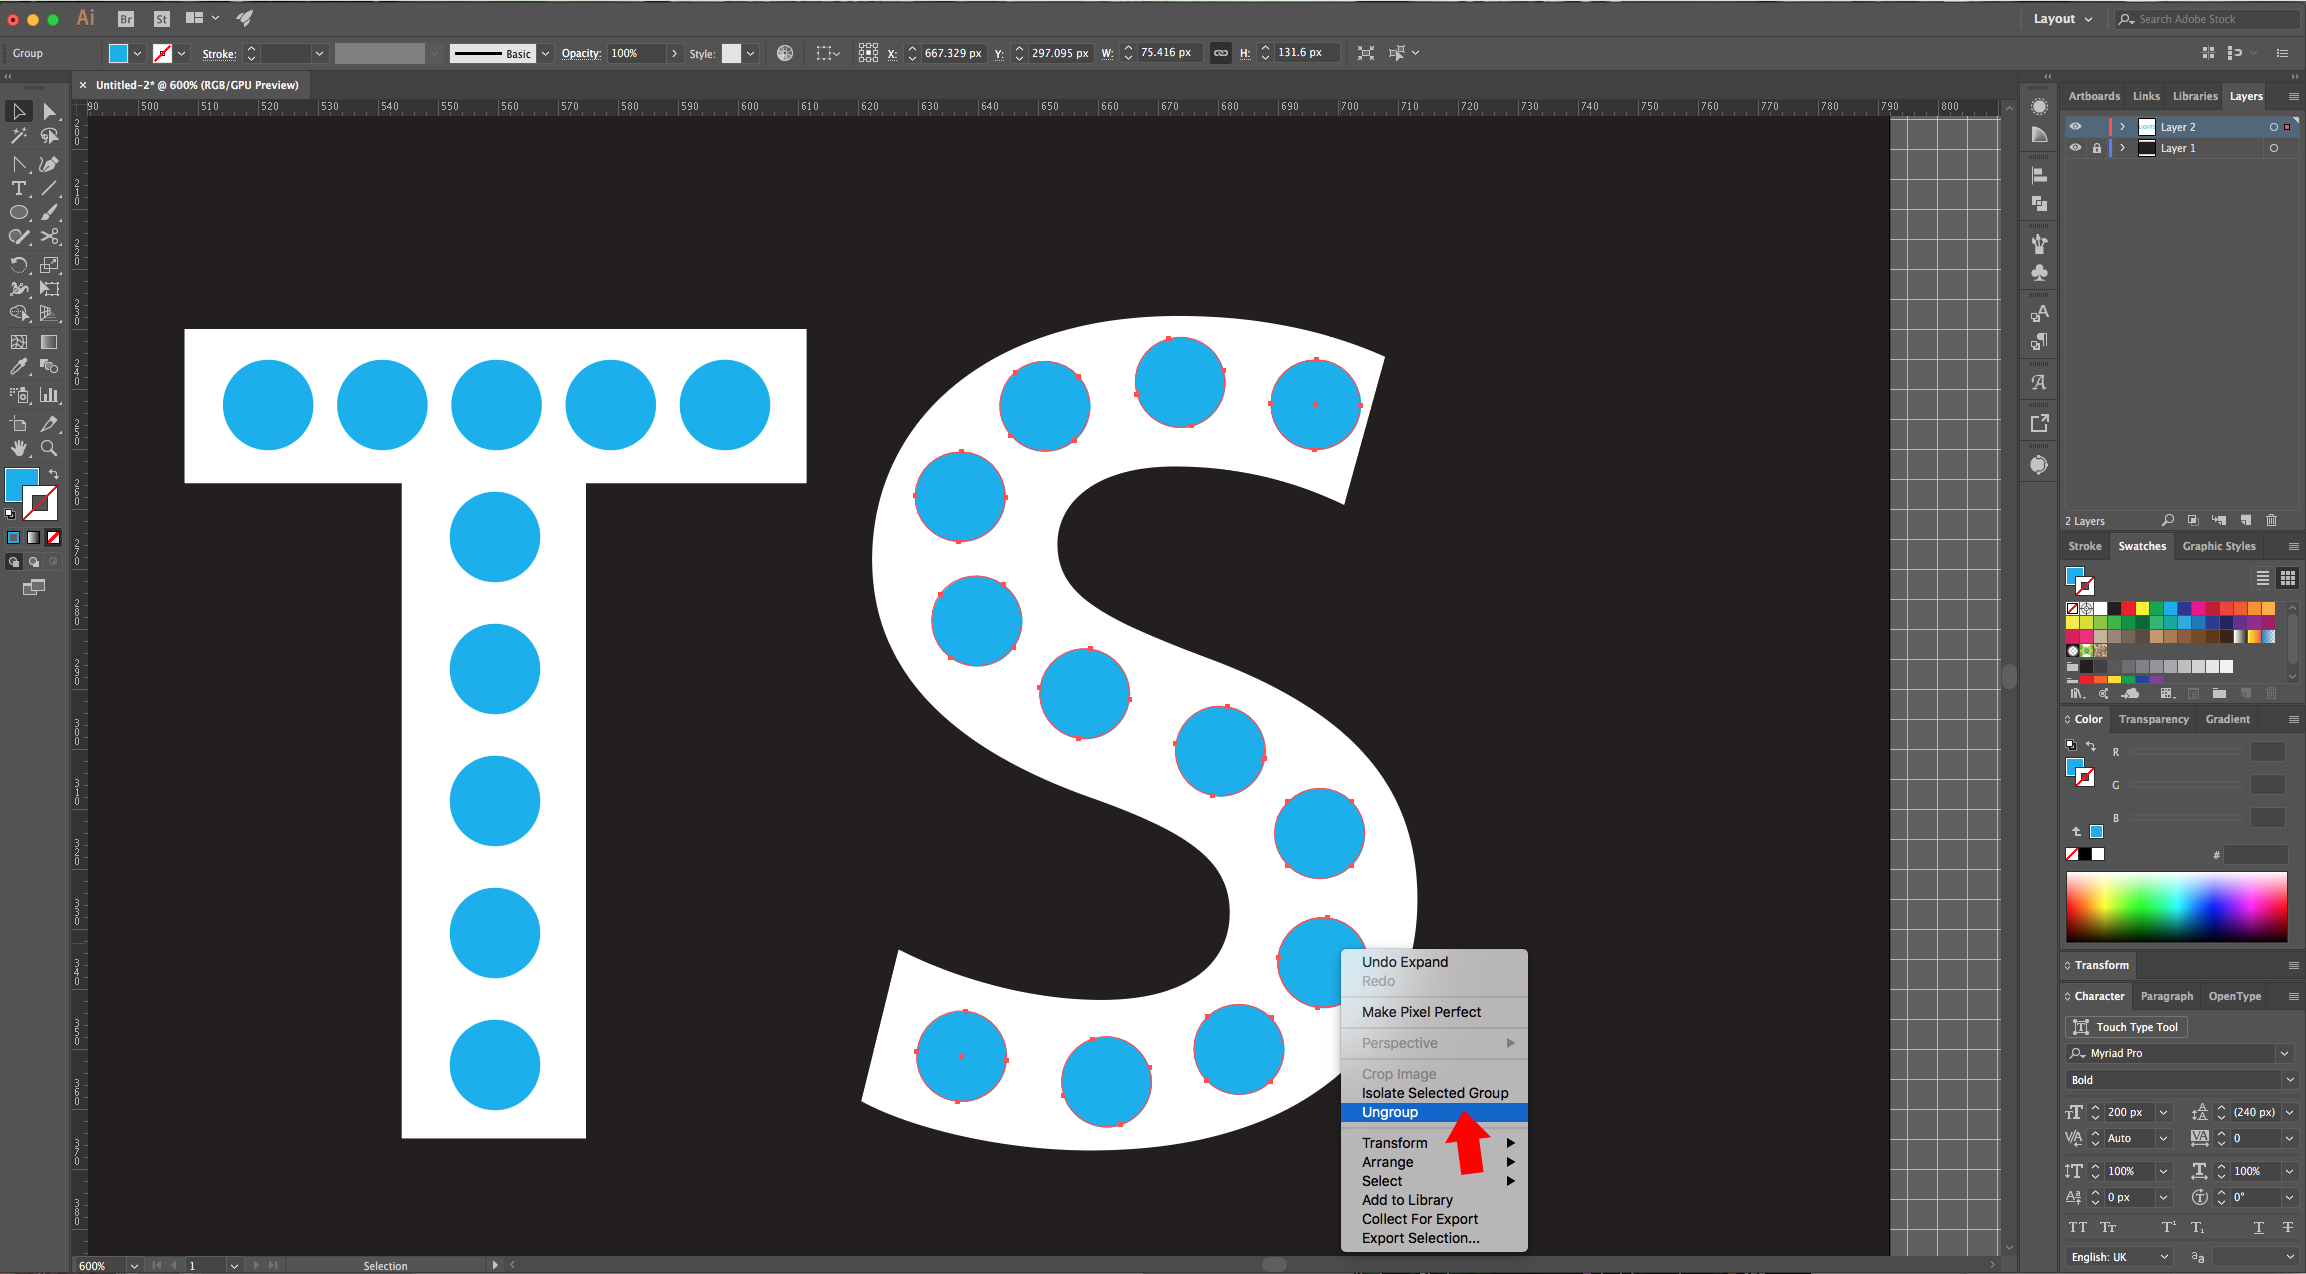
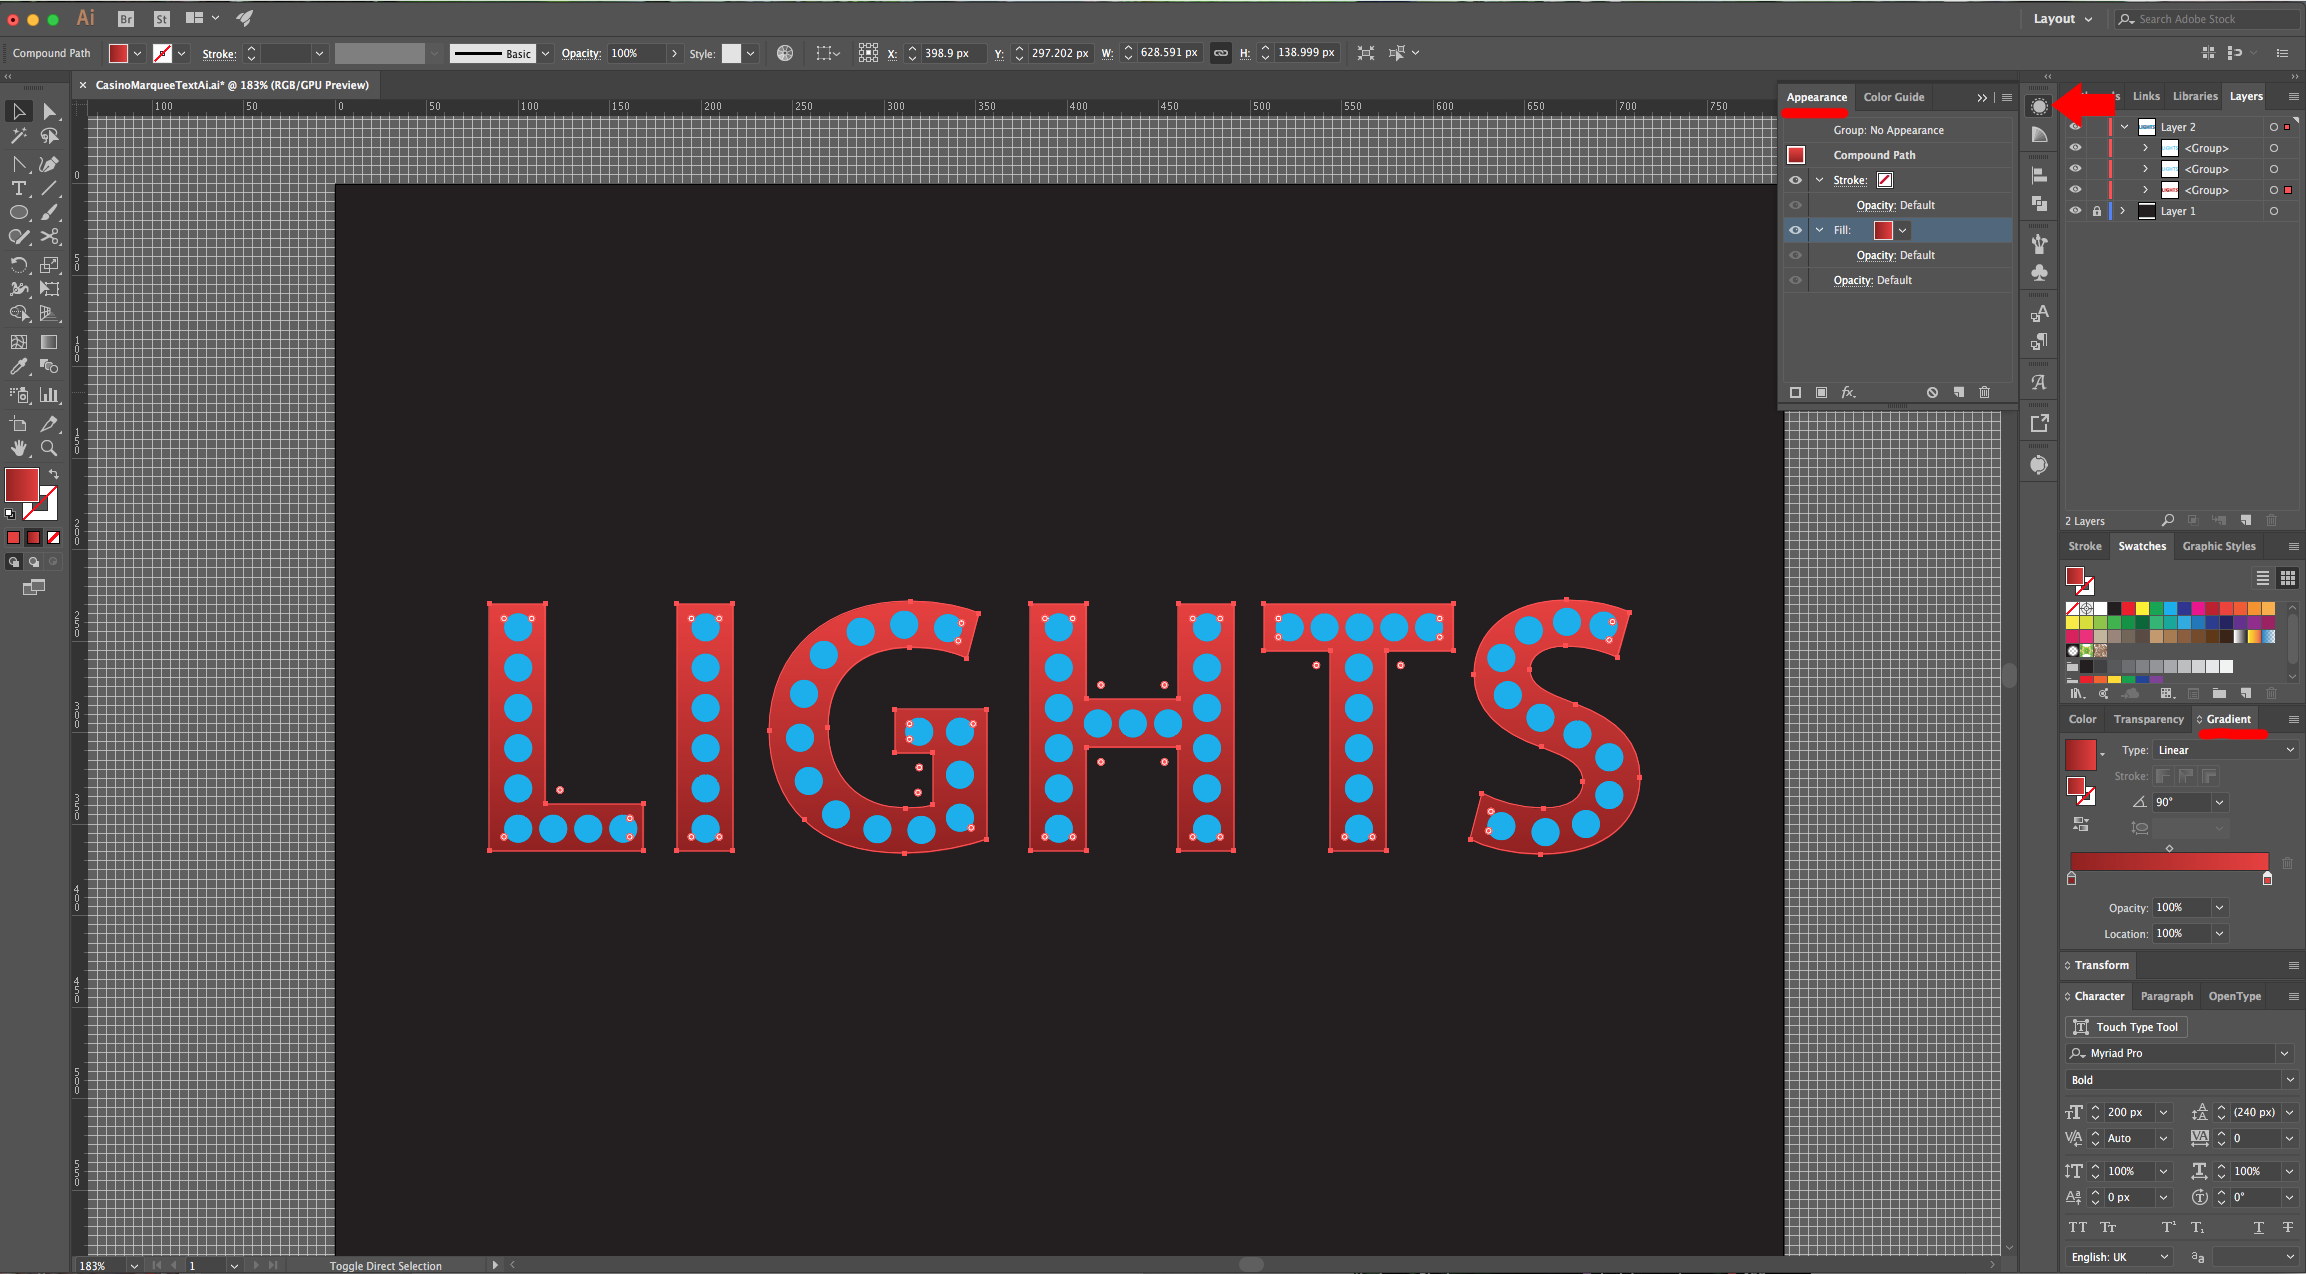
17 - Select one of your circles and go to Select > Same > Appearance to select all your circles, “Group” them together (Command/Control + G), make a “Copy” (Command/Control + C) and “Paste in Front” (Command/Control + F).
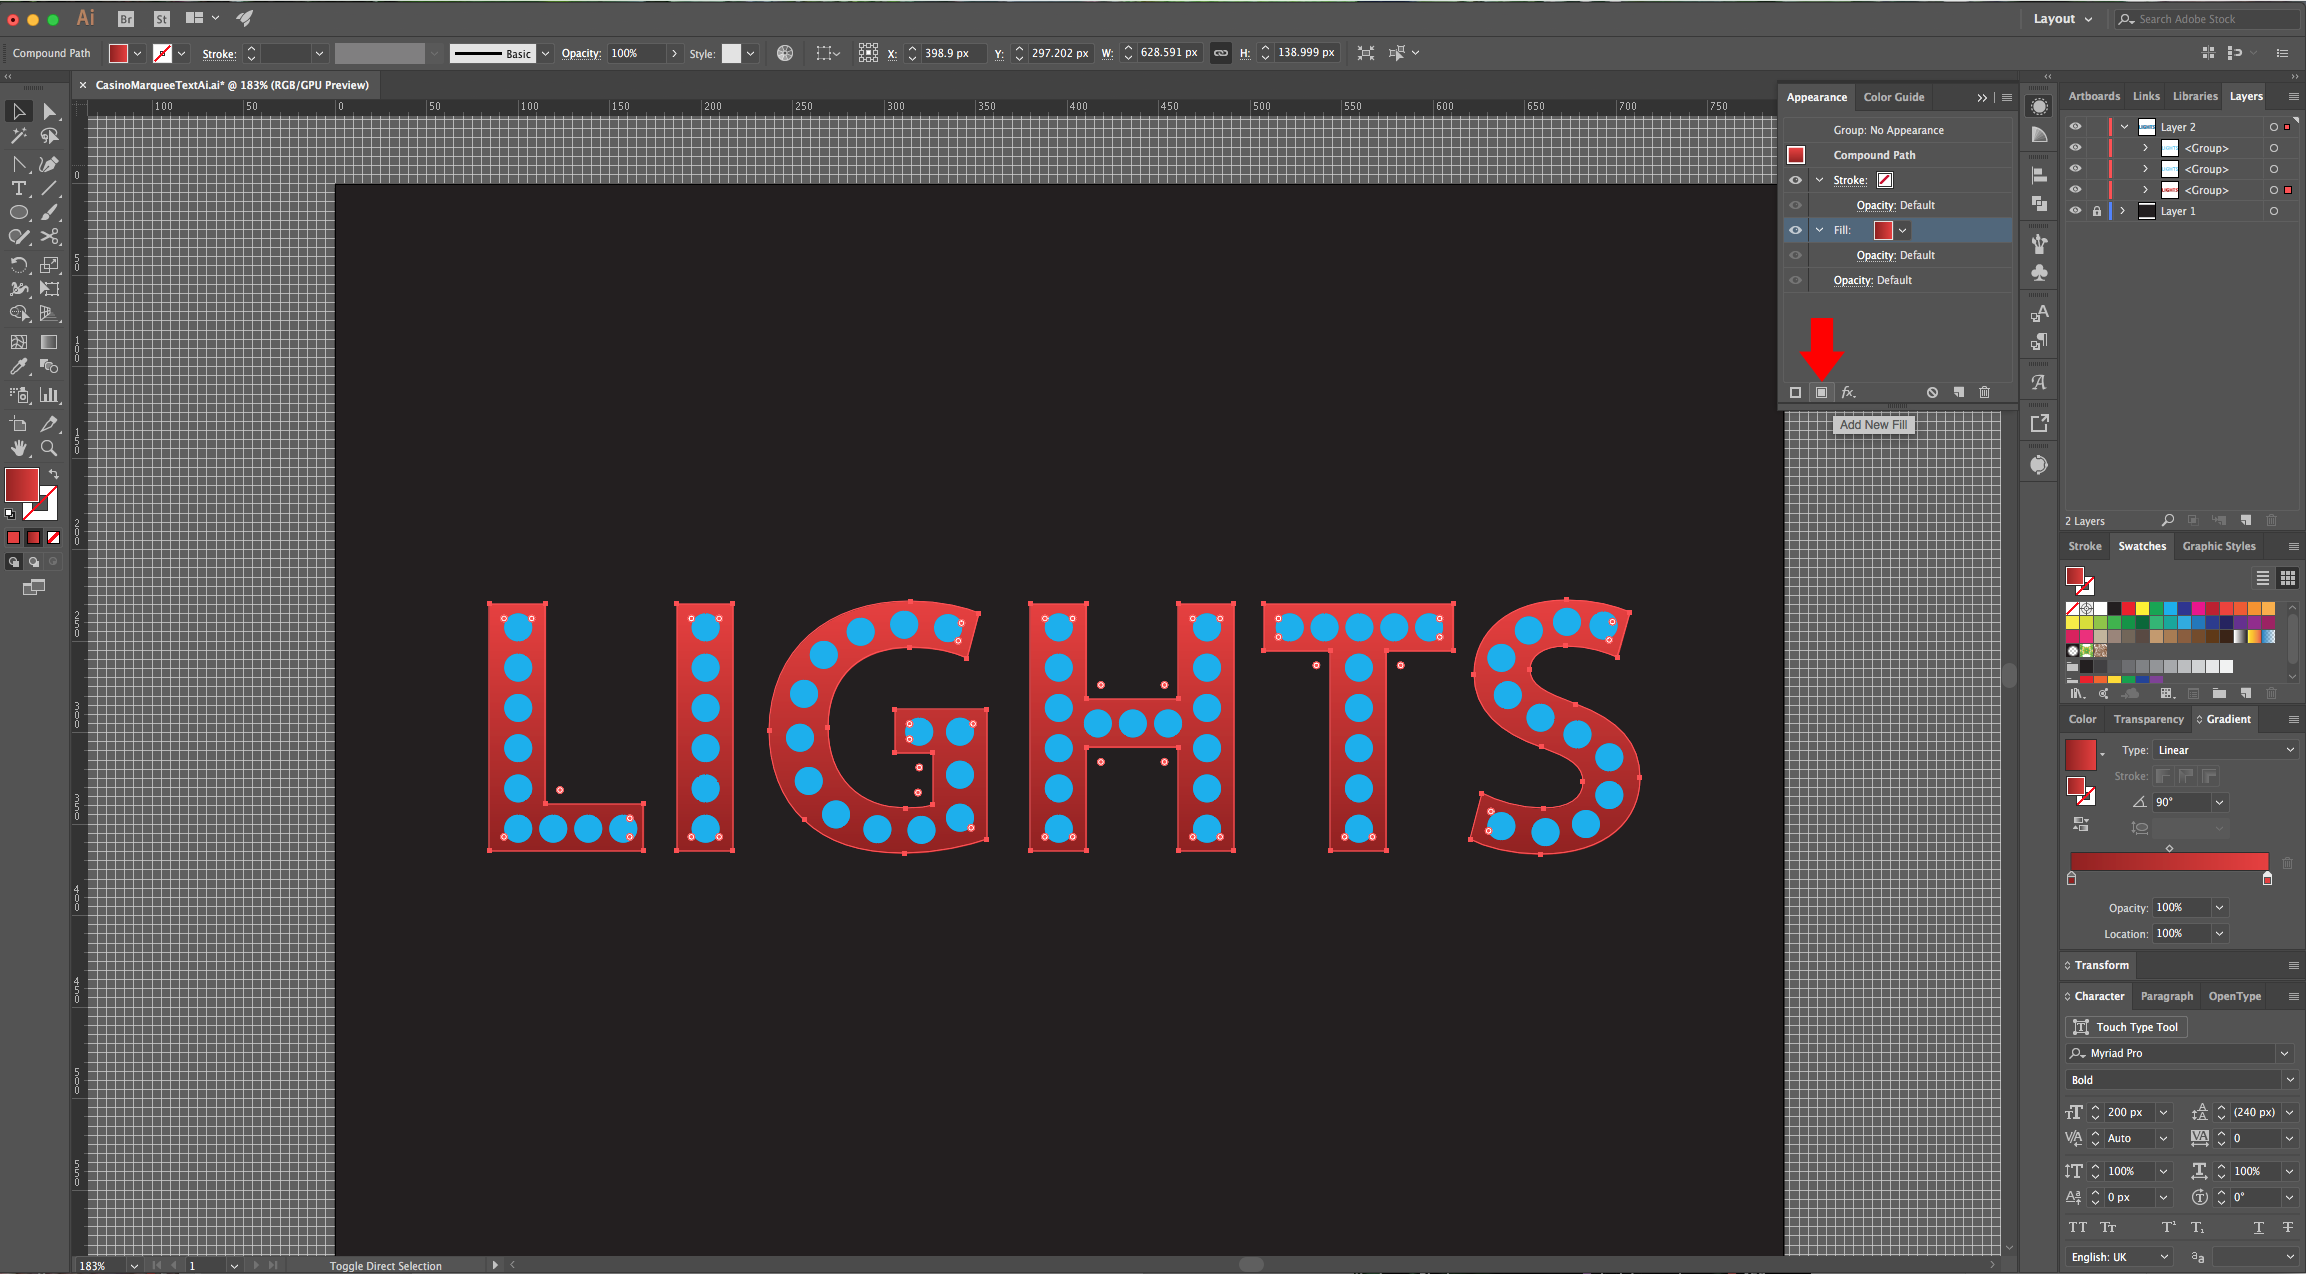
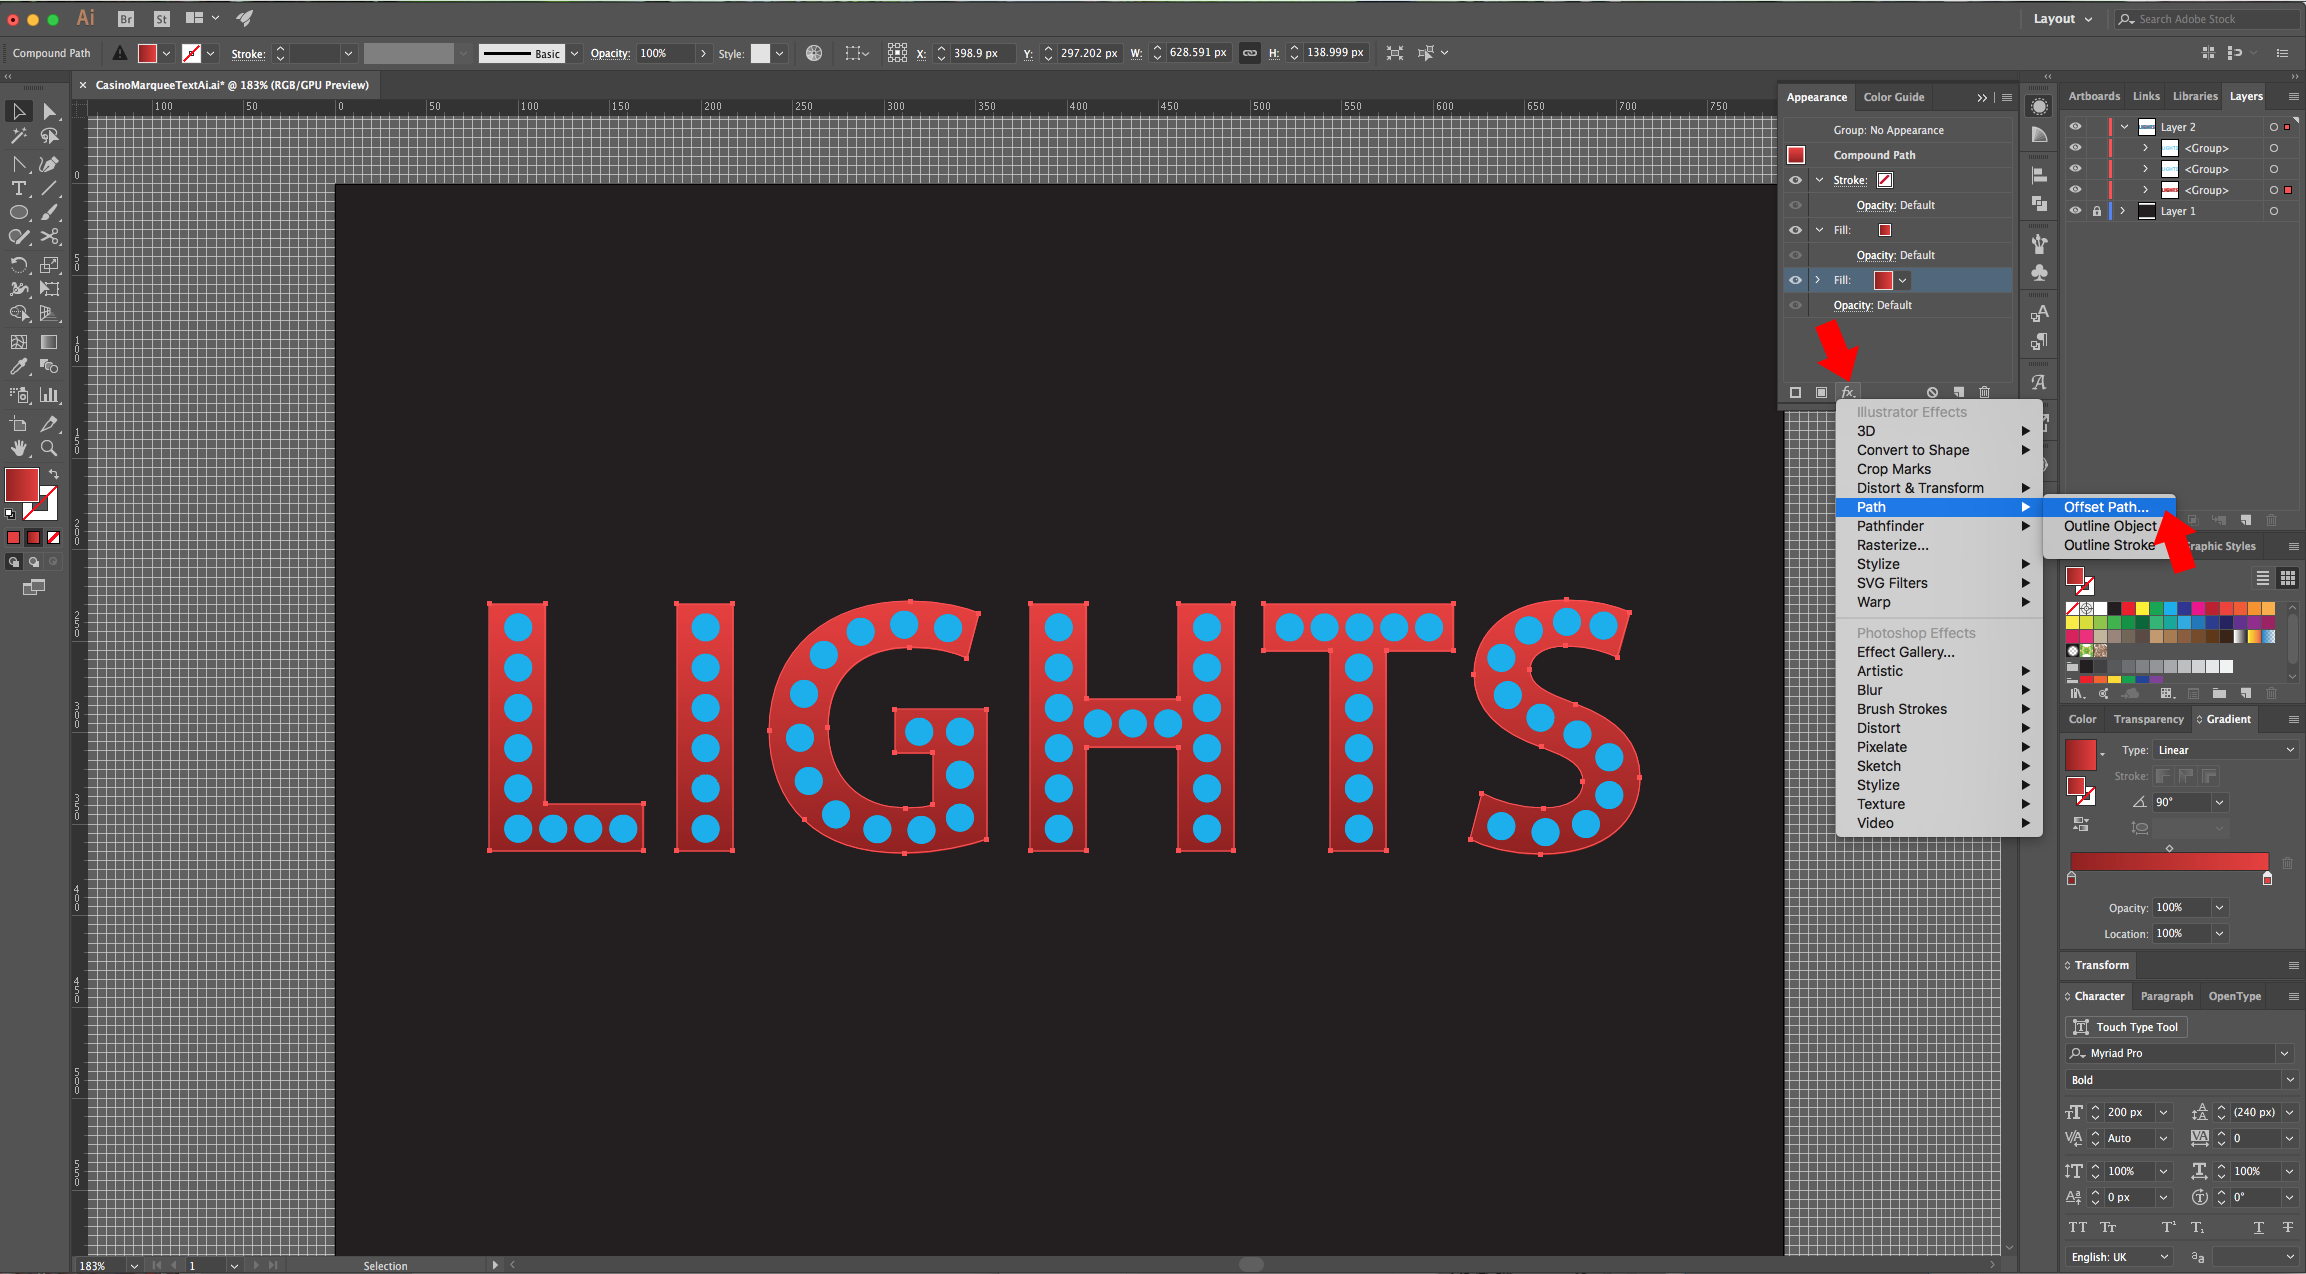
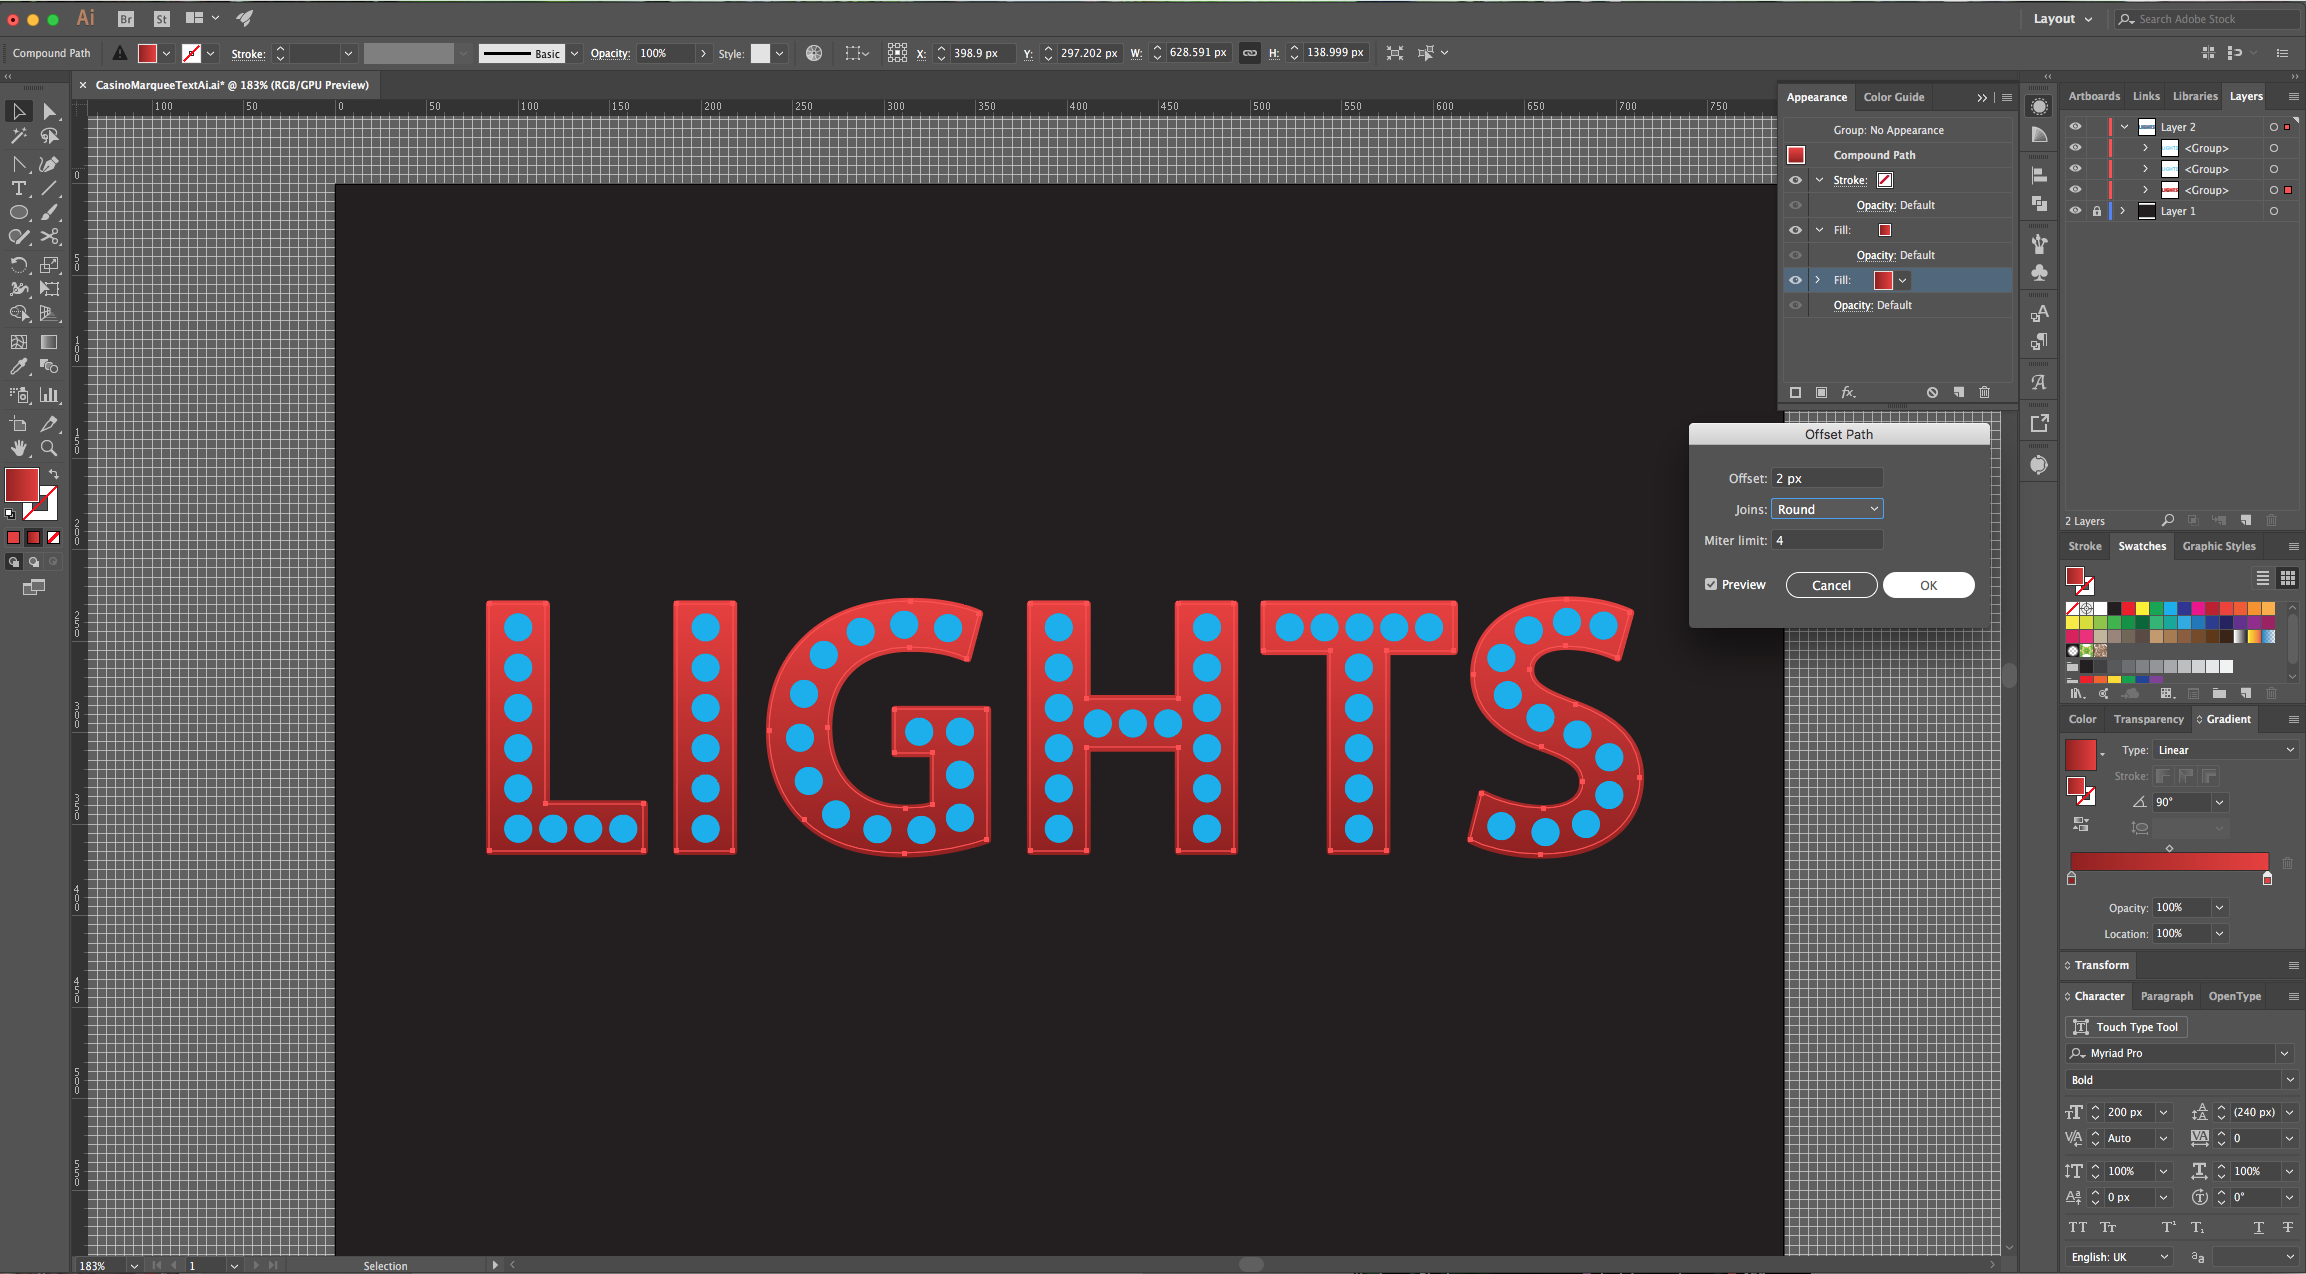
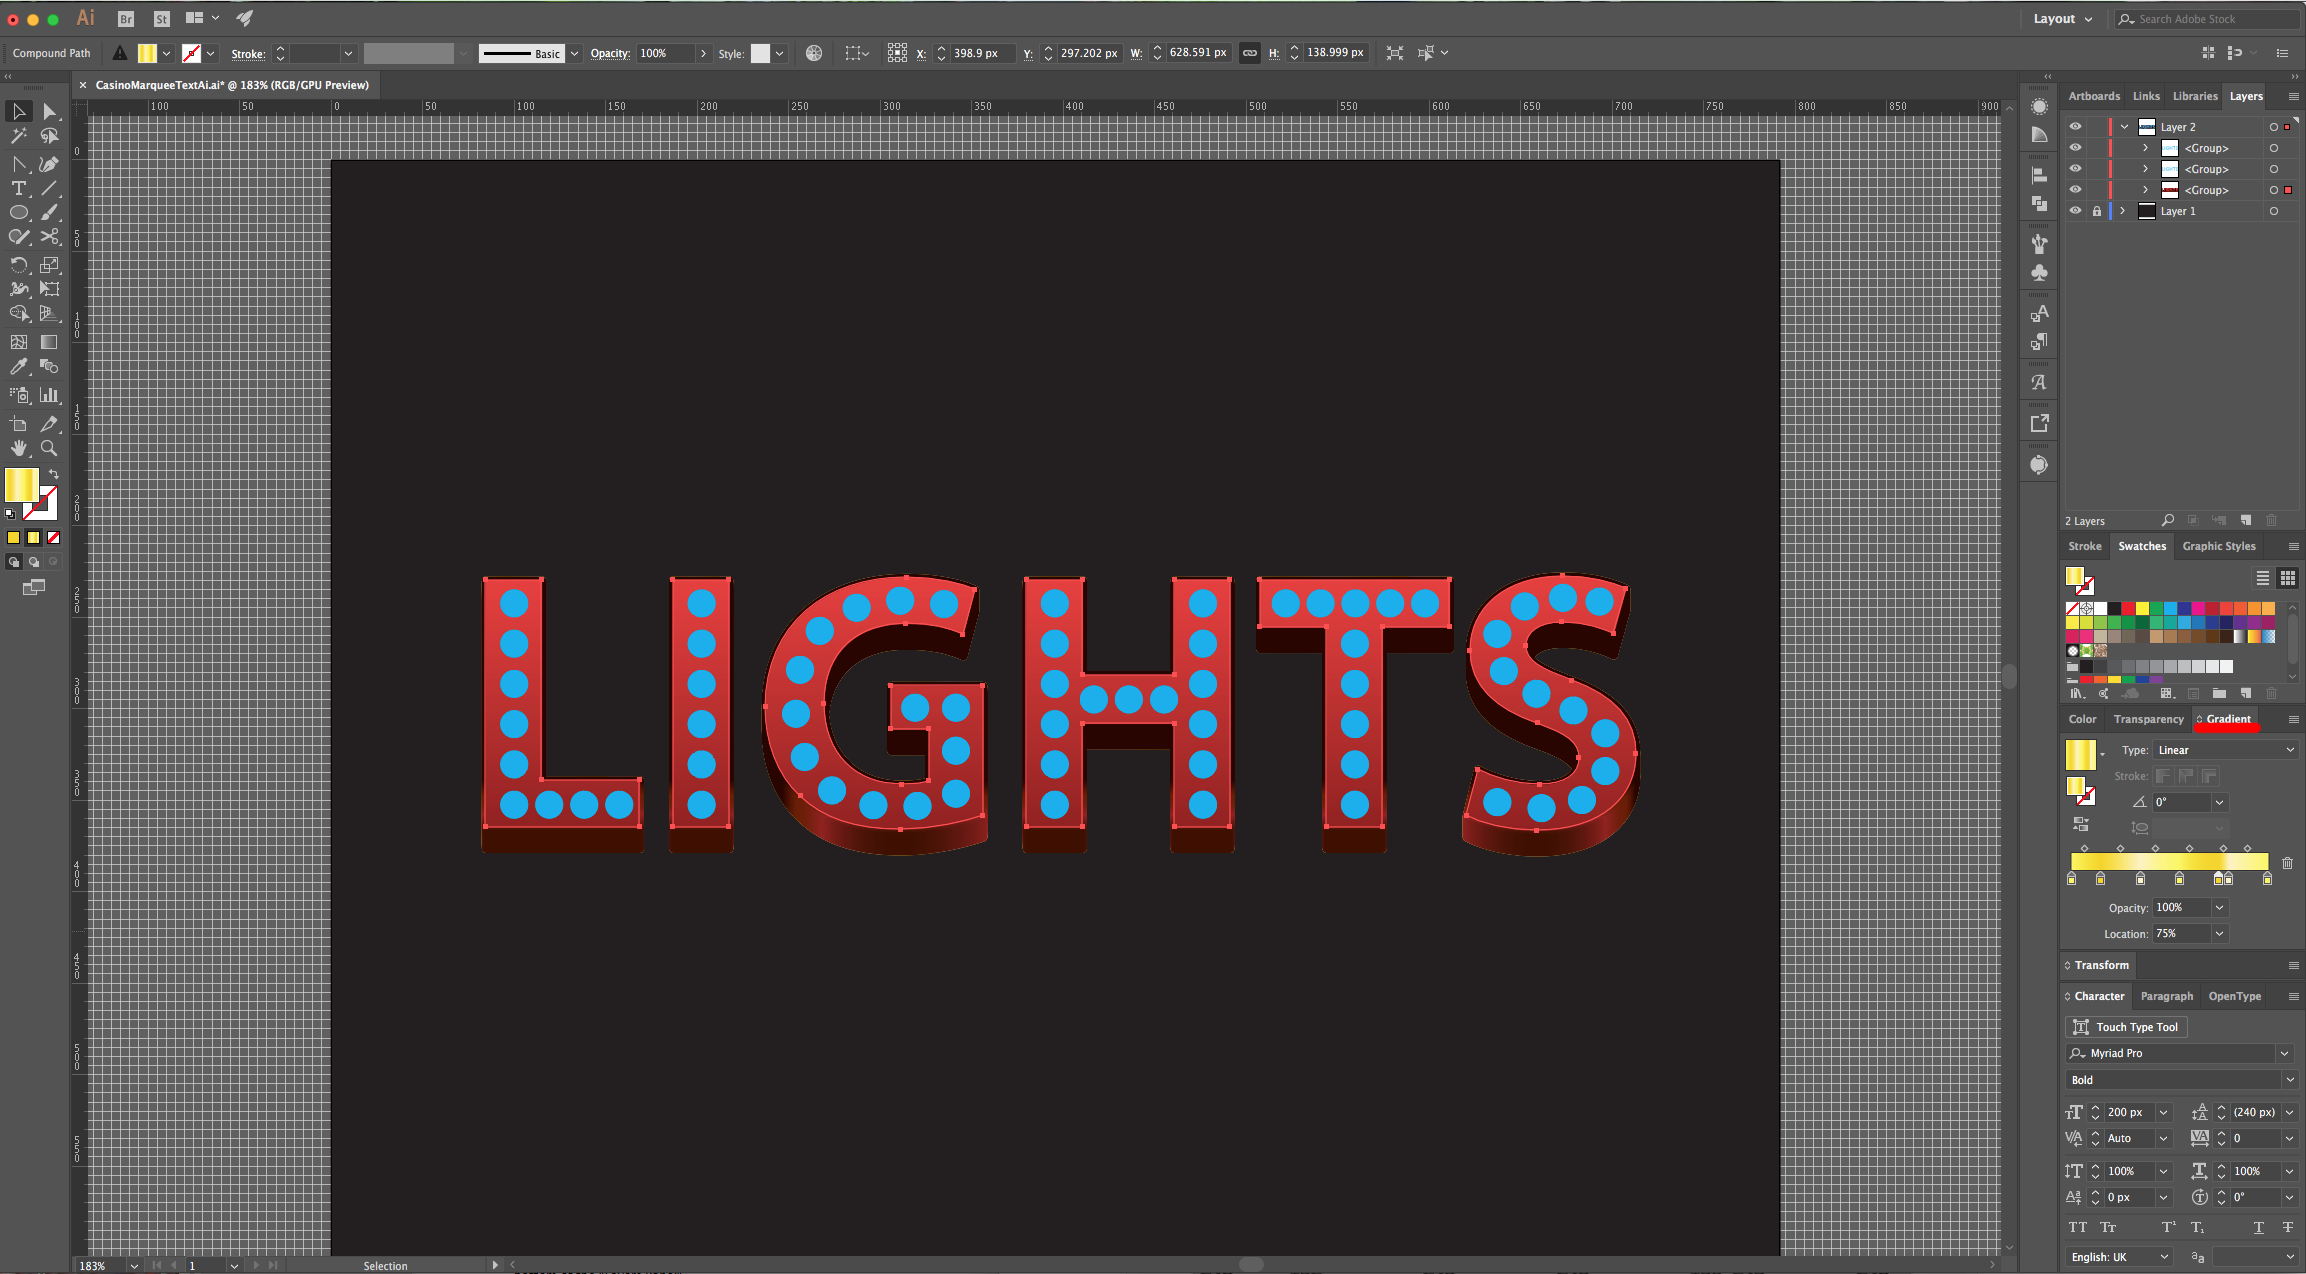
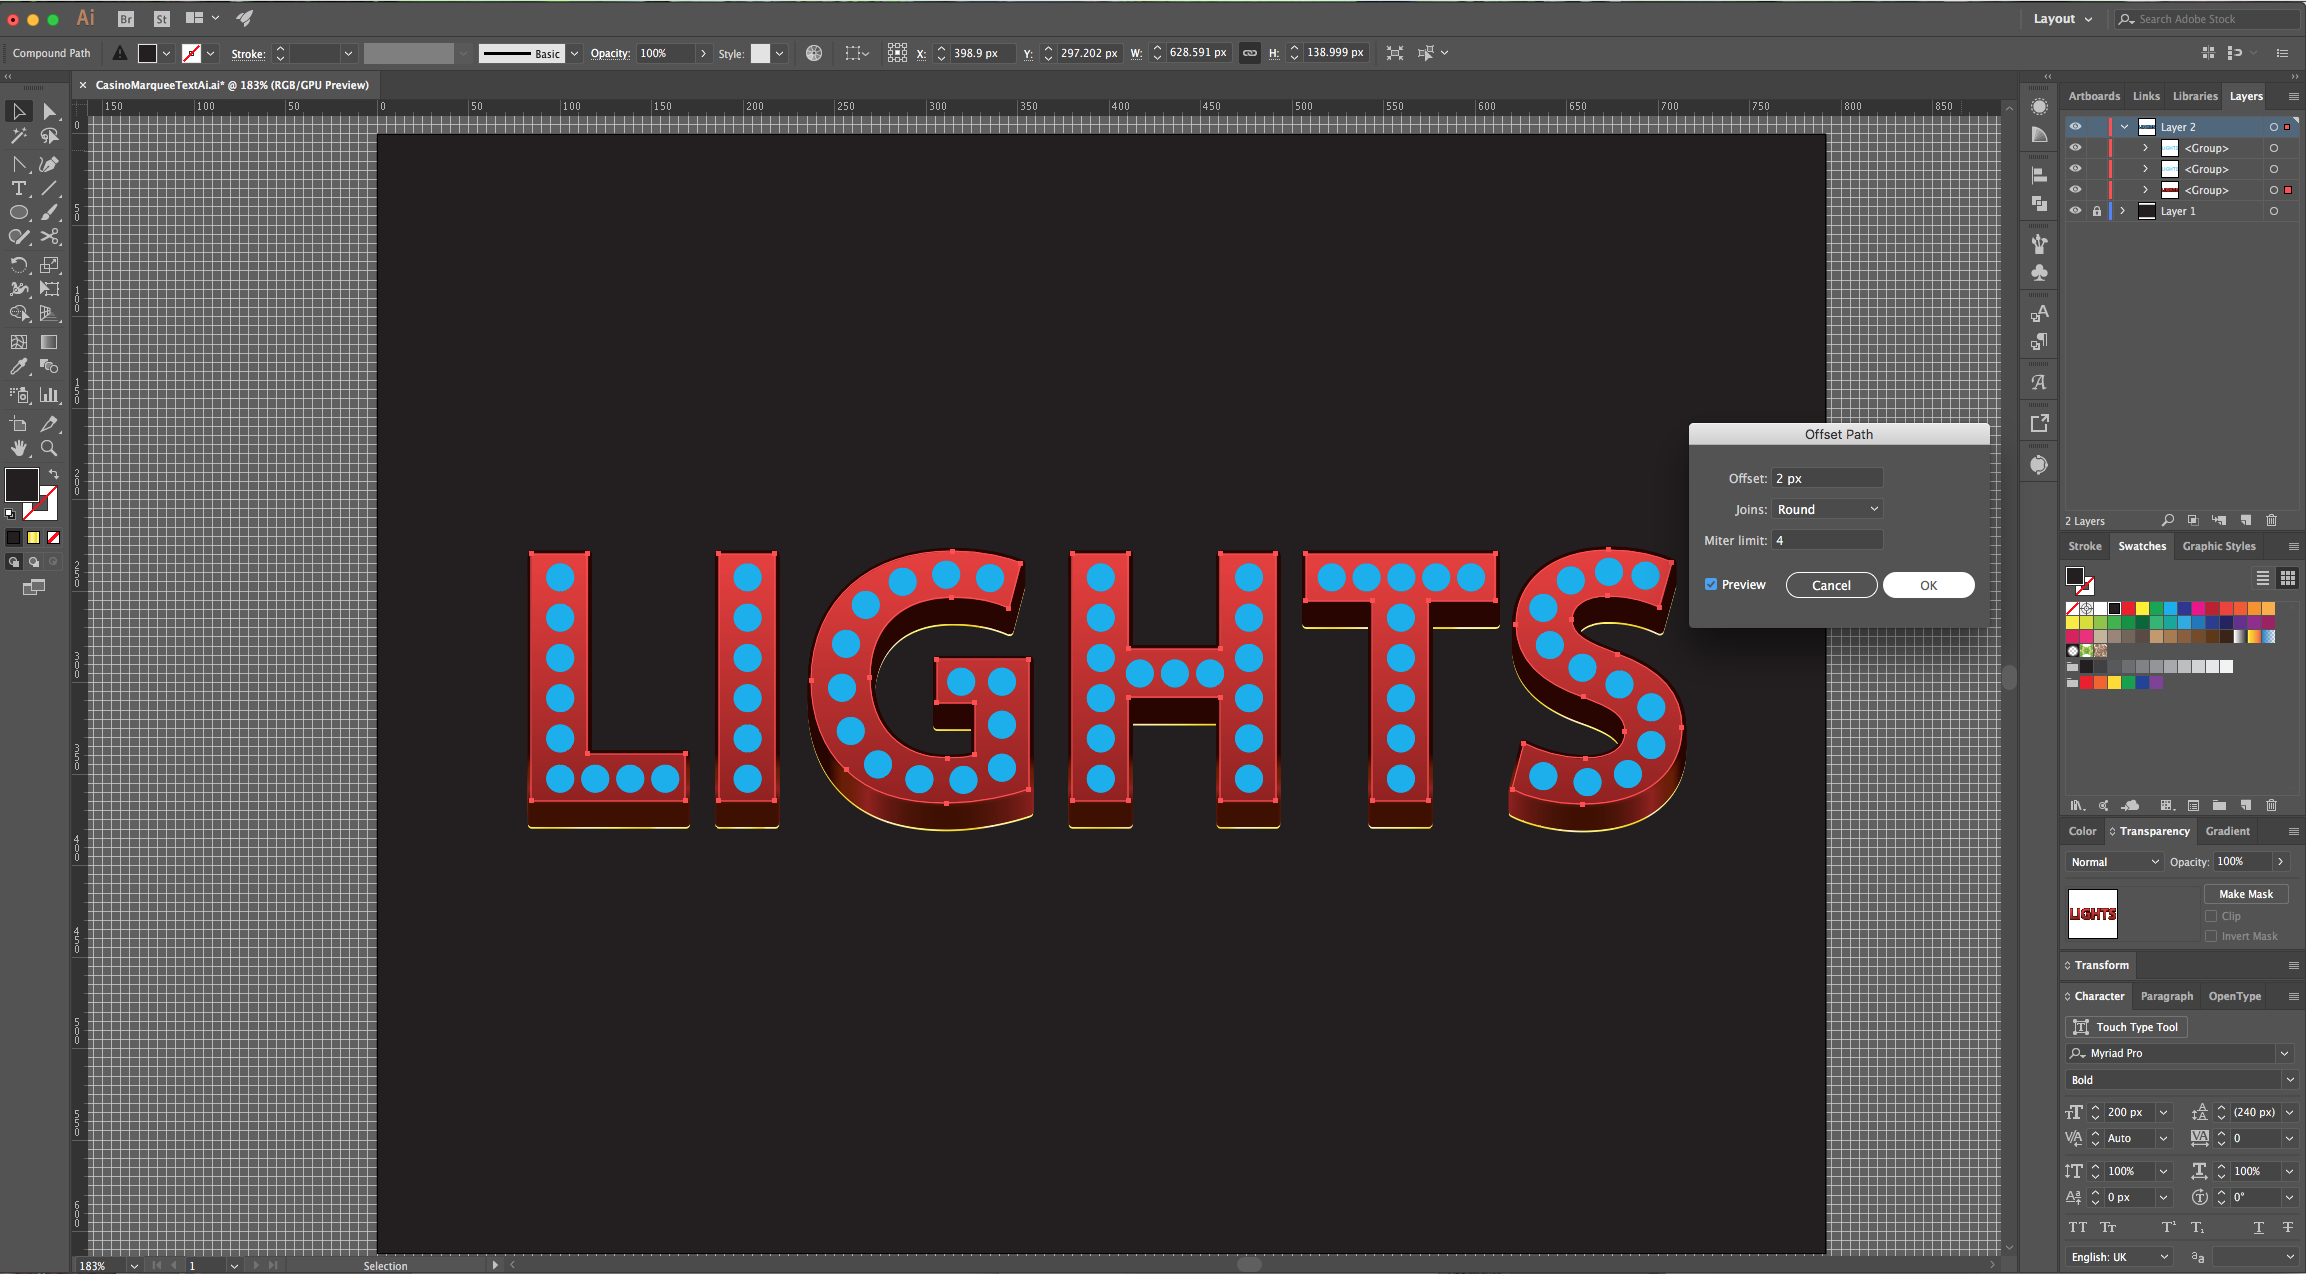
18 - Select the white letters and make a “Group”. Go to the “Appearance Panel”, change the “Fill” to a “Linear Gradient” with a 90° Angle going from #93211d to #e93e3a. Click on one of the small buttons on the Bottom-left to “Add New Fill” and make sure it is under your original one.
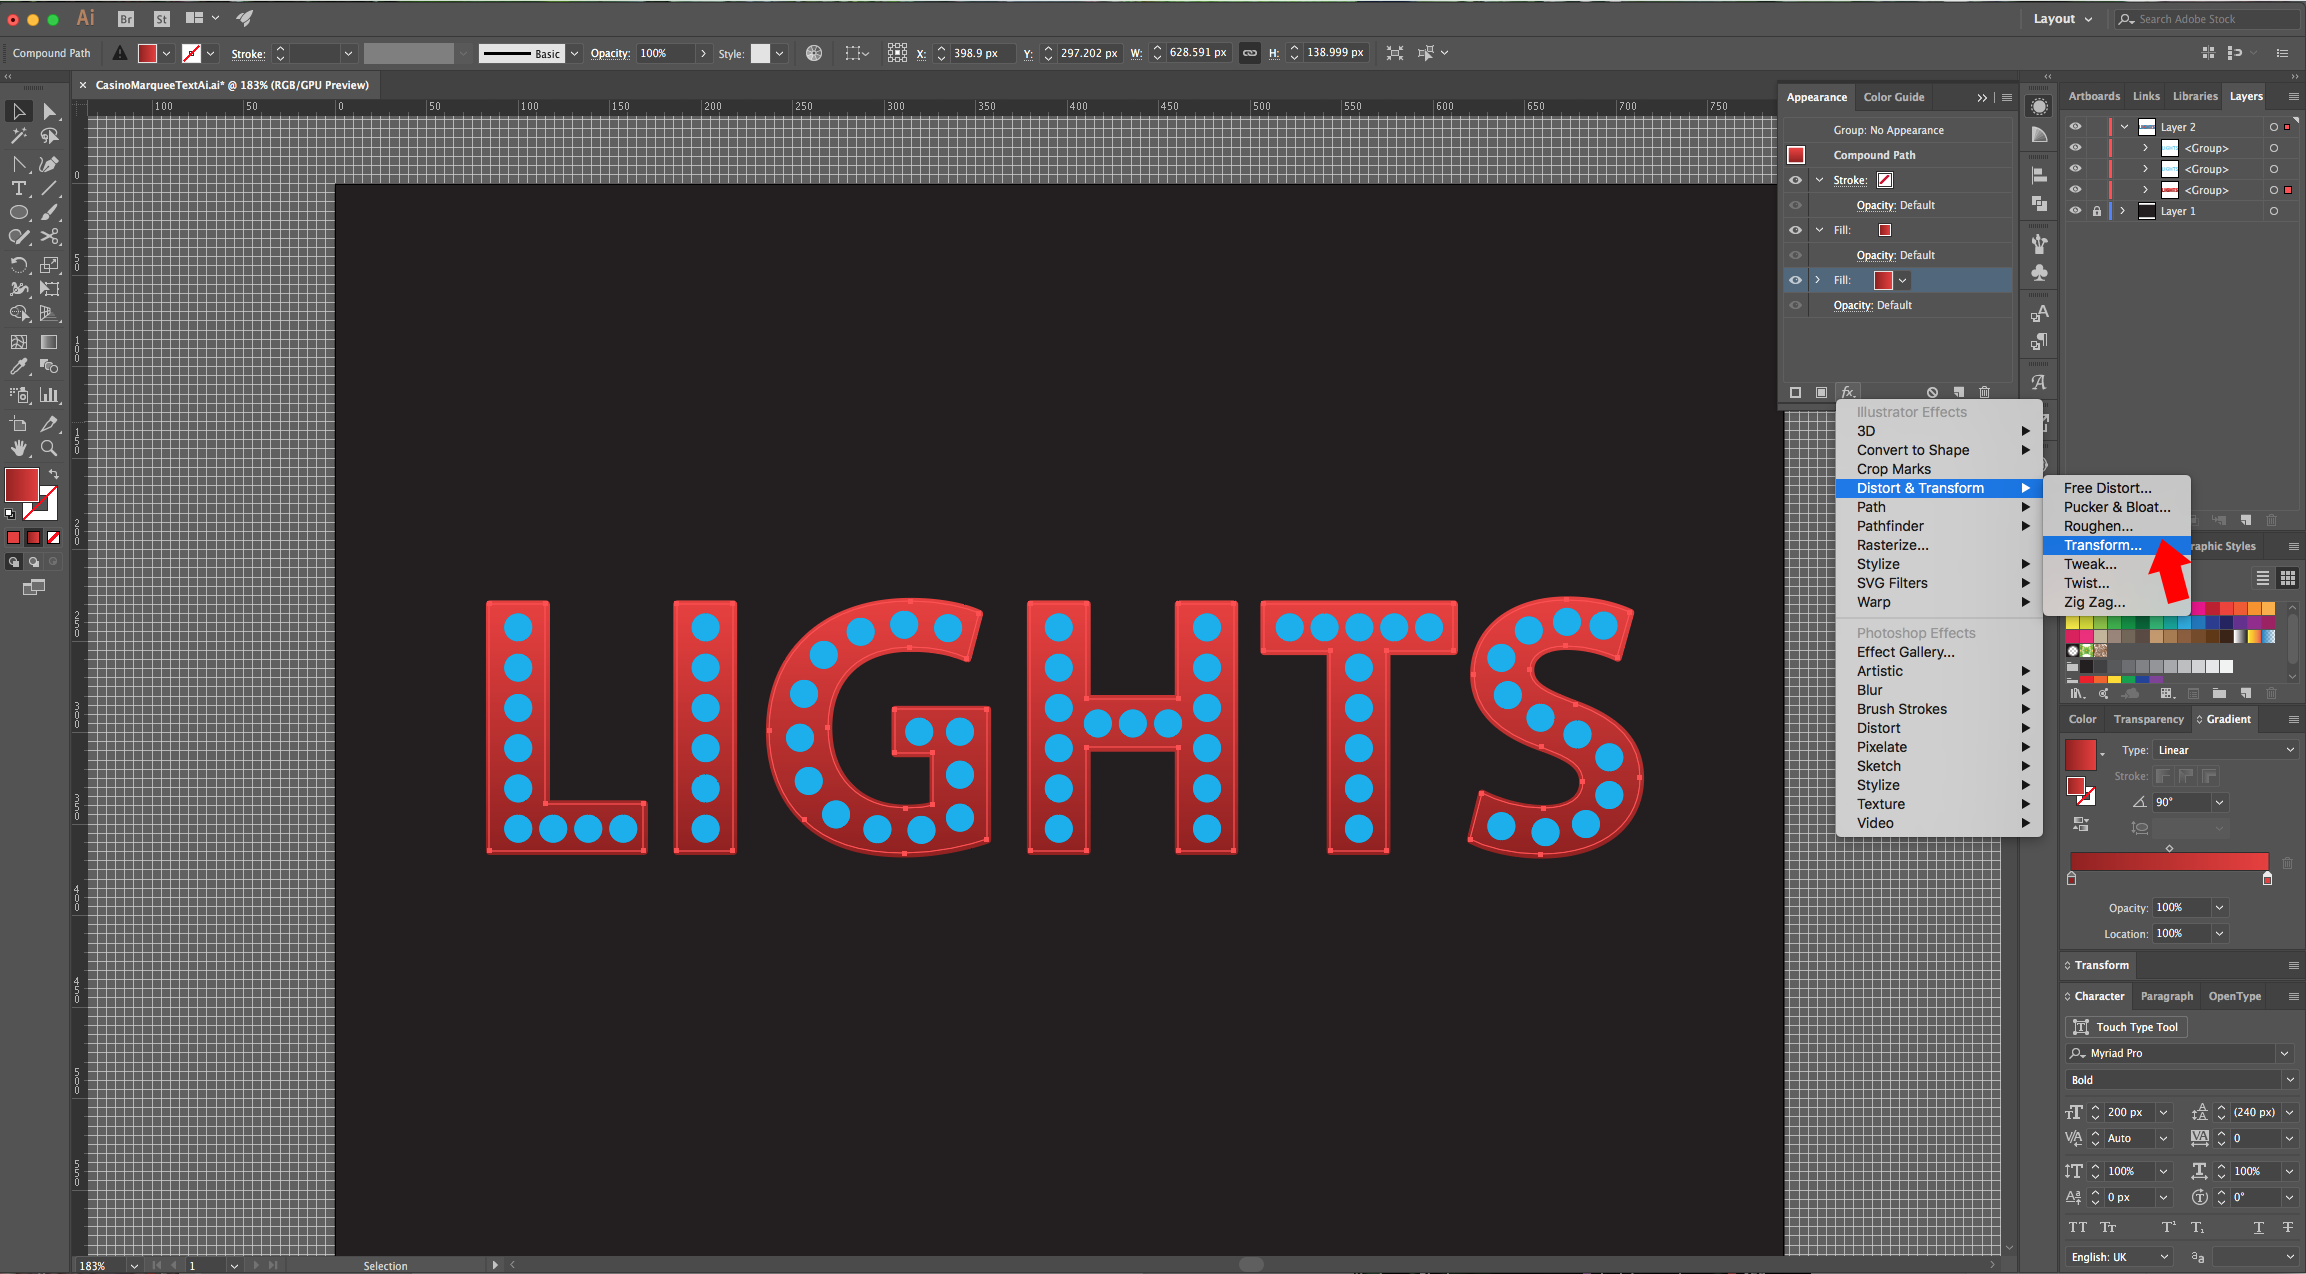
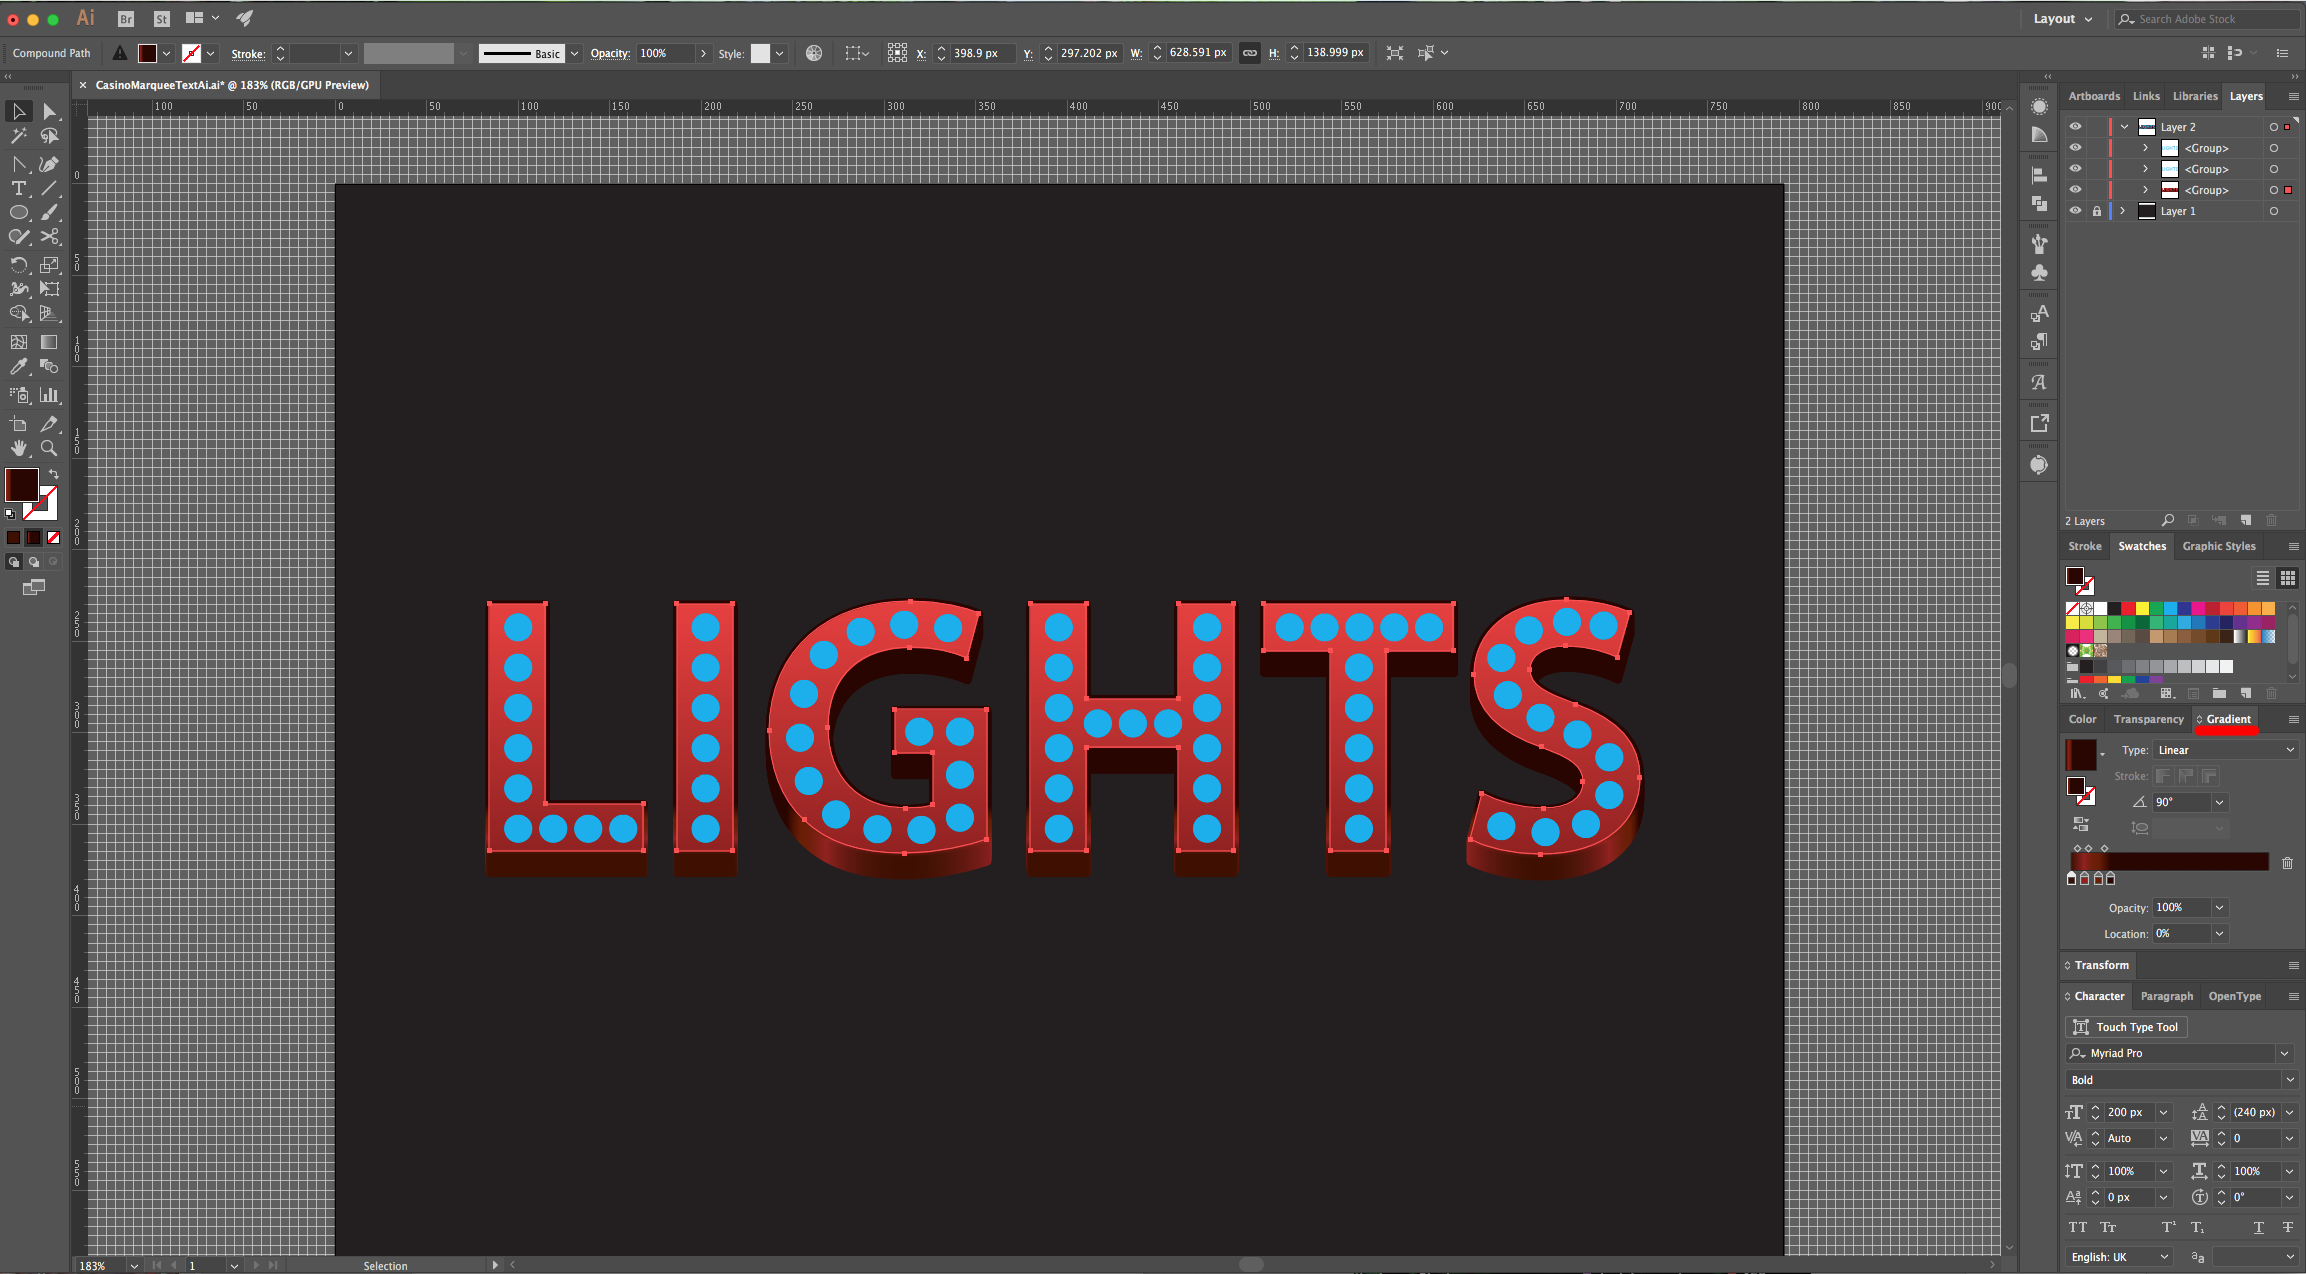
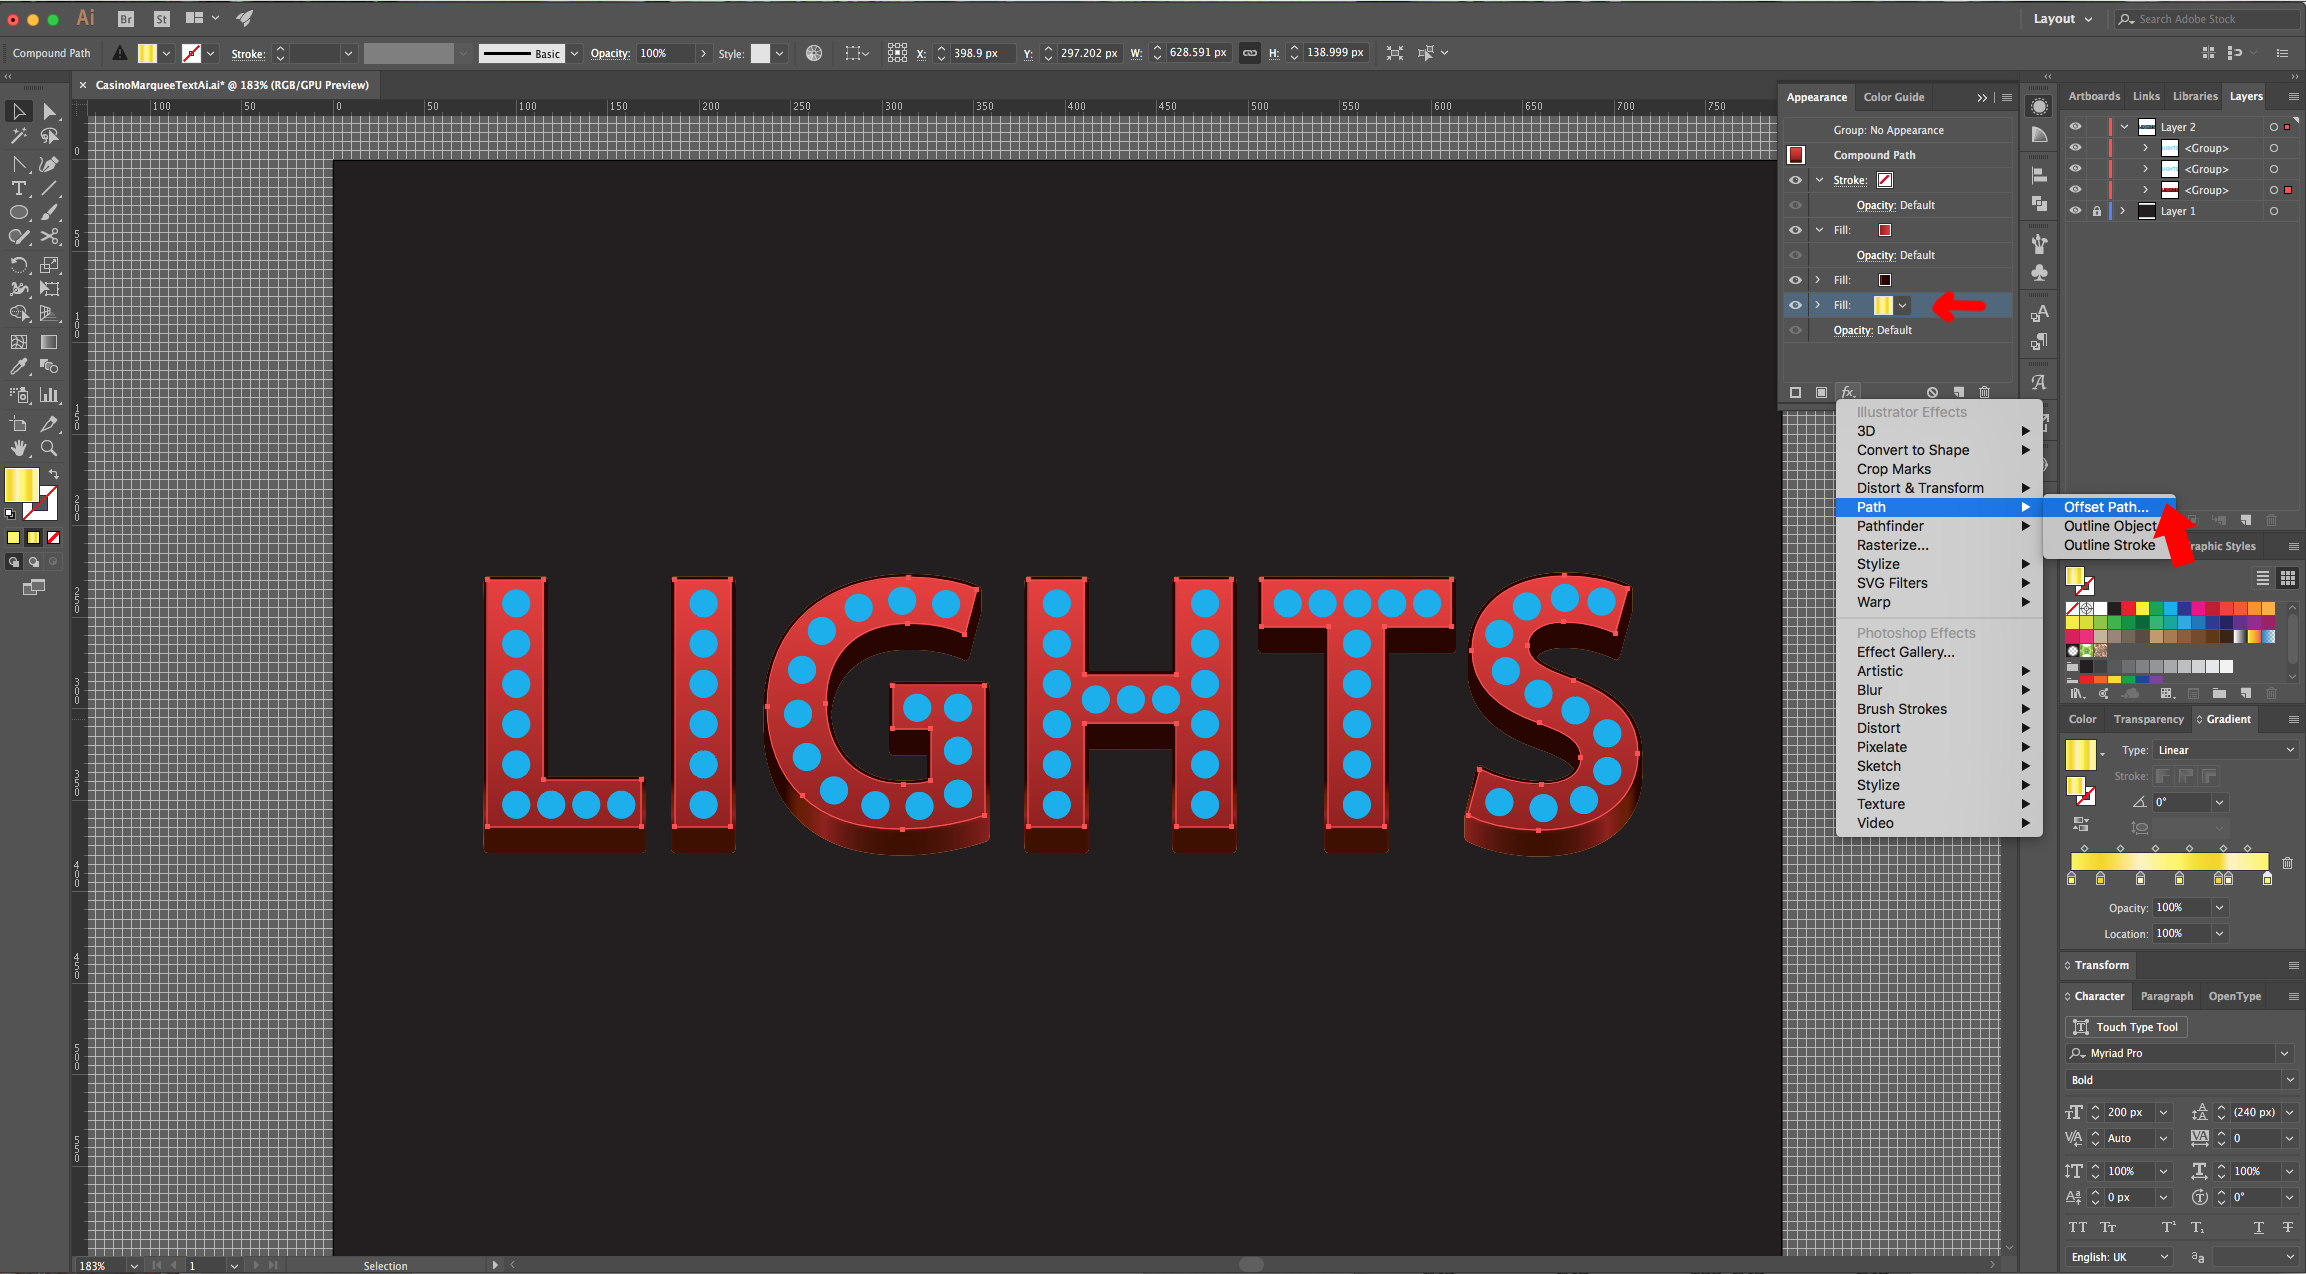
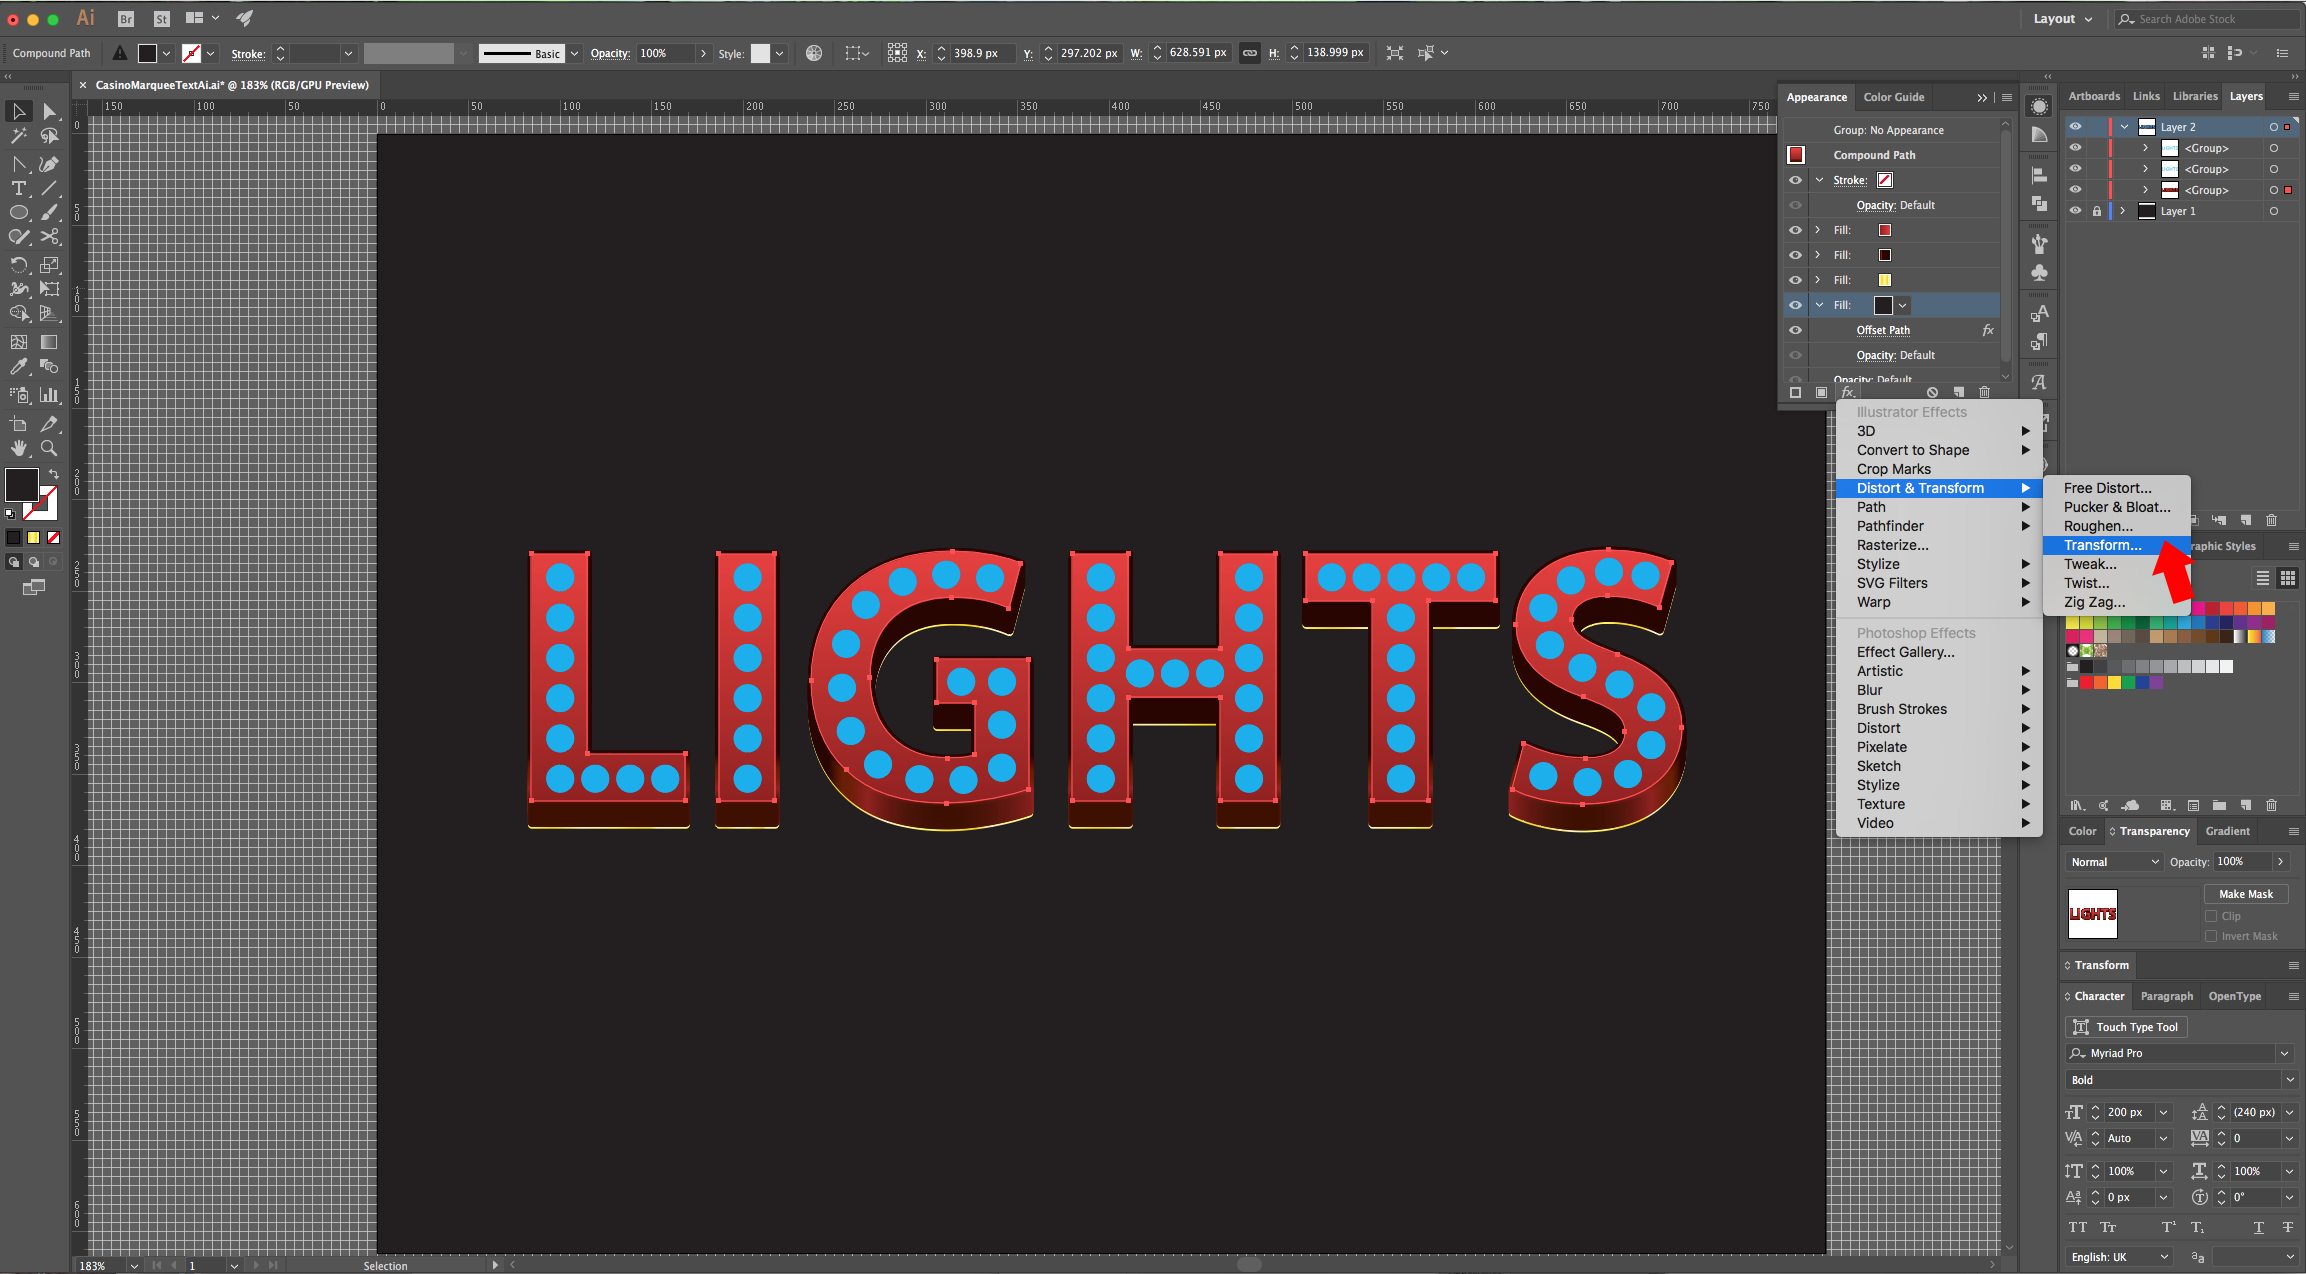
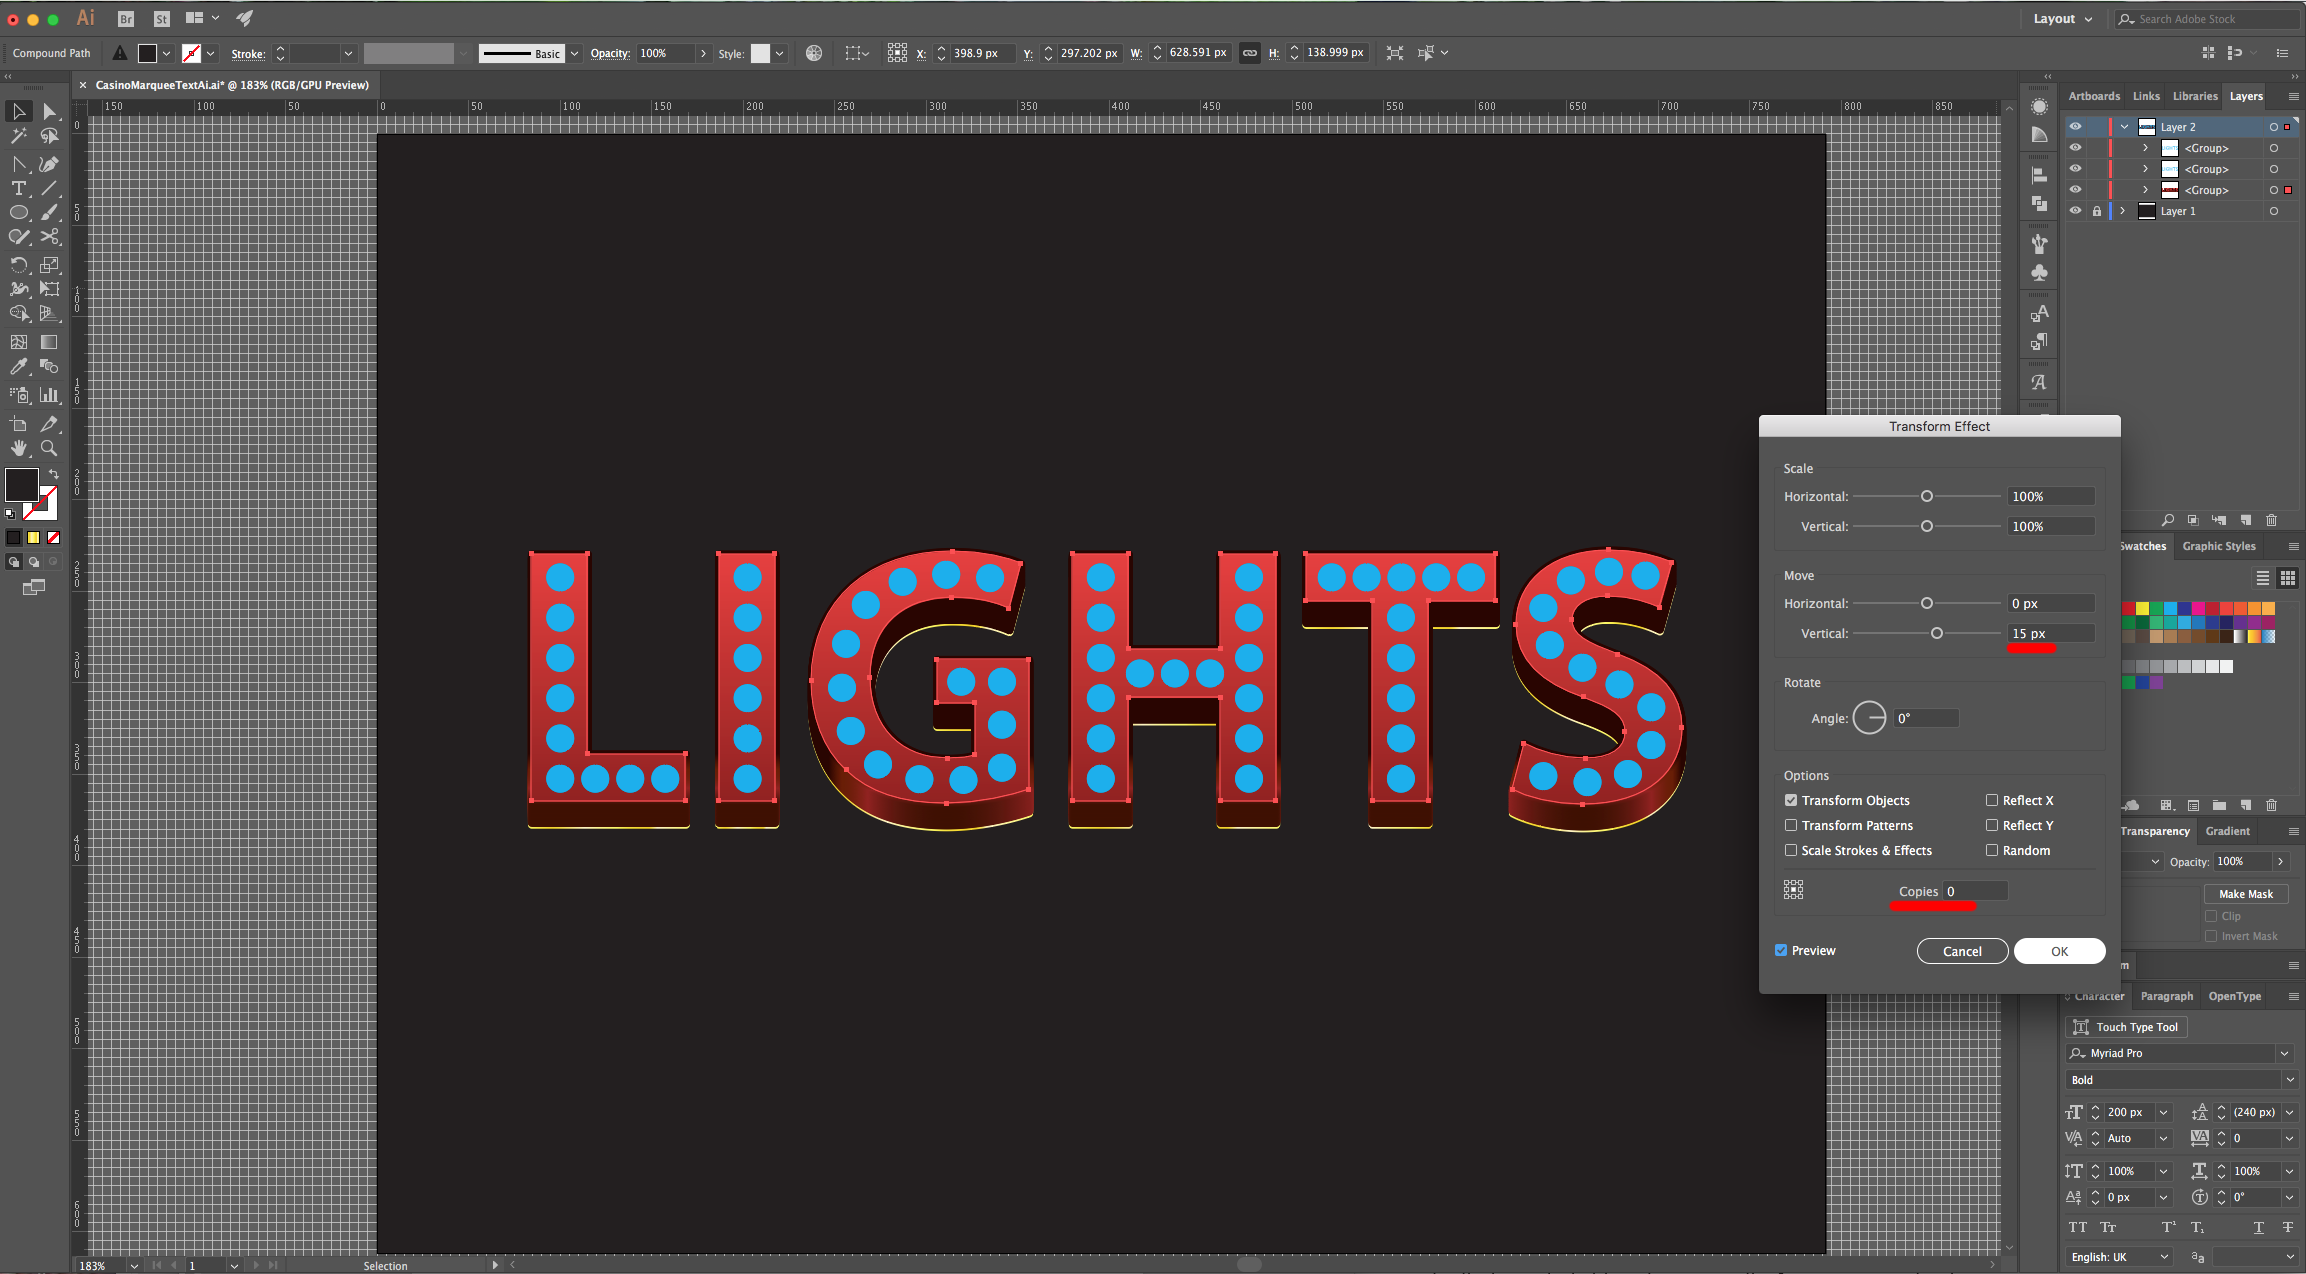
19 - With your second “Fill” still selected, click on the “Effects” button, navigate to Path > Offset Path, and enter a 2 px “Offset”, set the “Joins” to “Round” and click “OK”. With this “Fill” still selected, go to Distort & Transform > Transform and enter a 0.2 px in the “Move-Vertical” and 60 for “Copies”. Go to the “Gradients Panel” and add some colors to your “Fill” to make it look more tridimensional. (#3f1000 - Location 0%, #93211d - Location 6.5%, #6a1d00 - Location 14% and #2a0500 - Location 20%).

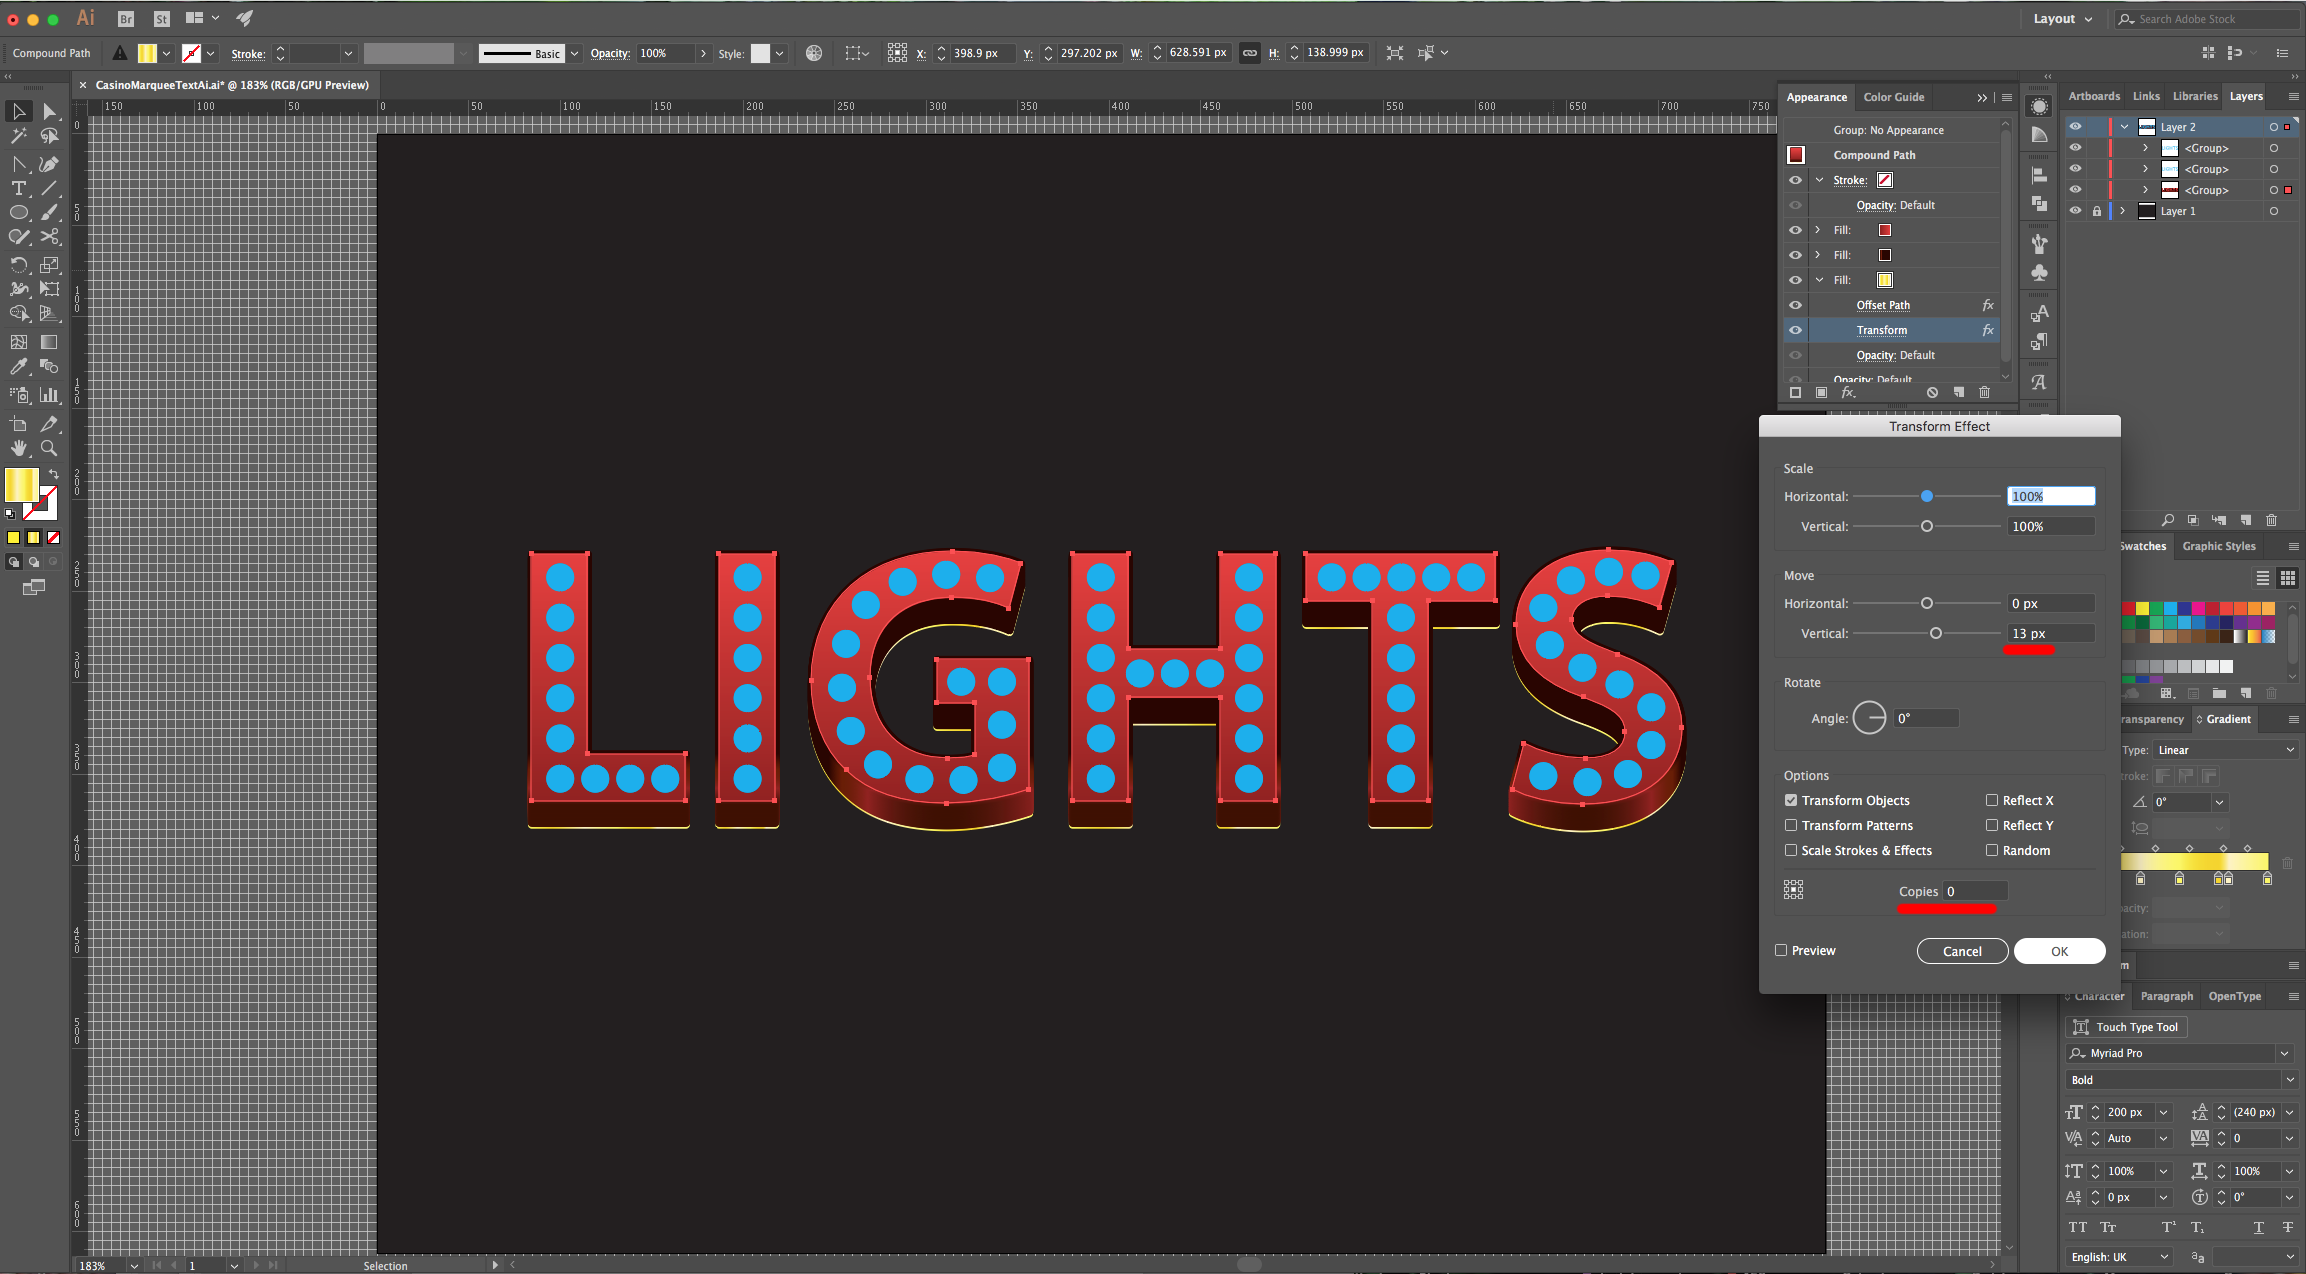
20 - Add a third “Fill”, making sure it is at the bottom and use the following values for the “Gradient”. Use a 0° Angle and these colors: #fbf85c - Location 0%, #f5d600 - Location 15%, #fdf3c2 - Location 35%, #fbf85c - Location 55%, #f5d600 - Location 75%, #fdf3c2 - Location 80% and #fbf85c - Location 100%.
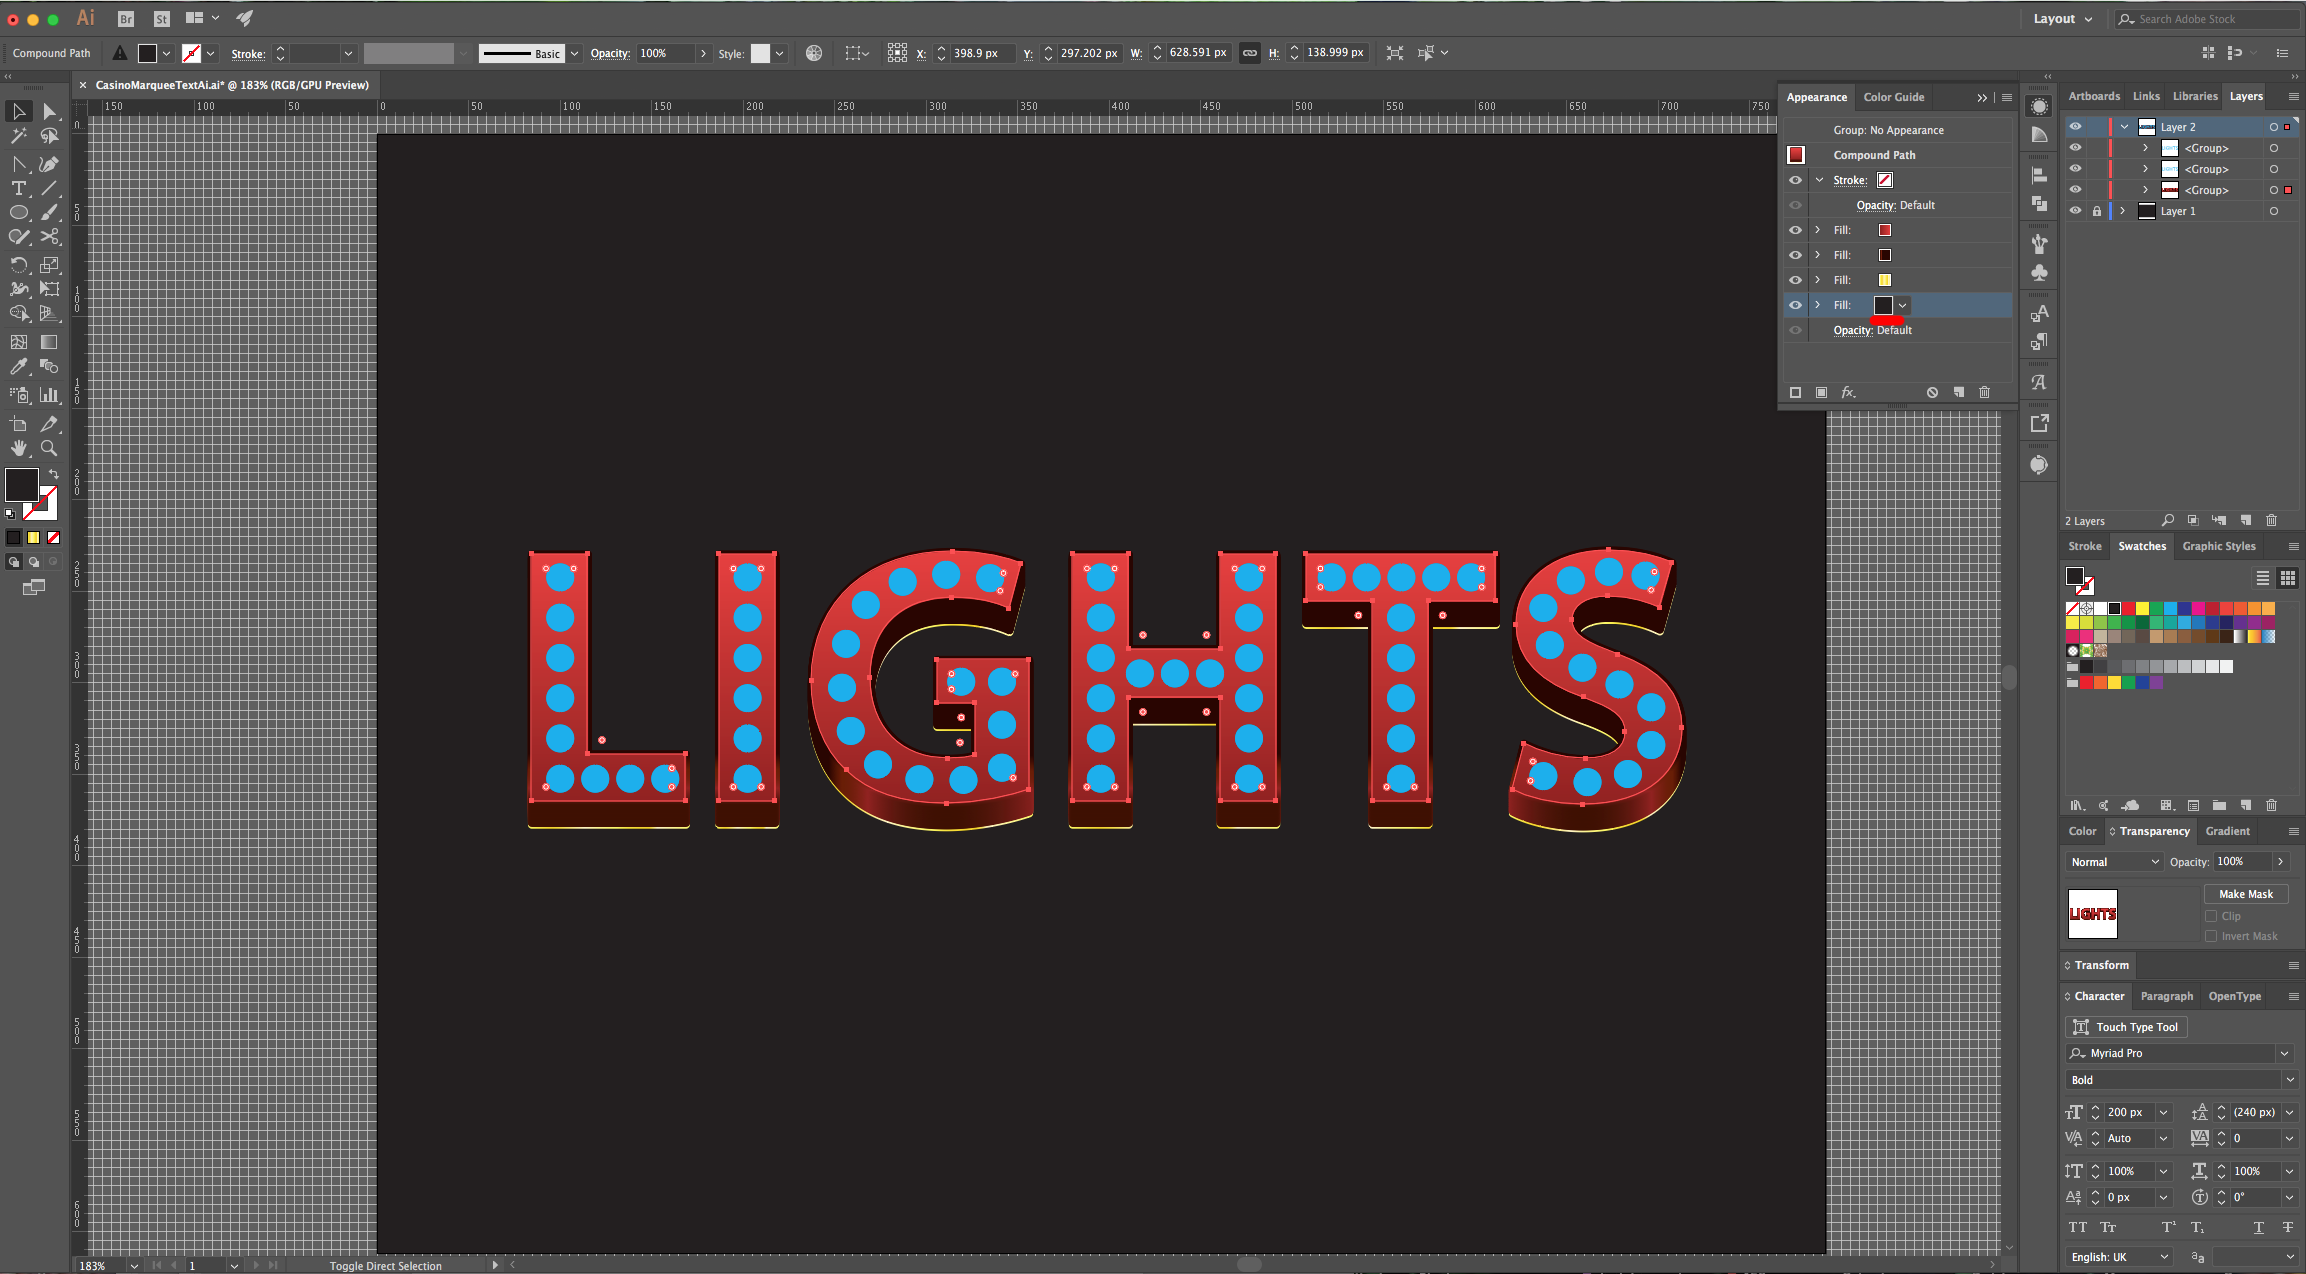
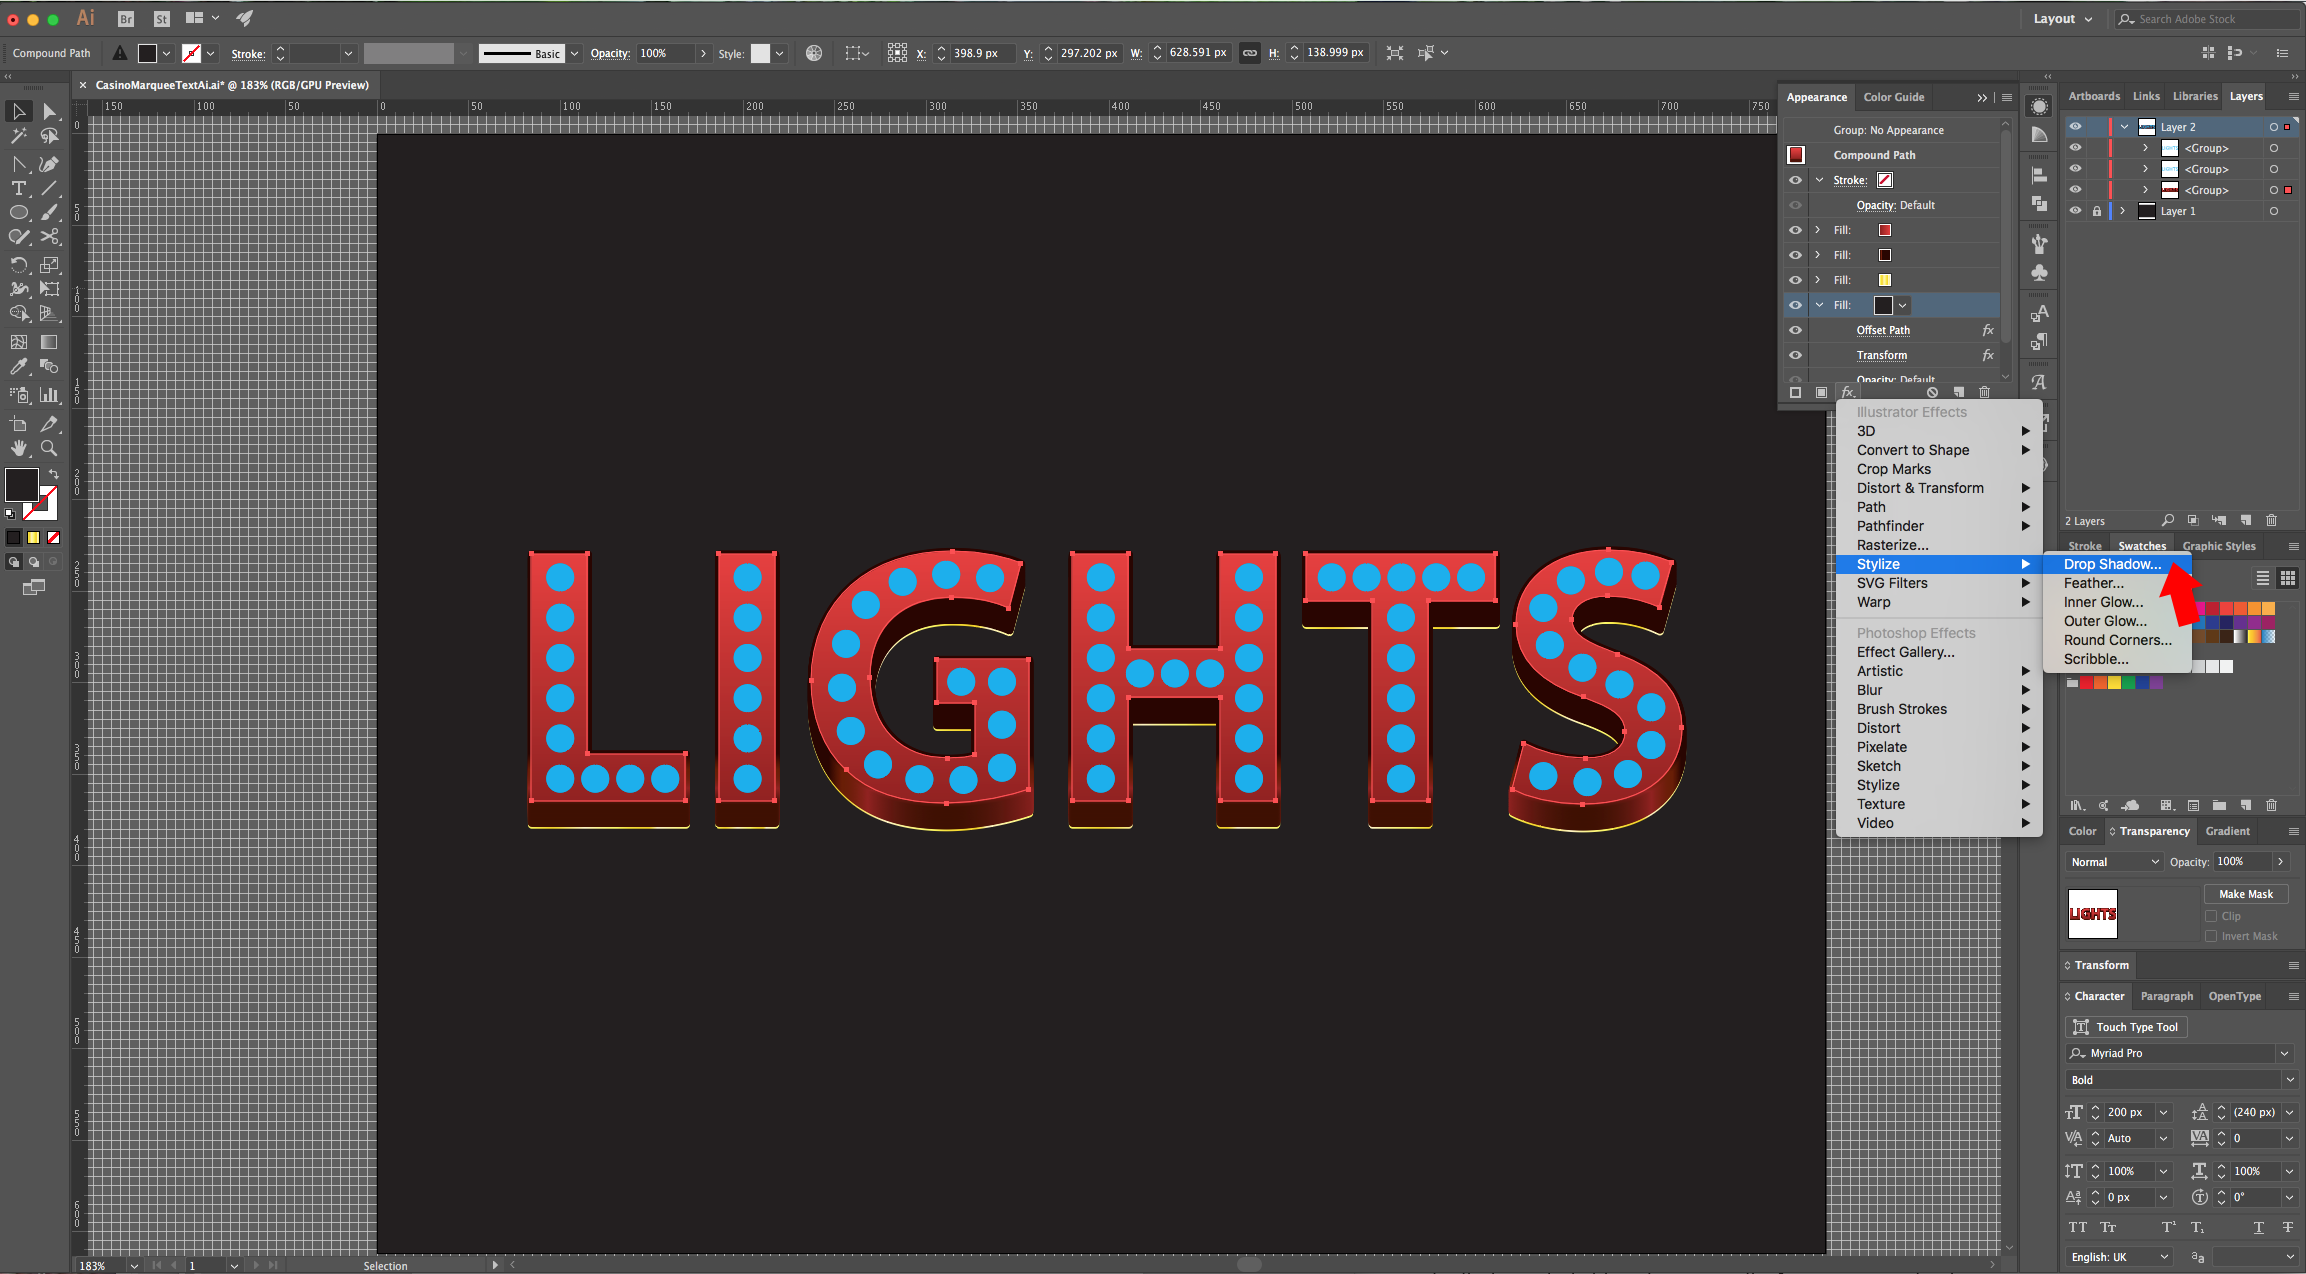
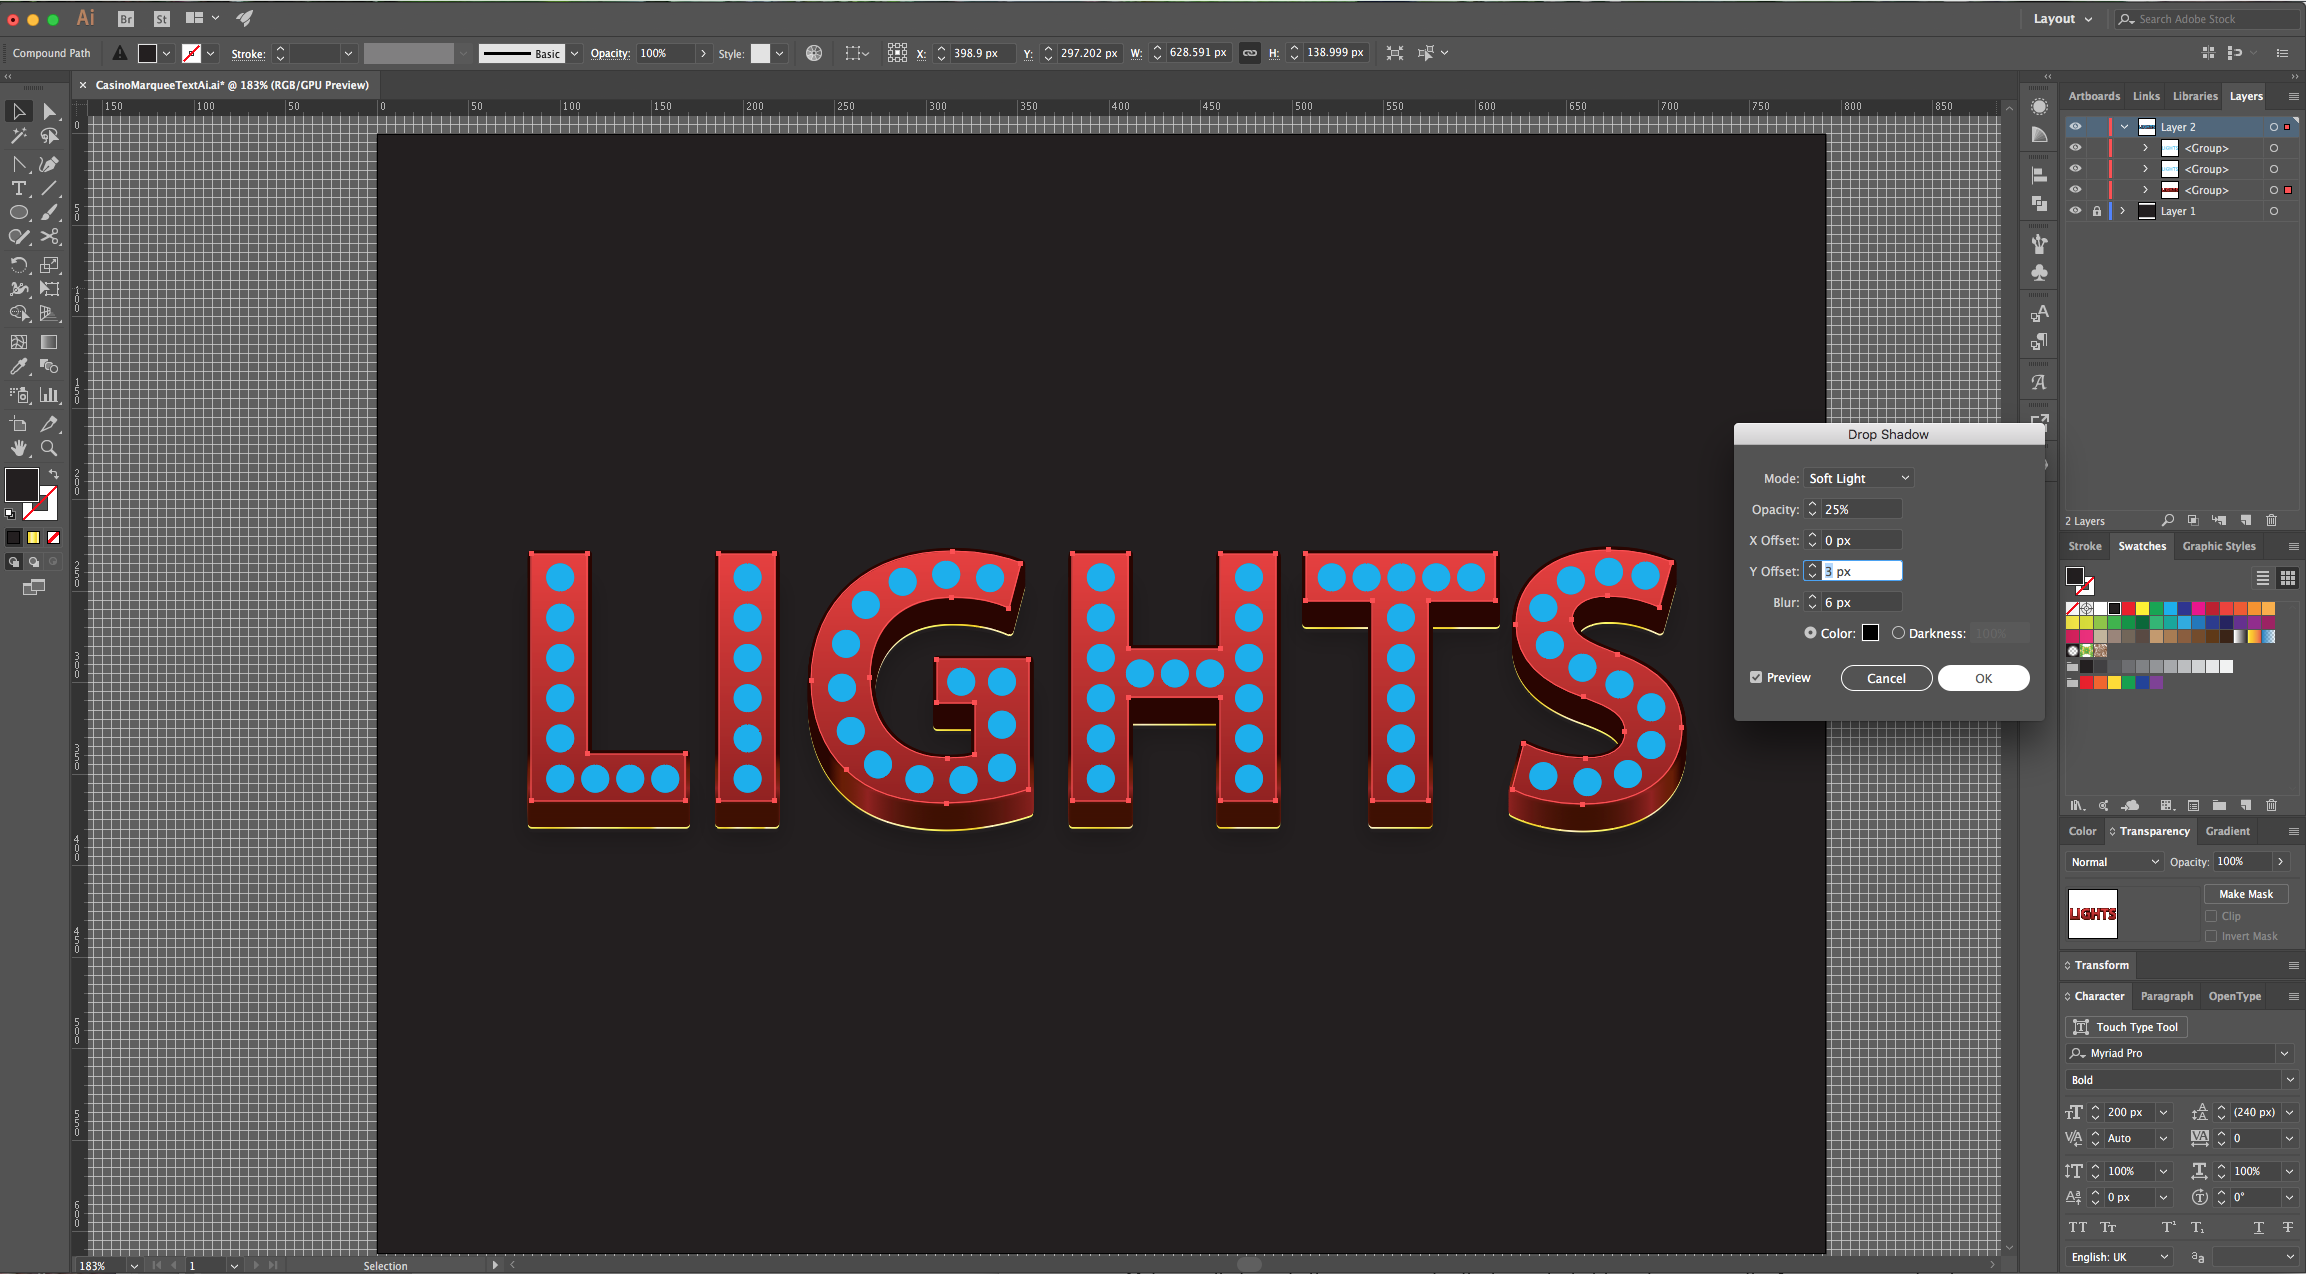
21 - Click on the small arrow just left of your “Fill”, you should have the “Offset Path” and the “Transform” Effects. Double-click on top of “Transform” and change “Move - Vertical” to 13 px and 0 “Copies”.
22 - Add another “Fill”, make sure it is at the bottom and “Fill” it with Black. Click on the “Effects” button, navigate to Path > Offset Path, and enter a 2 px “Offset”, set the “Joins” to “Round” and click “OK”. Then, go to Distort & Transform > Transform and enter a 15 px in the “Move-Vertical” and 0 for “Copies”. Last, go to Stylize > Drop Shadow and use the following values.
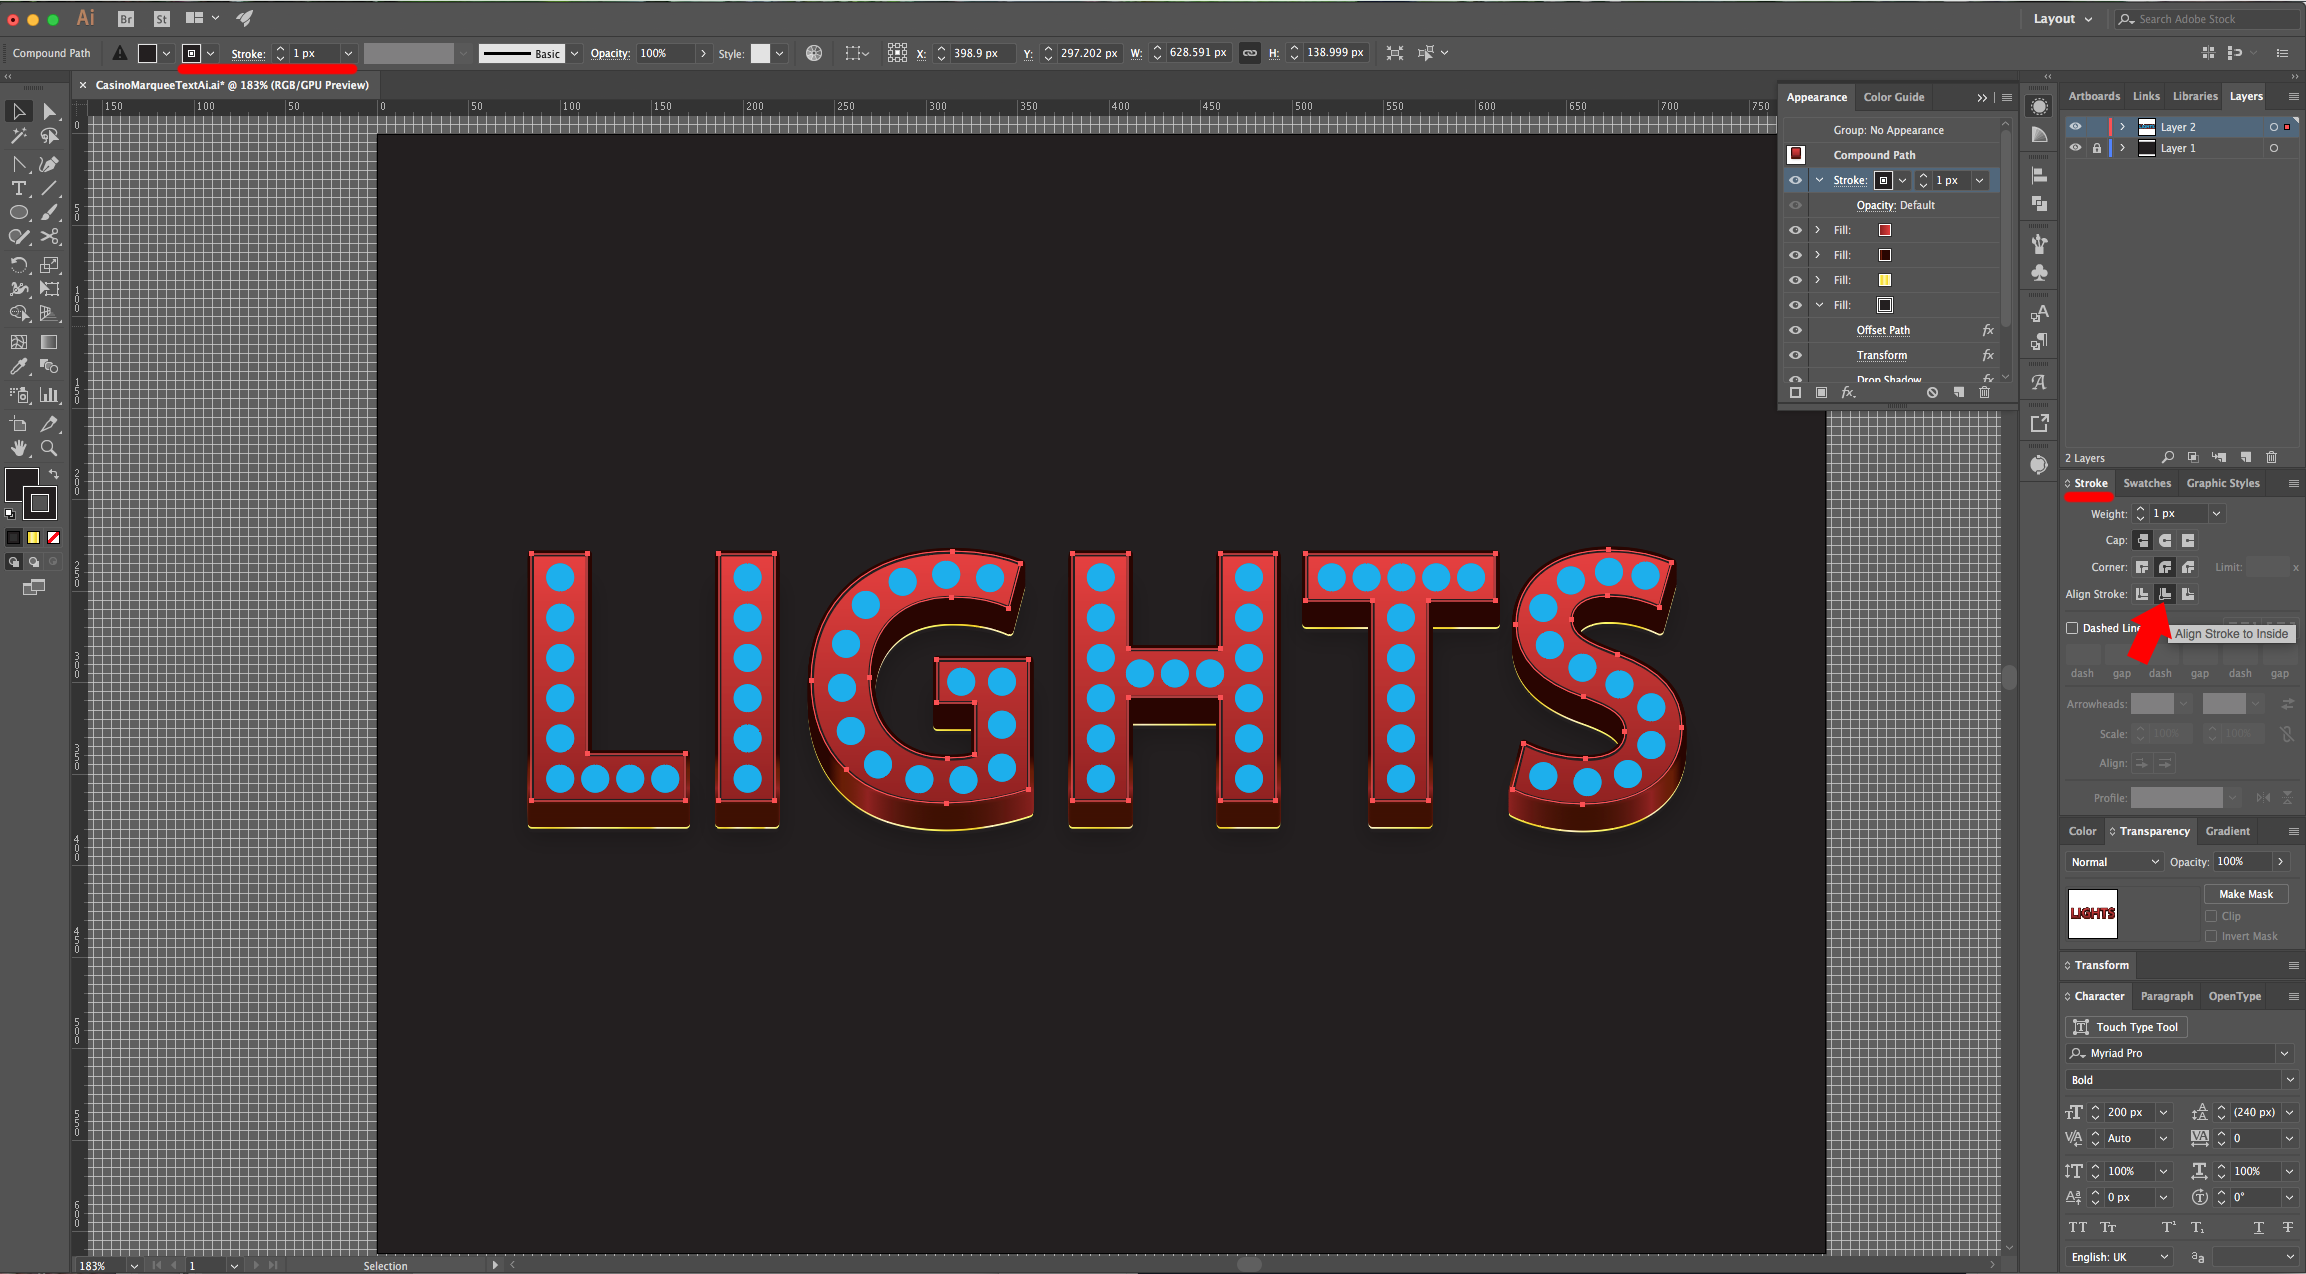
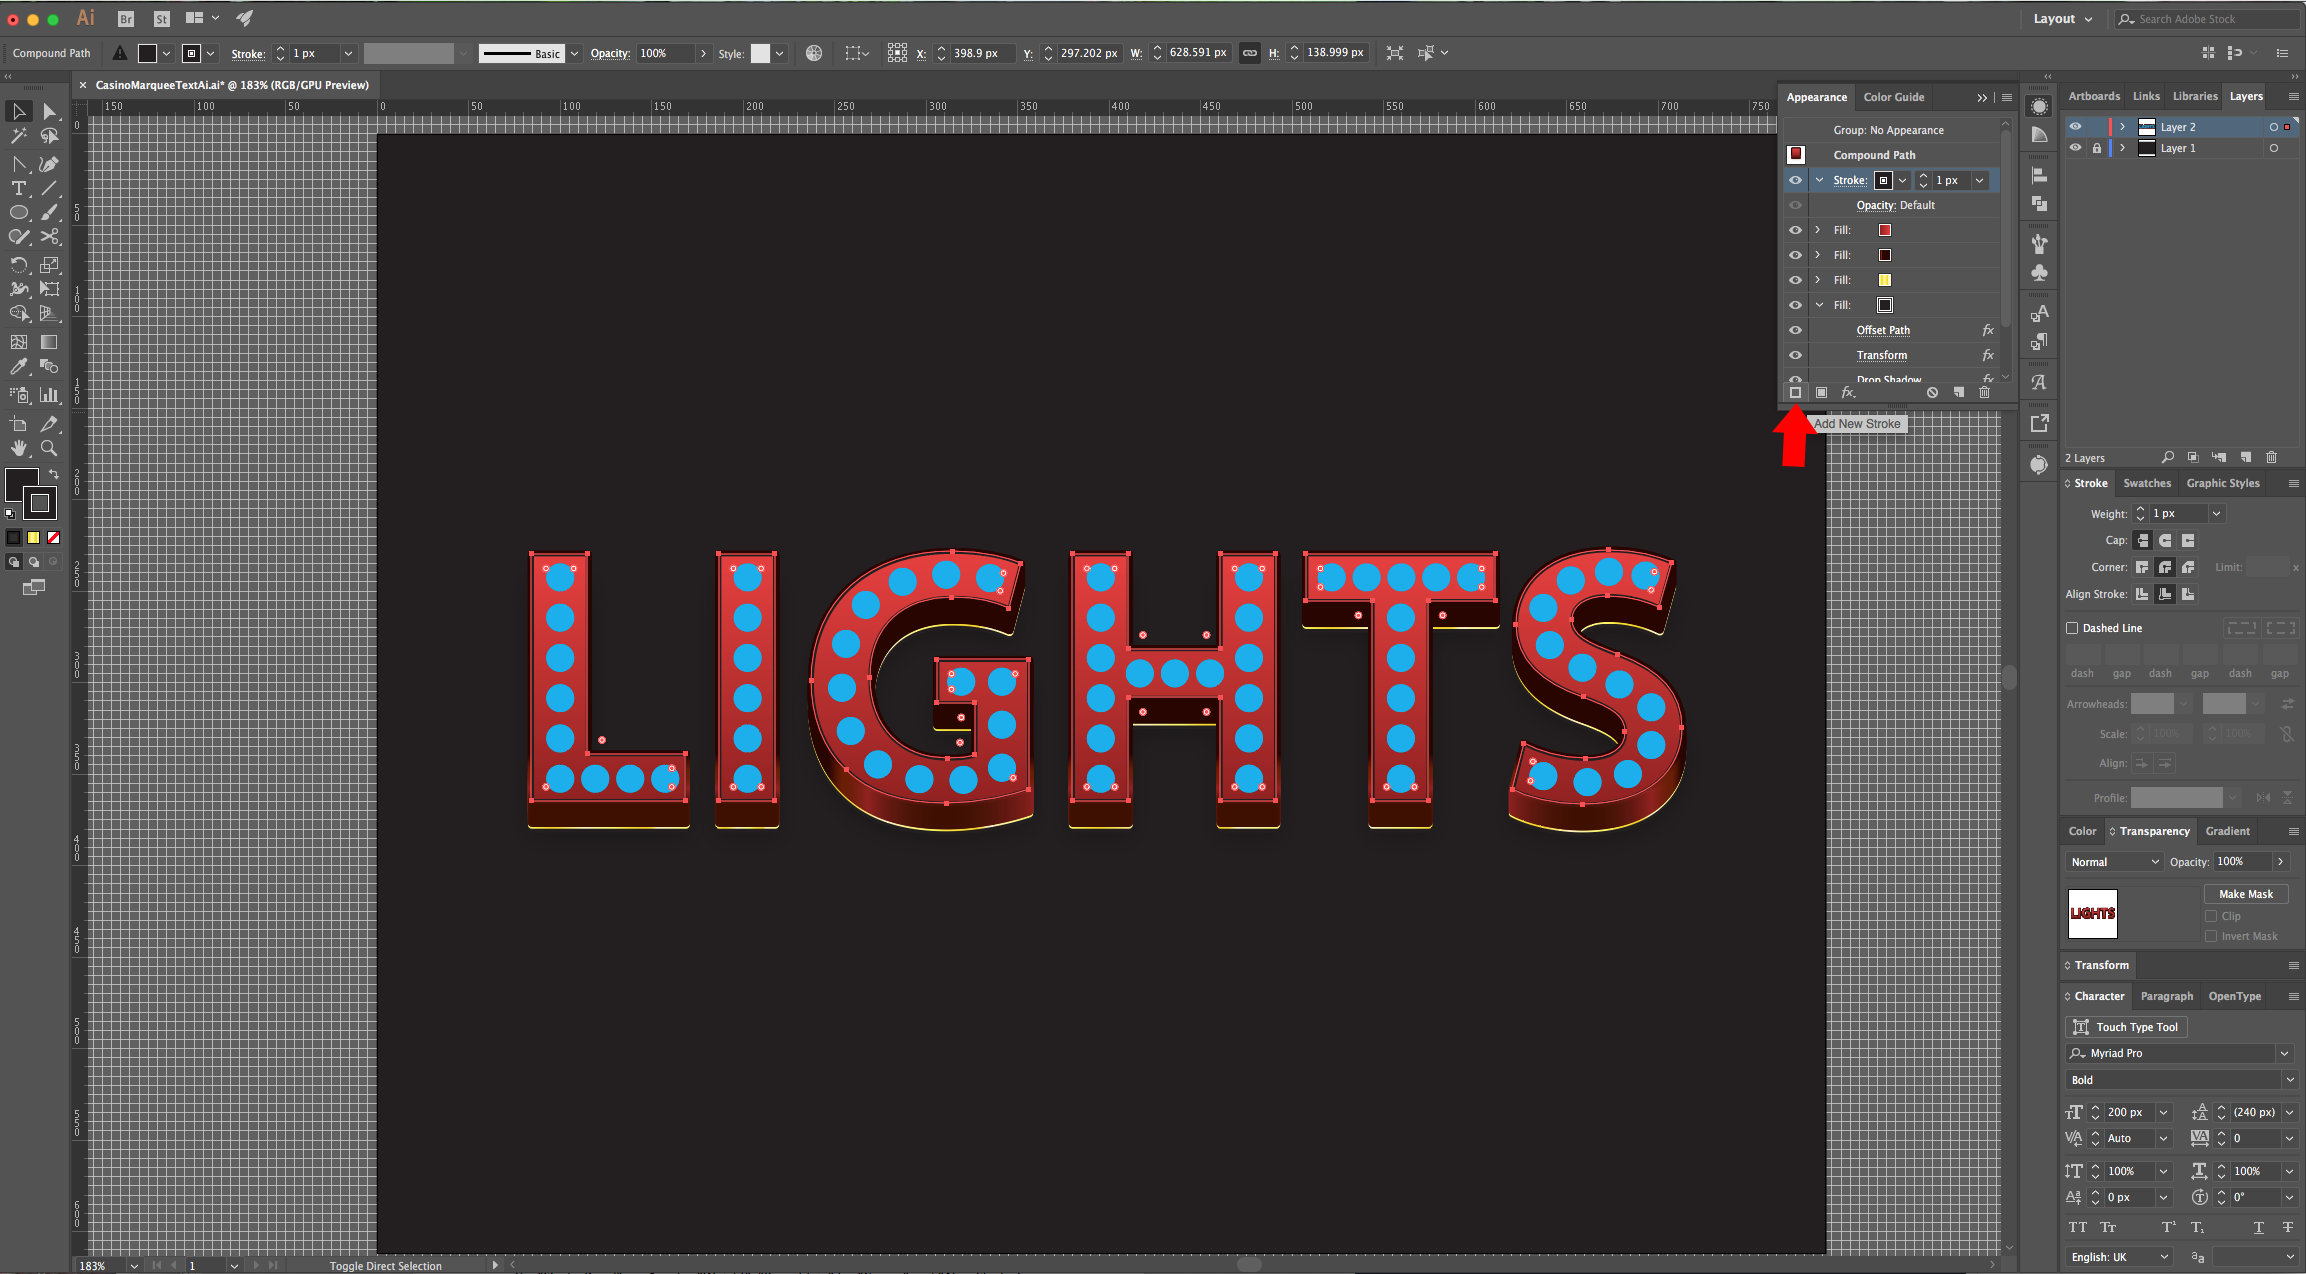
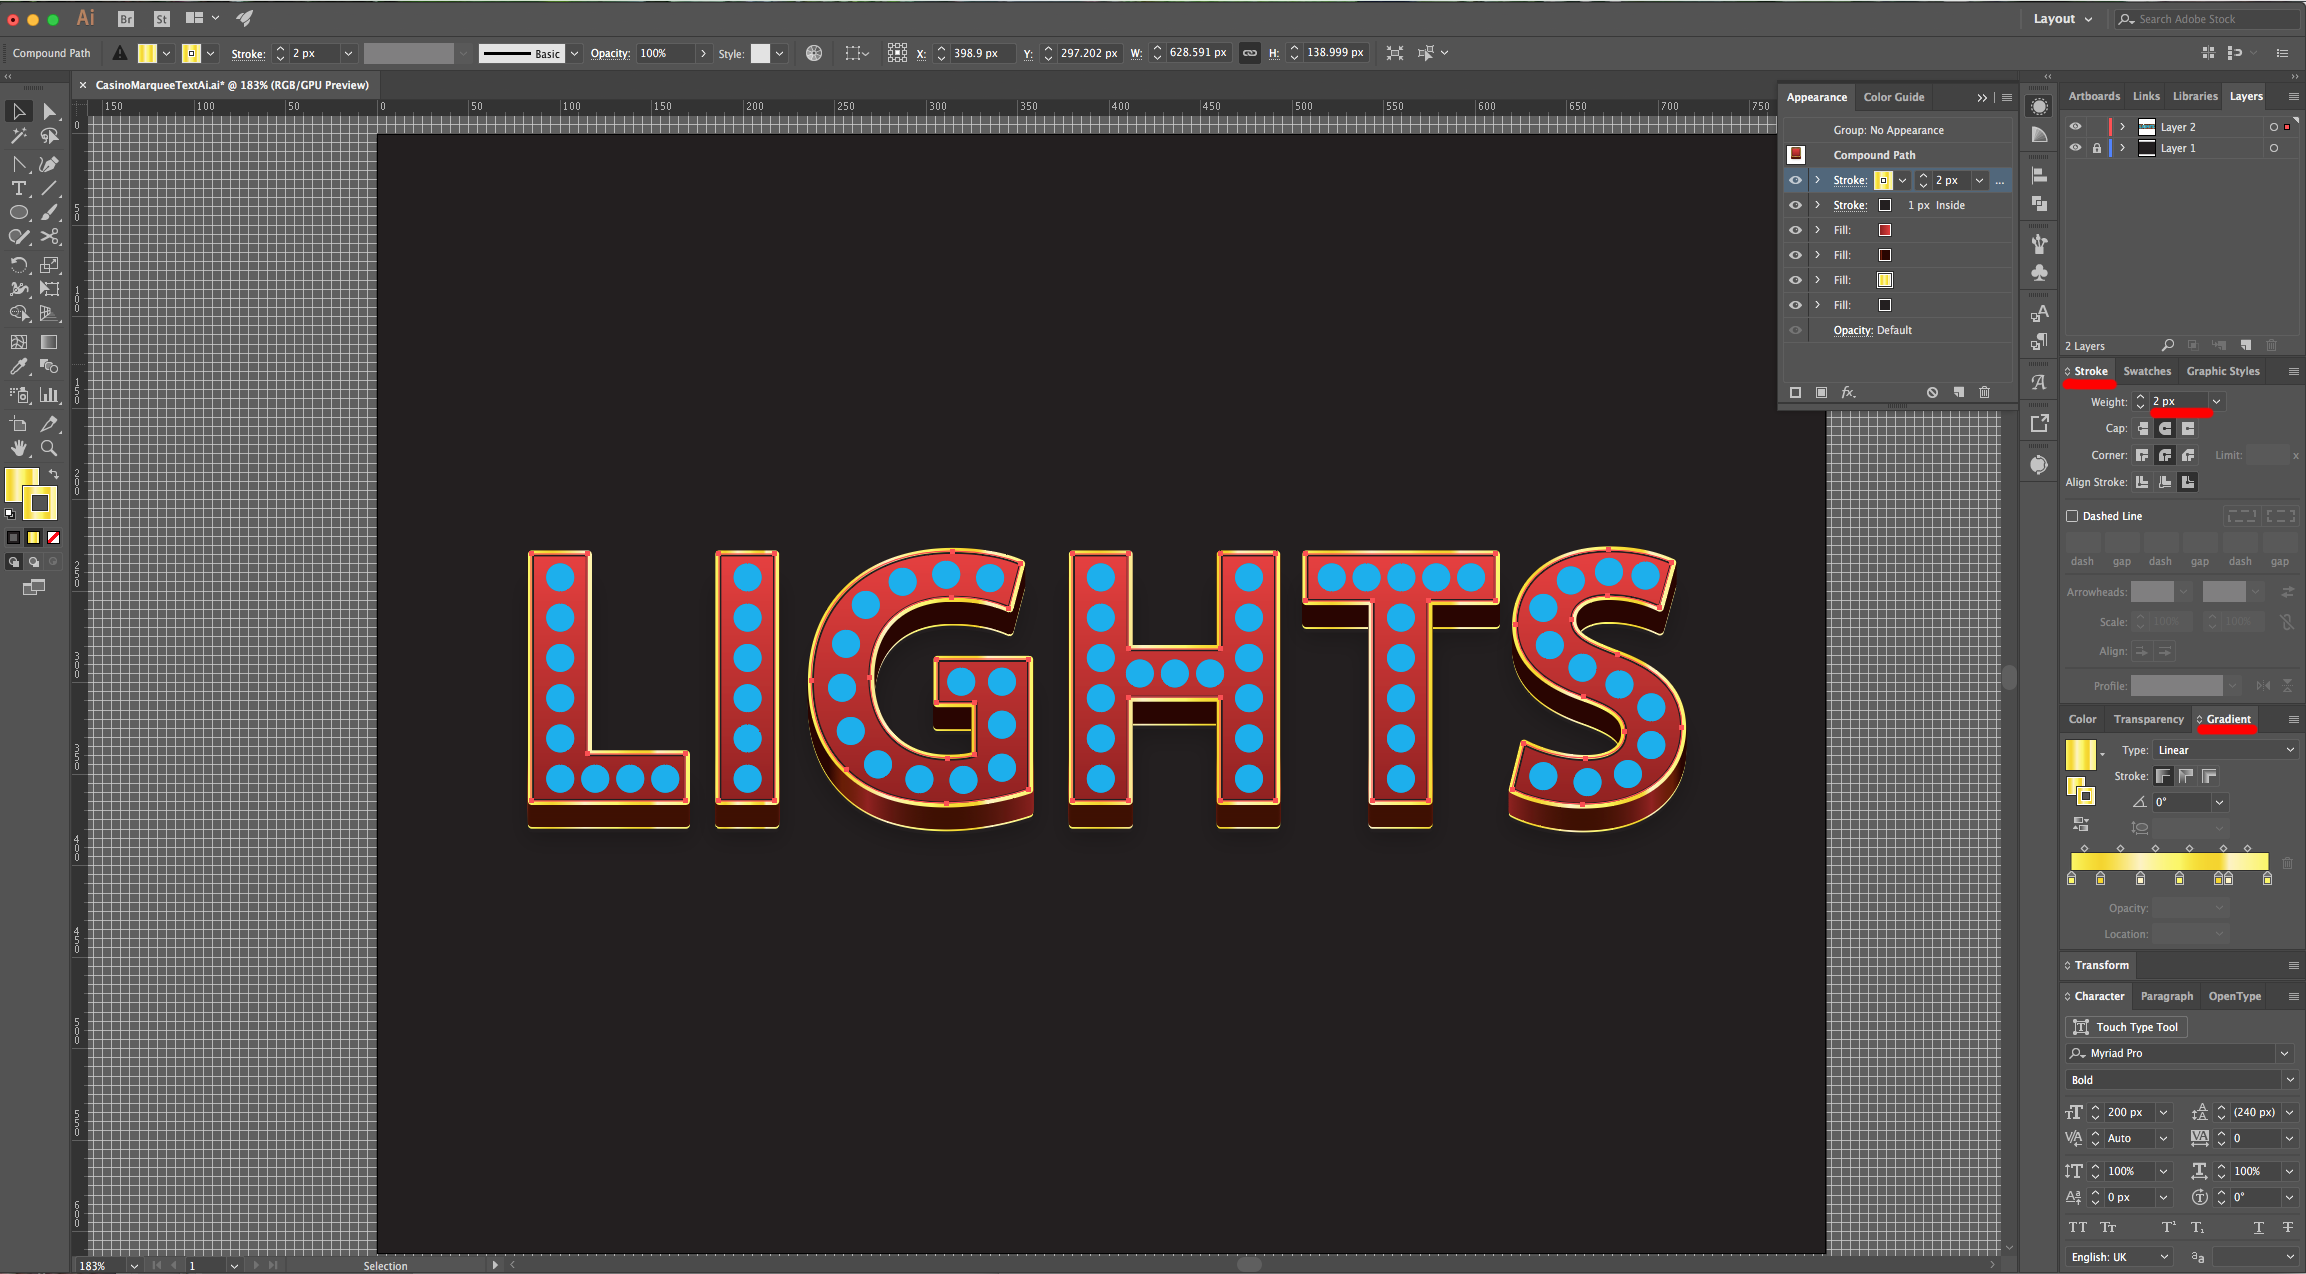
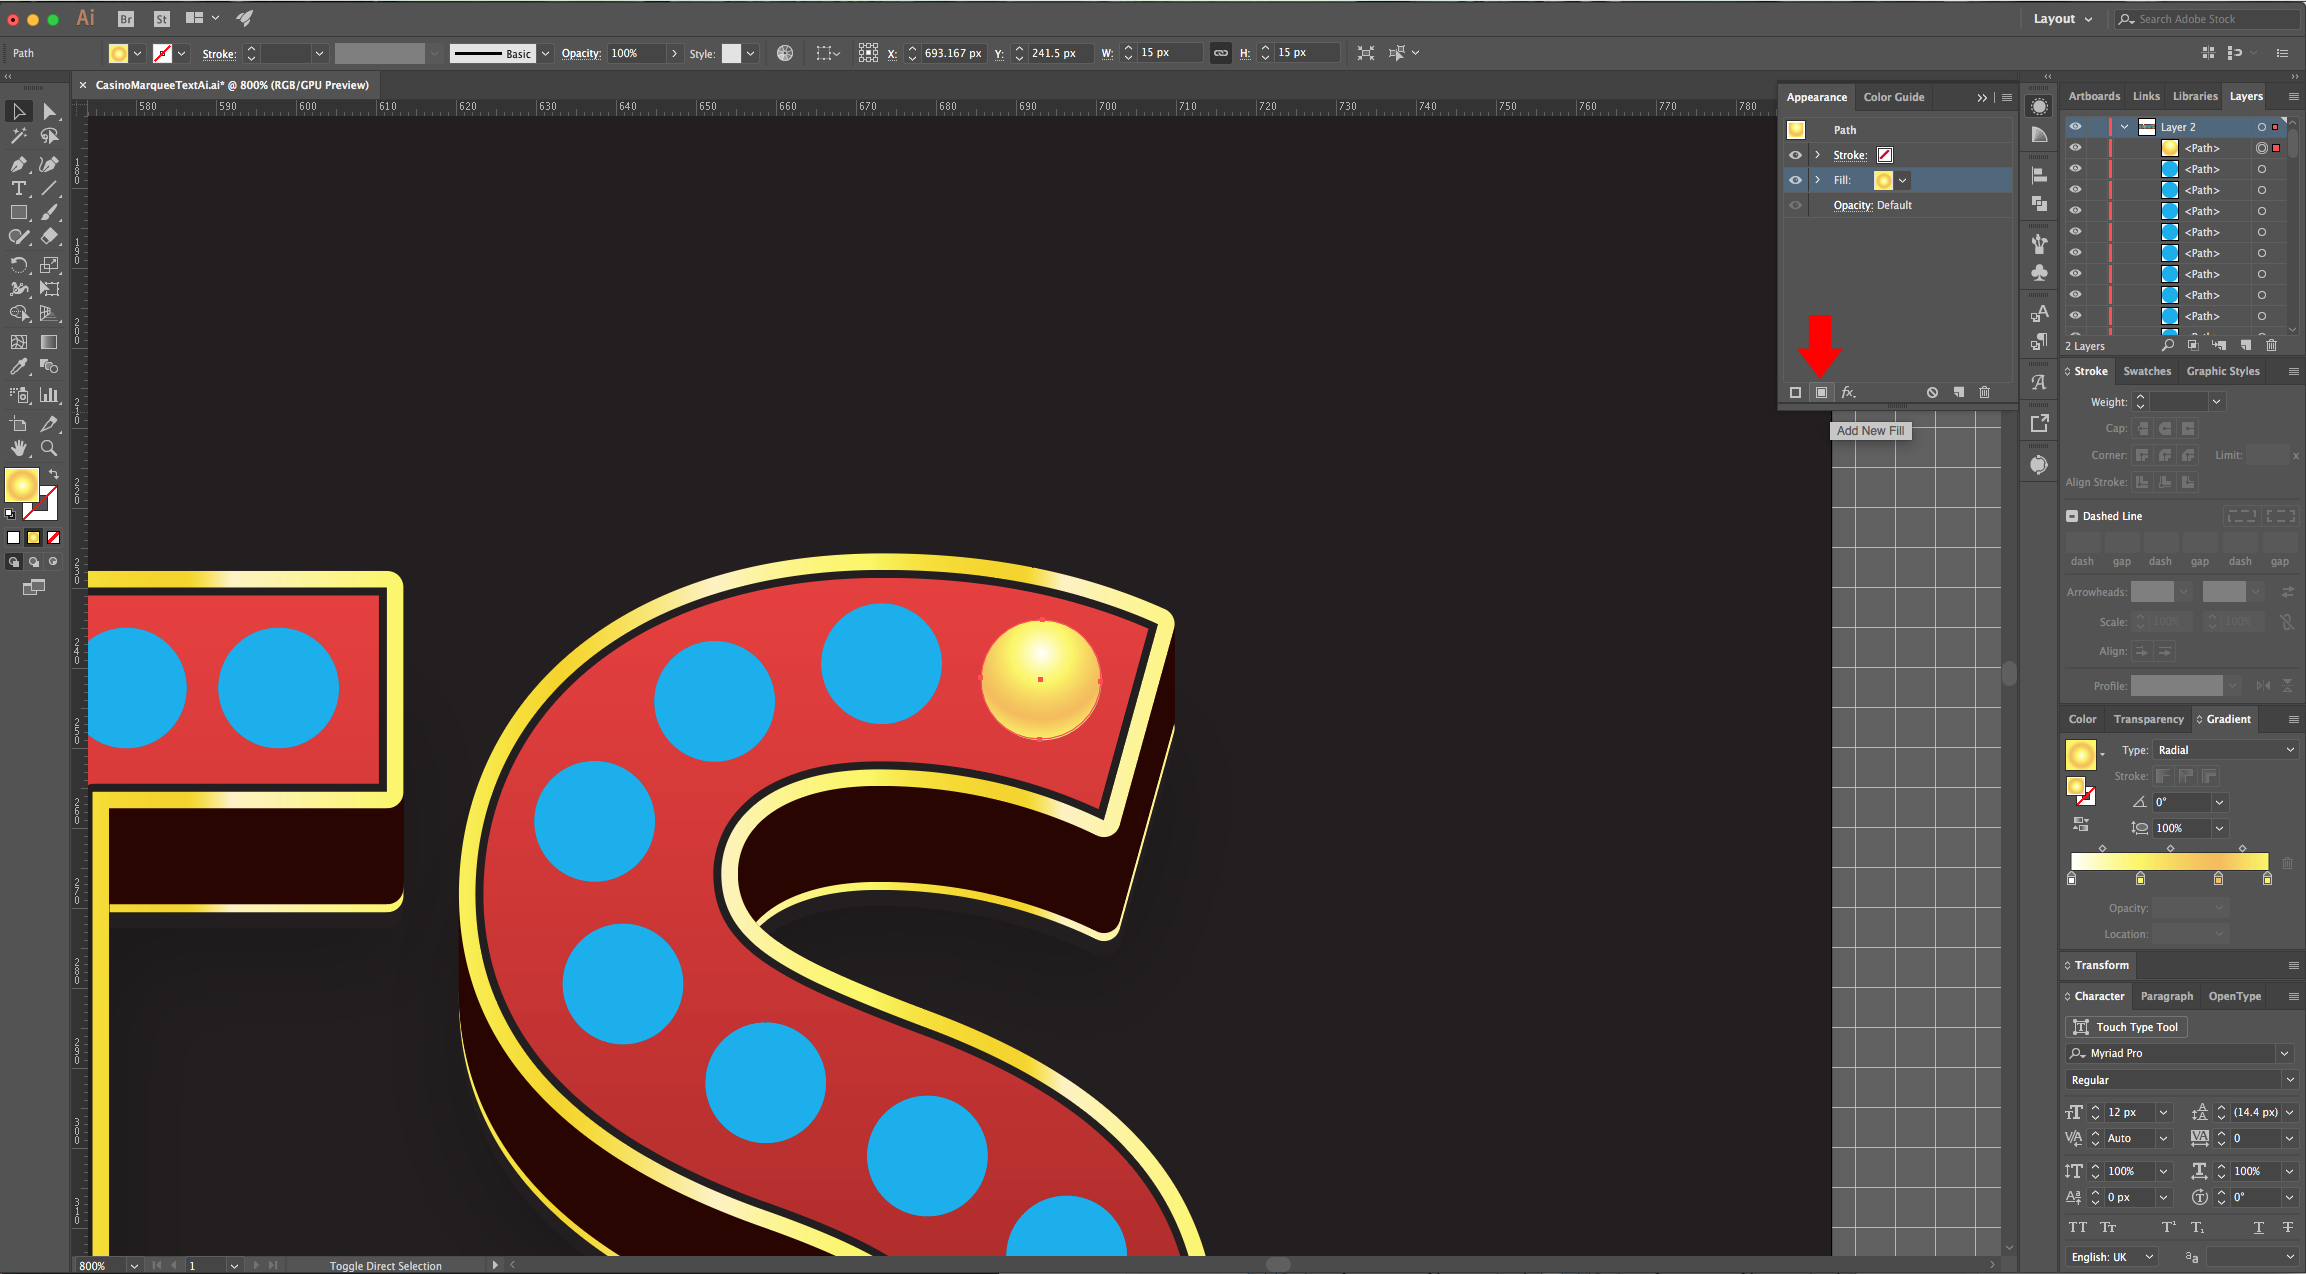
23 - Still in the “Appearance Panel”, select the “Stroke” and choose Black as “Fill” color. In the “Stroke Panel” use 1 px for “Weight”, “Round Join” for “Corner” and “Align Stroke to Inside”. Click on one of the small buttons on the Bottom-left to “Add New Stroke”. Make sure you are working on the “Top” one and change the “Fill” to the same Yellow Gradient we used as Fill before. Use 2 px for “Weight”, “Round Cap” and “Round Join” for “Corner” and “Align Stroke to Outside”.
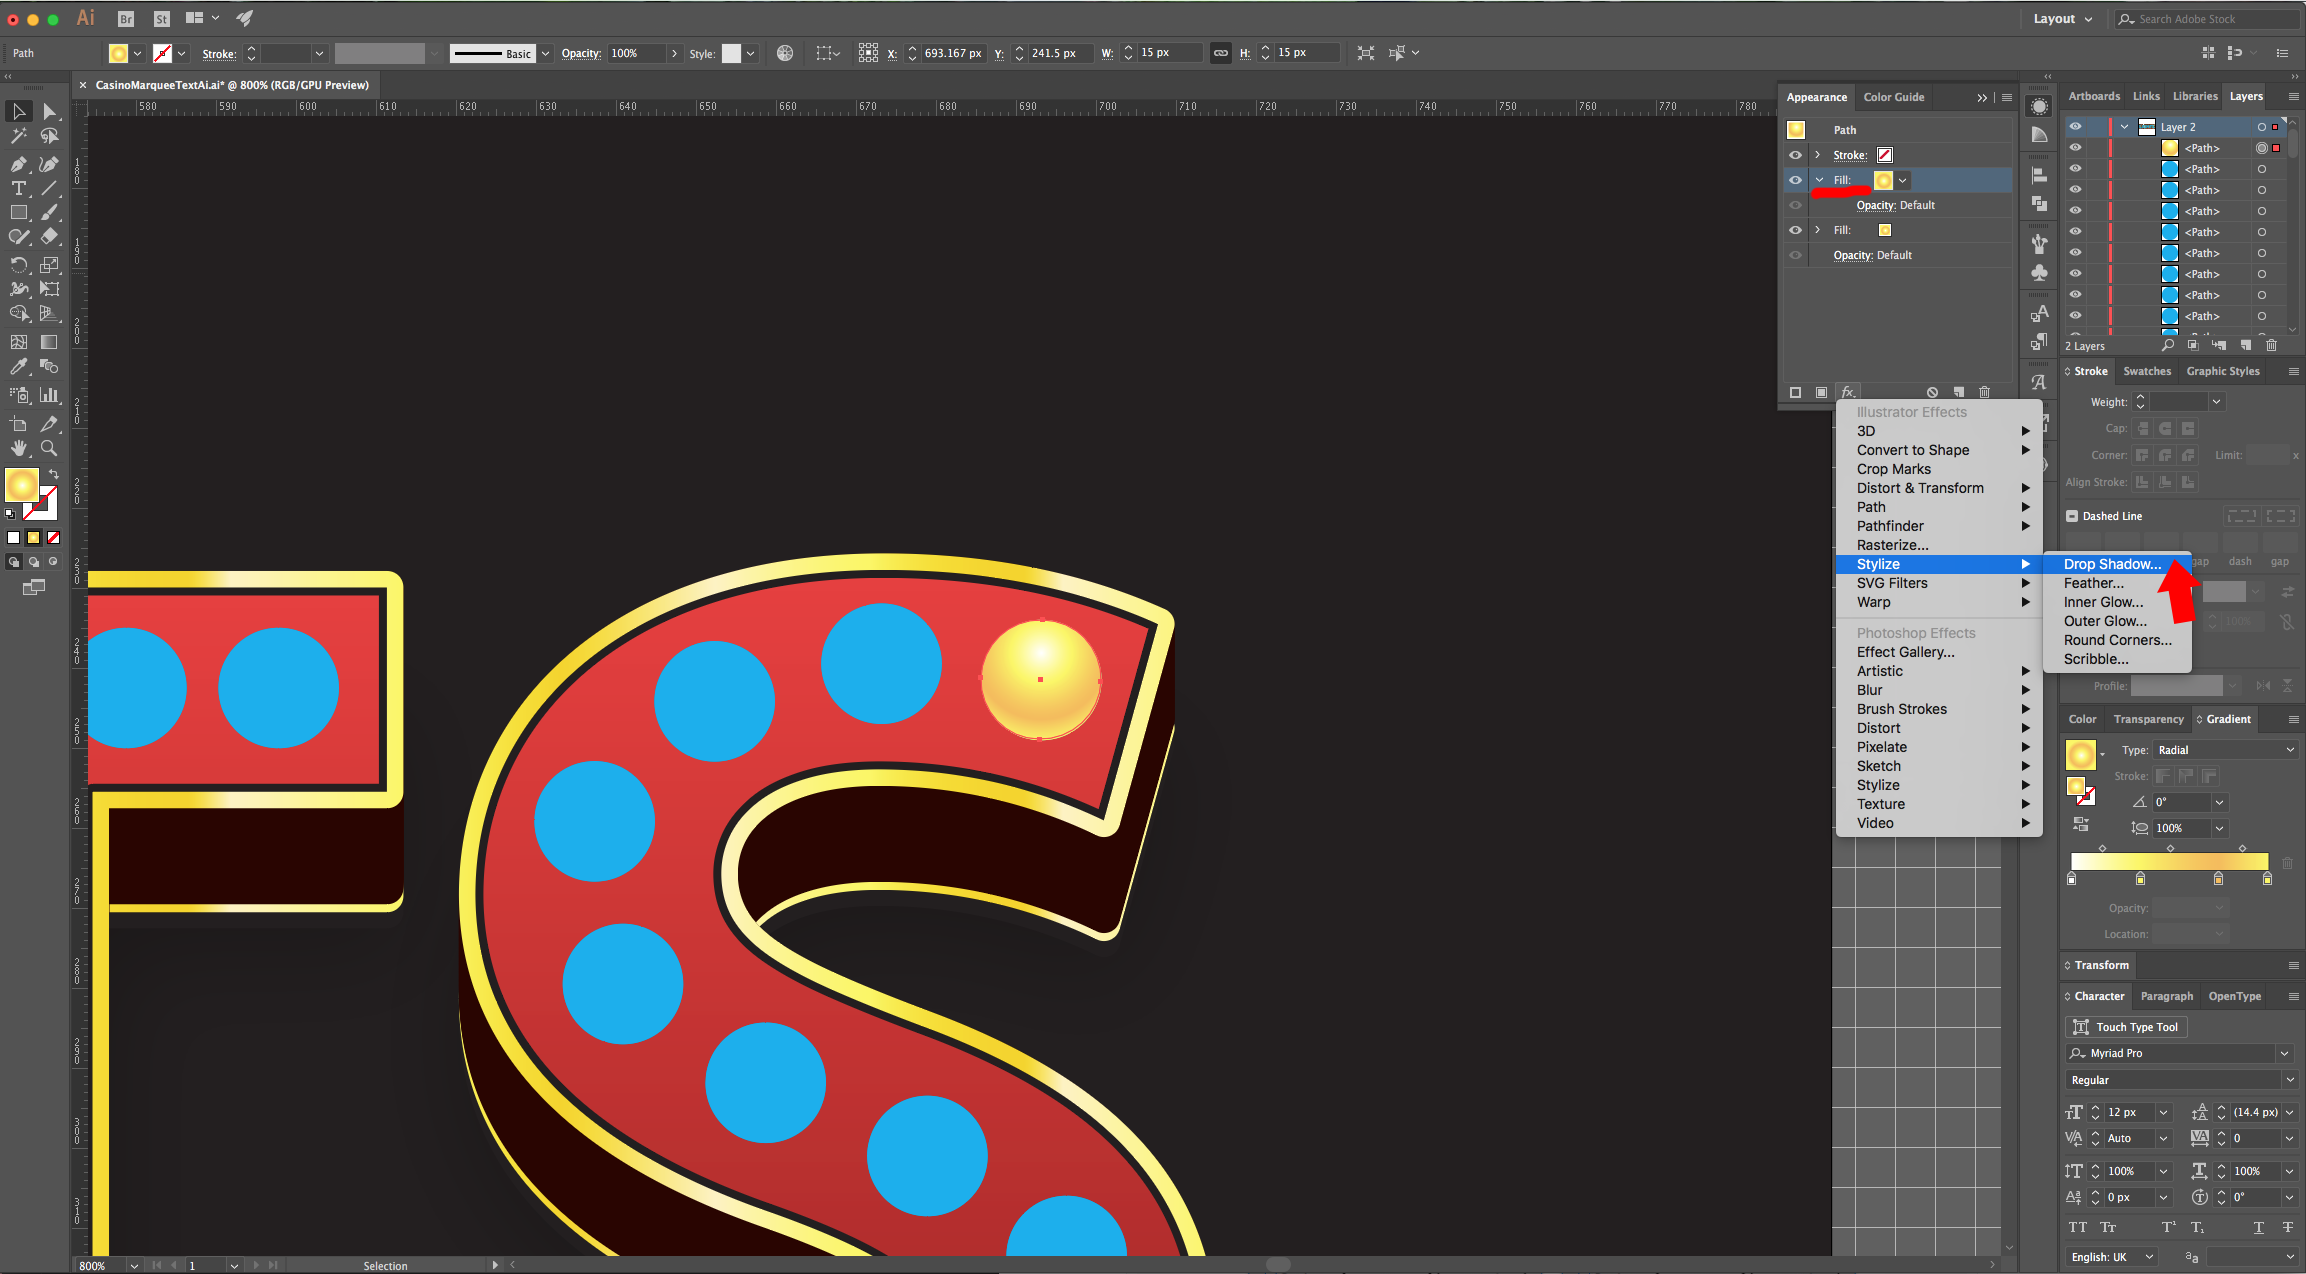
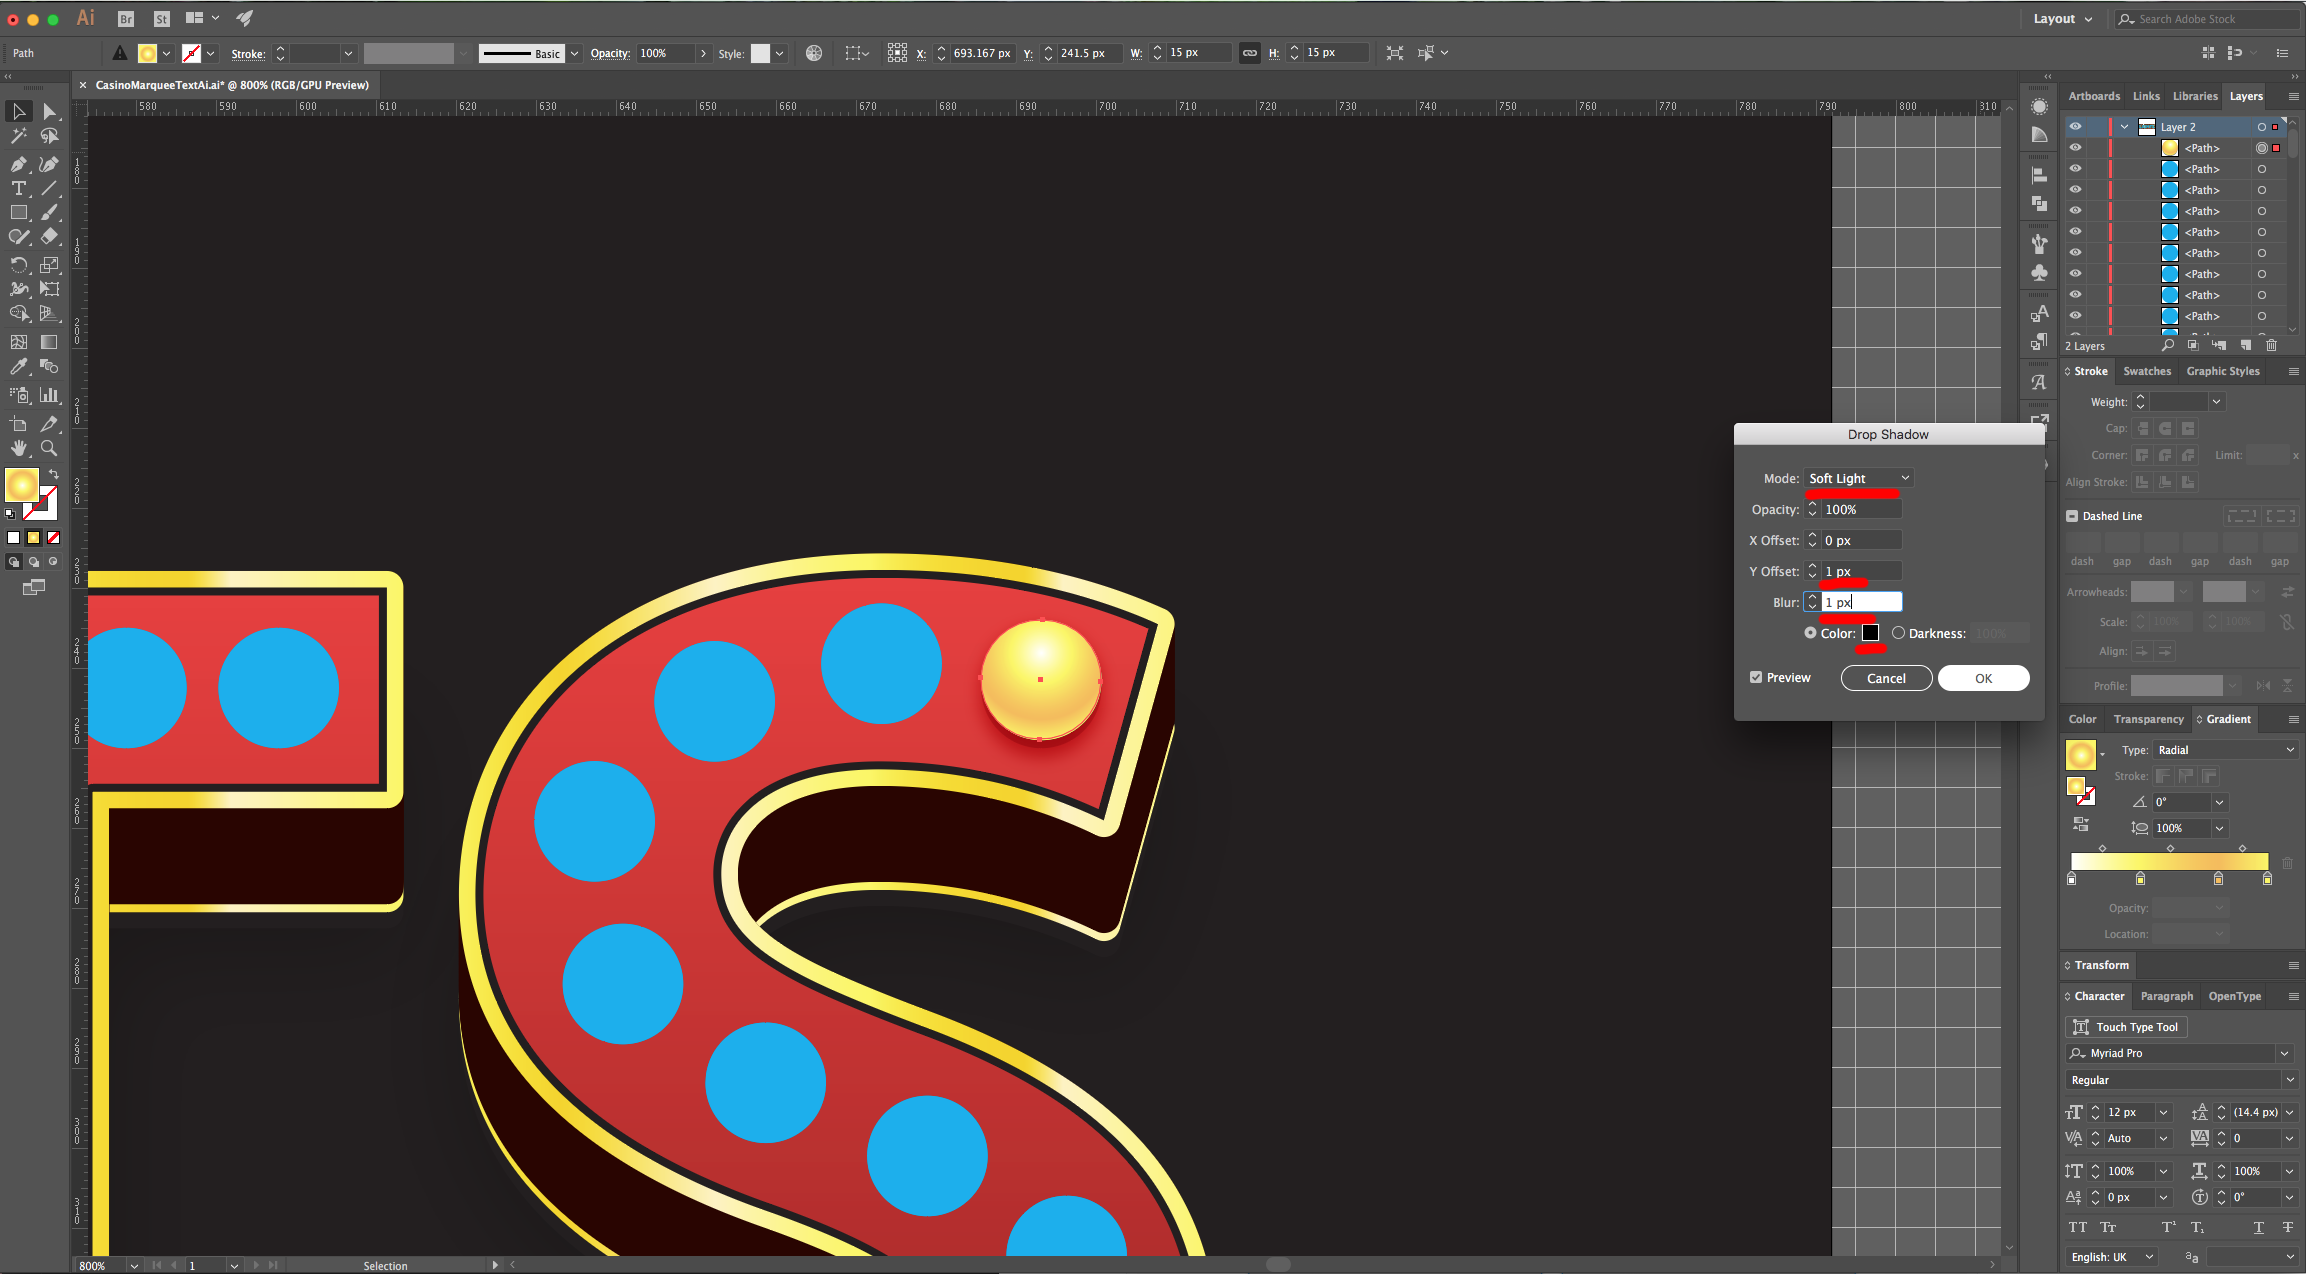
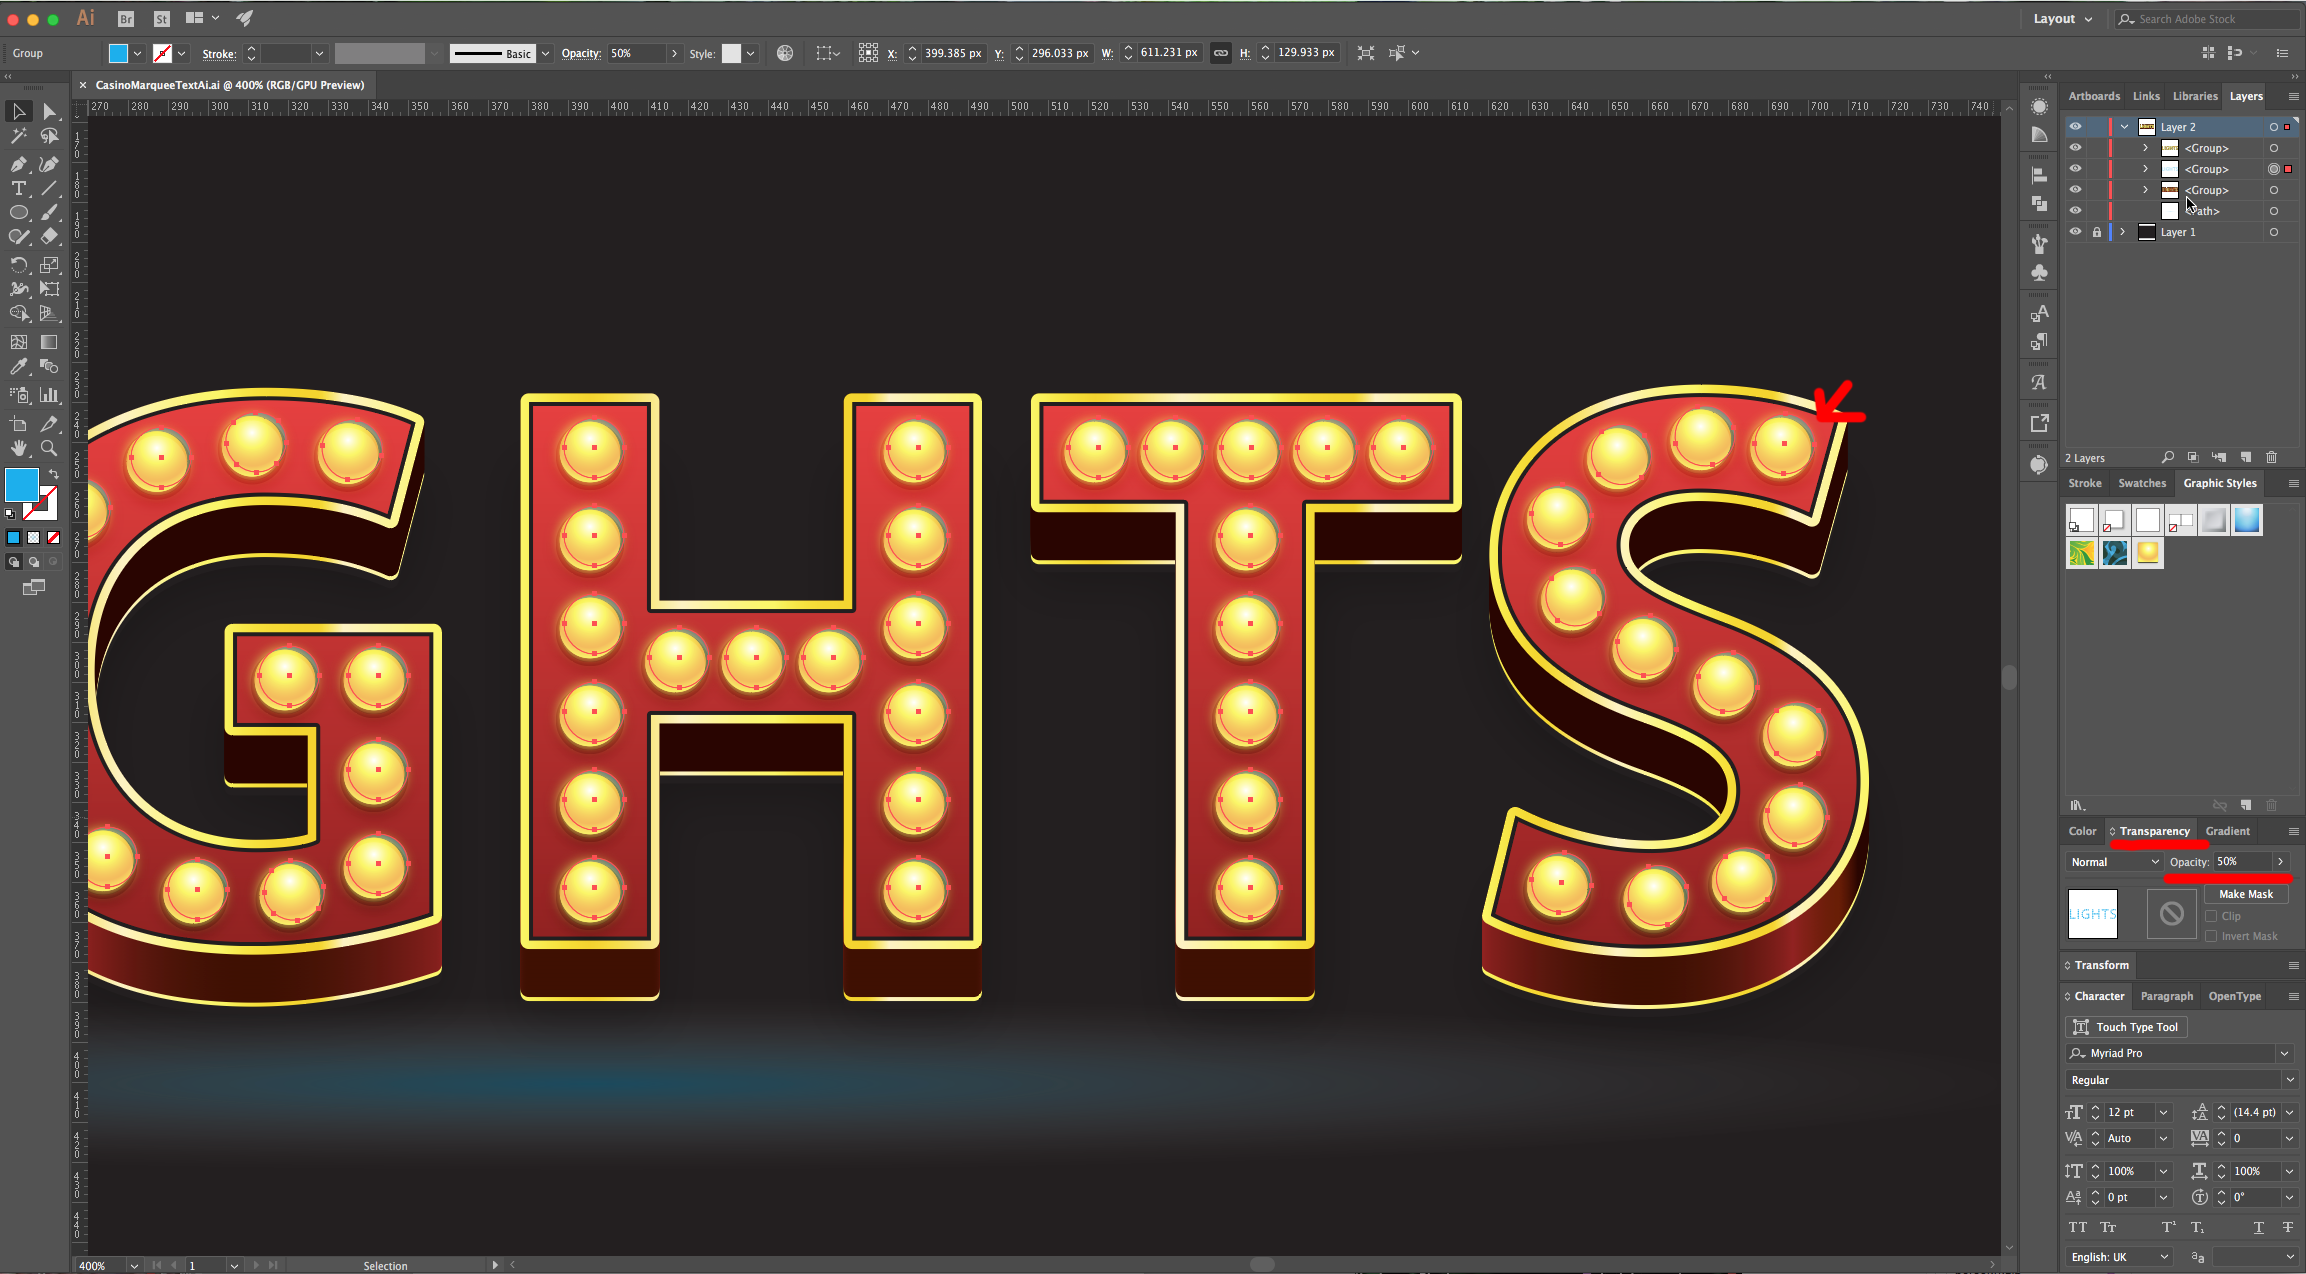
24 - Select the top group of blue circles and “Ungroup” it. Select one of the circles and fill it with a “Radial Gradient” with a 0° Angle, going from #ffffff - Location 0%, #fbf85c - Location 35%, #f5bd55 - Location 75% and #fbf85c - Location 100%. Select the “Gradient Tool” (G) and fix the “Aspect Ratio” to make it similar to the one we used.

25 - Without deselecting, go to the “Appearance Panel” and add a “New Fill”. Select the Topmost one and click on the “Effects” button, navigate to Stylize > Drop Shadow and use “Soft Light” as “Blending Mode” with a 50% “Opacity”, a “Y Offset” of 1px and #000000 as color (the other ones are 0). Add a second “Drop Shadow”, but this time make the “Opacity” 100% and the “Y Offset” and “Blur” 1px using #000000 as color.

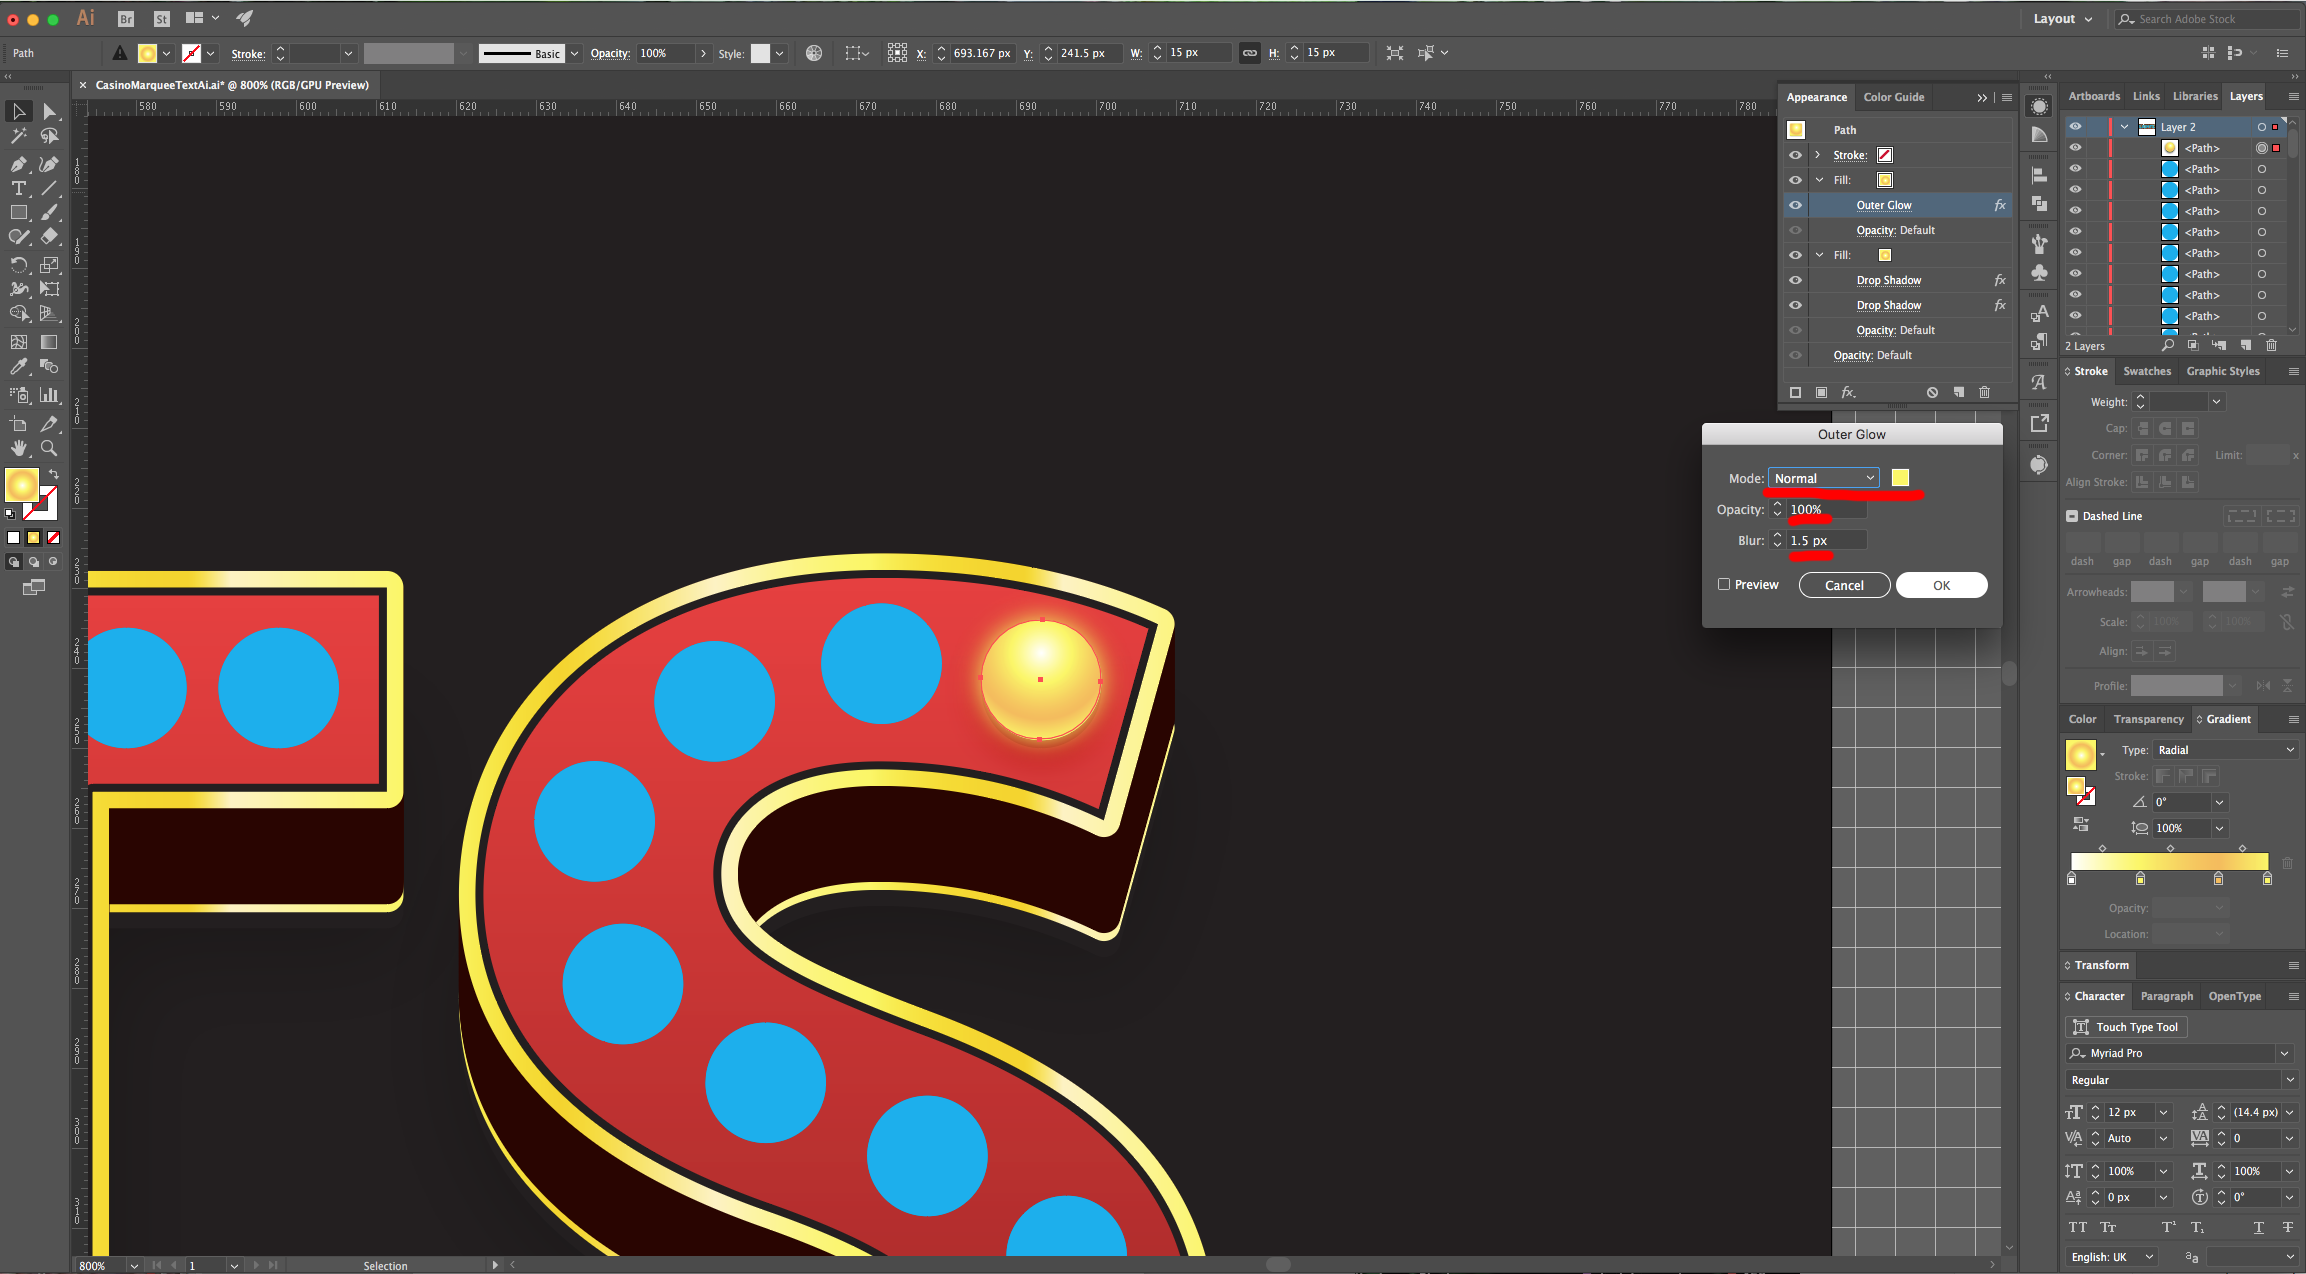
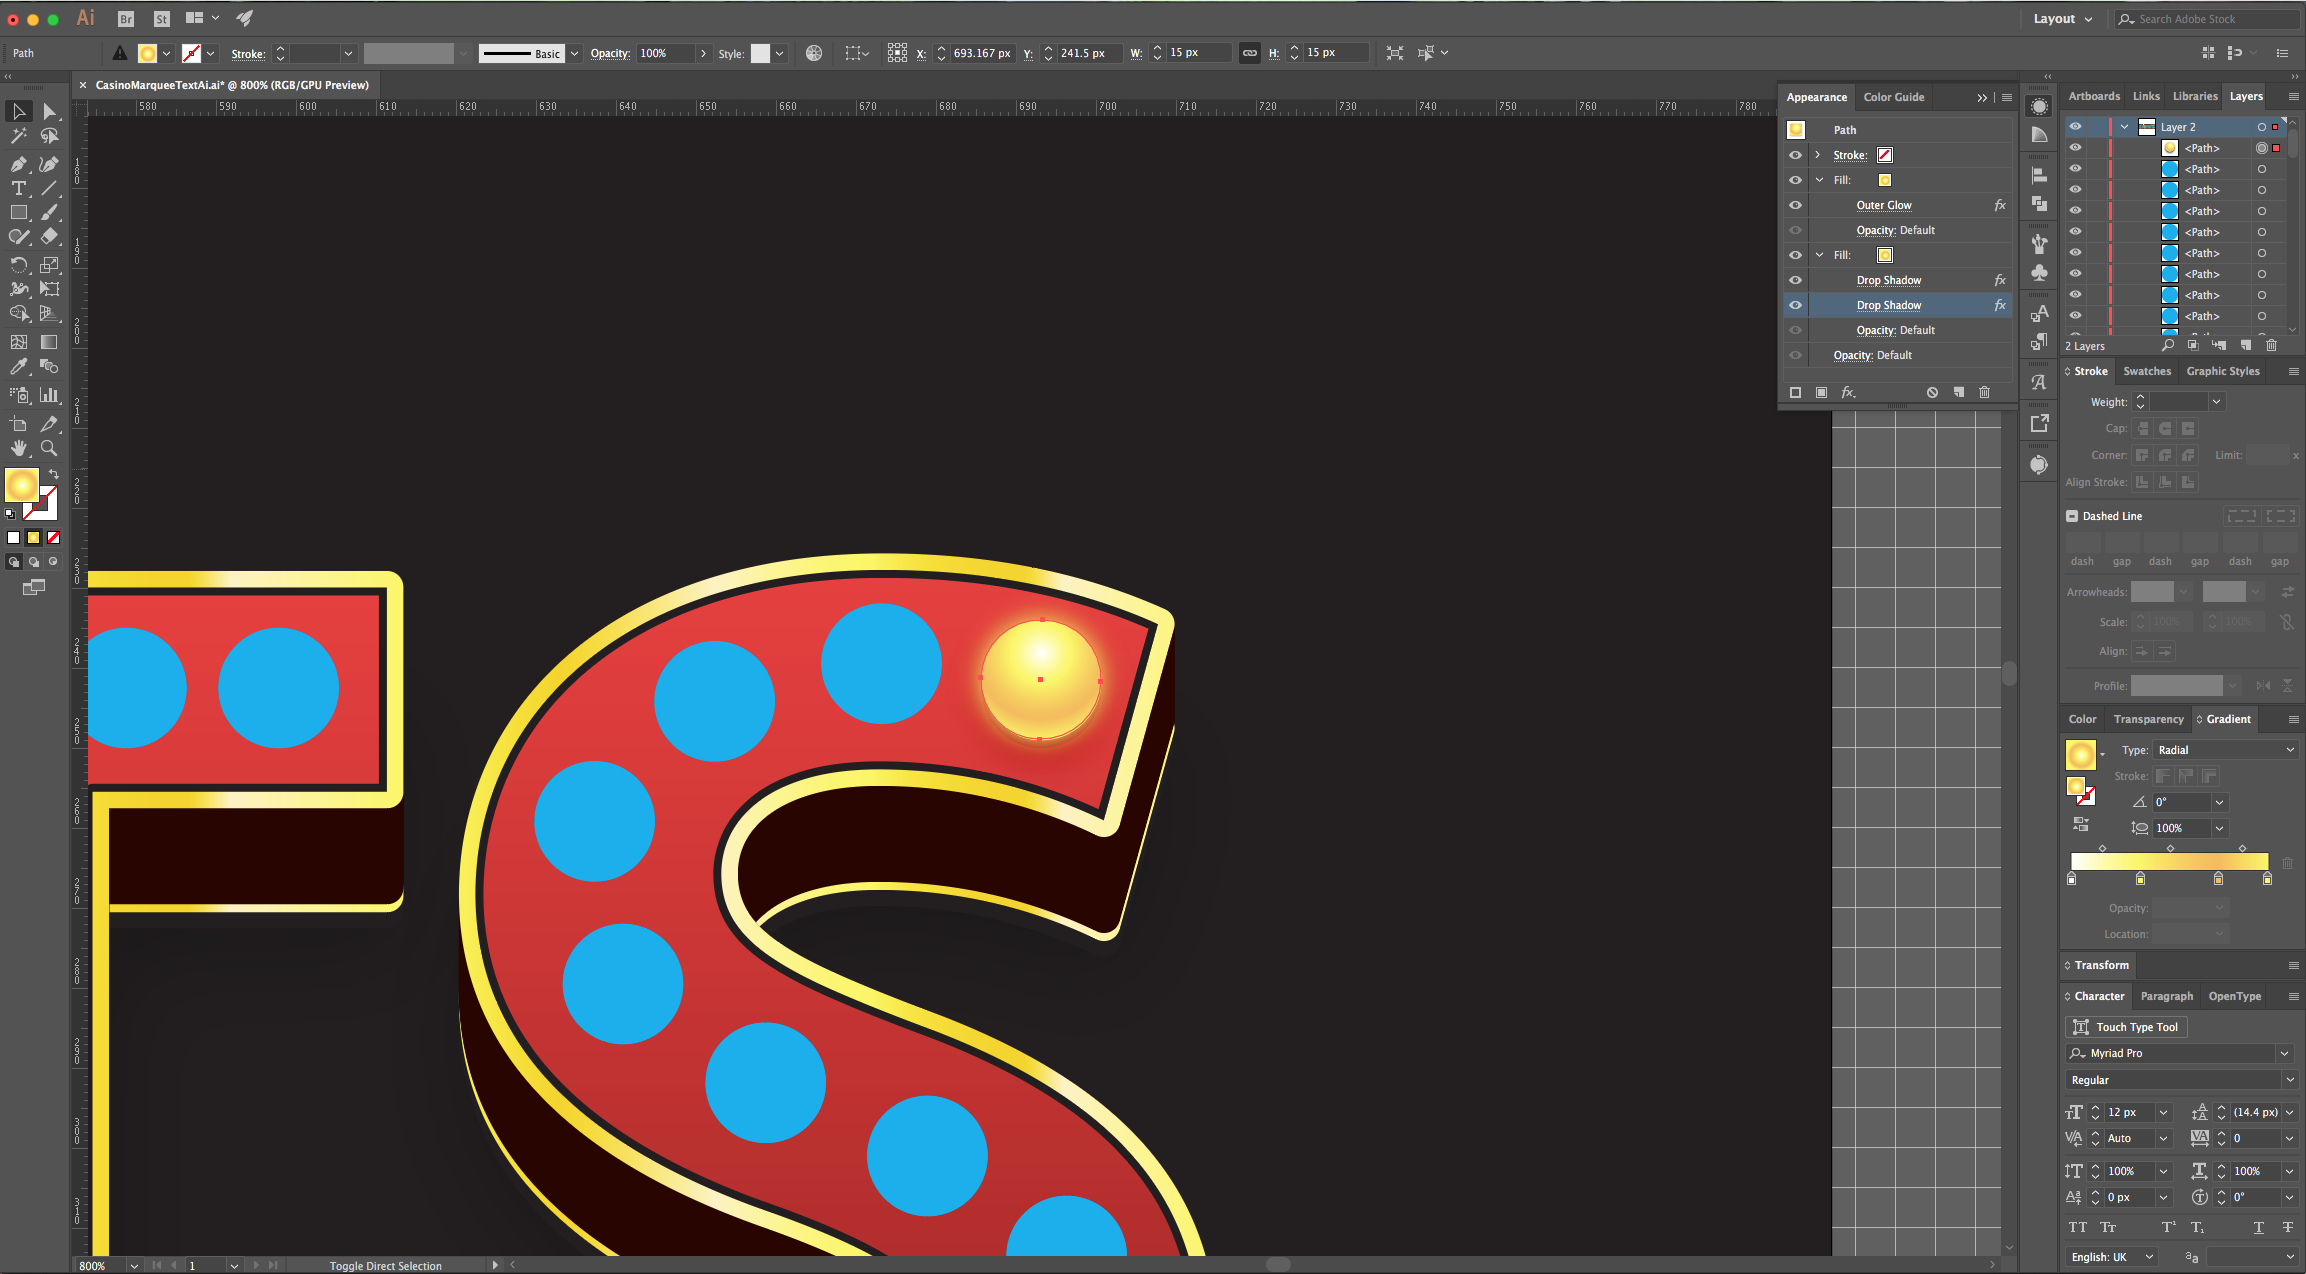
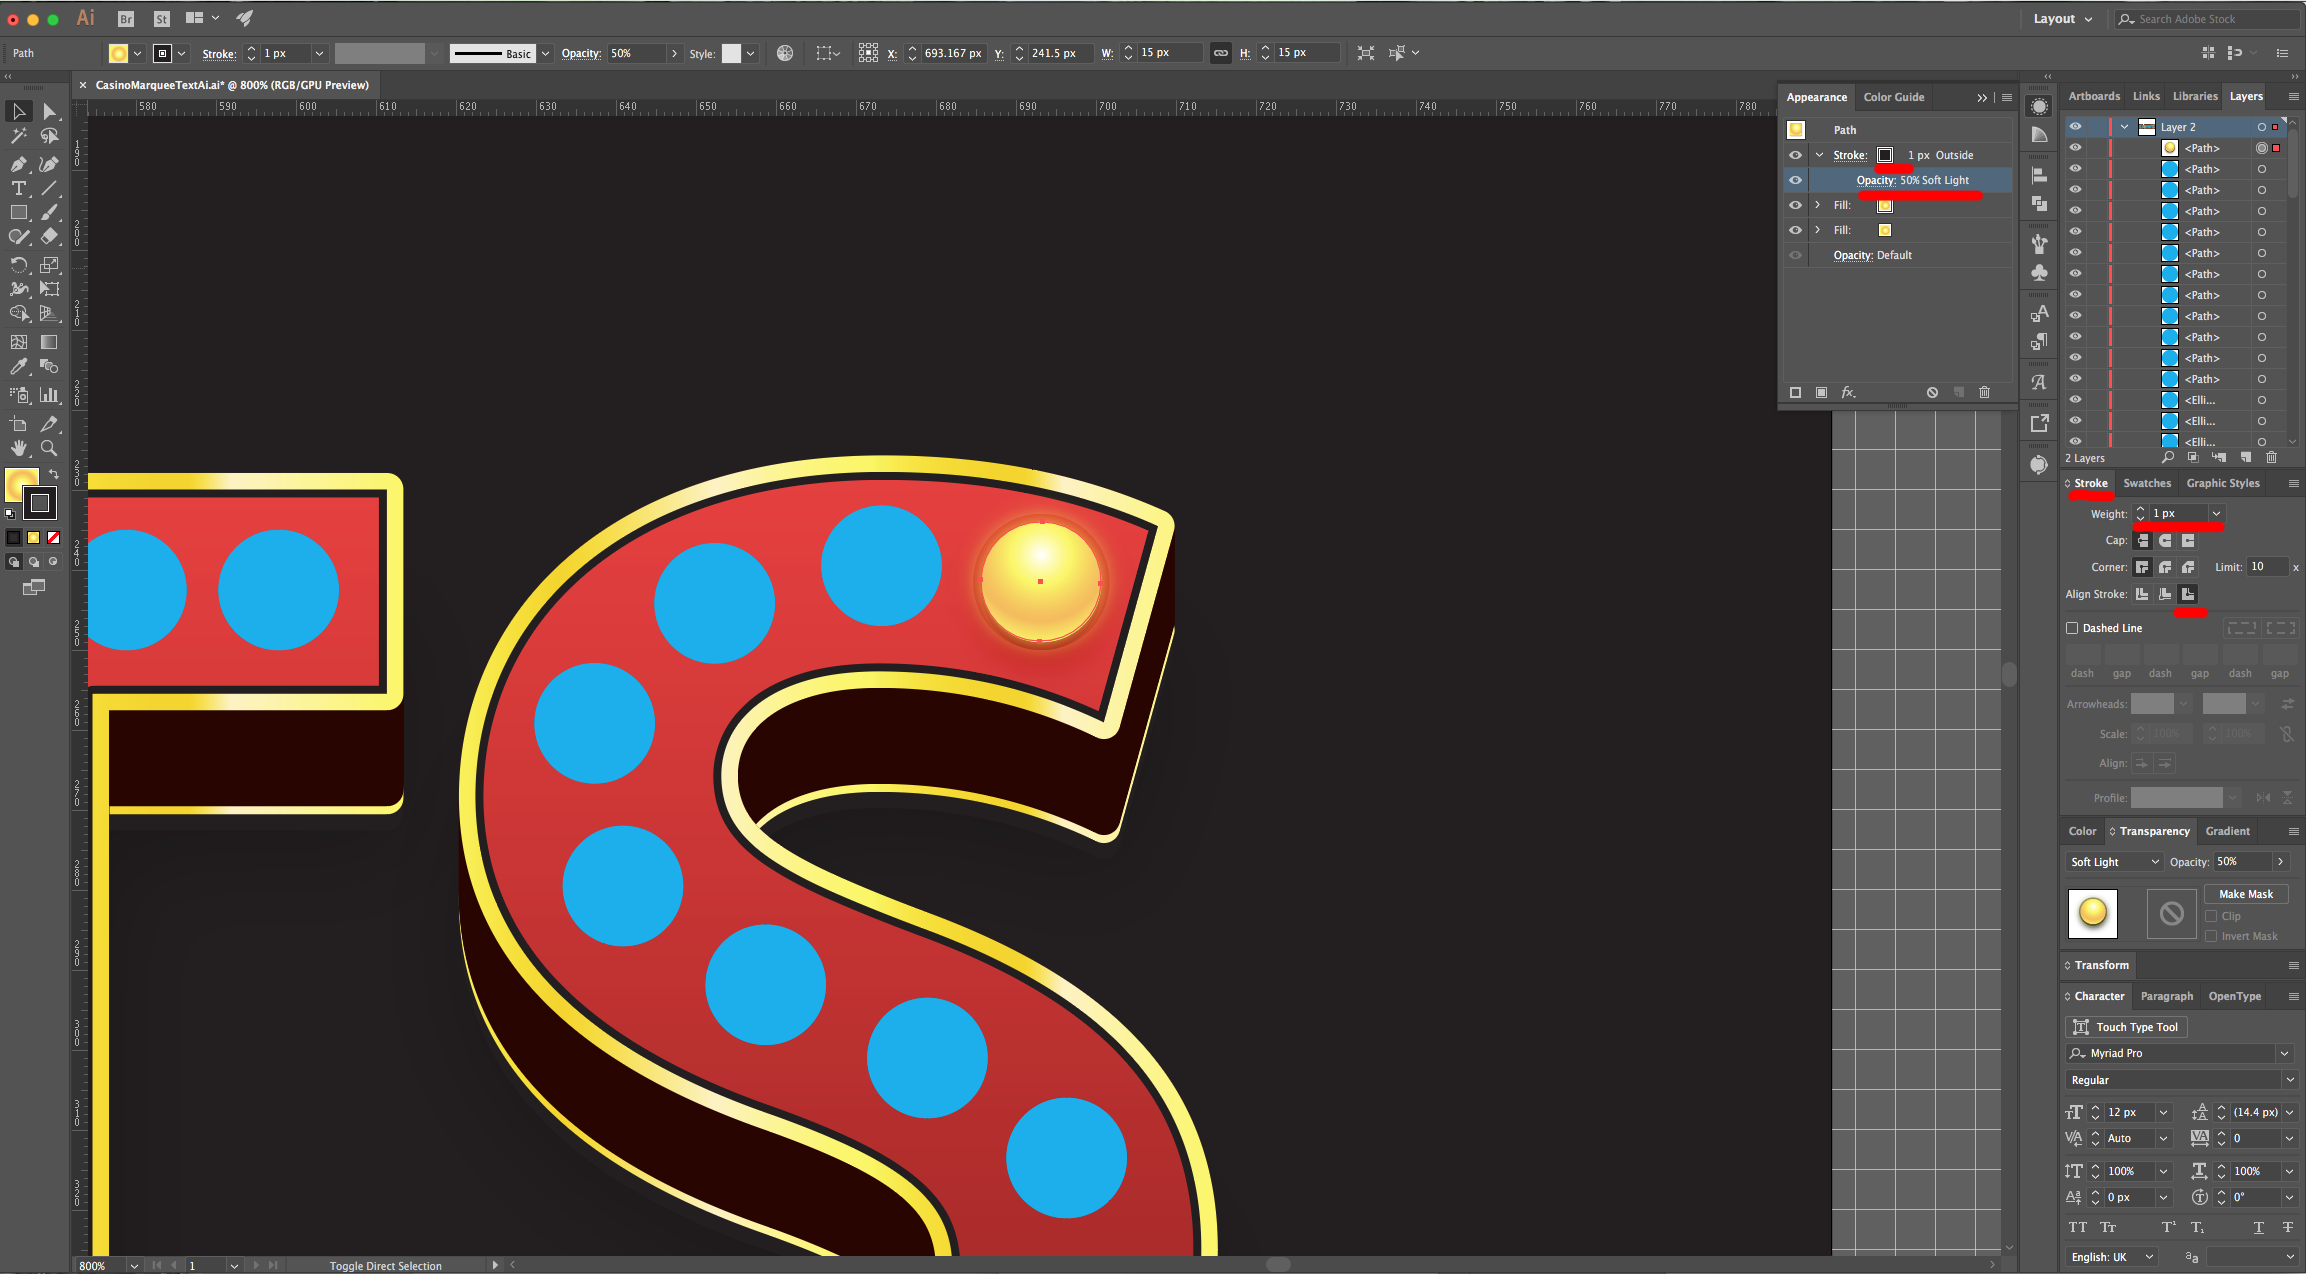
26 - Now, select the other “Fill” (the one in the bottom), click on the “Effects” button, navigate to Stylize > Outer Glow. Use “Normal” for “Mode”, #fbf85c as your color, a 100% “Opacity” and a 1.5 px “Blur”.

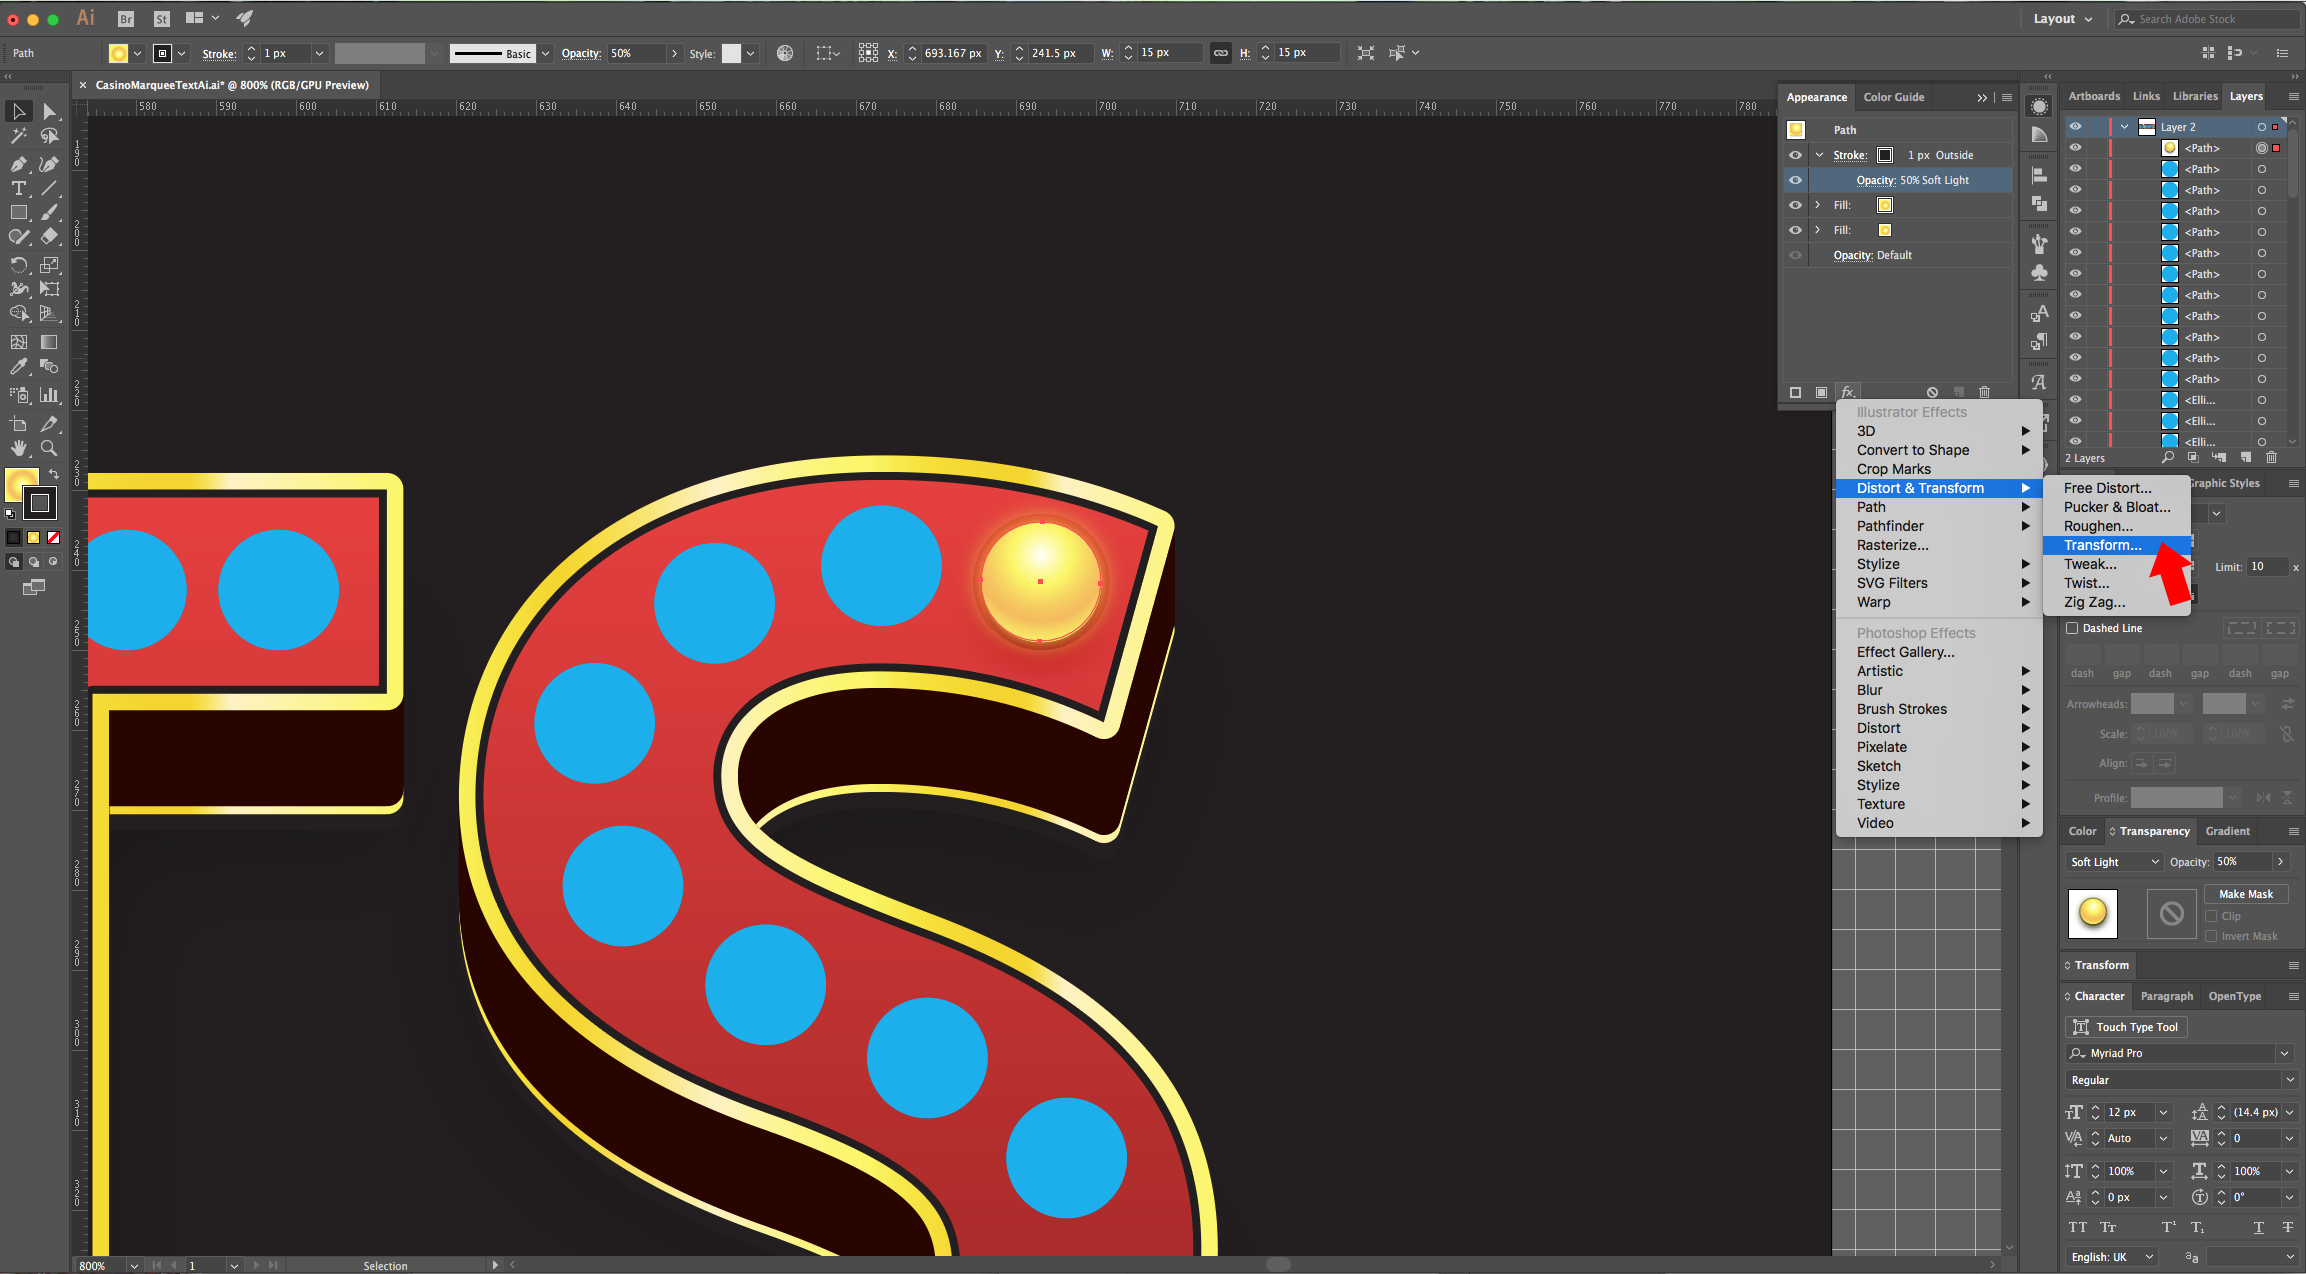
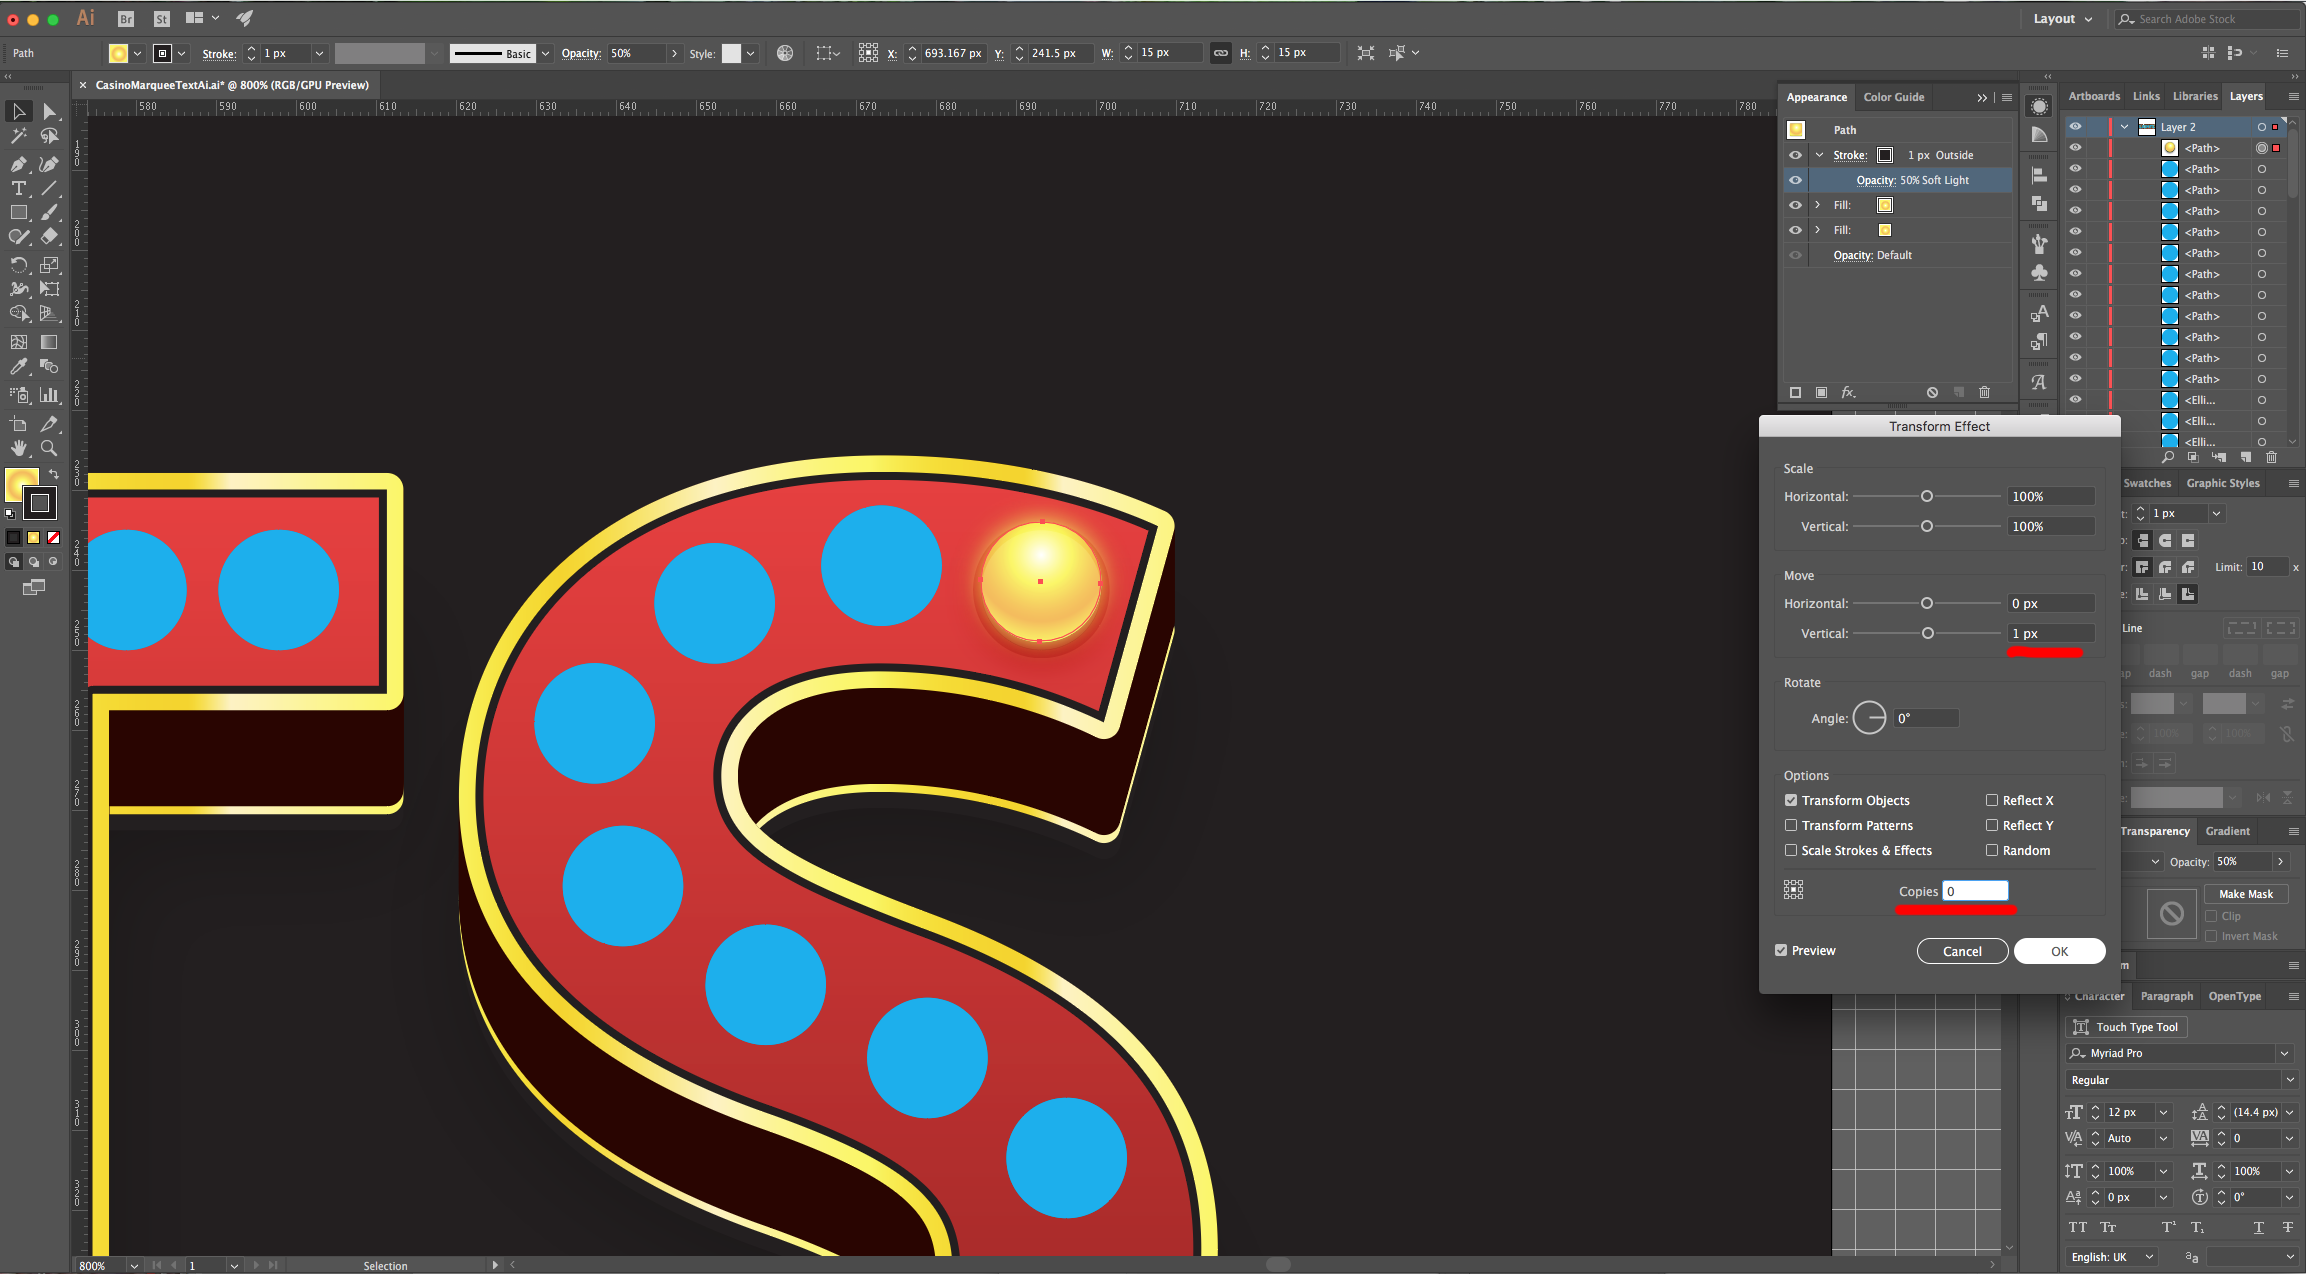
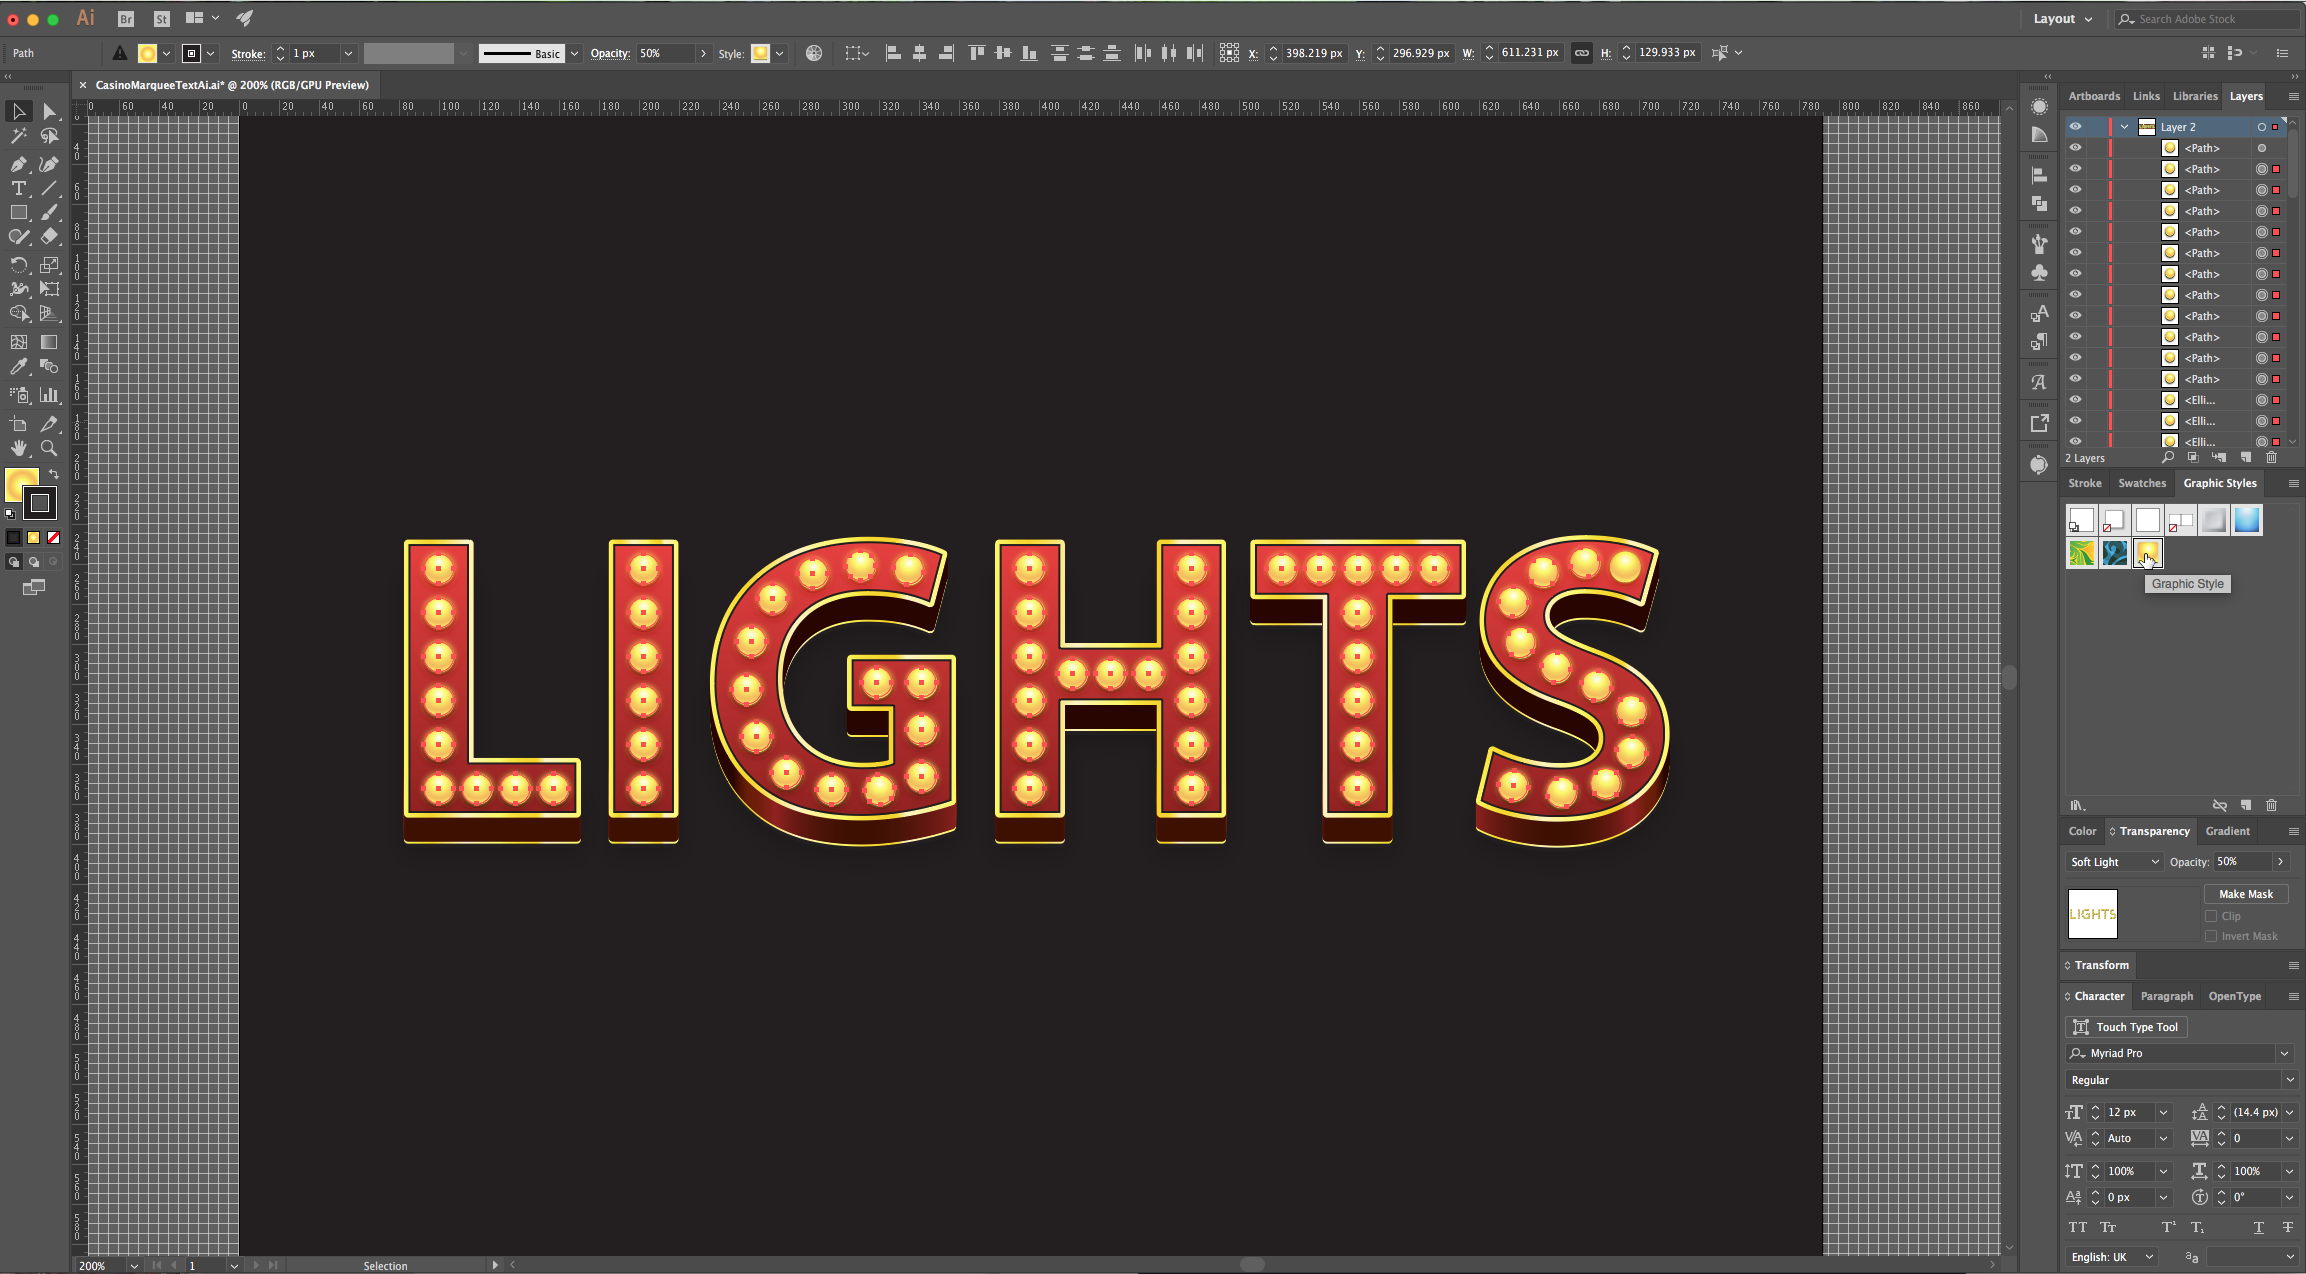
27 - Click on one of the small buttons on the Bottom-left to “Add New Stroke”, use 1 px for “Weight”, “Align Stroke to Outside” and use Black for color. It should have a 50% “Opacity” and “Soft Light” as “Blending Mode”. Then, go to Distort & Transform > Transform and enter a 1 px in the “Move-Vertical” and 0 for “Copies”.
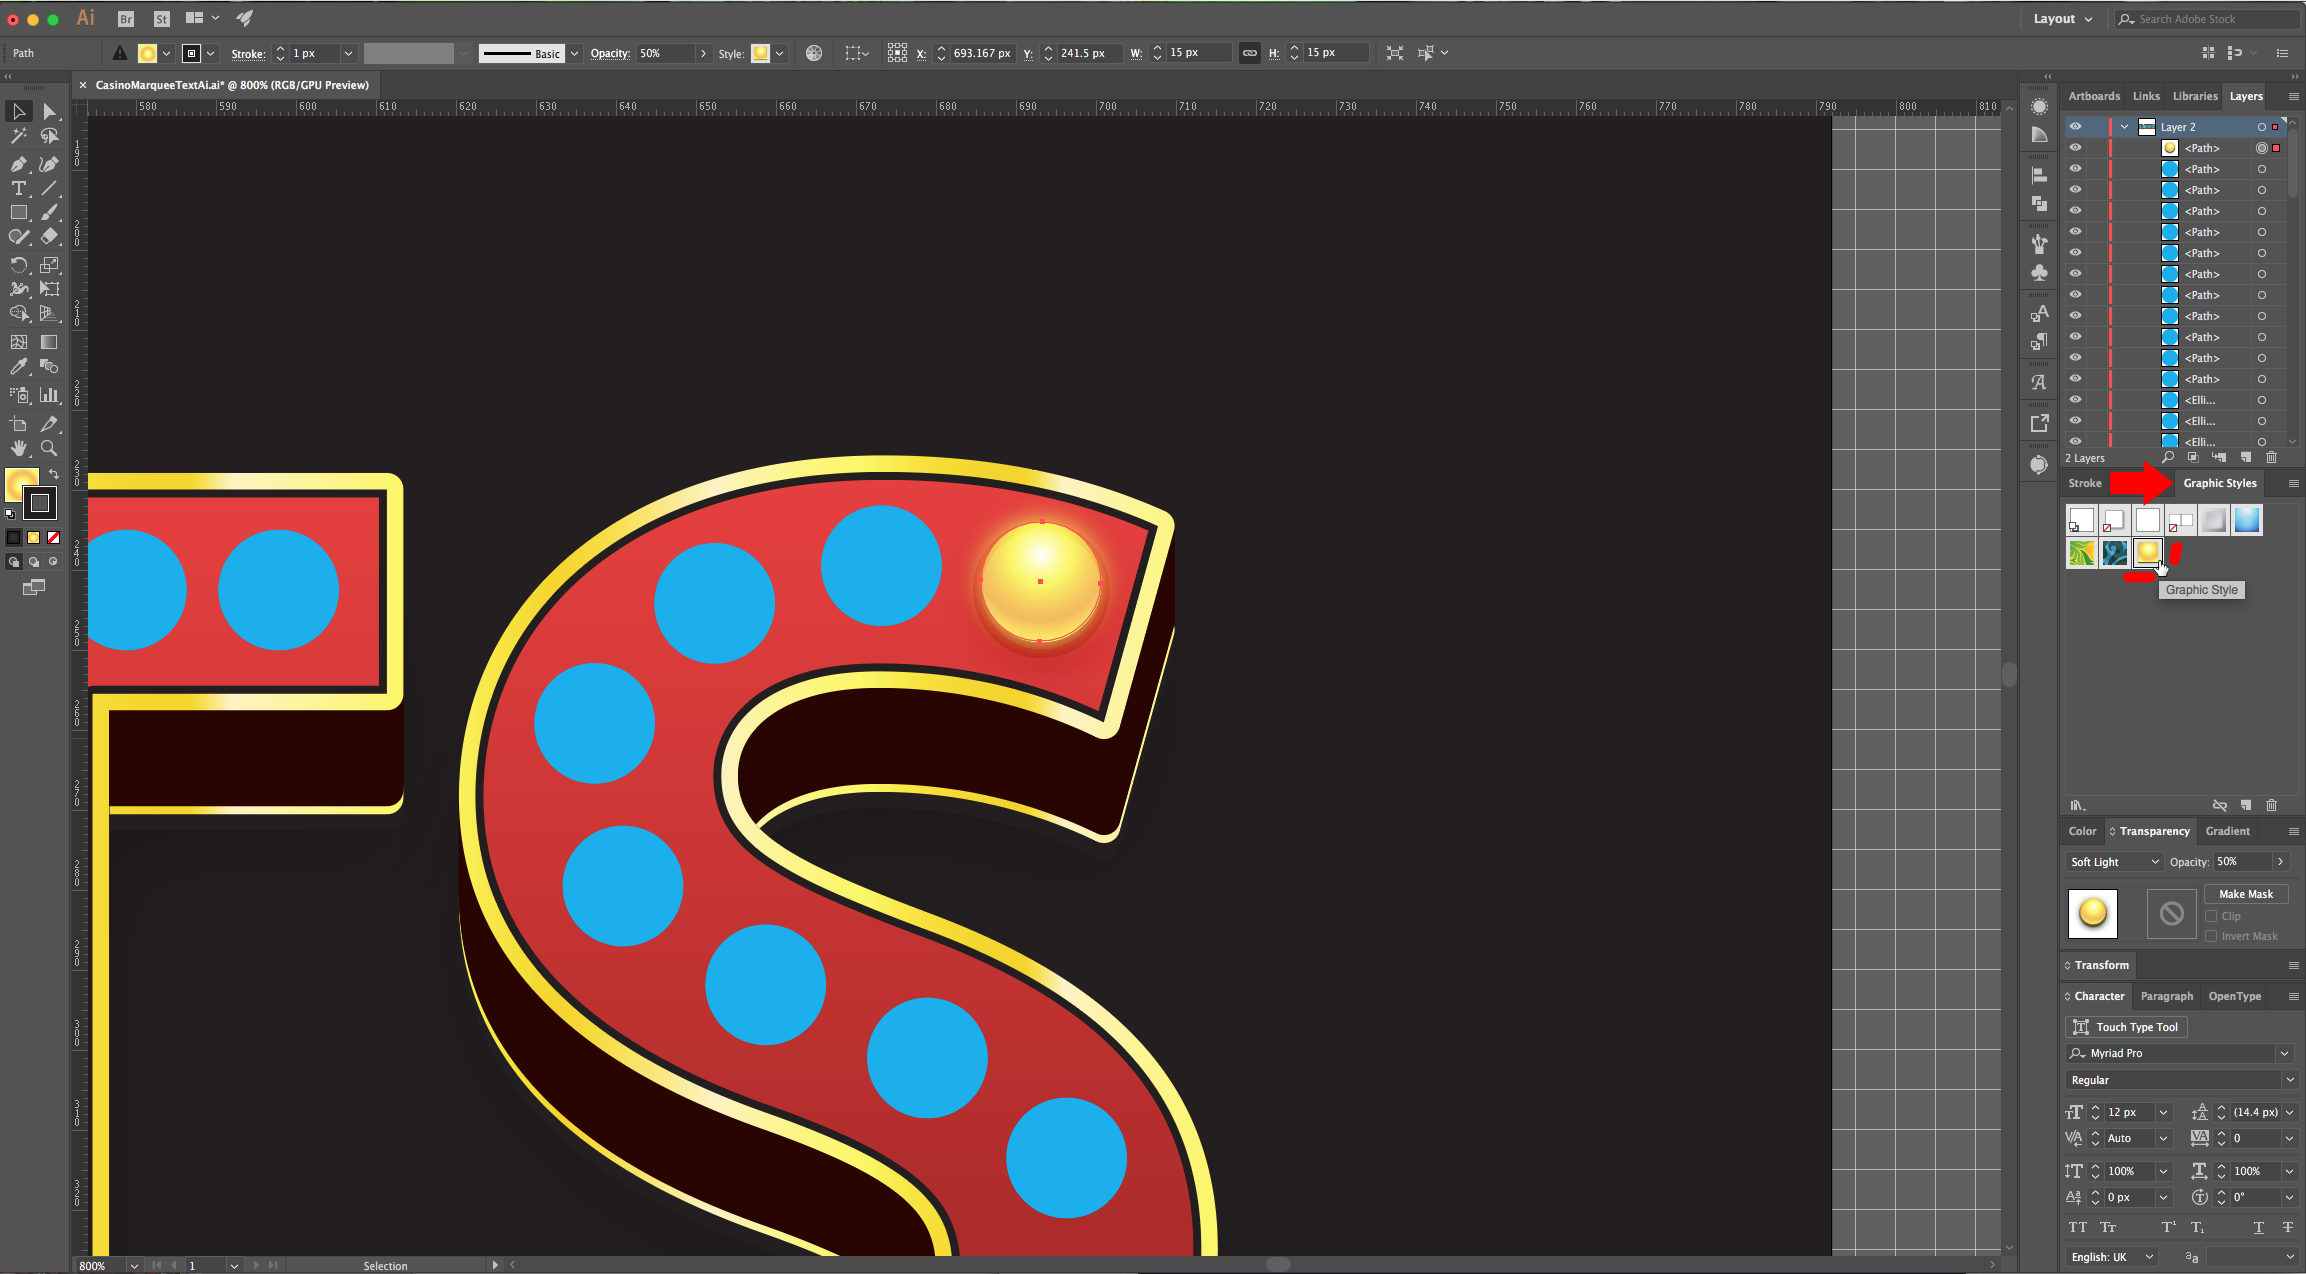
28 - Open the “Graphic Styles Panel” and drag your circle to create a “New Graphic Style”. Select all your blue circles (just the ones you Ungrouped earlier), apply your new “Graphic Style” to them and “Group” them together again. Select the second group of blue circles, move them a couple of clicks “Up” and “Right” and lower their “Opacity” to 50%.
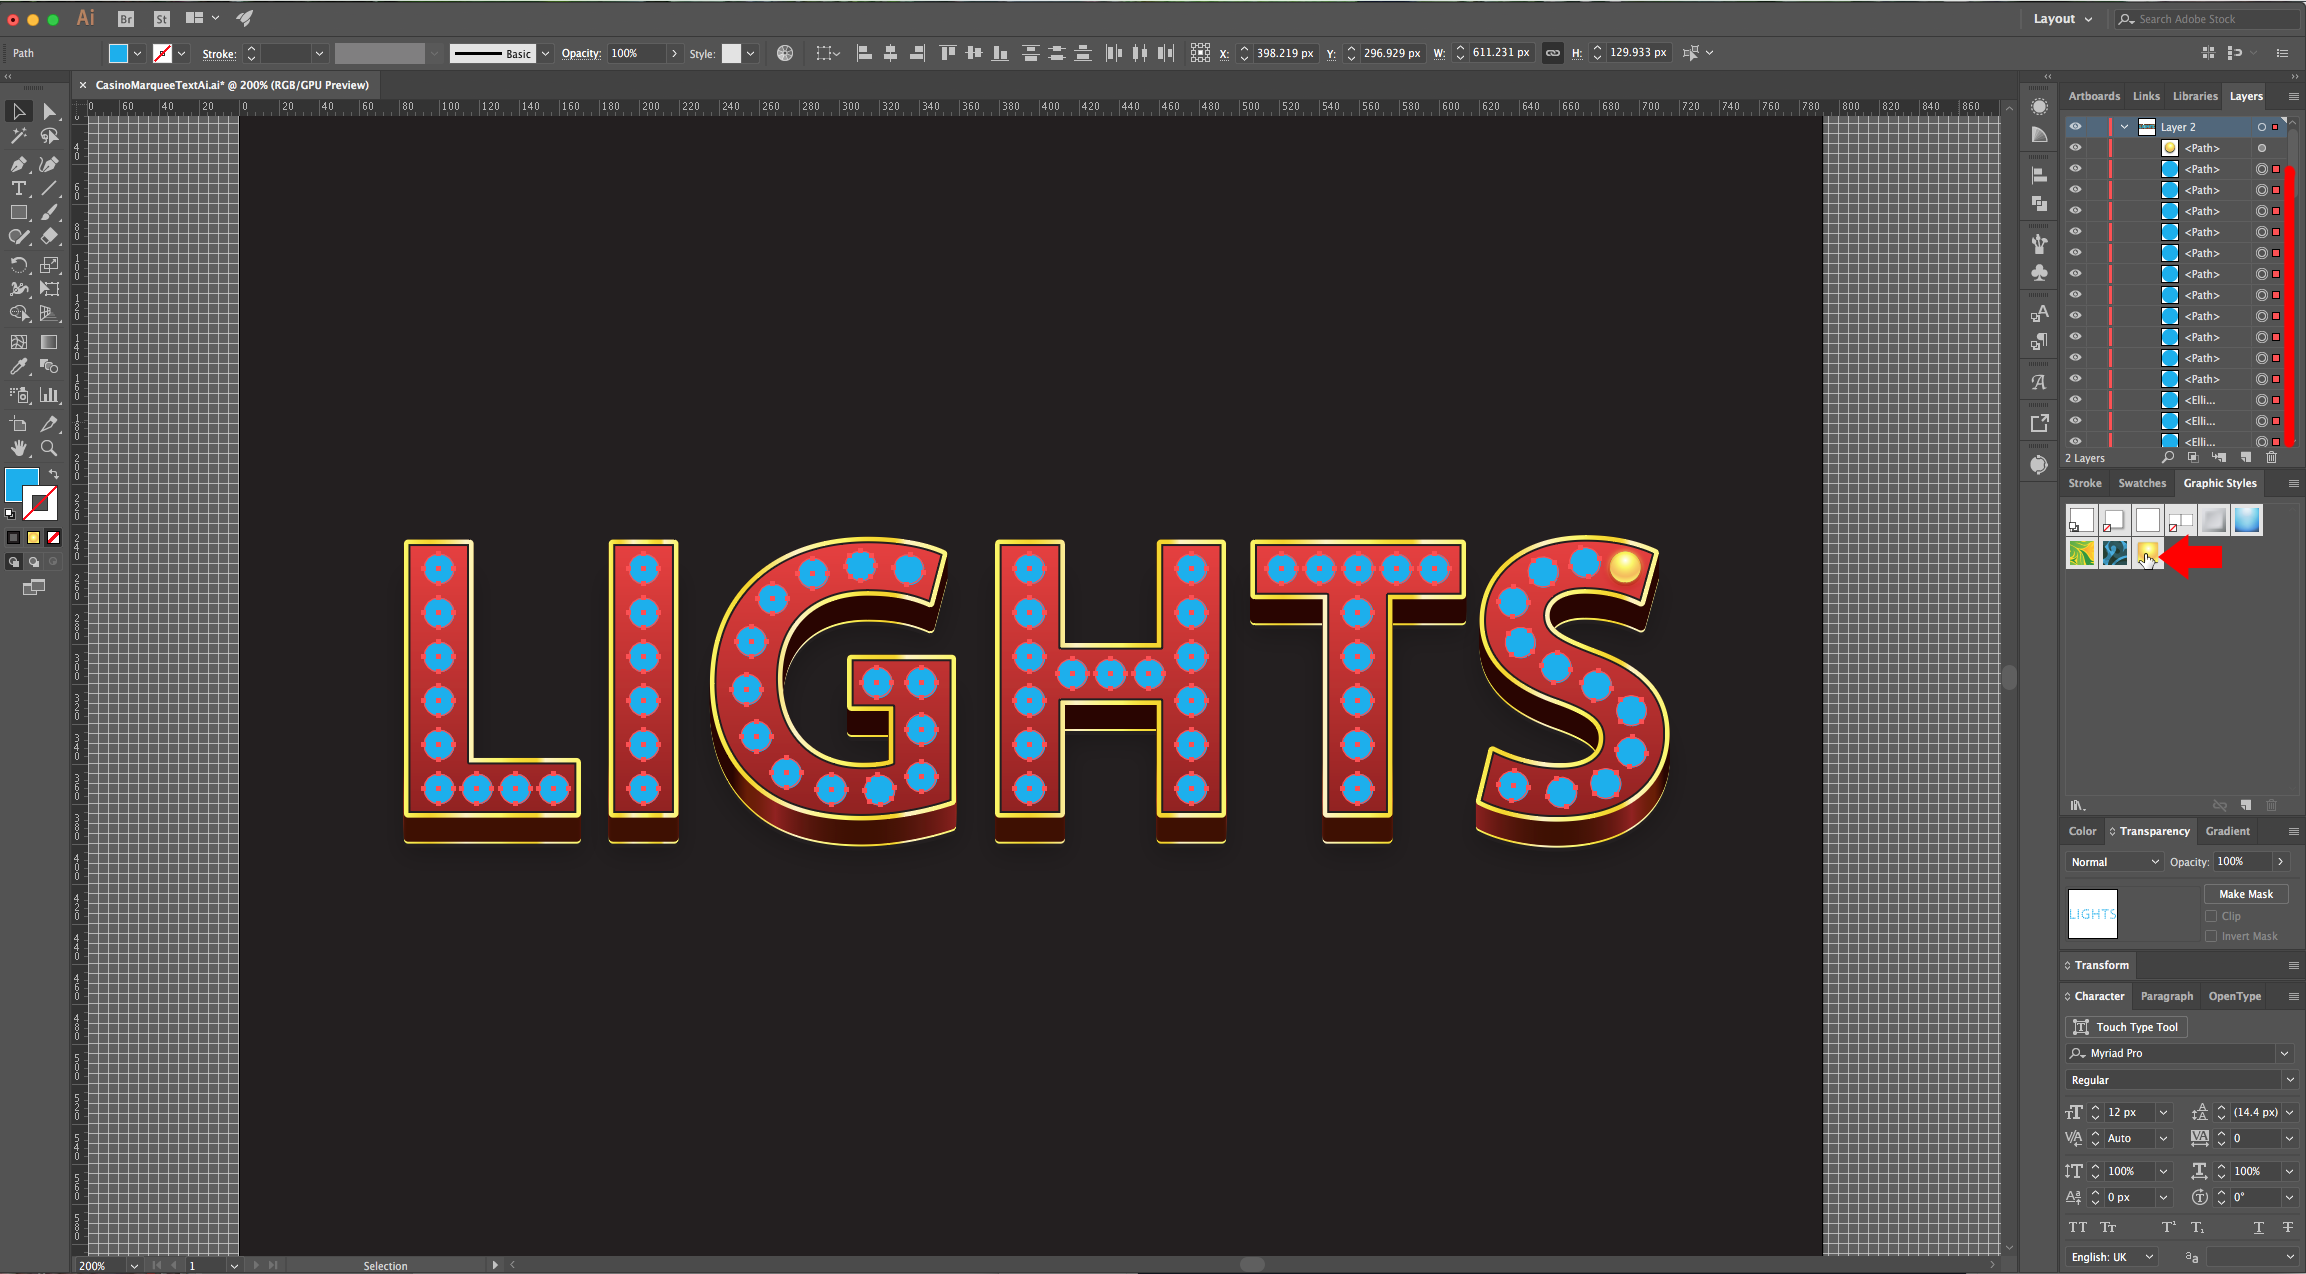
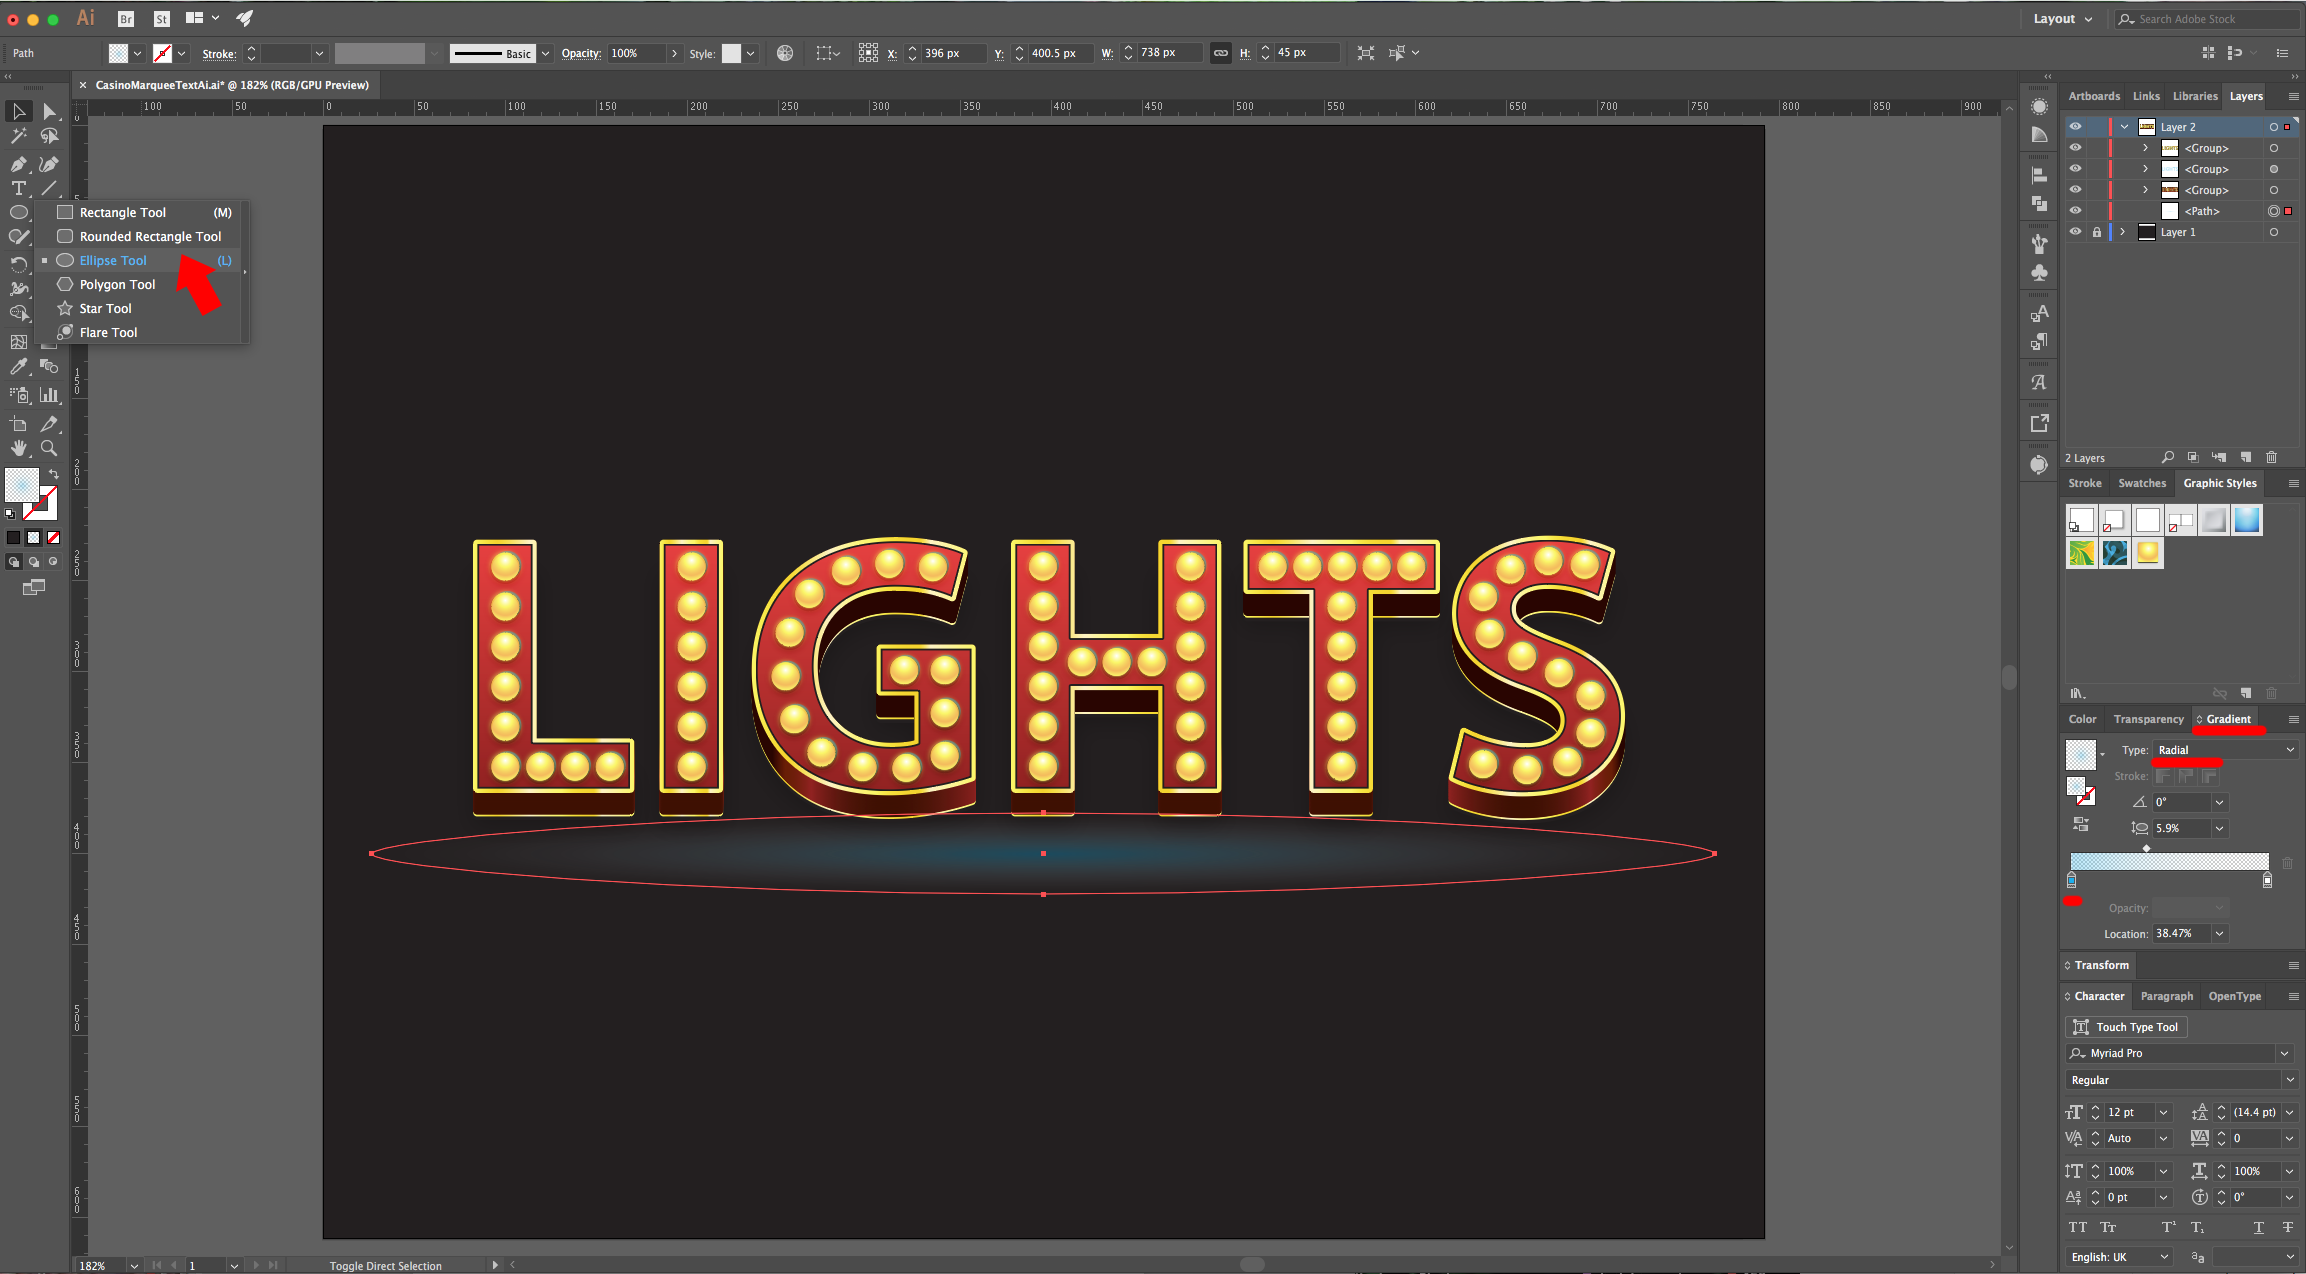
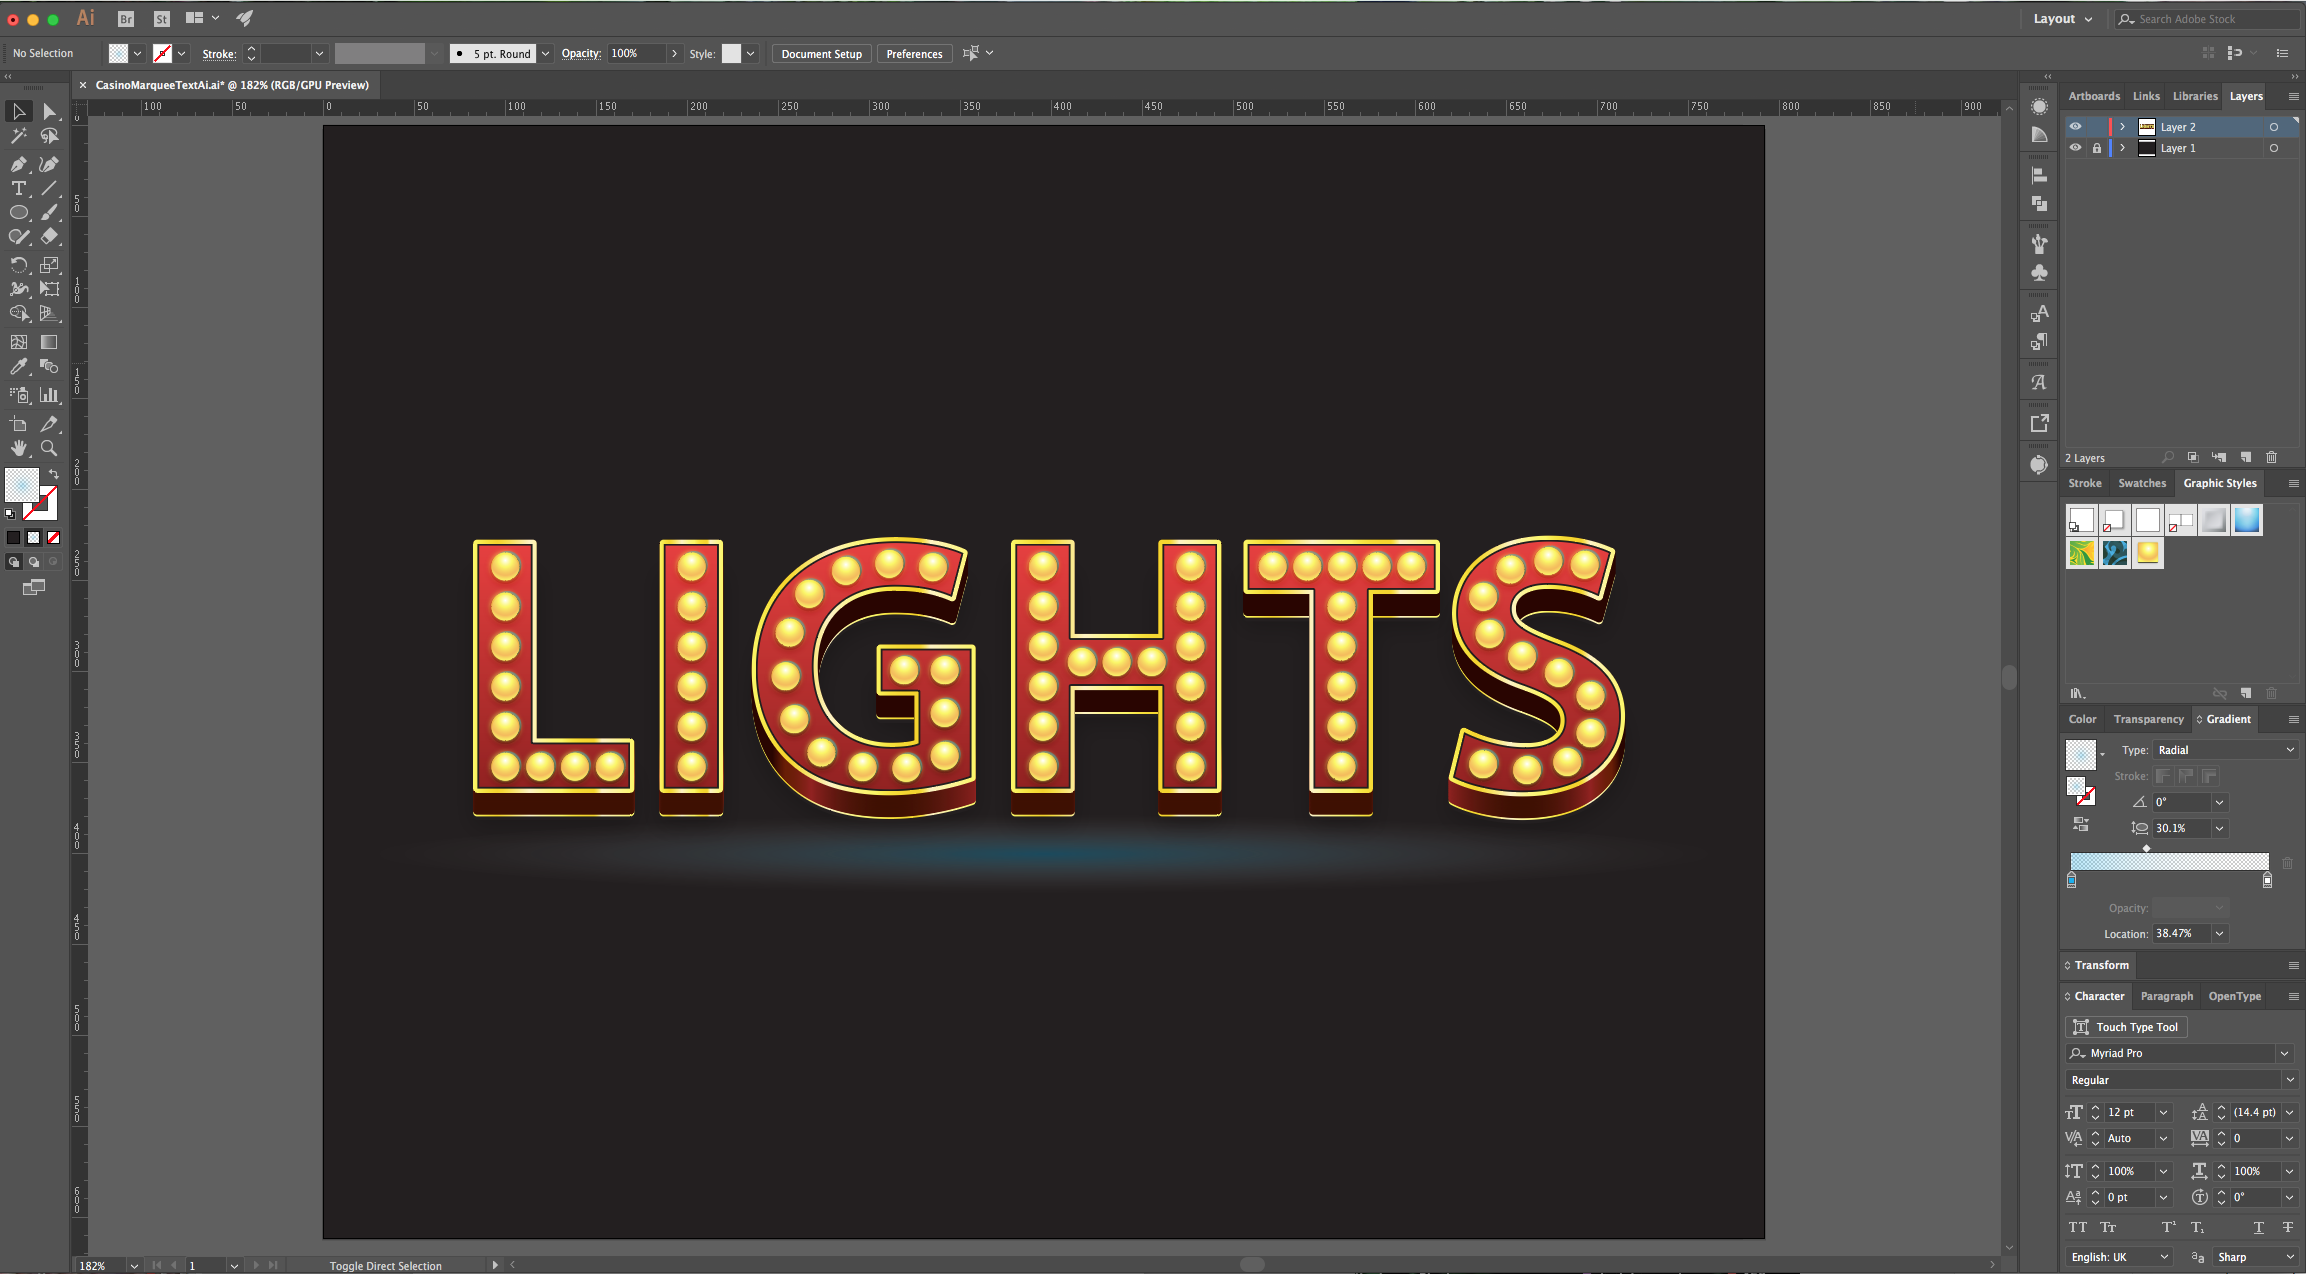
29 - Finally, create an elliptic shape, place it under your text (to simulate a burst of light) and fill it with a “Radial Gradient” from “Cyan” with a 30% to 0% “Opacity”.
1 - In Illustrator, create a “New Document”. Choose “Pixels” in the “Units” drop-down menu and click on the “More Settings” button. Change the “Color Mode” to RGB and click “Create Document”.
2 - Go to Illustrator CC > Preferences > Guides & Grid and change the “Gridline every” value to 5 px and “Subdivisions” to 1. Then, go to “Units” and make sure “Pixels” is the choice everything.
3 - Enable your “Grid” (Command/Control + ‘) and make sure “Snap to Grid” is ON too (Shift + Command/Control + ‘). If you want to hide your “Grid” or to turn “Snap to Grid” OFF, just click the key combinations again.
4 - Select the “Rectangle Tool” (M), draw a rectangle covering your entire canvas and fill it with Black.
5 - Lock your Layer by clicking on the left side of its Thumbnail and bring out the small padlock. Then, click on the small “Create New Layer” button at the bottom to create a “New Layer”.
6 - Select the “Type Tool” (T), choose your font (we used “”) and type your text. Fill it with White.
7 - To center your text, go to the “Pathfinder Panel”, use the “Horizontal and Vertical Align Center” options and make sure that “Align to Artboard” is selected to center your text. Right-click on top of it and choose “Create Outlines”. Right-click again and choose “Ungroup”.
8 - Select the “Ellipse Tool” (L), click inside your document and use a value of 15 px for “With” and “Height”. Fill your circle with Cyan and place it inside one of your letters.
9 - Hold “Shift” and “Alt/Option” keys while dragging your circle down to duplicate it. Select both and repeat until you fill your letter. Do this until you have an internal line made of circles inside all your letters. For now, don’t worry about spacing them evenly.
10 - Once you filled all your letter with circles, make sure that the one at the “start” and the one at the “end” of your line are placed where you want them. Then, select them together with the rest of the line (use the “Shift” key) and making sure that “Align to Selection” is selected click on “Vertical Distribute Centers”. If your line is “Horizontal” just choose “Horizontal Distribute Centers” instead.
11 - For the curved letters, there are two ways to create the dotted line. First, select the “Pen Tool” (P), draw a path inside your letter (click “Enter” to end the “Path”). Select one of your circles, go to the “Brushes Panel”, click on the Menu icon on the Top-Right corner and choose “New Brush…”.
12 - Select “Pattern Brush” and use the following settings. Then, select your “Path”, go to the “Brush Definition” drop-down menu and choose your new brush. If you need to adjust the “Path” ends a bit, use the “Direct Selection Tool” (A). Once you are done, go to Object > Expand Appearance to release the circles.
13 - You will notice that some of the circles change its shape and are no longer completely round. You can add a circle on top and erase the wrong one or you can use the second option.
14 - Copy one circle and then place a second one a bit to the right but aligned with the first. Select both and go to Object > Blend > Blend Options. Choose “Specified Steps”, use an approximate amount (we used 10) and choose “Align to Path”, then go to Object > Blend > Make.
15 - Next, use the “Direct Selection Tool” (A) to fix the path inside your letter. Select the blended circles and the path inside the letter and go to Object > Blend > Replace Spine. You can always modify the amount of “Steps” by going back into the “Blend > Make” dialogue. You can also fix your “Path” with the “Direct Selection Tool” (A).
16 - Once you are done, go to Object > Expand, make sure the “Object” and “Fill” boxes are checked and click “OK”. Right-click on top of the letter and choose “Ungroup”.
17 - Select one of your circles and go to Select > Same > Appearance to select all your circles, “Group” them together (Command/Control + G), make a “Copy” (Command/Control + C) and “Paste in Front” (Command/Control + F).
18 - Select the white letters and make a “Group”. Go to the “Appearance Panel”, change the “Fill” to a “Linear Gradient” with a 90° Angle going from #93211d to #e93e3a. Click on one of the small buttons on the Bottom-left to “Add New Fill” and make sure it is under your original one.
19 - With your second “Fill” still selected, click on the “Effects” button, navigate to Path > Offset Path, and enter a 2 px “Offset”, set the “Joins” to “Round” and click “OK”. With this “Fill” still selected, go to Distort & Transform > Transform and enter a 0.2 px in the “Move-Vertical” and 60 for “Copies”. Go to the “Gradients Panel” and add some colors to your “Fill” to make it look more tridimensional. (#3f1000 - Location 0%, #93211d - Location 6.5%, #6a1d00 - Location 14% and #2a0500 - Location 20%).
20 - Add a third “Fill”, making sure it is at the bottom and use the following values for the “Gradient”. Use a 0° Angle and these colors: #fbf85c - Location 0%, #f5d600 - Location 15%, #fdf3c2 - Location 35%, #fbf85c - Location 55%, #f5d600 - Location 75%, #fdf3c2 - Location 80% and #fbf85c - Location 100%.
21 - Click on the small arrow just left of your “Fill”, you should have the “Offset Path” and the “Transform” Effects. Double-click on top of “Transform” and change “Move - Vertical” to 13 px and 0 “Copies”.
22 - Add another “Fill”, make sure it is at the bottom and “Fill” it with Black. Click on the “Effects” button, navigate to Path > Offset Path, and enter a 2 px “Offset”, set the “Joins” to “Round” and click “OK”. Then, go to Distort & Transform > Transform and enter a 15 px in the “Move-Vertical” and 0 for “Copies”. Last, go to Stylize > Drop Shadow and use the following values.
23 - Still in the “Appearance Panel”, select the “Stroke” and choose Black as “Fill” color. In the “Stroke Panel” use 1 px for “Weight”, “Round Join” for “Corner” and “Align Stroke to Inside”. Click on one of the small buttons on the Bottom-left to “Add New Stroke”. Make sure you are working on the “Top” one and change the “Fill” to the same Yellow Gradient we used as Fill before. Use 2 px for “Weight”, “Round Cap” and “Round Join” for “Corner” and “Align Stroke to Outside”.
24 - Select the top group of blue circles and “Ungroup” it. Select one of the circles and fill it with a “Radial Gradient” with a 0° Angle, going from #ffffff - Location 0%, #fbf85c - Location 35%, #f5bd55 - Location 75% and #fbf85c - Location 100%. Select the “Gradient Tool” (G) and fix the “Aspect Ratio” to make it similar to the one we used.
25 - Without deselecting, go to the “Appearance Panel” and add a “New Fill”. Select the Topmost one and click on the “Effects” button, navigate to Stylize > Drop Shadow and use “Soft Light” as “Blending Mode” with a 50% “Opacity”, a “Y Offset” of 1px and #000000 as color (the other ones are 0). Add a second “Drop Shadow”, but this time make the “Opacity” 100% and the “Y Offset” and “Blur” 1px using #000000 as color.
26 - Now, select the other “Fill” (the one in the bottom), click on the “Effects” button, navigate to Stylize > Outer Glow. Use “Normal” for “Mode”, #fbf85c as your color, a 100% “Opacity” and a 1.5 px “Blur”.
27 - Click on one of the small buttons on the Bottom-left to “Add New Stroke”, use 1 px for “Weight”, “Align Stroke to Outside” and use Black for color. It should have a 50% “Opacity” and “Soft Light” as “Blending Mode”. Then, go to Distort & Transform > Transform and enter a 1 px in the “Move-Vertical” and 0 for “Copies”.
28 - Open the “Graphic Styles Panel” and drag your circle to create a “New Graphic Style”. Select all your blue circles (just the ones you Ungrouped earlier), apply your new “Graphic Style” to them and “Group” them together again. Select the second group of blue circles, move them a couple of clicks “Up” and “Right” and lower their “Opacity” to 50%.
29 - Finally, create an elliptic shape, place it under your text (to simulate a burst of light) and fill it with a “Radial Gradient” from “Cyan” with a 30% to 0% “Opacity”.
by @lornacane


