- By Kia Lor
- 6 Mins
- Illustrator Tutorials
How to Curve a Line in Illustrator
Learn how to curve an existing straight line and create a new curved line in Adobe Illustrator.
Knowing how to curve a line is one of the basic skills you should have when using Illustrator. There are many situations when you will need a curved line. This tutorial will show you how to create a curved line and how to curve an existing straight line.

You can create rainbow vectors, clouds, smiley faces, or raindrops like in the image above with curved lines.
Create a Curved Line
Using the Pen Tool
With the Pen Tool, you can create a curved line as you’re placing anchor points, starting with the second anchor point.
Step 1 - Select the Pen Tool and Add the First Anchor Point
Select the Pen Tool (P) from the left toolbar. The Pen Tool icon is the one without a curved line. Click on the canvas to add your first anchor point.

Step 2 - Add Second Anchor Point
Move over on the canvas and click + drag to place the second anchor point and curve the line. As you can see, the curve is being created after you click and while you’re dragging. The curved line will be created once you let go of the mouse button.
Note: clicking without dragging will create a corner at that anchor point.

Continue adding anchor points in the same manner to make a longer curved line.
Using the Curvature Tool
With the Curvature Tool, you can create a curved line starting with the third anchor point. You can see a preview of the curved line after you’ve placed the second anchor point.
Step 1 - Select the Curvature Tool and Add the First Anchor Point
Select the Curvature Tool (Shift + ~) found in the left toolbar. The Curvature Tool looks like the Pen Tool with a curved line at the tip. Click on the canvas to add the first anchor point.

Step 2 - Add Second and Third Anchor Points
Then click on the canvas to add the second point. The line is currently still straight. Drag the cursor to see a preview of the curved line. Click again to place the third anchor point creating the curved line.

Continue adding anchor points to lengthen the line if needed.
Curve a Straight Line With the Curvature Tool
Step 1 - Select the Curvature Tool and Click + Drag on the Line
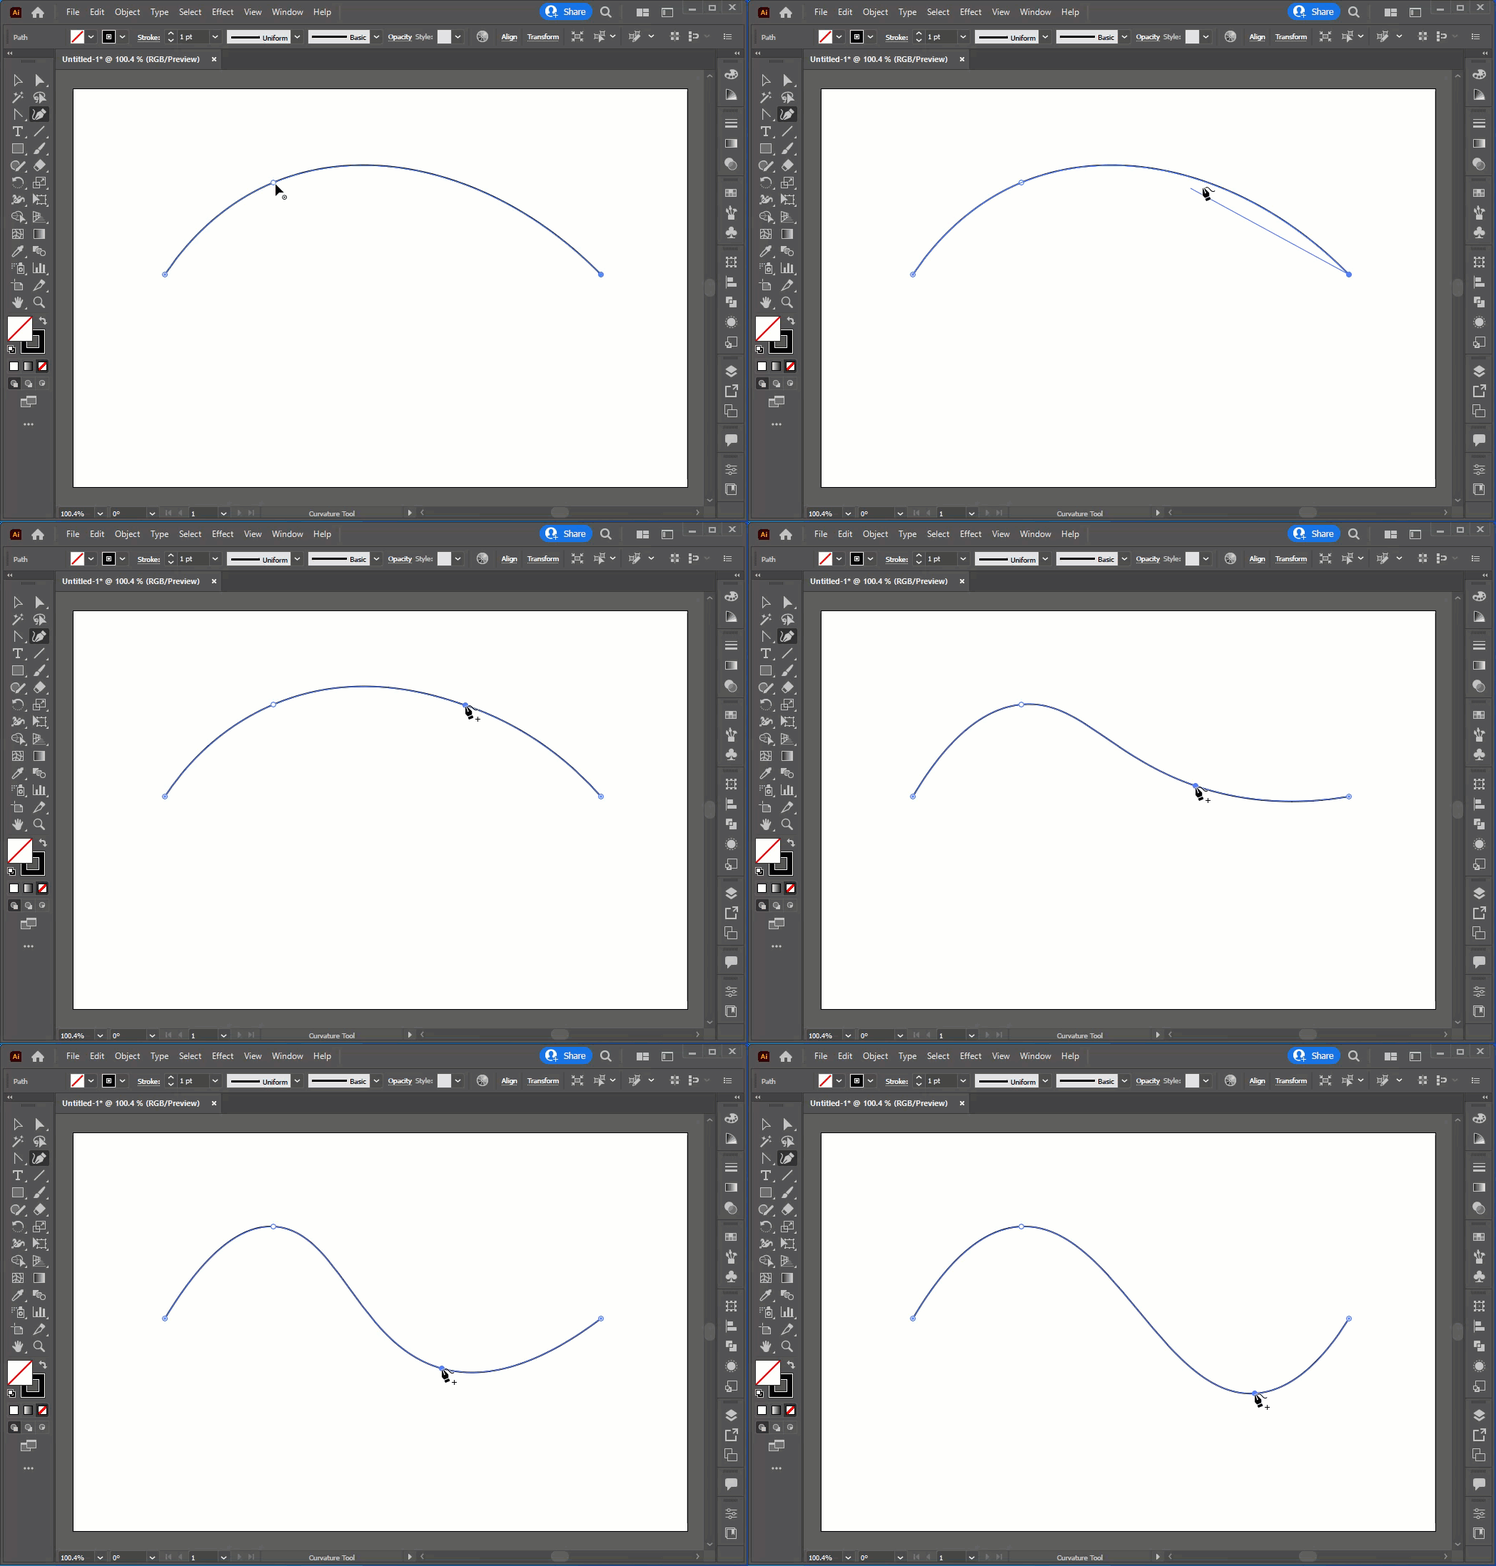
Select the Curvature Tool (Shift + ~). Hover over the line where you want to add an anchor point until the symbol at the bottom right of the cursor turns to a + (plus) sign. Then click + drag to add an anchor point and curve the line.

Step 2 - Add More Anchor Points and Curves
You can repeat the previous step to add more anchor points and curves to the line. See the following animation for a better understanding.

Now that you know how to make a curved line and how to curve a straight line in Illustrator, you can decide what method is best for your situation. To learn about other ways of manipulating a line, read our tutorial on adding anchor points in Illustrator. You can also take what you’ve learned from this tutorial and learn how to make flourishes in Illustrator.
6 Related Illustrator Tutorials
Wavy line patterns can easily be created with some basic shapes in Illustrator. These designs work well as seamless patterns for backgrounds or wallpaper. They can also be used for projects such as mugs, cushion covers and so much more. Up next, we will show you how to make a ...
In this tutorial, you will learn how to easily create a dotted line in Adobe Illustrator. Dotted lines can be a great way to divide up a document, label graphics, create texture in a line art illustration, or emphasize information on an infographic design.Step 1 - Draw a LineThere are ...
1- Open AI and create a new document.2- Using the text tool, write your text. Any thick bold font would work well with this technique.3- Right-click on your text and choose Create Outlines to convert the text into shapes.4- Right-click again and ungroup.5- Select every second ...
In this tutorial we will be making a line art illustration in Adobe Illustrator. These illustrations are perfect designs for t shirts, tote bags and so much more. Create them for mementos of all your favorite places or holidays!Check out our Illustrator tutorial section for more great tips! ...
Drawing a wavy line in Adobe Illustrator is super quick and easy. You simply choose the amount of waves and the size for your project. This can be used with many design options including logos or fun personal projects. I will be teaching you how to create a sunset with ...
1- Open canvas workspace.2- Click on the path tool.3- Click on your workspace. a node will appear. you can now draw a line. To draw a straight line hold the Shift key down while you are drawing your line. Double click to end the line.4- Click on ...

 All your Font Needs


