
How to Create a Comic Text Effect in DesignScape
Create fun comic text in DesignScape with this easy to follow tutorial!
In this tutorial, we will create a comic text effect in DesignScapethat exudes fun and excitement. We’ll be adding a colored background to our comic text effect, but you could make yours without it for a design you can use in many ways.
As a Gold Plus Member, you're able to use DesignScape for free and with your own fonts. Not a member yet? Then sign up for a free 30 Day Trial of the Gold Plus Membership today!

The bold comic font, Squirrel Jumping, is perfect for this, but here’s a list of other great bold fonts you can use instead. In addition to picking a font, you'll want to familiarize yourself with our tutorial on making 3D text in DesignScape.
Go ahead and start a new project and import your font. We went with a 11x8.5 inch canvas.
Step 1 - Make the Background
Our colored background will have a halftone pattern on top and an explosion shape on top of the halftone pattern.
Fill Background Layer with Color
Pick a foreground color and select the Paint Bucket Tool (G). We’re using a shade of purple (#9100ff).
Note: if you don’t see the Paint Bucket Tool, click and hold the Gradient Tool until the list opens, then select Paint Bucket Tool.

Click on the canvas to fill the Background layer with the foreground color.

Create a Halftone Pattern
To create a halftone pattern, we’ll start by making a gradient.
Make a Radial Gradient
Click the New Layer button near the bottom right corner. Then double-click on the new layer’s name in the Layers panel and change it to Halftone.

Select the Gradient Tool (G) located in the same spot as the Paint Bucket Tool.

Click the mini foreground and background color icon to reset the colors to black and white. Then change the gradient style in the top toolbar to Radial. Next, click and drag from the center of the canvas out to the right edge while holding the Shift key.

The gradient is shown in the following image.

Add a Halftone Filter to the Radial Gradient
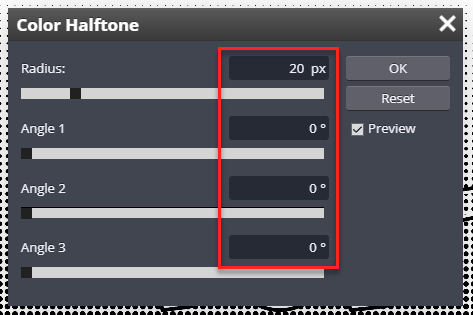
Go to Filter > Pixelate > Color Halftone.

Enter 40 px for the Radius, 0° for Angle 1, 2, and 3, and click OK.

See our halftone pattern in the following image.

Change the Halftone Layer Blend Mode and Opacity
Select the Halftone layer in the Layers panel, change the Blend Mode to Multiply, and lower the Opacity to about 17%.

Lock the Halftone Layer
Let’s lock the Halftone layer so we don’t accidentally move or alter it. Click the Halftone layer and then the padlock icon.

Create an Explosion Shape
Add Anchor Points Using the Pen Tool
Select the Pen Tool (P). Set the Fill to None and Stroke to black. Click near the edge of the canvas to add your first anchor point that will be one of the corners/peaks of the explosion shape.

Then, click and drag a little closer to the center of the canvas to create a slightly curved path.

Next, click on the canvas again to add another anchor point and create a wide U-shaped path. Continue adding anchor points around the canvas in a circular shape. Alternate between the two different anchor points until you reach the first anchor point. Make sure you click the first anchor point to close the shape.

Edit Anchor Points and Paths Using the Direct Selection Tool
With the Direct Selection Tool (A), move the anchor points and edit the angles of the curve if needed.
Click an anchor point to select it. Then click and drag the anchor point to move it where you want, or click and drag the handles (white circles) to change the angle of the curve.

Change Explosion Shape’s Fill and Stroke
In the top toolbar, change the Fill color, Stroke color, and stroke width of the explosion shape. We went with white for the Fill, black for the Stroke, and a width of 40 px.

Step 2 - Make the Comic Text Design
The comic text design will consist of multiple text layers. We will be duplicating the text layers many times. Make sure you follow along and rename your layers to avoid getting confused.
Add and Edit Text
Select the Type Tool (T) and pick the font you want to use.

Click on the canvas outside the explosion shape and enter your text.

Edit the text to your liking, such as changing the alignment, size, tracking, leading, etc. We have a guide on text basics in DesignScape if you need it.

Duplicate Text Layer and Rename the Duplicate Layer to 3D Text
Right-click on the text layer and choose Duplicate Layer. We’ll leave the original text layer alone in case you ever need to start over with the text. You can also hide and lock it if you want.

Rename the duplicate layer to 3D Text.

Convert 3D Text Layer to a Shape
Right-click on the 3D Text layer and choose Convert to Shape.

Duplicate 3D Text Layer Then Rename and Change Its Fill Color
Duplicate the 3D Text layer and rename this duplicate to Text Fill. Then select the Path Select tool (A), change the Fill color to yellow (#ffe500), and set the Stroke to None.

Merge All Paths of Text Fill Layer Using the Path Select Tool
Still using the Path Select Tool (A), click and drag over the text to select all the paths. Then select Merge from the dropdown in the top toolbar.

Duplicate Text Fill Layer Then Rename and Change Its Fill and Stroke to None
Duplicate the Text Fill layer and rename this duplicate to Text Outline. Then with the Path Select tool (A), set the Fill and Stroke to None.

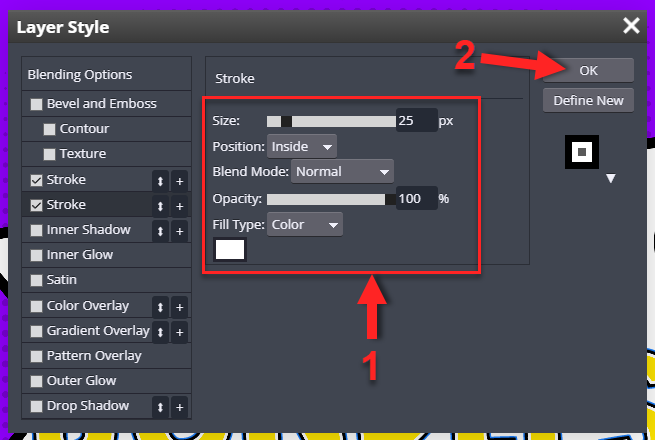
Next, with the Text Outline layer selected, click the Layer Style button at the bottom right and choose Stroke.

In the Stroke tab of the Layer Style dialog, use the following settings:
Size: 14 px
Position: Inside
Color selection: black
Leave the rest of the settings. On the left, click the + (plus) button to the right of the word Stroke to add another Stroke layer style.

In the bottom Stroke tab, use the following settings:
Size: 25 px
Position: Inside
Color selection: white
Leave the rest of the settings and click OK.
Create 3D Text Effect
Create Action to Help Create 3D Text Design
First, we will create an action set to help hasten the process of duplicating the 3D Text layer many times.
Open the Actions panel. Go to Window > Actions if you don't see the icon in the right toolbar that looks like a play button.

Click the New Action Set button then the New Action Button. Click the round Record button to start recording the actions.

Right-click on the 3D Text layer and choose Duplicate Layer.

You should now see Duplicate Layer under the Action Set 0 folder.

Next, select the Move Tool (V) and move the 3D Text copy layer down one click and to the left one click. You should now see Move Layer under Duplicate Layer under Action 0 folder. Click the square Record button to stop recording.

Apply Action to 3D Text Copy Layer
Select the 3D Text copy layer and click the apply button in the Actions panel. Apply the action until you have 30 copies of the 3D Text layer. You should have 31 layers total of the 3D Text layers, including the original layer.

Select all the 3D Text layers, right-click, and choose Merge Layers.

The result of merging all 3D Text layers onto a single layer is shown below. You don't have to merge the paths using the Path Select Tool (A) unless you want to add a gradient to the 3D Text layer shape.

Add a Halftone Pattern to the Text
Like before, we will use the Gradient Tool (G) to create a gradient and then apply a halftone filter to it.
Select the Text Fill layer and click the New Layer button to add a new layer directly above.

Instead of a Radial gradient, we want to make a Linear gradient. Reset the foreground and background colors again if needed. Then draw a straight line from the bottom edge to the top edge holding the Shift key.

Go to Filter > Pixelate > Color Halftone, and set Radius to 20 px and Angle 1, 2, and 3 to 0°.
Right-click on the linear halftone layer and choose Clipping Mask to apply the halftone pattern only to the Text Fill layer.

Set the halftone layer’s Opacity to about 25% and Blend Mode to Color Burn.

Step 3 - Add Extra Design Elements
You can stop here or add the following design elements for some pizzazz to make the comic text effect even more interesting.
Using the Custom Shape tool (U), you can add stars and long thin triangles around the explosion shape. If you would like to know more, we have a helpful tutorial on creating a shapein DesignScape.

Make the stars and triangles any color you want by changing their Fill color.

If you’d like to save your design, our guide on opening and saving files in DesignScape can help you with that.
We hope you had as much fun as we did creating this comic text effect in DesignScape. You can change any settings and colors to make the comic text effect your own.


