
How to Create a Shape in DesignScape
Learn how to quickly make a shape within DesignScape, the online photo editor from Design Bundles.
Today we will show you how to create a shape in DesignScape. There is a selection of preloaded shapes available, including fun custom shapes. These shapes can be used as a basis for creating your own designs. As DesignScape is a program available online, creating designs is flexible and efficient.
DesignScape is available to Gold Plus Members on Design Bundles. However, you can get a free Gold Plus Membership 30-day trial and try out this awesome program.
To locate DesignScape, head to the Plus Hub and click the DesignScape button.
Let’s begin by starting a new project in DesignScape.
Step 1 - Create the Rectangle Shape
On the left side toolbar you will find the shapes available in DesignScape. Place your mouse over the shape, then click and hold to open up the shapes menu. Here you will find the Rectangle, Ellipse, Line, Parametric Shape and Custom Shape.
Draw out the Rectangle
Click on the Rectangle shape to select it. You can also select and cycle through the shapes by using the keyboard shortcut U. Each time you press the letter U, it will select the next shape on the menu.

Now click anywhere on the white background to bring up the Rectangle sizing box. Type in the Width and Height of your shape and click Ok.

You can also simply click and drag out the shape on the white background. If you want a uniform shape, hold Shift while clicking + dragging.

Change Fill and Stroke
The shape will take on the color fill and stroke that is selected at the top toolbar. You can change the color by selecting the drop down arrow from the Fill option.

Create a Rounded Rectangle
You can also create a rounded rectangle but this option needs to be selected before drawing out the rectangle.
Select the Rectangle tool, then at the top toolbar change the Corner Radius as needed. Next, click and drag out your rectangle.

Step 2 - Use the Transform Controls to Adjust Size
With your rectangle shape drawn out, you may want to adjust the size. To do this we first need to click on the Move Tool on the left toolbar.
You will see the toolbar at the top change where you can tick the box for Transform controls. This will activate the sizing handles on the rectangle.

Adjust the shape and size of the rectangle by clicking + dragging one of the sizing handles in or out. As you click + drag, the top toolbar option will change.
This will show you where the rectangle is positioned on the X and Y axis as well as Width and Height.

Step 3 - Use Ellipse, Line and Parametric shapes
The Ellipse, Line and Parametric shapes can be accessed the same way as the Rectangle shape.
Create an Ellipse
Click and hold on the Rectangle shape to open the shapes menu. Then select the Ellipse Shape. You can click anywhere to open the sizing box or click and drag the Ellipse out.

Use the Line Shape
The Line shape tool has some options for creating arrows. Click on the Line Shape tool to select, then click + drag out a line. To keep the line straight, click + drag then hold down Shift.
You will see some tool options at the top toolbar. The Width will determine how wide the line is. If you click on Arrow, you will be able to add an arrow on both sides once you have ticked Start and/or End.
The Width, Length and Concavity of the arrows can be adjusted and you will see a preview at the bottom.
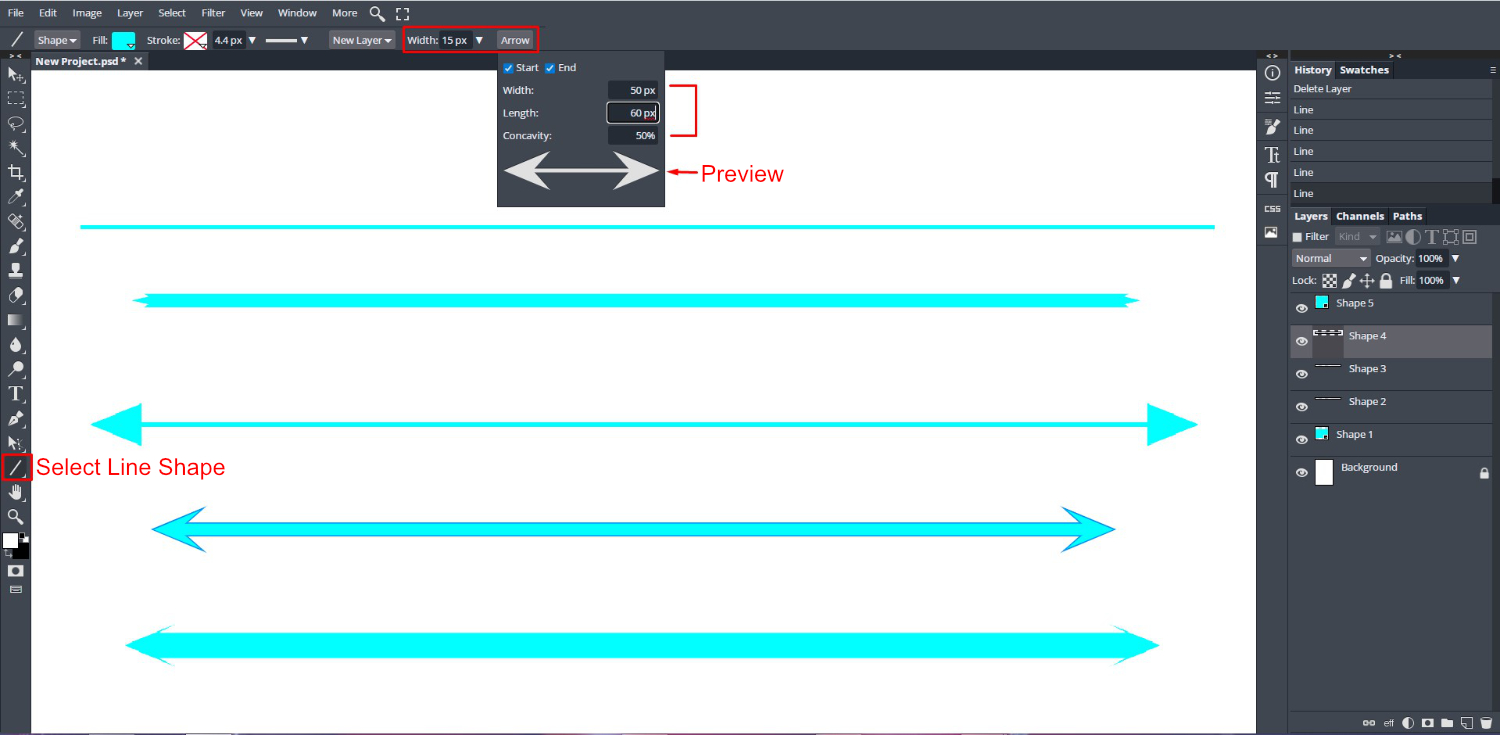
Various shapes can be created using the Line Shape tool and the arrow option.
Use the Parametric Shape
There are four options under the Parametric Shape, Polygon, Star, Arrow and Spiral. The options for Arrow are the same as in the Line Shape.Adjusting the settings for each option will give a different result.
For example, you can adjust the inner radius, how sharp or smooth the corners are, how many sides and so on. The image below shows different settings applied to give various results.

Step 4 - Use Custom Shapes
You can access preloaded shapes using the Custom Shape option. In the same way you selected the Rectangle, click and hold to open the shapes menu. Then choose Custom Shape, which will look like a star. You will see the word Shape at the top toolbar with a triangle.

When you click and drag out the shape, it will be a triangle by default.

To use the preloaded shapes, first click on the Custom Shapes tool on the left side. Then, go to the top and click on the drop down menu next to Shape. Scroll through the shapes and click to select one.
On your canvas, click + drag out the shape. You can also just click on the canvas and input the required value under the New: Custom Shape box.

There you go, now you can create shapes in DesignScape with a few easy steps. With the numerous preloaded options as well as various settings, you can happily design anything you want. DesignScape gives you the basis to begin, the rest is up to your imagination.


