
Cloud Effect Photoshop
Discover how to create a cloud effect with this in depth Photoshop tutorial.
In this tutorial, we will learn how to create a cool cloud effect in Photoshop with the aid of a custom brush, some layer styles, filters, and blending modes. You can use this technique with text or shapes to turn your messages and art into realistic fluffy clouds.

We will be using the Houstander font from our great variety of script fonts and this nice sea with clouds photo from our list of stunning nature photos to create our artwork.
Step 1 - Add Your Text to the Background
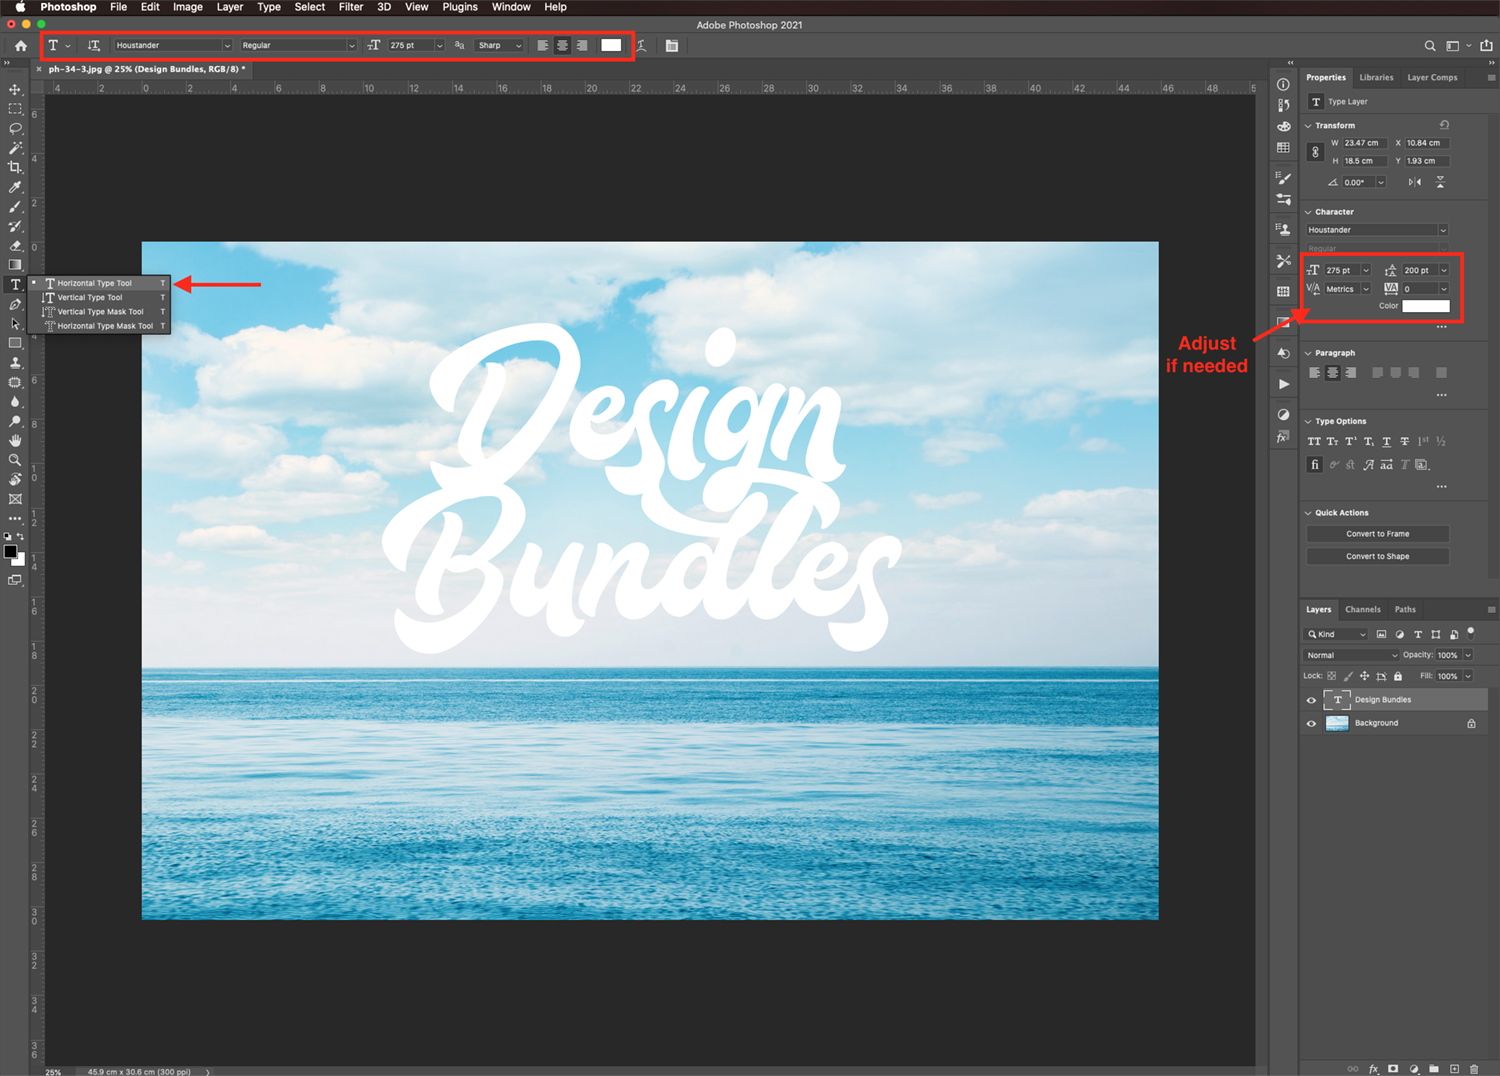
Start by opening the image you chose as the background. Then, select the Typetool (T), choose your font, click on the canvas, and type your text.
Use white as theFill color, and in the Character panel, if needed, increase the tracking to separate the letters a bit and adjust the leading/spacing between lines. The size of your text will depend on the space available on the background image.
Step 2 - Apply Filters to Text
Now, we are going to give our text a more cloud-like vibe using some filters to soften and deform its edges slightly.
Convert the Text Layer to a Smart Object
First, right-click on top of the text layer thumbnail in the Layers panel and choose Convert to Smart Object. This will make it so that the effects are applied non-destructively, preserving the original text for when you want to go back and adjust something later on.

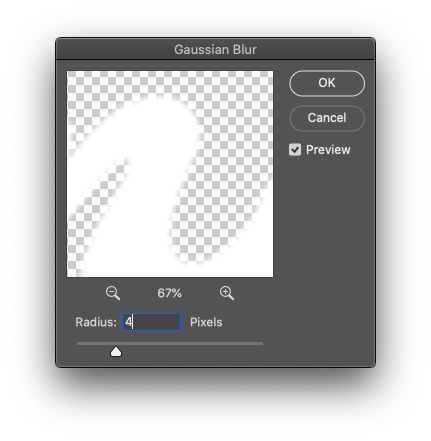
Next, go to Filter > Blur > Gaussian Blur and set the Radius value to 4 pixels.
Then, go to Filter > Distort > Ripple and set the Amount value to 60% and the Size to Large.

Repeat the Gaussian Blur and the Ripple filters as many times as needed to create your cloud effect.

Step 3 - Create a Cloud Brush
Next, we are going to create a cloud brush, and with it, we are going to make our cloud text effect more realistic.
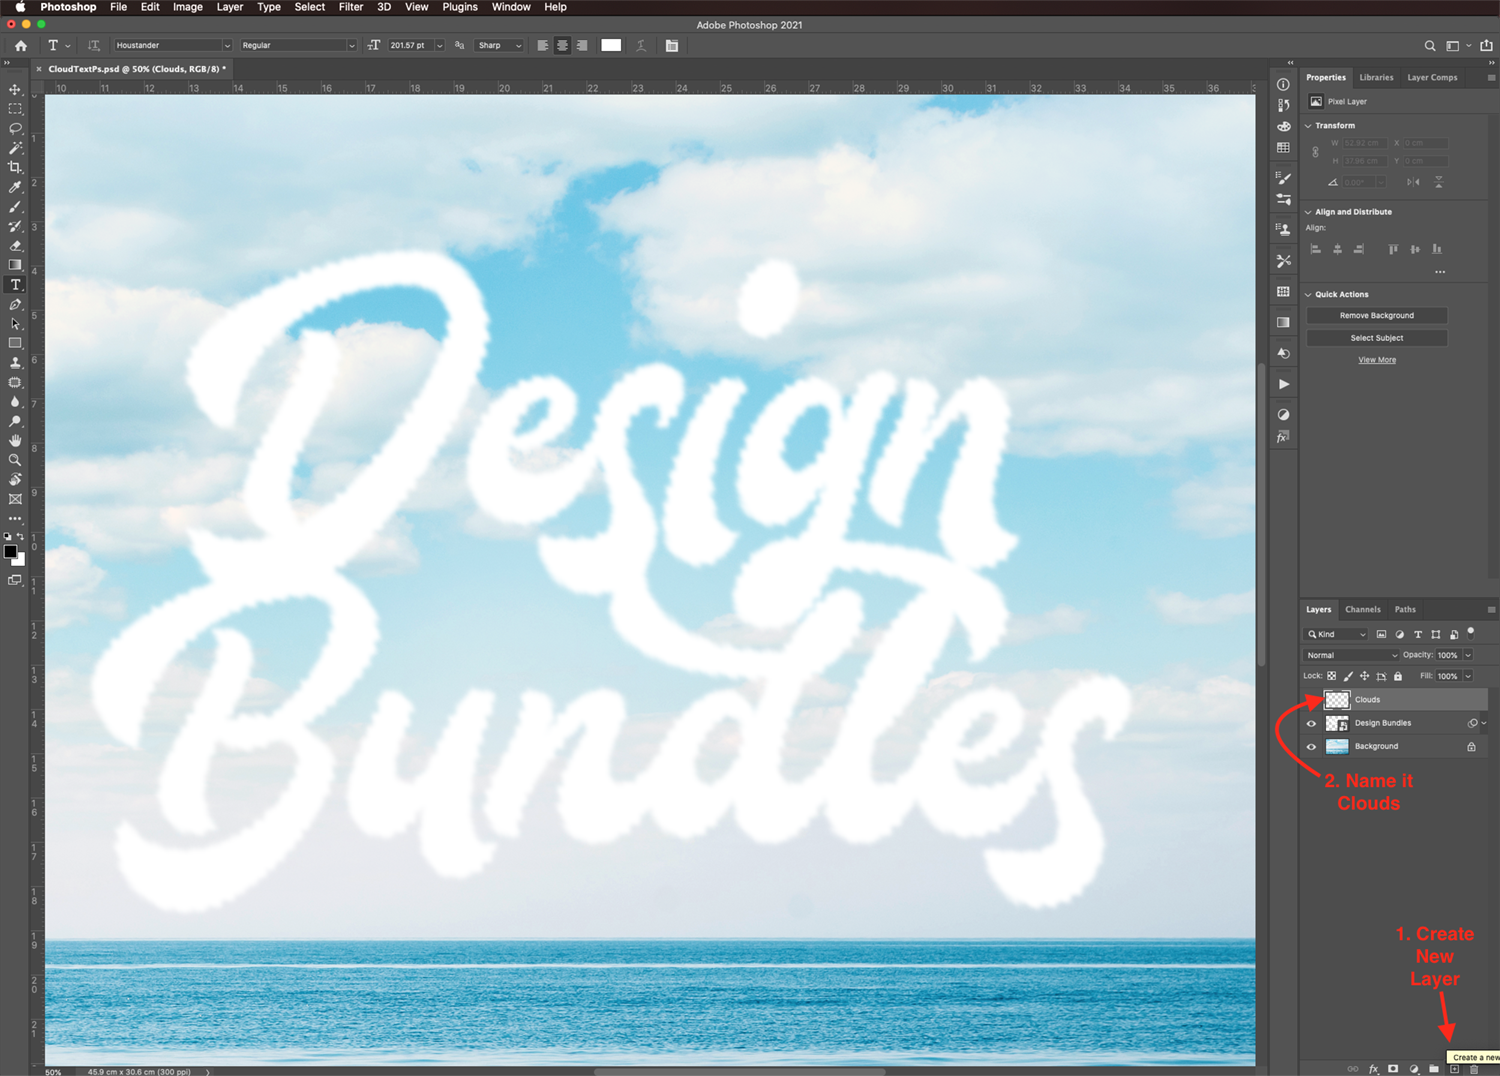
Create a New Layer
Let’s start by creating a New Layer by clicking on the button at the bottom of the Layers panel. Make sure it’s placed on top of everything and name it Clouds.
Adjust the Settings to Create the Cloud Brush
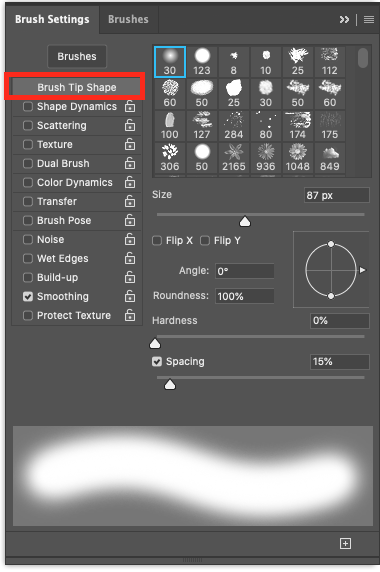
Select the Brush tool (B) and choose a Soft Round brush from the brush list.
Click on the small folder icon on the top toolbar to toggle theBrushSettingspanel.

In the Brush Settings panel, click on the Brush Tip Shapetab, keep the Size at 87 px and set the Spacing to 15%.
On the Shape Dynamics tab, use the following values:
Size Jitter: 30%
Angle Jitter: 50%
Roundness Jitter: 5%
Minimum Roundness: 20%
Control: Off in all the instances
Flip X and Y Jitter boxes: Checked
Brush Projection: Unchecked

On the Scattering tab, use the following values:
Scatter: 80%
Both Axes: Checked
Count: 1
Count Jitter: 40%
Control: Off in both instances

Save Your Brush
To save the brush, click on the small menu icon on the top right side and choose New Brush Preset.

Give it a name when prompted, check the Capture Brush Size in Preset box, and click OK.

Step 4 - Use the Brush to Add Clouds to Your Text
Next, we are going to use our newly created brush to give a more defined cloud-like appearance to our text.
Paint Clouds on Top and Around Your Text
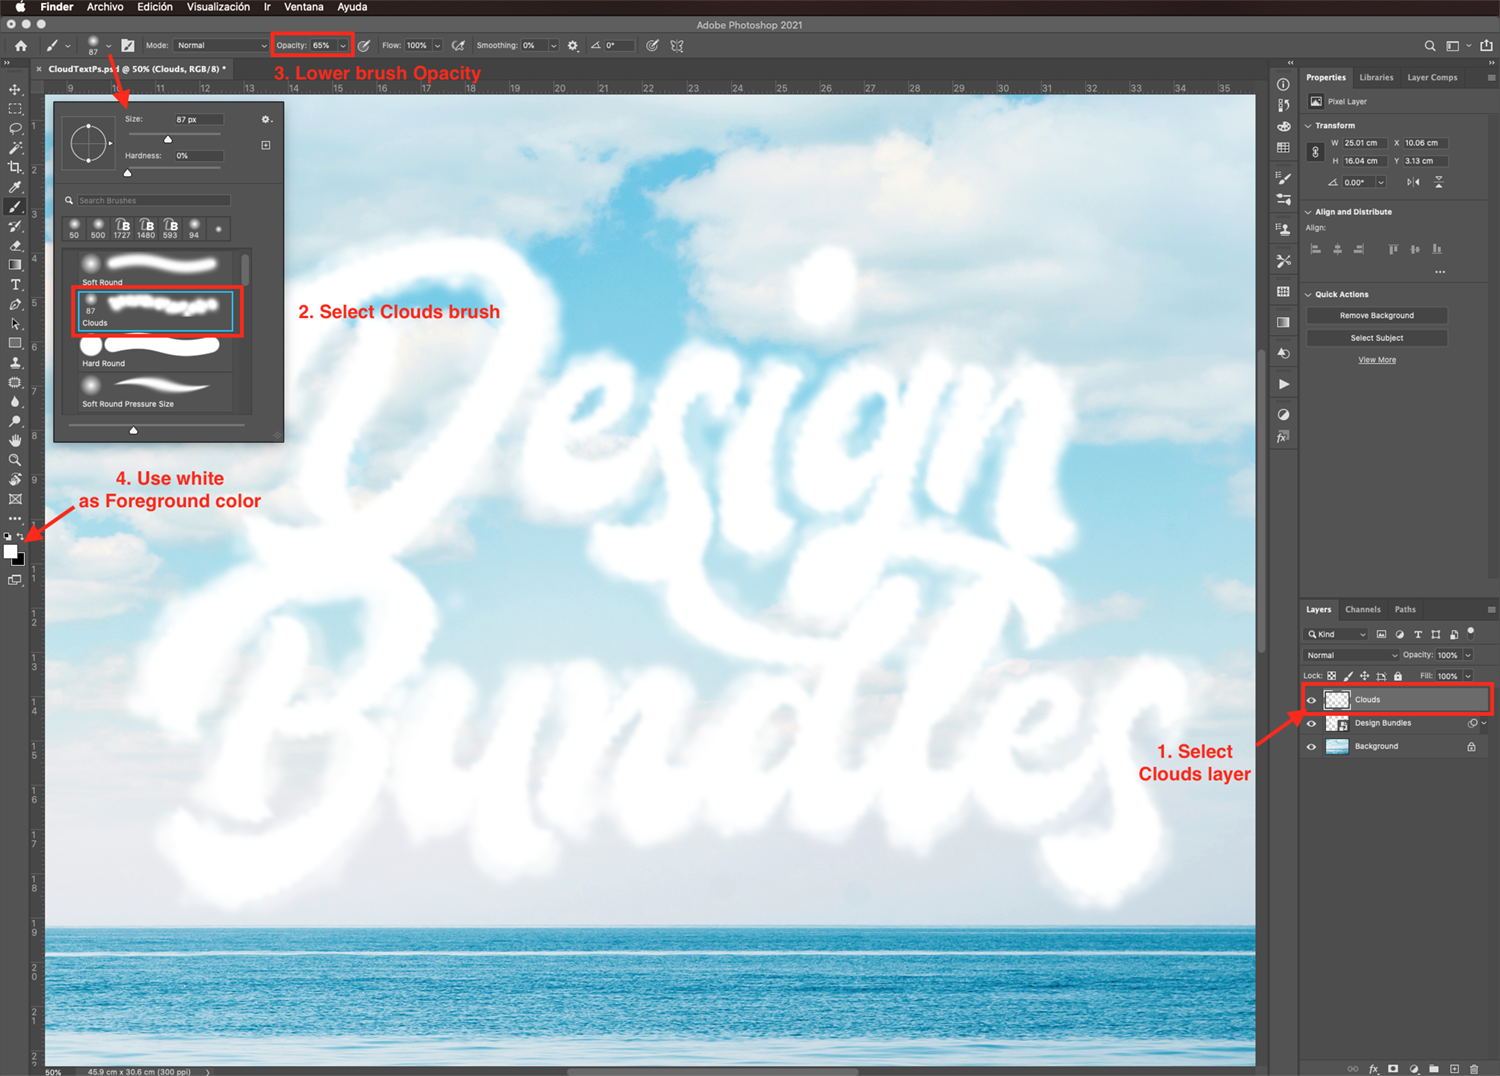
First, make sure that the Clouds layer thumbnail is selected in the Layers panel. Then, set white as your Foreground color and select the Brush tool (B).
Then, select your newly createdClouds brush and reduce the Opacity value to around 65%. Paint on top and around your text to add more clouds. You can increase or decrease the brush size and the opacity value to add more depth.
Change the Blending Mode of the Clouds Layer
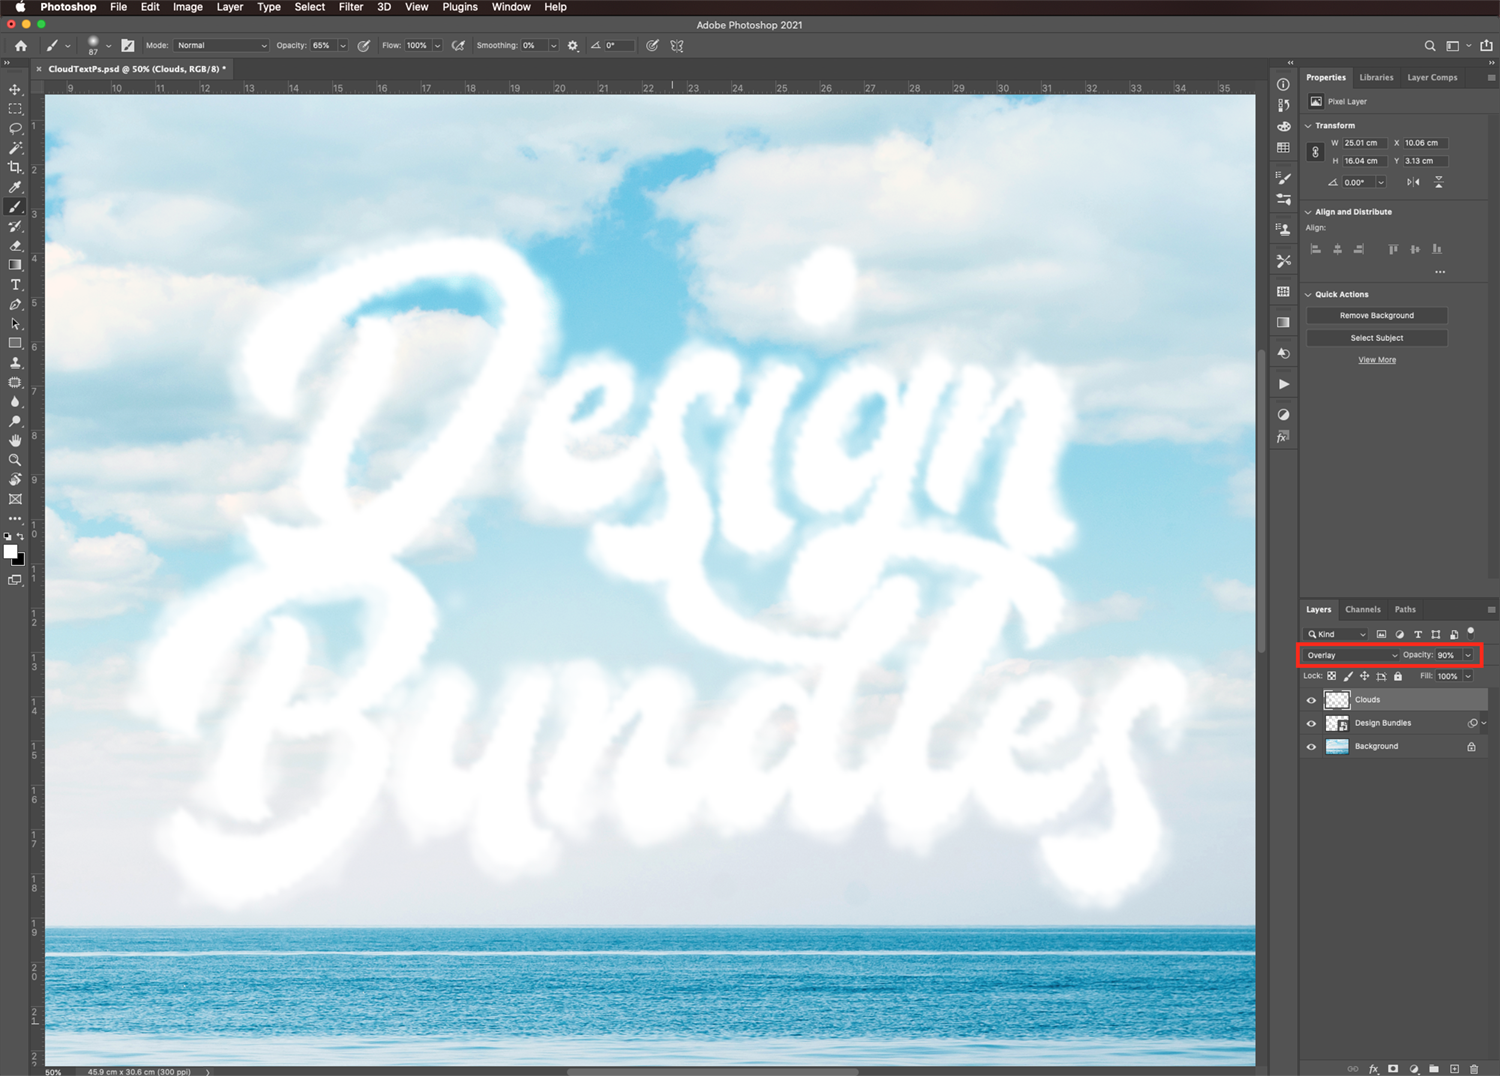
When you are done, change the Blending Mode of the Clouds layer to Overlay, and reduce the Opacity to 90%.
Convert Clouds Layer to a Smart Object
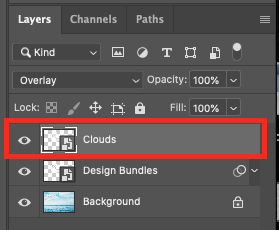
Right-click on top of the Clouds layer thumbnail in the Layers panel and choose Convert to Smart Object.
Step 5 - Apply Some Layer Styles
Now, to add depth to the cloud effect, we are going to use some layer styles.
Double-click on the CloudsSmart Object thumbnail to open the Layers Styles panel and use the following settings.
In theBevel & Emboss tab, use:
- Style: Inner Bevel
- Technique: Smooth
- Depth: 80%
- Direction: Up
- Size: 85px
- Soften: 0px
- Angle: 120º
- Use Global Light: Unchecked
- Altitude: 30º
- Gloss Contour: Linear
- Anti-aliased: Unchecked
- Highlight Mode: Normal
- Highlight Color: #ffffff
- Highlight Opacity: 30%
- Shadow Mode: Normal
- Shadow Color: #11110d
- Shadow Opacity: 23%

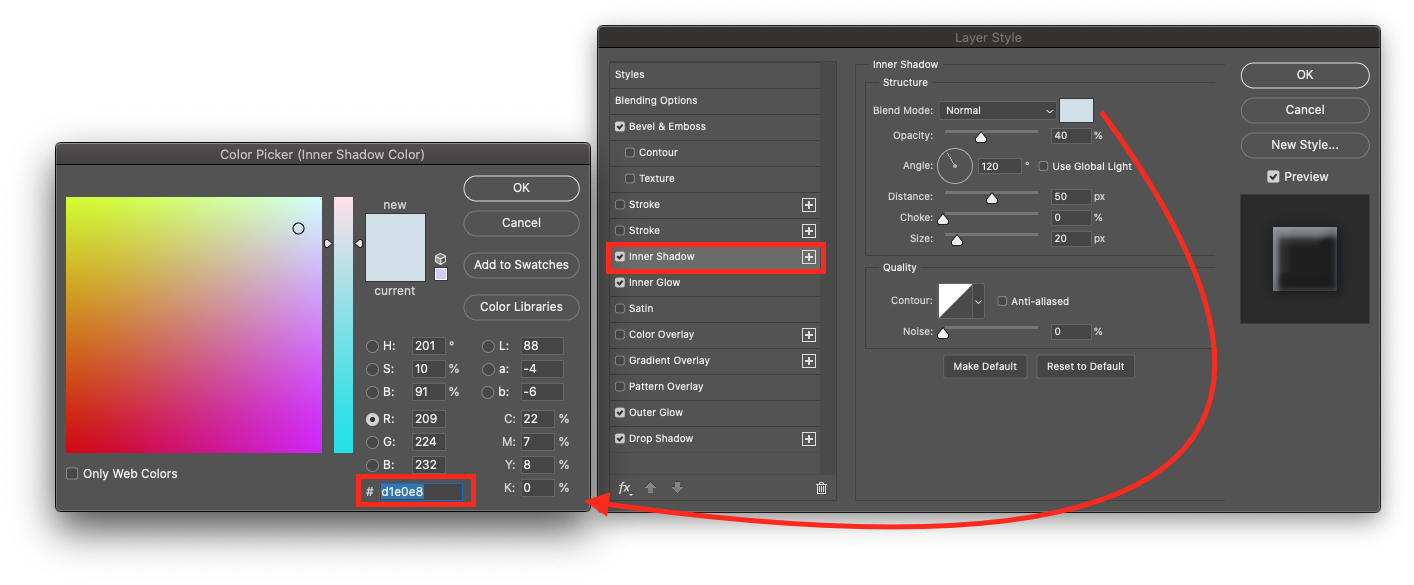
Next, in the Inner Shadow tab, use:
- Blend Mode: Normal
- Color: #d1e0e8
- Opacity: 40%
- Angle: 120º
- Use Global Light: Unchecked
- Distance: 50px
- Choke: 0%
- Size: 20px
- Contour: Linear
- Antialiased: Unchecked
- Noise: 0%
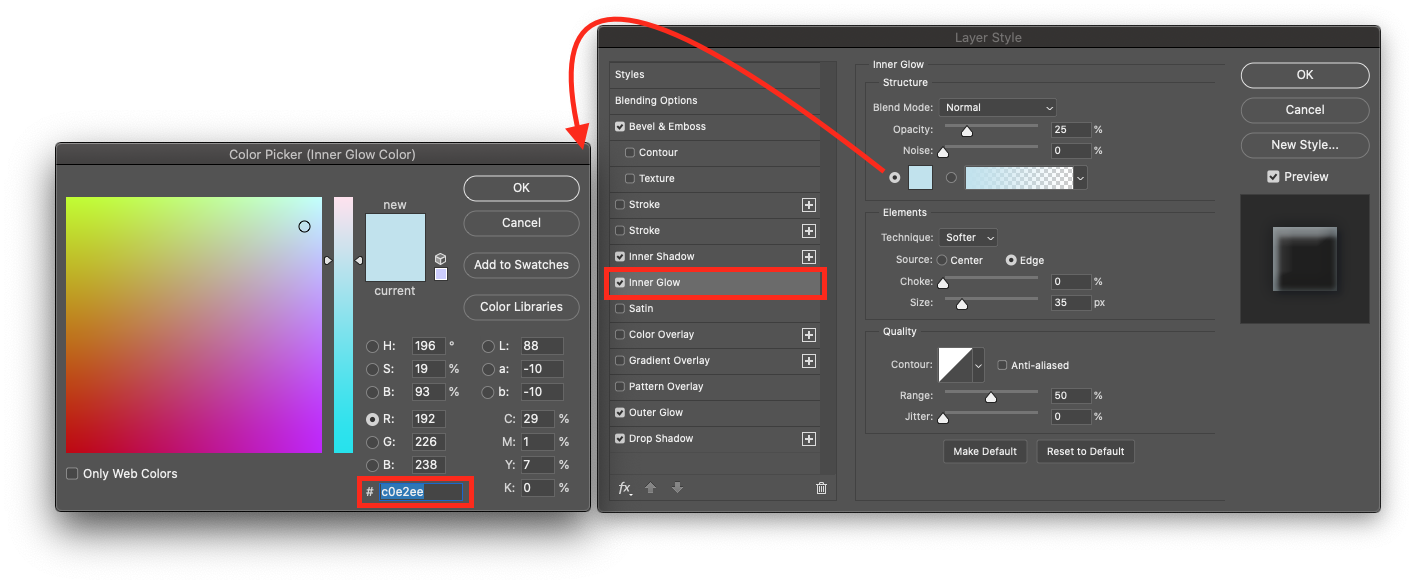
In the Inner Glow tab, use:
- Blend Mode: Normal
- Opacity: 25%
- Noise: 0%
- Color: #c0e2ee
- Technique: Softer
- Source: Edge
- Choke: 0%
- Size: 35px
- Contour: Linear
- Anti-aliased: Unchecked
- Range: 50%
- Jitter: 0%
In the Outer Glow tab, use:
- Blend Mode: Overlay
- Opacity: 25%
- Noise: 0%
- Color: #000b1f
- Technique: Softer
- Spread: 0%
- Size: 75px
- Contour: Linear
- Anti-aliased: Unchecked
- Range: 50%
- Jitter: 0%

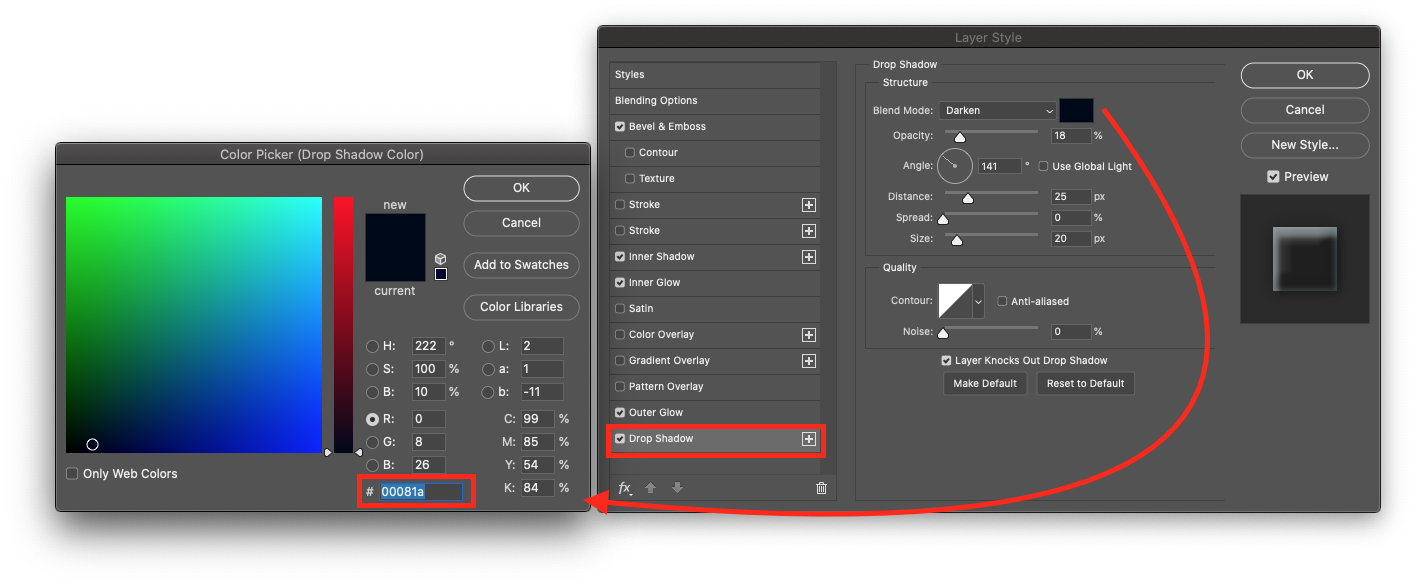
Finally, in the Drop Shadow tab, use:
- Blend Mode: Darken
- Color: #00081a
- Opacity: 18%
- Angle: 141º
- Use Global Light: Unchecked
- Distance: 25px
- Spread: 0%
- Size: 20px
- Contour: Linear
- Anti-aliased: Unchecked
- Noise: 0%
Add More Details if Needed
Check your text and add more details using the Clouds brush if needed.

Step 6 - Add a Cloud Texture
Next, we are going to add texture to our cloud effect using some filters and blending modes.
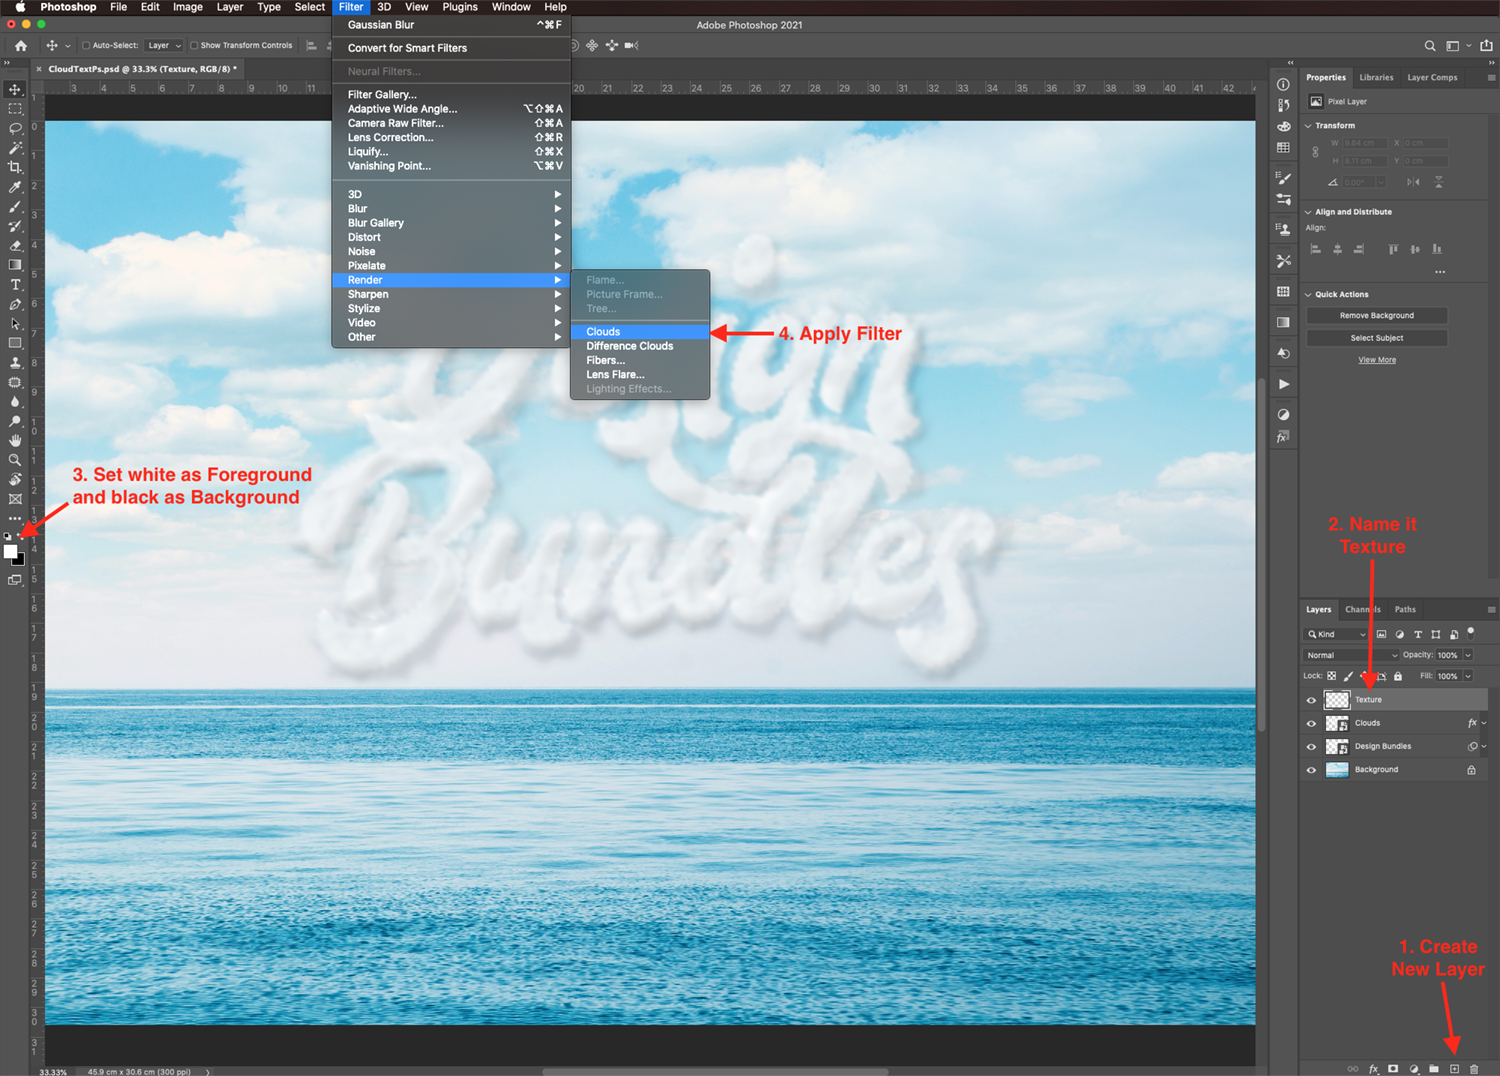
Create a New Layer Filled with the Clouds Filter
First, create a new layer on top and name it Texture.
Set theForeground color to white and the Background color to black. Then go to Filter > Render > Clouds.
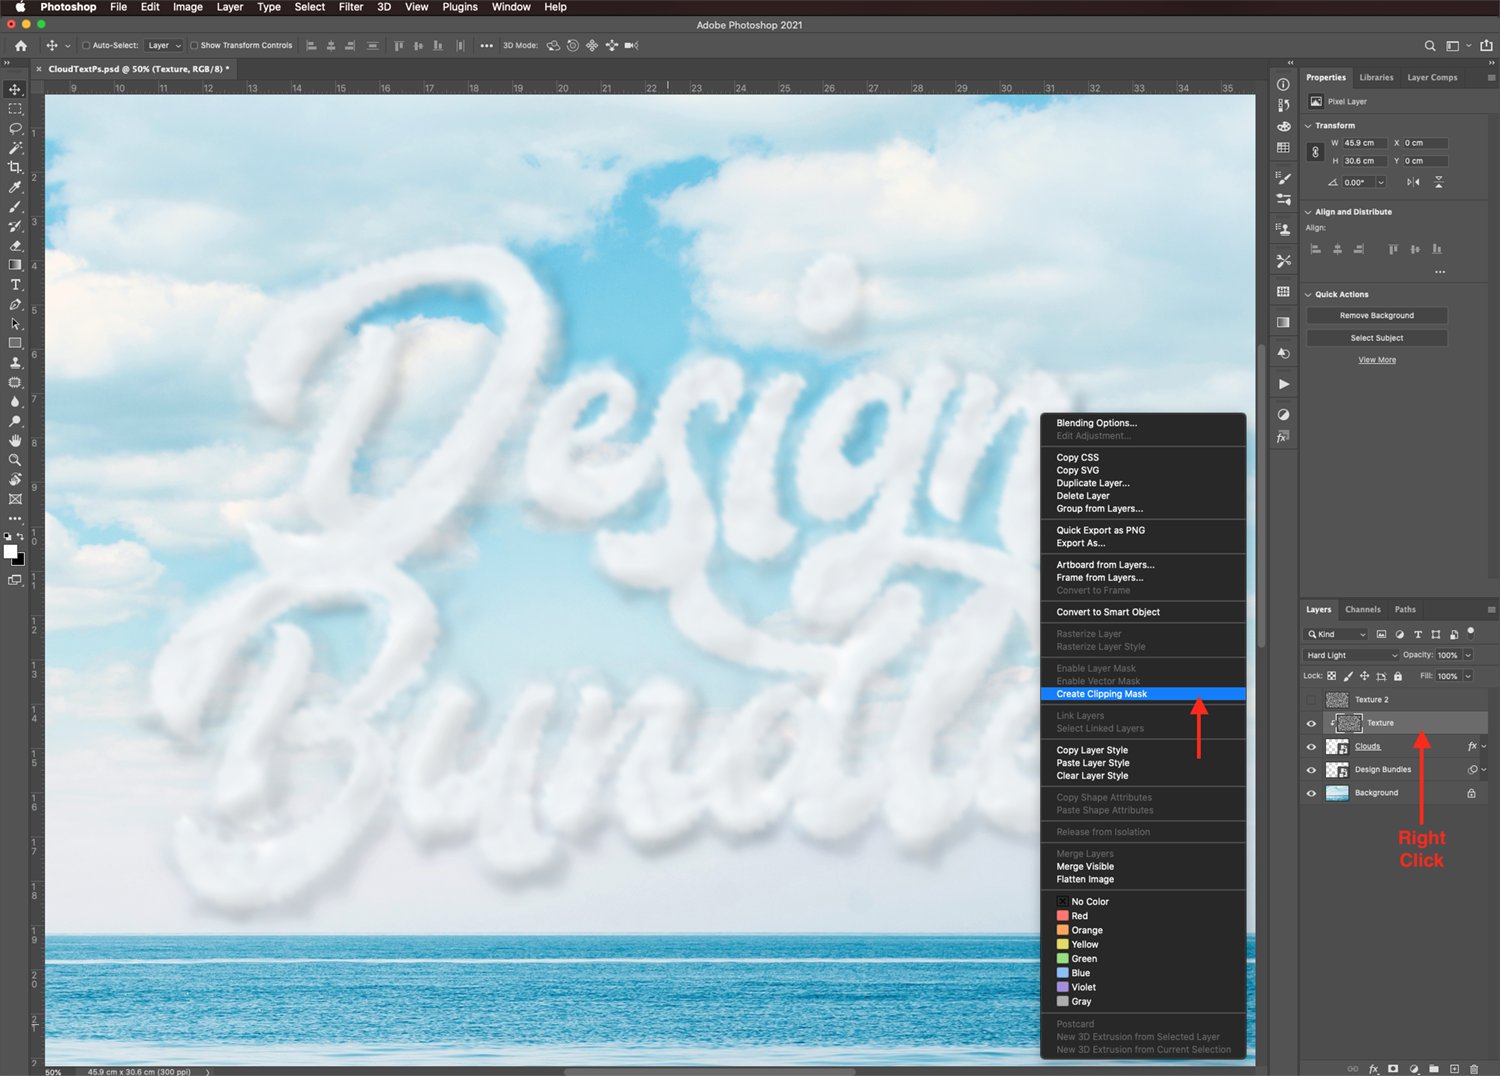
Duplicate the Texture Layer and Clip it
Duplicate (Cmd/Ctrl + J) the Texture layer and name it Texture 2. Change the Blending Mode of the duplicate to Overlay and hide it for now by clicking on the small eye icon on the left side of its thumbnail.

Right-click on the Texture layer thumbnail and choose Create Clipping Mask. Then, change its Blending Mode to Hard Light.
Add a Layer Mask to the Duplicate Texture Layer
Next, un-hide the Texture layer and add a Layer Mask to it by clicking on the small icon at the bottom of the Layers panel.

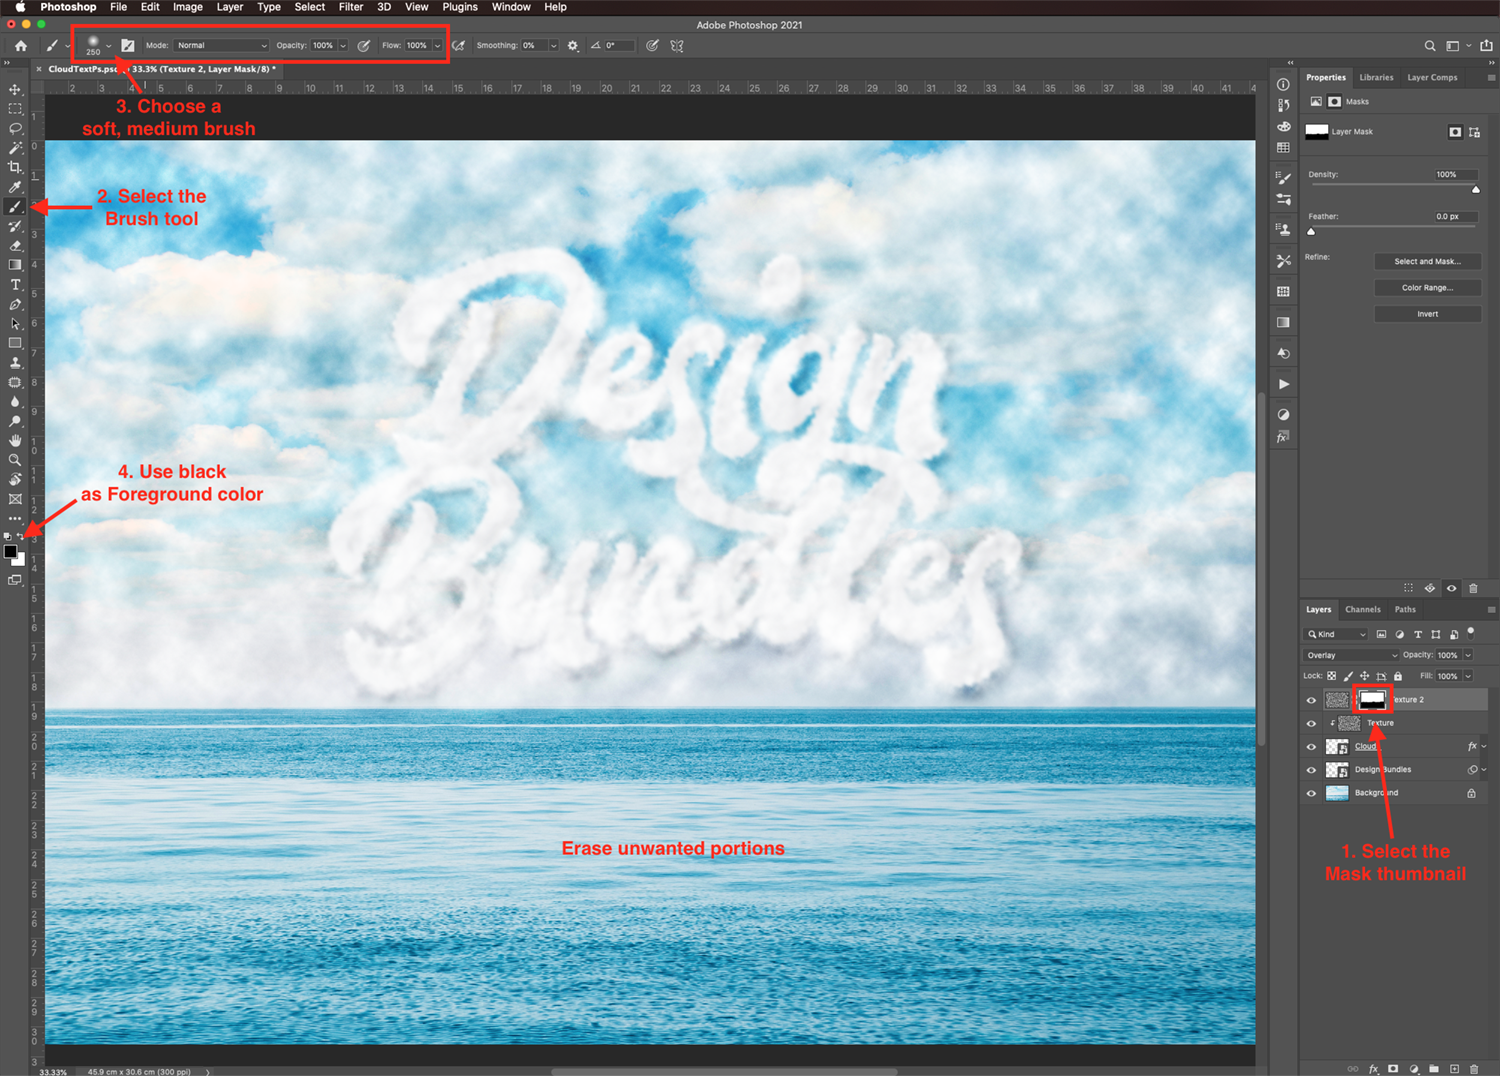
Erase Unwanted Texture Portions
We are going to use the mask to get rid of the unwanted texture portions and maybe tone down some of the ones we want to keep.
For this, make sure that the Foreground color is set to black. Select the Texture 2 mask thumbnail in the Layers panel and use a medium and soft brush (around 250 px and 0% Hardness) to erase the unwanted portions.
Later, you can use the Clouds brush, adjusting the size and opacity to tone down some of the areas of the texture that may need it.
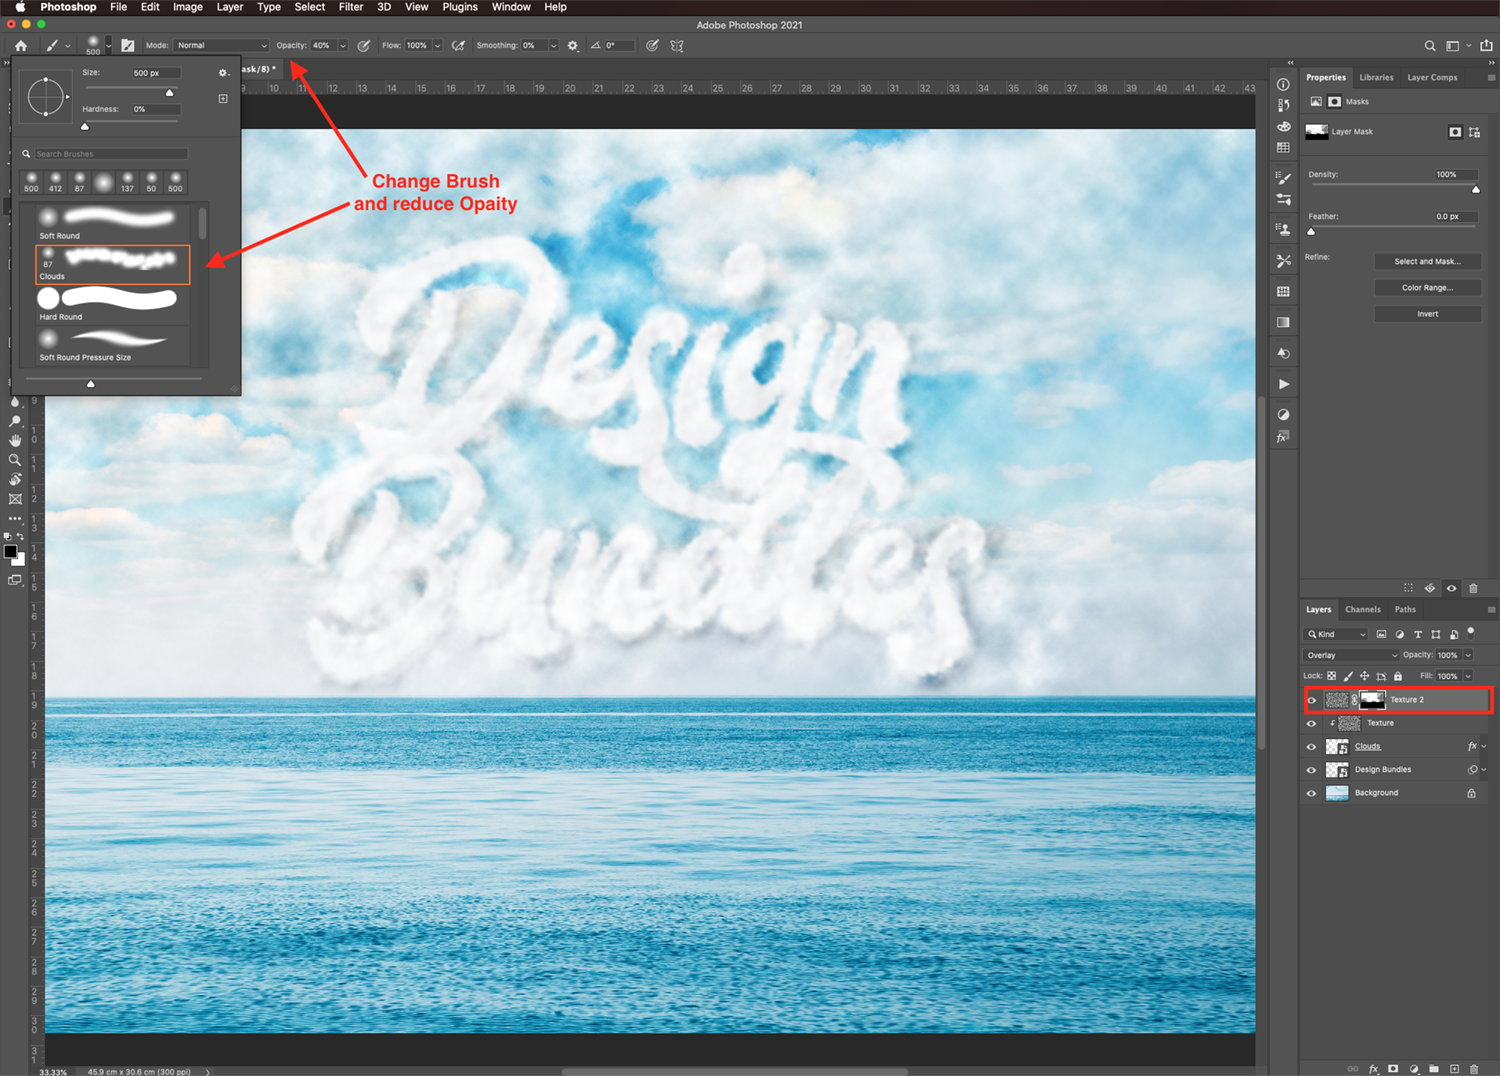
Finally, adjust the Opacity of the layer if needed. We reduced it to 70%.

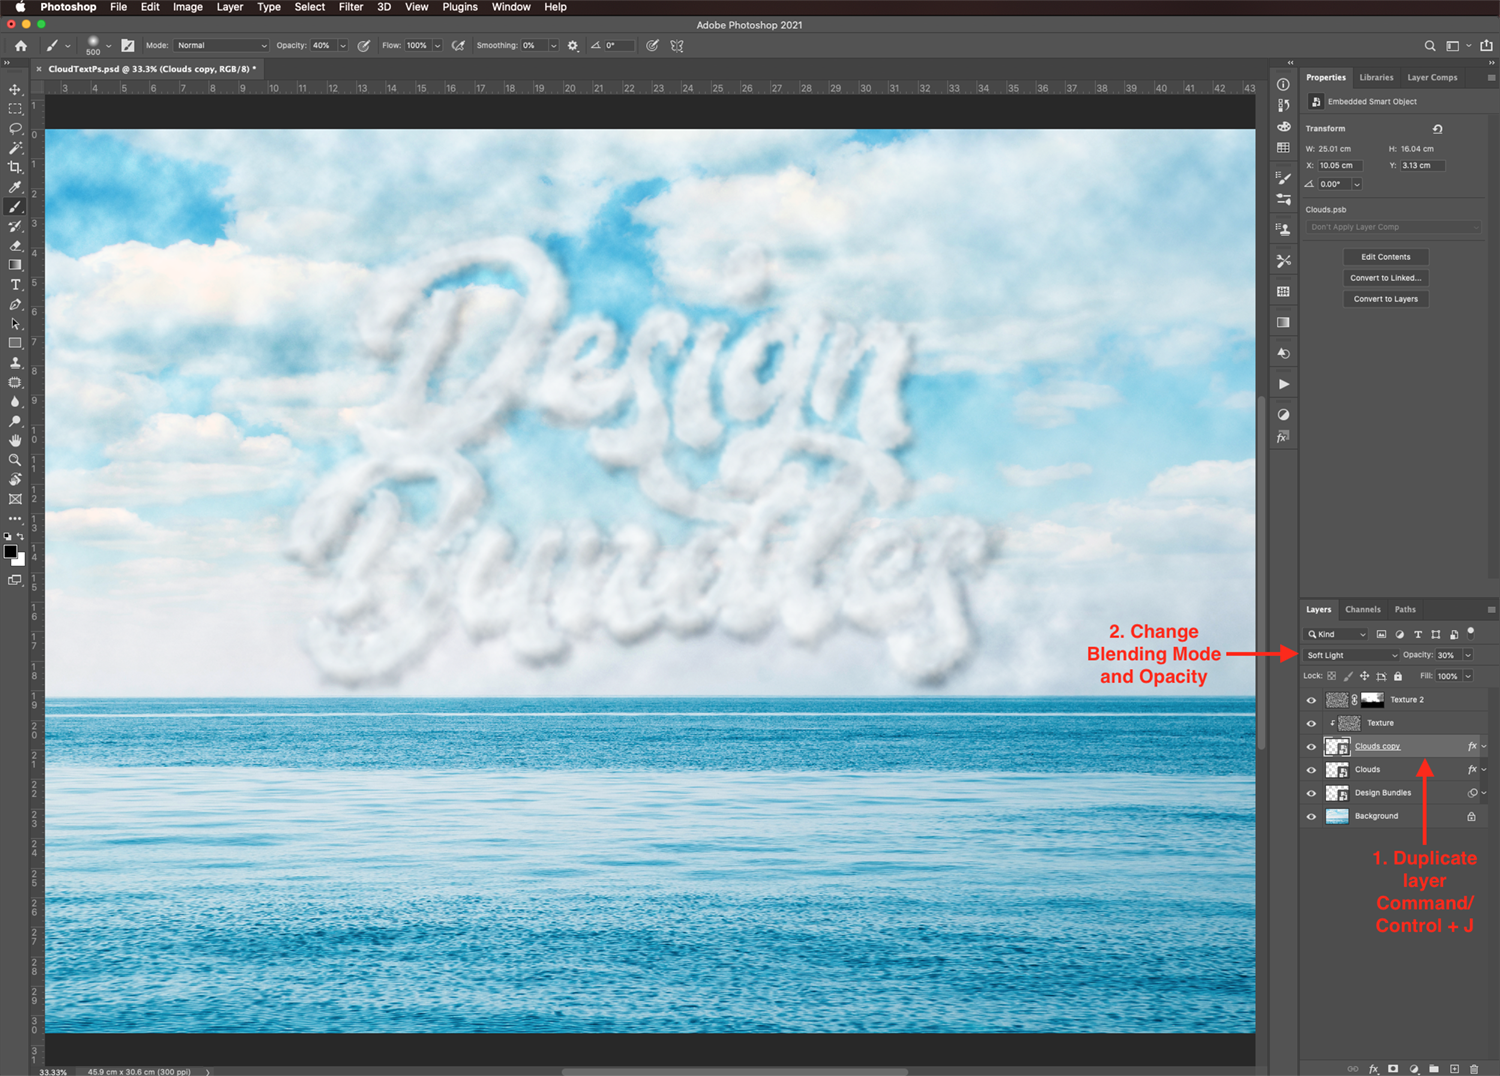
Step 7 - Add More Details to the Clouds
Now, we are going to add more depth and details to the cloud effect by duplicating some layers, adjusting their contrast, and changing their blending modes.
First, duplicate the Clouds layer, change the duplicate’s Blending Mode to Soft Light and reduce the Opacity to 30%.
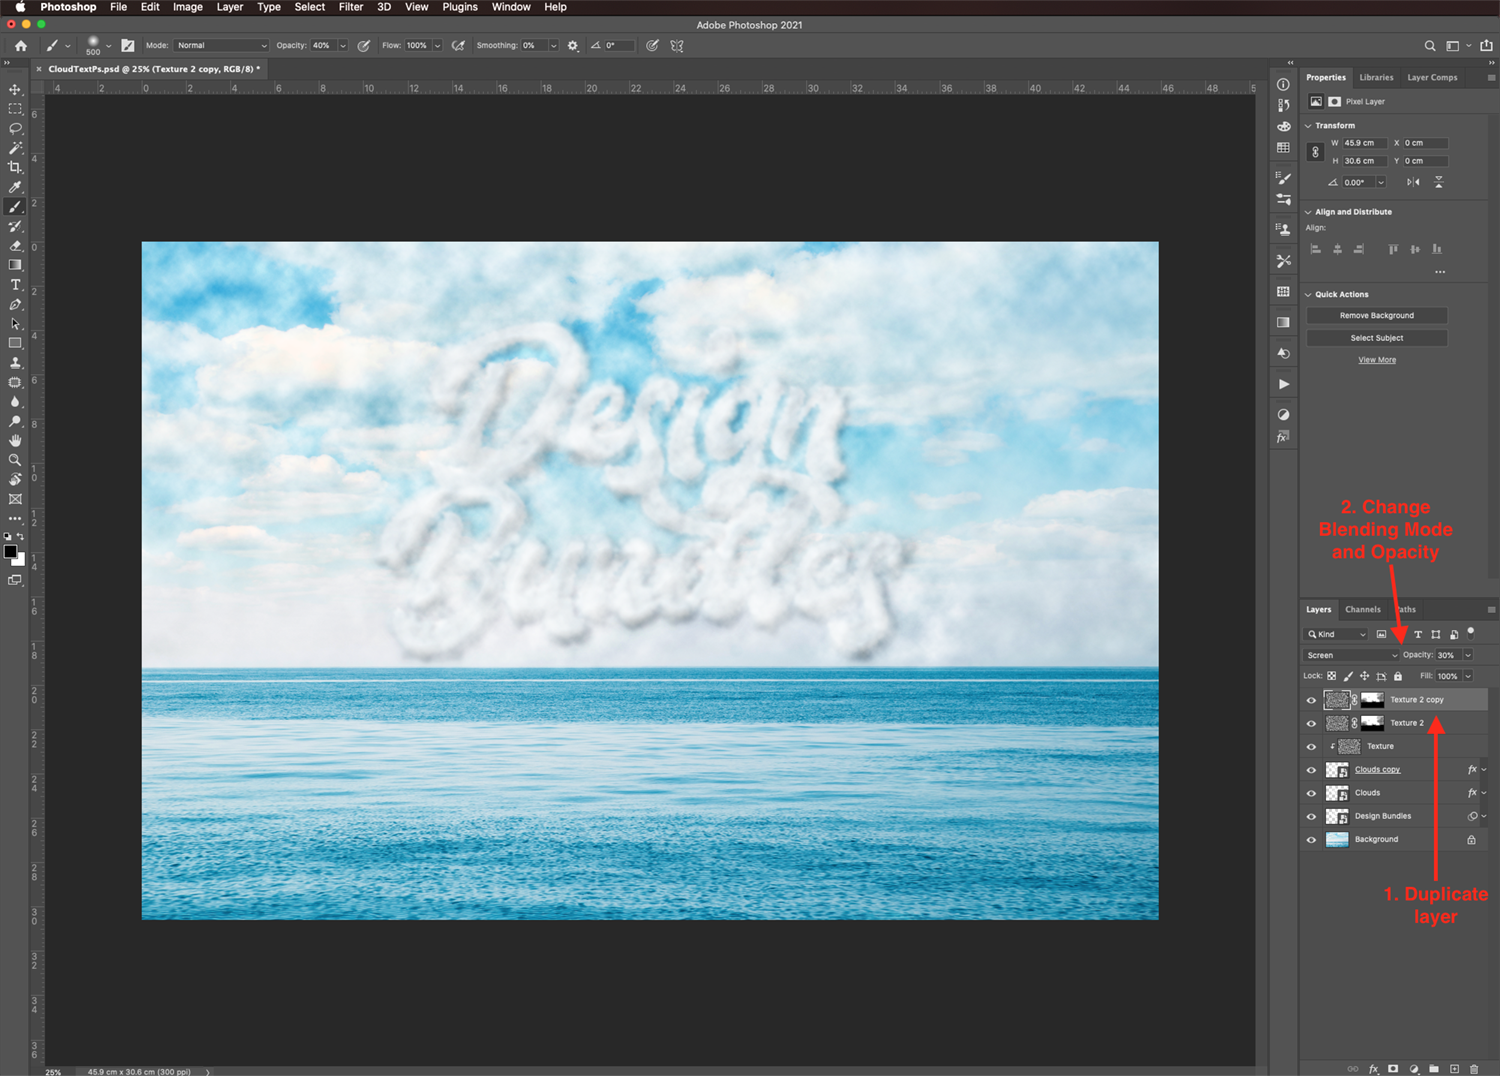
Also, duplicate the Texture 2 layer, change the duplicate’s Blending Mode to Screen and reduce the Opacity to 30%.
Step 8 - Adjust Your Artwork’s Color and Contrast
We are going to adjust the overall appearance of our artwork to add more contrast and make the colors pop by adding some adjustment layers. Also, we will sharpen everything a bit with some filters and blending modes.
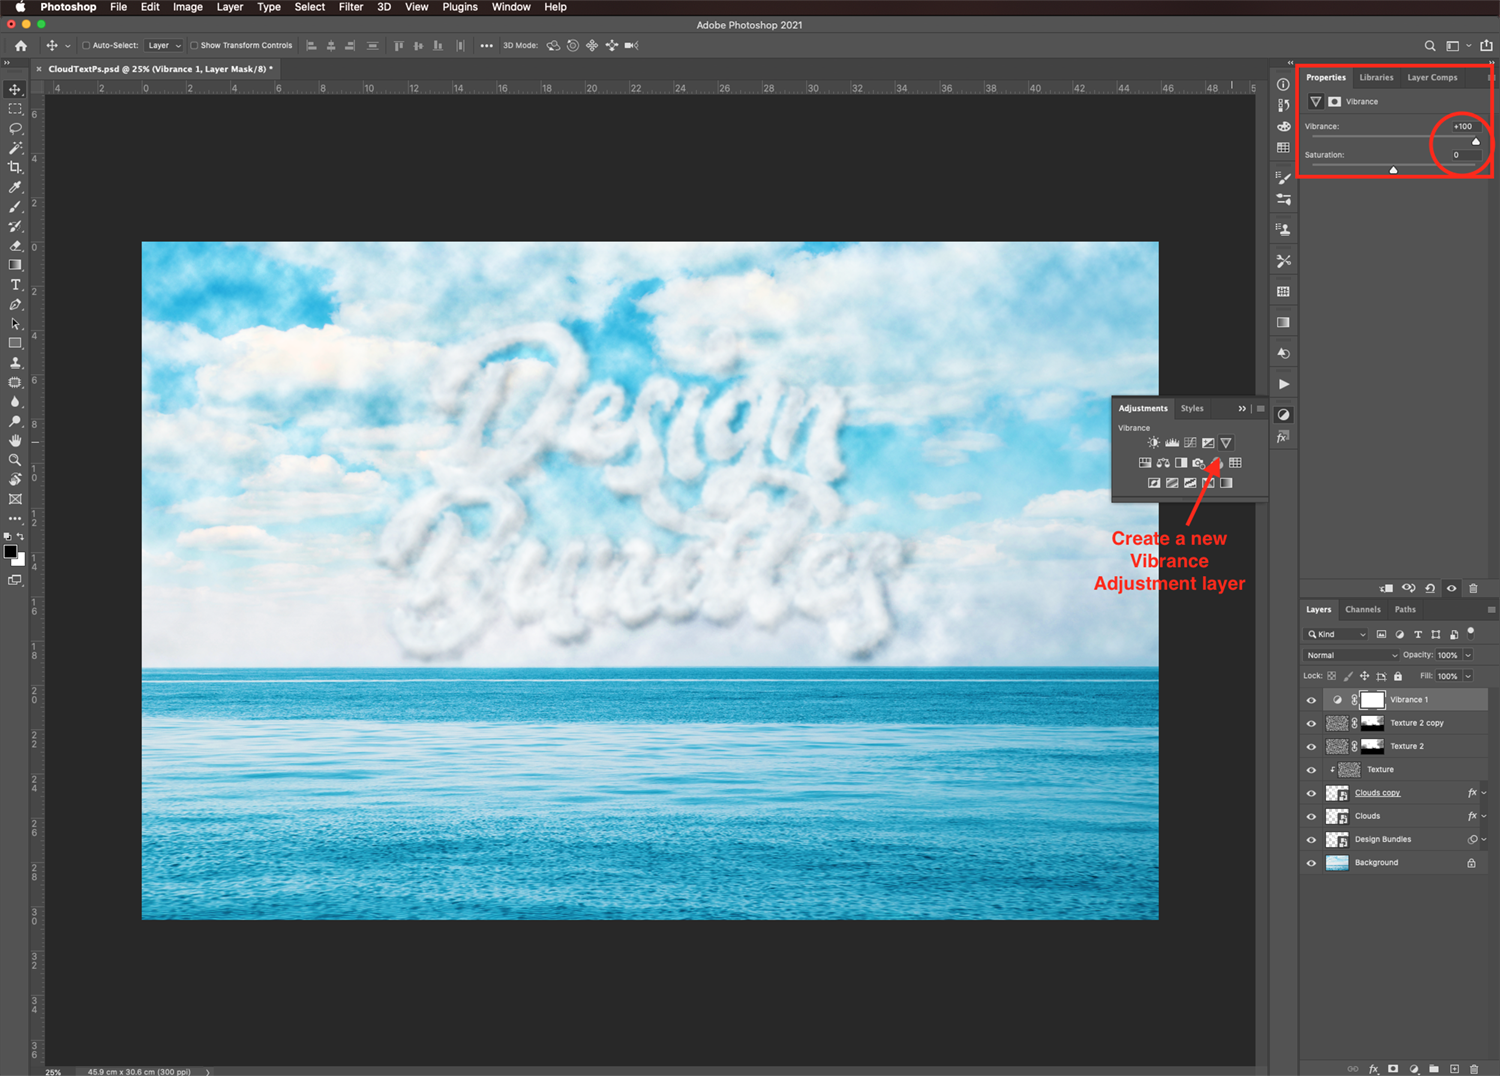
Add a Vibrance Adjustment Layer
To brighten up the colors, create a new Vibrance Adjustmentlayer on top of everything. Adjust the Vibrance value to +100 in the Properties panel.
Add a Levels Adjustment Layer
And to increase the contrast a bit, create a new Levels Adjustmentlayer on top of everything. Adjust the levers in the Properties panel to your liking.

Enhance Your Image with a High-Pass Filter
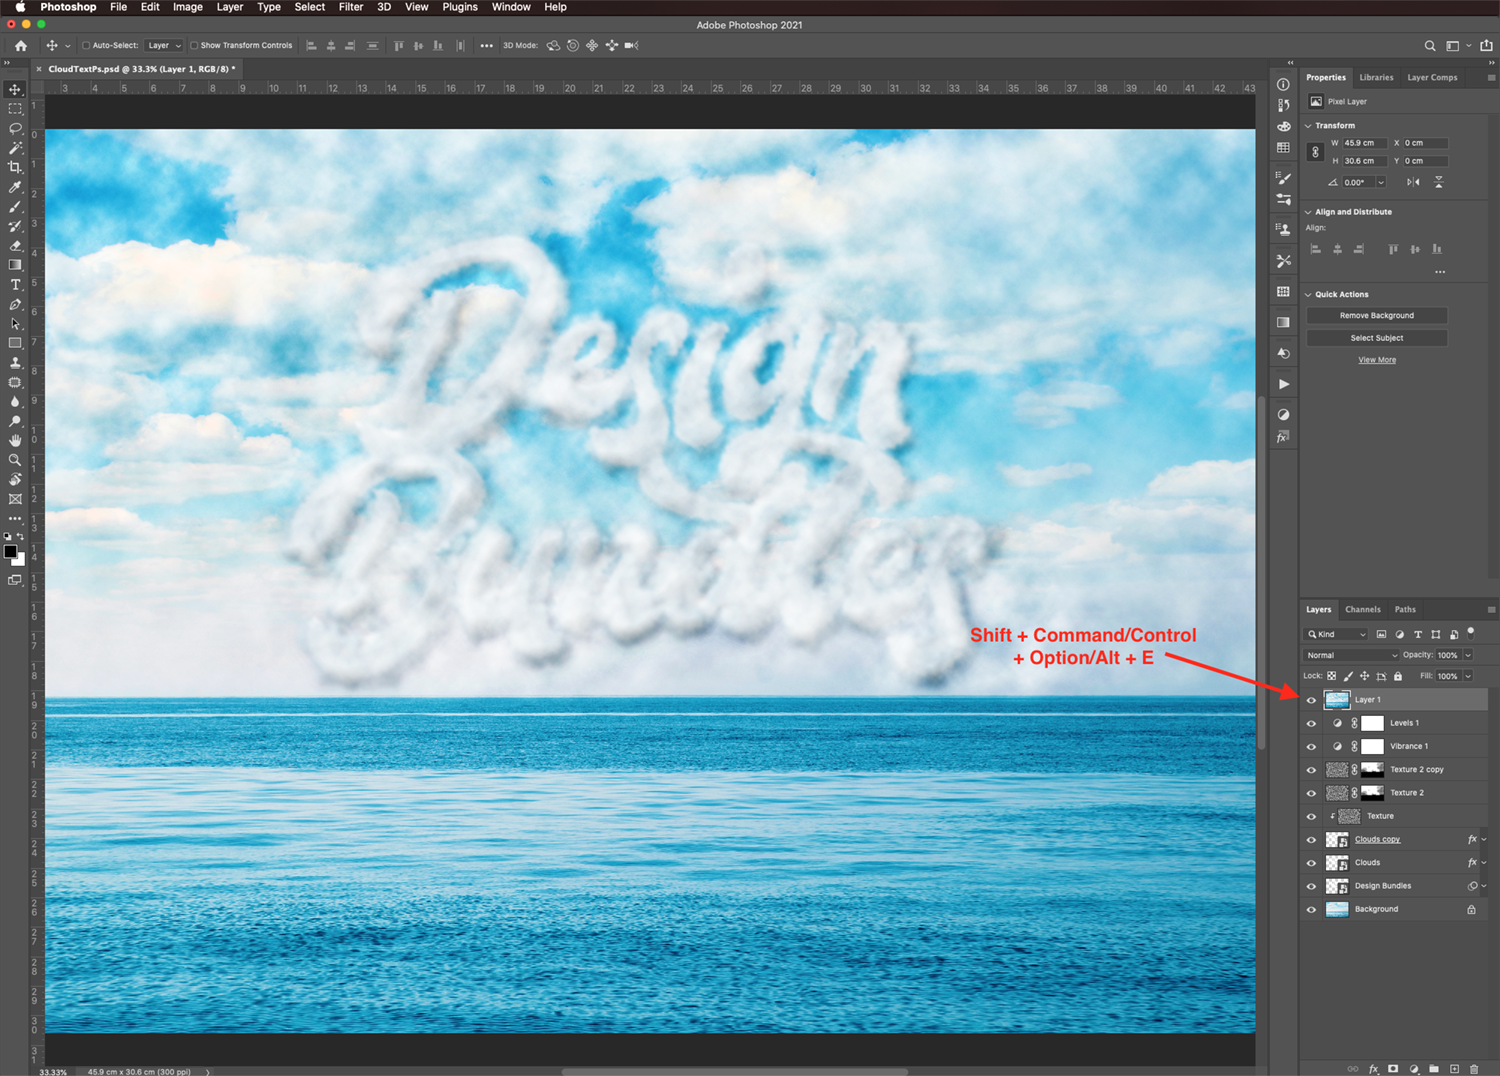
Finally, we are going to sharpen and enhance the details by applying a high-pass filter to a composite layer and blending it into our artwork.
First, create the composite layer by pressing Shift + Cmd/Ctrl + Opt/Alt + E.
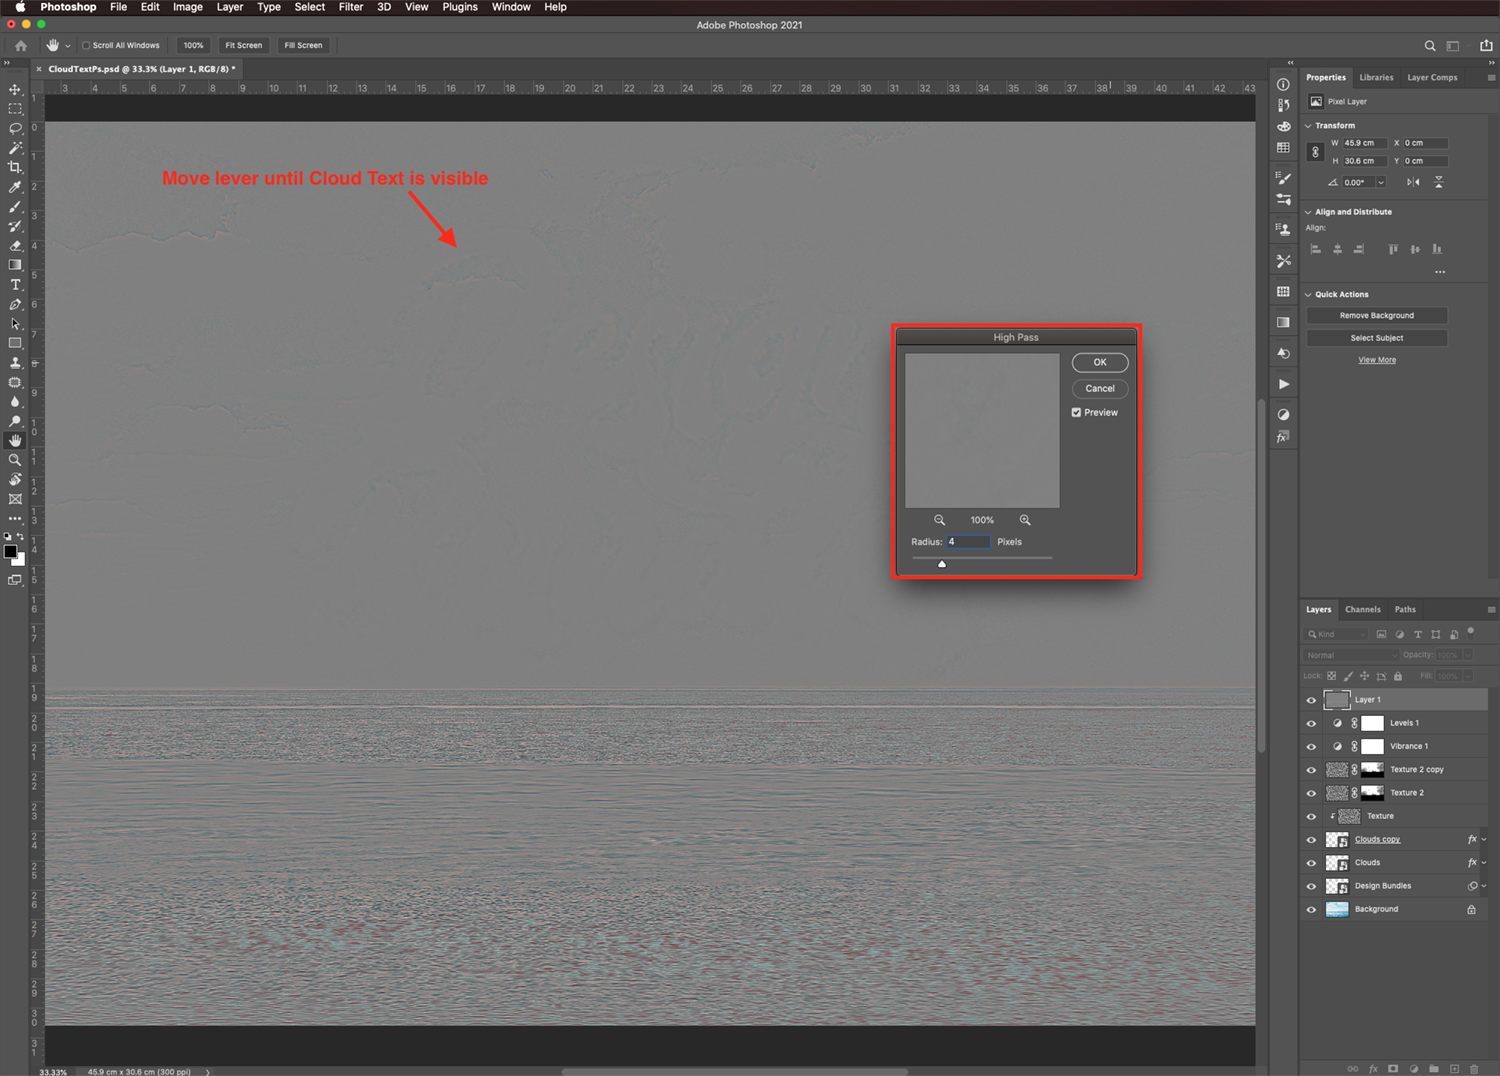
Next, go to Filter > Other > High Pass and set the Radius value to 2 pixels or until the cloud text is visible.
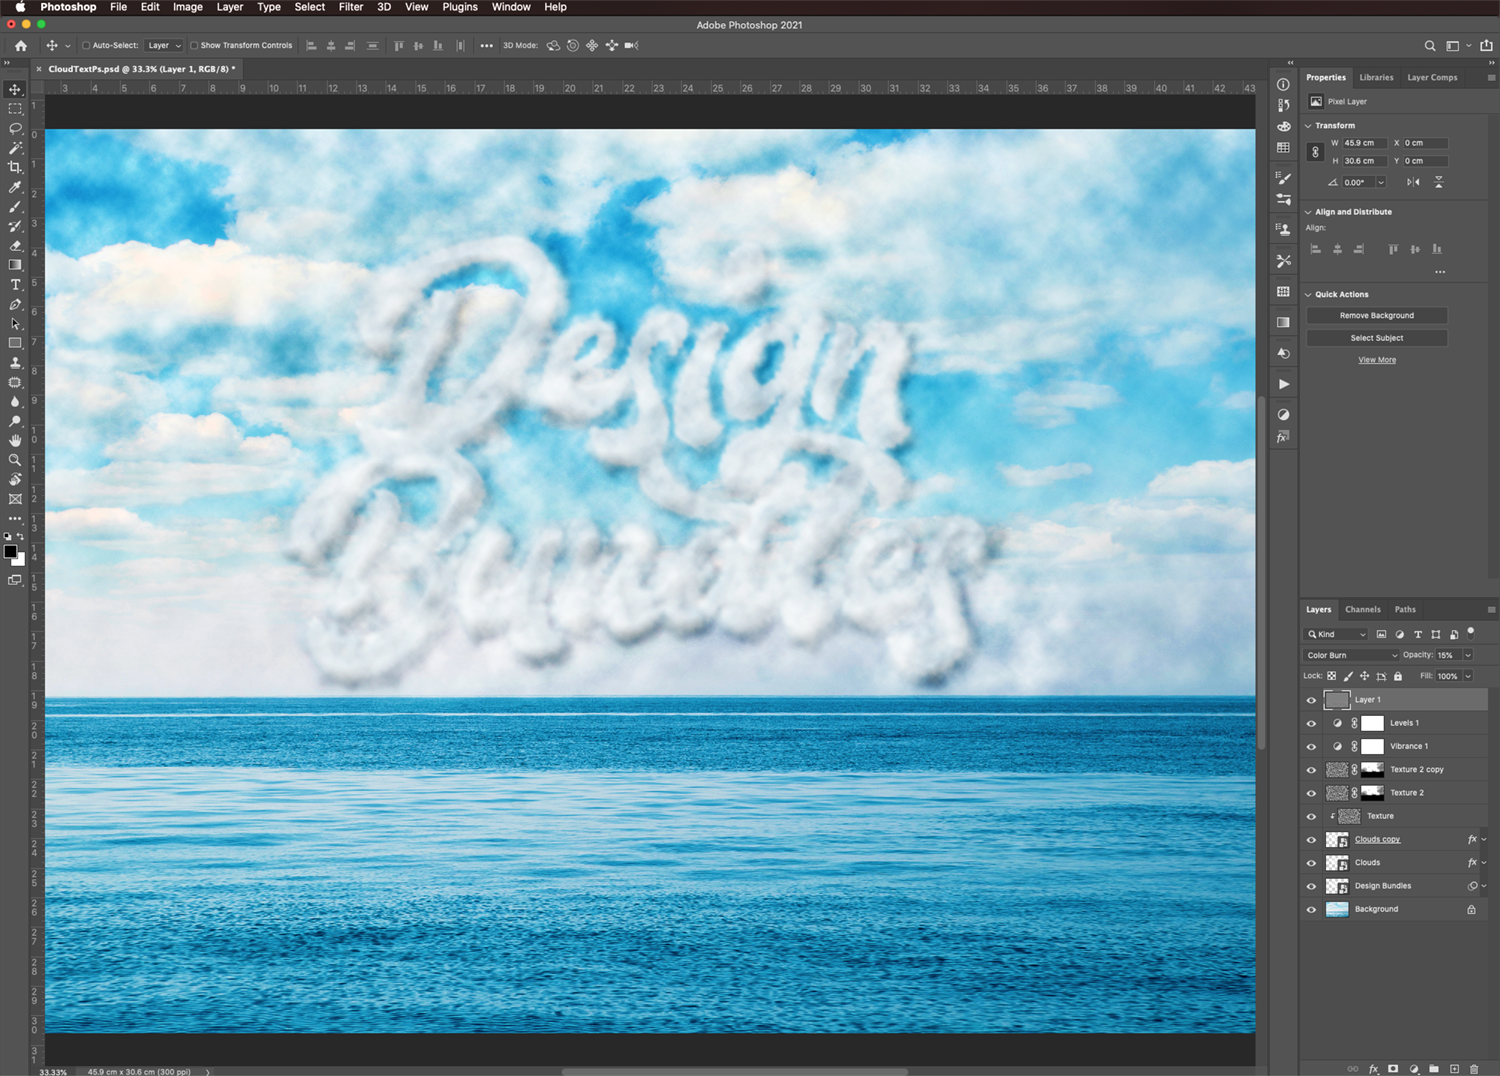
Finally, change the Blend Mode to Color Burn and reduce the Opacity to 15%.

Well, that’s it. We just created some really nice and realistic fluffy text in Photoshop with this nifty cloud effect.
Now, you can check the rest of our Photoshop tutorials, like how to make a peeling sticker effect, how to make 3D comic text, or how to create gold candle text.


