
How to Colorize Black and White Images in Photoshop
Vintage or black and white images are elegant and classy. But sometimes full-color images are more lively or better suited for your design. Photoshop provides the tools to add colors to your black-and-white pictures. You can even create your own customized color image. Follow our tutorial on how to colorize black and white images in Photoshop.
For this tutorial, we will use a smiling baby photo to work with. You may also want to use a reference color image for the skin and hair tones if working with a portrait.
First, we are going to add some color to the hair of the subject using a fill layer.
Take into account that the colors and blending modes will differ from image to image. If you chose another image, colors and modes may be different from what is used in this tutorial.
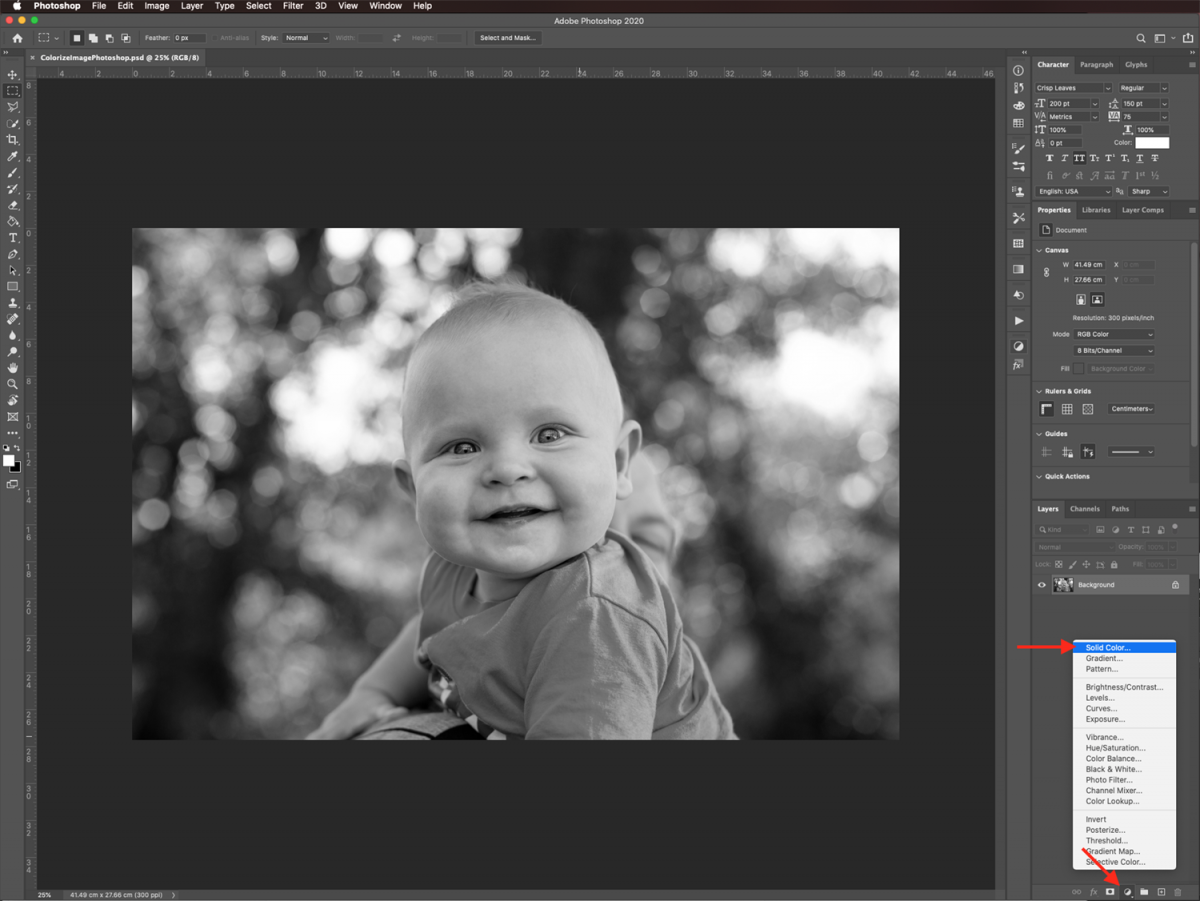
In Photoshop, open the image you have chosen. Click on the small black & white icon at the bottom of the Layers panel to create a new Solid Color fill layer.
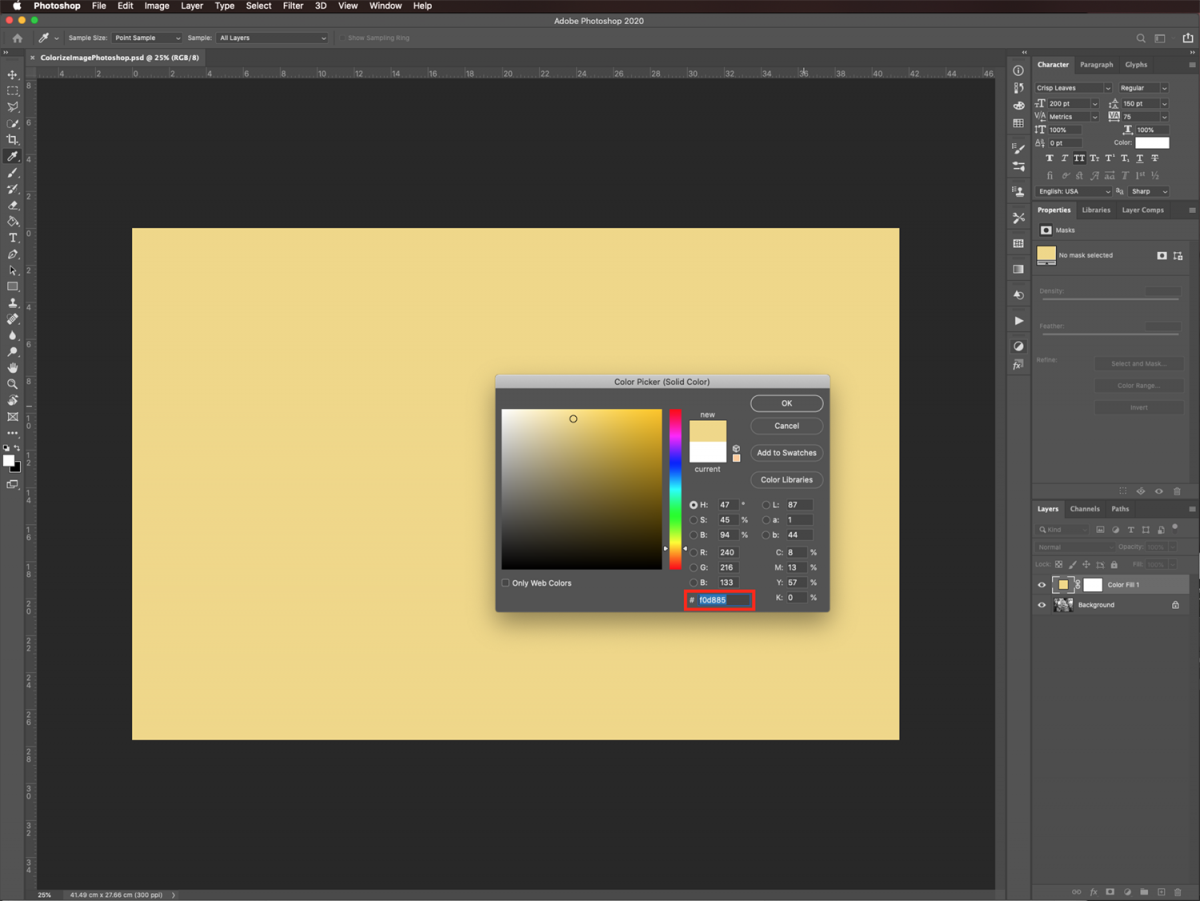
We used a medium yellow (#f0d885) as the fill color.
Next, change the Blending Mode of the layer to Soft Light. Then invert the Mask (Command/Control + I).
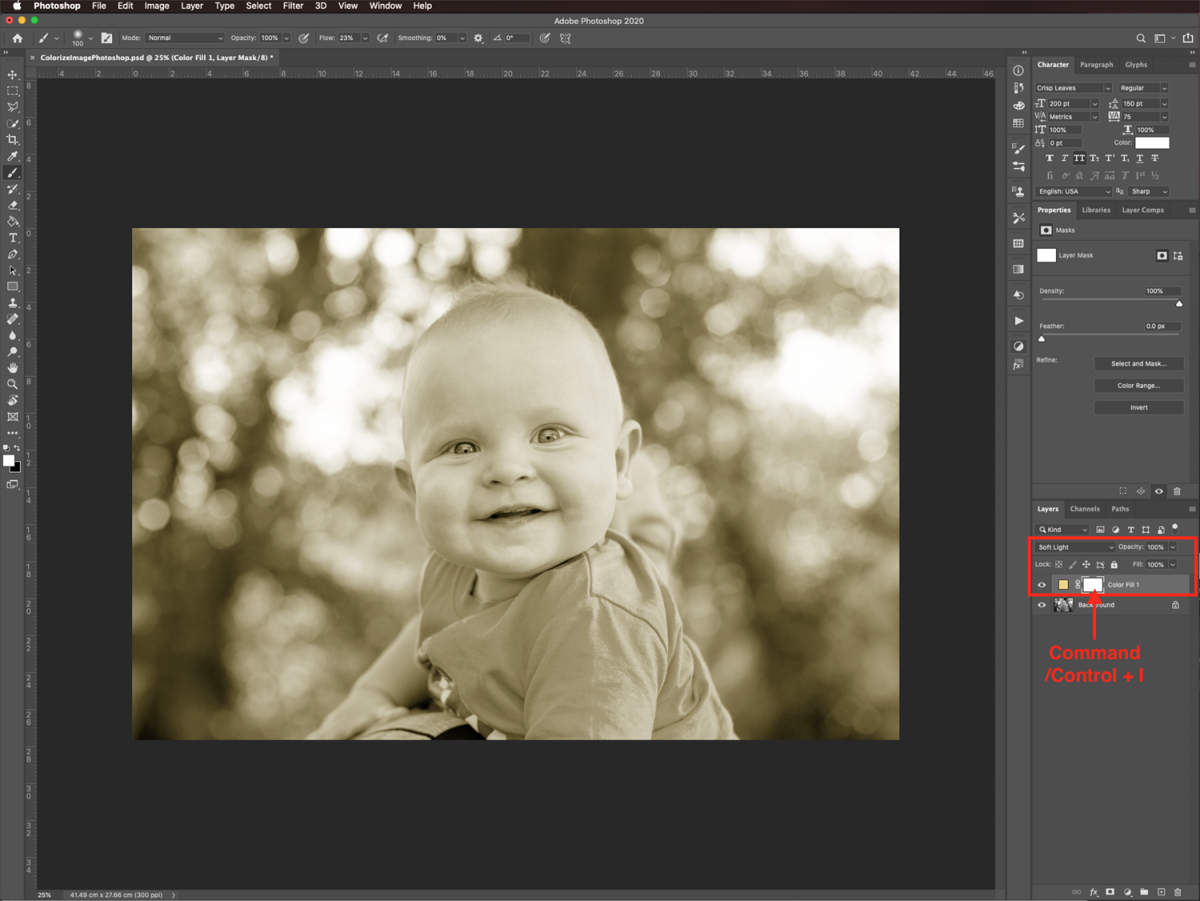
The fill color becomes black while the color on top of the image will disappear.

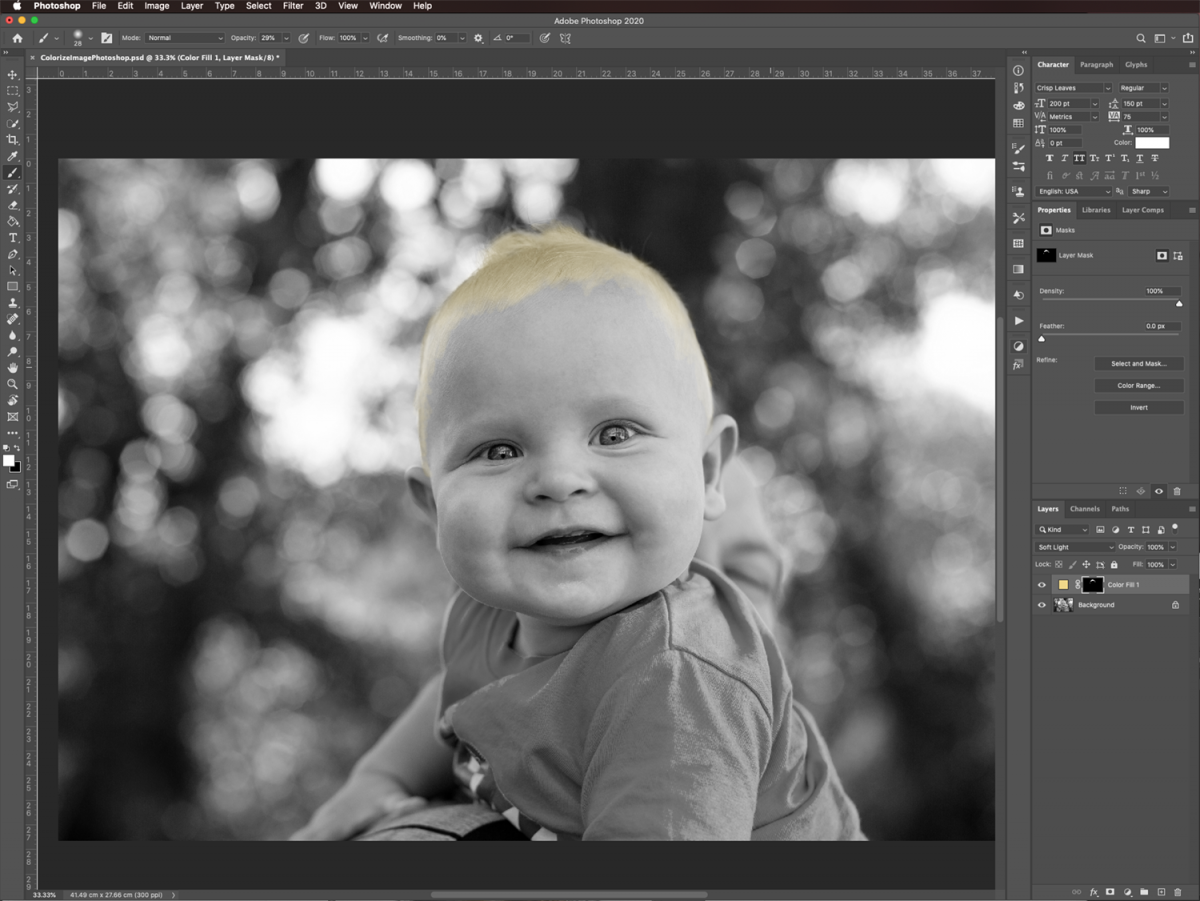
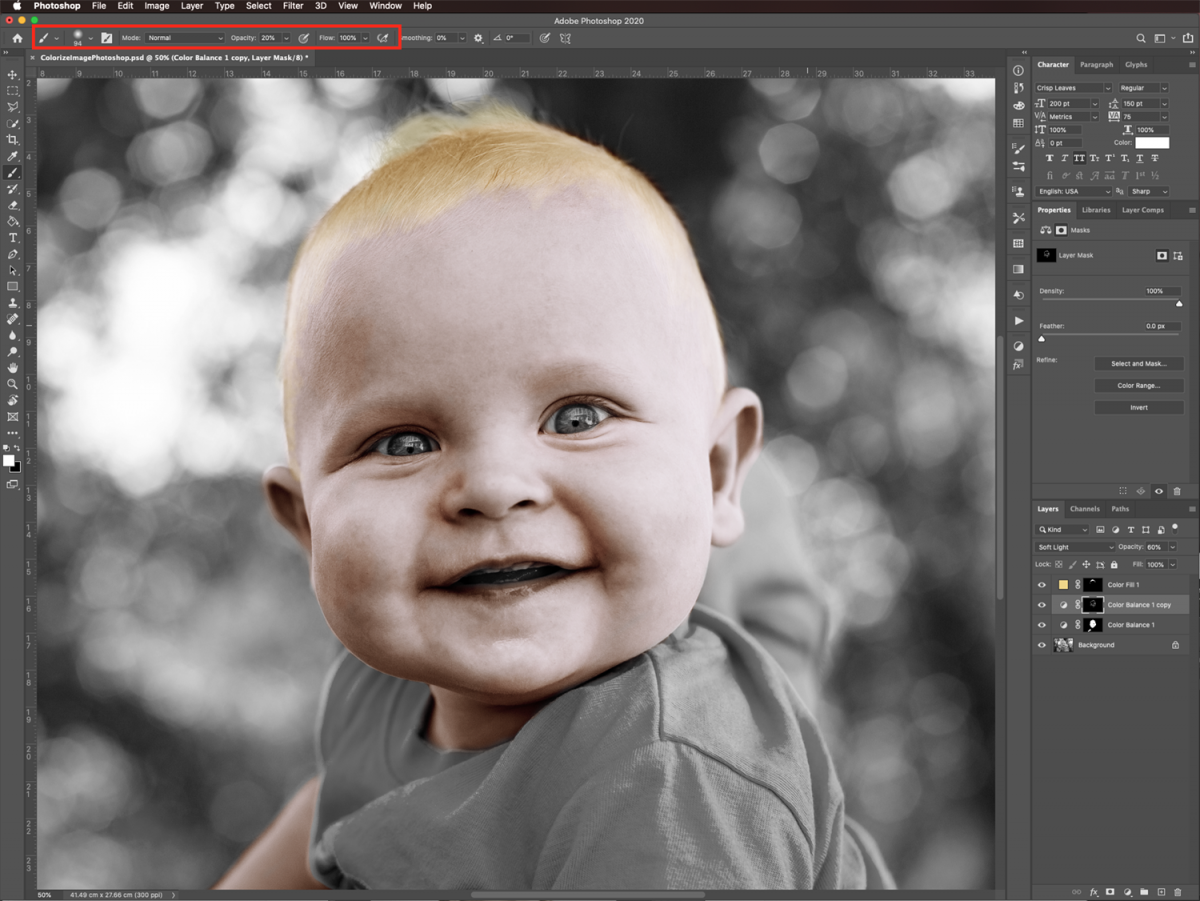
Now, to bring out the hair, select the Brush tool (B). Choose white as the Foreground color, and use a medium brush soft. We used 100 px approx and 0% Hardness.
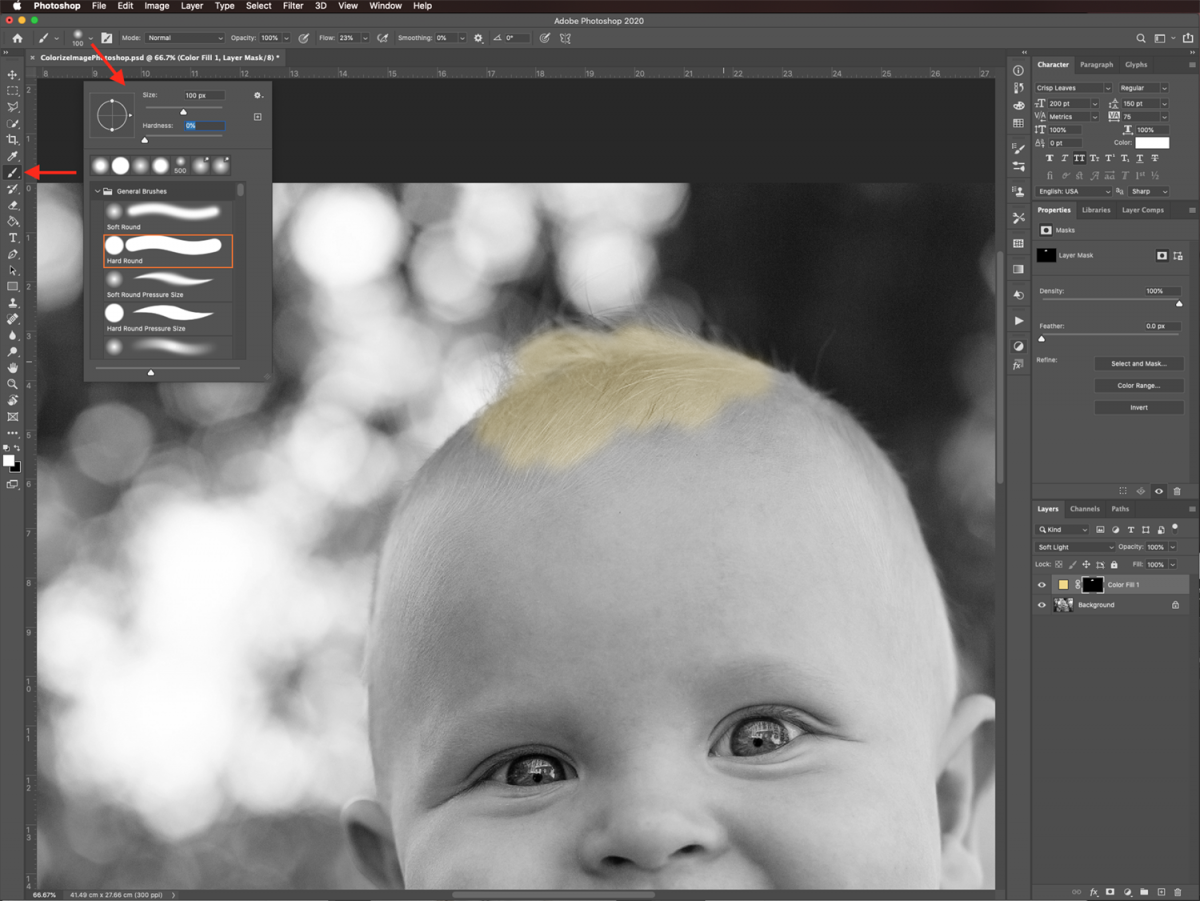
Start painting on top of the hair to add color to it. If you want to correct something, just change the foreground color to black and erase the portions you don’t like. Reduce the brush size and its opacity if needed.
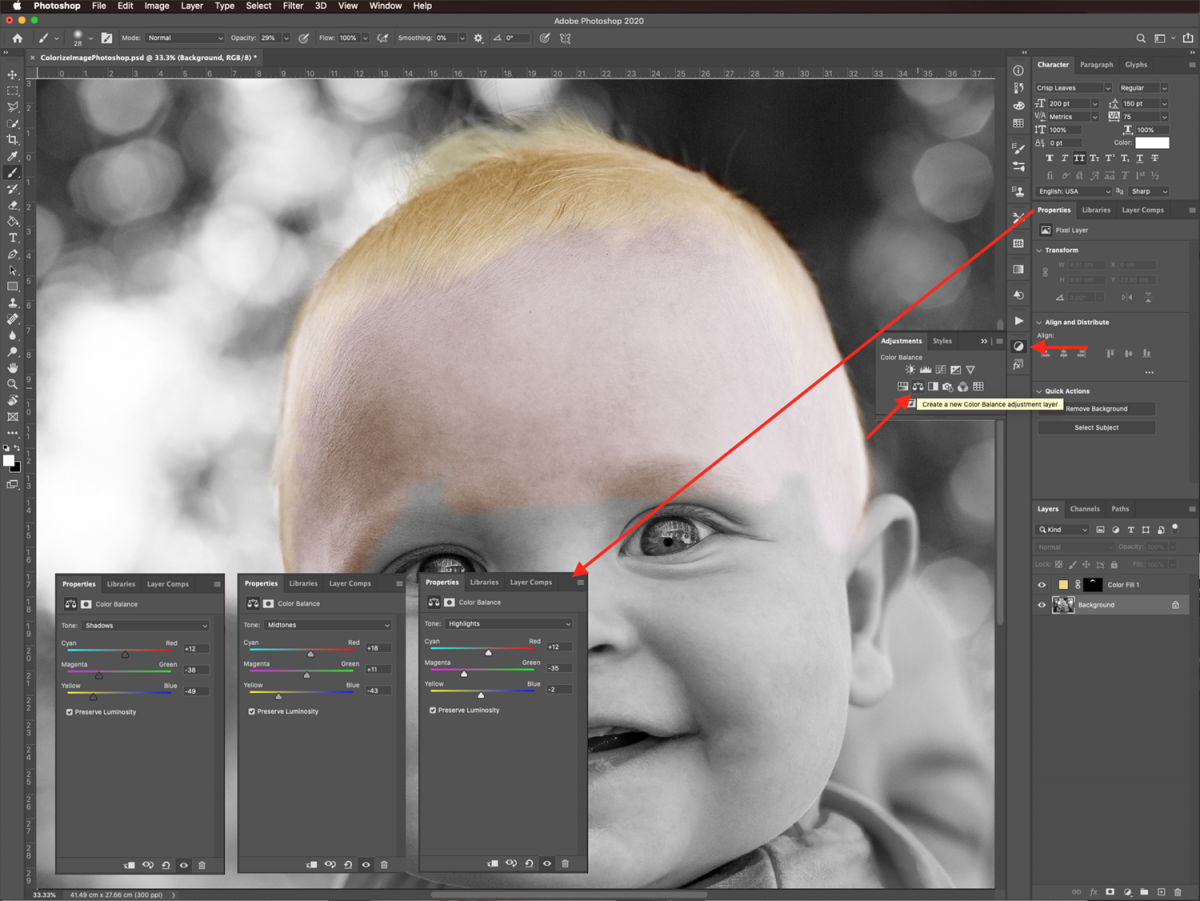
Create a new Color Balance adjustment layer on top of your subject layer. Play around with the values for all the Tones options such as Midtones, Highlights, and Shadows. Carry on until you achieve the proper skin tone.
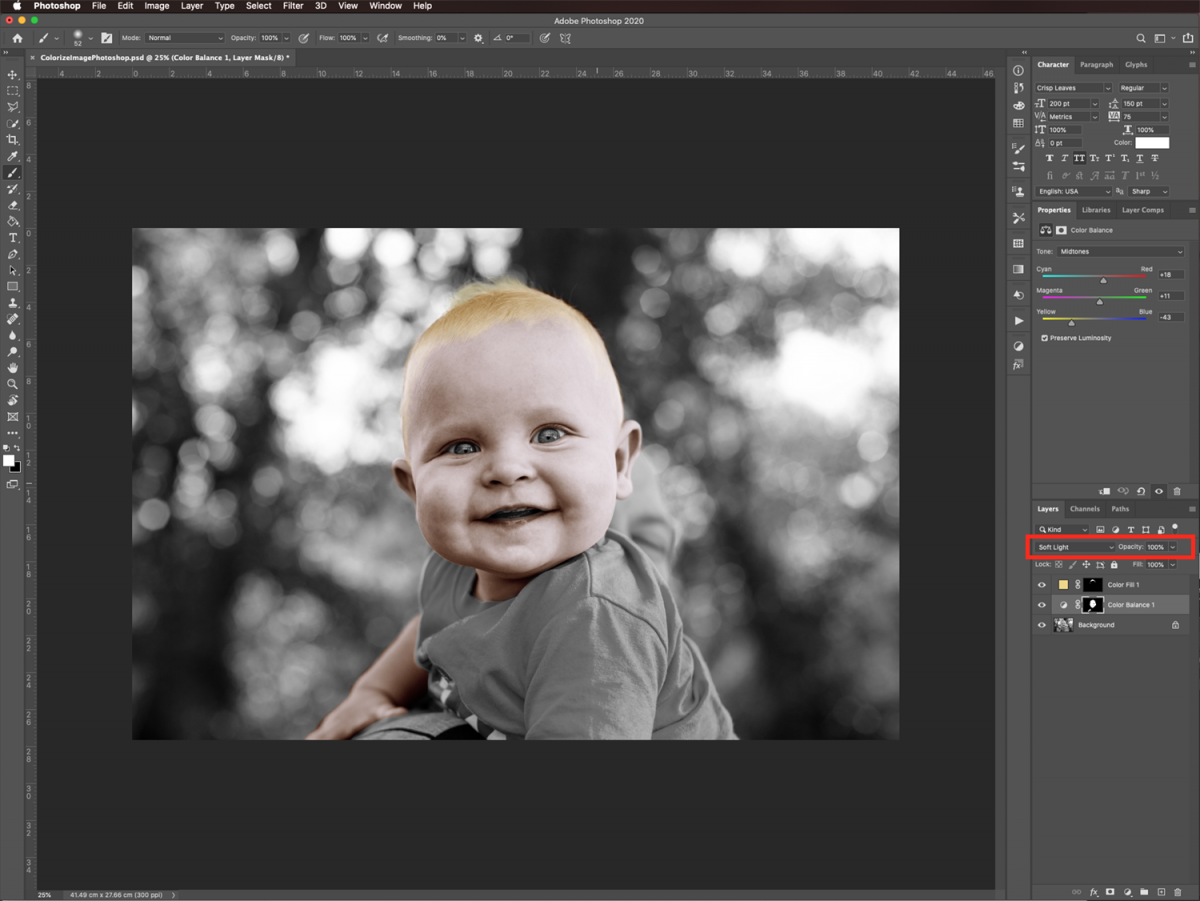
Change the Blending Mode of the layer to Soft Light. Invert the Mask for this layer (Command/Control + I) and use a soft brush to paint the parts where the skin is. You can always adjust the values of your tones in the Properties panel to fix the color if needed.
Remember, to make a correction, change the foreground color to black and erase the portions that need it.
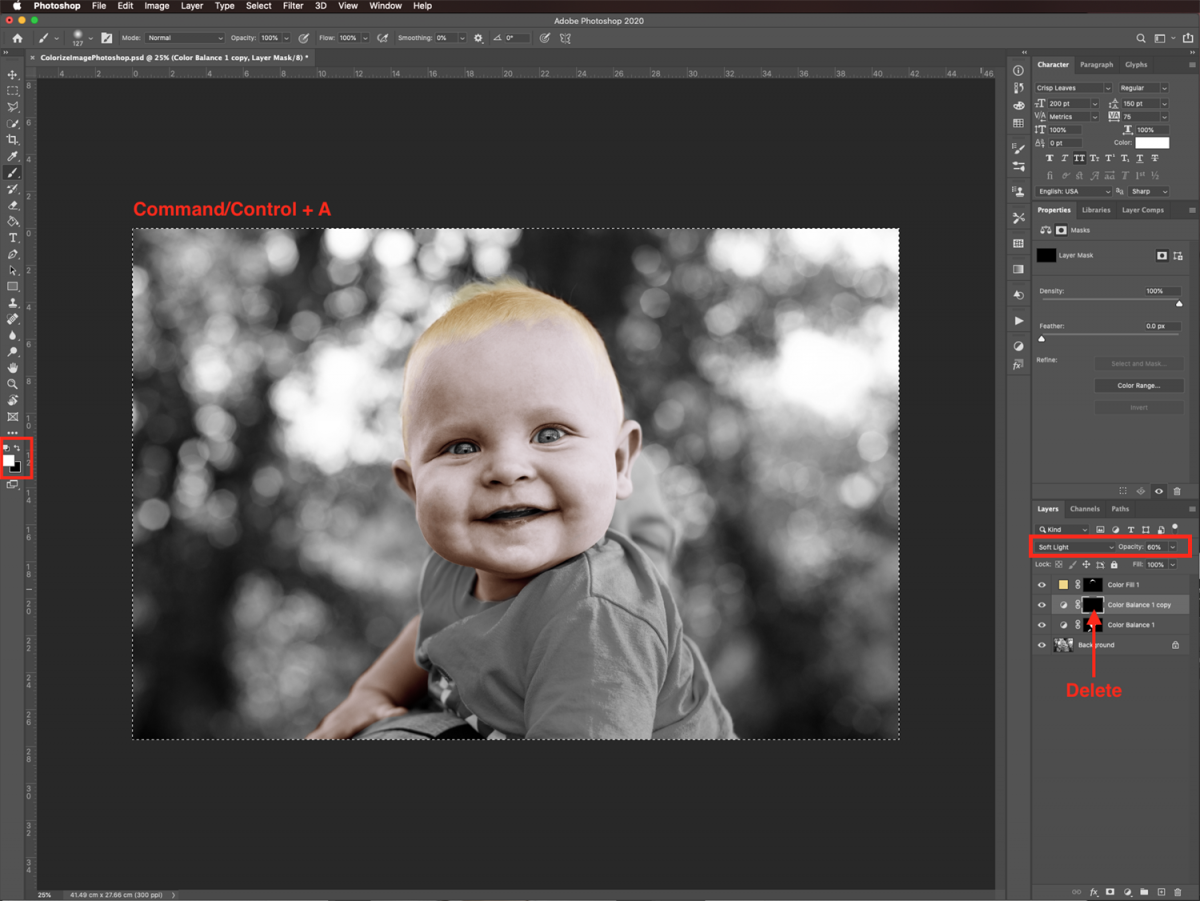
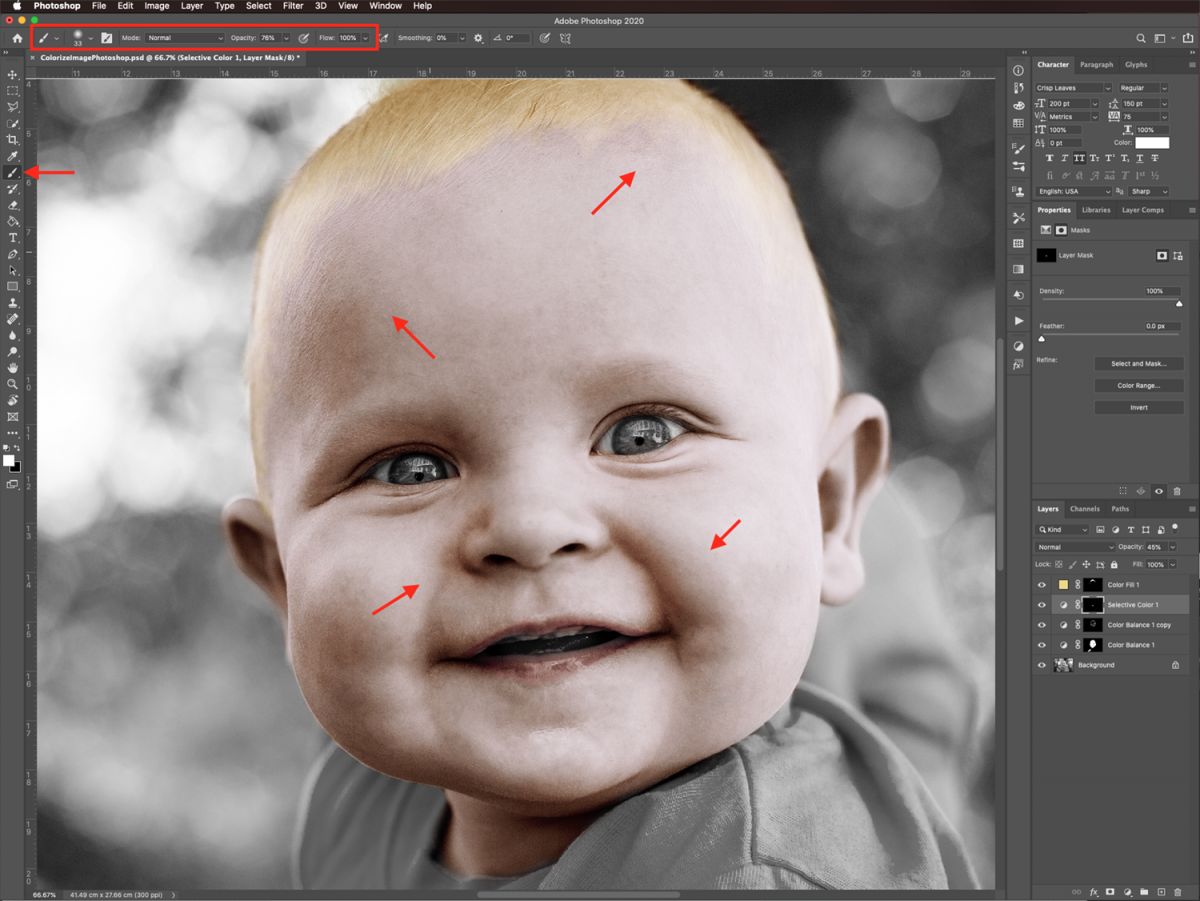
To add some details to the skin, duplicate the layer (Command/Control + J). Then lower the Opacity to about 60%. Fill the whole mask with black again by selecting it (Command/Control + A) and then hitting the Delete key.
Then, use a large and soft brush with an opacity of about 20%. Paint some details under the eyes, around the nostrils, etc. They should be placed where you would normally find color imperfections in a person’s skin.
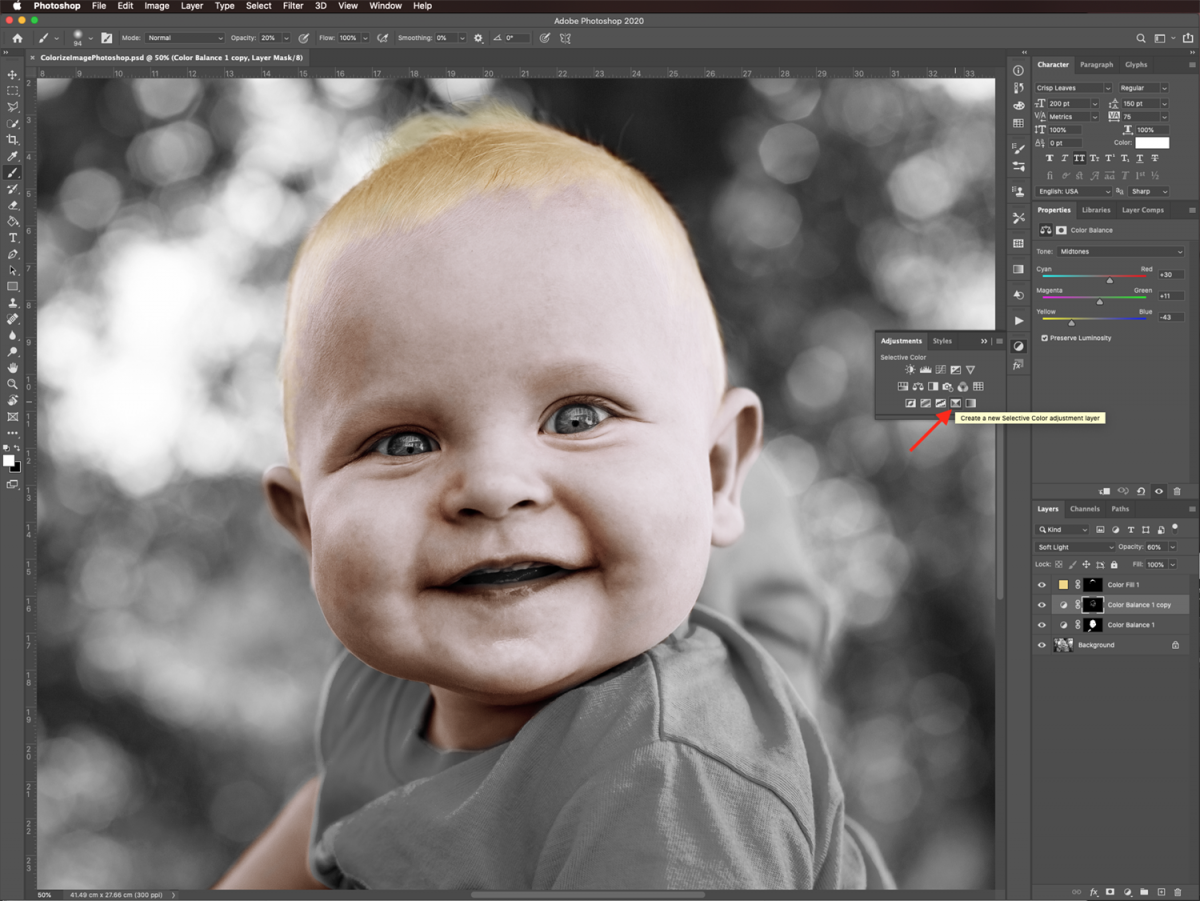
To color the lips, let’s create a new Selective Color adjustment layer on top of the skin layers.
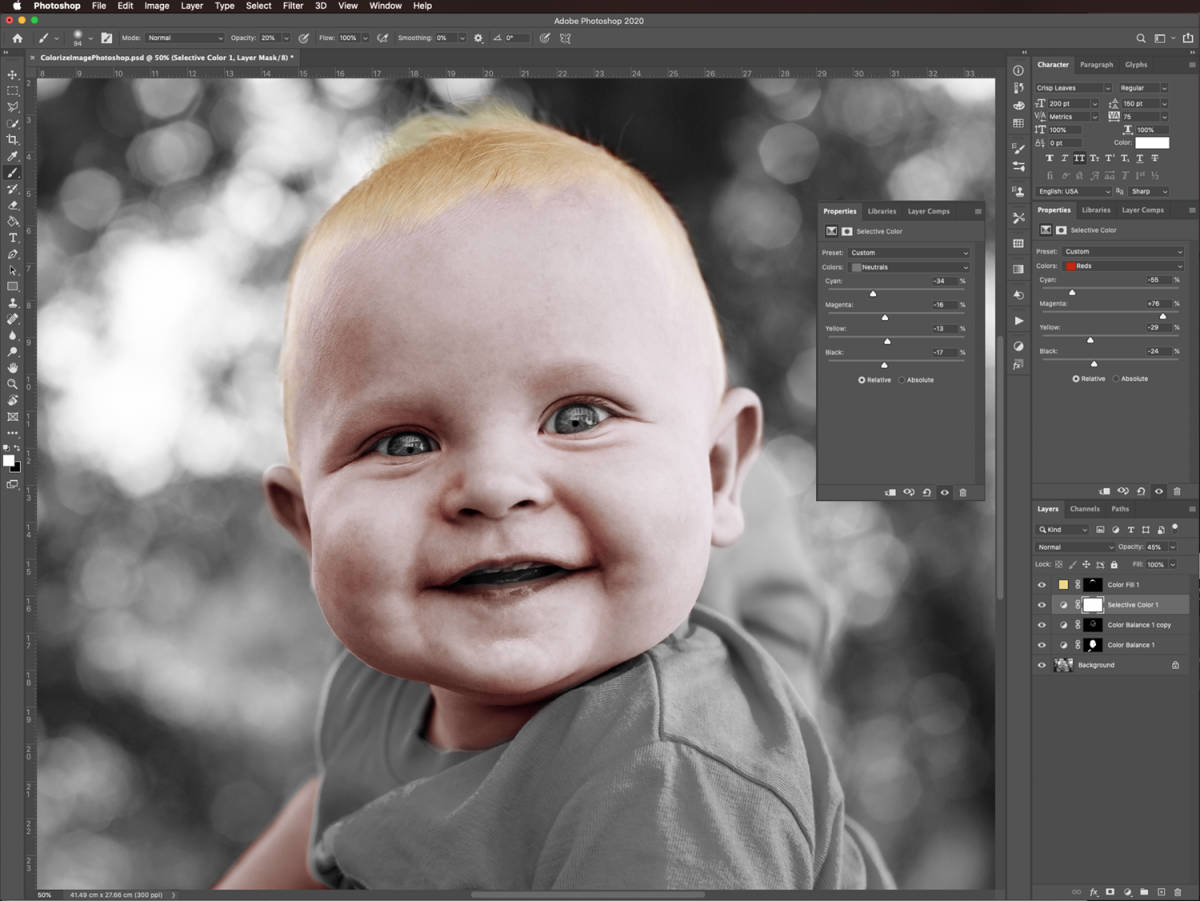
Lower the Opacity of the layer to around 45%. Then adjust the Neutrals and Reds to create a pink shade for the lips.
Invert the Mask for the layer (Command/Control + I). Next, paint on top of the lips with a soft brush with a low Opacity (about 75%).
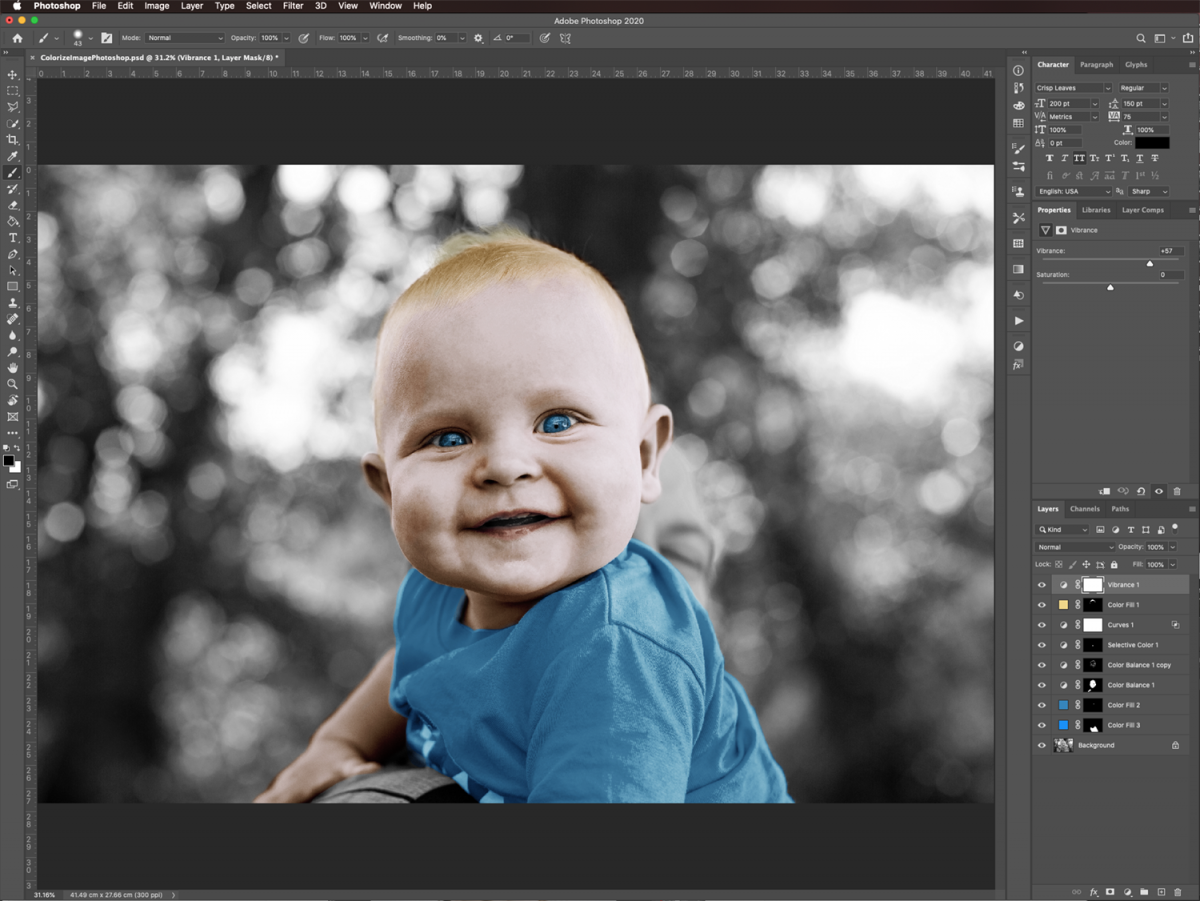
To brighten up your image, create a new Vibrance adjustment layer on top of everything.
Then change the Vibrance value to +57.
Create a new Curves adjustment layer in between the Hair and Skin layers.
Use the Linear Contrast (RGB) preset in the Properties panel.
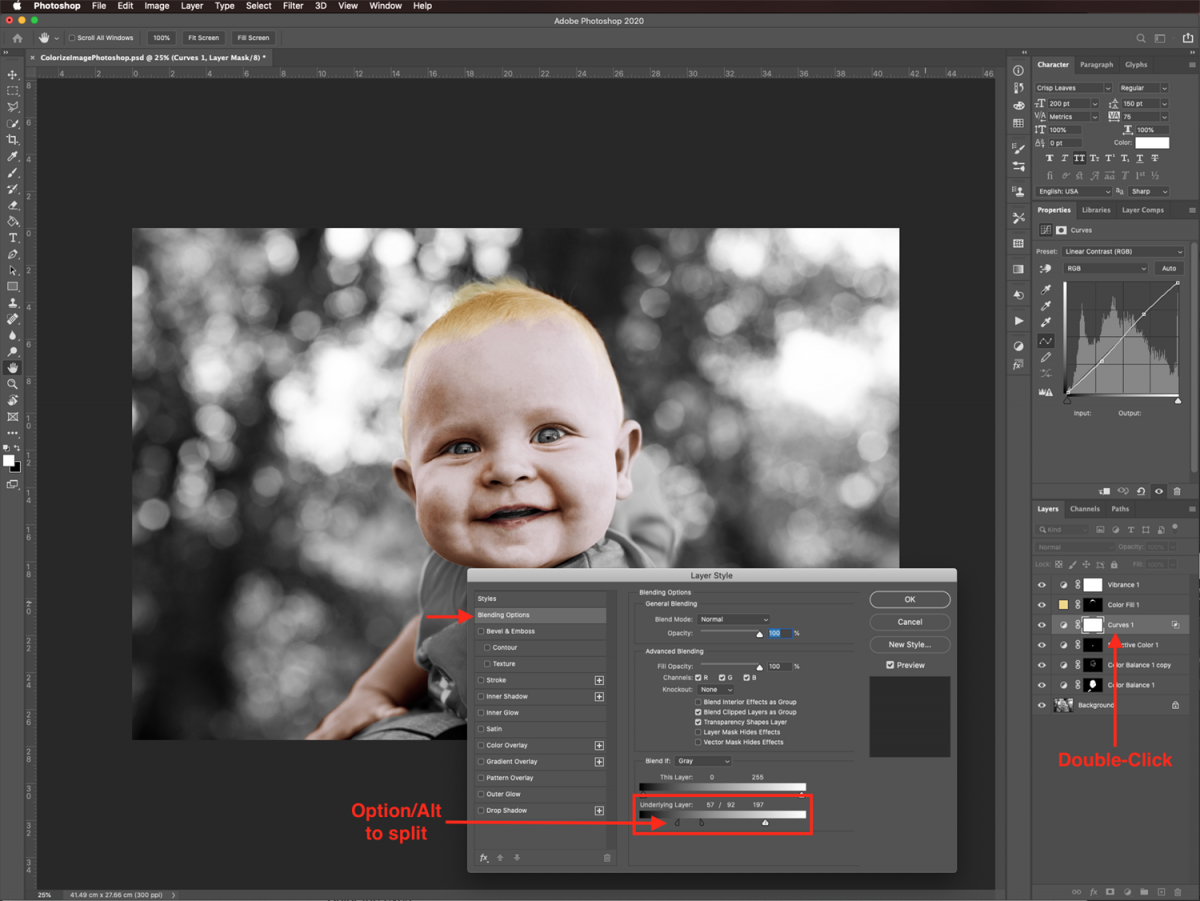
Double-click on top of the layer’s thumbnail to open the Layer Styles panel. Go to the Blending Options tab . Now split the blacks lever of the Underlying Layer by holding the Alt/Option key.
Then, move them to the right, to the portion where the dark grey ends. Splitting the lever will make the transition smoother.
Next, move the whites lever to the left without splitting it.
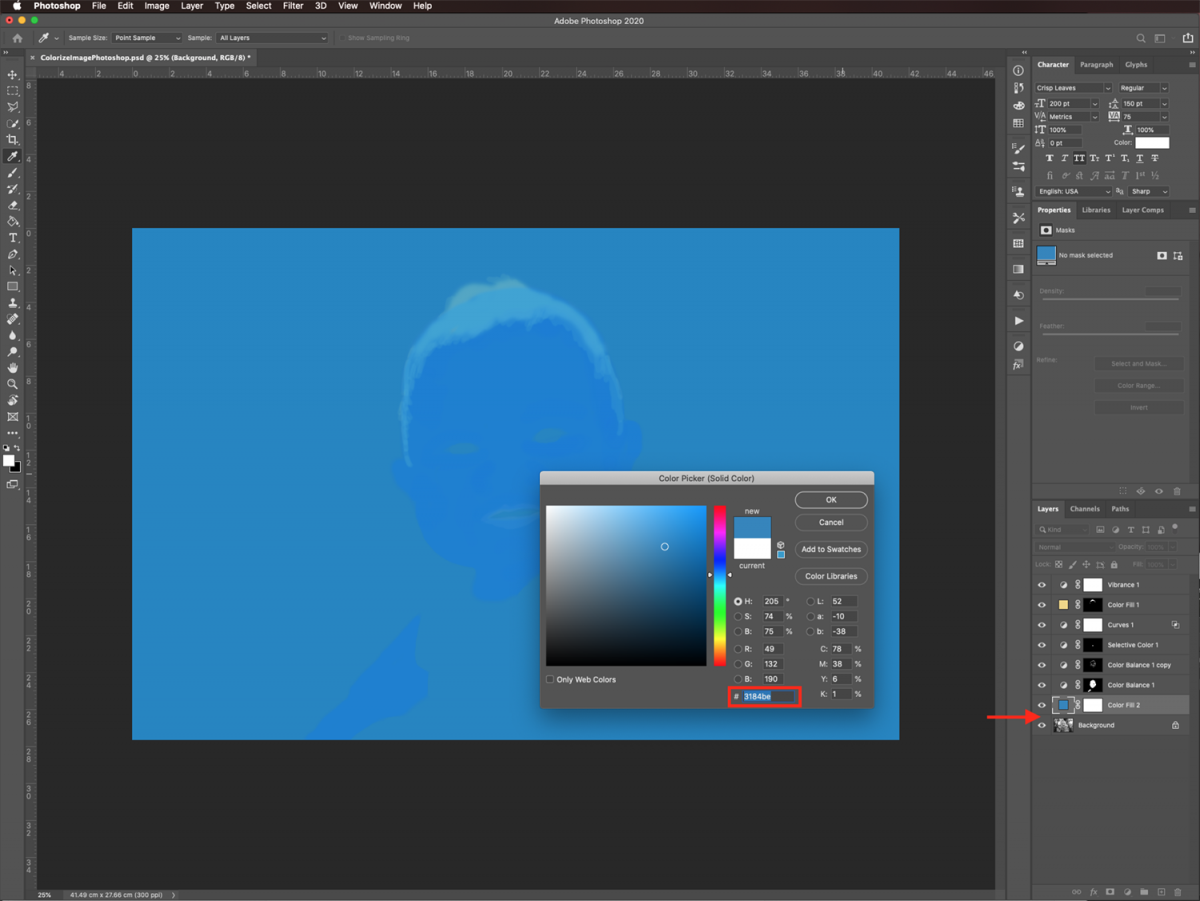
Create a new Color Fill layer on top of your subject, which will be the background layer. Use a color that will be appropriate for the eyes as a fill. We used a medium blue #3184be.
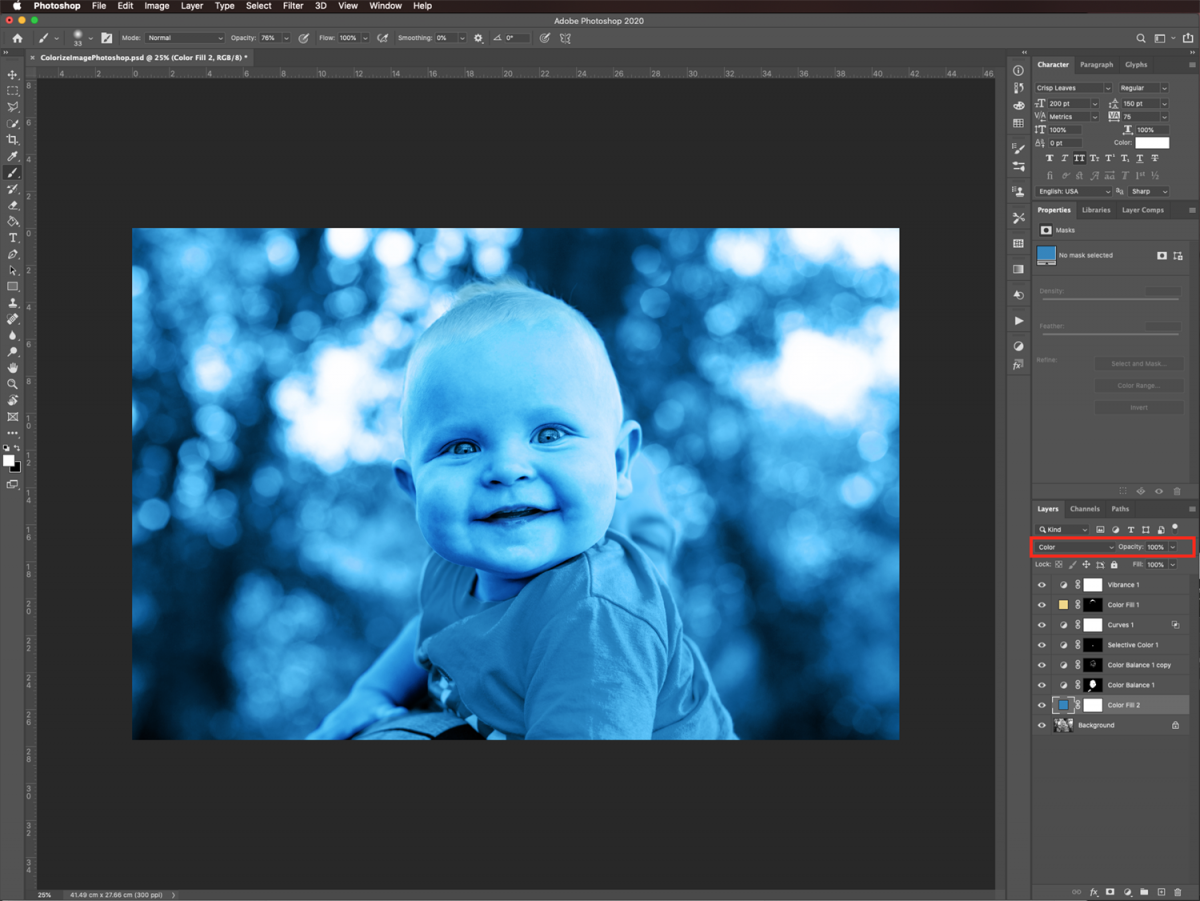
Change the Blending Mode of the layer to Color and invert the layer Mask (Command/Control + I).
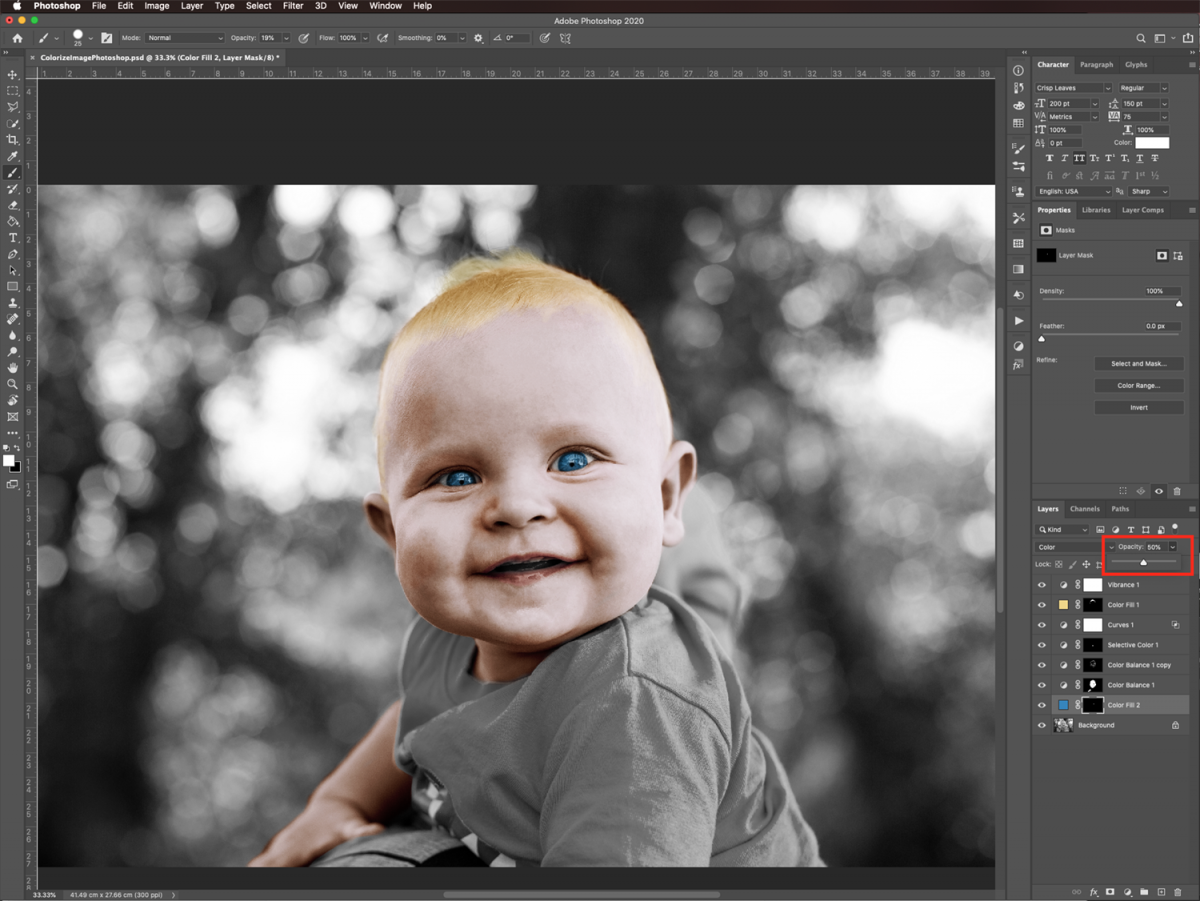
Use a soft brush with a low Opacity to paint the eyes. Trying to avoid the white highlights inside of them.

You may need to lower the layer’s Opacity to tone down the eye color. We lowered it to 50%.
Finally, we can add some color to the clothes. Create another Color Fill layer on top of your subject (background layer). Fill it with a shade that will look good on your subject’s clothes. We used a bright blue #038ef9. Then, change the Blending Mode of the layer to Soft Light and lower the Opacity to 80%.
Next, also invert the layer mask for this layer (Command/Control + I). Use a soft brush to paint on the clothes. If you want to correct something, change the foreground color to black and erase where needed.
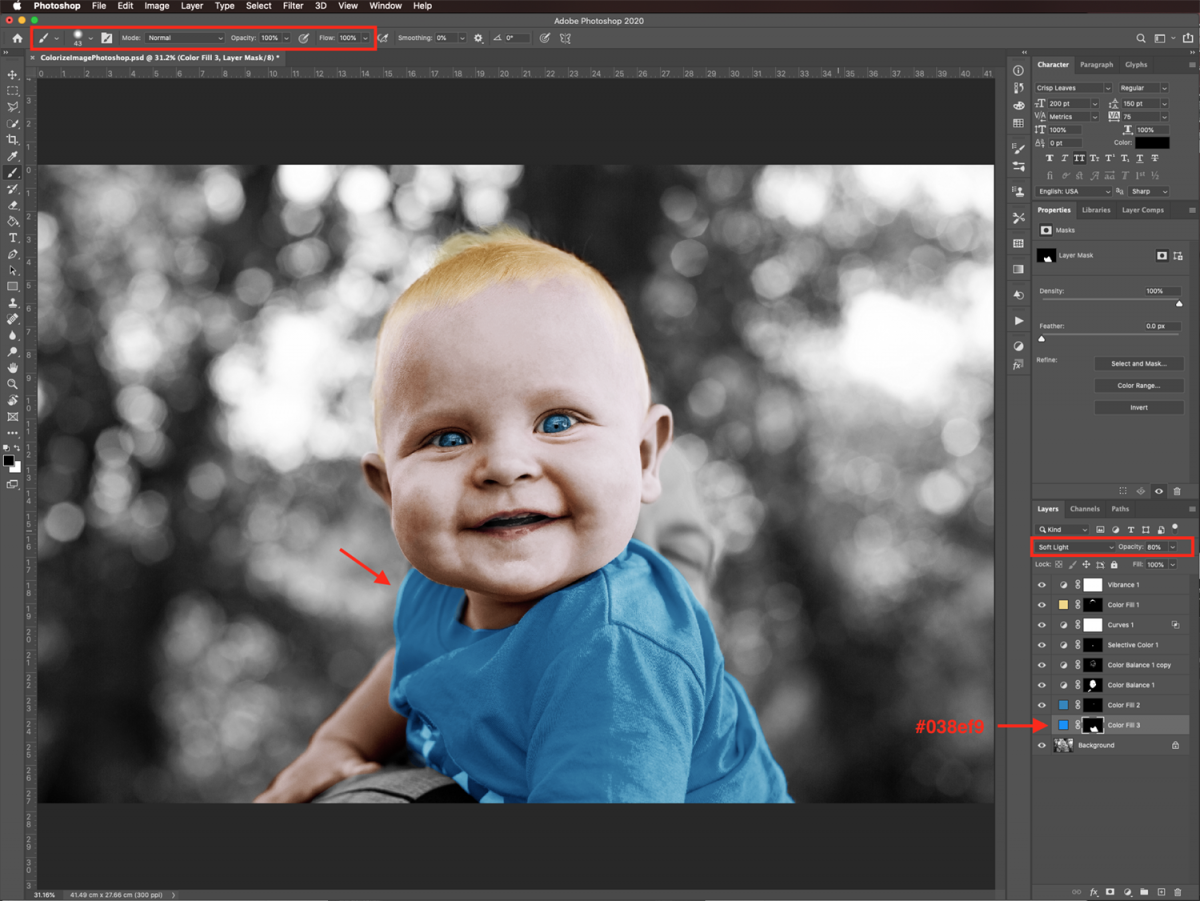
If the clothing color is too bright, you can reduce the layer’s Opacity a bit more. We reduced it down to 65%.

It’s time to give our image a final look by adjusting a few settings. We adjusted some of the colors, blending modes and layer’s opacity to make the image more realistic.
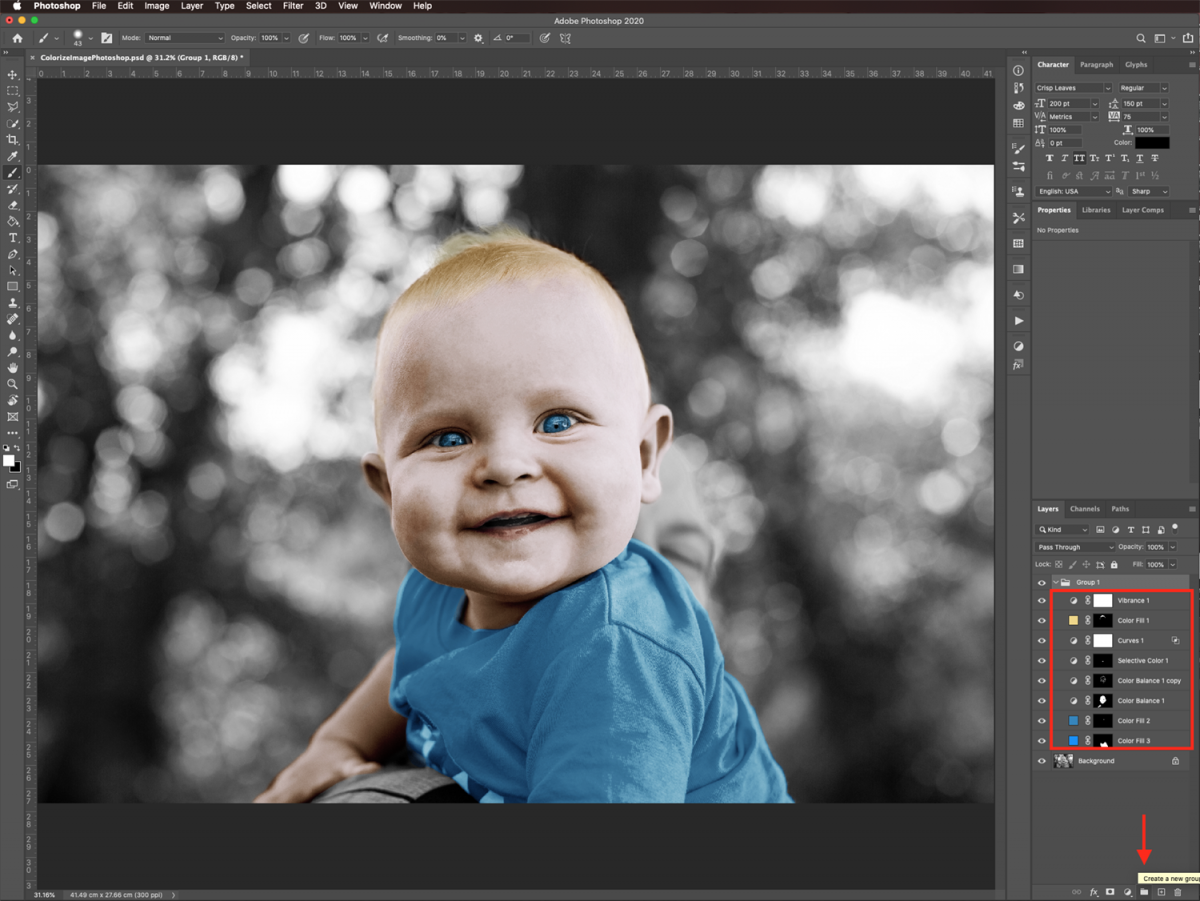
We want to group our layers so they will be easier to handle. Select all your layers with the exception of the original one (Shift key). Make a Group by clicking on the small folder icon at the bottom of the Layers panel.
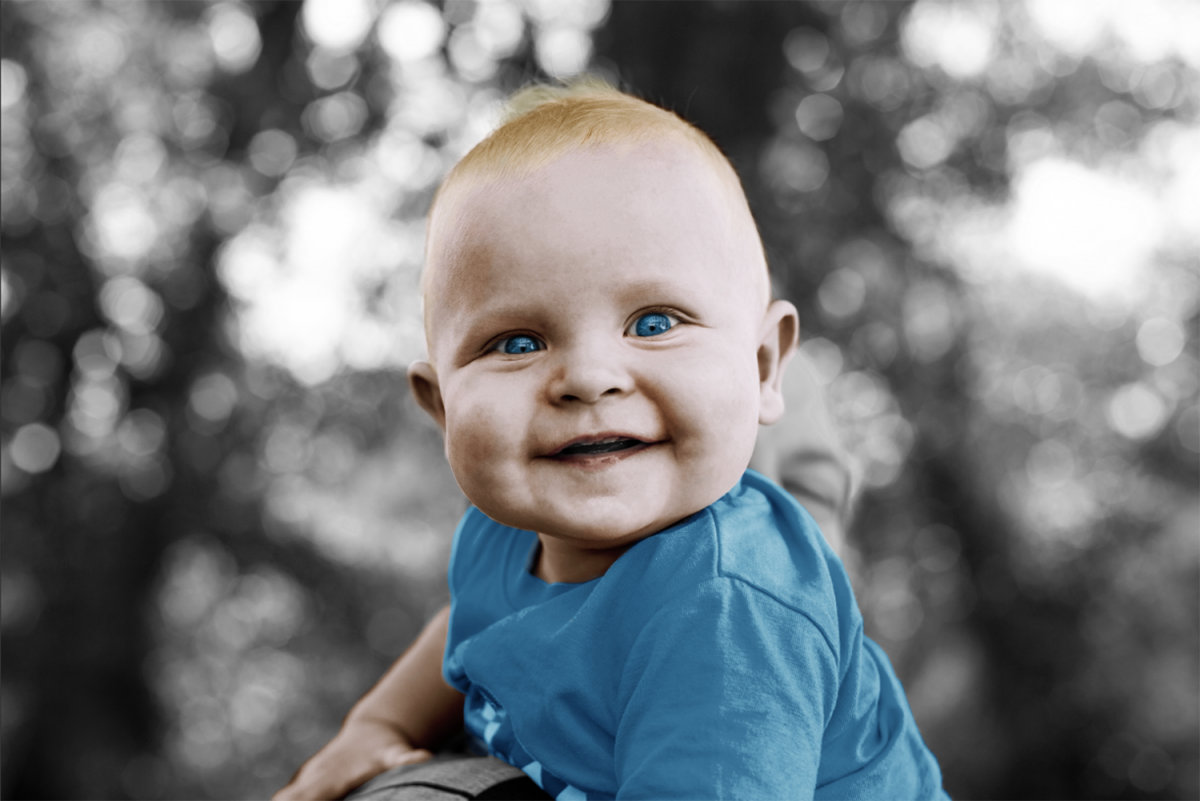
The image below is the final result of the color retouching. The colors are nice and smooth while the overall look is fairly realistic.
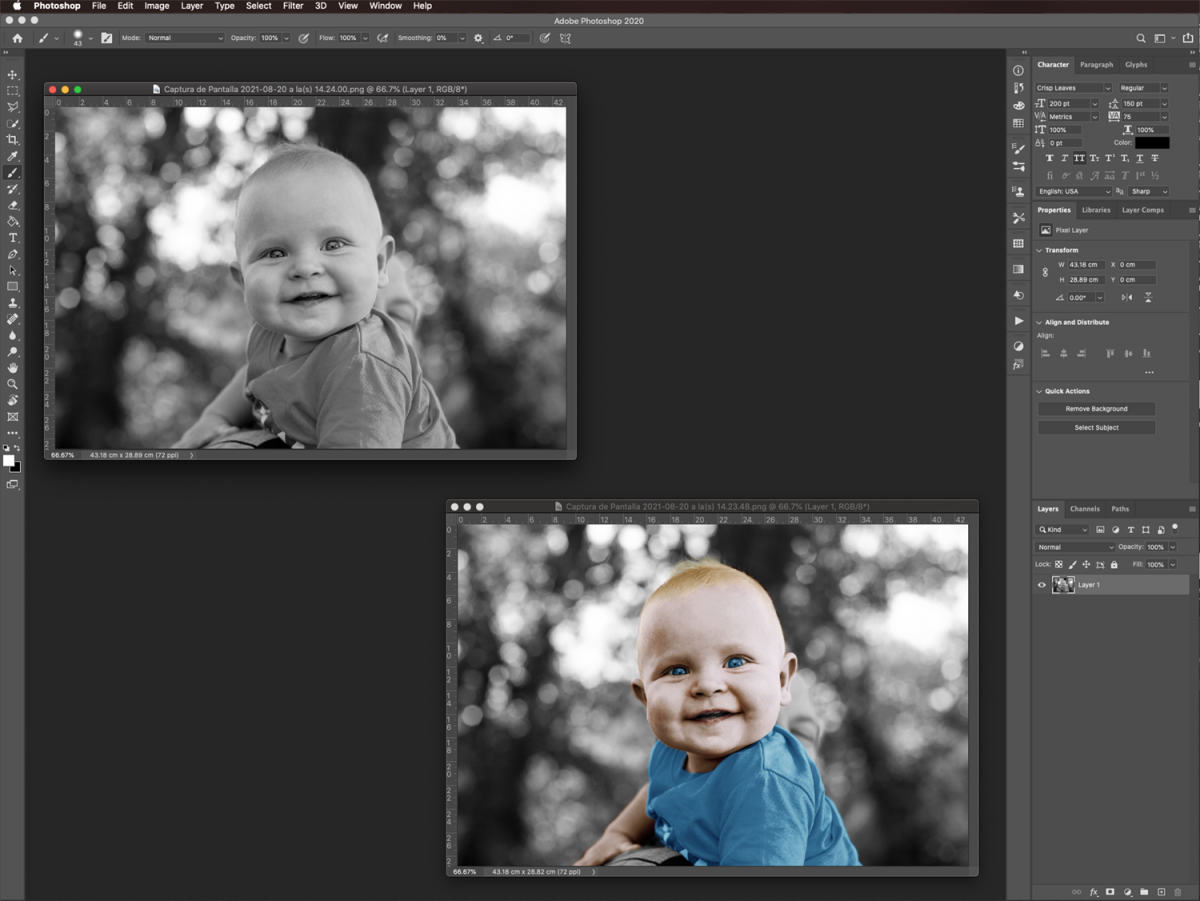
Here is a before and after look at our image for comparison.
Next up, learn how to replace the sky in photos, how to swap faces in photos, and how to create a dreamy glow in Adobe Photoshop.
For this tutorial, we will use a smiling baby photo to work with. You may also want to use a reference color image for the skin and hair tones if working with a portrait.
- Color the hair
- Add color to the skin
- Color the lips
- Adjust the overall colors of your image
- Color the clothes
- Final touches
Color the hair
Step 1 - Create a New Solid Color layer
First, we are going to add some color to the hair of the subject using a fill layer.
Take into account that the colors and blending modes will differ from image to image. If you chose another image, colors and modes may be different from what is used in this tutorial.
In Photoshop, open the image you have chosen. Click on the small black & white icon at the bottom of the Layers panel to create a new Solid Color fill layer.
We used a medium yellow (#f0d885) as the fill color.
Next, change the Blending Mode of the layer to Soft Light. Then invert the Mask (Command/Control + I).
The fill color becomes black while the color on top of the image will disappear.
Step 2 - Use a brush on the mask to bring out the hair color
Now, to bring out the hair, select the Brush tool (B). Choose white as the Foreground color, and use a medium brush soft. We used 100 px approx and 0% Hardness.
Start painting on top of the hair to add color to it. If you want to correct something, just change the foreground color to black and erase the portions you don’t like. Reduce the brush size and its opacity if needed.
Add color to the skin
Step 1 - Create a Color Balance adjustment layer
Create a new Color Balance adjustment layer on top of your subject layer. Play around with the values for all the Tones options such as Midtones, Highlights, and Shadows. Carry on until you achieve the proper skin tone.
Step 2 - Use a brush on the mask to bring out the skin color
Change the Blending Mode of the layer to Soft Light. Invert the Mask for this layer (Command/Control + I) and use a soft brush to paint the parts where the skin is. You can always adjust the values of your tones in the Properties panel to fix the color if needed.
Remember, to make a correction, change the foreground color to black and erase the portions that need it.
Step 3 - Duplicate the Color Balance layer to add details
To add some details to the skin, duplicate the layer (Command/Control + J). Then lower the Opacity to about 60%. Fill the whole mask with black again by selecting it (Command/Control + A) and then hitting the Delete key.
Then, use a large and soft brush with an opacity of about 20%. Paint some details under the eyes, around the nostrils, etc. They should be placed where you would normally find color imperfections in a person’s skin.
Color the lips
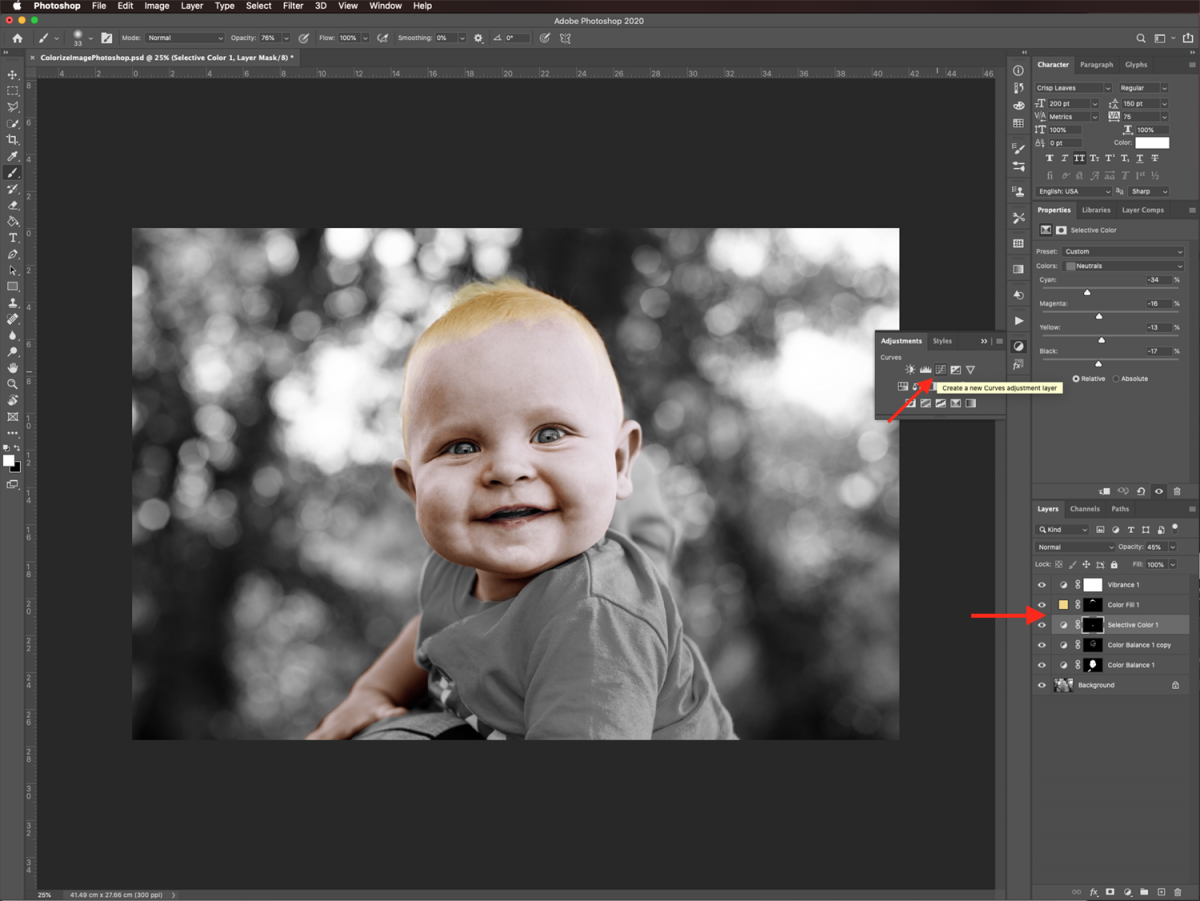
Step 1 - Create a Selective Color adjustment layer
To color the lips, let’s create a new Selective Color adjustment layer on top of the skin layers.
Lower the Opacity of the layer to around 45%. Then adjust the Neutrals and Reds to create a pink shade for the lips.
Step 2 - Use a brush on the mask to bring out the lip color
Invert the Mask for the layer (Command/Control + I). Next, paint on top of the lips with a soft brush with a low Opacity (about 75%).
Adjust the overall colors of your image
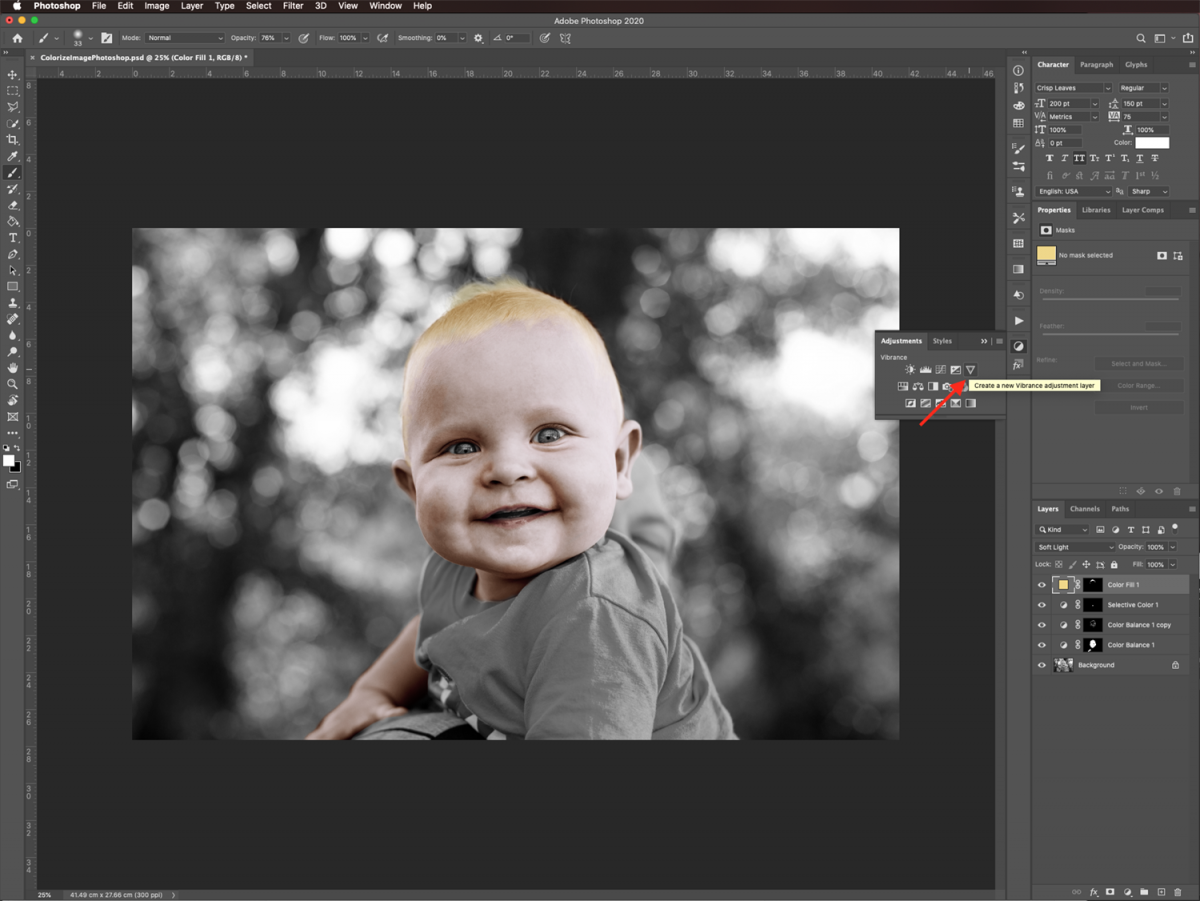
Step 1 - Create a Vibrance adjustment layer
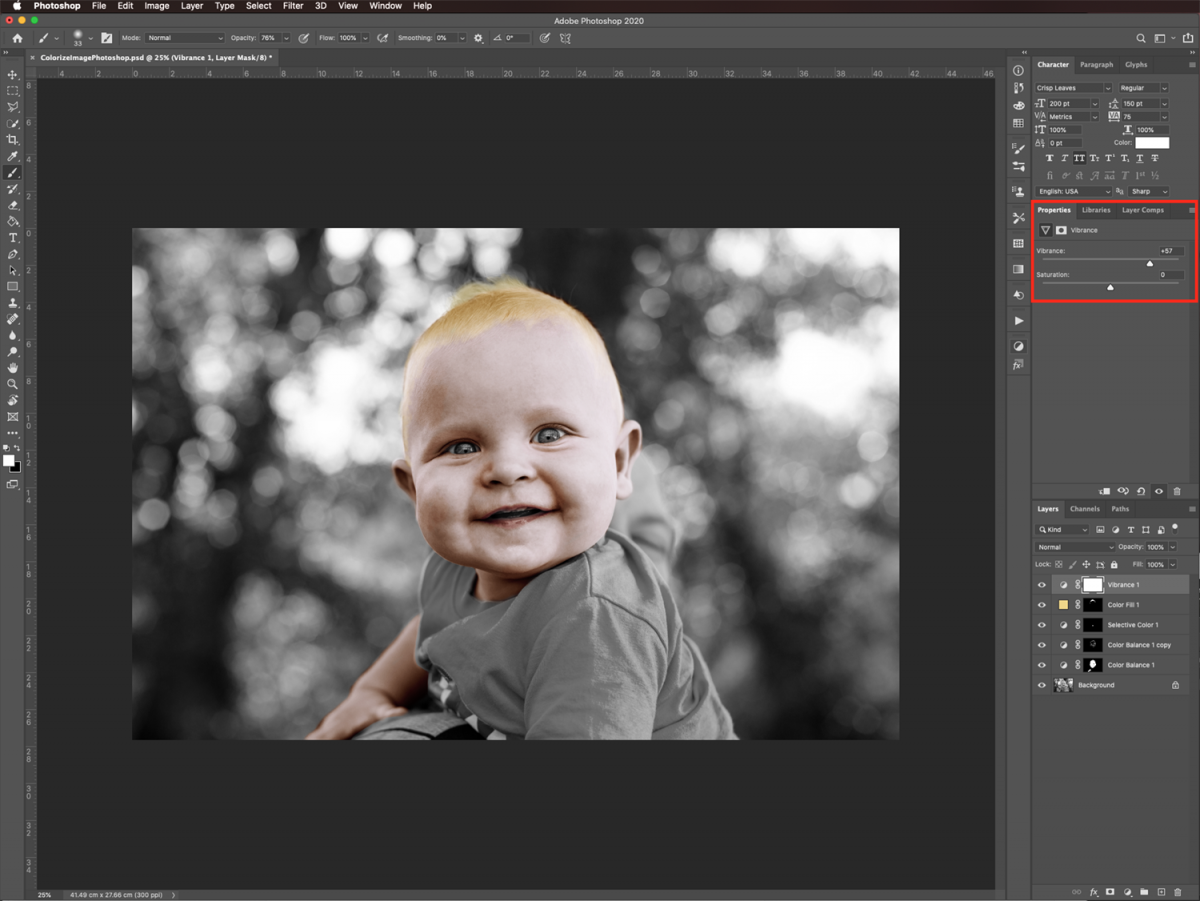
To brighten up your image, create a new Vibrance adjustment layer on top of everything.
Then change the Vibrance value to +57.
Step 2 - Create a Curves adjustment layer
Create a new Curves adjustment layer in between the Hair and Skin layers.
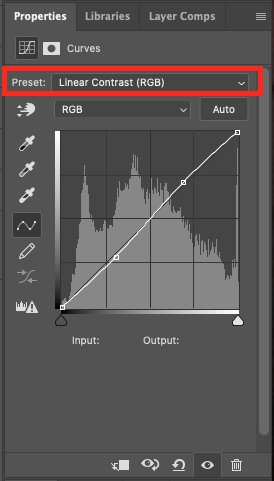
Use the Linear Contrast (RGB) preset in the Properties panel.
Step 3 - Adjust the curves layer Blending Options
Double-click on top of the layer’s thumbnail to open the Layer Styles panel. Go to the Blending Options tab . Now split the blacks lever of the Underlying Layer by holding the Alt/Option key.
Then, move them to the right, to the portion where the dark grey ends. Splitting the lever will make the transition smoother.
Next, move the whites lever to the left without splitting it.
Color the eyes
Step 1 - Add a new Color Fill layer
Create a new Color Fill layer on top of your subject, which will be the background layer. Use a color that will be appropriate for the eyes as a fill. We used a medium blue #3184be.
Step 2 - Use a brush on the mask to bring out the eyes color
Change the Blending Mode of the layer to Color and invert the layer Mask (Command/Control + I).
Use a soft brush with a low Opacity to paint the eyes. Trying to avoid the white highlights inside of them.
You may need to lower the layer’s Opacity to tone down the eye color. We lowered it to 50%.
Color the Clothes
Finally, we can add some color to the clothes. Create another Color Fill layer on top of your subject (background layer). Fill it with a shade that will look good on your subject’s clothes. We used a bright blue #038ef9. Then, change the Blending Mode of the layer to Soft Light and lower the Opacity to 80%.
Next, also invert the layer mask for this layer (Command/Control + I). Use a soft brush to paint on the clothes. If you want to correct something, change the foreground color to black and erase where needed.
If the clothing color is too bright, you can reduce the layer’s Opacity a bit more. We reduced it down to 65%.
Final touches
Step 1 - Adjust colors if needed
It’s time to give our image a final look by adjusting a few settings. We adjusted some of the colors, blending modes and layer’s opacity to make the image more realistic.
Step 2 - Group your layers
We want to group our layers so they will be easier to handle. Select all your layers with the exception of the original one (Shift key). Make a Group by clicking on the small folder icon at the bottom of the Layers panel.
The image below is the final result of the color retouching. The colors are nice and smooth while the overall look is fairly realistic.
Here is a before and after look at our image for comparison.
Next up, learn how to replace the sky in photos, how to swap faces in photos, and how to create a dreamy glow in Adobe Photoshop.


