
How to Create a Honeycomb Pattern in Illustrator
Learn how to create a Honeycomb pattern in Adobe Illustrator.
Creating a honeycomb pattern in Illustrator can be a bit time consuming, but you can achieve stunning results with simple techniques. And when you are done, you can use it as a phone or desktop wallpaper, as a text effect, or combine it with text to create unique sublimation designs.
You can use some color swatches in different shades of yellow and orange or an image as a color reference for your design if you want.

Step 1 - Create a Hexagonal Cell
We will start by creating the basic shape for the honeycomb pattern.
In Illustrator, create a new document. If the Rulers are not enabled, go to View > Rulers > Show Rulers(Cmd/Ctrl + R) to turn them on.
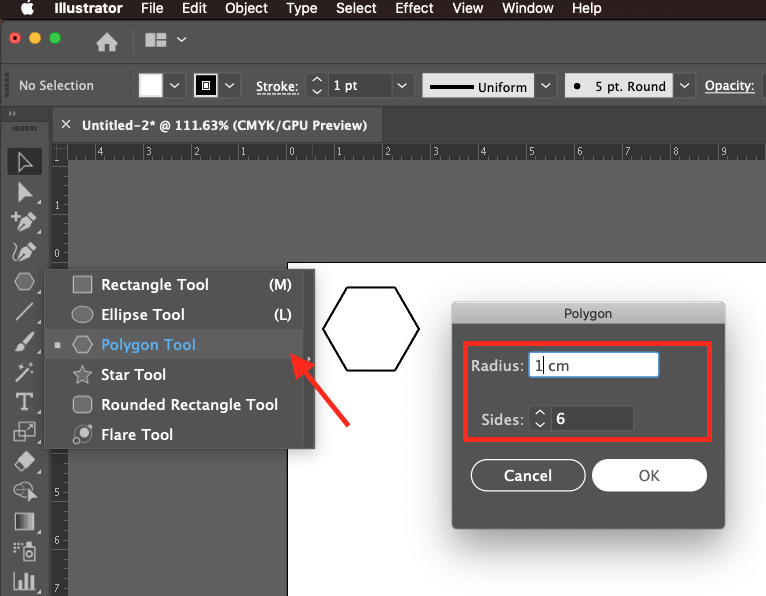
Create a Hexagon with the Polygon Tool
Select the Polygon Tool and click inside the canvas. Use a 1 cm Radius and keep 6 as the number of sides to create a hexagon.
Rotate the Hexagon
With the hexagon still selected, double-click the RotateTool (R) and use a 30° Angle.

Move the Hexagon to the Canvas Edge
Move the hexagon to the top-left corner of the canvas. Make sure that Smart Guides(Cmd/Ctrl + U) and Snap to Point are enabled in the View menu to make its correct placement easier.

Step 2 - Duplicate the Hexagonal Cell and Fill the Canvas Horizontally
To create the pattern, we are going to duplicate the base hexagon as many times as needed to fill the entire canvas. We will start by doing this horizontally.
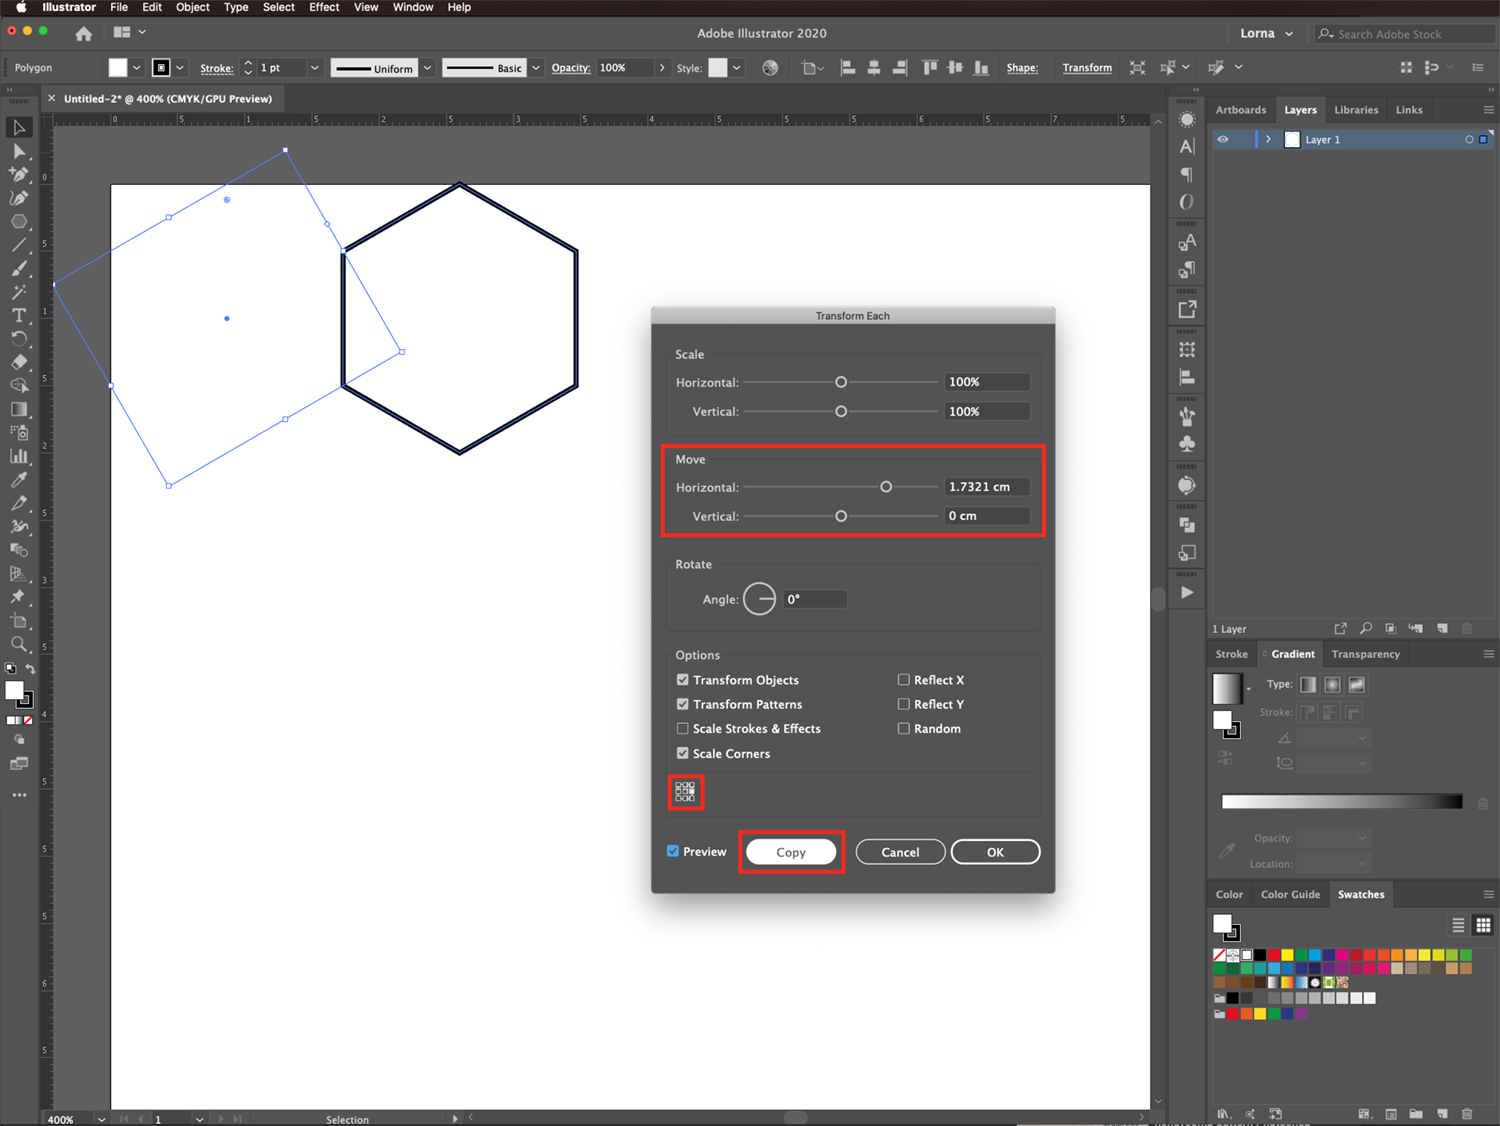
First, click on the Transform panel in the top menu to check the width (1.7321 cm) and height (2 cm) measurements and write them down for future use.

Use Transform Each to Make a Correctly Placed Hexagon Duplicate
Then, go to Object > Transform > Transform Each and use the previously noted width value (1.7321 cm) for the Horizontal Move. Leave the Vertical Move as 0 and set the reference point to the middle-right on the reference point locator on the Transform Each panel.
ClickCopy instead of ok to apply the changes to a duplicate path and leave the original one as it is.
The second hexagonal cell’s left side should be placed exactly where the right side of the first is.

Use Transform Again to Create a Row of Duplicates
Finally, go to Object > Transform > Transform Again(Cmd/Ctrl + D) to repeat as many times as needed to fill the canvas horizontally.


Step 3 - Duplicate the Hexagonal Cell Row and Fill the Canvas Vertically
Use Transform to Make a Correctly Placed Hexagon Row Duplicate
Next, select the entire row and head to the Appearance panel. Click on the Effects icon at the bottom left and navigate to Distort & Transform > Transform.
Use the previously noted width value divided by 2 (0.8661) for theHorizontal Move. For the Vertical Move, use 1.5 cm and set the reference point to the bottom-right corner on the reference point locator on the Transform Effect panel. Set the number of Copies to 1 to create a second row exactly under the original one.

Here’s what your result should look like.

Separate Each Cell Using Expand Appearance
Without deselecting, go to Object > Expand Appearance. Then, click on the Transform panel in the top menu and make a note of the height (3.5 cm) measurement for future use.

Use Move to Seamlessly Place a Duplicate of the Selected Rows Under the Original Ones
Go to Object > Transform > Move, input a Vertical Move value of 3 cm, and leave the rest as default. Click Copy instead of ok to apply the changes to a duplicate path and leave the original one as it is.

Now you should have four rows of hexagonal cells starting from the top of your canvas.

Use Transform Again to Fill the Canvas Vertically
Repeat, using Cmd/Ctrl+D as many times as needed to fill the canvas vertically this time.

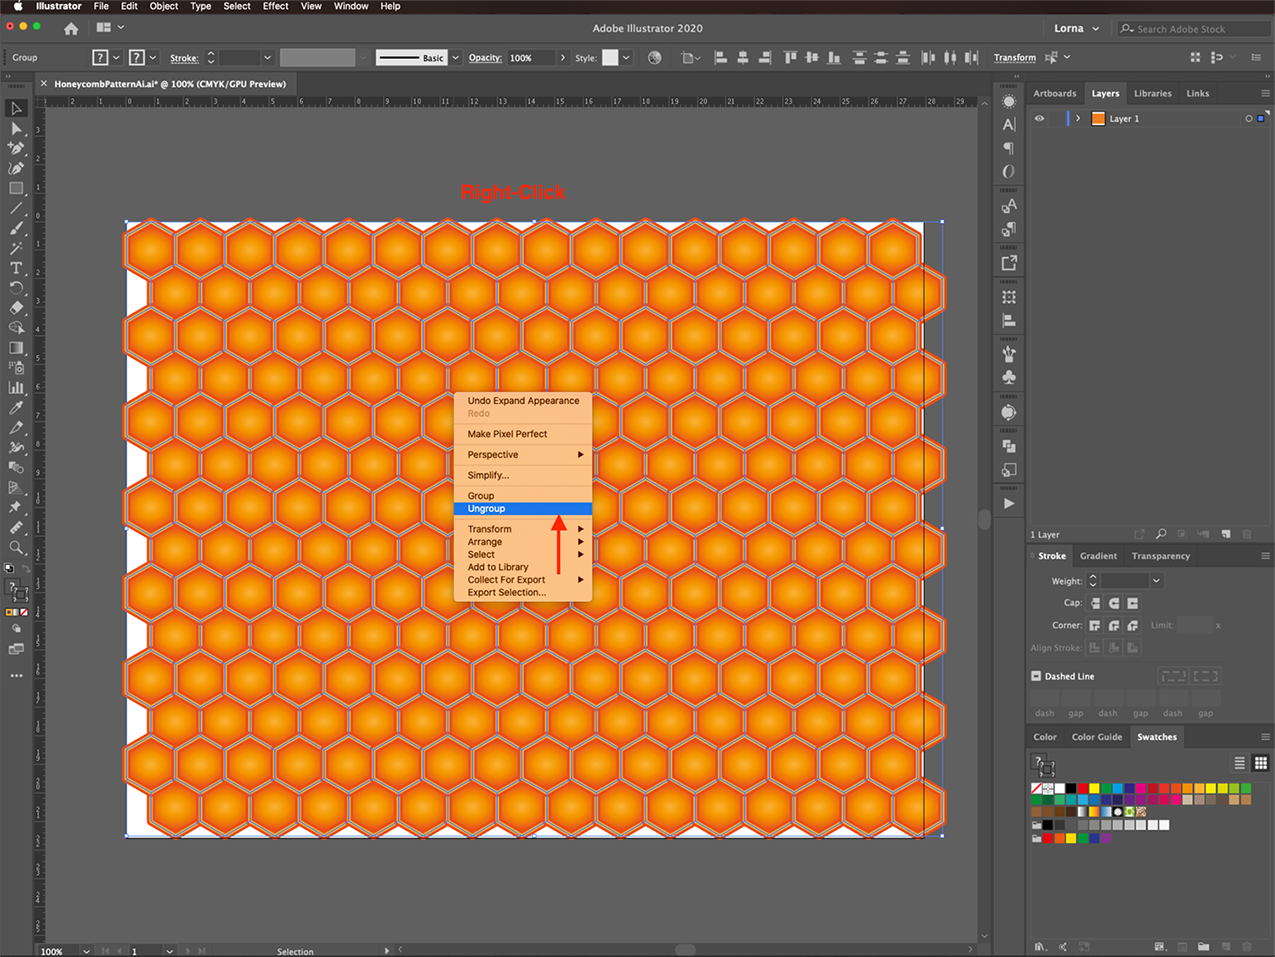
Ungroup the Cells
Right-click on top of your cells and choose Ungroup twice.

The first time should separate two cells that were together forming a polygon.

And the second time should separate the Fill and Stroke of the individual cells.

Step 4 - Fill the Cells With a Gradient
Next, we will start adding color to our honeycomb pattern.
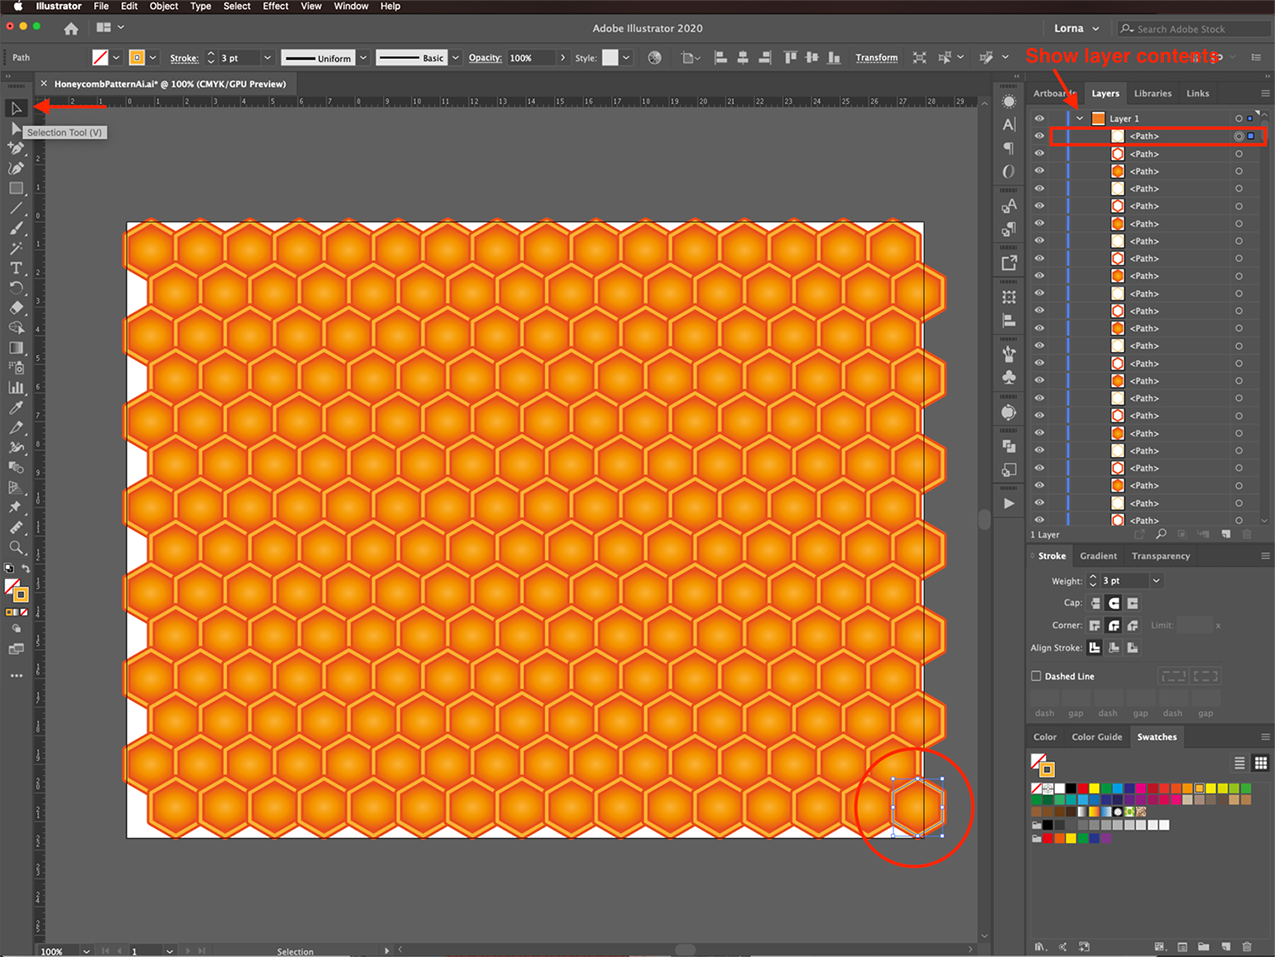
First, we need to select all the hexagonal cells that have a Fill and no Stroke. Use the SelectionTool (V) to select one of them. To make sure that you are selecting the correct path, click on the small arrow on the left of the layer thumbnail on the Layers panel to show the layer’s contents.

Then, go to Select > Same > Fill Color to select all of them.

And finally, change their Fill type to a Gradient. The default one in Illustrator is white to black.
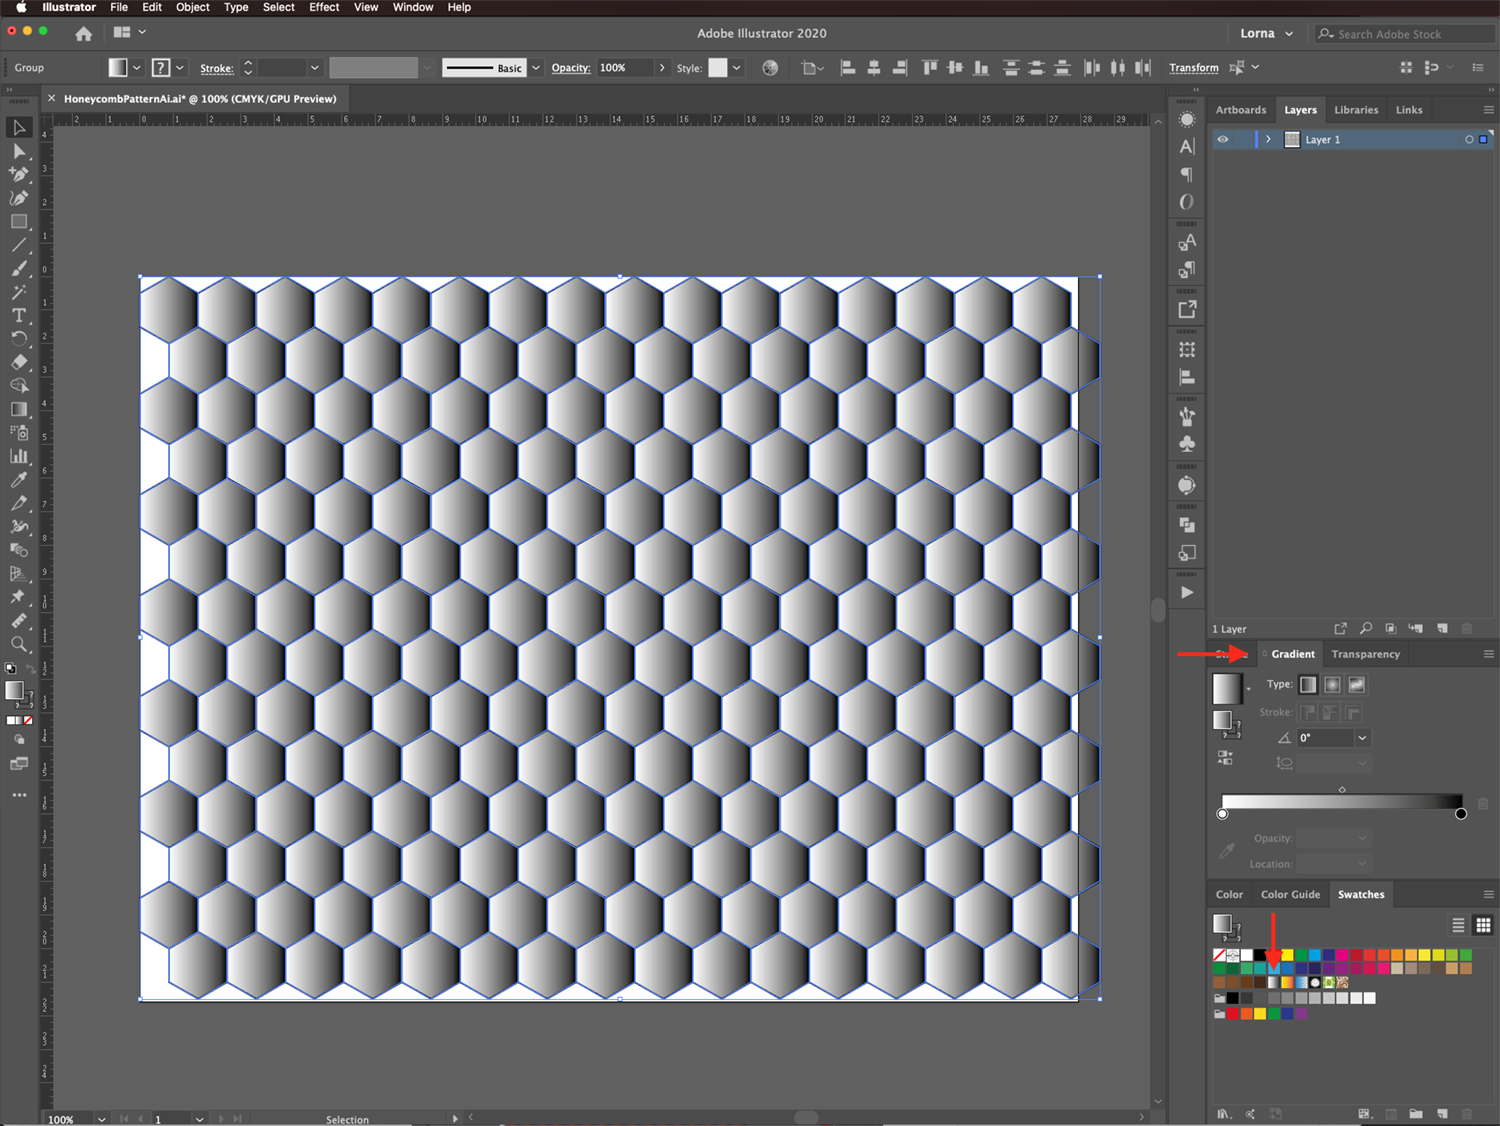
Change the Gradient Colors to Shades of Orange
Head to the Gradient panel, double-click on the first color (left or 0% location), and change it to a medium-light shade of orange (we chose one from the Swatches panel).
Click around the middle of the gradient slider to place another color at the 50%Location. Change the color to a medium-dark shade of orange (we chose one from the Swatches panel).
Finally, double-click on the last color (right or 100% location) and change it to a darker shade of orange (we chose one from theSwatches panel).

Adjust the Type of Gradient and Aspect Ratio
To make the gradient fill more realistic, change the gradient from linear to Radial and lower the Aspect Ratio to 85%.

Step 5 - Add Strokes to the Cells
Add a Dark Stroke to Cells
Now, select all the hexagonal cells that have a Stroke but no Fill using the same method as before. To make sure that you are selecting the correct paths, check the Layers panel.
Then, go toSelect > Same > Fill & Stroke to select all of them.
Once they are selected, change theStroke color to the darkest shade of orange, the Weight to 8 pt, and make the corner Round.

Add a Light Stroke to Cells
We need to add a second stroke to the cells, so without deselecting, head to the Appearance panel. Click on Add New Stroke at the bottom, use the lighter shade of orange and make the Weight 3 px.

Expand and Ungroup the Stroke Cells
We need to expand and ungroup the cells so that the modifications applied in the following steps work properly.
With the stroke cells still selected, go to Object > Expand Appearance. Then, right-click on top and choose Ungroup.
Rearrange the Order of the Rows
This part is optional, but if you notice some rows overlapping incorrectly, just select them, right-click on top and navigate to Arrange > Bring to Front (Shift + Cmd/Ctrl + ]). Repeat with all the rows that need it.


Step 6 - Create the 3D Effect
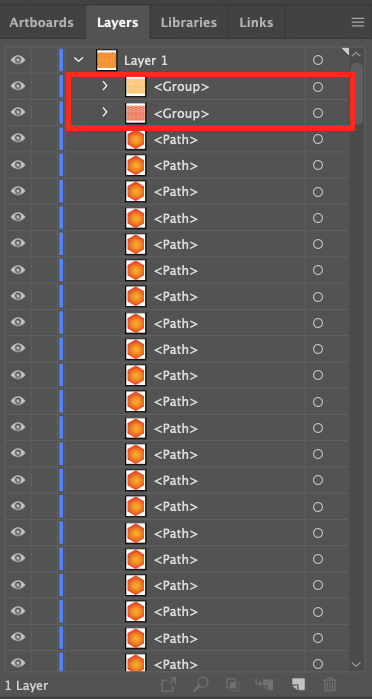
To create the 3D portion of the honeycomb texture, we first need to group similar color strokes together.
Group the Light Colored Strokes and the Dark Colored Strokes
Use the SelectionTool (V) to select one of the light-colored stroke hexagons. To make sure that you are selecting the correct path, click on the small arrow on the left of the layer thumbnail on the Layers panel to show the layer’s contents.
Then, go to Select > Same > Fill and Stroke to select all of them.

And Group (Cmd/Ctrl + G) them together.

Repeat with the darkest color stroke hexagons and create another group with them.

Now, you should see two groups of hexagons on top of the Layers panel, followed by many paths filled with the gradient.

Move the Light Colored Strokes
Select the light-colored stroke group, head to the Appearance panel, click on the Effects menu at the bottom, and navigate to Distort & Transform > Transform.
Use aHorizontal Move of 0.25 cm and a Vertical Move of -0.25 cm, set the reference point to the center of the reference point locator. Click Ok.

Round the Cells’ Corners
Select everything and head to the Appearance panel, click on the Effects menu at the bottom and navigate to Stylize > Round Corners. Use a 0.15 cm Radius, and click Ok.

Then, go to Object > Expand Appearance to separate the cells.
Blend the Colored Stroke Groups Together
The final thing to do to add depth to the honeycomb texture is to blend the color edges together to create the walls.
Select both light and dark-colored stroke groups and go to Object > Blend > Blend Options. Choose Specified Steps as the Spacing option with a value of 25, and click Ok.

Then, go to Object > Blend > Make (Option/Alt + Cmd/Ctrl + B) to apply the blend to the selected stroke groups.


The result should be a smooth progression from the darker color to the lighter one.

Your honeycomb texture design is now complete! You can enclose it inside a Clipping mask to make a clean cut at the edges.

Or you can mask a smaller portion and turn it into a seamless pattern to use in your designs. Check out our tutorial on how to make a seamless pattern in Illustrator if you want to explore this option.


We hope you enjoyed following our tutorial. If you would like to learn more about Illustrator, be sure to have a look at creating a floral logo, making a knockout design, and designing a 3D papercut effect in Adobe Illustrator.


