
How to Create a Holographic Text Effect in Photoshop
Discover how to create a holographic text effect in Photoshop with this step by step tutorial.
Did you know that you can use filters and layer styles to make a holographic text effect in Photoshop? In this tutorial, we'll be showing you how to create a holographic text effect from scratch. With the finished design, you can use it on social media posts, posters, sublimation designs, etc.

We went with the modern sans serif font, Cedric, for this tutorial.
Step 1 - Create the Colored Layer
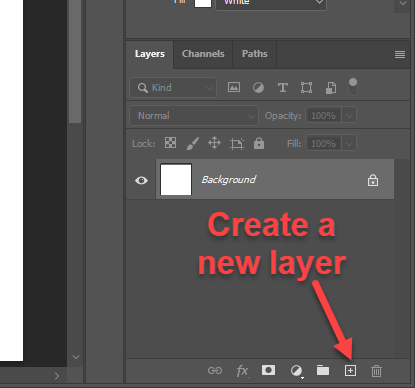
Add a New Layer
Click the Create a New Layer button at the bottom of the Layers panel.
Select the Gradient Tool
Select the Gradient Tool (G) from the left toolbar. Then click on the gradient bar in the Options bar at the top to change the gradient's colors.
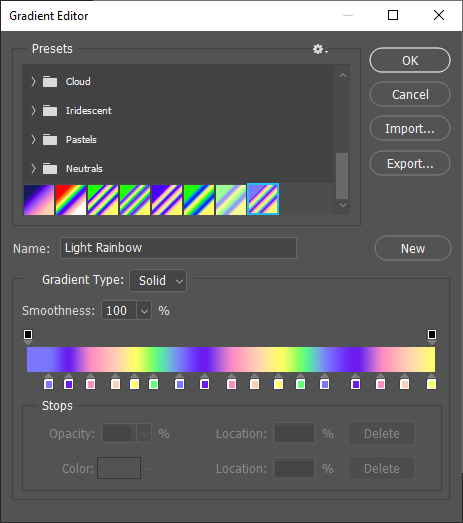
Change the Gradient Colors
You can click below the gradient bar to add a color, double-click on a color icon to change its color, and click + drag a color icon to move it on the gradient bar. Delete a color by selecting it and clicking the Delete button below.
We added colors to create a rainbow gradient. These are the colors we used: #7a77fc, #6d19f0, #ff8dc3, #ffcfb2, #fffd66, #66ff78. Then we simply repeated the pattern of colors on the gradient bar.
Apply a Linear Gradient to Layer 1
Make sure you have the linear gradient style selected in the Options bar. Click + drag from the top of the canvas to the bottom to apply a linear gradient to Layer 1. You can hold Shift while dragging if you want the gradient to be perfectly straight.

Convert Layer 1 to a Smart Object
Right-click on Layer 1 and select Convert to Smart Object.

Apply a Twirl Distort Filter to Layer 1
This step isn’t necessary, but it can help with distorting/warping the colors of the gradient. Go to Filter > Distort > Twirl.

Set the Angle to -400 and click OK.

Use the Liquify Filter Tool
To warp the colors some more, we will use the Liquify filter. Go to Filter > Liquify.

In the Liquify window, set the Brush Tool Options to your liking. We used the following settings:
- Size: 557
- Density: 32
- Pressure: 69
- Rate: 0
- Pin Edges: Checked

Then click + drag with the brush to push and pull the colors around until you’re happy with how it looks.
Below is how our Layer 1 currently looks.

Apply an Ocean Ripple Filter
Go to Filter > Filter Gallery.

Select Ocean Ripple under the Distort folder. Set Ripple Size to 3 and Ripple Magnitude to 2, then click OK.

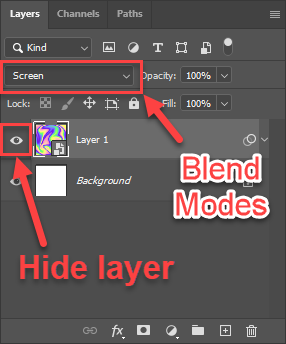
Change Blending Mode of Layer 1 and Hide the Layer
In the Layers panel, set Layer 1’s Blend Mode to Screen. Then click Layer 1’s eye icon to hide it for the time being.
Step 2 - Create the Bottom Texture Layer
Create New Layer and Convert It to a Smart Object
Select the Background layer, then click the Create a New Layer button. A new layer called Layer 2 will be added above Background layer and below Layer 1.

Then right-click on Layer 2 and convert it to a Smart Object. Once the layer is a Smart Object, the Smart Object icon will appear on the layer thumbnail, as shown below.

Render Some Clouds
With Layer 2 selected, go to Filter > Render > Clouds.

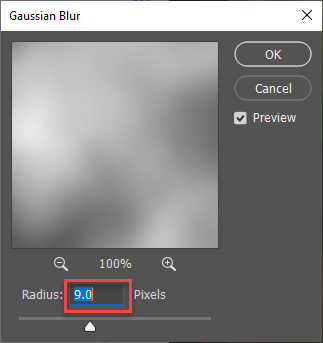
Apply a Gaussian Blur to Layer 2
Next, go to Filter > Blur > Gaussian Blur.
In the Gaussian Blur dialog, set the Radius to about 9 pixels and click OK.
Apply an Ocean Ripple Filter to Layer 2
Apply an Ocean Ripple filter from the Filter Gallery to Layer 2, but this time set the Ripple Magnitude to 11.

Change Layer 2’s Blend Mode and Hide the Layer
In the Layers panel, set Layer 2’s Blend Mode to Hard Light. As we did with Layer 1, hide Layer 2 by clicking its eye icon.

Step 3 - Add Text
Create a New Layer Above Background Layer and Add Text
As we did previously, create a new layer above Background layer by selecting Background layer and then clicking the Create a New Layer button. Select the Type Tool (T) in the left toolbar and your font in the Options bar. Then click on the canvas and enter your text.

Resize the Text
Select the text layer and press Control/Command + T to enable Free Transform. Then click + drag the handles on the bounding box to resize the text.Next, click + drag the text to the center of the canvas.

Step 4 - Create Clipping Masks
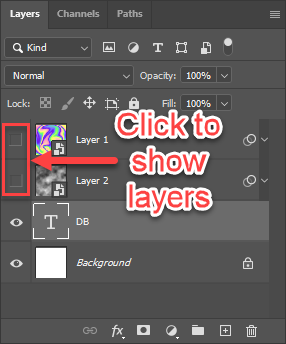
Show Layer 1 and Layer 2
Before we create clipping masks, we must show the hidden layers by clicking the empty squares where the eye icons were previously for Layer 1 and Layer 2.
Create Clipping Masks with Layer 1 and Layer 2
Right-click on Layer 2 and select Create Clipping Mask. Repeat this for Layer 1 as well.

Step 5 - Add Layer Styles to the Text Layer
Lastly, we will add Layer Styles to the text layer to help make the effect look more realistic. Double-click to the right of the text layer's name to open the Layer Style dialog.

Bevel & Emboss
Click the Reset to Default button and make the following changes to the Bevel & Emboss options:
- Syle: Inner Bevel
- Depth: 1000
- Soften: 4
- Angle: 130
- Use Global Light: Unchecked
- Altitude: 25
- Highlight Mode Color: #fac2e3
- Opacity: 35
- Shadow Mode Color: #fac2e3
- Opacity: 15

Stroke
Click the Reset to Default button and make the following changes to the Stroke options:
- Size: 2
- Position: Outside
- Opacity: 31
- Fill Type: Gradient
- Gradient Colors: Left end - #e7d5f8, right end - #fdcfe1
- Align with Layer: Unchecked

Inner Glow
Click the Reset to Default button and make the following changes to the Inner Glow options:
- Blend Mode: Linear Dodge (Add)
- Opacity: 20
- Choke: 4
- Size: 12

Outer Glow
Click the Reset to Default button and make the following changes to the Outer Glow options:
- Blend Mode: Multiply
- Opacity: 18
- Color: #fcc5e7
- Size: 15

Drop Shadow
Click the Reset to Default button and make the following changes to the Drop Shadow options:
- Blend Mode: Screen (if on a dark background)
- Blend Mode: Multiply (if on a light background)
- Color: #b489a4
- Opacity: 28
- Distance: 0
- Size: 20

You can modify any of the settings above to better fit your text. The filters can also be edited by double-clicking on them.
Step 6 - Move Text if Needed
This step is optional, but if you don't like the current look of how the colors flow, you can try moving your text layer around. Remember that the colored layer, Layer 1, fills the whole canvas, so you may like how the colors look in a different area.
Select the text layer and press Control/Command + T to enable Free Transform. Then click + drag the text around.

We were happy with our text being in the center. Our finished holographic text effect is shown below.

We're all done!! We hope you enjoyed the tutorial and that you’ll use what you learned today to create your own holographic text effect in Photoshop.


