
How to Make a Print and Cut in Silhouette Studio
1- Open Silhouette Studio. Click on page setup panel.
2- Change the paper size to fit your printer. I am using A4.
3- Click on the registration icon and then select type one registration marks. you will see a cross hatch and black square appear onto the design space.
4- Click on file- merge. select your digital design. (SVG/PNG) I am using the design Valentine's Day Doodles by Qilli.
5- Merge as many images as you need to print and cut. Resize. Make sure that the designs are within the red lines and the black cross hatch areas. If the images are over these lines they will not cut.
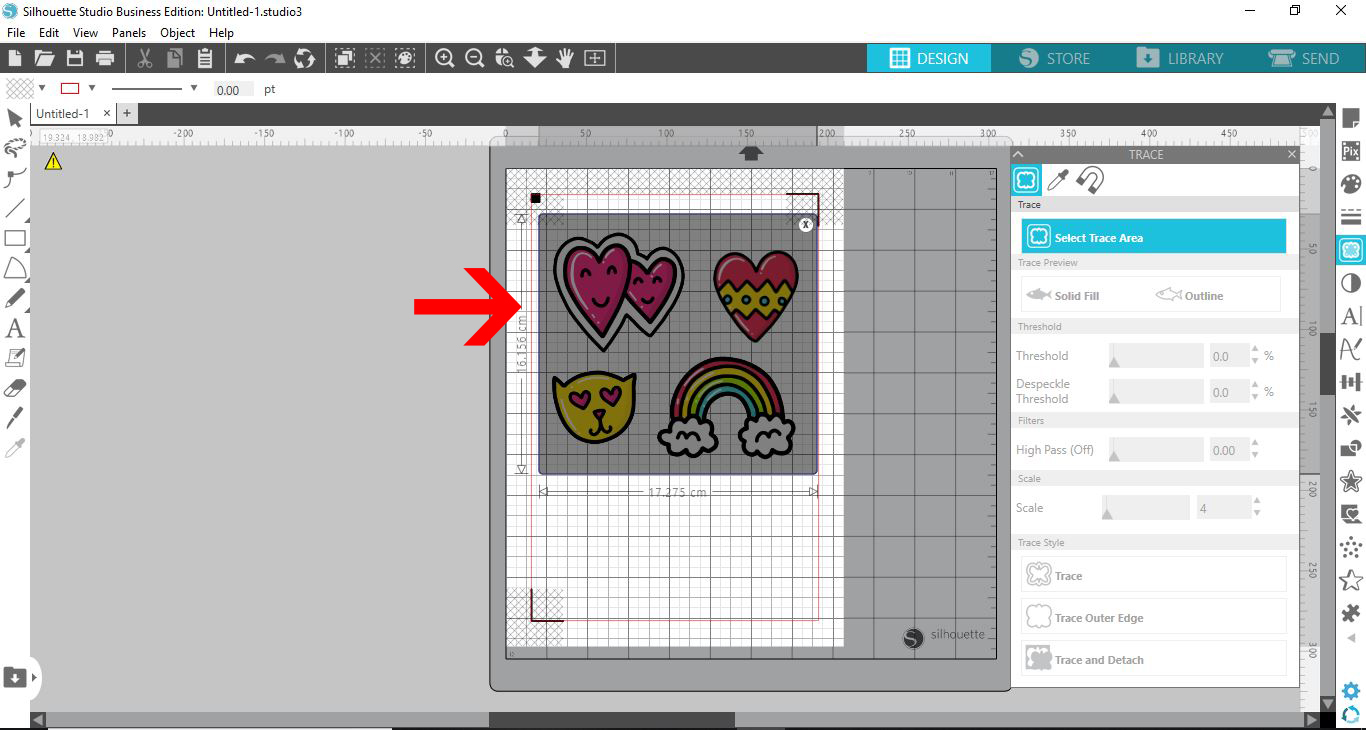
6- Click on the trace panel. Select trace area.
7- Select all the images.
8- Adjust the threshold, to have all the images to be highlighted yellow. Click on trace outer edge.
9- Your images will have cut lines.
10 - Click on the send screen, You will see that there is a cut line around the edge of each image.
11- If you need an edge around the image you need to add an offset. Click on the offset icon.
12- Select all the images. Click offset. adjust the width to you need. then apply.
13- Delete the original cut lines and you will leave the new offset cut lines.
14- In the send screen you can now see the offset cut lines.
15- Go to file - print.
16- Select your printer and print. The registration marks will also print for the silhouette to register.
17 - Place the printed page onto your cutting mat. Feed into your machine and then send.

2- Change the paper size to fit your printer. I am using A4.

3- Click on the registration icon and then select type one registration marks. you will see a cross hatch and black square appear onto the design space.

4- Click on file- merge. select your digital design. (SVG/PNG) I am using the design Valentine's Day Doodles by Qilli.

5- Merge as many images as you need to print and cut. Resize. Make sure that the designs are within the red lines and the black cross hatch areas. If the images are over these lines they will not cut.

6- Click on the trace panel. Select trace area.

7- Select all the images.
8- Adjust the threshold, to have all the images to be highlighted yellow. Click on trace outer edge.

9- Your images will have cut lines.

10 - Click on the send screen, You will see that there is a cut line around the edge of each image.

11- If you need an edge around the image you need to add an offset. Click on the offset icon.

12- Select all the images. Click offset. adjust the width to you need. then apply.

13- Delete the original cut lines and you will leave the new offset cut lines.

14- In the send screen you can now see the offset cut lines.

15- Go to file - print.

16- Select your printer and print. The registration marks will also print for the silhouette to register.

17 - Place the printed page onto your cutting mat. Feed into your machine and then send.


