Unlimited Downloads 15% off Marketplace Purchases Exclusive Software Access Unlimited Downloads
15% off Marketplace Purchases
Exclusive Software Access
Save 70% on Plus Maybe Later
How to Change Cut Lines to Score Lines in Cricut Design Space
  • By Design Bundles
  • 30 Aug 2021
  • 3 Mins
  • Cricut Tutorials

How to Change Cut Lines to Score Lines in Cricut Design Space

In this Design Space tutorial we show you how to change a cut line to a score line.

As of now, SVGs uploaded to Cricut Design Space will automatically import as a cut file. This may be frustrating if you often make envelopes or cards that require a score line. However, this tutorial will show how you can easily change those cut lines into score lines.

To illustrate this process, we will be using a Floral Birthday Card from Digital Gems.

There are several great greeting card templates available on Design Bundles that you can choose for your project.

To begin, open Design Space and upload the desired SVG. We have a great tutorial for you to follow on uploading SVG designs to Design Space if needed.

Step 1 - Select and Change Line Type

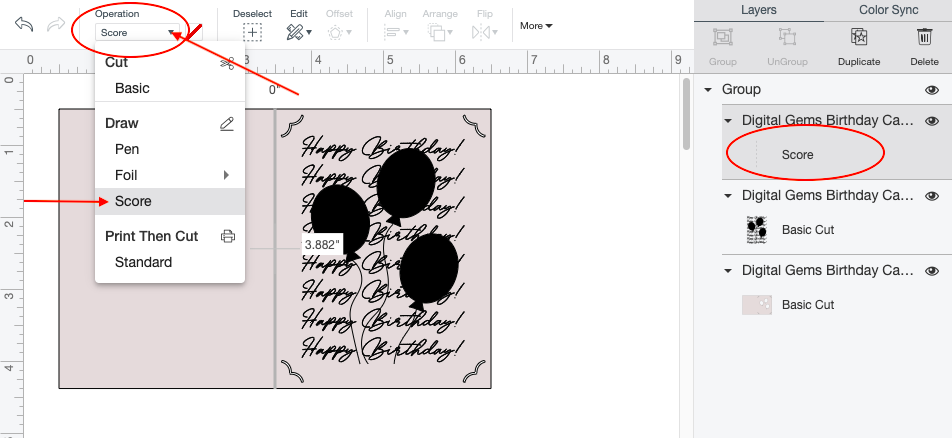
Start by selecting the item that needs to be changed to a score line. You can do this by clicking on the individual object under the Layers panel.

Selecting Cut Line Under Layers Panel

With the item selected, you can now click on the Operation tab on the top toolbar. A pop-up will soon appear that will allow you to change the line type for the selected object. Next, Scroll down and click on the Score button that is under the draw section. Doing this will change the cut line into a score line, which we wanted to achieve today.

Change Line type Design Space

Step 2 - Attach Score line

Next, select the score line and card template under you layers panel. After selecting both items, click the Attach button on the lower right-hand corner of the canvas screen. The attach button will bring both selected layers together.

Attach Score line Design Space

You have successfully changed cut line into a score line. You can now finish up the project by clicking the green Make it button on the upper-right hand corner.

If you liked this tutorial, make sure to check out our guides on how to offset text, and how to make sticker sheets in Cricut Design Space.


6 Related Cricut Tutorials

Grid lines in Cricut Design Space can be useful but at times you may not want to see them. While it is easy to turn them off, a beginner might not know where to look. We can help you there. In this tutorial we will show you how to turn ...

In this tutorial we will learn how to use the print and cut feature in Cricut Design Space app. This is one feature that can be used in a wide range of projects, from making stickers to beautiful greeting cards.To demonstrate this process I'll be using a cute unicorn ...

Today we’ll create a split monogram that you can easily make anywhere using the Cricut mobile app. Step 1. Create a New ProjectAfter logging in, create a new project in Cricut Design Space. You can simply do this by clicking the blue rectangle box that is labeled New Project. Step 2. ...

Follow our easy to use tutorial for using Font Glyphs on the iPad with the Cricut Design Space app.

Today we’ll focus on how to curve Text in Cricut Design Space App. If you're using Cricut Design Space on your computer, make sure to check out our guide on how to curve text in Cricut Design Space.Step 1 - Create a New ProjectOnce you have logged in, create ...

Today we’ll learn how to use Premade designs in Cricut Design Space mobile app. Thankfully, Cricut made it possible to not only create in Design Space but to be able to save and then access the same premade designs at a later date. Having this option in Design Space ...

You may also like

Help Center