
How to Change Eye Color in Photoshop
Learn how to change eye color in Photoshop with this quick tutorial.
One of the really cool image manipulation effects you can do in Photoshop is changing the eye color of your subjects. Today, we will learn how to realistically change the color of eyes in a non-destructive way by grouping together some adjustment layers and using blending modes.

For this tutorial, we used this close-up eye photo, but you can pick an image from Design Bundles’ section of amazing photos of people if you prefer.
Step 1 - Select the Area You Want to Recolor
First, we need to make a selection that covers the iris and pupil since that is the portion of the eye we want to change color.
To do it, pick the Elliptical Marquee Tool (M) from the left toolbar.

Create a Circular Selection That Covers the Iris
To create a selection that starts from the center, place your cursor inside the eye, then click and drag out towards the edges of the iris while holding the Option/Altkey.
Make it as close to the shape of the iris as possible, but don’t worry if it’s not perfect since we are going to fix it later on.

Get Rid of Unwanted Portions of the Selection
We don’t need the portion of the selection that covers the eyelid and lashes.
To get rid of it, hold the Shift + Option/Altkeys while creating an oval shape that covers the portion of the selection you want to keep. Your cursor should have a “+” on its bottom right side.
This way, the intersection between the circular and oval selections will be kept, and unwanted areas not in the intersection will be removed.

Step 2 - Create a Hue/Saturation Adjustment Layer
Without deselecting the iris, head to the Adjustments panel (Window > Adjustments) and create a new Hue/Saturation Adjustmentlayer.

You will notice that your new layer has a mask, so edits and adjustments will only affect your selected area.

Step 3 - Refine Your Selection
To make sure that we are only going to change the iris’ color and to help refine our selection if needed, let’s head to the Properties panel and check the Colorizebox. This will change the color of our selection and will make it easier to spot any details that need fixing.

Adjust the Mask Feather to Smooth Hard Edges
To smooth out the selection edges, make sure that your mask thumbnail is selected and click on the Masksicon in the Properties panel. Then, adjust the Feather value until you see that the edges are smooth enough.

Hide Unwanted Colored Portions by Refining Your Mask
If you see color on areas of the eye that should not be colored, make sure that your mask thumbnail is selected in the Layers panel.
Then, use the Brush tool (B) with a soft brush (0% Hardness), making sure that black is set as the Foreground color to hide them.
If you made a mistake, just swap the foreground and background colors by clicking the X key, then use white to bring out what you want.
If you want to take a more in-depth look at how to refine your masks, you can check out our guide on smoothing mask edges.

Step 4 - Change the Eye Color
Now, we are ready to change the color of the eye. Experiment with the Hue and Saturation sliders in the Properties panel until you get the color you want.

Step 5 - Create a Masked Group for the Adjustments Layers
Since we are going to add more layers to help give the eye a more realistic look, we want to keep all of those layers together and apply the mask to all of them. So let’s create a new group by clicking on the small folder icon at the bottom of the Layers panel, then name it Eye Color.

Next, drag the mask thumbnail on top of the folder to apply the mask to it. This will separate the Hue/Saturation layer from the mask. Drag the Hue/Saturation layer onto the folder to move it inside. Now, everything you place inside the folder will be affected by the mask.

Step 6 - Add More Contrast With a Levels Adjustment Layer
You may notice that some details on your eye, like the highlights and/or shadows, look a bit dull. To fix this, we are going to add a Levels Adjustmentlayer.
Make sure it is placed inside theEye Colorfolder and on top of the Hue/Saturationlayer. Then, move the black and white levers or choose one of the presets to bring out your highlights and create more contrast.

Step 7 - Enhance the Dark Areas
Duplicate the Background Layer
To enhance the dark areas a bit, we are going to duplicate our background layer (Cmd/Ctrl + J) and rename the duplicate Eye 2.

Reposition the Duplicate and Change Its Blending Mode
Now, move the duplicate layer inside the Eye Color folder on top of everything and change its Blending Mode to Saturation.
Depending on your image, you may need to use different blending modes and/or other settings to get the results you want.

Step 8 - Change the Eye Color Again If Needed
And that’s it. To change the color again, just select the Hue/Saturationlayer and play around with the levers until you get the color you want.
Remember that you may need to adjust your other layers too to get better results.

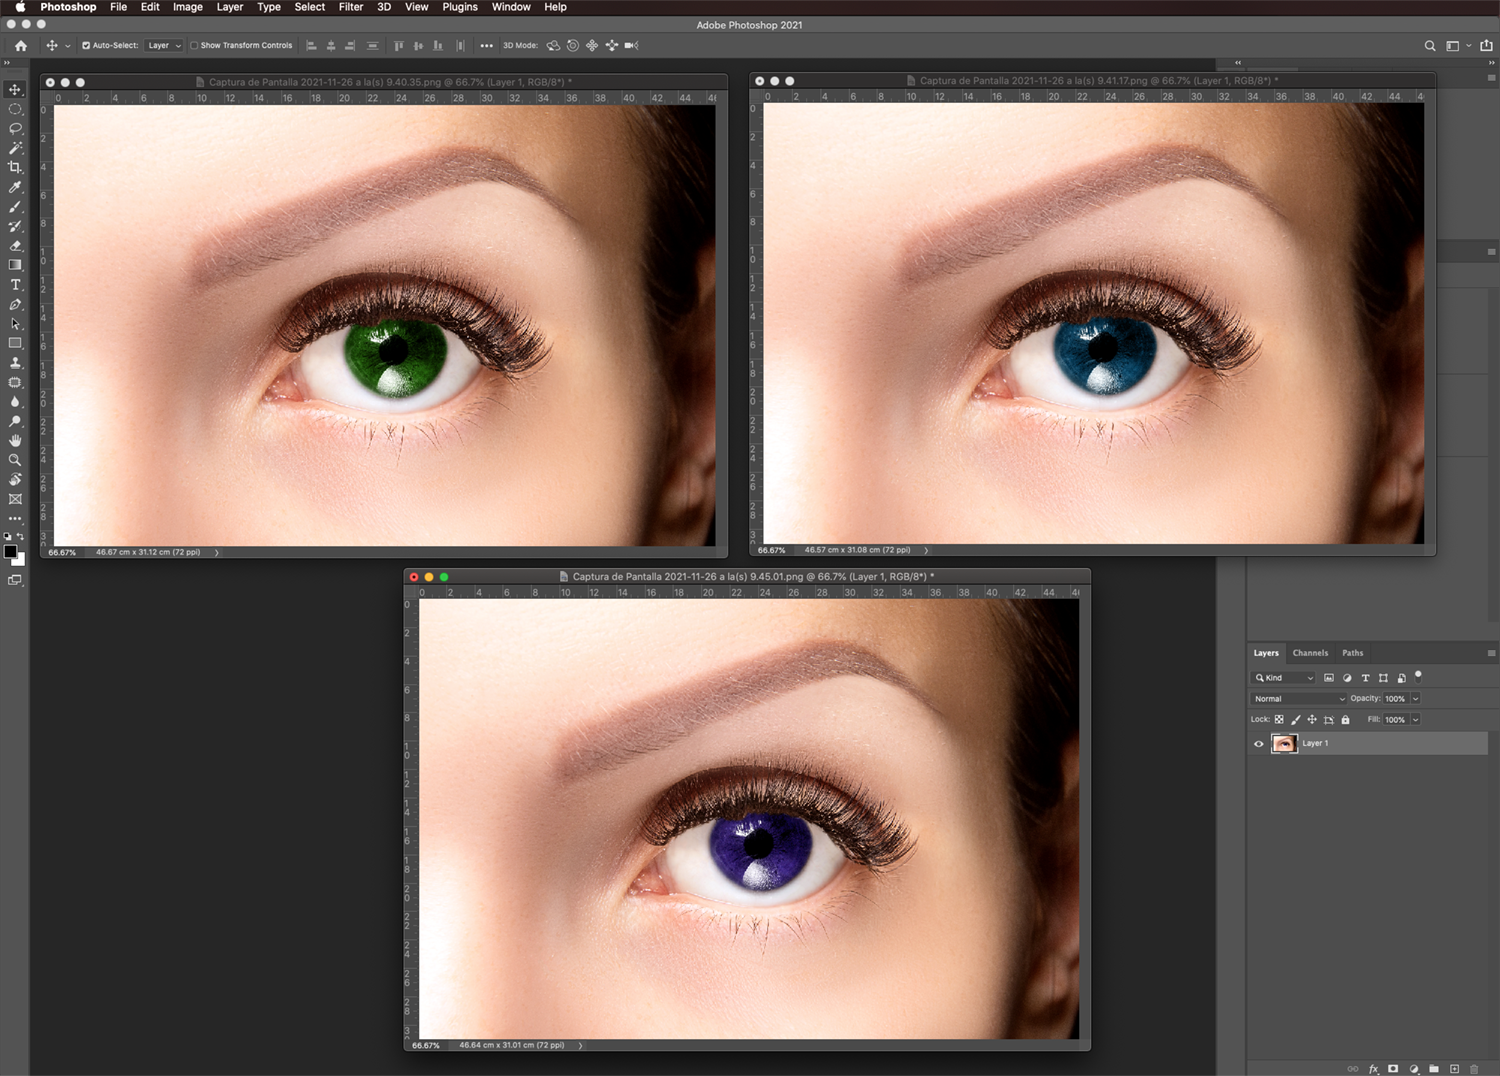
Here are some of the eye color changes we created.
So the next time you have a picture with red eyes, or maybe you just want to find out how you would look with a different eye color, you can change it easily using this technique with Photoshop.
If you enjoyed this tutorial, check out our guides on how to color match items or how to use color correction in Photoshop.


