
How to Create Custom Material Cut Settings for Silhouette
In Silhouette Studio the material cut settings can be found under the Send Panel. A selection of presets are available but you can also create custom material cut settings. The preloaded settings can be used as a guideline and adjusted for your specific material. In this tutorial we will show you how to create custom material cut settings for Silhouette Studio.
Earring SVGs are great for making unique earrings out of a variety of materials. Today, we will be using a butterfly earring SVG. Let us begin by opening Silhouette Studio.
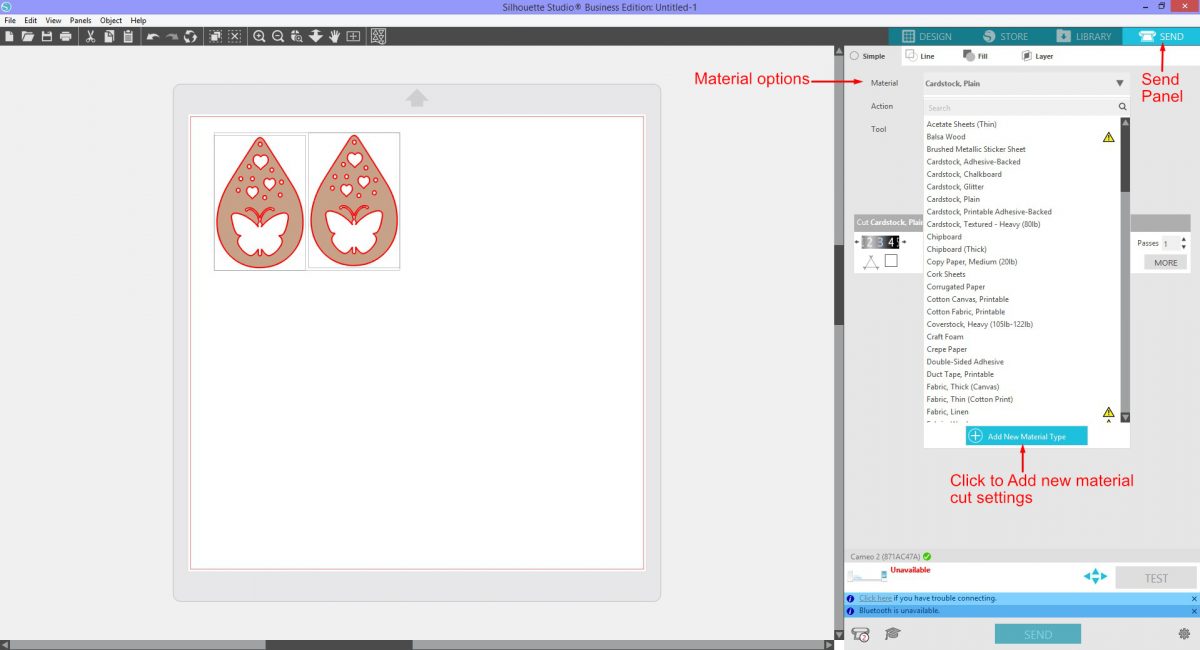
The Send panel is where the material cut settings are found and created. Open the design in Silhouette Studio and click on the Send panel. In the Send panel click on the Material options to expand the cut settings selection. Then at the bottom of the menu click on Add new material type.
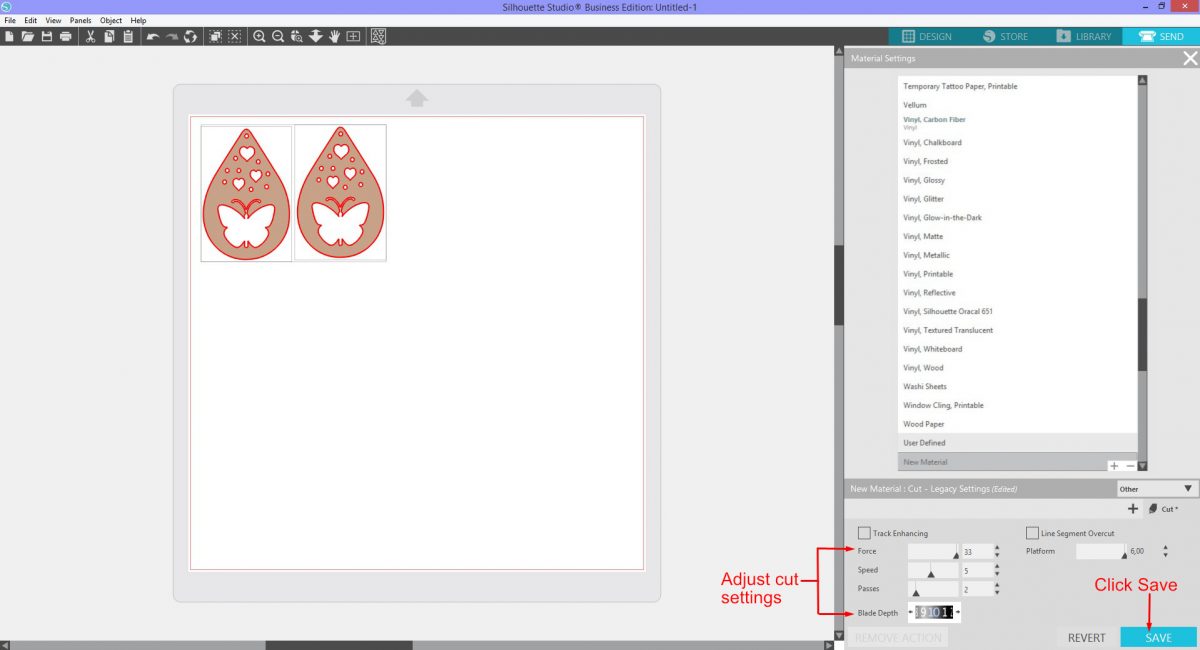
Another menu will open and at the bottom, under User defined, will be New material. Any new materials added will be placed here. We will start by adjusting the Material options. Leatherette or Faux Leather is a typical material used for earrings. But this material doesn't show under Material type so we will select Other.

The following settings are a guideline as not all material and machines cut the same. Click on the Blade Depth and adjust as needed. We set the depth to 10. Force was set to 33, Speed left at 5 and Passes set to 2.
Line Segment and overcut don't need to be adjusted for this material. Platform is used with the Curio machine but as we are using a Cameo this was not changed. Click on Save so the settings will be saved for the New material.
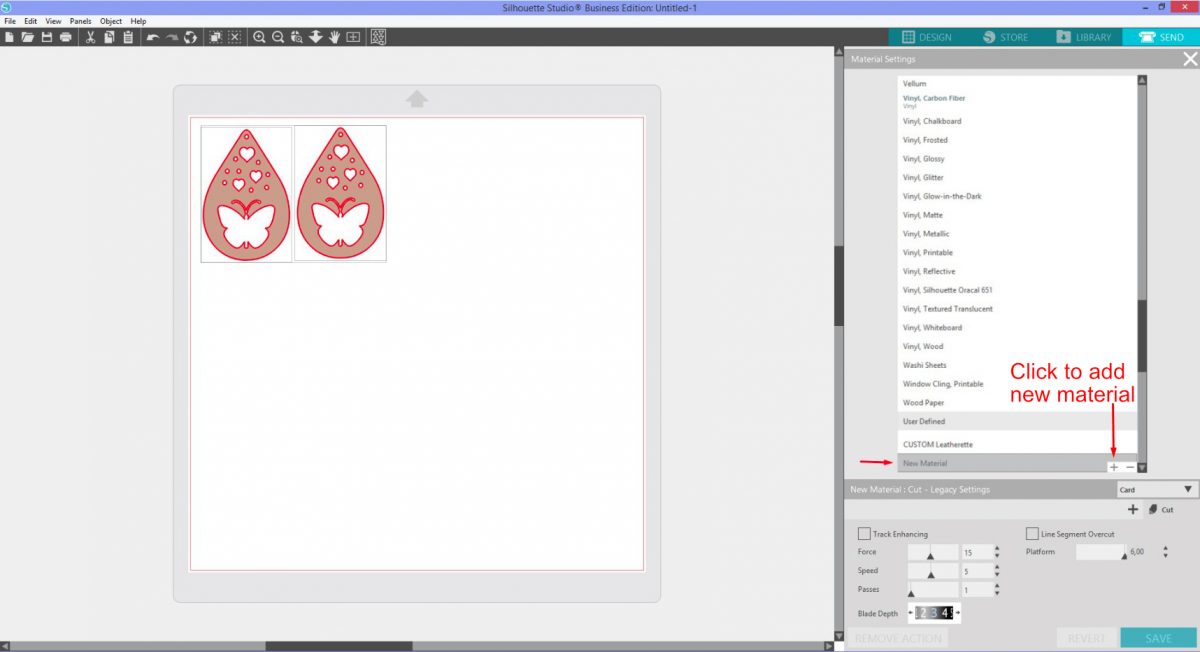
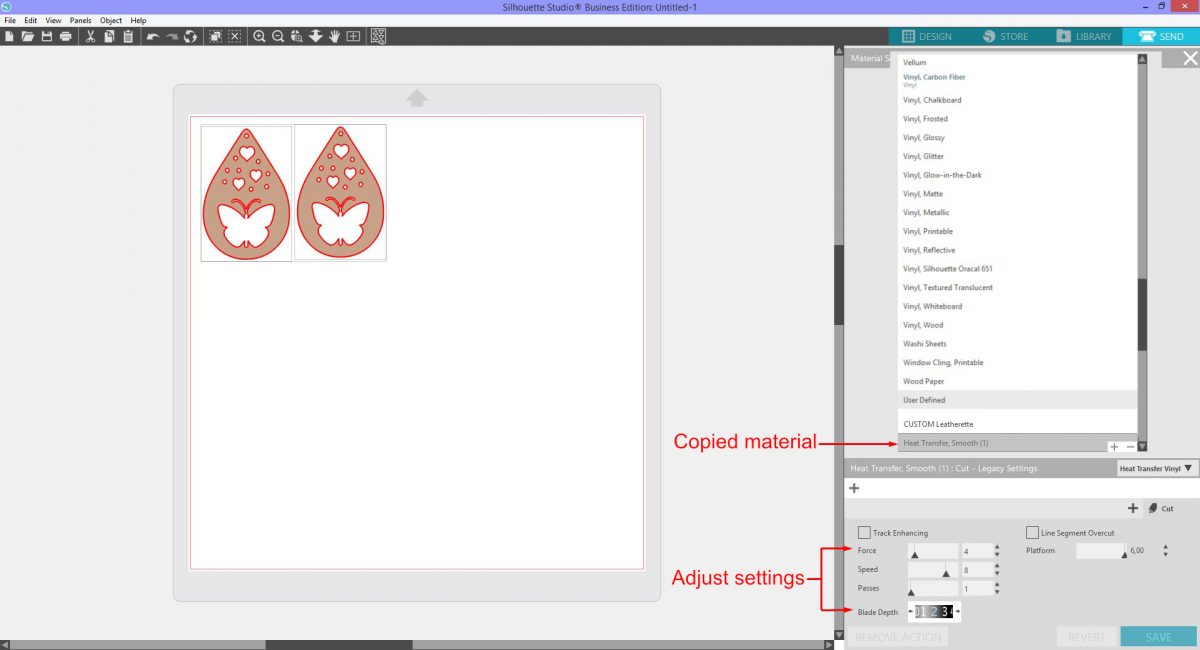
Right click on New Material and select Rename 'New Material'. Give the new material a name to help identify the cut settings e.g. CUSTOM Leatherette.

Additional custom settings can be added in the same way as Step 1. However there is a quicker way to create multiple custom settings. All it takes is one click under the Material Settings menu.
At the bottom right are Plus and Minus symbols. The Plus symbol is for adding a new material while the Minus deletes the selected material. Click on the Plus sign. The settings can be changed in the same way as with Step 1. Remember to click Save.
Click on the X symbol top right to exit the Material Settings menu. You will return to the main menu.
If you are unsure of where to start with cut settings, begin with a preset in Silhouette Studio. Each preset can be edited to fit your material needs and saved as a custom setting.
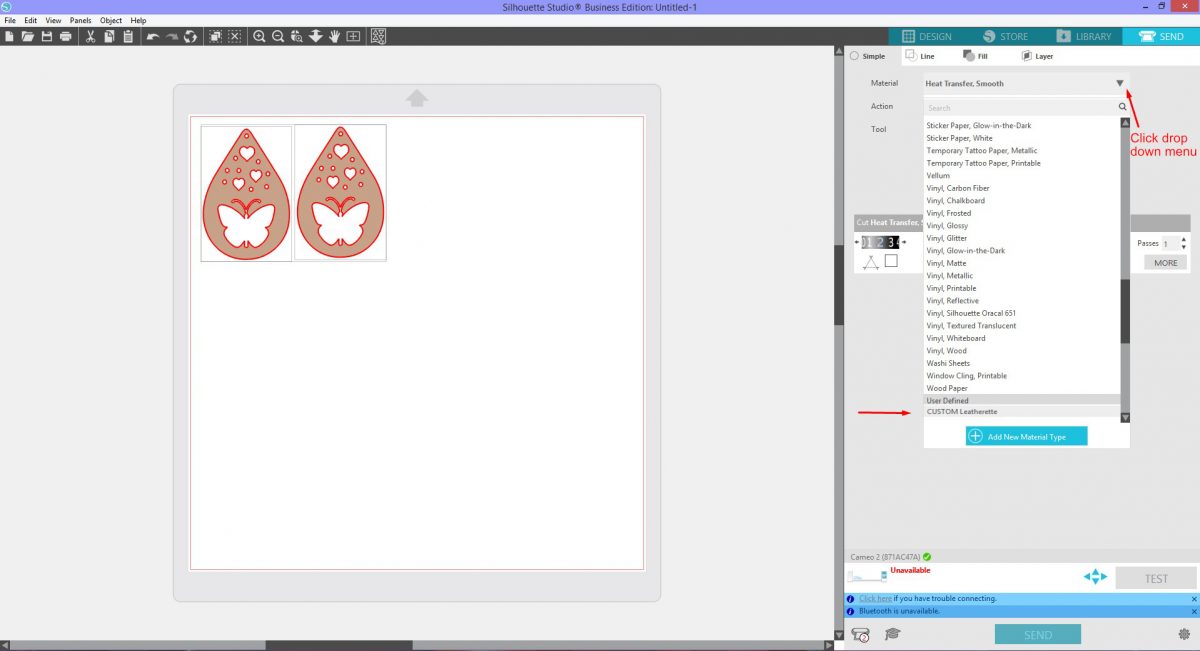
Click on the Material drop down menu and select an option. If we wanted to cut HTV to add to our Leatherette earrings we could start with the Heat Transfer, Smooth settings.
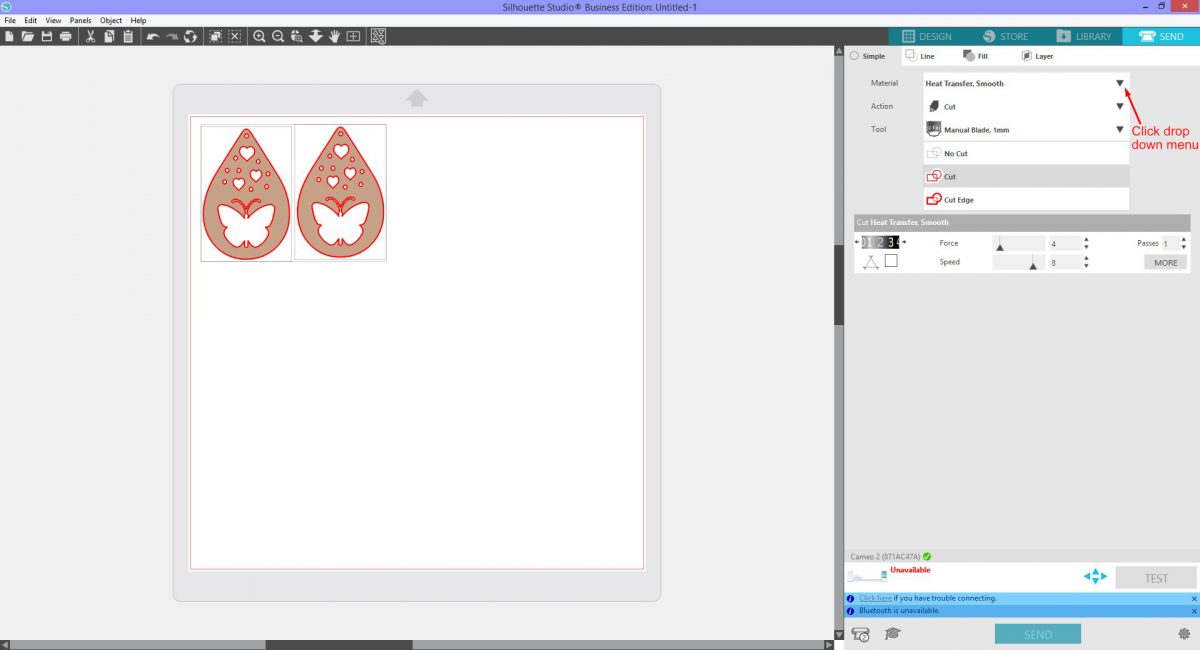
The material settings need to be edited in order to save as a custom setting. In this case the Blade was changed to a depth of 3 and the Force 15. The option to save will become available once the settings have been adjusted. You can now click Save As and the Material Settings will open. Adjust the settings further if needed then click Save.
The original presets can be adjusted under the Material Settings menu. But, as this will change the presets it's suggested that custom settings be created and saved instead. This will preserve the original presets.
Click the X symbol top right to close out of the Material Settings. We want to keep the original preset as is, so click on Revert. This will revert the settings back to what they were originally.
The custom material cut settings are setup and we can now cut our design. To access the custom settings, under the Send panel click on Material. Scroll down to User Defined then select the custom setting for your specific material. Silhouette Studio will update to show the custom settings.
Even with the custom settings setup it's always a good idea to do a test cut. We do test cuts to check the settings or the sharpness of the blade. We also do this as a precaution in case anything has changed. You are all set to cut out your project.
If you liked this tutorial make sure to check out some of our other Silhouette Beginner Tutorials such as using flexi shapes, using warp templates, and how print and cut in Silhouette.
Earring SVGs are great for making unique earrings out of a variety of materials. Today, we will be using a butterfly earring SVG. Let us begin by opening Silhouette Studio.
Step 1 - Add a custom material cut setting
The Send panel is where the material cut settings are found and created. Open the design in Silhouette Studio and click on the Send panel. In the Send panel click on the Material options to expand the cut settings selection. Then at the bottom of the menu click on Add new material type.
Another menu will open and at the bottom, under User defined, will be New material. Any new materials added will be placed here. We will start by adjusting the Material options. Leatherette or Faux Leather is a typical material used for earrings. But this material doesn't show under Material type so we will select Other.
The following settings are a guideline as not all material and machines cut the same. Click on the Blade Depth and adjust as needed. We set the depth to 10. Force was set to 33, Speed left at 5 and Passes set to 2.
Line Segment and overcut don't need to be adjusted for this material. Platform is used with the Curio machine but as we are using a Cameo this was not changed. Click on Save so the settings will be saved for the New material.
Right click on New Material and select Rename 'New Material'. Give the new material a name to help identify the cut settings e.g. CUSTOM Leatherette.
Step 2 - Add multiple material cut settings
Additional custom settings can be added in the same way as Step 1. However there is a quicker way to create multiple custom settings. All it takes is one click under the Material Settings menu.
At the bottom right are Plus and Minus symbols. The Plus symbol is for adding a new material while the Minus deletes the selected material. Click on the Plus sign. The settings can be changed in the same way as with Step 1. Remember to click Save.
Click on the X symbol top right to exit the Material Settings menu. You will return to the main menu.
Step 3 - Use the preset material cut settings
If you are unsure of where to start with cut settings, begin with a preset in Silhouette Studio. Each preset can be edited to fit your material needs and saved as a custom setting.
Click on the Material drop down menu and select an option. If we wanted to cut HTV to add to our Leatherette earrings we could start with the Heat Transfer, Smooth settings.
The material settings need to be edited in order to save as a custom setting. In this case the Blade was changed to a depth of 3 and the Force 15. The option to save will become available once the settings have been adjusted. You can now click Save As and the Material Settings will open. Adjust the settings further if needed then click Save.
The original presets can be adjusted under the Material Settings menu. But, as this will change the presets it's suggested that custom settings be created and saved instead. This will preserve the original presets.
Click the X symbol top right to close out of the Material Settings. We want to keep the original preset as is, so click on Revert. This will revert the settings back to what they were originally.
Step 4 - Use the custom material cut settings
The custom material cut settings are setup and we can now cut our design. To access the custom settings, under the Send panel click on Material. Scroll down to User Defined then select the custom setting for your specific material. Silhouette Studio will update to show the custom settings.
Even with the custom settings setup it's always a good idea to do a test cut. We do test cuts to check the settings or the sharpness of the blade. We also do this as a precaution in case anything has changed. You are all set to cut out your project.
If you liked this tutorial make sure to check out some of our other Silhouette Beginner Tutorials such as using flexi shapes, using warp templates, and how print and cut in Silhouette.


