- By Design Bundles
- 7 Mins
- Intermediate
- Silhouette Tutorials
How to use the Stippling Tool with Photos in the Silhouette Curio
Bring photos to life in a unique way, by stippling on to metal sheets.
Stippling is the process of using dots to create a design. This can be done with a pen on a medium. Another way is to use the Stippling Tool with the Silhouette Curio. It taps little indentations on thin metal sheets. The end result is a stylish metal sheet design. In this tutorial we will show you how to use the Stippling tool with photos and the Silhouette Curio.
It's good to note that black and white photos with high contrast seem to work best.
Step 1 - Import your photo
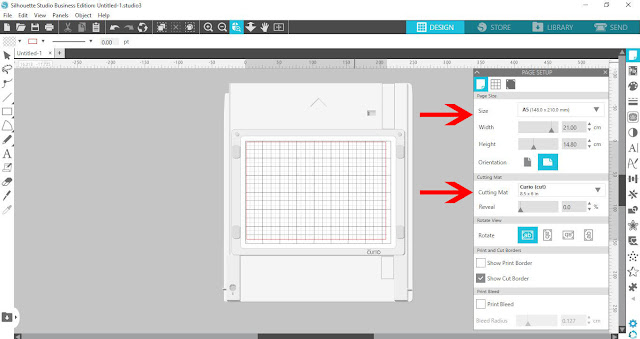
We will begin by opening Silhouette Studio and adjust the mat setting for our Curio machine. Click on the Page Setup icon top right. In the panel, depending on your version, change the Size or Machine to Curio. This should automatically adjust the Mat and Media size. If not, change the Cutting mat to Auto (Curio Cut) and Media to Auto (8.5x6).
If you are using a larger Curio mat, the Media is where you can adjust the size. The screen will change to show the Curio mat.
Go to File > Open and locate where your photo is stored. Click Ok to open.The image may open quite large so you will need to resize it.
You can do this by clicking on the image then dragging in on one of the corner handles. You can also resize by going to the Transform Panel on the right side panel. Select the second icon in the panel called Scale. Either click on a percentage or move the Scale slider and click Apply.We adjusted our size to 33%.
Step 2 - Add a basic Stipple design
The Stipple panel contains all of the stipple options. On the right hand side click on the dotted star to open the Stipple Panel.
Select the second option under the Stipple panel called Stipple Trace. We have a very helpful tutorial on tracing with the Stippling Tool if needed.
Click on the option that says Select Stipple Area. Next, click and drag out a trace box around the area you want to trace. Here we traced around the entire photo.
Once you release your mouse button a basic stippling will be applied to the photo.
Step 3 - Adjust the Stippling options
We now want to change the Stippling options. Under the Stippling panel, near the bottom, change the Refinement to 4. Thendrag the slider forthe Grid Spacingas far leftas it will go. This will clear up the image and give definition.
You have the option to invert the image and stippling. Doing this will give you a negative effect.
You can refine the design more by selecting the drop down box next to Stipple Style.
Go through the numerous Stipple Styles until you find one you are happy with.
Now, click on Create Stipple. The design will suddenly become very dark. Don't worry about this, it will not be the final effect.
Click on the Send button top right. Choose your Material and change the action to Stipple in the drop down menu. Make sure that the Tool selected is the Stipple Tool.
You will see all the dots in the Stipple effect show up as red. These are the areas that the tool will tap out.
You can create a different effect by changing out the Stipple tool for a marker or sketch pen.
Next up, learn how to use the sketch tooland how to print and emboss with the Silhouette Curio.
6 Related Silhouette Tutorials
With the Silhouette Alta 3D software, you can also create text designs. Objects with 3D text can be personalized for all kinds of projects. These projects can include cake toppers, luggage tags, monograms, and so much more. In this tutorial, we will show you how to use the Text tool ...
1- Open Silhouette Studio2- Add graphic and click on the replicate panel3- To duplicate click on the image showing what you trying to do.Here is the result:3- Rows and columns will produce three or four graphics total in the direction of the image you choose.Here ...
In today’s tutorial you will learn how to use the Modify Tool in Silhouette Studio. With the Modify Tool Panel, you can change the interaction between overlapping objects. This is especially useful when designing cut files from scratch. The ModifyTool is available in all Silhouette Studio versions.Throughout the ...
1- Open Silhouette Studio. Click on the cutting mat options and change to Curio. Change the size of the cut area to fit the curio mat.2- With the cutting mat and the size changed, you will see the curio mat appears on the design space.3- Type your text.4...
The Subtract tool in Silhouette Studio can be found in the Modify panel on the right side menu bar. You can also access it through the Objects menu at the top and select Modify then Subtract. The tool requires two at least SVG images where any part of the top ...
Sketching with the Silhouette Curio opens up so many creative possibilities. With the spacing distance you are able to sketch on thicker items including wooden pieces. Fine art can be created using sketch pens as well as invitations, intricate mandalas and much more. In this tutorial we will show you ...

 All your Font Needs


