


By Design Bundles
Cricut Tutorials8 min
Simple Monogram Design in Cricut Design Space Mobile App
Monograms are a great way to add a personal touch to glassware, PJs, and so much more. A monogram is a design that displays individual initials. It can also contain the first letter of a person’s first, last, and middle name. Today we will learn how to create a simple monogram design in the Cricut Design Space mobile app.
We will be working with the shapes and text icons to bring this design together. To top it off, we will be adding a beautiful vintage script font to our design. We have several script font duos on Font Bundles, similar to the one I am using today.
First, click on the Shapes icon on the lower left-hand side of the toolbar. Next, insert two circle shapes onto the canvas page. We have a more in-depth tutorial on using the shapes icon in the Cricut Design Space app if needed.
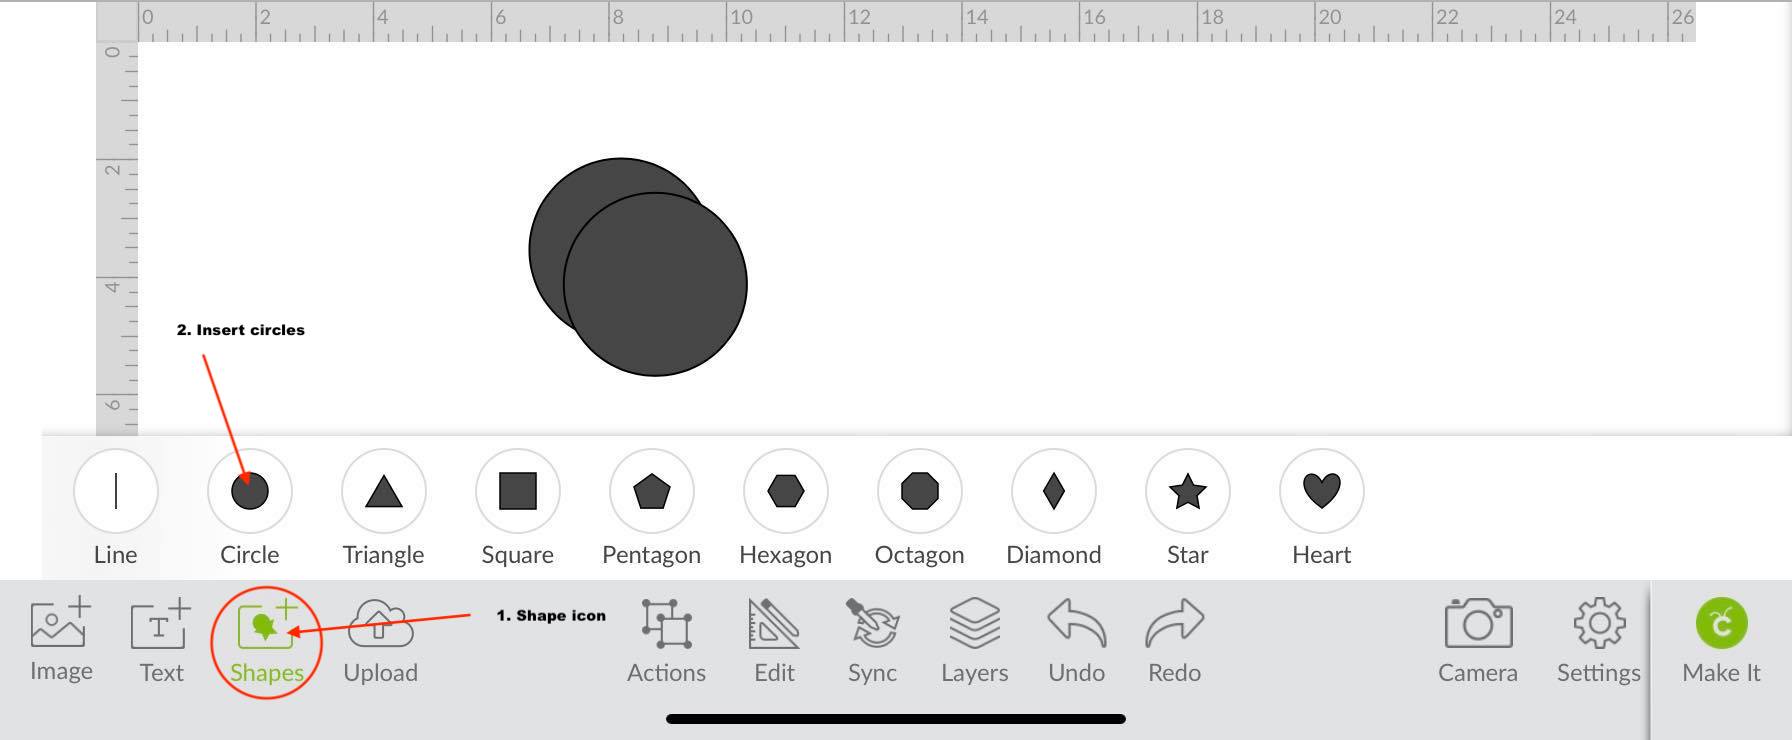
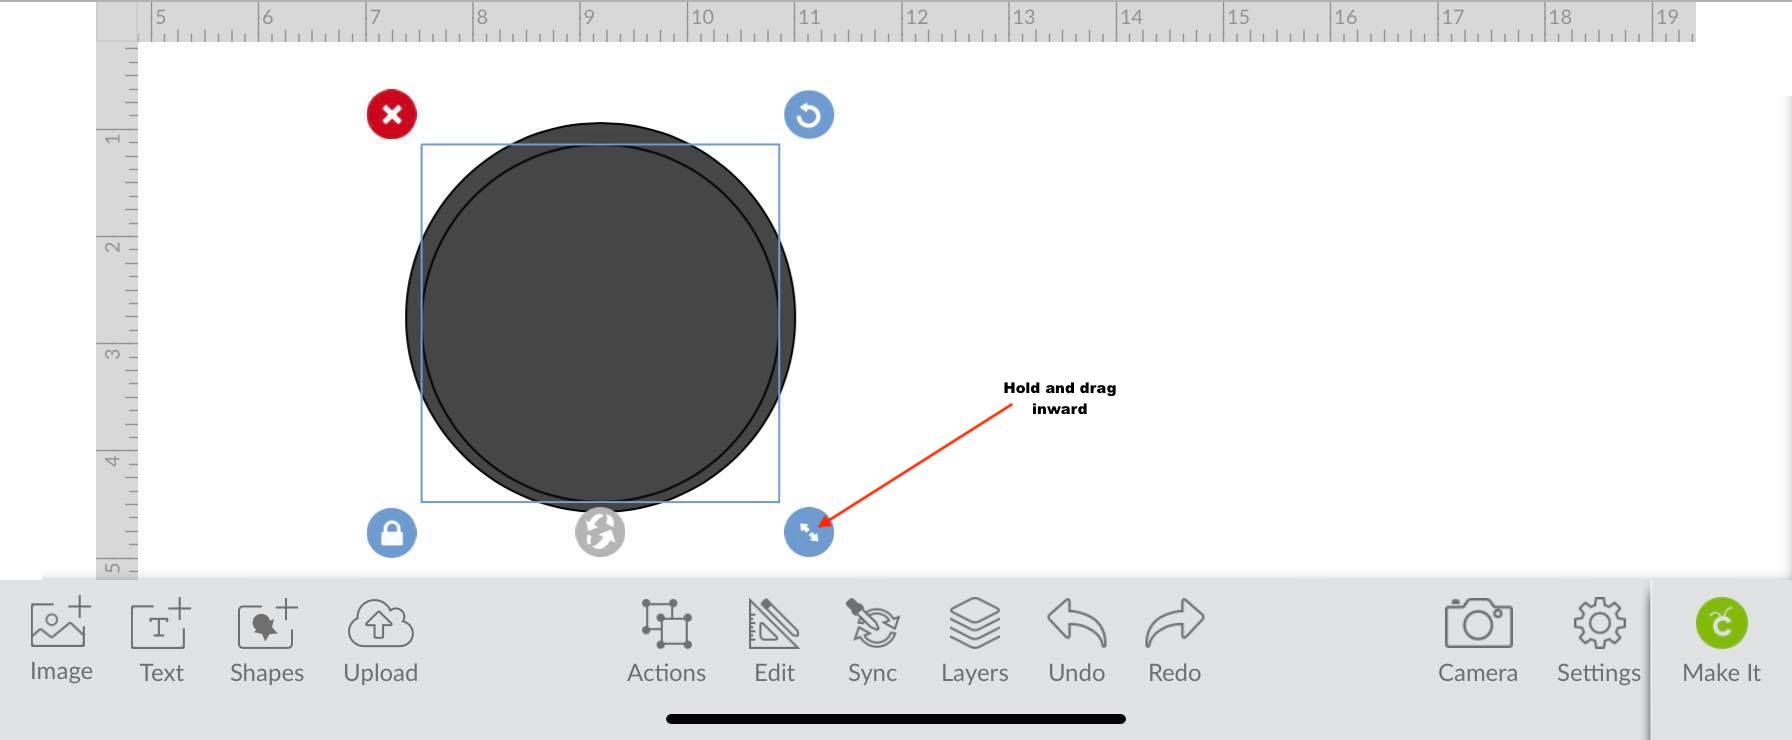
Next, select one of the circles and place it on top of the other one. Resize the circle shape until it is just a bit smaller than the shape underneath it. To resize the circle shape, select the shape and then hold the circle on the lower right-hand side to drag in.
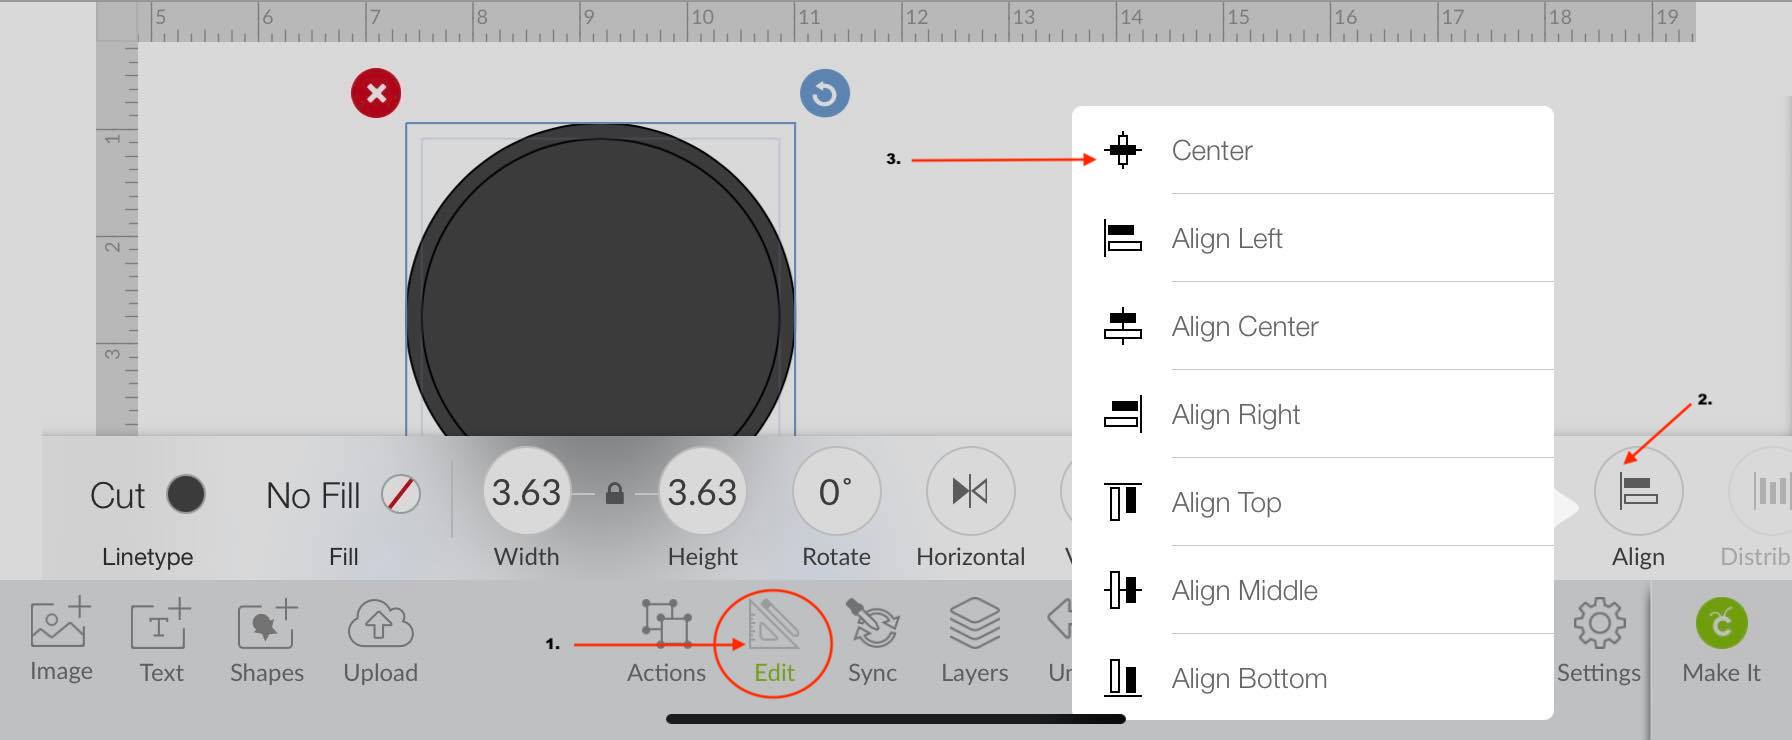
Now, select both shapes and align them to the center. You can do this by clicking the Edit icon and clicking Align to Center under the edit toolbar. We have a great tutorial on using the editing toolbar if you want to know more about it.
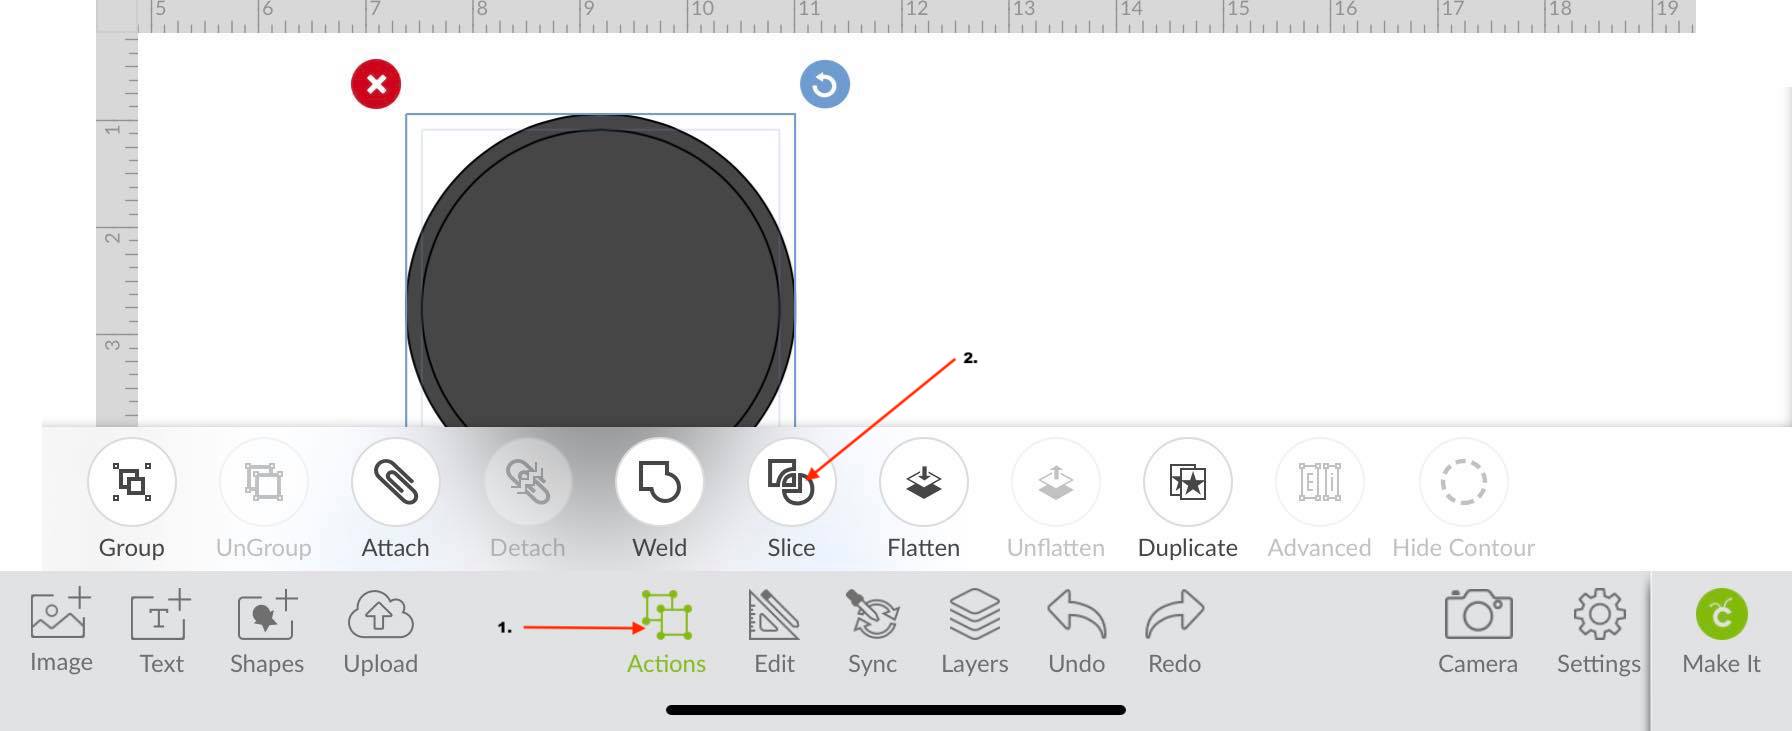
After aligning the two circles, select both items and then use the slice tool to cut out the smaller circle from the bigger one. Pull the unwanted pieces apart and then delete.
We will be left with the circle frame that we will add our monogram to.
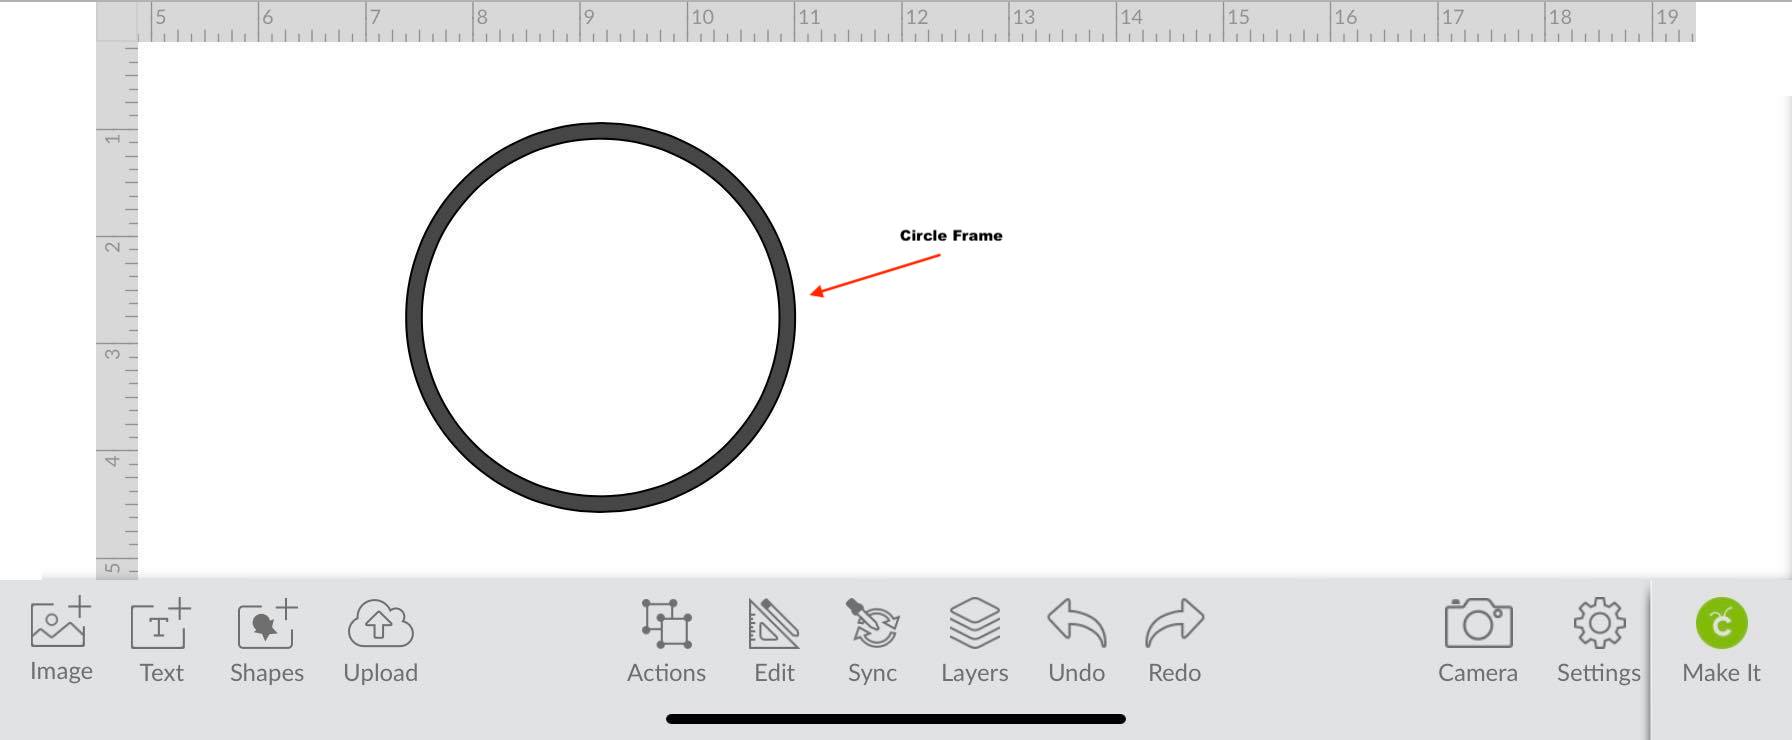
Type out your initials or text for the project using the Text icon on the lower toolbar. If this is the first time working with the text icon, we have a great tutorial on how to add text in Cricut Design Space if needed.
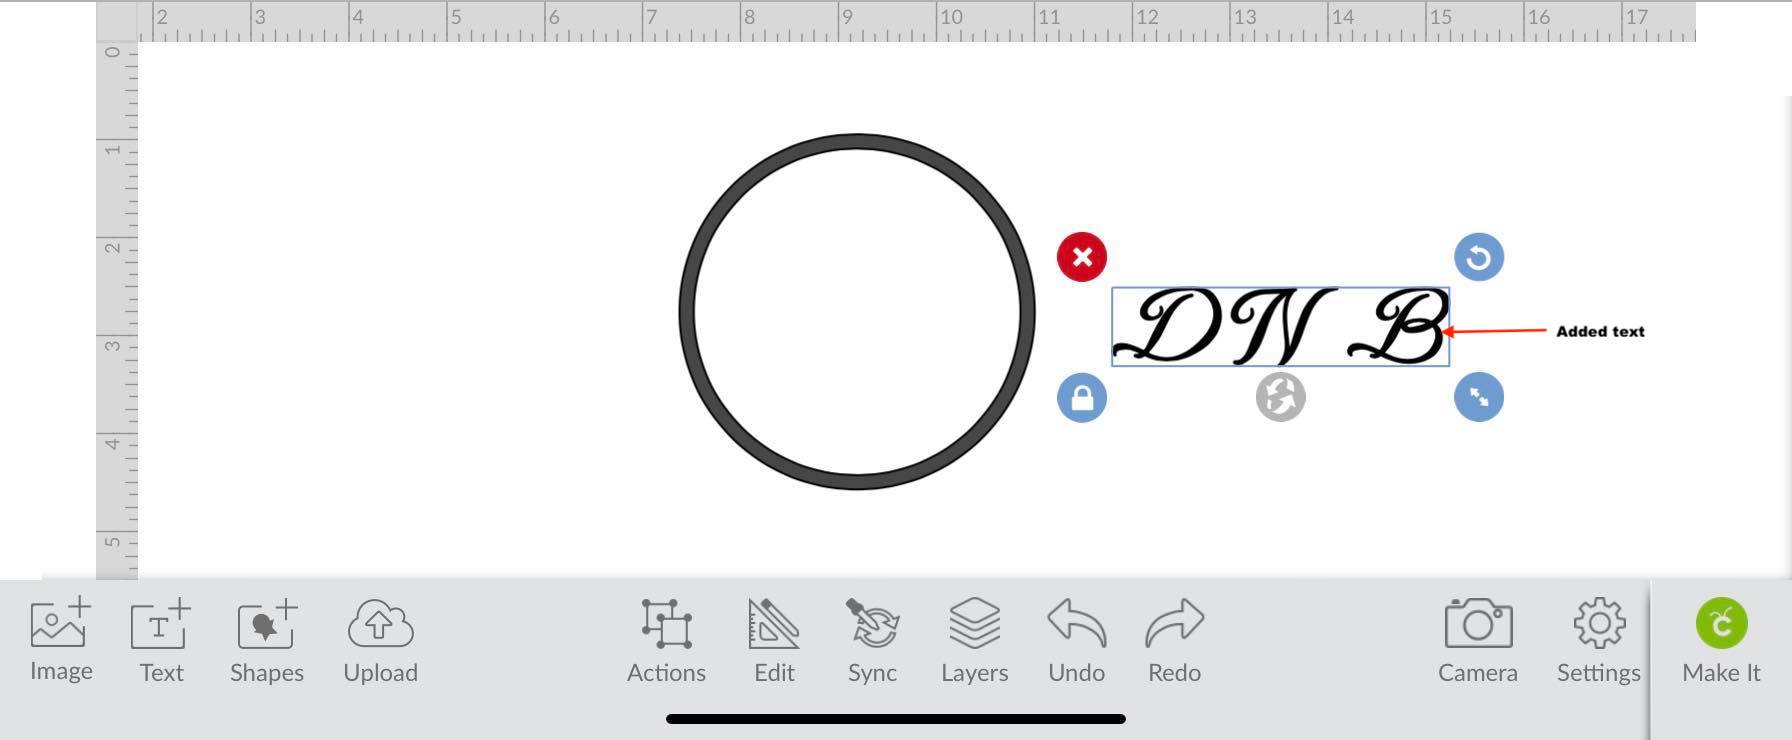
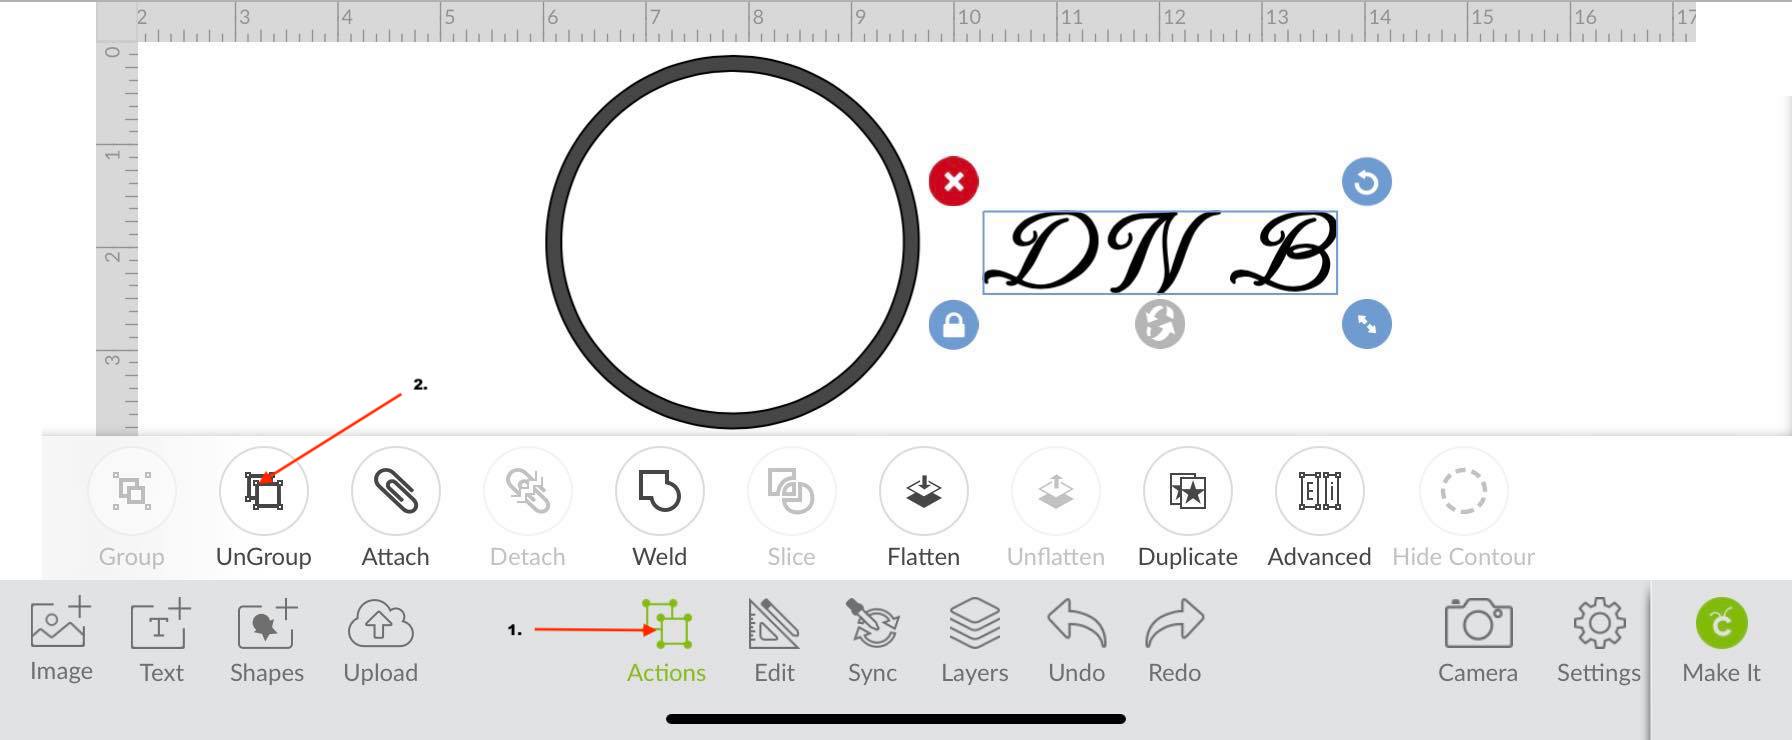
If you are using more than one letter then ungroup the text. Do this by clicking Ungroup under the Action icon.
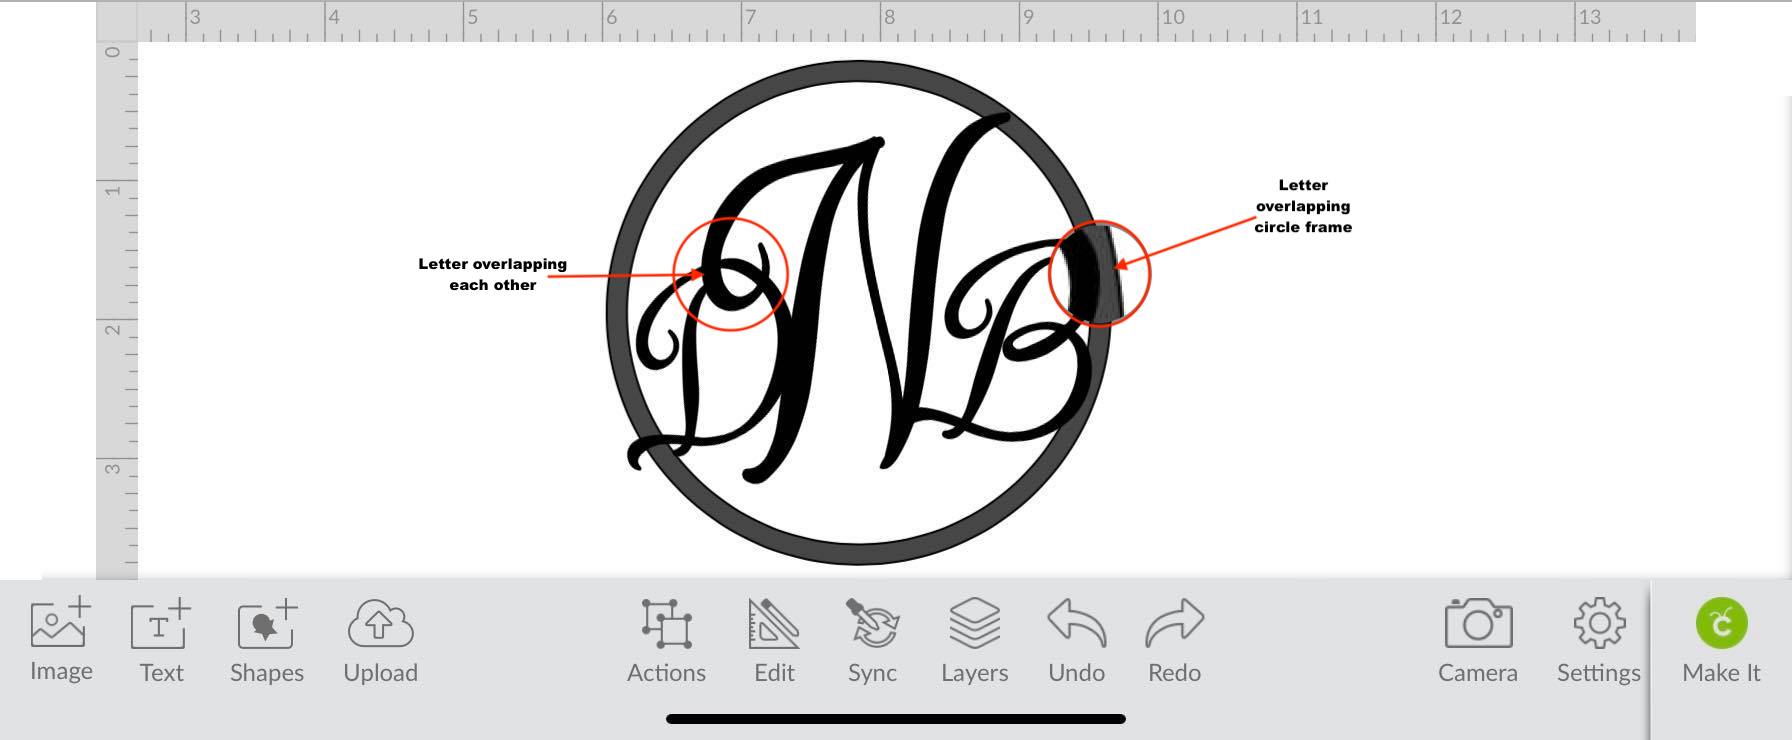
Next, place each letter inside of the circle. Arrange the letters so they slightly overlap each other and the circle frame.
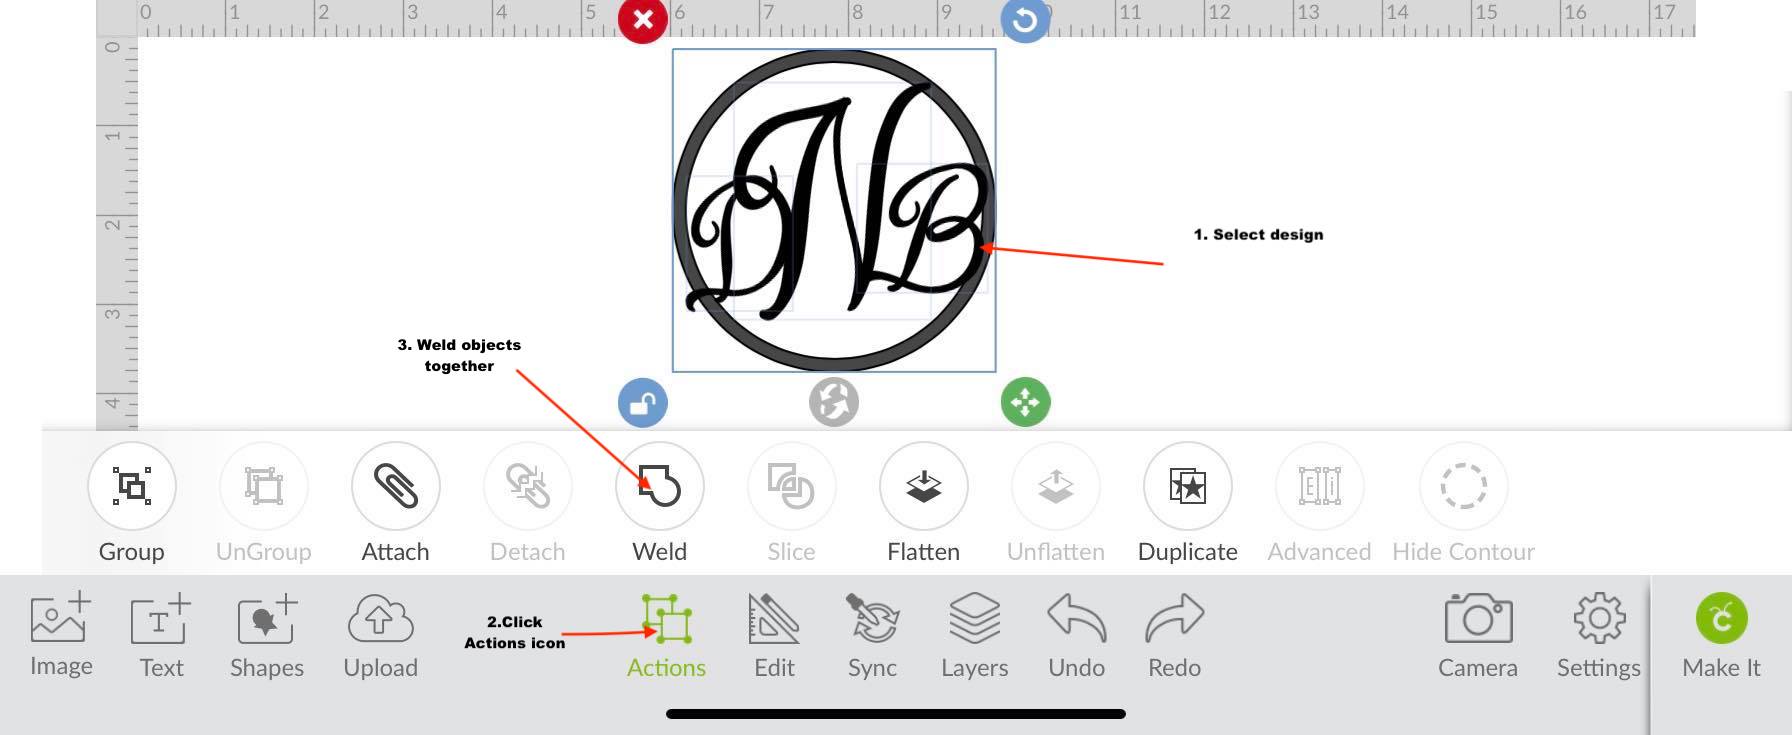
After arranging the letters, you can now weld everything together. To do this, select all the objects in the artwork and then click the Action icon. A pop-up toolbar will appear right above it. You can now click on the Weld tool. The weld tool will bring all the layers together so that it will be one continuous cut line.
Great job! You have successfully created a simple monogram design. Take it a text step further and learn how to make a split monogram in the Cricut Design Space app. Next up, learn how to add images to text or make a photo puzzle in Cricut Design Space.
We will be working with the shapes and text icons to bring this design together. To top it off, we will be adding a beautiful vintage script font to our design. We have several script font duos on Font Bundles, similar to the one I am using today.
Step 1 - Create a Circle Frame
First, click on the Shapes icon on the lower left-hand side of the toolbar. Next, insert two circle shapes onto the canvas page. We have a more in-depth tutorial on using the shapes icon in the Cricut Design Space app if needed.
Next, select one of the circles and place it on top of the other one. Resize the circle shape until it is just a bit smaller than the shape underneath it. To resize the circle shape, select the shape and then hold the circle on the lower right-hand side to drag in.
Now, select both shapes and align them to the center. You can do this by clicking the Edit icon and clicking Align to Center under the edit toolbar. We have a great tutorial on using the editing toolbar if you want to know more about it.
After aligning the two circles, select both items and then use the slice tool to cut out the smaller circle from the bigger one. Pull the unwanted pieces apart and then delete.
We will be left with the circle frame that we will add our monogram to.
Step 2 - Type out Initials
Type out your initials or text for the project using the Text icon on the lower toolbar. If this is the first time working with the text icon, we have a great tutorial on how to add text in Cricut Design Space if needed.
Step 3 - Arrange the Letters and Weld
If you are using more than one letter then ungroup the text. Do this by clicking Ungroup under the Action icon.
Next, place each letter inside of the circle. Arrange the letters so they slightly overlap each other and the circle frame.
After arranging the letters, you can now weld everything together. To do this, select all the objects in the artwork and then click the Action icon. A pop-up toolbar will appear right above it. You can now click on the Weld tool. The weld tool will bring all the layers together so that it will be one continuous cut line.
Great job! You have successfully created a simple monogram design. Take it a text step further and learn how to make a split monogram in the Cricut Design Space app. Next up, learn how to add images to text or make a photo puzzle in Cricut Design Space.
Related Tutorials
Cricut Tutorials
How to Make a Split Monogram in Cricut Design Space Mobile App
Cricut Tutorials
How to Curve Text in Cricut Design Space Mobile App
Today we’ll focus on how to curve Text in Cricut Design Space App....
Cricut Tutorials
How to Print then Cut in Cricut Design Space Mobile App
Learn how to easily use the Print then Cut Feature in Cricut Design Space Mobile App.
Cricut Tutorials
Text Options in Cricut Design Space Mobile App
Cricut Tutorials
How to Weld Text in Cricut Design Space Mobile App
In this tutorial we will show you how to weld text in the Cricut Design Space App.
Cricut Tutorials
How to Use the Slice Tool in Cricut Design Space Mobile App
Discover how to slice in Cricut Design Space Mobile App using the Slice Tool.


