- By Design Bundles
- 11 Mins
- Illustrator Tutorials
Pop Art Vector Images in Illustrator
Discover how to make a pop art inspired design in Illustrator with this step by step tutorial.
This tutorial will show you how to create a pop art vector image in Illustrator from a photo. Pop art vector images work well on posters, stickers, and sublimation designs as they are very striking with saturated colors and bold outlines.

For this tutorial, you will need an image or portrait. We chose to use an image of a woman thinking. Illustrator has a built-in Pop Art color palette, but instead, we will be using a 90s color palette and a pale skin tone color palette from Design Bundles.
Step 1 - Import Image Into Layer 1 and Create a New Layer
Use the Place Command
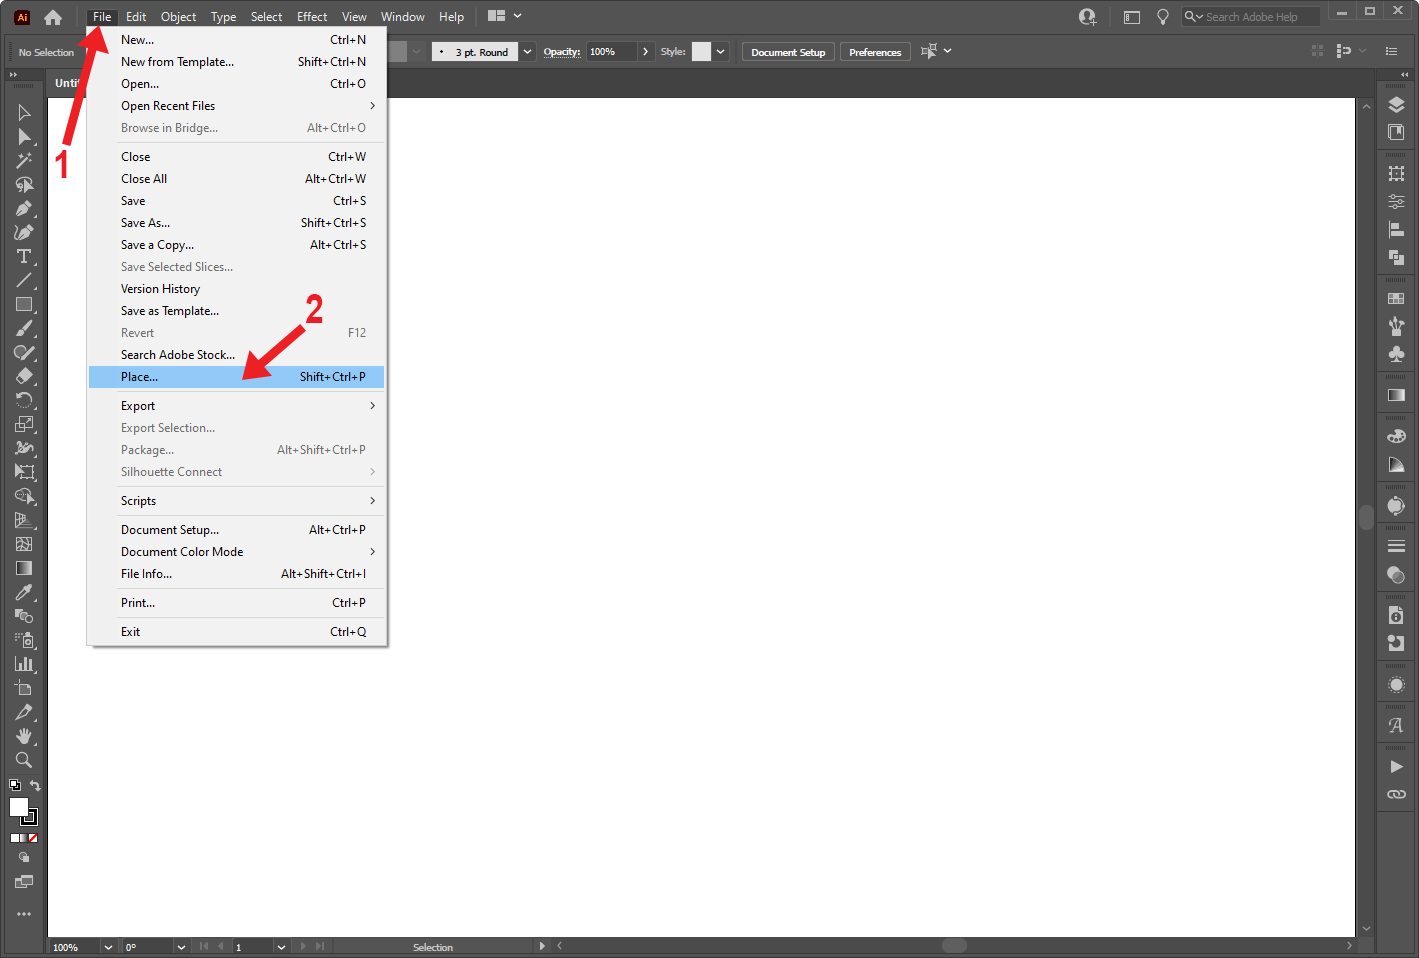
In a new Illustrator document, import your image by going to File > Place (Shift+Ctrl/Cmd+P).

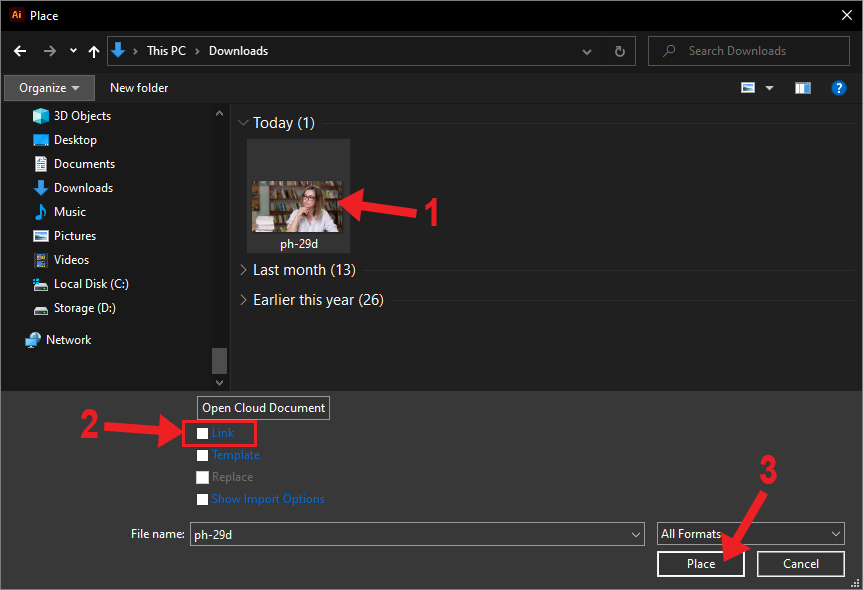
Select your image in the Place dialog box, uncheck the Link box at the bottom, and click Place.

Click on the canvas to place the image. Hold Shift, click one of the handles on the bounding box, and drag to resize the image. Move the image if needed.

Lock Image Layer and Create a New Layer
Before we start creating the vector lines and shapes, we want to lock the image layer. In the Layers panel, click on the column to the right of Layer 1’s eye icon, and a lock icon will appear when the layer has been locked.
After locking the layer, click the Create New Layer icon at the bottom of the Layers panel and select the new layer (Layer 2).

Step 2 - Create Vector Lines and Shapes on Layer 2
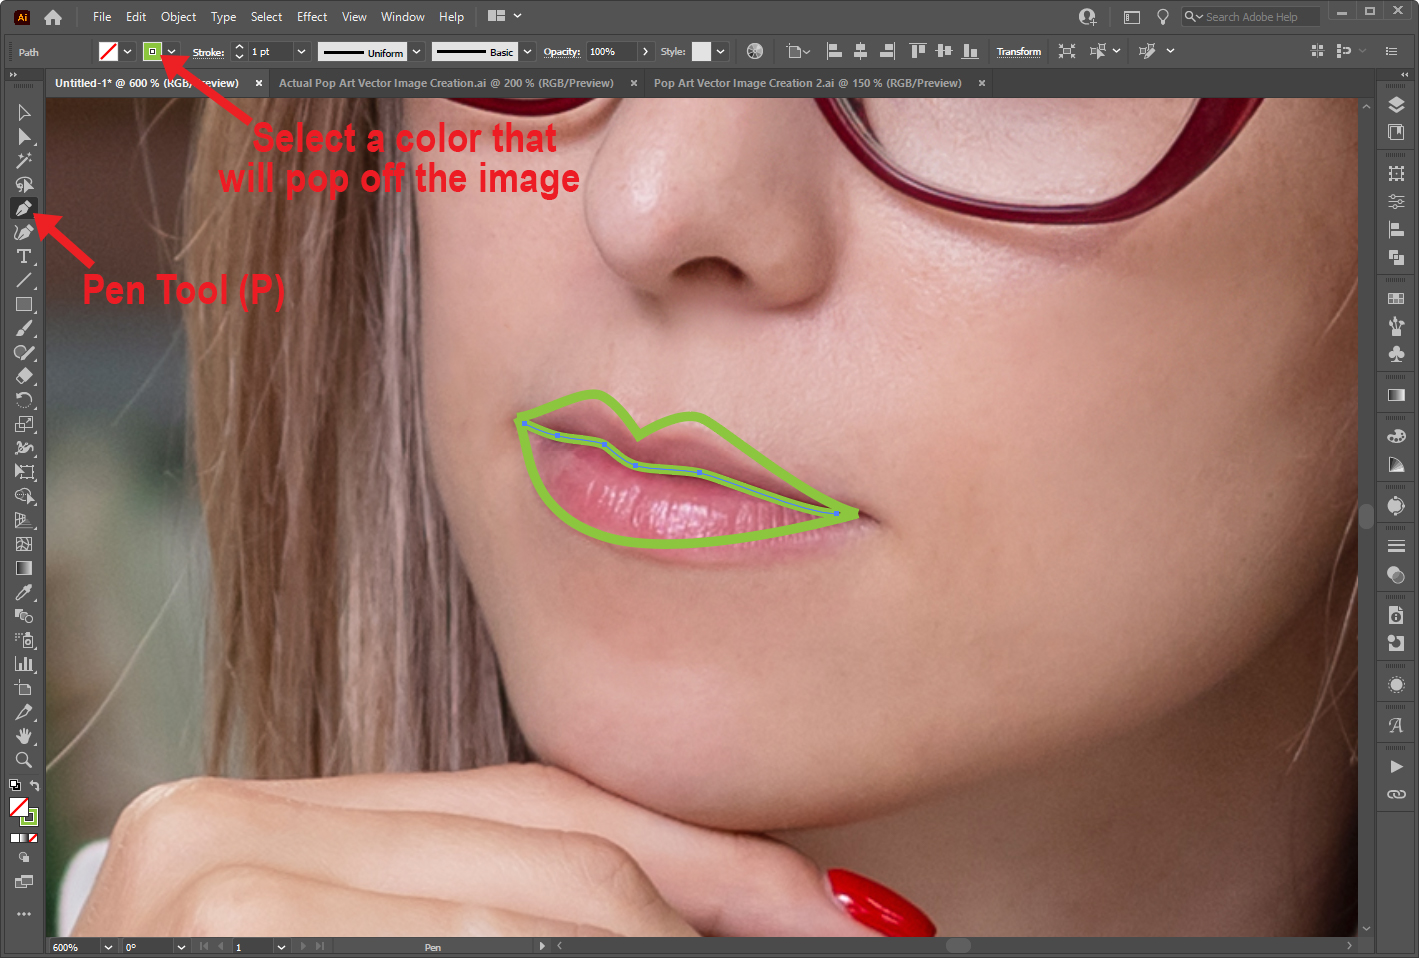
Now we can create the outlines and shapes of our subject in Layer 2. Our subject is the woman in the image, and we’ll be ignoring the background and the pencil she’s holding.
Zoom in on the subject, if needed. Select the Pen Tool (P), and pick a stroke color that will pop off your image as we will be creating many lines and shapes. Create the lines and shapes by tracing the subject. They don’t have to be exact.

You can also add lines and shapes based on the highlights and shadows of the image.
Vary Stroke Weight and Profile
Vary the stroke weight and the stroke profile to make the vector image more interesting. Select the stroke(s) and open the Stroke panel in the top or right toolbar to edit the stroke weight and profile.

The following image shows how the different strokes look.

Step 3 - Expand Appearance and Then Expand Layer 2
Once all the vector lines and shapes have been created, click the eye icon for Layer 1 in the Layers panel to hide the original image. This will help you see your vector image better.
In the Layers panel, click the circle to the right of Layer 2’s name to select everything in Layer 2. Go to Object > Expand Appearance.

With everything still selected, go to Object > Expand.

In the Expand dialog box, leave the Fill and Stroke checkboxes marked and click OK.

Step 4 - Duplicate Layer 2 and Lock New Layer
Back in the Layers panel, with Layer 2 collapsed, hold Alt/Option, click Layer 2, drag it up, and let go when you see a slightly thicker blue line appear. This will duplicate all of Layer 2.

Double-click on the new layer’s name (Layer 2 copy) and rename it to Layer 3. Then lock Layer 3.
Step 5 - Draw Rectangle, Move Rectangle to Back, and Remove Front
Select Layer 2. Next, click the Rectangle Tool (M) and pick a fill color that’s different from the existing lines and shapes. Draw a rectangle around the vector image. With the rectangle selected, right-click, and go to Arrange > Sent to Back.
Select everything in Layer 2. In the Pathfinder panel, choose Remove Front.

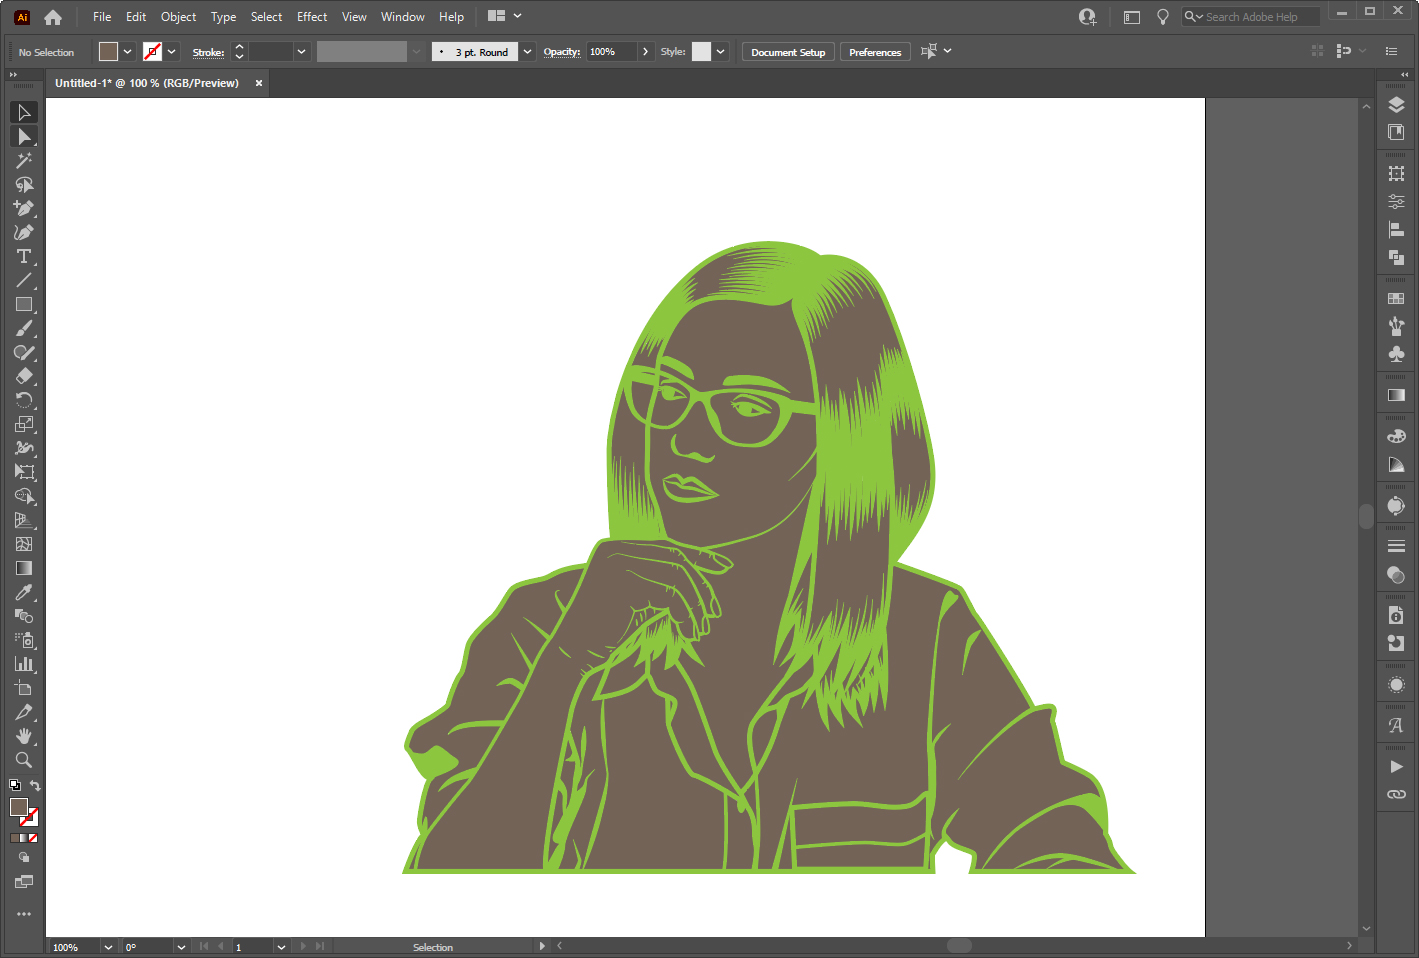
Press Shift+Ctrl/Cmd+G to ungroup. Then delete the areas outside of your subject. Your image should be similar to the one below.

Step 7 - Change Fill Colors
You should now have one layer with the outlines (Layer 3), one layer with the inside shapes (Layer 2), and one layer of the original photo (Layer 1).
Unlock Layer 3 and select everything in it. Change the fill color to black or any color you want, and lock the layer again.

Go through the shapes on Layer 2 and change their colors. The colors don’t have to match the original image. Remember, we are creating a pop art design that has bold, saturated colors.
Step 8 - Add Dot Patterns
Next, we will add a seamless dot pattern to portions of the vector image. The dot pattern is often seen in pop art and was inspired by halftone dots and comic book dots. You can create your own seamless dot patterns. Although our guide on creating a seamless pattern in Illustrator doesn’t exactly show you how to make the dot pattern, you may still find it helpful.
You can create these patterns in all sorts of colors and use them to fill your shapes. See the following image for an example of the dot pattern used in the vector image.

Step 9 - Add Extra Design Elements to the Vector Image
We won’t cover creating these elements in this tutorial, but you can add extra design elements such as a thought or speech bubble and a background. You can see these additional design elements used in the first image of this tutorial.
When creating pop art backgrounds, you can follow our tutorial on creating a halftone pattern in Illustrator.
We hope you enjoyed this tutorial on creating pop art vector images in Illustrator. Some other cool vector image designs you can create are flat characters in Illustrator and mountain backgrounds in Illustrator.
6 Related Illustrator Tutorials
For this tutorial we are going to use some vector flowers from Designbundle.net. We are exploring two different options to create a “Color Group” to use with our artwork.1 – In Illustrator create a new document, open the “Hand Drawn Flowers” file and copy (Command/Control + C) the flower or ...
1 - In Illustrator, create a “New Document”.2 - Select the “Rectangle Tool” (M) and create a “Rectangle” that covers the entire Document. Fill it with a “Radial Gradient” going from a light blue (#b5d0da) at 30% “Opacity” to 100% “Opacity”.3 - “Lock” your Layer using the small “Padlock” icon on ...
For this tutorial, you will need an image or portrait with a white or very neutral background.1 - In Photoshop, open the image you chose.2 - Duplicate your image twice (Command/Control + J). Hide the top one by clicking on the small eye icon to the left of its thumbnail.3 ...
For this tutorial, you will need some simple vector images to use as cut-out. We used one with the outline of “Waves” and other with some “Koi Fish”.1 - In Illustrator, create a “New Document”.2 - Select the “Rectangle Tool” (M), draw a rectangle that covers all your document and ...
1 - In Illustrator, create a “New Document”.2 - Select the “Rectangle Tool” (M), draw a rectangle covering your whole document and fill it with Black.3 - Lock your “Background” Layer by clicking on the left side of its thumbnail to bring out the small “Padlock” icon. Create a “New Layer” ...
Have you wanted to create vector images from your drawings but didn’t know how? It’s actually pretty easy to do. In this tutorial, we’ll teach you how to convert a drawing to a vector in Adobe Illustrator.We’ll be using a drawing of a feather from ...

 All your Font Needs


