
How to Create an Isometric Design in Illustrator
In this tutorial, discover how to create an impressive Isometric Design in Illustrator.
In today’s tutorial, we will show you how to create an isometric illustration in Adobe Illustrator. Isometric designs are great for giving dimension and character while still being flat vector shapes that are easily scalable.
In the following tutorial, we will create a cute candy store aided by isometric grids. You can check our great variety of isometric designs for some inspiration or use them directly in your artwork.

Step 1 - Create an Isometric Grid
Before getting started, you need to create your own isometric grid as a base for the design.
To avoid selecting the grid, the layer needs to be locked. Click on the left side of its thumbnail in the Layers panel to activate the padlock icon. Then, create a new layer by clicking on the icon at the bottom of the Layers panel. We will use this layer to add our isometric designs.

Step 2 - Create the base of your design
Turn on Snap to Grid
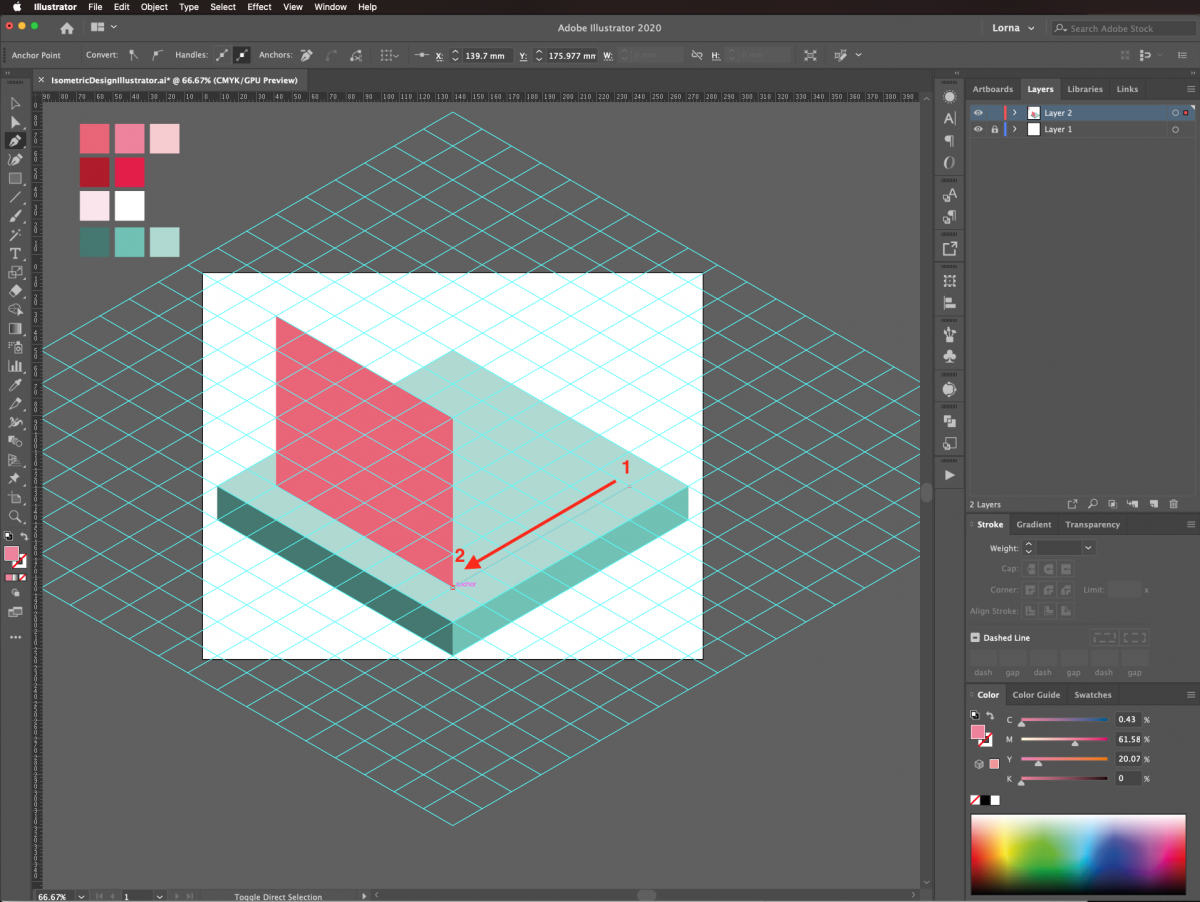
First, you need to make sure that Snap to Grid is enabled (View > Snap to Grid). You will also need to toggle the Smart Guides on and off depending on what you are doing (Command/Control + U). This will help you to place the anchor points in the correct position and to snap paths together easily.

Select the Pen Tool
Now, to create the shapes, select the Pen tool (P) and choose one of the colors from your palette. It is a good idea to have just the Stroke be visible first. This way you can have a better visual of the grid and where to place your anchor points.

To create your design, simply follow the isometric grid to get your lines at the correct angle. There are some basic rules you need to take into account to create shapes for top, front and side views:
- The width of the front view is equal to the width of the top view.
- The height of the side view is equal to the height of the top view.
- The width of the side view is equal to the height of the front view.
Once you have created your shape, press V (Selection tool) to select your shape and exit the Pen tool.

Then, you can press X to Swap the Fill and Stroke color.

Use the Eyedropper tool
To add or change the color of your shape, just select it and then use the Eyedropper tool (I) to click on the desired color from your palette.

Create the depth
Next, create the side and frontal shapes to achieve the 3D effect. Change the color of each shape to a different shade to mimic the lights and shadows and add depth.
Remember that the darker shade should be used on the sides and the medium one on the front and the lighter one on the tops.

To get a better view of the design, you can toggle the visibility of the Grid layer by clicking on the left side of its thumbnail in the Layers panel to bring out the small eye icon.

Step 3 - Create the Walls
Keep selecting the different color shades, using the Pen tool (P) to create the shapes, and swapping the Stroke and Fill until you have all the basic portions of your isometric illustration.

It is a good idea to start new shapes by adding the first anchor point on a place in the Grid that is not on the same spot as an existing shape. This, because the Pen tool may change to Delete Anchor Point (-) and accidentally delete a part of the other shape.
To finish up your shape, follow the grid until you reach your first anchor point and close it.

Remember that you only need faces, front, side, and top, to create a complete shape.

Step 4 - Create the Door
Now, it’s time to add the details like the door windows and roof of our candy store.
Create a Rectangle
First, create a white rectangle and place where the door should be.

Duplicate the rectangle
To make the door 3D and add the shadows, select the rectangle, then click and drag with your mouse diagonally up and left while holding the Option/Alt key to create a duplicate. It should be placed at a distance of about 4 to 5 mm from the original shape and following the isometric grid.

Use the Pathfinder tool
Select both rectangles, head to the Pathfinder panel, and press Divide.

Next, right-click on top and choose Ungroup (Shift + Command/Control + G) to separate all the paths.

And then, select the small upside down L-shaped portion on the top left side and delete it.

Change the color
Finally, change the color of the small path, or what would be the door frame on the bottom right of the door. Give it the same color as the one used on the left side of the candy shop.

Add a shadow
To add a shadow to the inside of the shop, create a black triangular shape where the shadow should be and lower its Opacity to 50% in the Transparency panel. You can add shadows in other places too using this technique.

Step 5 - Create the Windows
Duplicate the door
To add similar details you can duplicate and transform the ones you already have, like the door.
First, select all the paths that are part of it and group them together by right-clicking on top and choosing Group from the drop-down menu. Now you can make a Copy of the group (Command/Control + C).

Lock the unused layers
Then, select all the portions of the design you don’t want to modify and Lock them using Command/Control + 2.

Paste the door
Now you can Paste (Command/Control + V) and position the duplicate where you want. Then, use the Direct Selection tool (A) to click and on top of the anchor points that you want to select without selecting other paths.

Adjust the size
Drag the selected anchor points while holding the Shift key to adjust the shape of the object at a straight angle and create a window.

Create the second window
We are going to use another duplicate of the door and place it on the opposite side of the shop. To do it, create the duplicate and then, double click on the Reflect tool (O) in the toolbar to open the Reflect panel. Use a Vertical Axis with a 90º Angle.

Now you can do the same as in Step 6 to adjust the window on this side.

Step 6 - Create the Roof
Use the Line Segment Tool
There are other ways of creating and dividing your shapes. For example, you can create a complete shape, like in our case one for the side and front. And then use the Line Segment tool (L) to create a line where the division should be.

Divide the shapes
Then, you should select both the shape and line and use the Divide option from the Pathfinder panel.

Don’t forget to Ungroup(Shift + Command/Control G) the resulting shapes to apply the different fill colors.

Add the top of the roof
To create the sign on the roof, we will copy the top portion of the shape and Paste it in front (Command/Control + F).

Use the scale tool
Next, we will scale the duplicate 90% using the Scale tool (S).

Use the Pathfinder tool
And use the Divide option from the Pathfinder panel to split the shape.

Don’t forget to Ungroup(Shift + Command/Control G) everything. Then, delete the unwanted portions, use the Direct Selection tool (A) to adjust the shapes, and change the fill color to the appropriate one.
You can also resize it if needed remembering to hold the Shift key during the process to do it proportionally.

Step 7 - Create the Awning
There may be some portions of the design that need to be slightly skewed like the awning of the shop.
Make a rectangle
First, create a rectangle and make it roughly the size you want one of the awnings stripes to have.

Duplicate the rectangle
To make it 3D select it, then click and drag with your mouse diagonally down and right while holding the Option/Alt key to create a duplicate. Just as before, it should be placed at a distance of about 4 to 5 mm from the original shape and following the isometric grid.

Draw the edges
This time, instead of dividing the paths, use the bottom one as the reference and with the Pen tool (P) create the front and side portions of the shape. Then change the color of the front piece to a darker shade to add depth.

Use the Shear tool
Since normally an awning should be pointing down at a different angle we are going to adjust it using the Shear tool.

Click on top of one of the edges and drag to the side until you reach the desired angle.

Duplicate the shapes
Then, duplicate the shape, place it next to the first one and change the colors accordingly.

Select both shapes, duplicate them and position them so that you create the awning striped pattern. Repeat this until you reach the end of the sign or the roof.
You may need to select the awning and resize it so it is properly sized and aligned. Check this on both sides.

Add an awning to the right side
To add the awning to the other face of the shop, duplicate it and use the Reflect tool to apply and Horizontal reflect with a 90º Angle.

After placing it in the right spot, you may need to adjust its size and use the Direct Selection tool (A) to fix some details as previously shown.
Step 8 - Add text to the Sign
We are going to add some text to the candy shop sign using the SSR method. SSR stands for Scale, Shear, and Rotate. It is basically the same technique used to create the Grid, but it can be applied to all your shapes to adapt them to the isometric plane.
You can pick the perfect matchingfont for your designfromour great variety of sans serif fonts.
Add your text, flatten it by converting it to outlines (Shift + Command/Control + O), and then apply the following adjustments:
Scale: Non-Uniform Vertical Scale of 86.602
Shear: Horizontal -30º
Rotate:-30º

After hitting ok you should see similar results.

These settings are for the left side rotation. In case you want to use the right side one, just use a positive value for the angles (+30º). And for the tops, use a +30º angle for the Shear and a -30º angle for the Rotate.

Step 9 - Resize your design
Next, you can either make your design smaller or you can change the size of the artboard.
We want to reduce the size of our candy store in case we want to add more stuff to our artwork. So, select everything and don’t forget to unlock any shape that may need it. Then, use the Scale tool (S) to reduce its size uniformly.

Finally, you can add a color background to your design.

You can also add more details, like trees, sidewalks, streets, etc., or use the technique to create other kinds of objects and give a cool and unique look to your creations.
If you liked this tutorial make sure you don't miss these great tutorials like how to use the shape builder tool, how to create a floral logo, and how to create a flat character in Adobe Illustrator.


